## 搭建生產可用的Nacos集群
```
軟件包其中有JDK安裝包
鏈接:https://pan.baidu.com/s/1QiWfPZVCg-kEmysfNSzHCg
提取碼:virc
```
### 搭建方案
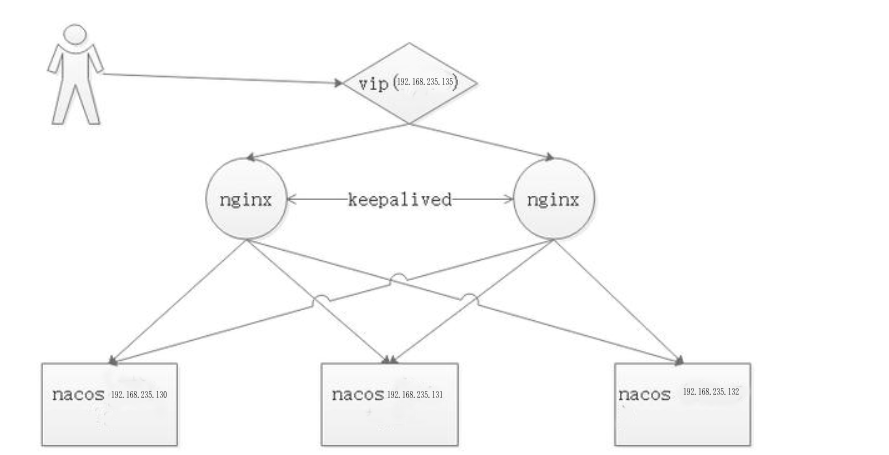
### 簡介
生產環境中部署`nacos`需要使用集群模式`cluster`保證高可用,本文主要詳細介紹如何搭建搭建生產可用的Nacos集群
* nacos采用raft協議實現集群,有leader的概念
### 主機規劃
#### mysql
| 節點 | 端口 |
| :-- | :-- |
| 59.110.164.254| 3306|
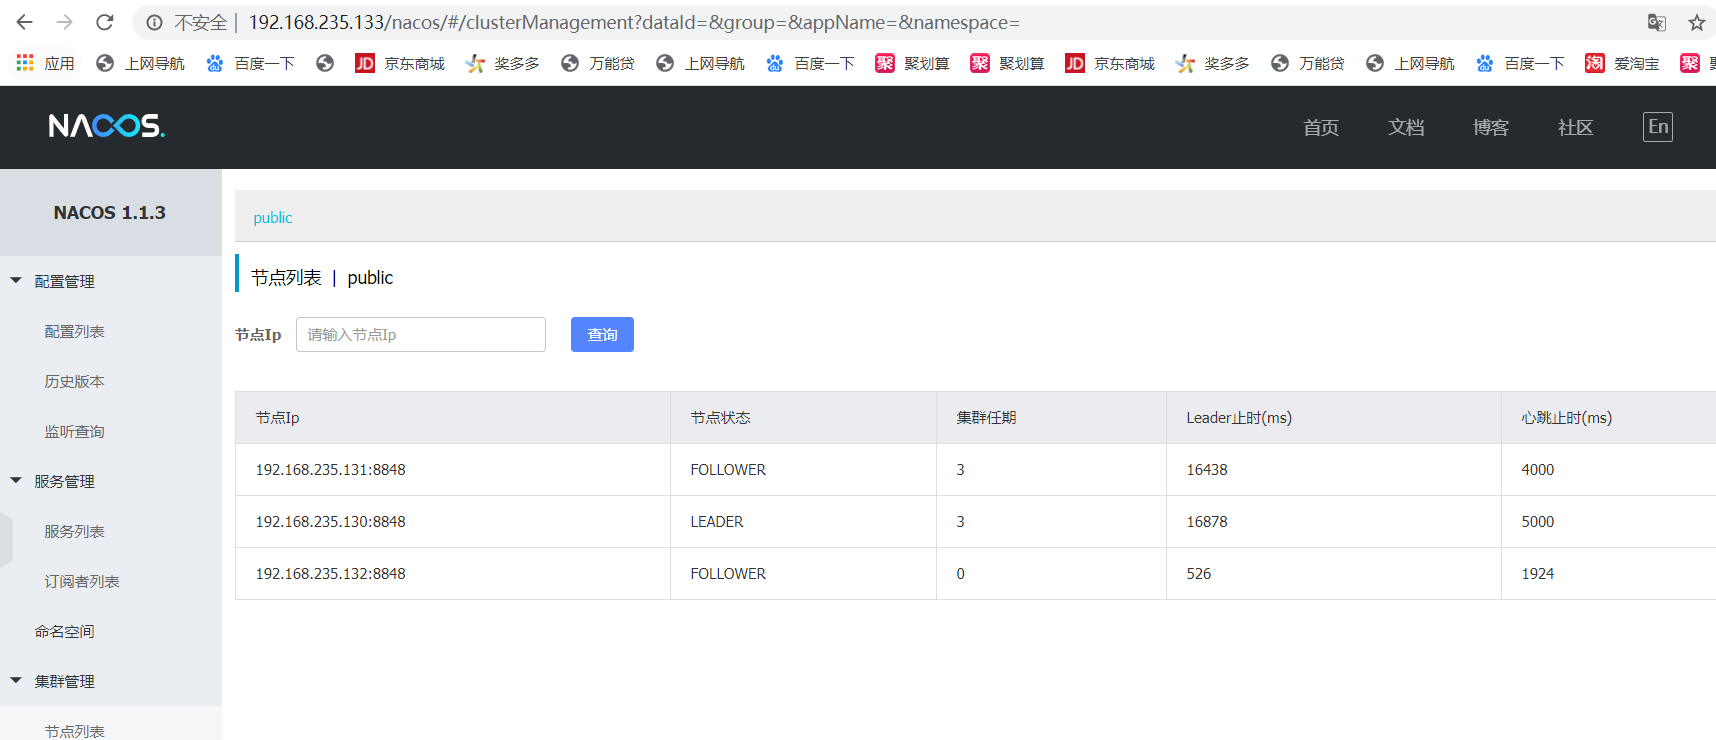
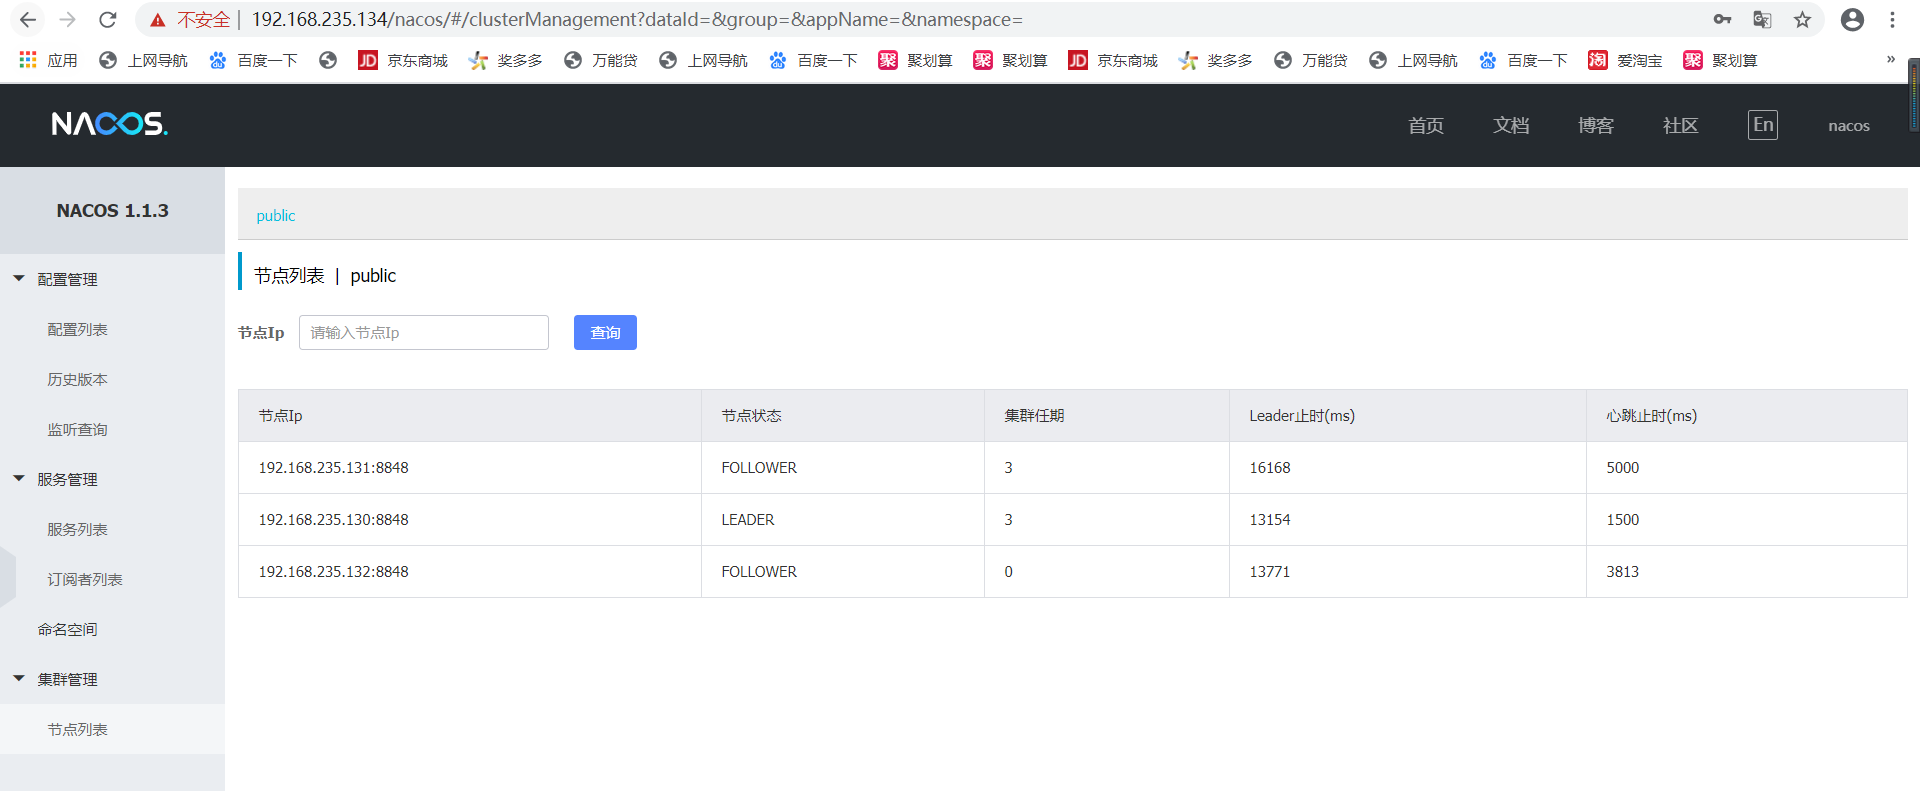
#### nacos集群
| 節點 | 端口 |
| :-- | :-- |
| 192.168.235.130| 8848 |
| 192.168.235.131| 8848 |
| 192.168.235.132 | 8848 |
nacos集群中,每臺機器安裝JDK
##### jdk安裝步驟
* 1.將下載好的jdk跟maven上傳到服務器上
* 2.解壓jdk到/usr/local/
tar -zxvf jdk-8u91-linux-x64.tar.gz -C /usr/local/
* 3.配置環境變量
vi /etc/profile
在最下面,按i進入insert模式,添加一下內容
JAVA\_HOME=/usr/local/jdk1.8.0\_91
export JAVA\_HOME
CLASSPATH=.:$JAVA\_HOME/lib
export CLASSPATH
PATH=$PATH:$JAVA\_HOME/bin:$CLASSPATH
export PATH
按esc進入命令行模式,再按:wq保存退出
* 4.激活配置
source /etc/profile
#### openresty集群
| 節點 | 端口 |
| :-- | :-- |
| 192.168.235.133| 80 |
| 192.168.235.134| 80|
VIP
> 192.168.235.135
### 準備階段
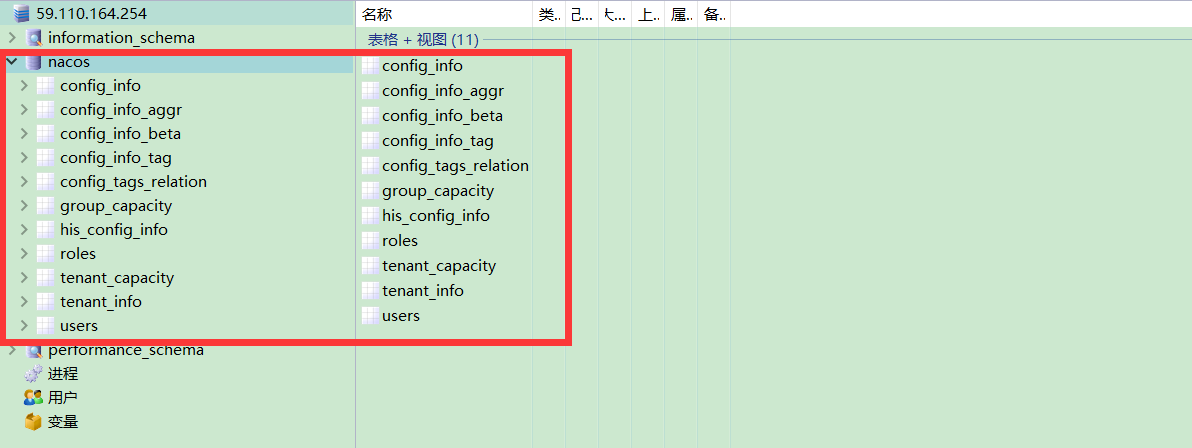
mysql中新建數據庫nacos,導入初始化腳本,本文采用單節點部署mysql方式,為了快速部署nacos集群,生產環境選用Galera mysql集群方式部署。
### 初始化腳本
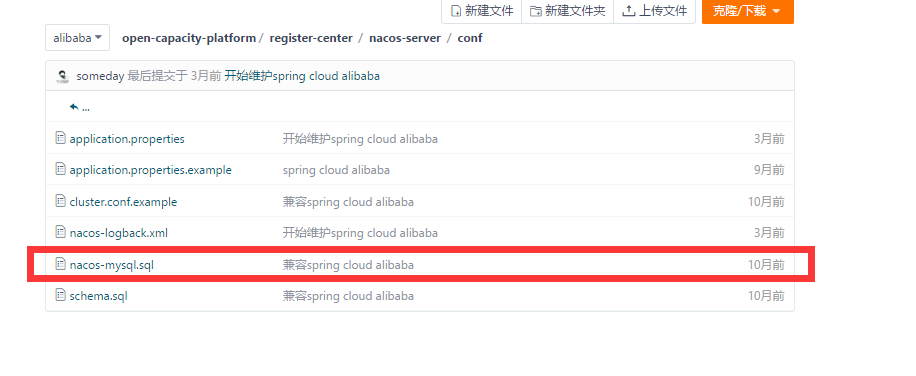
找到 `conf/nacos-mysql.sql` ,將其導入到數據庫中。
導入后查看數據庫
### 192.168.235.130
* 創建目錄
```
mkdir /app
```
* 將文章頂部百度網盤中的文件上傳到 192.168.235.130中的/app目錄

* 修改application.properties文件,最后部分增加如下配置
```
spring.datasource.platform=mysql
db.num=1
db.url.0=jdbc:mysql://59.110.164.254:3306/nacos?characterEncoding=utf8&connectTimeout=1000&socketTimeout=3000&autoReconnect=true
db.user=root
db.password=root
```
* 修改cluster.conf文件,nacos集群的三臺主機信息
```
# ip:port
192.168.235.130:8848
192.168.235.131:8848
192.168.235.132:8848
```
* 啟動
```
cd /app/nacos-server/bin
./startup.sh
```
* 查看啟動情況
```
tail -f /app/nacos-server/logs/start.out
```
### 192.168.235.131
* 創建目錄
```
mkdir /app
```
* 將文章頂部百度網盤中的文件上傳到 192.168.235.131中的/app目錄

* 修改application.properties文件,最后部分增加如下配置
```
spring.datasource.platform=mysql
db.num=1
db.url.0=jdbc:mysql://59.110.164.254:3306/nacos?characterEncoding=utf8&connectTimeout=1000&socketTimeout=3000&autoReconnect=true
db.user=root
db.password=root
```
* 修改cluster.conf文件,nacos集群的三臺主機信息
```
# ip:port
192.168.235.130:8848
192.168.235.131:8848
192.168.235.132:8848
```
* 啟動
```
cd /app/nacos-server/bin
./startup.sh
```
* 查看啟動情況
```
tail -f /app/nacos-server/logs/start.out
```
### 192.168.235.132
* 創建目錄
```
mkdir /app
```
* 將文章頂部百度網盤中的文件上傳到 192.168.235.132中的/app目錄

* 修改application.properties文件,最后部分增加如下配置
```
spring.datasource.platform=mysql
db.num=1
db.url.0=jdbc:mysql://59.110.164.254:3306/nacos?characterEncoding=utf8&connectTimeout=1000&socketTimeout=3000&autoReconnect=true
db.user=root
db.password=root
```
* 修改cluster.conf文件,nacos集群的三臺主機信息
```
# ip:port
192.168.235.130:8848
192.168.235.131:8848
192.168.235.132:8848
```
* 啟動
```
cd /app/nacos-server/bin
./startup.sh
```
* 查看啟動情況
```
tail -f /app/nacos-server/logs/start.out
```
### 192.168.235.133
* OpenResty安裝
```
●Centos:yum install -y readline-devel pcre-devel openssl-devel gcc GeoIP-devel
●wget https://openresty.org/download/openresty-1.11.2.1.tar.gz
●tar -zxvf openresty-1.11.2.1.tar.gz
●cd openresty-1.11.2.1
●./configure --with-luajit --with-pcre --with-http_gzip_static_module --with-http_realip_module --with-http_geoip_module --with-http_ssl_module --with-http_stub_status_module --prefix=/app/openresty
●make && make install
```
* 安裝完成
* 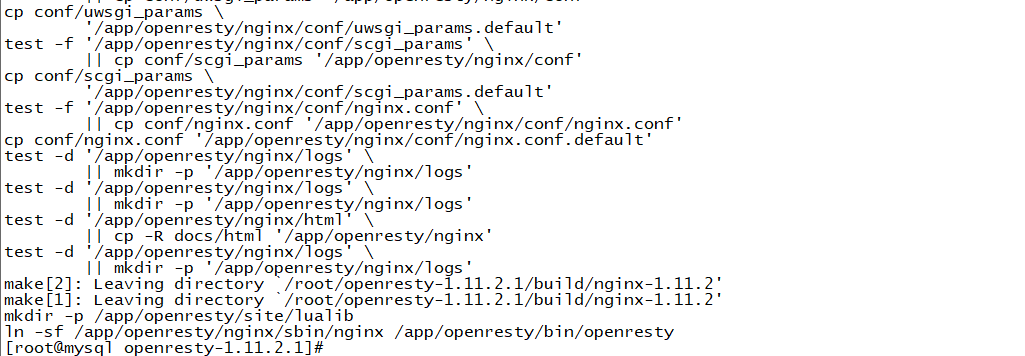
* OpenResty配置/app/openresty/nginx/conf/nginx.conf
```
#user nobody;
worker_processes 1;
#error_log logs/error.log;
#error_log logs/error.log notice;
#error_log logs/error.log info;
#pid logs/nginx.pid;
events {
worker_connections 1024;
}
http {
include mime.types;
default_type application/octet-stream;
#log_format main '$remote_addr - $remote_user [$time_local] "$request" '
# '$status $body_bytes_sent "$http_referer" '
# '"$http_user_agent" "$http_x_forwarded_for"';
#access_log logs/access.log main;
sendfile on;
#tcp_nopush on;
#keepalive_timeout 0;
keepalive_timeout 65;
#gzip on;
upstream nacosCluster {
server 192.168.235.130:8848;
server 192.168.235.131:8848;
server 192.168.235.132:8848;
}
server {
listen 80;
server_name nacostest.com;
location / {
proxy_pass http://nacosCluster;
}
}
}
~
```
* OpenResty啟動
```
cd /app/openresty/nginx/sbin
./nginx
```
* 驗證
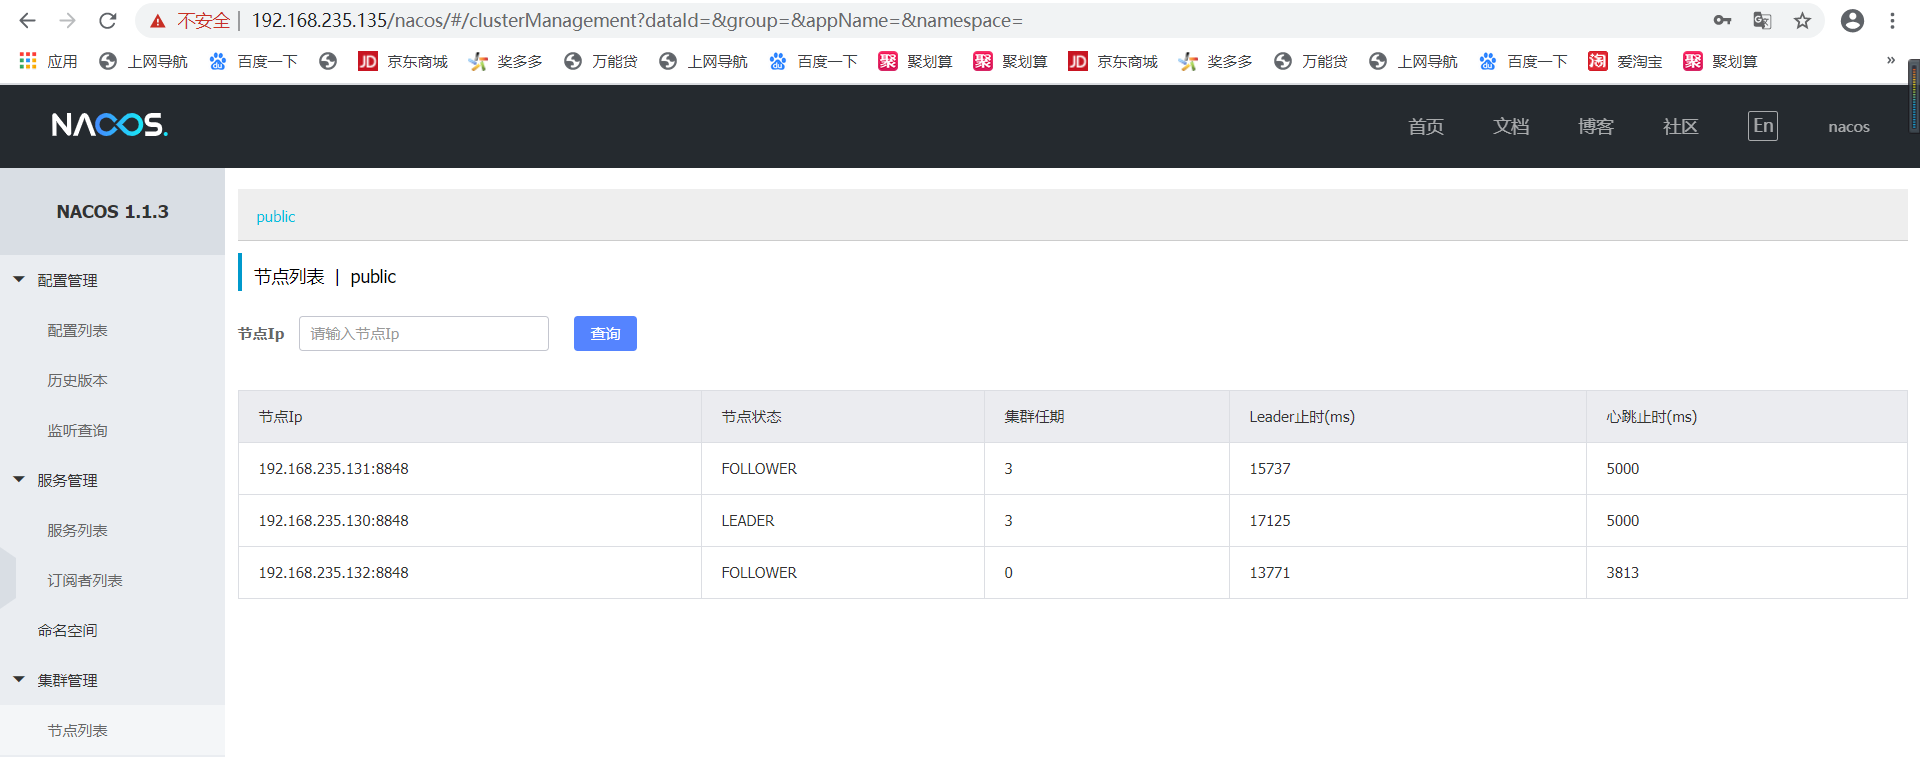
http://192.168.235.133/nacos
用戶名/密碼 nacos nacos
### 192.168.235.134
* OpenResty安裝
```
●Centos:yum install -y readline-devel pcre-devel openssl-devel gcc GeoIP-devel
●wget https://openresty.org/download/openresty-1.11.2.1.tar.gz
●tar -zxvf openresty-1.11.2.1.tar.gz
●cd openresty-1.11.2.1
●./configure --with-luajit --with-pcre --with-http_gzip_static_module --with-http_realip_module --with-http_geoip_module --with-http_ssl_module --with-http_stub_status_module --prefix=/app/openresty
●make && make install
```
* 安裝完成
* 
* OpenResty配置/app/openresty/nginx/conf/nginx.conf
```
#user nobody;
worker_processes 1;
#error_log logs/error.log;
#error_log logs/error.log notice;
#error_log logs/error.log info;
#pid logs/nginx.pid;
events {
worker_connections 1024;
}
http {
include mime.types;
default_type application/octet-stream;
#log_format main '$remote_addr - $remote_user [$time_local] "$request" '
# '$status $body_bytes_sent "$http_referer" '
# '"$http_user_agent" "$http_x_forwarded_for"';
#access_log logs/access.log main;
sendfile on;
#tcp_nopush on;
#keepalive_timeout 0;
keepalive_timeout 65;
#gzip on;
upstream nacosCluster {
server 192.168.235.130:8848;
server 192.168.235.131:8848;
server 192.168.235.132:8848;
}
server {
listen 80;
server_name nacostest.com;
location / {
proxy_pass http://nacosCluster;
}
}
}
~
```
* OpenResty啟動
```
cd /app/openresty/nginx/sbin
./nginx
```
* 驗證
http://192.168.235.134/nacos
用戶名/密碼 nacos nacos
### 192.168.235.133
* 安裝keepalived
```
yum install -y net-tools psmisc net-snmp ipvsadm keepalived
```
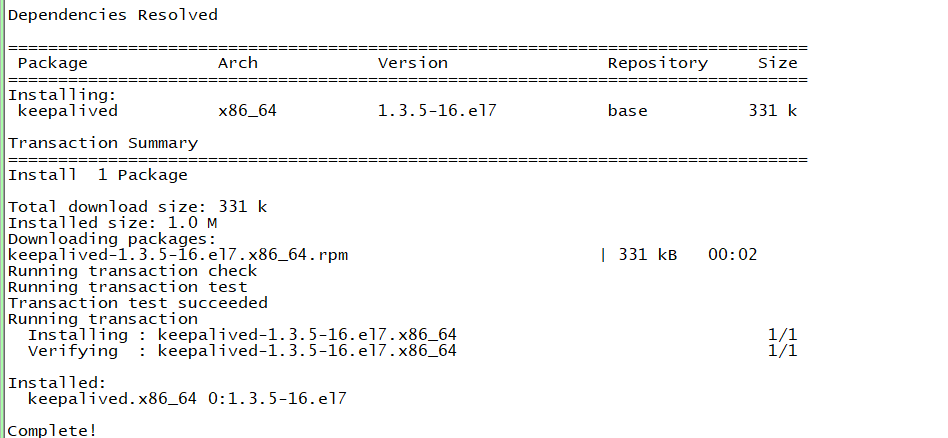
* 安裝killall命令
```
yum install psmisc -y
```
* 配置執行腳本
vi /etc/keepalived/check_nginx.sh
```
#!/bin/bash
count=$(ps -ef |grep nginx |egrep -cv "grep|$$")
if [ "$count" -eq 0 ];then
killall keepalived
fi
```
chmod +x /etc/keepalived/check_nginx.sh
* 配置/etc/keepalived/keepalived.conf,vip 192.168.235.135
```
! Configuration File for keepalived
global_defs {
# 陸脫脮始鎂碌脴路
notification_email {
acassen@firewall.loc
failover@firewall.loc
sysadmin@firewall.loc
}
# 脫錄鎂路壟脣碌脴路
notification_email_from Alexandre.Cassen@firewall.loc
smtp_server 127.0.0.1
smtp_connect_timeout 30
router_id NGINX_MASTER
}
vrrp_script check_nginx {
script "/etc/keepalived/check_nginx.sh"
}
vrrp_instance VI_1 {
state MASTER
interface ens33
virtual_router_id 51 # VRRP 路脫 ID實脌攏盧每賂枚媒祿碌脛
priority 100 # 脫脧錄露攏盧鹵賂路鎂脦脝脡脰 90
advert_int 1 # 指露簍VRRP 脨脤擄眉盲時錄洌兟
authentication {
auth_type PASS
auth_pass 1111
}
virtual_ipaddress {
192.168.235.135/24
}
track_script {
check_nginx
}
}
```
* 啟動keepalived
```
service keepalived start
service keepalived status
```
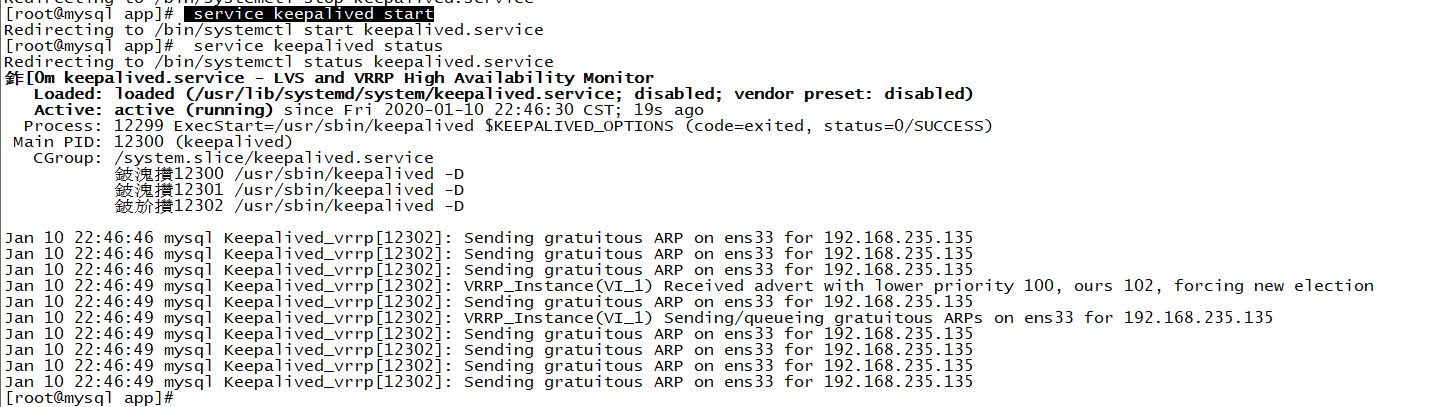
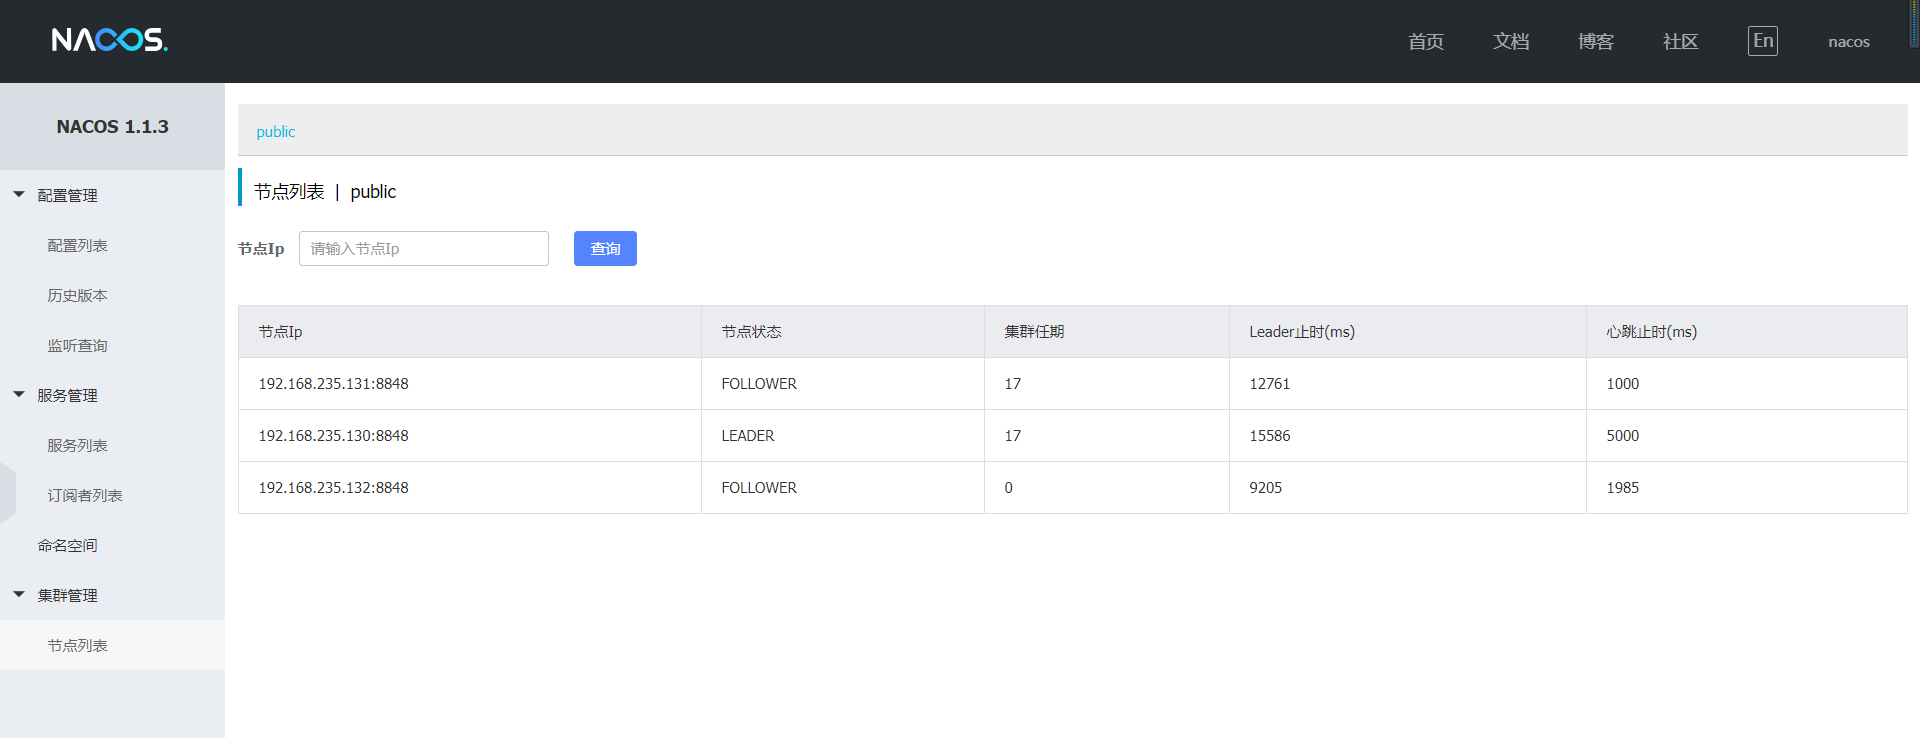
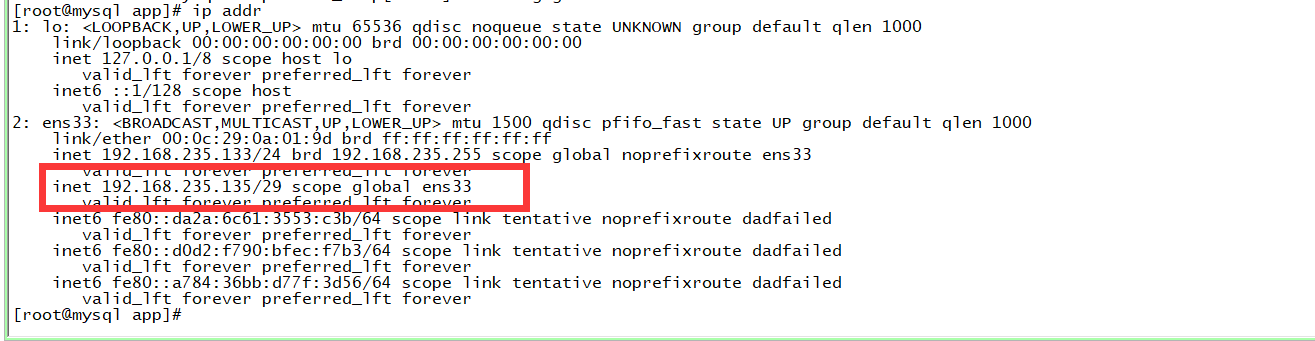
* 查看虛擬VIP
### 192.168.235.134
* 安裝keepalived
```
yum install -y net-tools psmisc net-snmp ipvsadm keepalived
```

* 安裝killall命令
```
yum install psmisc -y
```
* 配置執行腳本
vi /etc/keepalived/check_nginx.sh
```
#!/bin/bash
count=$(ps -ef |grep nginx |egrep -cv "grep|$$")
if [ "$count" -eq 0 ];then
killall keepalived
fi
```
chmod +x /etc/keepalived/check_nginx.sh
* 配置/etc/keepalived/keepalived.conf,vip 192.168.235.135
```
! Configuration File for keepalived
global_defs {
# 陸脫脮始鎂碌脴路
notification_email {
acassen@firewall.loc
failover@firewall.loc
sysadmin@firewall.loc
}
# 脫錄鎂路壟脣碌脴路
notification_email_from Alexandre.Cassen@firewall.loc
smtp_server 127.0.0.1
smtp_connect_timeout 30
router_id NGINX_MASTER
}
vrrp_script check_nginx {
script "/etc/keepalived/check_nginx.sh"
}
vrrp_instance VI_1 {
state BACKUP
interface ens33
virtual_router_id 51 # VRRP 路脫 ID實脌攏盧每賂枚媒祿碌脛
priority 90 # 脫脧錄露攏盧鹵賂路鎂脦脝脡脰 90
advert_int 1 # 指露簍VRRP 脨脤擄眉盲時錄洌兟
authentication {
auth_type PASS
auth_pass 1111
}
virtual_ipaddress {
192.168.235.135/24
}
track_script {
check_nginx
}
}
```
* 啟動keepalived
```
service keepalived start
service keepalived status
```

* 查看虛擬VIP


- 前言
- 1.項目說明
- 2.項目更新日志
- 3.文檔更新日志
- 01.快速開始
- 01.maven構建項目
- 02.環境安裝
- 03.STS項目導入
- 03.IDEA項目導入
- 04.數據初始化
- 05.項目啟動
- 06.付費文檔說明
- 02.總體流程
- 1.oauth接口
- 2.架構設計圖
- 3.微服務介紹
- 4.功能介紹
- 5.梳理流程
- 03.模塊詳解
- 01.老版本1.0.1分支模塊講解
- 01.db-core模塊
- 02.api-commons模塊
- 03.log-core模塊
- 04.security-core模塊
- 05.swagger-core模塊
- 06.eureka-server模塊
- 07.auth-server模塊
- 08.auth-sso模塊解析
- 09.user-center模塊
- 10.api-gateway模塊
- 11.file-center模塊
- 12.log-center模塊
- 13.batch-center模塊
- 14.back-center模塊
- 02.spring-boot-starter-web那點事
- 03.自定義db-spring-boot-starter
- 04.自定義log-spring-boot-starter
- 05.自定義redis-spring-boot-starter
- 06.自定義common-spring-boot-starter
- 07.自定義swagger-spring-boot-starter
- 08.自定義uaa-server-spring-boot-starter
- 09.自定義uaa-client-spring-boot-starter
- 10.自定義ribbon-spring-boot-starter
- 11.springboot啟動原理
- 12.eureka-server模塊
- 13.auth-server模塊
- 14.user-center模塊
- 15.api-gateway模塊
- 16.file-center模塊
- 17.log-center模塊
- 18.back-center模塊
- 19.auth-sso模塊
- 20.admin-server模塊
- 21.zipkin-center模塊
- 22.job-center模塊
- 23.batch-center
- 04.全新網關
- 01.基于spring cloud gateway的new-api-gateway
- 02.spring cloud gateway整合Spring Security Oauth
- 03.基于spring cloud gateway的redis動態路由
- 04.spring cloud gateway聚合swagger文檔
- 05.技術詳解
- 01.互聯網系統設計原則
- 02.系統冪等性設計與實踐
- 03.Oauth最簡向導開發指南
- 04.oauth jdbc持久化策略
- 05.JWT token方式啟用
- 06.token有效期的處理
- 07.@PreAuthorize注解分析
- 08.獲取當前用戶信息
- 09.認證授權白名單配置
- 10.OCP權限設計
- 11.服務安全流程
- 12.認證授權詳解
- 13.驗證碼技術
- 14.短信驗證碼登錄
- 15.動態數據源配置
- 16.分頁插件使用
- 17.緩存擊穿
- 18.分布式主鍵生成策略
- 19.分布式定時任務
- 20.分布式鎖
- 21.網關多維度限流
- 22.跨域處理
- 23.容錯限流
- 24.應用訪問次數控制
- 25.統一業務異常處理
- 26.日志埋點
- 27.GPRC內部通信
- 28.服務間調用
- 29.ribbon負載均衡
- 30.微服務分布式跟蹤
- 31.異步與線程傳遞變量
- 32.死信隊列延時消息
- 33.單元測試用例
- 34.Greenwich.RELEASE升級
- 35.混沌工程質量保證
- 06.開發初探
- 1.開發技巧
- 2.crud例子
- 3.新建服務
- 4.區分前后臺用戶
- 07.分表分庫
- 08.分布式事務
- 1.Seata介紹
- 2.Seata部署
- 09.shell部署
- 01.eureka-server
- 02.user-center
- 03.auth-server
- 04.api-gateway
- 05.file-center
- 06.log-center
- 07.back-center
- 08.編寫shell腳本
- 09.集群shell部署
- 10.集群shell啟動
- 11.部署阿里云問題
- 10.網關安全
- 1.openresty https保障服務安全
- 2.openresty WAF應用防火墻
- 3.openresty 高可用
- 11.docker配置
- 01.docker安裝
- 02.Docker 開啟遠程API
- 03.采用docker方式打包到服務器
- 04.docker創建mysql
- 05.docker網絡原理
- 06.docker實戰
- 6.01.安裝docker
- 6.02.管理鏡像基本命令
- 6.03.容器管理
- 6.04容器數據持久化
- 6.05網絡模式
- 6.06.Dockerfile
- 6.07.harbor部署
- 6.08.使用自定義鏡像
- 12.統一監控中心
- 01.spring boot admin監控
- 02.Arthas診斷利器
- 03.nginx監控(filebeat+es+grafana)
- 04.Prometheus監控
- 05.redis監控(redis+prometheus+grafana)
- 06.mysql監控(mysqld_exporter+prometheus+grafana)
- 07.elasticsearch監控(elasticsearch-exporter+prometheus+grafana)
- 08.linux監控(node_exporter+prometheus+grafana)
- 09.micoservice監控
- 10.nacos監控
- 11.druid數據源監控
- 12.prometheus.yml
- 13.grafana告警
- 14.Alertmanager告警
- 15.監控微信告警
- 16.關于接口監控告警
- 17.prometheus-HA架構
- 18.總結
- 13.統一日志中心
- 01.統一日志中心建設意義
- 02.通過ELK收集mysql慢查詢日志
- 03.通過elk收集微服務模塊日志
- 04.通過elk收集nginx日志
- 05.統一日志中心性能優化
- 06.kibana安裝部署
- 07.日志清理方案
- 08.日志性能測試指標
- 09.總結
- 14.數據查詢平臺
- 01.數據查詢平臺架構
- 02.mysql配置bin-log
- 03.單節點canal-server
- 04.canal-ha部署
- 05.canal-kafka部署
- 06.實時增量數據同步mysql
- 07.canal監控
- 08.clickhouse運維常見腳本
- 15.APM監控
- 1.Elastic APM
- 2.Skywalking
- 01.docker部署es
- 02.部署skywalking-server
- 03.部署skywalking-agent
- 16.壓力測試
- 1.ocp.jmx
- 2.test.bat
- 3.壓測腳本
- 4.壓力報告
- 5.報告分析
- 6.壓測平臺
- 7.并發測試
- 8.wrk工具
- 9.nmon
- 10.jmh測試
- 17.SQL優化
- 1.oracle篇
- 01.基線測試
- 02.調優前奏
- 03.線上瓶頸定位
- 04.執行計劃解讀
- 05.高級SQL語句
- 06.SQL tuning
- 07.數據恢復
- 08.深入10053事件
- 09.深入10046事件
- 2.mysql篇
- 01.innodb存儲引擎
- 02.BTree索引
- 03.執行計劃
- 04.查詢優化案例分析
- 05.為什么會走錯索引
- 06.表連接優化問題
- 07.Connection連接參數
- 08.Centos7系統參數調優
- 09.mysql監控
- 10.高級SQL語句
- 11.常用維護腳本
- 12.percona-toolkit
- 18.redis高可用方案
- 1.免密登錄
- 2.安裝部署
- 3.配置文件
- 4.啟動腳本
- 19.消息中間件搭建
- 19-01.rabbitmq集群搭建
- 01.rabbitmq01
- 02.rabbitmq02
- 03.rabbitmq03
- 04.鏡像隊列
- 05.haproxy搭建
- 06.keepalived
- 19-02.rocketmq搭建
- 19-03.kafka集群
- 20.mysql高可用方案
- 1.環境
- 2.mysql部署
- 3.Xtrabackup部署
- 4.Galera部署
- 5.galera for mysql 集群
- 6.haproxy+keepalived部署
- 21.es集群部署
- 22.生產實施優化
- 1.linux優化
- 2.jvm優化
- 3.feign優化
- 4.zuul性能優化
- 23.線上問題診斷
- 01.CPU性能評估工具
- 02.內存性能評估工具
- 03.IO性能評估工具
- 04.網絡問題工具
- 05.綜合診斷評估工具
- 06.案例診斷01
- 07.案例診斷02
- 08.案例診斷03
- 09.案例診斷04
- 10.遠程debug
- 24.fiddler抓包實戰
- 01.fiddler介紹
- 02.web端抓包
- 03.app抓包
- 25.疑難解答交流
- 01.有了auth/token獲取token了為啥還要配置security的登錄配置
- 02.權限數據存放在redis嗎,代碼在哪里啊
- 03.其他微服務和認證中心的關系
- 04.改包問題
- 05.use RequestContextListener or RequestContextFilter to expose the current request
- 06./oauth/token對應代碼在哪里
- 07.驗證碼出不來
- 08./user/login
- 09.oauth無法自定義權限表達式
- 10.sleuth引發線程數過高問題
- 11.elk中使用7x版本問題
- 12.RedisCommandTimeoutException問題
- 13./oauth/token CPU過高
- 14.feign與權限標識符問題
- 15.動態路由RedisCommandInterruptedException: Command interrupted
- 26.學習資料
- 海量學習資料等你來拿
- 27.持續集成
- 01.git安裝
- 02.代碼倉庫gitlab
- 03.代碼倉庫gogs
- 04.jdk&&maven
- 05.nexus安裝
- 06.sonarqube
- 07.jenkins
- 28.Rancher部署
- 1.rancher-agent部署
- 2.rancher-server部署
- 3.ocp后端部署
- 4.演示前端部署
- 5.elk部署
- 6.docker私服搭建
- 7.rancher-server私服
- 8.rancher-agent docker私服
- 29.K8S部署OCP
- 01.準備OCP的構建環境和部署環境
- 02.部署順序
- 03.在K8S上部署eureka-server
- 04.在K8S上部署mysql
- 05.在K8S上部署redis
- 06.在K8S上部署auth-server
- 07.在K8S上部署user-center
- 08.在K8S上部署api-gateway
- 09.在K8S上部署back-center
- 30.Spring Cloud Alibaba
- 01.統一的依賴管理
- 02.nacos-server
- 03.生產可用的Nacos集群
- 04.nacos配置中心
- 05.common.yaml
- 06.user-center
- 07.auth-server
- 08.api-gateway
- 09.log-center
- 10.file-center
- 11.back-center
- 12.sentinel-dashboard
- 12.01.sentinel流控規則
- 12.02.sentinel熔斷降級規則
- 12.03.sentinel熱點規則
- 12.04.sentinel系統規則
- 12.05.sentinel規則持久化
- 12.06.sentinel總結
- 13.sentinel整合openfeign
- 14.sentinel整合網關
- 1.sentinel整合zuul
- 2.sentinel整合scg
- 15.Dubbo與Nacos共存
- 31.Java源碼剖析
- 01.基礎數據類型和String
- 02.Arrays工具類
- 03.ArrayList源碼分析
- 32.面試專題匯總
- 01.JVM專題匯總
- 02.多線程專題匯總
- 03.Spring專題匯總
- 04.springboot專題匯總
- 05.springcloud面試匯總
- 文檔問題跟蹤處理