[TOC]
## Twitter ?Zipkin
Twitter公司的Zipkin是Google的Dapper系統的開源實現,Zipkin嚴格按照Dapper論文實現,采用Scala編寫,并且緊密集成到Twitter公司自己的分布式服務Finagle中,使得跟蹤做到對應用透明。

## 完整的調用鏈
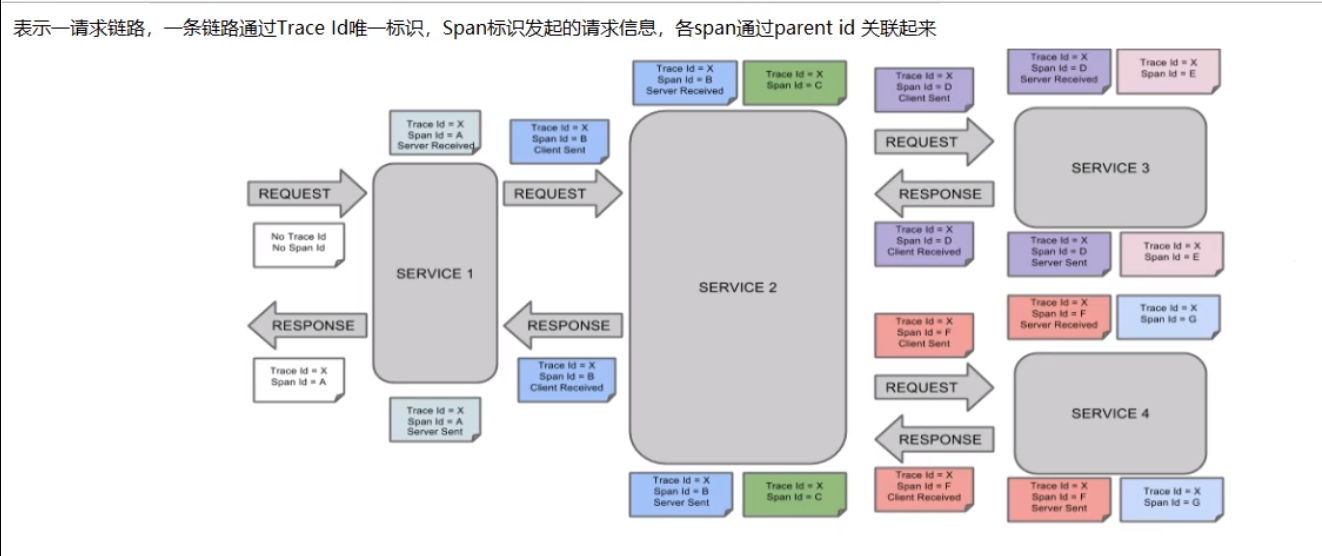
## 鏈路跟蹤核心概念
* Span
基本工作單元,例如,發送 RPC 請求是一個新的 Span,發送 HTTP 請求是一個新的 Span,內部方法調用也是一個新的 Span。
* Trace
一次分布式調用的鏈路信息,每次調用鏈路信息都會在請求入口處生成一個 TraceId。
* Annotation
用于記錄事件的信息。在 Annotation 中會有 CS、SR、SS、CR 這些信息,下面分別介紹下這些信息的作用。
* CS
也就是 Client Sent,客戶端發起一個請求,這個 Annotation 表示 Span 的開始。
* SR
也就是 Server Received,服務器端獲得請求并開始處理它,用 SR 的時間戳減去 CS 的時間戳會顯示網絡延遲時間。
* SS
也就是 Server Sent,在請求處理完成時將響應發送回客戶端,用 SS 的間戳減去 SR 的時間戳會顯示服務器端處理請求所需的時間。
* CR
也就是 Client Received,表示 Span 的結束,客戶端已成功從服務器端收到響應,用 CR 的時間戳減去 CS 的時間戳就可以知道客戶端從服務器接收響應所需的全部時間。
* MQ方式

* 啟動工程

* es-server
* es-client

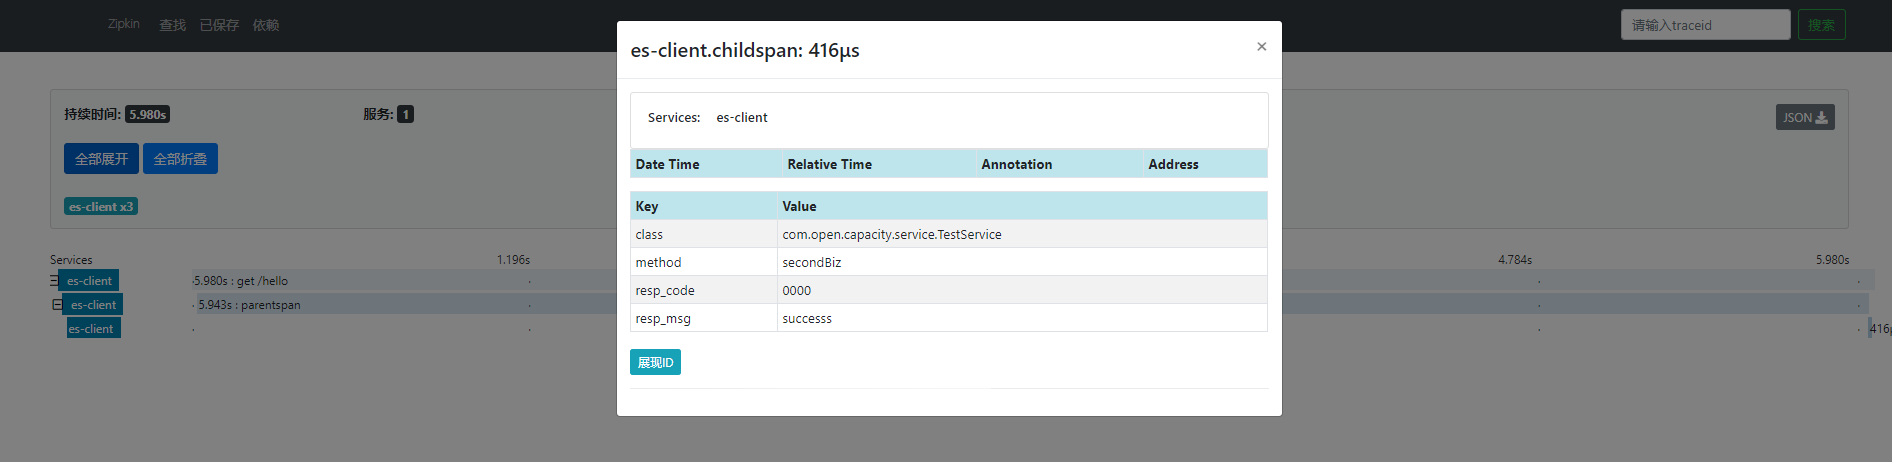
* 訪問[http://127.0.0.1:9412/hello](http://127.0.0.1:9412/hello)后會通過kafka上報,通過es-server查看調用


* 消息持久化

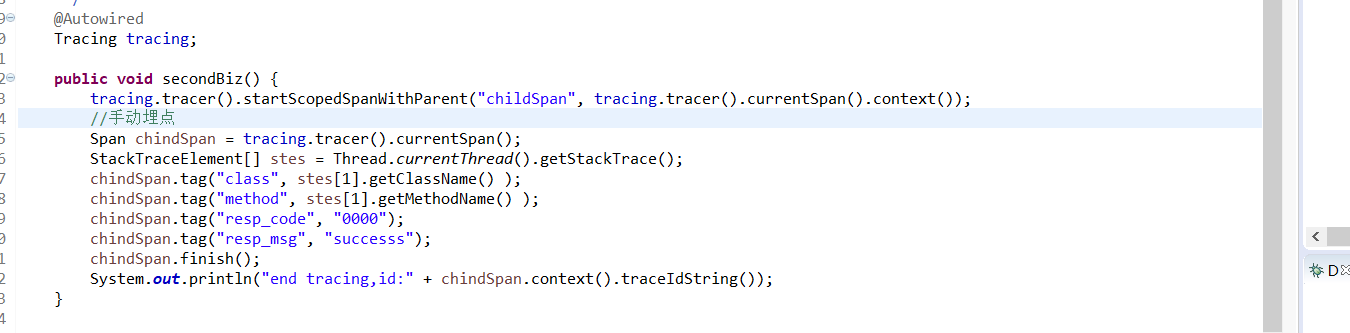
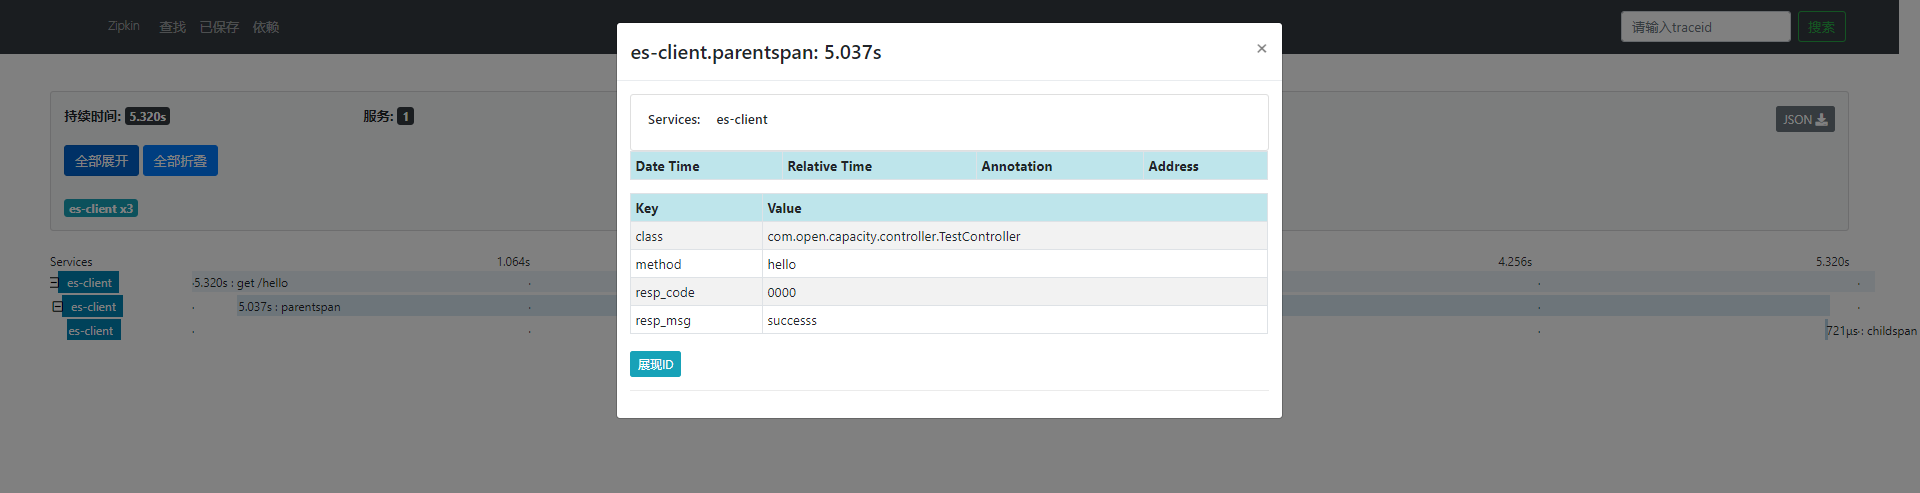
* 手動埋點

* 埋點效果展現
* es數據
## 
* zipkin數據清理
```
#!/bin/bash
# owen 2017
#調用鏈的數據只保留7天的
old_date=`date +%Y-%m-%d -d "7 days ago"`
curl -XDELETE "http://127.0.0.1:9200/zipkin:span-${old_date}"
```
## 使用 Brave 創建自定義 Span
從 2.X 版本開始,Spring Cloud Sleuth 全面使用 Brave 作為其底層的服務跟蹤實現框架。原本在 1.X 版本中通過 Spring Cloud Sleuth 自帶的 org.springframework.cloud.sleuth.Tracer 接口創建和管理自定義 Span 的方法將不再有效。因此,想要在訪問鏈路中創建自定義的 Span,需要對 Brave 框架所提供的功能有足夠的了解。
事實上,Brave 是 Java 版的 Zipkin 客戶端,它將收集的跟蹤信息,以 Span 的形式上報給 Zipkin 系統。我們首先來關注 Brave 中的 Span 類,該類的方法列表如下所示:
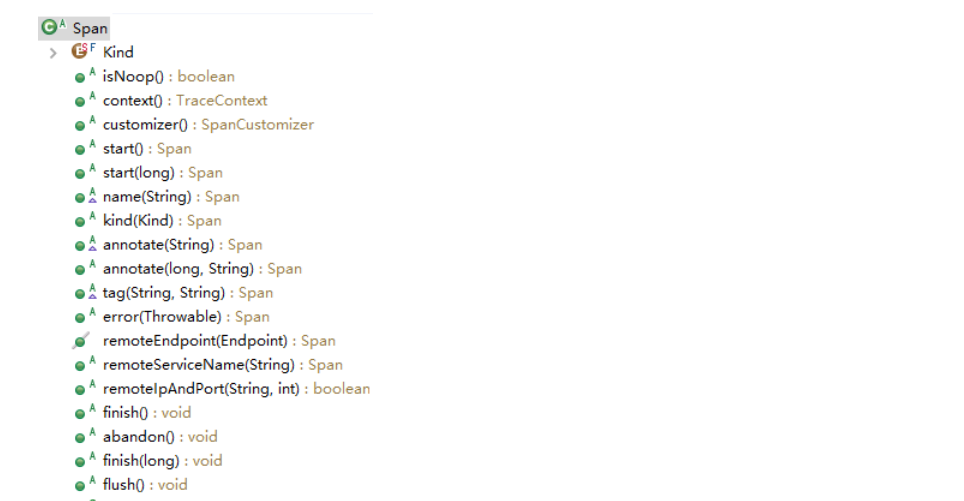
注意到 Span 是一個抽象類,在上面的方法列表中,我們也看到該類的幾乎所有方法都是抽象方法,需要子類進行實現。在 Brave 中,該抽象類的子類就是 RealSpan。RealSpan 中的 start 方法如下所示:
```
@Override
public Span start(long timestamp) {
??? synchronized (state) {
????? state.startTimestamp(timestamp);
??? }
??? return this;
}
```
這里的 state 是一個可變的 MutableSpan,而上述 start 方法就是為這個 MutableSpan 設置了開始時間。可以想象,對應的 finish 方法也會為 MutableSpan 設置結束時間,如下所示:
```
@Override
public void finish(long timestamp) {
??? if (!pendingSpans.remove(context)) return;
??? synchronized (state) {
????? state.finishTimestamp(timestamp);
??? }
??? finishedSpanHandler.handle(context, state);
}
```
對于關閉 Span 的操作而言,上述方法還添加了一個 Handler 以便執行回調邏輯,這也是非常常見的一種實現技巧。我們接著來看另一個非常有用的 annotate 方法,如下所示:
```
@Override
public Span annotate(long timestamp, String value) {
??? if ("cs".equals(value)) {
????? synchronized (state) {
??????? state.kind(Span.Kind.CLIENT);
??????? state.startTimestamp(timestamp);
????? }
??? } else if ("sr".equals(value)) {
????? synchronized (state) {
??????? state.kind(Span.Kind.SERVER);
??????? state.startTimestamp(timestamp);
????? }
??? } else if ("cr".equals(value)) {
????? synchronized (state) {
??????? state.kind(Span.Kind.CLIENT);
????? }
????? finish(timestamp);
??? } else if ("ss".equals(value)) {
????? synchronized (state) {
??????? state.kind(Span.Kind.SERVER);
????? }
????? finish(timestamp);
??? } else {
????? synchronized (state) {
??????? state.annotate(timestamp, value);
????? }
??? }
??? return this;
}
```
### Tracer
首先,我們來看如何通過 Tracer 創建一個新的根 Span,可以通過如下所示的 newTrace 方法進行實現:
```
public Span newTrace() {
return _toSpan(newRootContext());
}
```
這里用到了一個保存跟蹤信息的 TraceContext 上下文對象,對于根 Span 而言,這個 TraceContext 就是全新的上下文,沒有父 Span。而這里的 _toSpan 方法則最終構建了一個前面提到的 RealSpan 對象。
```
Span _toSpan(TraceContext decorated) {
if (isNoop(decorated)) return new NoopSpan(decorated);
PendingSpan pendingSpan = pendingSpans.getOrCreate(decorated, false);
return new RealSpan(decorated, pendingSpans, pendingSpan.state(), pendingSpan.clock(), finishedSpanHandler);
}
```
這里多了一個新建的對象叫 PendingSpan ,用于收集一條 Trace 上暫時被掛起的未完成的 Span。
一旦創建了根 Span,我們就可以在這個 Span 上執行 nextSpan 方法來添加新的 Span,如下所示:
```
public Span nextSpan() {
TraceContext parent = currentTraceContext.get();
return parent != null ? newChild(parent) : newTrace();
}
```
這里獲取當前 TraceContext,如果該上下文不存在,就通過 newTrace 方法來創建一個新的根 Span;如果存在,則基于這個上下文并調用 newChild 方法來創建一個子 Span。newChild 方法也比較簡單,如下所示:
```
public Span newChild(TraceContext parent) {
if (parent == null) throw new NullPointerException("parent == null");
return _toSpan(nextContext(parent));
}
```
當然,在很多場景下,我們首先需要獲取當前的 Span,這時候就可以使用 Tracer 類所提供的 currentSpan 方法,如下所示:
```
public Span currentSpan() {
TraceContext currentContext = currentTraceContext.get();
return currentContext != null ? toSpan(currentContext) : null;
}
```
基于 Tracer 提供的這些常見方法,我們可以梳理在業務代碼中添加一個自定義的 Span 模版方法,如下所示:
```
@Service
public class MyService {
@Autowired
private Tracer tracer;
public void perform() {
Span newSpan = tracer.nextSpan().name("spanName").start();
//ScopedSpan newSpan = tracer.startScopedSpan("spanName");
try {
//執行業務邏輯
}
finally{
newSpan.tag("key", "value");
newSpan.annotate("myannotation");
newSpan.finish();
}
}
}
```
在上述代碼中,我們注入了一個 Tracer 對象,然后通過 nextSpan().name("findByDeviceCode").start() 方法創建并啟動了一個“spanName”新的 Span。這是在業務代碼中嵌入自定義 Span 的一種方法。另一種方法是使用注釋行代碼中的 ScopedSpan,ScopedSpan 代表包含一定操作延遲的 Span 對象,可以在操作不脫離當前進程時可以使用。當我們執行完各種業務邏輯之后,可以分別通過 tag 方法和 annotate 添加標簽和定義事件,最后通過 finish 方法關閉 Span。這段模版代碼可以直接引入到日常的開發過程中。
## zipkin中的 mq
老版本zpikin使用到了spring cloud stream
### Spring Cloud Stream
Spring Cloud 專門提供了一個 Spring Cloud Stream 框架來實現事件驅動架構,并完成與主流消息中間件的集成。同時,Spring Cloud Stream 背后也整合了 Spring 家族中的消息處理和消息總線方面的幾個框架,可以說是 Spring Cloud 中整合程度最高的一個開發框架。
### Spring 家族中的消息處理機制
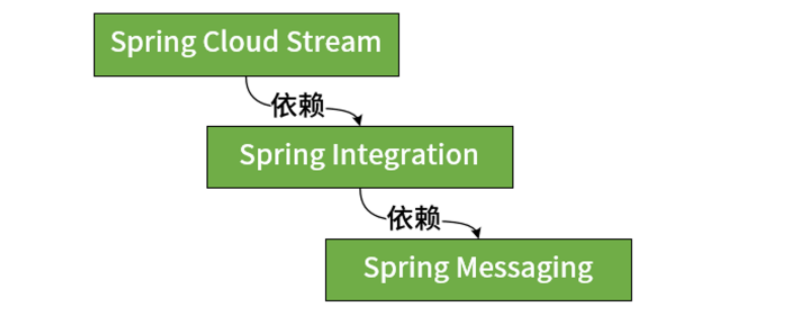
在了解了事件驅動架構以及消息中間件的基本概念之后,我們來看一下 Spring 中針對這些概念提供的技術解決方案。在 Spring 家族中,與消息處理機制相關的框架有三個。事實上, Spring Cloud Stream 是基于 Spring Integration 實現了消息發布和消費機制并提供了一層封裝,很多關于消息發布和消費的概念和實現方法本質上都是依賴于 Spring Integration。而在 Spring Integration 的背后,則依賴于 Spring Messaging 組件來實現消息處理機制的基礎設施。這三個框架之間的依賴關系如下圖所示:
接下來的內容,我們先來對位于底層的 Spring Messaging 和 Spring Integration 框架做一些展開,方便你在使用 Spring Cloud Stream 時對其背后的實現原理有更好的理解。
Spring Messaging
Spring Messaging 是 Spring 框架中的一個底層模塊,用于提供統一的消息編程模型。例如,消息這個數據單元在 Spring Messaging 中統一定義為如下所示的 Message 接口,包括一個消息頭 Header 和一個消息體 Payload:
```
public interface Message<T> {
??? T getPayload();
??? MessageHeaders getHeaders();
}
```
而消息通道 MessageChannel 的定義也比較簡單,我們可以調用 send() 方法將消息發送至該消息通道中,MessageChannel 接口定義如下所示:
復制代碼
~~~
public interface MessageChannel {
??? long INDEFINITE_TIMEOUT = -1;
??? default boolean send(Message<?> message) {
?????????? return send(message, INDEFINITE_TIMEOUT);
??? }
??? boolean send(Message<?> message, long timeout);
}
~~~
消息通道的概念比較抽象,可以簡單把它理解為是對隊列的一種抽象。我們知道在消息傳遞系統中,隊列的作用就是實現存儲轉發的媒介,消息發布者所生成的消息都將保存在隊列中并由消息消費者進行消費。通道的名稱對應的就是隊列的名稱,但是作為一種抽象和封裝,各個消息傳遞系統所特有的隊列概念并不會直接暴露在業務代碼中,而是通過通道來對隊列進行配置。
Spring Messaging 把通道抽象成如下所示的兩種基本表現形式,即支持輪詢的 PollableChannel 和實現發布-訂閱模式的 SubscribableChannel,這兩個通道都繼承自具有消息發送功能的 MessageChannel:
```
public interface PollableChannel extends MessageChannel {
??? Message<?> receive();
??? Message<?> receive(long timeout);
}
public interface SubscribableChannel extends MessageChannel {
??? boolean subscribe(MessageHandler handler);
??? boolean unsubscribe(MessageHandler handler);
}
```
我們注意到對于 PollableChannel 而言才有 receive 的概念,代表這是通過輪詢操作主動獲取消息的過程。而 SubscribableChannel 則是通過注冊回調函數 MessageHandler 來實現事件響應。MessageHandler 接口定義如下:
```
public interface MessageHandler {
?????? void handleMessage(Message<?> message) throws MessagingException;
}
```
Spring Messaging 在基礎消息模型之上還提供了很多方便在業務系統中使用消息傳遞機制的輔助功能,例如各種消息體內容轉換器 MessageConverter 以及消息通道攔截器 ChannelInterceptor 等,這里不做展開,你可以參考官方文檔做進一步了解。
### Spring Integration
Spring Integration 是對 Spring Messaging 的擴展,提供了對系統集成領域的經典著作《企業集成模式:設計構建及部署消息傳遞解決方案》中所描述的各種企業集成模式的支持,通常被認為是一種企業服務總線 ESB 框架。
在 Spring Messaging 的基礎上,Spring Integration 還實現了其他幾種有用的通道,包括支持阻塞式隊列的 RendezvousChannel,該通道與帶緩存的 QueueChannel 都屬于點對點通道,但只有在前一個消息被消費之后才能發送下一個消息。PriorityChannel 即優先級隊列,而 DirectChannel 是 Spring Integration 的默認通道,該通道的消息發送和接收過程處于同一線程中。另外還有 ExecutorChannel,使用基于多線程的 TaskExecutor 來異步消費通道中的消息。
Spring Integration 的設計目的是系統集成,因此內部提供了大量的集成化端點方便應用程序直接使用。當各個異構系統之間進行集成時,如何屏蔽各種技術體系所帶來的差異性,Spring Integration 為我們提供了解決方案。通過通道之間的消息傳遞,在消息的入口和出口我們可以使用通道適配器和消息網關這兩種典型的端點對消息進行同構化處理。Spring Integration 提供的常見集成端點包括 File、FTP、TCP/UDP、HTTP、JDBC、JMS、AMQP、JPA、Mail、MongoDB、Redis、RMI、Web Services 等。
### Spring Cloud Stream 基本架構
Spring Cloud Stream 對整個消息發布和消費過程做了高度抽象,并提供了一系列核心組件。我們先介紹通過 Spring Cloud Stream 構建消息傳遞機制的基本工作流程。區別于直接使用 RabbitMQ、Kafka 等消息中間件,Spring Cloud Stream 在消息生產者和消費者之間添加了一種橋梁機制,所有的消息都將通過 Spring Cloud Stream 進行發送和接收,如下圖所示:
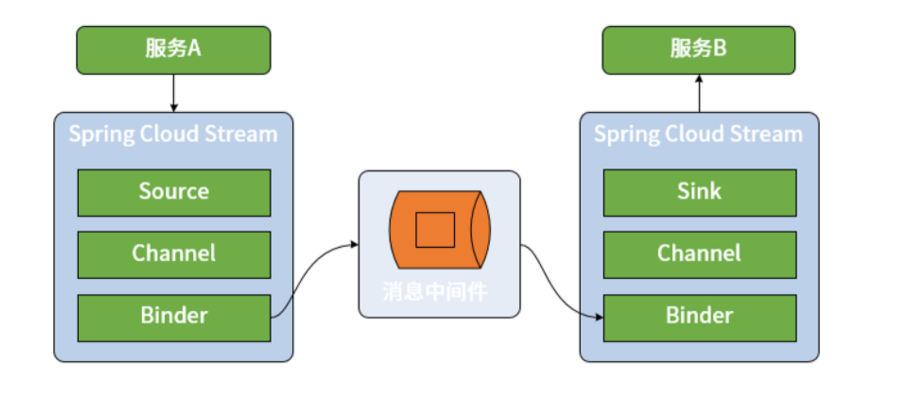
在上圖中,我們不難看出 Spring Cloud Stream 具備四個核心組件,分別是 Binder、Channel、Source 和 Sink,其中 Binder 和 Channel 成對出現,而 Source 和 Sink 分別面向消息的發布者和消費者。
* Source 和 Sink
在 Spring Cloud Stream 中,Source 組件是真正生成消息的組件,相當于是一個輸出(Output)組件。而 Sink 則是真正消費消息的組件,相當于是一個輸入(Input)組件。根據我們對事件驅動架構的了解,對于同一個 Source 組件而言,不同的微服務可能會實現不同的 Sink 組件,分別根據自身需求進行業務上的處理。
在 Spring Cloud Stream 中,Source 組件使用一個普通的 POJO 對象來充當需要發布的消息,通過將該對象進行序列化(默認的序列化方式是 JSON)然后發布到 Channel 中。另一方面,Sink 組件監聽 Channel 并等待消息的到來,一旦有可用消息,Sink 將該消息反序列化為一個 POJO 對象并用于處理業務邏輯。
* Channel
Channel 的概念比較容易理解,就是常見的通道,是對隊列的一種抽象。根據前面
所討論的結果,我們知道在消息傳遞系統中,隊列的作用就是實現存儲轉發的媒介,消息生產者所生成的消息都將保存在隊列中并由消息消費者進行消費。通道的名稱對應的往往就是隊列的名稱。
* Binder
Spring Cloud Stream 中最重要的概念就是 Binder。所謂 Binder,顧名思義就是一種黏合劑,將業務服務與消息傳遞系統黏合在一起。通過 Binder,我們可以很方便地連接消息中間件,可以動態的改變消息的目標地址、發送方式而不需要了解其背后的各種消息中間件在實現上的差異。
### Spring Cloud Stream 集成 Spring 消息處理機制
結合上面中了解到的關于 Spring Messaging 和 Spring Integration 的相關概念,我們就不難理解 Spring Cloud Stream 中關于 Source 和 Sink 的定義。Source 和 Sink 都是接口,其中 Source 接口的定義如下:
```
import org.springframework.cloud.stream.annotation.Output;
import org.springframework.messaging.MessageChannel;
public interface Source {
??? String OUTPUT = "output";
??? @Output(Source.OUTPUT)
??? MessageChannel output();
}
```
注意到這里通過 MessageChannel 來發送消息,而 MessageChannel 類來自 Spring Messaging 組件。我們在 MessageChannel 上發現了一個 @Output 注解,該注解定義了一個輸出通道。
類似的,Sink 接口定義如下:
```
import org.springframework.cloud.stream.annotation.Input;
import org.springframework.messaging.SubscribableChannel;
public interface Sink{
??? String INPUT = "input";
??? @Input(Sink.INPUT)
??? SubscribableChannel input();
}
```
同樣,這里通過 Spring Messaging 中的 SubscribableChannel 來實現消息接收,而 @Input 注解定義了一個輸入通道。
注意到 @Input 和 @Output 注解使用通道名稱作為參數,如果沒有名稱,會使用帶注解的方法名字作為參數,也就是默認情況下分別使用“input”和“output”作為通道名稱。從這個角度講,一個 Spring Cloud Stream 應用程序中的 Input 和 Output 通道數量和名稱都是可以任意設置的,我們只需要在這些通道的定義上添加 @Input 和 @Output 注解即可。
Spring Cloud Stream 對 Spring Messaging 和 Spring Integration 提供了原生支持。在常規情況下,我們不需要使用這些框架中提供的API就能完成常見的開發需求。但如果確實有需要,我們也可以使用更為底層 API 直接操控消息發布和接收過程。
### Spring Cloud Stream 中的消息傳遞模型
Spring Cloud Stream 將消息發布和消費抽象成如下三個核心概念,并結合目前主流的一些消息中間件對這些概念提供了統一的實現方式。
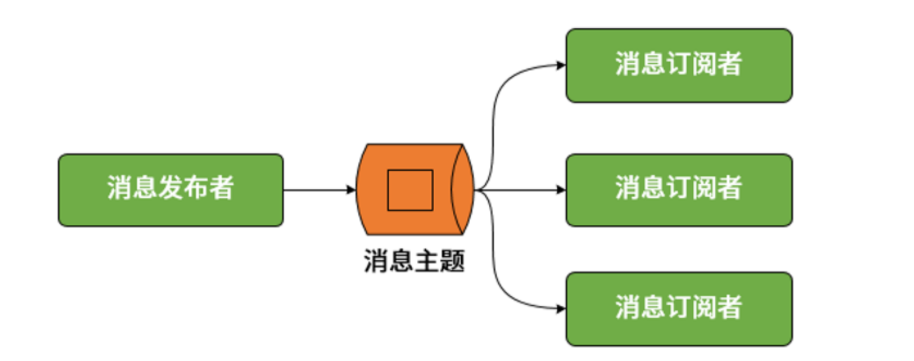
* 發布-訂閱模型
我們知道點對點模型和發布-訂閱模型是傳統消息傳遞系統的兩大基本模型,其中點對點模型實際上可以被視為發布-訂閱模型在訂閱者數量為 1 時的一種特例。因此,在 Spring Cloud Stream 中,統一通過發布-訂閱模型完成消息的發布和消費,如下所示:
* 消費者組
設計消費者組(Consumer Group)的目的是應對集群環境下的多服務實例問題。顯然,如果采用發布-訂閱模式就會導致一個服務的不同實例都消費到了同一條消息。為了解決這個問題,Spring Cloud Stream 中提供了消費者組的概念。一旦使用了消費組,一條消息就只能被同一個組中的某一個服務實例所消費。消費者的基本結構如下圖所示(其中虛線表示不會發生的消費場景):

* 消息分區
假如我們希望相同的消息都被同一個微服務實例來處理,但又有多個服務實例組成了負載均衡結構,那么通過上述的消費組概念仍然不能滿足要求。針對這一場景,Spring Cloud Stream 又引入了消息分區(Partition)的概念。引入分區概念的意義在于,同一分區中的消息能夠確保始終是由同一個消費者實例進行消費。盡管消息分區的應用場景并沒有那么廣泛,但如果想要達到類似的效果,Spring Cloud Stream 也為我們提供了一種簡單的實現方案,消息分區的基本結構如下圖所示:

### Binder 與消息中間件
Binder 組件本質上是一個中間層,負責與各種消息中間件的交互。目前,Spring Cloud Stream 中集成的消息中間件包括 RabbitMQ和Kafka。在具體介紹如何使用 Spring Cloud Stream 進行消息發布和消費之前,我們先來結合消息傳遞機制給出 Binder 對這兩種不同消息中間件的整合方式。
* RabbitMQ
RabbitMQ 是 AMQP(Advanced Message Queuing Protocol,高級消息隊列協議)協議的典型實現框架。在 RabbitMQ 中,核心概念是交換器(Exchange)。我們可以通過控制交換器與隊列之間的路由規則來實現對消息的存儲轉發、點對點、發布-訂閱等消息傳遞模型。在一個 RabbitMQ 中可能會存在多個隊列,交換器如果想要把消息發送到具體某一個隊列,就需要通過兩者之間的綁定規則來設置路由信息。路由信息的設置是開發人員操控 RabbitMQ 的主要手段,而路由過程的執行依賴于消息頭中的路由鍵(Routing Key)屬性。交換器會檢查路由鍵并結合路由算法來決定將消息路由到哪個隊列中去。下圖就是交換器與隊列之間的路由關系圖:

可以看到一條來自生產者的消息通過交換器中的路由算法可以發送給一個或多個隊列,從而分別實現點對點和發布訂閱功能。同時,我們基于上圖也不難得出消費者組的實現方案。因為 RabbitMQ 里每個隊列是被消費者競爭消費的,所以指定同一個組的消費者消費同一個隊列就可以實現消費者組。
* Kafka
從架構上講,在 Kafka 中,生產者使用推模式將消息發布到服務器,而消費者使用拉模式從服務器訂閱消息。在 Kafka 中還使用到了 Zookeeper,其作用在于實現服務器與消費者之間的負載均衡,所以啟動 Kafka 之前必須確保 Zookeeper 正常運行。同時,Kafka 也實現了消費者組機制,如下圖所示:
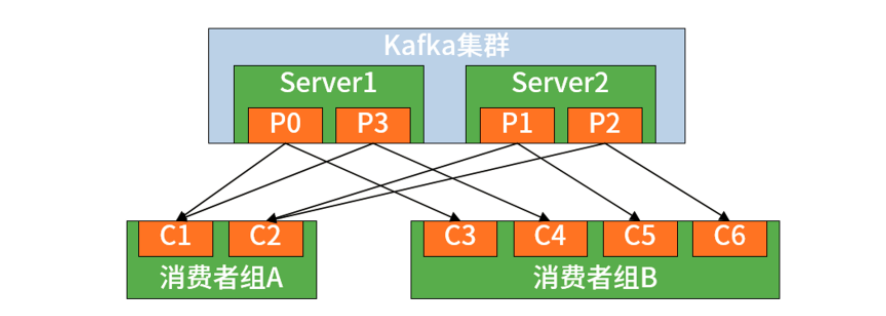
可以看到多個消費者構成了一種組結構,消息只能傳輸給某個組中的某一個消費者。也就是說,Kafka 中消息的消費具有顯式的分布式特性,天生就內置了 Spring Cloud Stream 中的消費組概念。
Spring Cloud Stream 中的 Binder
通過前面的介紹,我們明確了 Binder 組件是 Spring Cloud Stream 與各種消息中間件進行集成的核心組件,而 Binder 組件的實現過程涉及一批核心類之間的相互協作。接下來,我們就對 Binder 相關的核心類做源碼級的展開。
BindableProxyFactory
我們知道在發送和接收消息時,需要使用 @EnableBinding 注解,該注解的作用就是告訴 Spring Cloud Stream 將該應用程序綁定到消息中間件,從而實現兩者之間的連接。我們來到 org.springframework.cloud.stream.binding 包下的 BindableProxyFactory 類。根據該類上的注釋,BindableProxyFactory 是用于初始化由 @EnableBinding 注解所提供接口的工廠類,該類的定義如下所示:
```
public class BindableProxyFactory implements MethodInterceptor, FactoryBean<Object>, Bindable, InitializingBean
```
注意到 BindableProxyFactory 同時實現了 MethodInterceptor 接口和 Bindable 接口。其中前者是 AOP 中的方法攔截器,而后者是一個標明能夠綁定 Input 和 Output 的接口。我們先來看 MethodInterceptor 中用于攔截的 invoke 方法,如下所示:
```
@Override
public synchronized Object invoke(MethodInvocation invocation) throws Throwable {
Method method = invocation.getMethod();
Object boundTarget = targetCache.get(method);
if (boundTarget != null) {
return boundTarget;
}
Input input = AnnotationUtils.findAnnotation(method, Input.class);
if (input != null) {
String name = BindingBeanDefinitionRegistryUtils.getBindingTargetName(input, method);
boundTarget = this.inputHolders.get(name).getBoundTarget();
targetCache.put(method, boundTarget);
return boundTarget;
}
else {
Output output = AnnotationUtils.findAnnotation(method, Output.class);
if (output != null) {
String name = BindingBeanDefinitionRegistryUtils.getBindingTargetName(output, method);
boundTarget = this.outputHolders.get(name).getBoundTarget();
targetCache.put(method, boundTarget);
return boundTarget;
}
}
return null;
}
```
這里的邏輯比較簡單,可以看到 BindableProxyFactory 保存了一個緩存對象 targetCache。如果所調用方法已經存在于緩存中,則直接返回目標對象。反之,會根據 @Input 和 @Output 注解從 inputHolders 和 outputHolders 中獲取對應的目標對象并放入緩存中。這里使用緩存的作用僅僅是為了加快每次方法調用的速度,而系統在初始化時通過重寫 afterPropertiesSet 方法,已經將所有的目標對象都放置在 inputHolders 和 outputHolders 這兩個集合中。至于這里提到的這個目標對象,暫時可以把它理解為就是一種 MessageChannel 對象,后面會對其進行展開。
然后我們來看 Bindable 接口的定義,如下所示:
```
public interface Bindable {
default Collection<Binding<Object>> createAndBindInputs(BindingService adapter) {
return Collections.<Binding<Object>>emptyList();
}
default void bindOutputs(BindingService adapter) {}
default void unbindInputs(BindingService adapter) {}
default void unbindOutputs(BindingService adapter) {}
default Set<String> getInputs() {
return Collections.emptySet();
}
default Set<String> getOutputs() {
return Collections.emptySet();
}
}
```
顯然,這個接口提供了對 Input 和 Output 的綁定和解綁操作。在 BindableProxyFactory 中,對以上幾個方法的實現過程基本都類似,我們隨機挑選一個 bindOutputs 方法進行展開,如下所示:
```
@Override
public void bindOutputs(BindingService bindingService) {
for (Map.Entry<String, BoundTargetHolder> boundTargetHolderEntry : this.outputHolders.entrySet()) {
BoundTargetHolder boundTargetHolder = boundTargetHolderEntry.getValue();
String outputTargetName = boundTargetHolderEntry.getKey();
if (boundTargetHolderEntry.getValue().isBindable()) {
if (log.isDebugEnabled()) {
log.debug(String.format("Binding %s:%s:%s", this.namespace, this.type, outputTargetName));
}
bindingService.bindProducer(boundTargetHolder.getBoundTarget(), outputTargetName);
}
}
}
```
這里需要引入另一個重要的工具類 BindingService,該類提供了對 Input 和 Output 目標對象進行綁定的能力。但事實上,通過類上的注釋可以看到,這也是一個外觀類,它將底層的綁定動作委托給了 Binder。我們以綁定生產者的 bindProducer 方法為例展開討論,該方法如下所示:
```
public <T> Binding<T> bindProducer(T output, String outputName) {
String bindingTarget = this.bindingServiceProperties
.getBindingDestination(outputName);
Binder<T, ?, ProducerProperties> binder = (Binder<T, ?, ProducerProperties>) getBinder(
outputName, output.getClass());
ProducerProperties producerProperties = this.bindingServiceProperties
.getProducerProperties(outputName);
if (binder instanceof ExtendedPropertiesBinder) {
Object extension = ((ExtendedPropertiesBinder) binder)
.getExtendedProducerProperties(outputName);
ExtendedProducerProperties extendedProducerProperties = new ExtendedProducerProperties<>(
extension);
BeanUtils.copyProperties(producerProperties, extendedProducerProperties);
producerProperties = extendedProducerProperties;
}
validate(producerProperties);
Binding<T> binding = doBindProducer(output, bindingTarget, binder, producerProperties);
this.producerBindings.put(outputName, binding);
return binding;
}
```
顯然,這里的 doBindProducer 方法完成了真正的綁定操作,如下所示:
```
public <T> Binding<T> doBindProducer(T output, String bindingTarget, Binder<T, ?, ProducerProperties> binder,
ProducerProperties producerProperties) {
if (this.taskScheduler == null || this.bindingServiceProperties.getBindingRetryInterval() <= 0) {
return binder.bindProducer(bindingTarget, output, producerProperties);
}
else {
try {
return binder.bindProducer(bindingTarget, output, producerProperties);
}
catch (RuntimeException e) {
LateBinding<T> late = new LateBinding<T>();
rescheduleProducerBinding(output, bindingTarget, binder, producerProperties, late, e);
return late;
}
}
}
```
從這個方法中,我們終于看到了 Spring Cloud Stream 中最核心的概念 Binder,通過 Binder 的 bindProducer 方法完成了目標對象的綁定。
Binder
Binder 是一個接口,分別提供了綁定生產者和消費者的方法,如下所示:
```
public interface Binder<T, C extends ConsumerProperties, P extends ProducerProperties> {
Binding<T> bindConsumer(String name, String group, T inboundBindTarget, C consumerProperties);
Binding<T> bindProducer(String name, T outboundBindTarget, P producerProperties);
}
```
在介紹 Binder 接口的具體實現類之前,我們先來看一下如何獲取一個 Binder,getBinder 方法如下所示。
```
protected <T> Binder<T, ?, ?> getBinder(String channelName, Class<T> bindableType) {
String binderConfigurationName = this.bindingServiceProperties.getBinder(channelName);
return binderFactory.getBinder(binderConfigurationName, bindableType);
```
顯然,這里用到了個工廠模式。工廠類 BinderFactory 的定義如下所示:
```
public interface BinderFactory {
<T> Binder<T, ? extends ConsumerProperties, ? extends ProducerProperties> getBinder(String configurationName,
Class<? extends T> bindableType);
}
```
BinderFactory 只有一個方法,根據給定的配置名稱 configurationName 和綁定類型 bindableType 獲取 Binder 實例。而 BinderFactory 的實現類也只有一個,即 DefaultBinderFactory。在該實現類的 getBinder 方法中對配置信息進行了校驗,并通過 getBinderInstance 獲取真正的 Binder 實例。在 getBinderInstance 方法中,我們通過一系列基于 Spring 容器的步驟構建了一個上下文對象 ConfigurableApplicationContext,并通過該上下文對象獲取實現了 Binder 接口的 Java bean,核心代碼就是下面這句:
Binder<T, ?, ?> binder = binderProducingContext.getBean(Binder.class);
當然,對于 BinderFactory 而言,緩存也是需要的。在 DefaultBinderFactory 中存在一個 binderInstanceCache 變量,使用了一個 Map 來保存配置名稱所對應的 Binder 對象。
AbstractMessageChannelBinder
既然我們已經能夠獲取 Binder 實例,接下去就來討論 Binder 實例中對 bindConsumer 和 bindProducer 方法的實現過程。在 Spring Cloud Stream 中,Binder 接口的類層關系如下所示,注意到這里還展示了 spring-cloud-stream-binder-rabbit 代碼工程中的 RabbitMessageChannelBinder 類,這個類在以下講到 Spring Cloud Stream 與 RabbitMQ 進行集成時會具體展開:

Binder 接口類層結構圖
Spring Cloud Stream 首先提供了一個 AbstractBinder,這是一個抽象類,提供的 bindConsumer 和 bindProducer 方法實現如下所示:
```
@Override
public final Binding<T> bindConsumer(String name, String group, T target, C properties) {
if (StringUtils.isEmpty(group)) {
Assert.isTrue(!properties.isPartitioned(), "A consumer group is required for a partitioned subscription");
}
return doBindConsumer(name, group, target, properties);
}
protected abstract Binding<T> doBindConsumer(String name, String group, T inputTarget, C properties);
@Override
public final Binding<T> bindProducer(String name, T outboundBindTarget, P properties) {
return doBindProducer(name, outboundBindTarget, properties);
}
protected abstract Binding<T> doBindProducer(String name, T outboundBindTarget, P properties);
```
可以看到,它對 Binder 接口中相關方法只是提供了空實現,并把具體實現過程通過 doBindConsumer 和 doBindProducer 抽象方法交由子類進行完成。顯然,從設計模式上講,AbstractBinder 應用了很典型的模板方法模式。
AbstractBinder 的子類是 AbstractMessageChannelBinder,它同樣也是一個抽象類。我們來看它的 doBindProducer 方法,并對該方法中的核心語句進行提取和整理:
```
@Override
public final Binding<MessageChannel> doBindProducer(final String destination, MessageChannel outputChannel,
final P producerProperties) throws BinderException {
…
final MessageHandler producerMessageHandler;
final ProducerDestination producerDestination;
try {
producerDestination = this.provisioningProvider.provisionProducerDestination(destination,
producerProperties);
SubscribableChannel errorChannel = producerProperties.isErrorChannelEnabled()
? registerErrorInfrastructure(producerDestination) : null;
producerMessageHandler = createProducerMessageHandler(producerDestination, producerProperties,
errorChannel);
…
postProcessOutputChannel(outputChannel, producerProperties);
((SubscribableChannel) outputChannel).subscribe(
new SendingHandler(producerMessageHandler, HeaderMode.embeddedHeaders
.equals(producerProperties.getHeaderMode()), this.headersToEmbed,
producerProperties.isUseNativeEncoding()));
Binding<MessageChannel> binding = new DefaultBinding<MessageChannel>(destination, null, outputChannel,
producerMessageHandler instanceof Lifecycle ? (Lifecycle) producerMessageHandler : null) {
…
};
doPublishEvent(new BindingCreatedEvent(binding));
return binding;
}
```
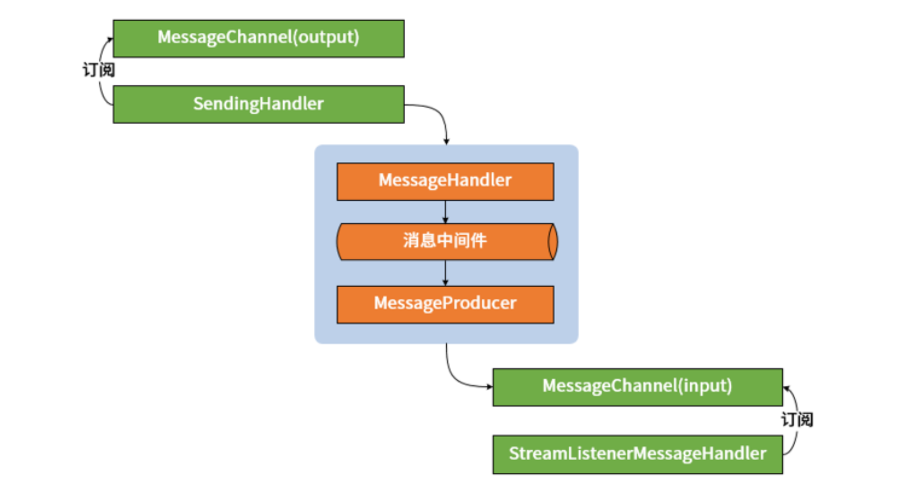
上述代碼的核心邏輯在于,Source 里的 output 發送消息到 outputChannel 通道之后會被 SendingHandler 這個 MessageHandler 進行處理。從設計模式上講,SendingHandler 是一個靜態代理類,因此它又將這個處理過程委托給了由 createProducerMessageHandler 方法所創建的 producerMessageHandler,這點從 SendingHandler 的定義中可以得到驗證,如下所示的 delegate 就是傳入的 producerMessageHandler:
```
private final class SendingHandler extends AbstractMessageHandler implements Lifecycle {
private final MessageHandler delegate;
@Override
protected void handleMessageInternal(Message<?> message) throws Exception {
Message<?> messageToSend = (this.useNativeEncoding) ? message
: serializeAndEmbedHeadersIfApplicable(message);
this.delegate.handleMessage(messageToSend);
}
// 省略其他方法
}
```
請注意,同樣作為一個模板方法類,AbstractMessageChannelBinder 具有三個抽象方法,即 createProducerMessageHandler、postProcessOutputChannel 和 afterUnbindProducer,這三個方法都需要由它的子類進行實現。也就是說,SendingHandler 所使用的 producerMessageHandler 需要由 AbstractMessageChannelBinder 子類負責進行創建。
需要注意的是,作為統一的數據模型,SendingHandler 以及 producerMessageHandler 中使用的都是 Spring Messaging 組件中的 Message 消息對象,而 createProducerMessageHandler 內部會把這個 Message 消息對象轉換成對應中間件的消息數據格式并進行發送。
下面轉到消息消費的場景,我們來看 AbstractMessageChannelBinder 的 doBindConsumer 方法。該方法的核心語句是創建一個消費者端點 ConsumerEndpoint,如下所示:
MessageProducer consumerEndpoint = createConsumerEndpoint(destination, group, properties);
consumerEndpoint.setOutputChannel(inputChannel);
這兩行代碼有兩個注意點。首先,createConsumerEndpoint 是一個抽象方法,需要 AbstractMessageChannelBinder 的子類進行實現。與 createProducerMessageHandler 一樣,createConsumerEndpoint 需要把中間件對應的消息數據結構轉換成 Spring Messaging 中統一的 Message 消息對象。
然后,我們注意到這里的 consumerEndpoint 類型是 MessageProducer。MessageProducer 在 Spring Integration 中代表的是消息的生產者,它會把從第三方消息中間件中收到的消息轉發到 inputChannel 所指定的通道中。基于 @StreamListener 注解,在 Spring Cloud Stream 中存在一個 StreamListenerMessageHandler 類,用于訂閱 inputChannel 消息通道中傳入的消息并進行消費。
作為總結,我們可以用如下所示的流程圖來概括整個消息發送和消費流程:
## 同一通道根據消息內容分發不同的消費邏輯應用場景
有的時候,我們對于同一通道中的消息處理,會通過判斷頭信息或者消息內容來做一些差異化處理,比如:可能在消息頭信息中帶入消息版本號,然后通過if判斷來執行不同的處理邏輯,其代碼結構可能是這樣的:
[https://blog.didispace.com/spring-cloud-starter-finchley-7-6/]()
- 前言
- 1.項目說明
- 2.項目更新日志
- 3.文檔更新日志
- 01.快速開始
- 01.maven構建項目
- 02.環境安裝
- 03.STS項目導入
- 03.IDEA項目導入
- 04.數據初始化
- 05.項目啟動
- 06.付費文檔說明
- 02.總體流程
- 1.oauth接口
- 2.架構設計圖
- 3.微服務介紹
- 4.功能介紹
- 5.梳理流程
- 03.模塊詳解
- 01.老版本1.0.1分支模塊講解
- 01.db-core模塊
- 02.api-commons模塊
- 03.log-core模塊
- 04.security-core模塊
- 05.swagger-core模塊
- 06.eureka-server模塊
- 07.auth-server模塊
- 08.auth-sso模塊解析
- 09.user-center模塊
- 10.api-gateway模塊
- 11.file-center模塊
- 12.log-center模塊
- 13.batch-center模塊
- 14.back-center模塊
- 02.spring-boot-starter-web那點事
- 03.自定義db-spring-boot-starter
- 04.自定義log-spring-boot-starter
- 05.自定義redis-spring-boot-starter
- 06.自定義common-spring-boot-starter
- 07.自定義swagger-spring-boot-starter
- 08.自定義uaa-server-spring-boot-starter
- 09.自定義uaa-client-spring-boot-starter
- 10.自定義ribbon-spring-boot-starter
- 11.springboot啟動原理
- 12.eureka-server模塊
- 13.auth-server模塊
- 14.user-center模塊
- 15.api-gateway模塊
- 16.file-center模塊
- 17.log-center模塊
- 18.back-center模塊
- 19.auth-sso模塊
- 20.admin-server模塊
- 21.zipkin-center模塊
- 22.job-center模塊
- 23.batch-center
- 04.全新網關
- 01.基于spring cloud gateway的new-api-gateway
- 02.spring cloud gateway整合Spring Security Oauth
- 03.基于spring cloud gateway的redis動態路由
- 04.spring cloud gateway聚合swagger文檔
- 05.技術詳解
- 01.互聯網系統設計原則
- 02.系統冪等性設計與實踐
- 03.Oauth最簡向導開發指南
- 04.oauth jdbc持久化策略
- 05.JWT token方式啟用
- 06.token有效期的處理
- 07.@PreAuthorize注解分析
- 08.獲取當前用戶信息
- 09.認證授權白名單配置
- 10.OCP權限設計
- 11.服務安全流程
- 12.認證授權詳解
- 13.驗證碼技術
- 14.短信驗證碼登錄
- 15.動態數據源配置
- 16.分頁插件使用
- 17.緩存擊穿
- 18.分布式主鍵生成策略
- 19.分布式定時任務
- 20.分布式鎖
- 21.網關多維度限流
- 22.跨域處理
- 23.容錯限流
- 24.應用訪問次數控制
- 25.統一業務異常處理
- 26.日志埋點
- 27.GPRC內部通信
- 28.服務間調用
- 29.ribbon負載均衡
- 30.微服務分布式跟蹤
- 31.異步與線程傳遞變量
- 32.死信隊列延時消息
- 33.單元測試用例
- 34.Greenwich.RELEASE升級
- 35.混沌工程質量保證
- 06.開發初探
- 1.開發技巧
- 2.crud例子
- 3.新建服務
- 4.區分前后臺用戶
- 07.分表分庫
- 08.分布式事務
- 1.Seata介紹
- 2.Seata部署
- 09.shell部署
- 01.eureka-server
- 02.user-center
- 03.auth-server
- 04.api-gateway
- 05.file-center
- 06.log-center
- 07.back-center
- 08.編寫shell腳本
- 09.集群shell部署
- 10.集群shell啟動
- 11.部署阿里云問題
- 10.網關安全
- 1.openresty https保障服務安全
- 2.openresty WAF應用防火墻
- 3.openresty 高可用
- 11.docker配置
- 01.docker安裝
- 02.Docker 開啟遠程API
- 03.采用docker方式打包到服務器
- 04.docker創建mysql
- 05.docker網絡原理
- 06.docker實戰
- 6.01.安裝docker
- 6.02.管理鏡像基本命令
- 6.03.容器管理
- 6.04容器數據持久化
- 6.05網絡模式
- 6.06.Dockerfile
- 6.07.harbor部署
- 6.08.使用自定義鏡像
- 12.統一監控中心
- 01.spring boot admin監控
- 02.Arthas診斷利器
- 03.nginx監控(filebeat+es+grafana)
- 04.Prometheus監控
- 05.redis監控(redis+prometheus+grafana)
- 06.mysql監控(mysqld_exporter+prometheus+grafana)
- 07.elasticsearch監控(elasticsearch-exporter+prometheus+grafana)
- 08.linux監控(node_exporter+prometheus+grafana)
- 09.micoservice監控
- 10.nacos監控
- 11.druid數據源監控
- 12.prometheus.yml
- 13.grafana告警
- 14.Alertmanager告警
- 15.監控微信告警
- 16.關于接口監控告警
- 17.prometheus-HA架構
- 18.總結
- 13.統一日志中心
- 01.統一日志中心建設意義
- 02.通過ELK收集mysql慢查詢日志
- 03.通過elk收集微服務模塊日志
- 04.通過elk收集nginx日志
- 05.統一日志中心性能優化
- 06.kibana安裝部署
- 07.日志清理方案
- 08.日志性能測試指標
- 09.總結
- 14.數據查詢平臺
- 01.數據查詢平臺架構
- 02.mysql配置bin-log
- 03.單節點canal-server
- 04.canal-ha部署
- 05.canal-kafka部署
- 06.實時增量數據同步mysql
- 07.canal監控
- 08.clickhouse運維常見腳本
- 15.APM監控
- 1.Elastic APM
- 2.Skywalking
- 01.docker部署es
- 02.部署skywalking-server
- 03.部署skywalking-agent
- 16.壓力測試
- 1.ocp.jmx
- 2.test.bat
- 3.壓測腳本
- 4.壓力報告
- 5.報告分析
- 6.壓測平臺
- 7.并發測試
- 8.wrk工具
- 9.nmon
- 10.jmh測試
- 17.SQL優化
- 1.oracle篇
- 01.基線測試
- 02.調優前奏
- 03.線上瓶頸定位
- 04.執行計劃解讀
- 05.高級SQL語句
- 06.SQL tuning
- 07.數據恢復
- 08.深入10053事件
- 09.深入10046事件
- 2.mysql篇
- 01.innodb存儲引擎
- 02.BTree索引
- 03.執行計劃
- 04.查詢優化案例分析
- 05.為什么會走錯索引
- 06.表連接優化問題
- 07.Connection連接參數
- 08.Centos7系統參數調優
- 09.mysql監控
- 10.高級SQL語句
- 11.常用維護腳本
- 12.percona-toolkit
- 18.redis高可用方案
- 1.免密登錄
- 2.安裝部署
- 3.配置文件
- 4.啟動腳本
- 19.消息中間件搭建
- 19-01.rabbitmq集群搭建
- 01.rabbitmq01
- 02.rabbitmq02
- 03.rabbitmq03
- 04.鏡像隊列
- 05.haproxy搭建
- 06.keepalived
- 19-02.rocketmq搭建
- 19-03.kafka集群
- 20.mysql高可用方案
- 1.環境
- 2.mysql部署
- 3.Xtrabackup部署
- 4.Galera部署
- 5.galera for mysql 集群
- 6.haproxy+keepalived部署
- 21.es集群部署
- 22.生產實施優化
- 1.linux優化
- 2.jvm優化
- 3.feign優化
- 4.zuul性能優化
- 23.線上問題診斷
- 01.CPU性能評估工具
- 02.內存性能評估工具
- 03.IO性能評估工具
- 04.網絡問題工具
- 05.綜合診斷評估工具
- 06.案例診斷01
- 07.案例診斷02
- 08.案例診斷03
- 09.案例診斷04
- 10.遠程debug
- 24.fiddler抓包實戰
- 01.fiddler介紹
- 02.web端抓包
- 03.app抓包
- 25.疑難解答交流
- 01.有了auth/token獲取token了為啥還要配置security的登錄配置
- 02.權限數據存放在redis嗎,代碼在哪里啊
- 03.其他微服務和認證中心的關系
- 04.改包問題
- 05.use RequestContextListener or RequestContextFilter to expose the current request
- 06./oauth/token對應代碼在哪里
- 07.驗證碼出不來
- 08./user/login
- 09.oauth無法自定義權限表達式
- 10.sleuth引發線程數過高問題
- 11.elk中使用7x版本問題
- 12.RedisCommandTimeoutException問題
- 13./oauth/token CPU過高
- 14.feign與權限標識符問題
- 15.動態路由RedisCommandInterruptedException: Command interrupted
- 26.學習資料
- 海量學習資料等你來拿
- 27.持續集成
- 01.git安裝
- 02.代碼倉庫gitlab
- 03.代碼倉庫gogs
- 04.jdk&&maven
- 05.nexus安裝
- 06.sonarqube
- 07.jenkins
- 28.Rancher部署
- 1.rancher-agent部署
- 2.rancher-server部署
- 3.ocp后端部署
- 4.演示前端部署
- 5.elk部署
- 6.docker私服搭建
- 7.rancher-server私服
- 8.rancher-agent docker私服
- 29.K8S部署OCP
- 01.準備OCP的構建環境和部署環境
- 02.部署順序
- 03.在K8S上部署eureka-server
- 04.在K8S上部署mysql
- 05.在K8S上部署redis
- 06.在K8S上部署auth-server
- 07.在K8S上部署user-center
- 08.在K8S上部署api-gateway
- 09.在K8S上部署back-center
- 30.Spring Cloud Alibaba
- 01.統一的依賴管理
- 02.nacos-server
- 03.生產可用的Nacos集群
- 04.nacos配置中心
- 05.common.yaml
- 06.user-center
- 07.auth-server
- 08.api-gateway
- 09.log-center
- 10.file-center
- 11.back-center
- 12.sentinel-dashboard
- 12.01.sentinel流控規則
- 12.02.sentinel熔斷降級規則
- 12.03.sentinel熱點規則
- 12.04.sentinel系統規則
- 12.05.sentinel規則持久化
- 12.06.sentinel總結
- 13.sentinel整合openfeign
- 14.sentinel整合網關
- 1.sentinel整合zuul
- 2.sentinel整合scg
- 15.Dubbo與Nacos共存
- 31.Java源碼剖析
- 01.基礎數據類型和String
- 02.Arrays工具類
- 03.ArrayList源碼分析
- 32.面試專題匯總
- 01.JVM專題匯總
- 02.多線程專題匯總
- 03.Spring專題匯總
- 04.springboot專題匯總
- 05.springcloud面試匯總
- 文檔問題跟蹤處理