<ruby id="bdb3f"></ruby>

    <p id="bdb3f"><cite id="bdb3f"></cite></p>

      <p id="bdb3f"><cite id="bdb3f"><th id="bdb3f"></th></cite></p><p id="bdb3f"></p>
        <p id="bdb3f"><cite id="bdb3f"></cite></p>

          <pre id="bdb3f"></pre>
          <pre id="bdb3f"><del id="bdb3f"><thead id="bdb3f"></thead></del></pre>

          <ruby id="bdb3f"><mark id="bdb3f"></mark></ruby><ruby id="bdb3f"></ruby>
          <pre id="bdb3f"><pre id="bdb3f"><mark id="bdb3f"></mark></pre></pre><output id="bdb3f"></output><p id="bdb3f"></p><p id="bdb3f"></p>

          <pre id="bdb3f"><del id="bdb3f"><progress id="bdb3f"></progress></del></pre>

                <ruby id="bdb3f"></ruby>

                ??碼云GVP開源項目 12k star Uniapp+ElementUI 功能強大 支持多語言、二開方便! 廣告
                Robox連接IOA ## **1、軟件及下載工程** ## **教程視頻** <iframe src="//player.bilibili.com/player.html?aid=937552393&bvid=BV1jT4y1i7gK&cid=556694054&page=1" scrolling="no" border="0" frameborder="no" framespacing="0" allowfullscreen="true"width="670px" height="442px"> </iframe> l IOA5.0**** l Robox虛擬示教器&虛擬控制器V2.1.0 ## 2、**軟件模擬仿真** 1、打開IOA軟件 ![](https://img.kancloud.cn/96/b3/96b350c7c0229a751d43da89b0957b50_126x138.png) 2、添加機器人到場景中 ![](https://img.kancloud.cn/fd/05/fd054095d9ea5c9089eb1a5f0945a826_806x636.png =600x400) 
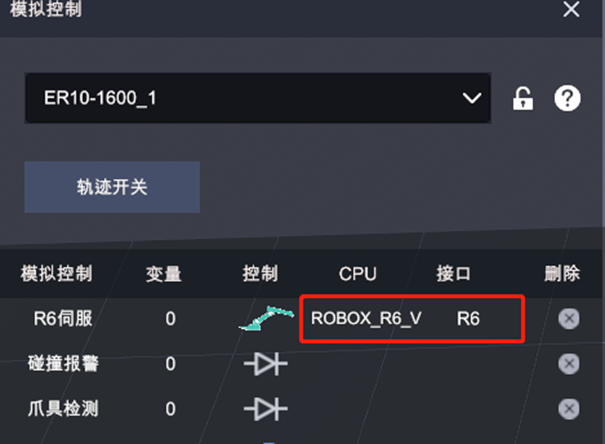
3、點擊控制器,添加Robox\_R6控制 ![](https://img.kancloud.cn/e9/62/e9628c7e0fba197decece6faeca730cf_790x912.png =600x500) 4、選擇機器人,點擊顯示控制![](https://img.kancloud.cn/ff/83/ff8336a66367ec620e56c2a16ca68cfd_60x58.png),給機器人R6伺服接口配置接線 ![](https://img.kancloud.cn/d2/c3/d2c3f1fd192c0fe7a7cdbaa41b49a249_605x444.png) 5、打開虛擬控制器軟件,當軟件顯示 System started時,控制器啟動完成 ![](https://img.kancloud.cn/83/ad/83ad29cfe24bc33d7b0144892ec9e2b8_698x575.png =600x400) 6、打開示教器軟件,登錄密碼 999999 ![](https://img.kancloud.cn/3c/15/3c150c47261766bf107b069fe6064fd6_738x575.png =600x400) 7、點擊左上角菜單按鈕,在打開界面中點擊設置按鈕 ![](https://img.kancloud.cn/15/57/15573f4d3ee22c96fba4196954dbdd27_760x527.png =600x400) 8、在設置界面中,點擊DH參數,根據所選擇的機器人填寫對應的DH參數,并點擊保存按鈕,保存設置。 ![](https://img.kancloud.cn/53/3f/533f6dd3aa1f0e6ea2b43e5f59f1e487_826x550.png =600x400) 9、打開IOA軟件控制器界面。IP填寫127.0.0.1,端口號填寫800
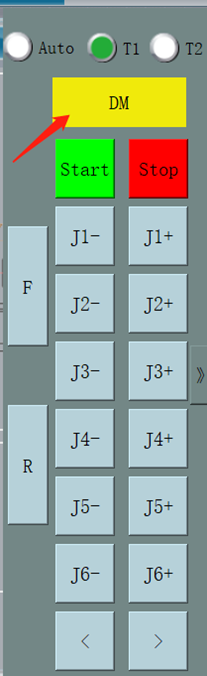
 ![](https://img.kancloud.cn/40/9d/409d746e302e5fbbe4fd73945629b61d_988x82.png =650x100) 10、點擊擴展按鈕,打開機器人控制界面 ![](https://img.kancloud.cn/96/a3/96a3c1372f2b17284180184e14c0caba_460x464.png =600x400) 11、點擊DM按鈕,為機器人上使能,然后可以通過J1~J6控制機器人運行。 ![](https://img.kancloud.cn/d0/3a/d03abf597a1a8e6c68db88254aba5c7c_207x676.png)
                  <ruby id="bdb3f"></ruby>

                  <p id="bdb3f"><cite id="bdb3f"></cite></p>

                    <p id="bdb3f"><cite id="bdb3f"><th id="bdb3f"></th></cite></p><p id="bdb3f"></p>
                      <p id="bdb3f"><cite id="bdb3f"></cite></p>

                        <pre id="bdb3f"></pre>
                        <pre id="bdb3f"><del id="bdb3f"><thead id="bdb3f"></thead></del></pre>

                        <ruby id="bdb3f"><mark id="bdb3f"></mark></ruby><ruby id="bdb3f"></ruby>
                        <pre id="bdb3f"><pre id="bdb3f"><mark id="bdb3f"></mark></pre></pre><output id="bdb3f"></output><p id="bdb3f"></p><p id="bdb3f"></p>

                        <pre id="bdb3f"><del id="bdb3f"><progress id="bdb3f"></progress></del></pre>

                              <ruby id="bdb3f"></ruby>

                              哎呀哎呀视频在线观看