
[TOC]
1、首先,我們先來理一下思路。
```
正常的接口測試流程:
確定測試接口的工具 —>?配置需要的接口參數 —> 進行測試 —> 檢查測試結果(有的需要數據庫輔助)
—> 生成測試報告(html報告)
那么,我們就根據這樣的過程來一步步搭建我們的框架。在這個過程中,我們需要做到業務和數據的分離,
這樣才能靈活,達到我們寫框架的目的。
接下來,我們來進行結構的劃分。
```
```
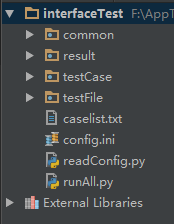
common:存放一些共通的方法
result:執行過程中生成的文件夾,里面存放每次測試的結果
testCase:用于存放具體的測試case
testFile:存放測試過程中用到的文件,包括上傳的文件,測試用例以及數據庫的sql語句
caselist:txt文件,配置每次執行的case名稱
config:配置一些常量,例如數據庫的相關信息,接口的相關信息等
readConfig: 用于讀取config配置文件中的內容
runAll:用于執行case
```
<br />
```
既然整體結構有了劃分,接下來就該一步步的填充整個框架了,首先,我們先來看看config.ini和
readConfig.py兩個文件,從他們入手。
```
```
# config.ini
[DATABASE]
host = 192.168.0.212
username = root
password = www.upsoft01.com
port = 3306
database = databasename
[HTTP]
# 接口的url
baseurl = http://192.168.0.212
port = 8000
timeout = 1.0
[EMAIL]
mail_host = smtp.163.com
mail_user = xxx@163.com
mail_pass = *********
mail_port = 25
sender = xxx@163.com
receiver = xxxx@qq.com/xxxx@qq.com
subject = python
content = "All interface test has been complited\nplease read the report file about the detile of result in the attachment."
testuser = Someone
on_off = 1
```
<br />
```
相信大家都知道這樣的配置文件,沒錯,所有一成不變的東西,我們都可以放到這里來。
現在,我們已經做好了固定的“倉庫”。來保存我們平時不動的東西,那么,我們要怎么把
它拿出來為我所用呢?這時候,readConfig.py文件出世了,它成功的幫我們解決了這個問題。
```
<details>
<summary>readConfig.py</summary>
```
# -*- coding: utf-8 -*-
import os
import codecs
import configparser
proDir = os.path.split(os.path.realpath(__file__))[0]
configPath = os.path.join(proDir, "config.ini")
class ReadConfig:
def __init__(self):
fd = open(configPath)
data = fd.read()
# remove BOM
if data[:3] == codecs.BOM_UTF8:
data = data[3:]
file = codecs.open(configPath, "w")
file.write(data)
file.close()
fd.close()
self.cf = configparser.ConfigParser()
self.cf.read(configPath)
def get_email(self, name):
value = self.cf.get("EMAIL", name)
return value
def get_http(self, name):
value = self.cf.get("HTTP", name)
return value
def get_db(self, name):
value = self.cf.get("DATABASE", name)
return value
```
</details>
<br />
我們定義的方法,根據名稱取對應的值,當然了,這里我們只用到了get方法,還有其他的例如set方法,有興趣的同學可以自己去探索下,也可以看看小編我自己的關于讀取配置文件的博文[https://my.oschina.net/u/3041656/blog/793467](https://my.oschina.net/u/3041656/blog/793467),這里我們就不在累述了。
<br />
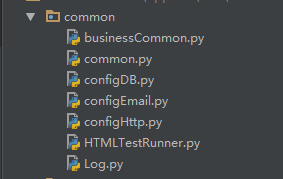
話不多說,我們先來看下common到底有哪些東西。
```
既然配置文件和讀取配置文件我們都已經完成了,也看到了common里的內容,接下來就
可以寫common里的共通方法了,從哪個下手呢?今天,我們就來翻“Log.py”的牌
吧,因為它是比較獨立的,我們單獨跟他打交道,也為了以后它能為我們服務打下良好基礎。
這里呢,我想跟大家多說兩句,對于這個log文件呢,我給它單獨啟用了一個線程,這樣在
整個運行過程中,我們在寫log的時候也會比較方便,看名字大家也知道了,這里就是我們
對輸出的日志的所有操作了,主要是對輸出格式的規定,輸出等級的定義以及其他一些輸
出的定義等等。總之,你想對log做的任何事情,都可以放到這里來。我們來看下代碼,沒
有比這個更直接有效的了。
```
```
import logging
from datetime import datetime
import threading
```
首先,我們要像上面那樣,引入需要的模塊,才能進行接下來的操作。
```
# -*- coding: utf-8 -*-
import logging
import os
from datetime import datetime
import threading
from interfaceTest import readConfig
class Log:
def __init__(self):
global logPath, resultPath, proDir
proDir = readConfig.proDir
resultPath = os.path.join(proDir, "result")
# 創建result file 如果它不存在
if not os.path.exists(resultPath):
os.mkdir(resultPath)
# defined test result file name by localtime
logPath = os.path.join(resultPath, str(datetime.now().strftime("%Y%m%d%H%M%S")))
# create test result file if it doesn't exist
if not os.path.exists(logPath):
os.mkdir(logPath)
# defined logger
self.logger = logging.getLogger()
# defined log level
self.logger.setLevel(logging.INFO)
# defined handler
handler = logging.FileHandler(os.path.join(logPath, "output.log"))
# defined formatter
formatter = logging.Formatter('%(asctime)s - %(name)s -%(levelname)s - %(message)s')
# defined formatter
handler.setFormatter(formatter)
# add handler
self.logger.addHandler(handler)
```
```
現在,我們創建了上面的Log類,在__init__初始化方法中,我們進行了log的相關初始化
操作。具體的操作內容,注釋已經寫得很清楚了,這樣,log的基本格式已經定義完成了,
至于其他的方法,就靠大家自己發揮了,畢竟每個人的需求也不同,我們就只寫普遍的共用
方法啦。接下來,就是把它放進一個線程內了,請看下面的代碼:
```
```
class MyLog:
log = None
mutex = threading.Lock()
def __init__(self):
pass
@staticmethod
def get_log():
if MyLog.log is None:
MyLog.mutex.acquire()
MyLog.log = Log()
MyLog.mutex.release()
return MyLog.log
```
關于python中線程的學習,不懂的同學可以點擊這里[https://my.oschina.net/u/3041656/blog/794357](https://my.oschina.net/u/3041656/blog/794357),進行學習哦。好了,至此log的內容也結束了。
下面,我們繼續搭建,這次要做的,是configHttp.py的內容。沒錯,我們開始配置接口文件啦!
下面是接口文件中主要部分的內容,讓我們一起來看看吧。
```
# -*- coding: utf-8 -*-
import requests
from interfaceTest import readConfig
# from common.Log import MyLog as Log
from interfaceTest.common.Log import MyLog as Log
localReadConfig = readConfig.ReadConfig()
class ConfigHttp:
def __init__(self):
global host, port, timeout
host = localReadConfig.get_http("baseurl")
port = localReadConfig.get_http("port")
timeout = localReadConfig.get_http("timeout")
self.log = Log.get_log()
self.logger = self.log.get_logger()
self.headers = {}
self.params = {}
self.data = {}
self.url = None
self.files = {}
def set_url(self, url):
self.url = host + url
def set_headers(self, header):
self.headers = header
def set_params(self, param):
self.params = param
def set_data(self, data):
self.data = data
def set_files(self, file):
self.files = file
# defined http get method
def get(self):
try:
response = requests.get(self.url, params=self.params, headers=self.headers, timeout=float(timeout))
# response.raise_for_status()
return response
except TimeoutError:
self.logger.error("Time out!")
return None
# defined http post method
def post(self):
try:
response = requests.post(self.url, headers=self.headers, data=self.data, files=self.files, timeout=float(timeout))
# response.raise_for_status()
return response
except TimeoutError:
self.logger.error("Time out!")
return None
```
這次是用python自帶的requests來進行接口測試的,相信有心的朋友已經看出來了,python+requests這個模式是很好用的,它已經幫我們封裝好了測試接口的方法,用起來很方便。這里呢,我就拿get和post兩個方法來說吧。
* **get方法**
????? ? 接口測試中見到最多的就是get方法和post方法,其中,get方法用于獲取接口的測試,說白了,就是說,使用get的接口,都不會對后臺數據進行更改,而且get方法在傳遞參數后,url的格式是這樣的:**http://接口地址?key1=value1&key2=value2**。
```
對于requests提供的get方法,有幾個常用的參數:
url:顯而易見,就是接口的地址url啦
headers:定制請求頭(headers),例如:content-type = application/x-www-form-urlencoded
params:用于傳遞測試接口所要用的參數,這里我們用python中的字典形式(key:value)進行參數的傳遞。
timeout:設置接口連接的最大時間(超過該時間會拋出超時錯誤)
現在,各個參數我們已經知道是什么意思了,剩下的就是往里面填值。
```
舉個栗子:
```
url="http://api.shein.com/v2/member/logout"
header={"content-type": application/x-www-form-urlencoded}
param={"user_id": 123456,"email": 123456@163.com}
timeout=0.5
requests.get(url, headers=header, params=param, timeout=timeout)
```
* **post方法**
? ? ? ? 與get方法類似,只要設置好對應的參數,就可以了。下面就直接舉個栗子,直接上代碼吧:
```
url="http://api.shein.com/v2/member/login"
header={"content-type": application/x-www-form-urlencoded}
data={"email": 123456@163.com,"password": 123456}
timeout=0.5
requests.post(url, headers=header, data=data, timeout=timeout)
```
這里我們需要說明一下,post方法中的參數,我們不在使用params進行傳遞,而是改用data進行傳遞了。下面我們來探(了)討(解)下接口的返回值。
依然只說常用的返回值的操作。
```
text:獲取接口返回值的文本格式
json():獲取接口返回值的json()格式
status_code:返回狀態碼(成功為:200)
headers:返回完整的請求頭信息(headers['name']:返回指定的headers內容)
encoding:返回字符編碼格式
url:返回接口的完整url地址
```
```
關于失敗請求拋出異常,我們可以使用“raise_for_status()”來完成,那么,當我們的請求發生
錯誤時,就會拋出異常。在這里提醒下各位朋友,如果你的接口,在地址不正確的時候,會
有相應的錯誤提示(有時也需要進行測試),這時,千萬不能使用這個方法來拋出錯誤,因
為python自己在鏈接接口時就已經把錯誤拋出,那么,后面你將無法測試期望的內容。而且
程序會直接在這里當掉,以錯誤來計。
```
快,我想學(看)習(看)common.py里的內容。
```
# -*- coding: utf-8 -*-
import os
from interfaceTest.common import configHttp
from interfaceTest.readConfig import proDir
from xlrd import open_workbook
from xml.etree import ElementTree
from interfaceTest.common.Log import MyLog as Log
localConfigHttp = configHttp.ConfigHttp()
log = Log.get_log()
logger = log.get_logger()
# 從excel文件中讀取測試用例
def get_xls(xls_name, sheet_name):
cls = []
# get xls file's path
xlsPath = os.path.join(proDir, "testFile", xls_name)
# open xls file
file = open_workbook(xlsPath)
# get sheet by name
sheet = file.sheet_by_name(sheet_name)
# get one sheet's rows
nrows = sheet.nrows
for i in range(nrows):
if sheet.row_values(i)[0] != u'case_name':
cls.append(sheet.row_values(i))
return cls
# 從xml文件中讀取sql語句
database = {}
def set_xml():
if len(database) == 0:
sql_path = os.path.join(proDir, "testFile", "SQL.xml")
tree = ElementTree.parse(sql_path)
for db in tree.findall("database"):
db_name = db.get("name")
# print(db_name)
table = {}
for tb in db.getchildren():
table_name = tb.get("name")
# print(table_name)
sql = {}
for data in tb.getchildren():
sql_id = data.get("id")
# print(sql_id)
sql[sql_id] = data.text
table[table_name] = sql
database[db_name] = table
def get_xml_dict(database_name, table_name):
set_xml()
database_dict = database.get(database_name).get(table_name)
return database_dict
def get_sql(database_name, table_name, sql_id):
db = get_xml_dict(database_name, table_name)
sql = db.get(sql_id)
return sql
```
上面就是我們common的兩大主要內容了
```
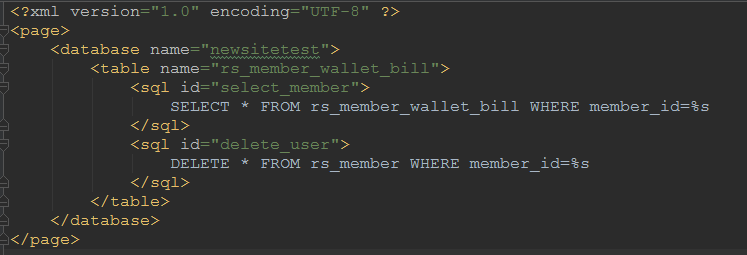
我們利用xml.etree.Element來對xml文件進行操作,然后通過我們自定義的方法,根據傳遞
不同的參數取得不(想)同(要)的值。
利用xlrd來操作excel文件,注意啦,我們是用excel文件來管理測試用例的。
聽起來會不會有點兒懵,小編剛學時也很懵,看文件就好理解了。
```
excel文件:

xml文件:
還有不會的小伙伴,可以參見這兩篇文章學習下:excel:[https://my.oschina.net/u/3041656/blog/819892](https://my.oschina.net/u/3041656/blog/819892)? xml:[https://my.oschina.net/u/3041656/blog/819895](https://my.oschina.net/u/3041656/blog/819895)
接下來,我們看看數據庫和發送郵件吧(也可根據需要,不寫該部分內容)
先看老朋友“數據庫”吧。
小編這次使用的是MySQL數據庫,所以我們就以它為例吧。
```
# configDB.py
# -*- coding: utf-8 -*-
from distutils import config
import pymysql
from interfaceTest import readConfig
from interfaceTest.common.Log import MyLog as Log
localReadConfig = readConfig.ReadConfig()
class MyDB:
global host, username, password, port, database, readConfig
host = localReadConfig.get_db("host")
username = localReadConfig.get_db("username")
password = localReadConfig.get_db("password")
port = localReadConfig.get_db("port")
database = localReadConfig.get_db("database")
config = {
'host': str(host),
'user': username,
'passwd': password,
'port': int(port),
'db': database
}
def __init__(self):
self.log = Log.get_log()
self.logger = self.log.get_logger()
self.db = None
self.cursor = None
def connectDB(self):
try:
# connect to DB
self.db = pymysql.connect(**config)
# create cursor
self.cursor = self.db.cursor()
print("Connect DB successfully!")
except ConnectionError as ex:
self.logger.error(str(ex))
def executeSQL(self, sql, params):
self.connectDB()
# executing sql
self.cursor.execute(sql, params)
# executing by committing to DB
self.db.commit()
return self.cursor
def get_all(self, cursor):
value = cursor.fetchall()
return value
def get_one(self, cursor):
value = cursor.fetchone()
return value
def closeDB(self):
self.db.close()
print("Database closed!")
```
這就是完整的數據庫的文件啦。因為小編的需求對數據庫的操作不是很復雜,所以這些已基本滿足要求啦。注意下啦,在此之前,請朋友們先把pymysql裝起來!安裝的方法很簡單,由于小編是使用pip來管理python包安裝的,所以只要進入python安裝路徑下的pip文件夾下,執行以下命令即可:
```
pip3 install pymysql
```
```
在整個文件中,我們并沒有出現具體的變量值哦,為什么呢?沒錯,因為前面我們寫了config.ini文件,
所有的數據庫配置信息都在這個文件內哦,是不是感覺很方便呢,以后就算變更數據庫了,也只要修
改config.ini文件的內容就可以了,結合前面測試用例的管理(excel文件),sql語句的存放(xml文件),
還有接下來我們要說的,businessCommon.py和存放具體case的文件夾,那么我們就已經將數據和業
務分開啦,哈哈哈,想想以后修改測試用例內容,sql語句神馬的工作,再也不用每個case都修改,只
要改幾個固定的文件。
```
回歸上面的configDB.py文件,內容很簡單,相信大家都能看得懂,就是連接數據庫,執行sql,獲取結果,最后關閉數據庫,沒有什么不一樣的地方。還有不明白的朋友可以查看這個鏈接進行學習:[http://www.runoob.com/python/python-mysql.html](http://www.runoob.com/python/python-mysql.html)
<br />
該談談郵件啦,你是不是也遇到過這樣的問題:每次測試完之后,都需要給開發一份測試報告。那么,對于我這樣的懶人,是不愿意老是找人家開發的,所以,我就想,每次測試完,我們可以讓程序自己給開發人員發一封email,告訴他們,測試已經結束了,并且把測試報告以附件的形式,通過email發送給開發者的郵箱,這樣豈不是爽哉!
所以,configEmail.py應運而生。
```
# -*- coding: utf-8 -*-
import os
import smtplib
from email.mine.multipart import MIMEMultipart
from email.mime.text import MIMEText
from datetime import datetime
import threading
import readconfig
from interfaceTest import readConfig
from interfaceTest.common.Log import MyLog
import zipfile
import glob
localReadConfig = readConfig.ReadConfig()
class Email:
def __init__(self):
global host, user, password, port, sender, title, content
host = localReadConfig.get_email("mail_host")
user = localReadConfig.get_email("mail_user")
password = localReadConfig.get_email("mail_pass")
port = localReadConfig.get_email("mail_port")
sender = localReadConfig.get_email("sender")
title = localReadConfig.get_email("subject")
content = localReadConfig.get_email("content")
self.value = localReadConfig.get_email("receiver")
self.receive = []
# get receive list
for n in str(self.value).split("/"):
self.receive.append(n)
# defined email subject
date = datetime.now().strftime("%Y-%m-%d %H:%M:%S")
self.subject = title + " " + date
self.log = MyLog.get_log()
self.logger = self.log.get_logger()
self.msg = MIMEMultipart('mixed')
def config_header(self):
self.msg['subject'] = self.subject
self.msg['from'] = sender
self.msg['to'] = ";".join(self.receive)
def config_content(self):
content_plain = MIMEText(content, 'plain', 'utf-8')
self.msg.attach(content_plain)
def config_file(self):
# if the file content is not null, then config the email file
if self.check_file():
reportpath = self.log.get_result_path()
zippath = os.path.join(readConfig.proDir, "result", "test.zip")
# zip file
files = glob.glob(reportpath + '\*')
f = zipfile.ZipFile(zippath, 'w', zipfile.ZIP_DEFLATED)
for file in files:
f.write(file)
f.close()
reportfile = open(zippath, 'rb').read()
filehtml = MIMEText(reportfile, 'base64', 'utf-8')
filehtml['Content-Type'] = 'application/octet-stream'
filehtml['Content-Disposition'] = 'attachment; filename="test.zip"'
self.msg.attach(filehtml)
def check_file(self):
reportpath = self.log.get_report_path()
if os.path.isfile(reportpath) and not os.stat(reportpath) == 0:
return True
else:
return False
def send_email(self):
self.config_header()
self.config_content()
self.config_file()
try:
smtp = smtplib.SMTP()
smtp.connect(host)
smtp.login(user, password)
smtp.sendmail(sender, self.receive, self.msg.as_string())
smtp.quit()
self.logger.info("The test report has send to developer by email")
except Exception as ex:
self.logger.error(str(ex))
class MyEmail:
email = None
mutex = threading.Lock()
def __init__(self):
pass
@staticmethod
def get_email():
if MyEmail.email is None:
MyEmail.mutex.acquire()
MyEmail.email = Email()
MyEmail.mutex.release()
return MyEmail.email
if __name__ == "__main__":
email = MyEmail.get_email()
```
關于python對email的操作,上面代碼看不太明白的朋友,請移步這里繼續學習:[https://my.oschina.net/u/3041656/blog/819937](https://my.oschina.net/u/3041656/blog/819937)
<br />
離成功不遠了,簡單說明下HTMLTestRunner.py文件。
runAll.py這是我們整個框架運行的入口,上面內容完成后,這是最后一步啦,寫完它,我們的框架就算是完成了。
```
# -*- coding: utf-8 -*-
import unittest
import os
from interfaceTest import readConfig
from interfaceTest.common import HTMLTestRunner
from interfaceTest.common.common import logger
def set_case_list(self):
fb = open(self.caseListFile)
for value in fb.readlines():
data = str(value)
if data != '' and not data.startswith("#"):
self.caseListFile.append(data.replace("\n", ""))
fb.close()
def set_case_suite(self):
self.set_case_list()
test_suite = unittest.TestSuite()
suite_model = []
for case in self.caseList:
case_file = os.path.join(readConfig.proDir, "testCase")
print(case_file)
case_name = case.split("/")[-1]
print(case_name + ".py")
discover = unittest.defaultTestLoader.discover(case_file, pattern=case_name + '.py', top_level_dir=None)
suite_model.append(discover)
if len(suite_model) > 0:
for suite in suite_model:
for test_name in suite:
test_suite.addTest(test_name)
else:
return None
return test_suite
def on_off(args):
pass
def run(self):
try:
suit = self.set_case_suite()
if suit is not None:
logger.info("*********TEST START*********")
fp = open(resultPath, 'wb')
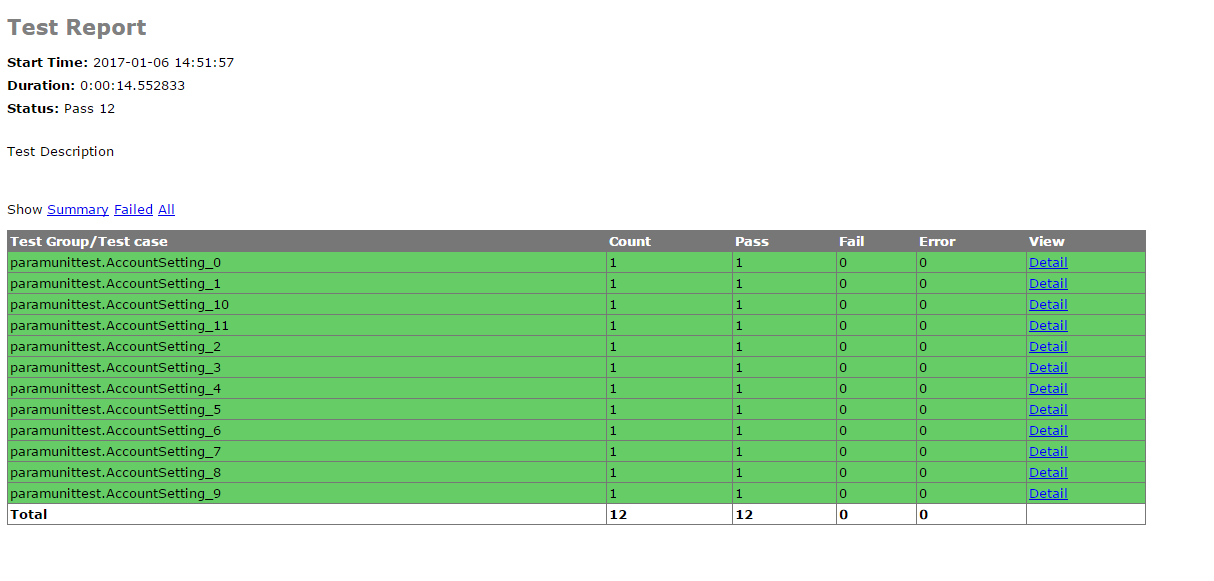
runner = HTMLTestRunner.HTMLTestRunner(stream=fp, title='Test Report', description='Test Description')
runner.run(suit)
else:
logger.info("Have no case to test.")
except Exception as ex:
logger.error(str(ex))
finally:
logger.info("*********TEST END**********")
# send test report by email
if int(on_off) == 0:
self.email.send_email()
elif int(on_off) == 1:
logger.info("Doesn't send report email to developer.")
else:
logger.info("Unknow state.")
```
上面我貼出了runAll里面的主要部分,首先我們要從caselist.txt文件中讀取需要執行的case名稱,然后將他們添加到python自帶的unittest測試集中,最后執行run()函數,執行測試集。
<br />
終于呢,整個接口自動化框架已經講完了。之前的之前貼出的目錄結構中的文件還有沒說到的。
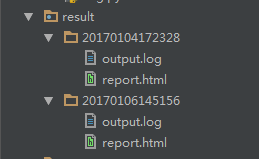
result文件夾會在首次執行case時生成,并且以后的測試結果都會被保存在該文件夾下,同時每次測試的文件夾都是用系統時間命名,里面包含了兩個文件,log文件和測試報告。
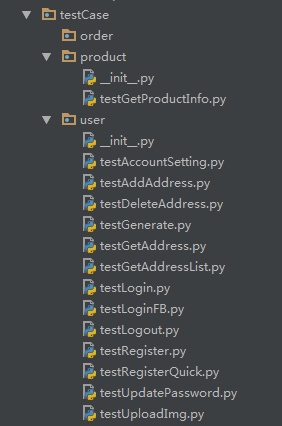
testCase文件夾下,存放我們寫的具體的測試case啦,上面這些就是小編寫的一些。注意嘍,所有的case名稱都要以test開頭來命名哦,這是因為,unittest在進行測試時會自動匹配testCase文件夾下面所有test開頭的.py文件。
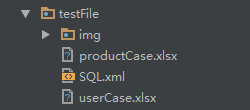
testFile文件夾下,放置我們測試時用來管理測試用例的excel文件和用于數據庫查詢的sql語句的xml文件哦。
最后就是caselist.txt文件了,就讓你們瞄一眼吧:

凡是沒有被注釋掉的,都是要被執行的case名稱啦。在這里寫上你要執行的case名稱就可以啦。
- Linux
- Linux 文件權限概念
- 重點總結
- Linux 文件與目錄管理
- 2.1 文件與目錄管理
- 2.2 文件內容查閱
- 文件與文件系統的壓縮,打包與備份
- 3.1 Linux 系統常見的壓縮指令
- 3.2 打包指令: tar
- vi/vim 程序編輯器
- 4.1 vi 的使用
- 4.2 vim編輯器刪除一行或者多行內容
- 進程管理
- 5.1 常用命令使用技巧
- 5.2 進程管理
- 系統服務 (daemons)
- 6.1 通過 systemctl 管理服務
- Linux 系統目錄結構
- Linux yum命令
- linux系統查看、修改、更新系統時間(自動同步網絡時間)
- top linux下的任務管理器
- Linux基本配置
- CentOS7開啟防火墻
- CentOS 使用yum安裝 pip
- strace 命令
- Linux下設置固定IP地址
- 查看Linux磁盤及內存占用情況
- Mysql
- 關系數據庫概述
- 數據庫技術
- 數據庫基礎語句
- 查詢語句(--重點--)
- 約束
- 嵌套查詢(子查詢)
- 表emp
- MySQL數據庫練習
- 01.MySQL數據庫練習數據
- 02.MySQL數據庫練習題目
- 03.MySQL數據庫練習-答案
- Mysql遠程連接數據庫
- Python
- python基礎
- Python3中字符串、列表、數組的轉換方法
- python字符串
- python安裝、pip基本用法、變量、輸入輸出、流程控制、循環
- 運算符及優先級、數據類型及常用操作、深淺拷貝
- 虛擬環境(virtualenv)
- 網絡編程
- TCP/IP簡介
- TCP編程
- UDP編程
- 進程和線程
- 訪問數據庫
- 使用SQLite
- 使用MySQL
- Web開發
- HTML簡介
- Python之日志處理(logging模塊)
- 函數式編程
- 高階函數
- python報錯解決
- 啟動Python時報“ImportError: No module named site”錯誤
- python實例
- 01- 用python解決數學題
- 02- 冒泡排序
- 03- 郵件發送(smtplib)
- Django
- 01 Web應用
- Django3.2 教程
- Django簡介
- Django環境安裝
- 第一個Django應用
- Part 1:請求與響應
- Part 2:模型與后臺
- Part 3:視圖和模板
- Part 4:表單和類視圖
- Part 5:測試
- Part 6:靜態文件
- Part 7:自定義admin
- 第一章:模型層
- 實戰一:基于Django3.2可重用登錄與注冊系統
- 1. 搭建項目環境
- 2. 設計數據模型
- 3. admin后臺
- 4. url路由和視圖
- 5. 前端頁面設計
- 6. 登錄視圖
- 7. Django表單
- 8. 圖片驗證碼
- 9. session會話
- 10. 注冊視圖
- 實戰二:Django3.2之CMDB資產管理系統
- 1.項目需求分析
- 2.模型設計
- 3.數據收集客戶端
- 4.收集Windows數據
- 5.Linux下收集數據
- 6.新資產待審批區
- 7.審批新資產
- django 快速搭建blog
- imooc-Django全棧項目開發實戰
- redis
- 1.1 Redis簡介
- 1.2 安裝
- 1.3 配置
- 1.4 服務端和客戶端命令
- 1.5 Redis命令
- 1.5.1 Redis命令
- 1.5.2 鍵(Key)
- 1.5.3 字符串(string)
- 1.5.4 哈希(Hash)
- 1.5.5 列表(list)
- 1.5.6 集合(set)
- 1.5.7 有序集合(sorted set)
- Windows
- Win10安裝Ubuntu子系統
- win10遠程桌面身份驗證錯誤,要求的函數不受支持
- hm軟件測試
- 02 linux基本命令
- Linux終端命令格式
- Linux基本命令(一)
- Linux基本命令(二)
- 02 數據庫
- 數據庫簡介
- 基本概念
- Navicat使用
- SQL語言
- 高級
- 03 深入了解軟件測試
- day01
- 04 python基礎
- 語言基礎
- 程序中的變量
- 程序的輸出
- 程序中的運算符
- 數據類型基礎
- 數據序列
- 數據類型分類
- 字符串
- 列表
- 元組
- 字典
- 列表與元組的區別詳解
- 函數
- 案例綜合應用
- 列表推導式
- 名片管理系統
- 文件操作
- 面向對象基礎(一)
- 面向對象基礎(二)
- 異常、模塊
- 05 web自動化測試
- Day01
- Day02
- Day03
- Day04
- Day05
- Day06
- Day07
- Day08
- 06 接口自動化測試
- 軟件測試面試大全2020
- 第一章 測試理論
- 軟件測試面試
- 一、軟件基礎知識
- 二、網絡基礎知識
- 三、數據庫
- SQL學生表 — 1
- SQL學生表 — 2
- SQL查詢 — 3
- SQL經典面試題 — 4
- 四、linux
- a. linux常用命令
- 五、自動化測試
- 自動化測試
- python 筆試題
- selenium面試題
- 如何判斷一個頁面上元素是否存在?
- 如何提高腳本的穩定性?
- 如何定位動態元素?
- 如何通過子元素定位父元素?
- 如果截取某一個元素的圖片,不要截取全部圖片
- 平常遇到過哪些問題?如何解決的
- 一個元素明明定位到了,點擊無效(也沒報錯),如果解決?
- selenium中隱藏元素如何定位?(hidden、display: none)
- 六、接口測試
- 接口測試常規面試題
- 接口自動化面試題
- json和字典dict的區別?
- 測試的數據你放在哪?
- 什么是數據驅動,如何參數化?
- 下個接口請求參數依賴上個接口的返回數據
- 依賴于登錄的接口如何處理?
- 依賴第三方的接口如何處理
- 不可逆的操作,如何處理,比如刪除一個訂單這種接口如何測試
- 接口產生的垃圾數據如何清理
- 一個訂單的幾種狀態如何全部測到,如:未處理,處理中,處理失敗,處理成功
- python如何連接數據庫操作?
- 七、App測試
- 什么是activity?
- Activity生命周期?
- Android四大組件
- app測試和web測試有什么區別?
- android和ios測試區別?
- app出現ANR,是什么原因導致的?
- App出現crash原因有哪些?
- app對于不穩定偶然出現anr和crash時候你是怎么處理的?
- app的日志如何抓取?
- logcat查看日志步驟
- 你平常會看日志嗎, 一般會出現哪些異常
- 抓包工具
- fiddler
- Wireshark
- 安全/滲透測試
- 安全性測試都包含哪些內容?
- 開放性思維題
- 面試題
- 字節測試面試
- 一、計算機網絡
- 二、操作系統
- 三、數據庫
- 四、數據結構與算法
- 五、Python
- 六、Linux
- 七、測試用例
- 八、智力/場景題
- 九、開放性問題
- python3_收集100+練習題(面試題)
- python3_100道題目答案
- 接口測試
- 接口測試實例_01
- python+requests接口自動化測試框架實例詳解
- 性能測試
- 性能測試流程
- 性能測試面試題
- 如何編寫性能測試場景用例
- 性能測試:TPS和QPS的區別
- jmeter
- jmeter安裝配置教程
- Jmeter性能測試 入門
- PyCharm
- 快捷工具
- 1-MeterSphere
- 一、安裝和升級
- 2- MobaXterm 教程
- 3-fiddler抓包
- 4-Xshell
- Xshell的安裝和使用
- Xshell遠程連接失敗怎么解決
- 5-Vmware
- Vmware提示以獨占方式鎖定此配置文件失敗
- Windows10徹底卸載VMWare虛擬機步驟
- VM ware無法關機,虛擬機繁忙
- VMware虛擬機下載與安裝
- 解決VM 與 Device/Credential Guard 不兼容。在禁用 Device/Credential Guard 后,可以運行 VM 的方法
- VMware虛擬機鏡像克隆與導入
- 6-WPS
- 1.WPS文檔里的批注怎么刪除
- 2.wps表格中設置圖表的坐標
- 3. wps快速繪制數學交集圖
- 7-MongoDB
- Win10安裝配置MongoDB
- Navicat 15.x for MongoDB安裝破解教程
- Apache
- apache層的賬戶權限控制,以及apache黑名單白名單過濾功能
- HTTP / HTTPS協議
- HTTP協議詳解
- 代理
- 狀態碼詳解
- HTTPS詳解
- Selenium3+python3
- (A) selenium
- selenium自動化環境搭建(Windows10)
- 火狐firebug和firepath插件安裝方法(最新)
- 元素定位工具和方法
- Selenium3+python3自動化
- 新手學習selenium路線圖---學前篇
- 1-操作瀏覽器基本方法
- 2-八種元素定位方法
- 3-CSS定位語法
- 4-登錄案例
- 5-定位一組元素find_elements
- 6-操作元素(鍵盤和鼠標事件)
- 7-多窗口、句柄(handle)
- 8-iframe
- 9-select下拉框
- 10-alert\confirm\prompt
- 11-JS處理滾動條
- 12-單選框和復選框(radiobox、checkbox)
- 13-js處理日歷控件(修改readonly屬性)
- 14-js處理內嵌div滾動條
- 15-table定位
- 16-js處理多窗口
- 17-文件上傳(send_keys)
- 18-獲取百度輸入聯想詞
- 19-處理瀏覽器彈窗
- 20-獲取元素屬性
- 21-判斷元素存在
- 22-爬頁面源碼(page_source)
- 23-顯式等待(WebDriverWait)
- 24-關于面試的題
- 25-cookie相關操作
- 26-判斷元素(expected_conditions)
- 27-判斷title(title_is)
- 28-元素定位參數化(find_element)
- 29-18種定位方法(find_elements)
- 30- js解決click失效問題
- 31- 判斷彈出框存在(alert_is_present)
- 32- 登錄方法(參數化)
- 33- 判斷文本(text_to_be_present_in_element)
- 34- unittest簡介
- 35- unittest執行順序
- 36- unittest之裝飾器(@classmethod)
- 37- unittest之斷言(assert)
- 38- 捕獲異常(NoSuchElementException)
- 39- 讀取Excel數據(xlrd)
- 40- 數據驅動(ddt)
- 41- 異常后截圖(screenshot)
- 42- jenkins持續集成環境搭建
- 43- Pycharm上python和unittest兩種運行方式
- 44- 定位的坑:class屬性有空格
- 45- 只截某個元素的圖
- 46- unittest多線程執行用例
- 47- unittest多線程生成報告(BeautifulReport)
- 48- 多線程啟動多個不同瀏覽器
- (B) python3+selenium3實現web UI功能自動化測試框架
- (C) selenium3常見報錯處理
- 書籍
- (D)Selenium3自動化測試實戰--基于Python語
- 第4章 WebDriver API
- 4.1 從定位元素開始
- 4.2 控制瀏覽器
- 4.3 WebDriver 中的常用方法
- 4.4 鼠標操作
- 4.5 鍵盤操作
- 4.6 獲得驗證信息
- 4.7 設置元素等待
- 4.8 定位一組元素
- 4.9 多表單切換
- 4.10 多窗口切換
- 4.11 警告框處理
- 4.12 下拉框處理
- 4.13 上傳文件
- 4.14 下載文件
- 4.15 操作cookie
- 4.16 調用JavaScript
- 4.17 處理HTML5視頻播放
- 4.18 滑動解鎖
- 4.19 窗口截圖
- 第5章 自動化測試模型
- 5.3 模塊化與參數化
- 5.4 讀取數據文件
- 第6章 unittest單元測試框架
- 6.1 認識unittest