
[TOC]
>PS:個人筆記,僅供參考,需要深入了解請閱讀參考資料。以下幾個章節都是從《Vue 技術揭秘》copy 一部分下來的,以后有空會附上自己的理解。
# 參考資料
[https://ustbhuangyi.github.io/vue-analysis/prepare/directory.html#sfc](https://ustbhuangyi.github.io/vue-analysis/prepare/directory.html#sfc)
# 源碼目錄設計
Vue.js 的源碼都在 src 目錄下,其目錄結構如下。
```shell
src
├── compiler # 編譯相關
├── core # 核心代碼
├── platforms # 不同平臺的支持
├── server # 服務端渲染
├── sfc # .vue 文件解析
├── shared # 共享代碼
```
## compiler
compiler 目錄包含 Vue.js 所有編譯相關的代碼。它包括把模板解析成 ast 語法樹,ast 語法樹優化,代碼生成等功能。
編譯的工作可以在構建時做(借助 webpack、vue-loader 等輔助插件);也可以在運行時做,使用包含構建功能的 Vue.js。顯然,編譯是一項耗性能的工作,所以更推薦前者——離線編譯。
## core
core 目錄包含了 Vue.js 的核心代碼,包括內置組件、全局 API 封裝,Vue 實例化、觀察者、虛擬 DOM、工具函數等等。
這里的代碼可謂是 Vue.js 的靈魂,也是我們之后需要重點分析的地方。
## platform
Vue.js 是一個跨平臺的 MVVM 框架,它可以跑在 web 上,也可以配合 weex 跑在 native 客戶端上。platform 是 Vue.js 的入口,2 個目錄代表 2 個主要入口,分別打包成運行在 web 上和 weex 上的 Vue.js。
## server
Vue.js 2.0 支持了服務端渲染,所有服務端渲染相關的邏輯都在這個目錄下。注意:這部分代碼是跑在服務端的 Node.js,不要和跑在瀏覽器端的 Vue.js 混為一談。
服務端渲染主要的工作是把組件渲染為服務器端的 HTML 字符串,將它們直接發送到瀏覽器,最后將靜態標記"混合"為客戶端上完全交互的應用程序。
## sfc
通常我們開發 Vue.js 都會借助 webpack 構建, 然后通過 .vue 單文件來編寫組件。
這個目錄下的代碼邏輯會把 .vue 文件內容解析成一個 JavaScript 的對象。
## shared
Vue.js 會定義一些工具方法,這里定義的工具方法都是會被瀏覽器端的 Vue.js 和服務端的 Vue.js 所共享的。
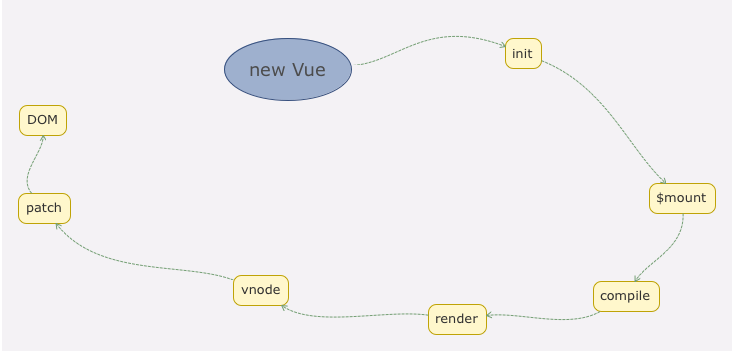
# new Vue 發生了什么
## Vue 的定義
在`src/core/instance/index.js`中可以看到 Vue 實際上就是一個用 Function 實現的類,我們只能通過`new Vue`去實例化它:
```js
import { initMixin } from './init'
import { stateMixin } from './state'
import { renderMixin } from './render'
import { eventsMixin } from './events'
import { lifecycleMixin } from './lifecycle'
import { warn } from '../util/index'
function Vue (options) {
if (process.env.NODE_ENV !== 'production' &&
!(this instanceof Vue)
) {
warn('Vue is a constructor and should be called with the `new` keyword')
}
this._init(options)
}
initMixin(Vue)
stateMixin(Vue)
eventsMixin(Vue)
lifecycleMixin(Vue)
renderMixin(Vue)
export default Vue
```
可以看到 Vue 實例的初始化會調用`this._init`方法,該方法定義在`src/core/instance/init.js`中:
```js
Vue.prototype._init = function (options?: Object) {
const vm: Component = this
// a uid
vm._uid = uid++
let startTag, endTag
/* istanbul ignore if */
if (process.env.NODE_ENV !== 'production' && config.performance && mark) {
startTag = `vue-perf-start:${vm._uid}`
endTag = `vue-perf-end:${vm._uid}`
mark(startTag)
}
// a flag to avoid this being observed
vm._isVue = true
// merge options
if (options && options._isComponent) {
// optimize internal component instantiation
// since dynamic options merging is pretty slow, and none of the
// internal component options needs special treatment.
initInternalComponent(vm, options)
} else {
vm.$options = mergeOptions(
resolveConstructorOptions(vm.constructor),
options || {},
vm
)
}
/* istanbul ignore else */
if (process.env.NODE_ENV !== 'production') {
initProxy(vm)
} else {
vm._renderProxy = vm
}
// expose real self
vm._self = vm
initLifecycle(vm)
initEvents(vm)
initRender(vm)
callHook(vm, 'beforeCreate')
initInjections(vm) // resolve injections before data/props
initState(vm)
initProvide(vm) // resolve provide after data/props
callHook(vm, 'created')
/* istanbul ignore if */
if (process.env.NODE_ENV !== 'production' && config.performance && mark) {
vm._name = formatComponentName(vm, false)
mark(endTag)
measure(`vue ${vm._name} init`, startTag, endTag)
}
// 初始化的最后,如果檢測到有 el 屬性,就調用 vm.$mount 方法掛載 vm,掛載的目標
// 就是把模板渲染成最終的 DOM
if (vm.$options.el) {
vm.$mount(vm.$options.el)
}
}
```
Vue 初始化主要就干了幾件事情,合并配置,初始化生命周期,初始化事件中心,初始化渲染,初始化 data、props、computed、watcher 等等。
## Vue 實例掛載的實現
Vue 中我們是通過`$mount`實例方法去掛載`vm`的,`$mount`方法在多個文件中都有定義,如`src/platform/web/entry-runtime-with-compiler.js`、`src/platform/web/runtime/index.js`、`src/platform/weex/runtime/index.js`。因為`$mount`這個方法的實現是和平臺、構建方式都相關的。下面只分析帶`compiler`版本的`$mount`實現,因為拋開 webpack 的 vue-loader,我們在純前端瀏覽器環境分析 Vue 的工作原理,有助于我們對原理理解的深入。
`compiler`版本的`$mount`定義在`src/platform/web/entry-runtime-with-compiler.js`:
```js
const mount = Vue.prototype.$mount // 緩存原型上的 $mount 方法
Vue.prototype.$mount = function ( // 重新定義原型上的 $mount 方法
el?: string | Element, // el 表示掛載的元素
hydrating?: boolean // 第二個參數和服務端渲染相關,瀏覽器環境下不需要
): Component {
el = el && query(el)
/* istanbul ignore if */
// 限制 el,不能掛載在 body、html 這樣的根節點上
if (el === document.body || el === document.documentElement) {
process.env.NODE_ENV !== 'production' && warn(
`Do not mount Vue to <html> or <body> - mount to normal elements instead.`
)
return this
}
const options = this.$options
// resolve template/el and convert to render function
// 如果沒有定義 render 方法,則把 template 或 el 轉換成 render 方法
if (!options.render) {
let template = options.template
if (template) {
if (typeof template === 'string') {
if (template.charAt(0) === '#') {
template = idToTemplate(template)
/* istanbul ignore if */
if (process.env.NODE_ENV !== 'production' && !template) {
warn(
`Template element not found or is empty: ${options.template}`,
this
)
}
}
} else if (template.nodeType) {
template = template.innerHTML
} else {
if (process.env.NODE_ENV !== 'production') {
warn('invalid template option:' + template, this)
}
return this
}
} else if (el) {
template = getOuterHTML(el)
}
if (template) {
/* istanbul ignore if */
if (process.env.NODE_ENV !== 'production' && config.performance && mark) {
mark('compile')
}
// 通過 compileToFunctions 轉換為 render 方法,所有 Vue 組件的渲染都需要 render 方法
const { render, staticRenderFns } = compileToFunctions(template, {
shouldDecodeNewlines,
shouldDecodeNewlinesForHref,
delimiters: options.delimiters,
comments: options.comments
}, this)
options.render = render
options.staticRenderFns = staticRenderFns
/* istanbul ignore if */
if (process.env.NODE_ENV !== 'production' && config.performance && mark) {
mark('compile end')
measure(`vue ${this._name} compile`, 'compile', 'compile end')
}
}
}
return mount.call(this, el, hydrating) // 最后,調用原先的原型上的 mount 方法
}
```
`$mount`方法實際上會去調用`mountComponent`方法,這個方法定義在`src/core/instance/lifecycle.js`文件中:
```js
export function mountComponent (
vm: Component,
el: ?Element,
hydrating?: boolean
): Component {
vm.$el = el
if (!vm.$options.render) {
vm.$options.render = createEmptyVNode
if (process.env.NODE_ENV !== 'production') {
/* istanbul ignore if */
if ((vm.$options.template && vm.$options.template.charAt(0) !== '#') ||
vm.$options.el || el) {
warn(
'You are using the runtime-only build of Vue where the template ' +
'compiler is not available. Either pre-compile the templates into ' +
'render functions, or use the compiler-included build.',
vm
)
} else {
warn(
'Failed to mount component: template or render function not defined.',
vm
)
}
}
}
callHook(vm, 'beforeMount')
let updateComponent
/* istanbul ignore if */
if (process.env.NODE_ENV !== 'production' && config.performance && mark) {
updateComponent = () => {
const name = vm._name
const id = vm._uid
const startTag = `vue-perf-start:${id}`
const endTag = `vue-perf-end:${id}`
mark(startTag)
const vnode = vm._render()
mark(endTag)
measure(`vue ${name} render`, startTag, endTag)
mark(startTag)
vm._update(vnode, hydrating)
mark(endTag)
measure(`vue ${name} patch`, startTag, endTag)
}
} else {
updateComponent = () => {
vm._update(vm._render(), hydrating)
}
}
// we set this to vm._watcher inside the watcher's constructor
// since the watcher's initial patch may call $forceUpdate (e.g. inside child
// component's mounted hook), which relies on vm._watcher being already defined
// 實例化一個渲染 Watcher,在其回調函數中調用 updateComponent 方法
// 在此方法中調用 vm._render 方法先生成虛擬 Node,最終調用 vm._update 更新 DOM。
new Watcher(vm, updateComponent, noop, {
before () {
if (vm._isMounted) {
callHook(vm, 'beforeUpdate')
}
}
}, true /* isRenderWatcher */)
hydrating = false
// manually mounted instance, call mounted on self
// mounted is called for render-created child components in its inserted hook
if (vm.$vnode == null) {
vm._isMounted = true // 表示該實例已掛載
callHook(vm, 'mounted') // 執行 mounted 鉤子函數
}
return vm
}
```
這里可以回顧下 Vue 對其生命周期鉤子的描述:
`beforeCreate`(創建前) 在實例初始化之后,數據觀測 (data observer) 和event/watcher 事件配置之前被調用。從下面截取的 vue 源碼可以看到`beforeCreate`調用的時候,是獲取不到 props 或者 data 中的數據的,因為這些數據的初始化都在`initState`中:
```js
Vue.prototype._init = function(options) {
initLifecycle(vm)
initEvents(vm)
initRender(vm)
callHook(vm, 'beforeCreate') // 拿不到 props data
initInjections(vm)
initState(vm)
initProvide(vm)
callHook(vm, 'created')
}
```
`created`(創建后) 在實例創建完成后被立即調用。在這一步,實例已完成以下的配置:數據觀測 (data observer),屬性和方法的運算,watch/event 事件回調。然而,掛載階段還沒開始,`$el`屬性目前不可見。
然后就到了這里的`beforemounted`和`mounted`了:
`beforeMount`(載入前) 在掛載開始之前被調用,相關的 render 函數首次被調用。實例已完成以下的配置:編譯模板,把 data 里面的數據和模板生成 html。注意此時還沒有掛載 html 到頁面上。
`mounted`(載入后) 在 el 被新創建的 vm.$el 替換,并掛載到實例上去之后調用。實例已完成以下的配置:用上面編譯好的 html 內容替換 el 屬性指向的 DOM 對象。完成模板中的 html 渲染到 html 頁面中。
## render
上面有說到`mountComponent`方法會完成整個渲染工作,其最核心的 2 個方法是`vm._render`和`vm._update`。
Vue 的`_render`方法是實例的一個私有方法,它用來把實例渲染成一個虛擬 Node。它的定義在`src/core/instance/render.js`文件中:
```js
Vue.prototype._render = function (): VNode {
const vm: Component = this
const { render, _parentVnode } = vm.$options
// reset _rendered flag on slots for duplicate slot check
if (process.env.NODE_ENV !== 'production') {
for (const key in vm.$slots) {
// $flow-disable-line
vm.$slots[key]._rendered = false
}
}
if (_parentVnode) {
vm.$scopedSlots = _parentVnode.data.scopedSlots || emptyObject
}
// set parent vnode. this allows render functions to have access
// to the data on the placeholder node.
vm.$vnode = _parentVnode
// render self
let vnode
try {
vnode = render.call(vm._renderProxy, vm.$createElement)
} catch (e) {
handleError(e, vm, `render`)
// return error render result,
// or previous vnode to prevent render error causing blank component
/* istanbul ignore else */
if (process.env.NODE_ENV !== 'production') {
if (vm.$options.renderError) {
try {
vnode = vm.$options.renderError.call(vm._renderProxy, vm.$createElement, e)
} catch (e) {
handleError(e, vm, `renderError`)
vnode = vm._vnode
}
} else {
vnode = vm._vnode
}
} else {
vnode = vm._vnode
}
}
// return empty vnode in case the render function errored out
if (!(vnode instanceof VNode)) {
if (process.env.NODE_ENV !== 'production' && Array.isArray(vnode)) {
warn(
'Multiple root nodes returned from render function. Render function ' +
'should return a single root node.',
vm
)
}
vnode = createEmptyVNode()
}
// set parent
vnode.parent = _parentVnode
return vnode
}
```
這里調用了`render`方法,我們在平時的開發工作中手寫`render`方法的場景比較少,而寫的比較多的是`template`模板,在之前的`mounted`方法的實現中,會把`template`編譯成`render`方法,但這個編譯過程是非常復雜的。
在 Vue 的官方文檔中介紹了`render`函數的第一個參數是`createElement`,那么結合之前的例子:
```html
<div id="app">
{{ message }}
</div>
```
相當于我們編寫如下`render`函數:
```js
render: function (createElement) {
return createElement('div', {
attrs: {
id: 'app'
},
}, this.message)
}
```
`vm._render`最終是通過執行`createElement`方法并返回的是`vnode`,它是一個虛擬 Node。因此在分析`createElement`的實現前,我們先了解一下 Virtual DOM 的概念。
## Virtual DOM
Virtual DOM 就是用一個原生的 JS 對象去描述一個 DOM 節點,所以它比創建一個 DOM 的代價要小很多。在 Vue.js 中,Virtual DOM 是用`VNode`這么一個 Class 去描述,它是定義在`src/core/vdom/vnode.js`中的。
```js
export default class VNode {
tag: string | void;
data: VNodeData | void;
children: ?Array<VNode>;
text: string | void;
elm: Node | void;
ns: string | void;
context: Component | void; // rendered in this component's scope
key: string | number | void;
componentOptions: VNodeComponentOptions | void;
componentInstance: Component | void; // component instance
parent: VNode | void; // component placeholder node
// strictly internal
raw: boolean; // contains raw HTML? (server only)
isStatic: boolean; // hoisted static node
isRootInsert: boolean; // necessary for enter transition check
isComment: boolean; // empty comment placeholder?
isCloned: boolean; // is a cloned node?
isOnce: boolean; // is a v-once node?
asyncFactory: Function | void; // async component factory function
asyncMeta: Object | void;
isAsyncPlaceholder: boolean;
ssrContext: Object | void;
fnContext: Component | void; // real context vm for functional nodes
fnOptions: ?ComponentOptions; // for SSR caching
fnScopeId: ?string; // functional scope id support
constructor (
tag?: string,
data?: VNodeData,
children?: ?Array<VNode>,
text?: string,
elm?: Node,
context?: Component,
componentOptions?: VNodeComponentOptions,
asyncFactory?: Function
) {
this.tag = tag
this.data = data
this.children = children
this.text = text
this.elm = elm
this.ns = undefined
this.context = context
this.fnContext = undefined
this.fnOptions = undefined
this.fnScopeId = undefined
this.key = data && data.key
this.componentOptions = componentOptions
this.componentInstance = undefined
this.parent = undefined
this.raw = false
this.isStatic = false
this.isRootInsert = true
this.isComment = false
this.isCloned = false
this.isOnce = false
this.asyncFactory = asyncFactory
this.asyncMeta = undefined
this.isAsyncPlaceholder = false
}
// DEPRECATED: alias for componentInstance for backwards compat.
/* istanbul ignore next */
get child (): Component | void {
return this.componentInstance
}
}
```
其實 VNode 是對真實 DOM 的一種抽象描述,它的核心定義無非就幾個關鍵屬性,標簽名、數據、子節點、鍵值等,其它屬性都是都是用來擴展 VNode 的靈活性以及實現一些特殊 feature 的。由于 VNode 只是用來映射到真實 DOM 的渲染,不需要包含操作 DOM 的方法,因此它是非常輕量和簡單的。
Virtual DOM 除了它的數據結構的定義,映射到真實的 DOM 實際上要經歷 VNode 的 create、diff、patch 等過程。那么在 Vue.js 中,VNode 的 create 是通過之前提到的`createElement`方法創建的。
## createElement
Vue.js 利用 createElement 方法創建 VNode,它定義在`src/core/vdom/create-elemenet.js`中。其過程比較復雜,簡單來說每個 VNode 有`children`,`children`每個元素也是一個 VNode,這樣就形成了一個 VNode Tree,它很好的描述了我們的 DOM Tree。
回到`mountComponent`函數的過程,我們已經知道`vm._render`是如何創建了一個 VNode,接下來就是要把這個 VNode 渲染成一個真實的 DOM 并渲染出來,這個過程是通過`vm._update`完成的。
## update
Vue 的`_update`是實例的一個私有方法,它被調用的時機有 2 個,一個是首次渲染,一個是數據更新的時候,這里僅看其首次渲染時發揮的作用。`_update`方法的作用是把 VNode 渲染成真實的 DOM,它的定義在`src/core/instance/lifecycle.js`中。
```js
Vue.prototype._update = function (vnode: VNode, hydrating?: boolean) {
const vm: Component = this
const prevEl = vm.$el
const prevVnode = vm._vnode
const prevActiveInstance = activeInstance
activeInstance = vm
vm._vnode = vnode
// Vue.prototype.__patch__ is injected in entry points
// based on the rendering backend used.
if (!prevVnode) {
// initial render
vm.$el = vm.__patch__(vm.$el, vnode, hydrating, false /* removeOnly */)
} else {
// updates
vm.$el = vm.__patch__(prevVnode, vnode)
}
activeInstance = prevActiveInstance
// update __vue__ reference
if (prevEl) {
prevEl.__vue__ = null
}
if (vm.$el) {
vm.$el.__vue__ = vm
}
// if parent is an HOC, update its $el as well
if (vm.$vnode && vm.$parent && vm.$vnode === vm.$parent._vnode) {
vm.$parent.$el = vm.$el
}
// updated hook is called by the scheduler to ensure that children are
// updated in a parent's updated hook.
}
```
`_update`的核心就是調用`vm.__patch__`方法,實例化一個組件的時候,其整個過程就是遍歷 VNode Tree 遞歸創建了一個完整的 DOM 樹并插入到 Body 上。
- 序言 & 更新日志
- H5
- Canvas
- 序言
- Part1-直線、矩形、多邊形
- Part2-曲線圖形
- Part3-線條操作
- Part4-文本操作
- Part5-圖像操作
- Part6-變形操作
- Part7-像素操作
- Part8-漸變與陰影
- Part9-路徑與狀態
- Part10-物理動畫
- Part11-邊界檢測
- Part12-碰撞檢測
- Part13-用戶交互
- Part14-高級動畫
- CSS
- SCSS
- codePen
- 速查表
- 面試題
- 《CSS Secrets》
- SVG
- 移動端適配
- 濾鏡(filter)的使用
- JS
- 基礎概念
- 作用域、作用域鏈、閉包
- this
- 原型與繼承
- 數組、字符串、Map、Set方法整理
- 垃圾回收機制
- DOM
- BOM
- 事件循環
- 嚴格模式
- 正則表達式
- ES6部分
- 設計模式
- AJAX
- 模塊化
- 讀冴羽博客筆記
- 第一部分總結-深入JS系列
- 第二部分總結-專題系列
- 第三部分總結-ES6系列
- 網絡請求中的數據類型
- 事件
- 表單
- 函數式編程
- Tips
- JS-Coding
- Framework
- Vue
- 書寫規范
- 基礎
- vue-router & vuex
- 深入淺出 Vue
- 響應式原理及其他
- new Vue 發生了什么
- 組件化
- 編譯流程
- Vue Router
- Vuex
- 前端路由的簡單實現
- React
- 基礎
- 書寫規范
- Redux & react-router
- immutable.js
- CSS 管理
- React 16新特性-Fiber 與 Hook
- 《深入淺出React和Redux》筆記
- 前半部分
- 后半部分
- react-transition-group
- Vue 與 React 的對比
- 工程化與架構
- Hybird
- React Native
- 新手上路
- 內置組件
- 常用插件
- 問題記錄
- Echarts
- 基礎
- Electron
- 序言
- 配置 Electron 開發環境 & 基礎概念
- React + TypeScript 仿 Antd
- TypeScript 基礎
- React + ts
- 樣式設計
- 組件測試
- 圖標解決方案
- Storybook 的使用
- Input 組件
- 在線 mock server
- 打包與發布
- Algorithm
- 排序算法及常見問題
- 劍指 offer
- 動態規劃
- DataStruct
- 概述
- 樹
- 鏈表
- Network
- Performance
- Webpack
- PWA
- Browser
- Safety
- 微信小程序
- mpvue 課程實戰記錄
- 服務器
- 操作系統基礎知識
- Linux
- Nginx
- redis
- node.js
- 基礎及原生模塊
- express框架
- node.js操作數據庫
- 《深入淺出 node.js》筆記
- 前半部分
- 后半部分
- 數據庫
- SQL
- 面試題收集
- 智力題
- 面試題精選1
- 面試題精選2
- 問答篇
- 2025面試題收集
- Other
- markdown 書寫
- Git
- LaTex 常用命令
- Bugs