
>[success] # 多頁面打包
~~~
1.當我們想使用多頁面打包去構建項目的時候,最笨的方法就是去配置每個多頁面的'HtmlWebpackPlugin',
這里有個思維我總是繞不過去,在這里記錄一下,首先webpack 啥都不配置只能解析,'js' 和'json',打包后
生成的也是'js',他不會給你構建'html',想讓他構建html 就需要用到'HtmlWebpackPlugin',在'webpack'里面
配置的'entry'識別的入口也是識別的js文件
2.entry將這個入口文件的項目依賴的文件打成'js',想讓'HtmlWebpackPlugin'生成的html 和這些入口打包生成
的js匹配上,就需要設置'HtmlWebpackPlugin'里面的chunk然他們一致
~~~
>[info] ## 多頁面打包
~~~
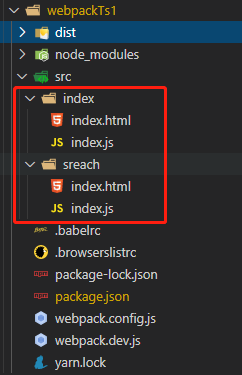
說明:如圖項目結構目錄'HtmlWebpackPlugin' 需要指定作為html的模板,我們將目錄結構一個文件夾存儲
多頁的html模板,打包的入口文件
1.初級開發程序員愛寫的方式就是堆積代碼。多頁面寫出的效果如下,有多少多頁面就手動寫多少個HtmlWebpackPlugin :
const path = require('path')
const HtmlWebpackPlugin = require('html-webpack-plugin')
module.exports = {
mode: 'production',
entry: {
index: './src/index/index.js',
sreach: './src/sreach/index.js'
},
output: {
path: path.join(__dirname, 'dist'),
filename: '[name].js'
},
module: {
rules: [{
test: /\.js$/,
exclude: /node_modules/,
use: 'babel-loader'
}, {
test: /\.css$/,
use: ['style-loader', 'css-loader']
}]
},
plugins: [
new HtmlWebpackPlugin({
template: path.join(__dirname, 'src/index/index.html'), // 使用模板
filename: 'index.html', // 打包后的文件名
chunks: ['index'], // 對應html模板想要引入對應打包入口打包后的js包,這里就需要和entry key一一對應
inject: true, // 默認注入所有靜態資源
minify: {
html5: true,
collapsableWhitespace: true,
preserveLineBreaks: false,
minifyCSS: true,
minifyJS: true,
removeComments: false
}
}),
new HtmlWebpackPlugin({
template: path.join(__dirname, 'src/sreach/index.html'), // 使用模板
filename: 'sreach.html', // 對應html模板想要引入對應打包入口打包后的js包,這里就需要和entry key一一對應
chunks: ['sreach'], // 打包后需要使用的chunk(文件)
inject: true, // 默認注入所有靜態資源
minify: {
html5: true,
collapsableWhitespace: true,
preserveLineBreaks: false,
minifyCSS: true,
minifyJS: true,
removeComments: false
}
}),
]
}
~~~
* 項目結構目錄
>[danger] ##### 通過腳本的思維去寫
~~~
1.首先利用'glob.sync' 可以獲取文件目錄 -- 'npm i glob -D'
~~~
~~~
const path = require('path')
const HtmlWebpackPlugin = require('html-webpack-plugin')
/*
1.因為要配置打包入口,和'HtmlWebpackPlugin'要使用的html模板
因此創建兩個變量'entry' 和'htmlWebpackPlugins' 負責生成,
我們需要的打包配置入口和'HtmlWebpackPlugin' 使用的html模板
*/
const glob = require('glob')
const setMPA = () => {
const entry = {};
const htmlWebpackPlugins = [];
const entryFiles = glob.sync(path.join(__dirname, './src/*/index.js'));
Object.keys(entryFiles)
.map((index) => {
const entryFile = entryFiles[index]; // 獲取入口打包文件的路徑
// '/Users/cpselvis/my-project/src/index/index.js'
const match = entryFile.match(/src\/(.*)\/index\.js/); // 通過正則取出entry到時候要使用的key
const pageName = match && match[1]; // 小的細節沒有下角標1的話做一個兼容判斷
entry[pageName] = entryFile;
htmlWebpackPlugins.push(
new HtmlWebpackPlugin({
inlineSource: '.css$',
template: path.join(__dirname, `src/${pageName}/index.html`),
filename: `${pageName}.html`,
chunks: ['vendors', pageName],
inject: true,
minify: {
html5: true,
collapseWhitespace: true,
preserveLineBreaks: false,
minifyCSS: true,
minifyJS: true,
removeComments: false
}
})
);
});
return {
entry,
htmlWebpackPlugins
}
}
const {
entry,
htmlWebpackPlugins
} = setMPA();
module.exports = {
mode: 'production',
entry,
output: {
path: path.join(__dirname, 'dist'),
filename: '[name].js'
},
module: {
rules: [{
test: /\.js$/,
exclude: /node_modules/,
use: 'babel-loader'
}, {
test: /\.css$/,
use: ['style-loader', 'css-loader']
}]
},
plugins: [].concat(htmlWebpackPlugins)
}
~~~
>[danger] ##### 公共文件處理
~~~
1.當我們在進行多頁面打包時候,可能兩個項目都用了同樣的工具類,或者框架,本質上我們可以將
這些同樣的內容打包成一份,引入到這些打包后的文件,這樣不會因為公共方法會因為你多少個多頁面
而成為對應倍數打包
~~~
~~~
module.exports = {
...
optimization: {
splitChunks: {
// 自動提取所有公共模塊到單獨 bundle
chunks: 'all'
}
},
...
}
~~~
>[danger] ##### 要讀文章系列
[原文鏈接](https://segmentfault.com/a/1190000017393930)
>[danger] ##### 問答
* 感嘆一句大神寫代碼考慮的真多 摩拜
~~~
1.這里entryFiles直接用map,取第一個參數實測效果一樣,用Objec.keys是有什么特別原因?
答:里主要是如果 entry是 hard code的寫法的話,那么entry是一個 object,例如:
entry: {
index: './src/index/index.js',
search: './src/search/index.js'
}
那么,我們獲取動態設置 html-webpack-plugin 是不是需要通過 Object.keys 去獲取key,主要是基于這點去考慮的哈。
由于我們這里直接演示了最通用的方案,一步到位,其實完全用 map 匹配沒問題的,直接用 map 匹配即可。
~~~
- 工程化 -- Node
- vscode -- 插件
- vscode -- 代碼片段
- 前端學會調試
- 谷歌瀏覽器調試技巧
- 權限驗證
- 包管理工具 -- npm
- 常見的 npm ci 指令
- npm -- npm install安裝包
- npm -- package.json
- npm -- 查看包版本信息
- npm - package-lock.json
- npm -- node_modules 層級
- npm -- 依賴包規則
- npm -- install 安裝流程
- npx
- npm -- 發布自己的包
- 包管理工具 -- pnpm
- 模擬數據 -- Mock
- 頁面渲染
- 渲染分析
- core.js && babel
- core.js -- 到底是什么
- 編譯器那些術語
- 詞法解析 -- tokenize
- 語法解析 -- ast
- 遍歷節點 -- traverser
- 轉換階段、生成階段略
- babel
- babel -- 初步上手之了解
- babel -- 初步上手之各種配置(preset-env)
- babel -- 初步上手之各種配置@babel/helpers
- babel -- 初步上手之各種配置@babel/runtime
- babel -- 初步上手之各種配置@babel/plugin-transform-runtime
- babel -- 初步上手之各種配置(babel-polyfills )(未來)
- babel -- 初步上手之各種配置 polyfill-service
- babel -- 初步上手之各種配置(@babel/polyfill )(過去式)
- babel -- 總結
- 各種工具
- 前端 -- 工程化
- 了解 -- Yeoman
- 使用 -- Yeoman
- 了解 -- Plop
- node cli -- 開發自己的腳手架工具
- 自動化構建工具
- Gulp
- 模塊化打包工具為什么出現
- 模塊化打包工具(新) -- webpack
- 簡單使用 -- webpack
- 了解配置 -- webpack.config.js
- webpack -- loader 淺解
- loader -- 配置css模塊解析
- loader -- 圖片和字體(4.x)
- loader -- 圖片和字體(5.x)
- loader -- 圖片優化loader
- loader -- 配置解析js/ts
- webpack -- plugins 淺解
- eslit
- plugins -- CleanWebpackPlugin(4.x)
- plugins -- CleanWebpackPlugin(5.x)
- plugin -- HtmlWebpackPlugin
- plugin -- DefinePlugin 注入全局成員
- webapck -- 模塊解析配置
- webpack -- 文件指紋了解
- webpack -- 開發環境運行構建
- webpack -- 項目環境劃分
- 模塊化打包工具 -- webpack
- webpack -- 打包文件是個啥
- webpack -- 基礎配置項用法
- webpack4.x系列學習
- webpack -- 常見loader加載器
- webpack -- 移動端px轉rem處理
- 開發一個自己loader
- webpack -- plugin插件
- webpack -- 文件指紋
- webpack -- 壓縮css和html構建
- webpack -- 清里構建包
- webpack -- 復制靜態文件
- webpack -- 自定義插件
- wepack -- 關于靜態資源內聯
- webpack -- source map 對照包
- webpack -- 環境劃分構建
- webpack -- 項目構建控制臺輸出
- webpack -- 項目分析
- webpack -- 編譯提速優護體積
- 提速 -- 編譯階段
- webpack -- 項目優化
- webpack -- DefinePlugin 注入全局成員
- webpack -- 代碼分割
- webpack -- 頁面資源提取
- webpack -- import按需引入
- webpack -- 搖樹
- webpack -- 多頁面打包
- webpack -- eslint
- webpack -- srr打包后續看
- webpack -- 構建一個自己的配置后續看
- webpack -- 打包組件和基礎庫
- webpack -- 源碼
- webpack -- 啟動都做了什么
- webpack -- cli做了什么
- webpack - 5
- 模塊化打包工具 -- Rollup
- 工程化搭建代碼規范
- 規范化標準--Eslint
- eslint -- 擴展配置
- eslint -- 指令
- eslint -- vscode
- eslint -- 原理
- Prettier -- 格式化代碼工具
- EditorConfig -- 編輯器編碼風格
- 檢查提交代碼是否符合檢查配置
- 整體流程總結
- 微前端
- single-spa
- 簡單上手 -- single-spa
- 快速理解systemjs
- single-sap 不使用systemjs
- monorepo -- 工程
- Vue -- 響應式了解
- Vue2.x -- 源碼分析
- 發布訂閱和觀察者模式
- 簡單 -- 了解響應式模型(一)
- 簡單 -- 了解響應式模型(二)
- 簡單 --了解虛擬DOM(一)
- 簡單 --了解虛擬DOM(二)
- 簡單 --了解diff算法
- 簡單 --了解nextick
- Snabbdom -- 理解虛擬dom和diff算法
- Snabbdom -- h函數
- Snabbdom - Vnode 函數
- Snabbdom -- init 函數
- Snabbdom -- patch 函數
- 手寫 -- 虛擬dom渲染
- Vue -- minVue
- vue3.x -- 源碼分析
- 分析 -- reactivity
- 好文
- grpc -- 瀏覽器使用gRPC
- grcp-web -- 案例
- 待續