
>[success] # webpack cli 源碼分析
~~~
1.上一節可以知道,在啟動過程中,webpack確保你已經安裝了cli后,會開始啟動cli,這時候后
就會到'node_modules\webpack-cli\bin\cli.js'
~~~
>[info] ## 分析
~~~
1.打開文件后發現是一個立即執行函數,
~~~
>[danger] ##### 判斷啟用本地還是全局cli
~~~js
1.下面這段主要是'本地如果安裝了webpack-cli,就用本地安裝版本,不用全局的'
2.可以打開'import-local' 這個庫的源碼來看一下'use strict';
const path = require('path');
const resolveCwd = require('resolve-cwd');
const pkgDir = require('pkg-dir');
module.exports = filename => {
// 獲取文件的根目錄
const globalDir = pkgDir.sync(path.dirname(filename));
// 獲取文件的絕對路徑
const relativePath = path.relative(globalDir, filename);
// 獲取根目錄下package.json文件信息
const pkg = require(path.join(globalDir, 'package.json'));
// 取出package.json 的name 一般name 都是文件名,根據相對路徑
// 來判斷改模塊是否存在如果不存在返回undefined
const localFile = resolveCwd.silent(path.join(pkg.name, relativePath));
// Use `path.relative()` to detect local package installation,
// because __filename's case is inconsistent on Windows
// Can use `===` when targeting Node.js 8
// See https://github.com/nodejs/node/issues/6624
return localFile && path.relative(localFile, filename) !== '' ? require(localFile) : null;
};
3.來看一下,在我的項目中,當在'cli' 文件的'__filename'傳入打印后的一些值
'globalDir' -- G:\testJs\webpackTs1\node_modules\webpack-cli
'relativePath' -- bin\cli.js
'localFile' -- G:\testJs\webpackTs1\node_modules\webpack-cli\bin\cli.js
"path.join(globalDir, 'package.json')" -- webpack-cli\bin\cli.js
~~~
~~~
const importLocal = require("import-local");
// Prefer the local installation of webpack-cli
// 本地如果安裝了webpack-cli,就用本地安裝版本,不用全局的
if (importLocal(__filename)) { // 本地的返回值是null
return;
}
// 使用v8緩存的代碼,從而加快實例化時間, “代碼緩存”是由V8解析和編譯完成的工作。
require("v8-compile-cache");
~~~
>[danger] ##### 引入處理錯誤的工具模塊
~~~
const ErrorHelpers = require("./utils/errorHelpers");
~~~
>[warning] ### 處理不需要經過編譯的命令
~~~
1.通過判斷輸入的的指令來是否在'./utils/constants'模塊定義的'NON_COMPILATION_ARGS' 常量數組里,
如果存在整個程序結束并且去執行'./utils/prompt-command',如果不存在代碼接著往下走
~~~
>[danger] ##### 看懂這段源碼前需要知道的知識
~~~
1.如何在控制臺輸入命令并且獲取?利用'process.argv' 獲取的是一個數組'string[]'
const a = process.argv
console.log(a)
我們用node 運行上面代碼(因為我是將這段代碼放到了一個test.js文件中 )因此我在控制臺輸入的指令為
'node test.js param1 param2'
'打印的結果':(下面數組第0項和第1項是自帶,數組后面的項是輸入的參數)
[ 'D:\\nodjs\\node.exe', // 屬性返回啟動 Node.js 進程的可執行文件的絕對路徑名
'G:\\testJs\\js\\test.js', // 正被執行的 JavaScript 文件的路徑
'param1',
'param2' ]
~~~
>[danger] ##### ./utils/constants文件中的內容
~~~
const NON_COMPILATION_ARGS = [
"init", //創建一份 webpack 配置文件
"migrate", //進行 webpack 版本遷移
"add", //往 webpack 配置文件中增加屬
"remove", //往 webpack 配置文件中刪除屬
"serve", //運行 webpack-serve
"generate-loader", //生成 webpack loader 代碼
"generate-plugin", //生成 webpack plugin 代碼
"info'" //返回與本地環境相關的一些信息
];
~~~
>[danger] ##### cli 這段的源碼
~~~
1.這部分引入了 一個指令集合的數組'NON_COMPILATION_ARGS',里面開始一段比較有意思的邏輯
1.1.如果你輸入的參數是'serve' 在開頭的 話會被從接受控制臺輸出參數的 'process.argv'數組里清除
,有點抽象舉個例子,當你輸出指令是(這里我是windows系統所以路徑反斜杠是朝著面的 )
'.\node_modules\.bin\webpack serve info' 此時你的'process.argv' 里返回的值如下
[ 'D:\\nodjs\\node.exe', // 屬性返回啟動 Node.js 進程的可執行文件的絕對路徑名
'G:\\testJs\\js\\test.js', // 正被執行的 JavaScript 文件的路徑
'serve',
'info' ]
但是不行我要把你serve 指令干掉變成
[ 'D:\\nodjs\\node.exe', // 屬性返回啟動 Node.js 進程的可執行文件的絕對路徑名
'G:\\testJs\\js\\test.js', // 正被執行的 JavaScript 文件的路徑
'info' ]
1.2.再利用數組find 方法返回第一個輸入指令在指令集合的指令
1.3.并且執行'/utils/prompt-command '模塊的代碼,并且終止執行接下來的代碼
2.不往'/utils/prompt-command'代碼里面深入看,來猜為什么在這里清除掉了,看一下需要調用方法參數
require("./utils/prompt-command")(NON_COMPILATION_CMD, ...process.argv);
2.1.可以發現他需要兩個參數,一個是最先找到指令集合中的指令,一個是輸入的指令,
那他的邏輯很有可能是先執行輸入指令中第一個符合,指令集合的中指令,在執行后續指令
那么serve 很有可能和其他指令不同,導致循環執行serve,現在都是猜測
來一個數組find 的小案例
[1,2,3].find(item=> item ===3) // 3
~~~
~~~
const {
NON_COMPILATION_ARGS
} = require("./utils/constants");
// 查找輸入指令是否在指令集合中
const NON_COMPILATION_CMD = process.argv.find(arg => {
if (arg === "serve") { // 輸入的指令如果為serve
// 下面這兩行比較有意思 在 process.argv 接受的指令中將serve清除掉
// 第一個先過濾,第二步把過濾的值重新賦值
global.process.argv = global.process.argv.filter(a => a !== "serve");
process.argv = global.process.argv;
}
// 數組的find 方法返回輸入指令中,第一個符合指令集合中的值
return NON_COMPILATION_ARGS.find(a => a === arg);
});
if (NON_COMPILATION_CMD) { //如果是集合中的指令 就去執行導入這個模塊帶并且結束下面的代碼
return require("./utils/prompt-command")(NON_COMPILATION_CMD, ...process.argv);
}
~~~
>[danger] ##### ./utils/prompt-command 里面做了什么
~~~
1.分析'require("./utils/prompt-command")(NON_COMPILATION_CMD, ...process.argv);' 有兩個參數
1.1.'NON_COMPILATION_CMD,' 輸入指令中第一個在指令集合的參數
1.2.'...process.argv' 如果是輸入指令中第一個參數'serve' 則不包含的,輸入指令集合數組
3.整個這個文件代碼也是分為四個部分,三個工具方法,一個執行方法
3.1.const runCommand = (command, args) => {...} // 執行某個命令,這里是本地安裝
3.2.const npmGlobalRoot =() => {...} // 執行某個命令,這里是全局安裝
3.3.const runWhenInstalled = (packages, pathForCmd, ...args) => {...} // 執行執行命令對應的方法
3.4.promptForInstallation(packages, ...args){...} // 來決定是執行命令還是安裝執行命令的包
~~~
* 把3.1 - 3.3的 源碼直接貼出來(這里就直接參考第一章對安裝命令方法的講解)
~~~
const runCommand = (command, args) => {
const cp = require("child_process");
return new Promise((resolve, reject) => {
const executedCommand = cp.spawn(command, args, {
stdio: "inherit",
shell: true
});
executedCommand.on("error", error => {
reject(error);
});
executedCommand.on("exit", code => {
if (code === 0) {
resolve();
} else {
reject();
}
});
});
};
const npmGlobalRoot = () => {
const cp = require("child_process");
return new Promise((resolve, reject) => {
const command = cp.spawn("npm", ["root", "-g"]);
command.on("error", error => reject(error));
command.stdout.on("data", data => resolve(data.toString()));
command.stderr.on("data", data => reject(data));
});
};
const runWhenInstalled = (packages, pathForCmd, ...args) => {
const currentPackage = require(pathForCmd);
const func = currentPackage.default;
if (typeof func !== "function") {
throw new Error(`@webpack-cli/${packages} failed to export a default function`);
}
return func(...args);
};
~~~
* promptForInstallation
~~~
module.exports = function promptForInstallation(packages, ...args) {
const nameOfPackage = "@webpack-cli/" + packages;// 拼接包名例如指令serve 拼接出@webpack-cli/serve
let packageIsInstalled = false; // 標記包是否安裝的開關
let pathForCmd;
try {
const path = require("path");
const fs = require("fs");
// process.cwd() 方法會返回 Node.js 進程的當前工作目錄
// pathForCmd 就會拼出一個目錄例如指令是serve 當前工作目錄/"node_modules/@webpack-cli/serve
pathForCmd = path.resolve(process.cwd(), "node_modules", "@webpack-cli", packages);
if (!fs.existsSync(pathForCmd)) { // 如果當前工作目錄不存在這個包就去全局目錄里找
const globalModules = require("global-modules");
pathForCmd = globalModules + "/@webpack-cli/" + packages;
require.resolve(pathForCmd);
} else { // 存在 就走著個
require.resolve(pathForCmd);
}
packageIsInstalled = true; // 并且加安裝開關標志成true 表示這個包是安裝過得
} catch (err) { // 兩個地方都沒找到進入catch
packageIsInstalled = false;
}
if (!packageIsInstalled) { // 兩個地方都沒找到開始安裝包
const path = require("path");
const fs = require("fs");
const readLine = require("readline");
const isYarn = fs.existsSync(path.resolve(process.cwd(), "yarn.lock"));
const packageManager = isYarn ? "yarn" : "npm";
const options = ["install", "-D", nameOfPackage];
if (isYarn) {
options[0] = "add";
}
if (packages === "init") {// init 包比較特別會被安裝到全局目錄里
if (isYarn) {
options.splice(1, 1); // remove '-D'
options.splice(0, 0, "global");
} else {
options[1] = "-g";
}
}
const commandToBeRun = `${packageManager} ${options.join(" ")}`;
const question = `Would you like to install ${packages}? (That will run ${commandToBeRun}) (yes/NO) : `;
console.error(`The command moved into a separate package: ${nameOfPackage}`);
const questionInterface = readLine.createInterface({
input: process.stdin,
output: process.stdout
});
questionInterface.question(question, answer => {
questionInterface.close();
switch (answer.toLowerCase()) {
case "y":
case "yes":
case "1": {
runCommand(packageManager, options)
.then(_ => {
if (packages === "init") {// init 包比較特別會被安裝到全局目錄里
npmGlobalRoot()
.then(root => {
const pathtoInit = path.resolve(root.trim(), "@webpack-cli", "init");
return pathtoInit;
})
.then(pathForInit => {
return require(pathForInit).default(...args);
})
.catch(error => {
console.error(error);
process.exitCode = 1;
});
return;
}
pathForCmd = path.resolve(process.cwd(), "node_modules", "@webpack-cli", packages);
// 安裝好后執行這個安裝模塊
return runWhenInstalled(packages, pathForCmd, ...args);
})
.catch(error => {
console.error(error);
process.exitCode = 1;
});
break;
}
default: { // 不同意安裝
console.error(`${nameOfPackage} needs to be installed in order to run the command.`);
process.exitCode = 1;
break;
}
}
});
} else {
return runWhenInstalled(packages, pathForCmd, ...args);// 執行指令對應的模塊
}
};
~~~
>[warning] ### 處理需要經過編譯的命令
~~~
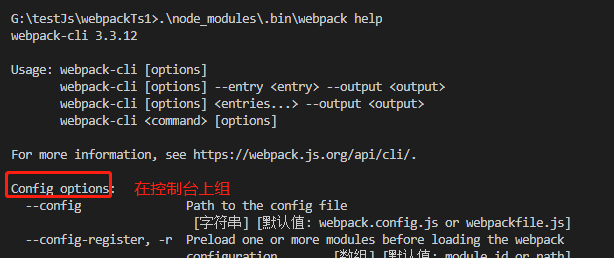
1.'.\node_modules\.bin\webpack help' 當我們輸入help 時候可以發現控制臺會出現,額外的不僅僅只在
上面集合指令數組中才有的指令,這些指令的執行分析系
~~~
>[danger] ##### yargs
~~~
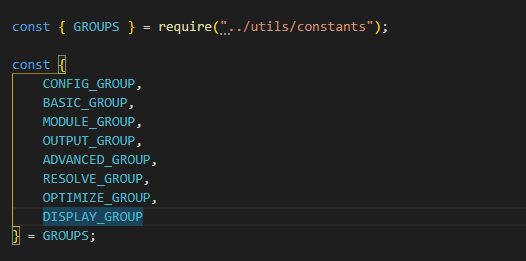
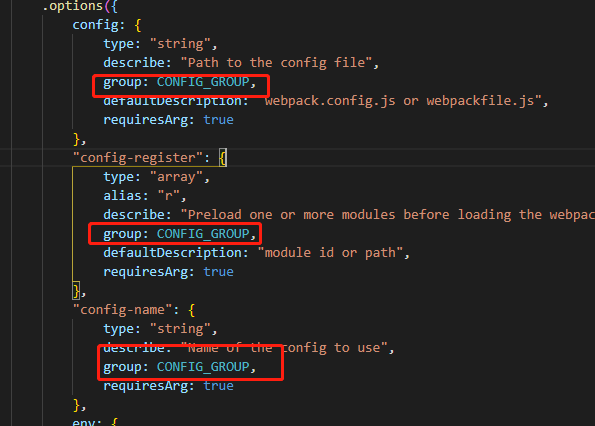
1.如何在控制臺生成這些幫助指令實際使用'yargs' 庫,在'./config/config-yargs'也配置這些指令,
打開這文件其實可以看到下面這些指令都是在不同的組里面,這九組的含義
1.1.'Config options': 配置相關參數(文件名稱、運行環境等)
1.2.'Basic options': 基礎參數(entry設置、debug模式設置、watch監聽設置、devtool設置)
1.3.'Module options': 模塊參數,給 loader 設置擴展
1.4.'Output options': 輸出參數(輸出路徑、輸出文件名稱)
1.5.'Advanced options': 高級用法(記錄設置、緩存設置、監聽頻率、bail等)
1.6.'Resolving options': 解析參數(alias 和 解析的文件后綴設置)
1.7.'Optimizing options': 優化參數
1.8.'Stats options': 統計參數
1.9.'options': 通用參數(幫助命令、版本信息等)
~~~
* ./config/config-yargs 指令組
~~~
// 聲明一些基本的幫助信息
const yargs = require("yargs").usage(`webpack-cli ${require("../package.json").version}
Usage: webpack-cli [options]
webpack-cli [options] --entry <entry> --output <output>
webpack-cli [options] <entries...> --output <output>
webpack-cli <command> [options]
For more information, see https://webpack.js.org/api/cli/.`);
// 將這個yargs 對象加入config-yargs模塊
require("./config/config-yargs")(yargs);
~~~
>[danger] ##### 指令執行
~~~
1.process.argv.slice(2) 獲取輸出的指令,要知道這個前兩項里面不是我們輸入的真正意義上的指令
2.回調函數中 argv err output 這三個參數參考文檔
https://github.com/yargs/yargs/blob/HEAD/docs/api.md#parseargs-context-parsecallback
~~~
~~~
yargs.parse(process.argv.slice(2), (err, argv, output) => {...})
~~~
* 在yargs.parse 回調函數中接著會看到這部分的代碼
~~~
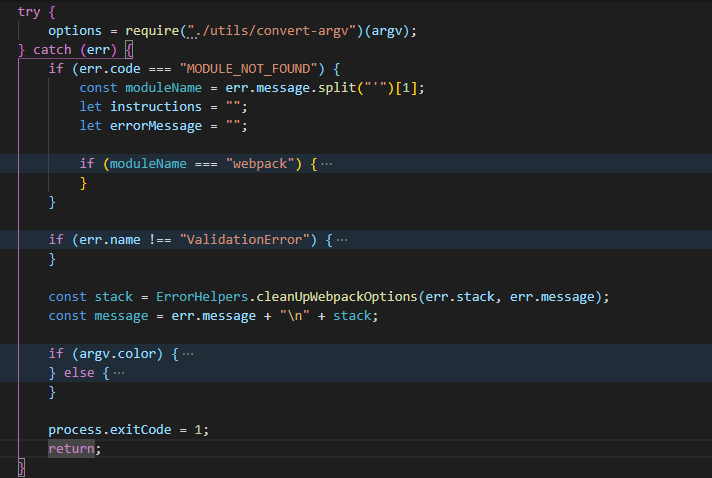
1.根據命令行參數,獲取并解析配置文件配置信息options,并結合命令行參數再次處理配置信息options,
校驗配置項合法性。
2.捕獲異常,webpack模塊找不到,沒安裝的話提示下。
3.非校驗錯誤,直接拋出錯誤。
4.校驗錯誤等,簡潔化處理保留必要錯誤信息。
5.結束。返回
~~~
* 對第一條詳細解釋一下
~~~
1.options = require("./utils/convert-argv")(argv);會根據你指令返回的配置項將這個轉換成webpack格式
輸入的指令'.\node_modules\.bin\webpack optimize-max-chunks'
~~~
* argv 這個對象
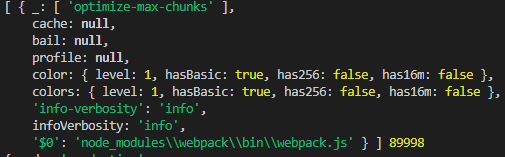
* 將argv 這個對象通過./utils/convert-argv解析后打印的opition值
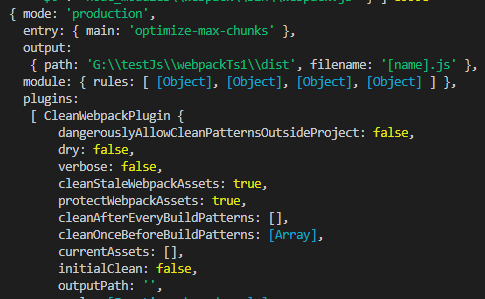
* 代碼
>[danger] ##### ifArg方法
~~~
1.從命令行取參數值,并且執行傳入的函數,函數參數時從命令行取的參數值。兼容數組,遍歷執行
~~~
~~~
function ifArg(name, fn, init) {
if (Array.isArray(argv[name])) {
if (init) init();
argv[name].forEach(fn);
} else if (typeof argv[name] !== "undefined") {
if (init) init();
fn(argv[name], -1);
}
}
~~~
>[danger] ##### processOptions
~~~
1.這個函數主要會引入一個webpack,并且把這個配置項傳給webpakc
注這里代碼太多了可以自己打開慢慢看
~~~
>[danger] ##### cli 實際做了什么
~~~
1.webpack-cli對配置文件和命令行參數進行轉換最終生成配置選項參數 options
最終會根據配置參數實例化 webpack 對象,然后執行構建流程
~~~
- 工程化 -- Node
- vscode -- 插件
- vscode -- 代碼片段
- 前端學會調試
- 谷歌瀏覽器調試技巧
- 權限驗證
- 包管理工具 -- npm
- 常見的 npm ci 指令
- npm -- npm install安裝包
- npm -- package.json
- npm -- 查看包版本信息
- npm - package-lock.json
- npm -- node_modules 層級
- npm -- 依賴包規則
- npm -- install 安裝流程
- npx
- npm -- 發布自己的包
- 包管理工具 -- pnpm
- 模擬數據 -- Mock
- 頁面渲染
- 渲染分析
- core.js && babel
- core.js -- 到底是什么
- 編譯器那些術語
- 詞法解析 -- tokenize
- 語法解析 -- ast
- 遍歷節點 -- traverser
- 轉換階段、生成階段略
- babel
- babel -- 初步上手之了解
- babel -- 初步上手之各種配置(preset-env)
- babel -- 初步上手之各種配置@babel/helpers
- babel -- 初步上手之各種配置@babel/runtime
- babel -- 初步上手之各種配置@babel/plugin-transform-runtime
- babel -- 初步上手之各種配置(babel-polyfills )(未來)
- babel -- 初步上手之各種配置 polyfill-service
- babel -- 初步上手之各種配置(@babel/polyfill )(過去式)
- babel -- 總結
- 各種工具
- 前端 -- 工程化
- 了解 -- Yeoman
- 使用 -- Yeoman
- 了解 -- Plop
- node cli -- 開發自己的腳手架工具
- 自動化構建工具
- Gulp
- 模塊化打包工具為什么出現
- 模塊化打包工具(新) -- webpack
- 簡單使用 -- webpack
- 了解配置 -- webpack.config.js
- webpack -- loader 淺解
- loader -- 配置css模塊解析
- loader -- 圖片和字體(4.x)
- loader -- 圖片和字體(5.x)
- loader -- 圖片優化loader
- loader -- 配置解析js/ts
- webpack -- plugins 淺解
- eslit
- plugins -- CleanWebpackPlugin(4.x)
- plugins -- CleanWebpackPlugin(5.x)
- plugin -- HtmlWebpackPlugin
- plugin -- DefinePlugin 注入全局成員
- webapck -- 模塊解析配置
- webpack -- 文件指紋了解
- webpack -- 開發環境運行構建
- webpack -- 項目環境劃分
- 模塊化打包工具 -- webpack
- webpack -- 打包文件是個啥
- webpack -- 基礎配置項用法
- webpack4.x系列學習
- webpack -- 常見loader加載器
- webpack -- 移動端px轉rem處理
- 開發一個自己loader
- webpack -- plugin插件
- webpack -- 文件指紋
- webpack -- 壓縮css和html構建
- webpack -- 清里構建包
- webpack -- 復制靜態文件
- webpack -- 自定義插件
- wepack -- 關于靜態資源內聯
- webpack -- source map 對照包
- webpack -- 環境劃分構建
- webpack -- 項目構建控制臺輸出
- webpack -- 項目分析
- webpack -- 編譯提速優護體積
- 提速 -- 編譯階段
- webpack -- 項目優化
- webpack -- DefinePlugin 注入全局成員
- webpack -- 代碼分割
- webpack -- 頁面資源提取
- webpack -- import按需引入
- webpack -- 搖樹
- webpack -- 多頁面打包
- webpack -- eslint
- webpack -- srr打包后續看
- webpack -- 構建一個自己的配置后續看
- webpack -- 打包組件和基礎庫
- webpack -- 源碼
- webpack -- 啟動都做了什么
- webpack -- cli做了什么
- webpack - 5
- 模塊化打包工具 -- Rollup
- 工程化搭建代碼規范
- 規范化標準--Eslint
- eslint -- 擴展配置
- eslint -- 指令
- eslint -- vscode
- eslint -- 原理
- Prettier -- 格式化代碼工具
- EditorConfig -- 編輯器編碼風格
- 檢查提交代碼是否符合檢查配置
- 整體流程總結
- 微前端
- single-spa
- 簡單上手 -- single-spa
- 快速理解systemjs
- single-sap 不使用systemjs
- monorepo -- 工程
- Vue -- 響應式了解
- Vue2.x -- 源碼分析
- 發布訂閱和觀察者模式
- 簡單 -- 了解響應式模型(一)
- 簡單 -- 了解響應式模型(二)
- 簡單 --了解虛擬DOM(一)
- 簡單 --了解虛擬DOM(二)
- 簡單 --了解diff算法
- 簡單 --了解nextick
- Snabbdom -- 理解虛擬dom和diff算法
- Snabbdom -- h函數
- Snabbdom - Vnode 函數
- Snabbdom -- init 函數
- Snabbdom -- patch 函數
- 手寫 -- 虛擬dom渲染
- Vue -- minVue
- vue3.x -- 源碼分析
- 分析 -- reactivity
- 好文
- grpc -- 瀏覽器使用gRPC
- grcp-web -- 案例
- 待續