
# C 指針
> 原文: [https://www.programiz.com/c-programming/c-pointers](https://www.programiz.com/c-programming/c-pointers)
#### 在本教程中,您將學習指針。 什么是指針,如何使用它們以及在示例的幫助下使用它們時可能遇到的常見錯誤。
指針是 C 和 C++ 編程的強大功能。 在學習指針之前,讓我們學習一下 C 編程中的地址。
* * *
## C 地址
如果程序中有變量`var`,則`&var`將在內存中提供其地址。
使用`scanf()`函數時,我們已多次使用地址。
```c
scanf("%d", &var);
```
在此,用戶輸入的值存儲在`var`變量的地址中。 讓我們舉一個可行的例子。
```c
#include <stdio.h>
int main()
{
int var = 5;
printf("var: %d\n", var);
// Notice the use of & before var
printf("address of var: %p", &var);
return 0;
}
```
**輸出**
```c
var: 5
address of var: 2686778
```
**注意**:運行上面的代碼時,您可能會獲得其他地址。
* * *
## C 指針
指針(指針變量)是用于存儲地址而非值的特殊變量。
### 指針語法
這是我們如何聲明指針的方法。
```c
int* p;
```
在這里,我們聲明了`int`類型的指針`p`。
您也可以通過以下方式聲明指針。
```c
int *p1;
int * p2;
```
* * *
讓我們再舉一個聲明指針的例子。
```c
int* p1, p2;
```
在這里,我們聲明了一個指針`p1`和一個正常變量`p2`。
* * *
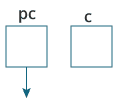
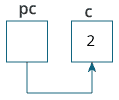
### 給指針分配地址
讓我們舉個例子。
```c
int* pc, c;
c = 5;
pc = &c;
```
在此,將`c`變量分配為 5。 并且,將`c`的地址分配給`pc`指針。
* * *
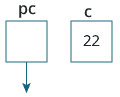
### 獲取指針所指的值
要獲取指針所指向的值,我們使用`*`運算符。 例如:
```c
int* pc, c;
c = 5;
pc = &c;
printf("%d", *pc); // Output: 5
```
此處,`c`的地址分配給`pc`指針。 為了獲得存儲在該地址中的值,我們使用了`* pc`。
**注意**:在上面的示例中,`pc`是指針,而不是`*pc`。 您不能也不應做類似`*pc = &c`的操作;
順便說一下,`*`被稱為解除引用運算符(使用指針時)。 它對指針進行操作并給出存儲在該指針中的值。
* * *
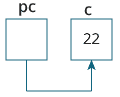
### 改變指針指向的值
讓我們舉個例子。
```c
int* pc, c;
c = 5;
pc = &c;
c = 1;
printf("%d", c); // Output: 1
printf("%d", *pc); // Ouptut: 1
```
我們已經將`c`的地址分配給`pc`指針。
然后,我們將`c`的值更改為 1。由于`pc`和`c`的地址相同,所以`*pc`給出 1。
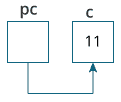
讓我們再舉一個例子。
```c
int* pc, c;
c = 5;
pc = &c;
*pc = 1;
printf("%d", *pc); // Ouptut: 1
printf("%d", c); // Output: 1
```
We have assigned the address of `c` to the `pc` pointer.
然后,我們使用`*pc = 1;`將`*pc`更改為 1。 由于`pc`和`c`的地址相同,因此`c`等于 1。
讓我們再舉一個例子。
```c
int* pc, c, d;
c = 5;
d = -15;
pc = &c; printf("%d", *pc); // Output: 5
pc = &d; printf("%d", *pc); // Ouptut: -15
```
最初,使用`pc = &c;`將`c`的地址分配給`pc`指針。 由于`c`為 5,因此`*pc`給我們 5。
然后,使用`pc = &d;`將`d`的地址分配給`pc`指針。 由于`d`為 -15,因此`*pc`給我們 -15。
* * *
### 示例:指針的工作原理
讓我們舉一個可行的例子。
```c
#include <stdio.h>
int main()
{
int* pc, c;
c = 22;
printf("Address of c: %p\n", &c);
printf("Value of c: %d\n\n", c); // 22
pc = &c;
printf("Address of pointer pc: %p\n", pc);
printf("Content of pointer pc: %d\n\n", *pc); // 22
c = 11;
printf("Address of pointer pc: %p\n", pc);
printf("Content of pointer pc: %d\n\n", *pc); // 11
*pc = 2;
printf("Address of c: %p\n", &c);
printf("Value of c: %d\n\n", c); // 2
return 0;
}
```
**輸出**
```c
Address of c: 2686784
Value of c: 22
Address of pointer pc: 2686784
Content of pointer pc: 22
Address of pointer pc: 2686784
Content of pointer pc: 11
Address of c: 2686784
Value of c: 2
```
* * *
**程序的說明**
1. `int* pc, c;`
此處,創建了類型均為`int`的指針`pc`和常規變量`c`。
由于`pc`和`c`最初并未初始化,因此指針`pc`指向無地址或隨機地址。 并且,變量`c`具有地址,但包含隨機垃圾值。
2. `c = 22;`
這將 22 分配給變量`c`。 即,將 22 存儲在變量`c`的存儲單元中。
3. `pc = &c;`
這將變量`c`的地址分配給指針`pc`。
4. `c = 11;`
這將 11 分配給變量`c`。
5. `*pc = 2;`
將指針`pc`指向的存儲位置的值更改為 2。
* * *
### 使用指針時的常見錯誤
假設您希望指針`pc`指向`c`的地址。 然后,
```c
int c, *pc;
// pc is address but c is not
pc = c; // Error
// &c is address but *pc is not
*pc = &c; // Error
// both &c and pc are addresses
pc = &c;
// both c and *pc values
*pc = c;
```
這是指針語法初學者經常會感到困惑的示例。
```c
#include <stdio.h>
int main() {
int c = 5;
int *p = &c;
printf("%d", *p); // 5
? return 0;
}
```
**使用`int?*p = &c;`時為什么沒有出現錯誤?**
這是因為
```c
int *p = &c;
```
相當于
```c
int *p:
p = &c;
```
在這兩種情況下,我們都將創建一個指針`p`(不是`*p`)并為其分配`&c`。
為了避免這種混亂,我們可以使用如下語句:
```c
int* p = &c;
```
* * *
現在您知道了什么是指針,您將在下一個教程中學習指針與數組的關系。
- Programiz C 語言教程
- C 簡介
- C 關鍵字和標識符
- C 變量,常量和字面值
- C 數據類型
- C 輸入輸出(I/O)
- C 編程運算符
- C 簡單示例
- C 流程控制
- C if...else語句
- C for循環
- C while和do...while循環
- C break和continue
- C switch語句
- C goto聲明
- C 控制流程示例
- C 函數
- C 函數
- C 用戶定義的函數
- C 編程中用戶定義函數的類型
- C 遞歸
- C 存儲類
- C 函數示例
- C 數組
- C 數組
- C 多維數組
- 將數組傳遞給 C 中的函數
- C 編程指針
- C 指針
- 數組和指針之間的關系
- C 按引用調用:使用指針
- C 動態內存分配
- C 數組和指針示例
- C 字符串
- C 編程字符串
- 使用庫函數進行 C 編程中的字符串操作
- C 編程中的字符串示例
- 結構與聯合
- 結構
- 結構和指針
- C 結構與函數
- C 聯合
- C 結構示例
- C 文件
- C 文件處理
- C 文件示例
- 其他主題
- 枚舉
- C 預處理器和宏
- C 標準庫函數
- C 示例
- C 程序:打印金字塔和圖案
- C 程序:檢查數字是否為質數
- C 程序:檢查數字是否為回文
- C 程序:HelloWorld
- C 程序:打印整數(由用戶輸入)
- C 程序:相加兩個整數
- C 程序:將兩個浮點數相乘
- C 程序:查找字符的 ASCII 值
- C 程序:商和余數
- C 程序:查找int,float,double和char的大小
- C 程序:long關鍵字演示
- C 程序:交換兩個數字
- C 程序:檢查數字是偶數還是奇數
- C 程序:檢查字符是元音還是輔音
- C 程序:查找三個數字中最大的數字
- C 程序:查找二次方程的根
- C 程序:檢查閏年
- C 程序:檢查數字是正數還是負數
- C 程序:檢查字符是否為字母
- C 程序:計算自然數之和
- C 程序:查找數字階乘
- C 程序:生成乘法表
- C 程序:顯示斐波那契數列
- C 程序:查找兩個數字的 GCD
- C 程序:查找兩個數字的 LCM
- C 程序:使用循環從 A 到 Z 顯示字符
- C 程序:計算整數中的位數
- C 程序:反轉數字
- C 程序:計算數字的冪
- C 程序:顯示兩個間隔之間的質數
- C 程序:檢查阿姆斯特朗數
- C 程序:在兩個間隔之間顯示阿姆斯特朗數
- C 程序:顯示數字因數
- C 程序:使用switch...case制作一個簡單的計算器
- C 程序:使用函數顯示區間內的質數
- C 程序:使用用戶定義的函數檢查質數或阿姆斯特朗數
- C 程序:檢查一個數字是否可以表示為兩個質數之和
- C 程序:使用遞歸查找自然數之和
- C 程序:使用遞歸查找數字的階乘
- C 程序:使用遞歸查找 GCD
- C 程序:將二進制數轉換為十進制,反之亦然
- C 程序:將八進制數轉換為十進制,反之亦然
- C 程序:將二進制數轉換為八進制,反之亦然
- C 程序:使用遞歸來反轉句子
- C 程序:使用遞歸計算冪
- C 程序:使用數組計算平均值
- C 程序:查找數組中的最大元素
- C 程序:計算標準差
- C 程序:使用多維數組相加兩個矩陣
- C 程序:使用多維數組將兩個矩陣相乘
- C 程序:查找矩陣的轉置
- C 程序:通過將矩陣傳遞給函數來將兩個矩陣相乘
- C 程序:使用指針訪問數組元素
- C 程序:使用按引用調用以循環順序交換數字
- C 程序:使用動態內存分配查找最大數字
- C 程序:查找字符串中字符的頻率
- C 程序:計算元音,輔音等的數量
- C 程序:刪除字符串中除字母之外的所有字符
- C 程序:查找字符串的長度
- C 程序:連接兩個字符串
- C 程序:不使用strcpy()復制字符串
- C 程序:按字典順序(字典順序)對元素進行排序
- C 程序:使用程序存儲學生信息
- C 程序:使用結構相加兩個距離(以英寸-英尺系統為單位)
- C 程序:通過將結構傳遞給函數來相加兩個復數
- C 程序:計算兩個時間段之間的差異
- C 程序:使用結構存儲學生信息
- C 程序:在結構中動態存儲數據
- C 程序:將句子寫入文件
- C 程序:從文件中讀取一行并顯示它
- C 程序:顯示自己的源代碼作為輸出
- Programiz C++ 教程
- C++ 簡介
- C++ 變量,文字和常量
- C++ 數據類型
- C++ 基本輸入/輸出
- C++ 類型轉換
- C++ 運算符
- C++ 注釋
- C++ 流控制
- C++ if,if...else和嵌套if...else
- C++ for循環
- C++ while和do...while循環
- C++ break語句
- C++ switch..case語句
- C++ goto語句
- C++ 函數
- C++ 函數
- C++ 中用戶定義函數的類型
- C++ 函數重載
- C++ 編程默認參數(參數)
- C++ 存儲類
- C++ 遞歸
- C++ 通過引用返回
- C++ 數組和字符串
- C++ 數組
- C++ 多維數組
- 在 C++ 編程中將數組傳遞給函數
- C++ 字符串
- C++ 結構
- C++ 結構
- C++ 結構與功能
- C++ 結構指針
- C++ 枚舉
- C++ 對象和類
- C++ 類和對象
- C++ 構造器
- 如何通過 C++ 中的函數傳遞和返回對象?
- C++ 運算符重載
- C++ 指針
- C++ 指針
- C++ 指針和數組
- 通過引用進行 C++ 調用:使用指針[包含示例]
- C++ 內存管理:new和delete
- C++ 繼承
- C++ 繼承
- C++ 編程中的公共,受保護和私有繼承
- C++ 函數覆蓋
- C++ 多重,多層和層次繼承
- C++ 友元函數和友元類
- C++ 虛函數
- C++ 模板
- C++ 示例
- C++ 程序:HelloWorld
- C++ 程序:檢查數字是否為質數
- C++ 程序:創建金字塔和圖案
- C++ 程序:加兩個數字
- C++ 程序:打印用戶輸入的數字
- C++ 程序:查找商數和余數
- C++ 程序:在系統中查找int,float,double和char的大小
- C++ 程序:交換兩個數字
- C++ 程序:檢查數字是偶數還是奇數
- C++ 程序:檢查字符是元音還是輔音
- C++ 程序:查找三個數字中最大的數字
- C++ 程序:查找二次方程式的所有根
- C++ 程序:計算自然數之和
- C++ 程序:檢查閏年
- C++ 程序:查找階乘
- C++ 程序:生成乘法表
- C++ 程序:顯示斐波那契數列
- C++ 程序:查找 GCD
- C++ 程序:查找 LCM
- C++ 程序:反轉數字
- C++ 程序:計算數字的冪
- C++ 程序:遞增++和遞減--運算符重載
- C++ 程序:使用運算符重載減去復數
- C++ 程序:查找字符的 ASCII 值
- C++ 程序:將兩個數相乘
- C++ 程序:檢查數字是否為回文
- C++ 程序:顯示兩個間隔之間的質數
- C++ 程序:檢查阿姆斯特朗數
- C++ 程序:顯示兩個間隔之間的阿姆斯特朗數
- C++ 程序:顯示數字的因數
- C++ 程序:使用switch...case的簡單的加減乘除計算器
- C++ 程序:使用函數顯示兩個時間間隔之間的質數
- C++ 程序:通過創建函數來檢查質數
- C++ 程序:檢查數字是否可以表示為兩個質數之和
- C++ 程序:使用遞歸查找自然數之和
- C++ 程序:使用遞歸計算數字的階乘
- C++ 程序:使用遞歸查找 GCD
- C++ 程序:將二進制數轉換為十進制,反之亦然
- C++ 程序:將八進制數轉換為十進制,反之亦然
- C++ 程序:將二進制數轉換為八進制,反之亦然
- C++ 程序:使用遞歸來反轉句子
- C++ 程序:使用遞歸計算冪
- C++ 程序:使用數組計算數字平均值
- C++ 程序:查找數組的最大元素
- C++ 程序:計算標準差
- C++ 程序:使用多維數組相加兩個矩陣
- C++ 程序:使用多維數組將兩個矩陣相乘
- C++ 程序:查找矩陣的轉置
- C++ 程序:通過將矩陣傳遞給函數將兩個矩陣相乘
- C++ 程序:使用指針訪問數組元素
- C++ 程序:使用引用調用以循環順序交換數字
- C++ 程序:查找字符串中字符的頻率
- C++ 程序:查找字符串中元音,輔音,數字和空白的數量
- C++ 程序:刪除字符串中除字母之外的所有字符
- C++ 程序:查找字符串的長度
- C++ 程序:連接兩個字符串
- C++ 程序:復制字符串
- C++ 程序:按字典順序(字典順序)對元素進行排序
- C++ 程序:在結構中存儲學生的信息
- C++ 程序:使用結構相加兩個距離(以英寸-英尺為單位)
- C++ 程序:通過將結構傳遞給函數來添加復數
- C++ 程序:計算兩個時間段之間的差異
- C++ 程序:使用結構存儲和顯示信息
- Programiz C# 教程
- 簡介
- C# Hello World - 您的第一個 C# 程序
- C# 關鍵字和標識符
- C# 變量和(原始)數據類型
- C# 運算符
- C# 基本輸入和輸出
- C# 表達式,語句和塊(帶有示例)
- C# 注釋
- 流程控制
- C# if,if...else,if...else if和嵌套if語句
- C# for循環
- C# while和do...while循環
- C# foreach循環
- C# switch語句
- C# 三元(?:)運算符
- 其他話題
- C# 按位和移位運算符
- C# 預處理程序指令
- C# 編程中的命名空間
- C# 部分類和部分方法
- Programiz 數據結構和算法教程
- DSA 簡介
- 什么是算法?
- 為什么要學習數據結構和算法?
- 漸近分析
- 主定理
- 分治算法
- 數據結構(一)
- 棧
- 隊列
- 隊列類型
- 循環隊列
- 優先隊列
- 雙端隊列
- 數據結構(二)
- 鏈表
- 鏈表操作:遍歷,插入和刪除
- 鏈表的類型 - 單鏈,雙鏈和循環鏈
- 哈希表
- 堆數據結構
- 斐波那契堆
- 減小斐波那契堆上的鍵和刪除節點的操作
- 基于樹的 DSA(I)
- 樹數據結構
- 樹遍歷 - 中序,前序和后序
- 滿二叉樹
- 滿二叉樹
- 完美二叉樹
- 完全二叉樹
- 平衡二叉樹
- 二叉搜索樹(BST)
- AVL 樹
- 基于樹的 DSA(II)
- B 樹
- 插入 B 樹
- 從 B 樹刪除
- B+ 樹
- 在 B+ 樹上插入
- 從 B+ 樹中刪除
- 紅黑樹
- 插入紅黑樹
- 從紅黑樹中刪除
- 基于圖的 DSA
- 圖數據結構
- 生成樹和最小生成樹
- 強連通的組件
- 鄰接矩陣
- 鄰接表
- DFS 算法
- BFS 算法
- Bellman Ford 算法
- 排序和搜索算法
- 冒泡排序算法
- 選擇排序算法
- 插入排序算法
- 歸并排序算法
- 快速排序算法
- 計數排序算法
- 基數排序算法
- 桶排序算法
- 堆排序算法
- Shell 排序算法
- 線性搜索
- 二分搜索
- 貪婪算法
- 貪婪算法
- Ford-Fulkerson 算法
- Dijkstra 算法
- Kruskal 算法
- Prim 算法
- 霍夫曼編碼
- 動態規劃
- 動態規劃
- Floyd-Warshall 算法
- 最長公共子序列
- 其他算法
- 回溯算法
- Rabin-Karp 算法
- Programiz Java 教程
- Java 簡介
- Java HelloWorld 程序
- Java JDK,JRE 和 JVM
- Java 變量和(原始)數據類型
- Java 運算符
- Java 基本輸入和輸出
- Java 表達式,語句和塊
- Java 注釋
- Java 流程控制
- Java if,if...else語句
- Java switch語句
- Java for循環
- Java for-each循環(增強循環)
- Java while和do...while循環
- Java Break語句
- Java continue語句
- Java 數組
- Java 數組
- Java 多維數組
- Java 復制數組
- Java OOP(I)
- Java 類和對象
- Java 方法
- Java 構造器
- Java 字符串
- Java 訪問修飾符
- Java this關鍵字
- Java final關鍵字
- Java 遞歸
- Java instanceof
- Java OOP(II)
- Java 繼承
- Java 方法覆蓋
- Java super
- Java 抽象類和抽象方法
- Java 接口
- Java 多態
- Java 封裝
- Java OOP(III)
- Java 嵌套和內部類
- Java 靜態嵌套類
- Java 匿名類
- Java 單例
- Java 枚舉
- Java 枚舉構造器
- Java 枚舉字符串
- Java 反射
- Java 異常處理
- Java 異常
- Java 異常處理
- Java throw
- Java 捕獲多個異常
- Java try-with-resources
- Java 注解
- Java 注解類型
- Java 日志
- Java 斷言
- Java 列表
- Java 集合框架
- Java Collection接口
- Java List接口
- Java ArrayList類
- Java Vector
- Java Stack類
- Java 隊列
- Java Queue接口
- Java PriorityQueue
- Java Deque接口
- Java LinkedList
- Java ArrayDeque
- Java BlockingQueue
- Java ArrayBlockingQueue
- Java LinkedBlockingQueue
- Java 映射
- Java Map接口
- Java HashMap
- Java LinkedHashMap
- Java WeakHashMap
- Java EnumMap
- Java SortedMap接口
- Java NavigableMap接口
- Java TreeMap
- Java ConcurrentMap接口
- Java ConcurrentHashMap
- Java 集
- Java Set接口
- Java HashSet類
- Java EnumSet
- Java LinkedHashSet
- Java SortedSet接口
- Java NavigableSet接口
- Java TreeSet
- Java 算法
- Java Iterator接口
- Java ListIterator接口
- Java I/O 流
- Java I/O 流
- Java InputStream類
- Java OutputStream類
- Java FileInputStream類
- Java FileOutputStream類
- Java ByteArrayInputStream類
- Java ByteArrayOutputStream類
- Java ObjectInputStream類
- Java ObjectOutputStream類
- Java BufferedInputStream類
- Java BufferedOutputStream類
- Java PrintStream類
- Java 讀取器/寫入器
- Java Reader類
- Java Writer類
- Java InputStreamReader類
- Java OutputStreamWriter類
- Java FileReader類
- Java FileWriter類
- Java BufferedReader類
- Java BufferedWriter類
- Java StringReader類
- Java StringWriter類
- Java PrintWriter類
- 其他主題
- Java Scanner類
- Java 類型轉換
- Java 自動裝箱和拆箱
- Java Lambda 表達式
- Java 泛型
- Java File類
- Java 包裝器類
- Java 命令行參數
- Java 實例
- Java 程序:檢查數字是否為質數
- Java 程序:顯示斐波那契數列
- Java 程序:創建金字塔和圖案
- Java 程序:反轉數字
- Java 程序:打印整數(由用戶輸入)
- Java 程序:相加兩個整數
- Java 程序:將兩個浮點數相乘
- Java 程序:查找字符的 ASCII 值
- Java 程序:計算商數和余數
- Java 程序:交換兩個數字
- Java 程序:檢查數字是偶數還是奇數
- Java 程序:檢查字母是元音還是輔音
- Java 程序:在三個數字中找到最大值
- Java 程序:查找二次方程式的所有根
- Java 程序:檢查閏年
- Java 程序:檢查數字是正數還是負數
- Java 程序:檢查字符是否為字母
- Java 程序:計算自然數之和
- Java 程序:查找數字的階乘
- Java 程序:生成乘法表
- Java 程序:顯示斐波那契數列
- Java 程序:查找兩個數字的 GCD
- Java 程序:查找兩個數字的 LCM
- Java 程序:使用循環從 A 到 Z 顯示字符
- Java 程序:計算整數的位數
- Java 程序:計算數字的冪
- Java 程序:檢查數字是否為回文
- Java 程序:檢查數字是否為質數
- Java 程序:顯示兩個時間間隔之間的質數
- Java 程序:檢查阿姆斯特朗數
- Java 程序:顯示兩個間隔之間的阿姆斯特朗數
- Java 程序:使用函數顯示間隔之間的質數
- Java 程序:使用函數顯示間隔之間的阿姆斯特朗數
- Java 程序:以顯示數字的因數
- Java 程序:使用switch...case創建一個簡單的計算器
- Java 程序:檢查一個數字是否可以表示為兩個質數之和
- Java 程序:使用遞歸查找自然數之和
- Java 程序:使用遞歸查找數字的階乘
- Java 程序:使用遞歸查找 GCD
- Java 程序:將二進制數轉換為十進制,反之亦然
- Java 程序:將八進制數轉換為十進制,反之亦然
- Java 程序:將二進制數轉換為八進制,反之亦然
- Java 程序:使用遞歸來反轉句子
- Java 程序:使用遞歸來計算冪
- Java 程序:使用數組計算平均值
- Java 程序:查找數組的最大元素
- Java 程序:計算標準差
- Java 程序:使用多維數組相加兩個矩陣
- Java 程序:使用多維數組相乘矩陣
- Java 程序:通過將矩陣傳遞給函數來將兩個矩陣相乘
- Java 程序:查找矩陣轉置
- Java 程序:查找字符串中字符的頻率
- Java 程序:計算句子中元音和輔音的數量
- Java 程序:按字典順序對元素進行排序
- Java 程序:通過將對象傳遞給函數來相加兩個復數
- Java 程序:計算兩個時間段之間的差異
- Java 程序:從字符串中刪除所有空格
- Java 程序:打印數組
- Java 程序:將字符串轉換為日期
- Java 程序:將數字四舍五入到 n 個小數位
- Java 程序:連接兩個數組
- Java 程序:將字符轉換為字符串,反之亦然
- Java 程序:檢查數組是否包含給定值
- Java 程序:檢查字符串是否為空或null
- Java 程序:獲取當前日期/時間
- Java 程序:將毫秒轉換為分鐘和秒
- Java 程序:相加兩個日期
- Java 程序:連接兩個列表
- Java 程序:將列表(ArrayList)轉換為數組,反之亦然
- Java 程序:獲取當前工作目錄
- Java 程序:將映射(HashMap)轉換為列表
- Java 程序:將數組轉換為集(HashSet),反之亦然
- Java 程序:將字節數組轉換為十六進制
- Java 程序:從文件內容創建字符串
- Java 程序:將文本附加到現有文件
- Java 程序:將棧跟蹤轉換為字符串
- Java 程序:將文件轉換為字節數組,反之亦然
- Java 程序:將InputStream轉換為字符串
- Java 程序:將OutputStream轉換為字符串
- Java 程序:按字符串值查找枚舉
- Java 程序:比較字符串
- Java 程序:按值對映射進行排序
- Java 程序:按屬性對自定義對象的ArrayList進行排序
- Java 程序:檢查字符串是否為數字
- Java 程序:創建目錄
- Java 程序:重命名文件
- Java 程序:列出目錄中的文件
- Java 程序:復制文件
- Programiz Kotlin 教程
- Kotlin 簡介
- Kotlin HelloWorld - 您的 Kotlin 程序
- Kotlin 變量和原始類型
- Kotlin 運算符
- Kotlin 類型轉換
- Kotlin 表達式,語句和塊
- Kotlin 注釋
- Kotlin 基本輸入/輸出
- Kotlin 流程控制
- Kotlin if表達式
- Kotlin when表達式
- Kotlin while和do...while循環
- Kotlin for循環
- Kotlin break表達式
- Kotlin continue表達式
- Kotlin 函數
- Kotlin 函數
- Kotlin 中綴函數調用
- Kotlin 默認和命名參數
- Kotlin 遞歸(遞歸函數)和尾遞歸
- Kotlin OOP
- Kotlin 類和對象
- Kotlin 構造器
- Kotlin 獲取器和設置器
- Kotlin 繼承
- Kotlin 可見性修飾符
- Kotlin 抽象類
- Kotlin 接口
- Kotlin 嵌套和內部類
- Kotlin 數據類
- Kotlin 密封類
- Kotlin 對象聲明和表達式
- Kotlin 伴隨對象
- Kotlin 擴展函數
- Kotlin 運算符重載
- Kotlin 示例
- Kotlin 程序:獲取當前日期/時間
- Kotlin 程序:將列表(ArrayList)轉換為Array,反之亦然
- Kotlin 程序:將字符串轉換為日期
- Kotlin 程序:按屬性對自定義對象的ArrayList進行排序
- Kotlin 程序:打印整數(由用戶輸入)
- Kotlin 程序:相加兩個整數
- Kotlin 程序:將兩個浮點數相乘
- Kotlin 程序:查找字符的 ASCII 值
- Kotlin 程序:計算商數和余數
- Kotlin 程序:交換兩個數字
- Kotlin 程序:檢查數字是偶數還是奇數
- Kotlin 程序:檢查字母是元音還是輔音
- Kotlin 程序:在三個數字中找到最大的一個
- Kotlin 程序:查找二次方程的所有根
- Kotlin 程序:檢查閏年
- Kotlin 程序:檢查數字是正數還是負數
- Kotlin 程序:檢查字符是否為字母
- Kotlin 程序:計算自然數之和
- Kotlin 程序:查找數字的階乘
- Kotlin 程序:生成乘法表
- Kotlin 程序:展示斐波那契數列
- Kotlin 程序:查找兩個數字的 GCD
- Kotlin 程序:查找兩個數字的 LCM
- Kotlin 程序:使用循環從 A 到 Z 顯示字符
- Kotlin 程序:計算整數位數
- Kotlin 程序:反轉數字
- Kotlin 程序:計算數字的冪
- Kotlin 程序:檢查數字是否為回文
- Kotlin 程序:檢查數字是否為質數
- Kotlin 程序:顯示兩個間隔之間的質數
- Kotlin 程序:檢查阿姆斯特朗數
- Kotlin 程序:顯示兩個間隔之間的阿姆斯特朗數
- Kotlin 程序:使用函數顯示間隔之間的質數
- Kotlin 程序:使用函數顯示間隔之間的阿姆斯特朗數
- Kotlin 程序:顯示數字因數
- Kotlin 程序:使用switch...case制作一個簡單的計算器
- Kotlin 程序:檢查一個數字是否可以表示為兩個質數之和
- Kotlin 程序:使用遞歸找到自然數之和
- Kotlin 程序:使用遞歸查找數字的階乘
- Kotlin 程序:使用遞歸查找 GCD
- Kotlin 程序:將二進制數轉換為十進制,反之亦然
- Kotlin 程序:將八進制數轉換為十進制,反之亦然
- Kotlin 程序:將二進制數轉換為八進制,反之亦然
- Kotlin 程序:使用遞歸來反轉句子
- Kotlin 程序:使用遞歸來計算冪
- Kotlin 程序:使用數組計算平均值
- Kotlin 程序:在數組中查找最大的元素
- Kotlin 程序:計算標準差
- Kotlin 程序:使用多維數組相加兩個矩陣
- Kotlin 程序:使用多維數組乘以矩陣
- Kotlin 程序:通過將矩陣傳遞給函數來將兩個矩陣相乘
- Kotlin 程序:查找矩陣的轉置
- Kotlin 程序:查找字符串中字符的頻率
- Kotlin 程序:計算句子中元音和輔音的數量
- Kotlin 程序:按字典順序(字典順序)對元素進行排序
- Kotlin 程序:通過將類傳遞給函數來相加兩個復數
- Kotlin 程序:計算兩個時間段之間的差異
- Kotlin 程序:創建金字塔和圖案
- Kotlin 程序:從字符串中刪除所有空格
- Kotlin 程序:打印數組
- Kotlin 程序:將數字四舍五入到 n 個小數位
- Kotlin 程序:連接兩個數組
- Kotlin 程序:將字符轉換為字符串并反之
- Kotlin 程序:檢查數組是否包含給定值
- Kotlin 程序:檢查字符串是否為空或null
- Kotlin 程序:將毫秒轉換為分鐘
- Kotlin 程序:相加兩個日期
- Kotlin 程序:連接兩個列表
- Kotlin 程序:獲取當前工作目錄
- Kotlin 程序:將映射(HashMap)轉換為列表
- Kotlin 程序:將數組轉換為Set(HashSet),反之亦然
- Kotlin 程序:將字節數組轉換為十六進制
- Kotlin 程序:從文件內容創建字符串
- Kotlin 程序:將文本附加到現有文件
- Kotlin 程序:將棧跟蹤轉換為字符串
- Kotlin 程序:將文件轉換為字節數組,反之亦然
- Kotlin 程序:將InputStream轉換為字符串
- Kotlin 程序:將OutputStream轉換為字符串
- Kotlin 程序:通過字符串值查找枚舉
- Kotlin 程序:比較字符串
- Kotlin 程序:按值對映射排序
- Kotlin 程序:檢查字符串是否為數字
- Programiz Python 教程
- Python 簡介
- 如何開始使用 Python?
- Python 關鍵字和標識符
- Python 語句,縮進和注釋
- Python 變量,常量和字面值
- Python 數據類型
- Python 類型轉換
- Python 輸入,輸出和導入
- Python 運算符
- Python 命名空間和范圍
- Python 流程控制
- Python if...else語句
- Python for循環
- Python While循環
- Python break和continue
- Python pass語句
- Python 函數
- Python 函數
- Python 函數參數
- Python 遞歸
- Python 匿名/ Lambda 函數
- Python 全局,局部和非局部變量
- Python global關鍵字
- Python 模塊
- Python 包
- Python 數據類型
- Python 數字,類型轉換和數學
- Python 列表
- Python 元組
- Python 字符串
- Python 集
- Python 字典
- Python 文件
- Python 文件 I/O
- Python 目錄和文件管理
- Python 錯誤和內置異常
- Python 使用try,except和finally語句的異常處理
- Python 自定義異常
- Python 對象和類
- Python 面向對象編程
- Python 對象和類
- Python 繼承
- Python 多重繼承
- Python 運算符重載
- Python 高級主題
- Python 迭代器
- Python 生成器
- Python 閉包
- Python 裝飾器
- Python @property裝飾器
- Python 正則表達式
- Python 日期時間
- Python 日期時間
- Python strftime()
- Python strptime()
- 如何在 Python 中獲取當前日期和時間?
- Python 獲取當前時間
- Python 日期時間到時間戳,反之亦然
- Python time模塊
- Python sleep()
- Python 示例
- Python 程序:檢查質數
- Python 程序:相加兩個數字
- Python 程序:查找數字階乘
- Python 程序:制作一個簡單的計算器
- Python 程序:打印 Helloworld
- Python 程序:查找平方根
- Python 程序:計算三角形的面積
- Python 程序:求解二次方程式
- Python 程序:交換兩個變量
- Python 程序:生成隨機數
- Python 程序:將公里轉換為英里
- Python 程序:將攝氏溫度轉換為華氏溫度
- Python 程序:檢查數字是正數,負數還是 0
- Python 程序:檢查數字是奇數還是偶數
- Python 程序:檢查閏年
- Python 程序:在三個數字中找到最大的
- Python 程序:檢查質數
- Python 程序:打印一個間隔內的所有質數
- Python 程序:查找數字階乘
- Python 程序:顯示乘法表
- Python 程序:打印斐波那契序列
- Python 程序:檢查阿姆斯特朗數
- Python 程序:查找間隔內的阿姆斯特朗數
- Python 程序:查找自然數總和
- Python 程序:使用匿名函數顯示 2 的冪
- Python 程序:查找可被另一個數整除的數字
- Python 程序:將十進制轉換為二進制,八進制和十六進制
- Python 程序:查找字符的 ASCII 值
- Python 程序:查找 HCF 或 GCD
- Python 程序:查找 LCM
- Python 程序:查找數字的因數
- Python 程序:制作一個簡單的計算器
- Python 程序:打亂紙牌
- Python 程序:顯示日歷
- Python 程序:使用遞歸顯示斐波那契數列
- Python 程序:使用遞歸查找自然數之和
- Python 程序:使用遞歸查找數字的階乘
- Python 程序:使用遞歸將十進制轉換為二進制
- Python 程序:相加兩個矩陣
- Python 程序:轉置矩陣
- Python 程序:將兩個矩陣相乘
- Python 程序:檢查字符串是否為回文
- Python 程序:從字符串中刪除標點符號
- Python 程序:按字母順序對單詞進行排序
- Python 程序:演示不同的集合操作
- Python 程序:計算每個元音的數量
- Python 程序:合并郵件
- Python 程序:查找圖像的大小(分辨率)
- Python 程序:查找文件哈希
- Programiz Swift 教程
- Swift 介紹
- Swift HelloWorld 程序
- Swift 變量,常量和字面值
- Swift 數據類型
- Swift 可選項
- Swift 的字符和字符串
- Swift 基本輸入和輸出
- Swift 表達式,語句和代碼塊
- Swift 注釋
- Swift 運算符
- Swift 運算符
- Swift 運算符的優先級和關聯性
- Swift 三元條件運算符
- Swift 按位和移位運算符
- Seift 流程控制
- Swift if,if...else語句
- switch語句
- Swift for-in循環
- Swift while和repeat...while循環
- Swift 中的嵌套循環
- break語句
- continue語句
- Guard語句
- Swift 集合
- Swift 數組
- Swift 集
- Swift 字典
- Swift 函數
- Swift 函數
- Swift 函數參數和返回值
- Swift 嵌套函數
- Swift 遞歸
- Swift 范圍
- Swift 函數重載
- Swift 進階
- Swift 閉包
- Swift 類型別名