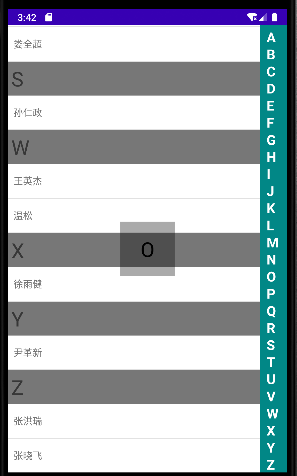
# 1. 聯系人快速索引

* 拖拽右邊索引,ListView聯動;
* 顯示中間標識,表示當前選擇為多少;
# 2. 實現
也就是:
* ListView的setSelection方法來設置定位;
* 自定義View;
* 處理onTouchEvent事件;
布局文件:
~~~
<RelativeLayout xmlns:android="http://schemas.android.com/apk/res/android"
xmlns:tools="http://schemas.android.com/tools"
android:layout_width="match_parent"
android:layout_height="match_parent"
android:orientation="vertical"
tools:context=".MainActivity">
<ListView
android:id="@+id/listView"
android:layout_width="match_parent"
android:layout_height="match_parent"
android:text="Hello World!"
/>
<com.weizu.contactindex.Index
android:id="@+id/myIndex"
android:layout_alignParentEnd="true"
android:layout_width="wrap_content"
android:layout_height="match_parent"
android:background="@color/teal_700"
/>
<TextView
android:id="@+id/tag"
android:gravity="center"
android:layout_centerInParent="true"
android:layout_width="80dp"
android:layout_height="80dp"
android:textSize="30sp"
android:textColor="@color/black"
android:background="#55000000"
android:padding="20dp"
android:visibility="gone"
/>
</RelativeLayout>
~~~
ListView對應的item文件:
~~~
<?xml version="1.0" encoding="utf-8"?>
<LinearLayout
xmlns:android="http://schemas.android.com/apk/res/android"
android:layout_width="match_parent"
android:layout_height="match_parent"
android:orientation="vertical"
>
<TextView
android:id="@+id/top_char"
android:gravity="center_vertical|left"
android:layout_width="match_parent"
android:layout_height="50dp"
android:textSize="30sp"
android:text="A"
android:paddingLeft="5dp"
android:background="#88000000"
/>
<TextView
android:id="@+id/name"
android:gravity="center_vertical|left"
android:text="李思"
android:layout_width="match_parent"
android:layout_height="50dp"
android:paddingLeft="8dp"
/>
</LinearLayout>
~~~
即:

然后自定義右邊豎直View,:
~~~
class Index: View{
constructor(context: Context?, attrs: AttributeSet?) : super(context, attrs)
private var paint: Paint = Paint()
var defaultTextSize = dp2px(20) // 默認字體大小
var defaultWidth = dp2px(40).toInt() // 默認寬度
var itemHeight = defaultTextSize // 每個詞的高度
var itemWidth = defaultTextSize // 每個詞的寬度
val defaultPaddingBottom = 10 // 默認底部距離
var touchIndex = -1 // 手指觸摸的下標
var mListener: OnIndexTouchListener? = null
init {
paint.isAntiAlias = true
paint.color = Color.WHITE
paint.textSize = defaultTextSize
paint.setTypeface(Typeface.DEFAULT_BOLD)
paint.setTextAlign(Paint.Align.CENTER)
}
val words = listOf<String>("A", "B", "C", "D", "E", "F", "G", "H", "I",
"J", "K", "L", "M", "N", "O", "P", "Q", "R", "S", "T", "U", "V",
"W", "X", "Y", "Z")
override fun onMeasure(widthMeasureSpec: Int, heightMeasureSpec: Int) {
super.onMeasure(widthMeasureSpec, heightMeasureSpec)
var width = defaultWidth
if(MeasureSpec.getMode(widthMeasureSpec) == MeasureSpec.EXACTLY){
width = MeasureSpec.getSize(widthMeasureSpec)
}
val height = MeasureSpec.getSize(heightMeasureSpec)
setMeasuredDimension(width, height)
// 計算每一項的高度
itemHeight = ((height * 1.0f - defaultPaddingBottom) / words.size)
Log.e("TAG", "itemHeight: ${itemHeight}", )
}
override fun onDraw(canvas: Canvas?) {
super.onDraw(canvas)
for( i in 0 until words.size){
val word = words[i]
if(touchIndex == i){
paint.color = resources.getColor(R.color.purple_700)
} else{
paint.color = Color.WHITE
}
// 繪制一個矩形
var rect = Rect(0, (i * itemHeight).toInt(), itemWidth.toInt(), ((i + 1) * itemHeight).toInt())
val x = (itemWidth + paint.measureText(word)) / 2
val y = rect.centerY() + itemHeight / 2;
canvas?.drawText(word, x, y, paint)
}
}
override fun onTouchEvent(event: MotionEvent?): Boolean {
super.onTouchEvent(event)
when(event?.action){
MotionEvent.ACTION_DOWN, MotionEvent.ACTION_MOVE -> {
var currentIndex = (event.y / itemHeight).toInt()
if(currentIndex != touchIndex){
touchIndex = currentIndex
invalidate()
// 設置監聽
mListener?.onIndexTouch(touchIndex, words[touchIndex])
}
}
MotionEvent.ACTION_UP -> {
touchIndex = -1
invalidate()
}
}
return true
}
fun dp2px(dp: Int): Float{
return resources.displayMetrics.density * dp
}
fun setOnIndexTouchListener(l: OnIndexTouchListener){
mListener = l
}
interface OnIndexTouchListener{
fun onIndexTouch(index: Int, word: String)
}
}
~~~
在其中完成測量和繪制,在測量中規定了默認的寬度,高度默認為設置的填充父控件,這里也就是全屏。然后根據這個高度來平均分配26個字母,也就是itemHeight。然后在onDraw方法中繪制一個小矩形,大小也就是默認寬度和itemHeight,即均勻分配的26個矩形填充整個View。然后計算字體應該放置的位置,使用:
~~~
val x = (itemWidth + paint.measureText(word)) / 2
val y = rect.centerY() + itemHeight / 2;
~~~
進行簡單計算,當然這里字體從效果上來看并沒有居中顯示。后續再繼續深入學習。
然后就是對觸摸事件的處理,也就是復寫onTouchEvent方法,使用當前手指在屏幕上的坐標y值除以itemHeight得到邏輯上的每個字母的下標。然后判斷是否和當前下標相等,如果不等,就表示手指移動了,故而需要更新該下標值以及對應的刷新屏幕,也就是調用invalidate方法。
然后就是在MainActivity中TextView的顯示和隱藏,以及對ListView的setSelection()來設置移動,由于比較簡單,這里就直接貼出代碼:
~~~
class MainActivity : AppCompatActivity() {
val myIndex by lazy { findViewById<Index>(R.id.myIndex) }
val listView by lazy { findViewById<ListView>(R.id.listView) }
val tag by lazy { findViewById<TextView>(R.id.tag) }
var datas = mutableListOf<String>("阿雷", "李四", "李思", "張曉飛", "胡繼群",
"劉暢", "尹革新", "溫松", "李鳳秋", "婁全超", "王英杰", "孫仁政", "姜宇航",
"張洪瑞", "侯亞帥", "徐雨健", "阿三")
lateinit var handler: Handler
override fun onCreate(savedInstanceState: Bundle?) {
super.onCreate(savedInstanceState)
setContentView(R.layout.activity_main)
initDatas()
listView.adapter = MyAdapter()
myIndex.setOnIndexTouchListener(object : Index.OnIndexTouchListener {
override fun onIndexTouch(index: Int, word: String) {
// 定位到listView的下標位置
listView.setSelection(getIndex(word))
// 顯示一下標簽Tag
showTag(word)
}
})
}
fun showTag(word: String){
tag.text = word
tag.visibility = View.VISIBLE
handler.removeCallbacksAndMessages(null)
handler.postDelayed({
tag.visibility = View.GONE
}, 2000)
}
fun getIndex(word: String): Int{
// 該下標為距離word最近的位置
var itemIndex = 0
for (i in 0 until datas.size){
val current = PinYinUtils.getPinYin(datas.get(i)).subSequence(0, 1)
if(word > current as String){
itemIndex = i
}
if(current == word){
itemIndex = i
break
}
}
return itemIndex
}
fun initDatas(){
Collections.sort(datas, object : java.util.Comparator<String> {
override fun compare(o1: String?, o2: String?): Int {
return PinYinUtils.getPinYin(o1).compareTo(PinYinUtils.getPinYin(o2))
}
})
handler = Handler(Looper.getMainLooper())
}
inner class MyAdapter: BaseAdapter() {
override fun getCount() = datas.size
override fun getItem(position: Int) = position
override fun getItemId(position: Int) = position.toLong()
override fun getView(position: Int, convertView: View?, parent: ViewGroup?): View {
var myViewHolder: MyViewHolder? = null
var view: View? = convertView
if(convertView == null){
myViewHolder = MyViewHolder()
view = View.inflate(this@MainActivity, R.layout.list_item, null)
myViewHolder.top_char = view.findViewById<TextView>(R.id.top_char)
myViewHolder.name = view.findViewById<TextView>(R.id.name)
} else{
myViewHolder = convertView.getTag() as MyViewHolder?
}
myViewHolder?.apply {
val current = PinYinUtils.getPinYin(datas.get(position)).subSequence(0, 1)
myViewHolder.top_char?.text = current
myViewHolder.name?.text = datas.get(position)
view?.setTag(myViewHolder)
// 設置出現過的不再顯示top_char
if(position != 0 && PinYinUtils.getPinYin(datas.get(position - 1)).subSequence(0, 1).equals(current)){
myViewHolder.top_char?.visibility = View.GONE
} else{
myViewHolder.top_char?.visibility = View.VISIBLE
}
}
return view!!
}
}
inner class MyViewHolder{
var top_char: TextView? = null
var name: TextView? = null
}
}
~~~
當然,這里還需要處理的一個最大的問題就在于字體在自定義View中并沒有居中。打算擬定新開一個目錄在專門學習對onDraw的繪制的學習。
- 介紹
- UI
- MaterialButton
- MaterialButtonToggleGroup
- 字體相關設置
- Material Design
- Toolbar
- 下拉刷新
- 可折疊式標題欄
- 懸浮按鈕
- 滑動菜單DrawerLayout
- NavigationView
- 可交互提示
- CoordinatorLayout
- 卡片式布局
- 搜索框SearchView
- 自定義View
- 簡單封裝單選
- RecyclerView
- xml設置點擊樣式
- adb
- 連接真機
- 小技巧
- 通過字符串ID獲取資源
- 自定義View組件
- 使用系統控件重新組合
- 旋轉菜單
- 輪播圖
- 下拉輸入框
- 自定義VIew
- 圖片組合的開關按鈕
- 自定義ViewPager
- 聯系人快速索引案例
- 使用ListView定義側滑菜單
- 下拉粘黏效果
- 滑動沖突
- 滑動沖突之非同向沖突
- onMeasure
- 繪制字體
- 設置畫筆Paint
- 貝賽爾曲線
- Invalidate和PostInvalidate
- super.onTouchEvent(event)?
- setShadowLayer與陰影效果
- Shader
- ImageView的scaleType屬性
- 漸變
- LinearGradient
- 圖像混合模式
- PorterDuffXfermode
- 橡皮擦效果
- Matrix
- 離屏繪制
- Canvas和圖層
- Canvas簡介
- Canvas中常用操作總結
- Shape
- 圓角屬性
- Android常見動畫
- Android動畫簡介
- View動畫
- 自定義View動畫
- View動畫的特殊使用場景
- LayoutAnimation
- Activity的切換轉場效果
- 屬性動畫
- 幀動畫
- 屬性動畫監聽
- 插值器和估值器
- 工具
- dp和px的轉換
- 獲取屏幕寬高
- JNI
- javah命令
- C和Java相互調用
- WebView
- Android Studio快捷鍵
- Bitmap和Drawable圖像
- Bitmap簡要介紹
- 圖片縮放和裁剪效果
- 創建指定顏色的Bitmap圖像
- Gradle本地倉庫
- Gradle小技巧
- RxJava+Okhttp+Retrofit構建網絡模塊
- 服務器相關配置
- node環境配置
- 3D特效
