
[TOC]
# 1. 前言
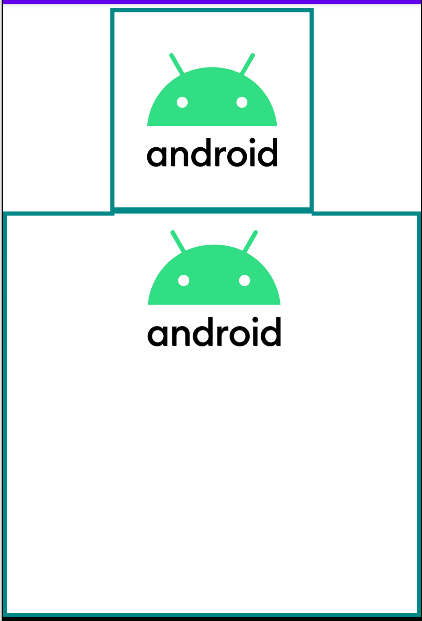
很多時候都需要圖片的縮放效果。在ImageView中就支持這個屬性,比如有下面這個圖像:

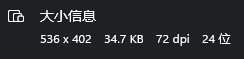
其詳細信息為:
但是,我們可以在ImageView中很容易將其載入到一個正方形的ImageView容器中,比如:
~~~
<ImageView
android:layout_gravity="center_horizontal"
android:layout_marginTop="4dp"
android:src="@drawable/a"
android:layout_width="200dp"
android:layout_height="200dp"
android:scaleType="fitCenter"
android:background="@drawable/border"
/>
~~~
為了觀察方便,這里為ImageView設置了一個邊框border.xml:
~~~
<?xml version="1.0" encoding="utf-8"?>
<shape xmlns:android="http://schemas.android.com/apk/res/android">
<!--設置邊框顏色-->
<stroke android:width="4dp" android:color="@color/teal_700"/>
<!--設置填充顏色-->
<solid android:color="@android:color/transparent"/>
<padding android:left="4dp" android:top="4dp" android:right="4dp" android:bottom="4dp"/>
</shape>
~~~
效果:

可見其便捷性。所以這里大致將所遇到的圖片縮放方法做一個總結。
# 2. 方法案例
## 2.1 使用Bitmap的createScaledBitmap
~~~
class ScaleBitmapDemo: View {
constructor(context: Context?) : super(context) {init()}
constructor(context: Context?, attrs: AttributeSet?) : super(context, attrs){init()}
constructor(context: Context?, attrs: AttributeSet?, defStyleAttr: Int) : super(
context,
attrs,
defStyleAttr
){init()}
private lateinit var targetBitmap: Bitmap
private lateinit var mPaint: Paint
private lateinit var rect: Rect
private var startX = 0
private var targetWidth = 0
private var targetHeight = 0
private var paddingSize = 0
private fun init(){
// 關閉硬件加速
setLayerType(LAYER_TYPE_SOFTWARE, null)
// 載入圖像
val decodeResource = BitmapFactory.decodeResource(resources, R.drawable.a)
// 因為這里沒有裁剪,所以計算一下寬度的縮放值即可
targetWidth = dp2px(200)
val scale = targetWidth * 1f / decodeResource.width
targetHeight = (decodeResource.height * 1f * scale).toInt()
mPaint = Paint(Paint.ANTI_ALIAS_FLAG)
mPaint.color = resources.getColor(R.color.teal_700, null)
mPaint.style = Paint.Style.FILL
// 左邊X坐標
startX = (resources.displayMetrics.widthPixels - targetWidth) / 2
rect = Rect(startX, 300, startX + targetWidth, 300 + targetHeight)
paddingSize = dp2px(4)
// 從當前存在的位圖,按一定的比例創建一個新的位圖。
targetBitmap = Bitmap.createScaledBitmap(decodeResource,
targetWidth - paddingSize * 2,
(targetHeight - scale * paddingSize * 5).toInt(), false)
}
override fun onDraw(canvas: Canvas?) {
super.onDraw(canvas)
canvas?.apply {
drawRect(rect, mPaint)
drawBitmap(targetBitmap, startX.toFloat() + paddingSize, 300f + paddingSize, mPaint)
}
}
private fun dp2px(value: Int) : Int{
return (resources.displayMetrics.density * value).toInt()
}
}
~~~
關鍵部分也就是:
~~~
// 從當前存在的位圖,按一定的比例創建一個新的位圖。
targetBitmap = Bitmap.createScaledBitmap
~~~
結果:

因為這里沒有裁剪,所以這里保持圖片長方形形狀進行縮放。
## 2.2 縮放圖片(createScaledBitmap),裁剪畫布
大致思路:首先判斷下圖像的大小和容器的大小,然后進行縮放圖像,需要確保圖像的寬高大于容器的寬高。然后將這個圖像所在的畫布進行裁剪,從中心裁剪出容器大小的圖像即可。代碼如下:
~~~
class ShaderScaleBitmapDemo : View {
constructor(context: Context?) : super(context) {
init()
}
constructor(context: Context?, attrs: AttributeSet?) : super(context, attrs) {
init()
}
constructor(context: Context?, attrs: AttributeSet?, defStyleAttr: Int) : super(
context,
attrs,
defStyleAttr
) {
init()
}
private lateinit var mPaint: Paint
private lateinit var mBitmap: Bitmap
private lateinit var mRect: Rect
private var translateCanvasX = 0f
private fun init() {
// 關閉硬件加速
setLayerType(LAYER_TYPE_SOFTWARE, null)
// 載入圖像
mBitmap = BitmapFactory.decodeResource(resources, R.drawable.a)
mPaint = Paint(Paint.ANTI_ALIAS_FLAG)
mPaint.color = resources.getColor(R.color.teal_700, null)
mPaint.style = Paint.Style.FILL_AND_STROKE
// 判斷圖像是否大于容器大小
val imagewidth = dp2px(200 - 4)
// 1 表示圖像的寬或者高比容器小,需要放大
// 2 表示圖像大小合適,直接裁剪即可
// 3 表示圖像大小過大,需要縮小
var flag = 1
if (mBitmap.width > imagewidth && mBitmap.height > imagewidth) {
if( mBitmap.height - imagewidth < 500 ) flag = 2
else flag = 3
}
// 縮放圖像
when(flag){
1, 3 -> {
mBitmap = scaleBitmapImage(mBitmap, imagewidth)
}
}
// 計算裁剪畫布的坐標
val clipRectLeft = (mBitmap.width - imagewidth) / 2
val clipRectTop = (mBitmap.width - imagewidth) / 2
val clipRectRight = left + imagewidth
val clipRectBottom = top + imagewidth
translateCanvasX = (resources.displayMetrics.widthPixels - imagewidth) * 1f/ 2
// 裁剪畫布的矩形
mRect = Rect(clipRectLeft, clipRectTop, clipRectRight, clipRectBottom)
}
private fun scaleBitmapImage(bitmap: Bitmap, w: Int): Bitmap {
var scale = 1f
scale = Math.min(scale, w * 1f / bitmap.width)
scale = Math.min(scale, w * 1f / bitmap.height)
return createBitmapByOriginAndScaleValue(bitmap, scale)
}
private fun createBitmapByOriginAndScaleValue(bitmap: Bitmap, scale:Float): Bitmap{
return Bitmap.createScaledBitmap(
bitmap,
(scale * bitmap.width + 0.5f).toInt(),
(scale * bitmap.height + 0.5f).toInt(),
false
)
}
override fun onDraw(canvas: Canvas?) {
super.onDraw(canvas)
canvas?.apply {
val saveLayer = saveLayer(0f, 0f,
translateCanvasX + mBitmap.width.toFloat(),
mBitmap.height.toFloat(),
mPaint
)
translate(translateCanvasX, 0f)
clipRect(mRect)
drawBitmap(mBitmap, dp2px(2).toFloat(), dp2px(2).toFloat(), mPaint)
restoreToCount(saveLayer)
}
}
private fun dp2px(value: Int): Int {
return (resources.displayMetrics.density * value).toInt()
}
}
~~~
結果也就是下面的第二個圖像,第一個是上面直接使用ImageView的效果:

看著有點像是縮放的大小差不多,但是因為在這個自定義View中沒有處理onMeasure方法,所以這里的容器的寬高是存在問題的,當然,這里不再處理。比如如果我們在使用的時候也指定border.xml:
~~~
<com.weizu.ShaderScaleBitmapDemo
android:layout_width="wrap_content"
android:layout_height="wrap_content"
android:background="@drawable/border"
/>
~~~
結果:
很明顯,達不到預期效果。但是這里如果僅僅是縮放和裁剪畫布已經達到的練習效果。之后會就如何自定義View來實現ImageView的效果進行實踐,所以這里不再介紹如何修復這里的bug。
## 2.3 另一種裁剪方式(createBitmap)
在上面的案例中繼續使用另一種裁剪效果,這里使用:
```
createBitmap(Bitmap source, int x, int y, int width, int height)
```
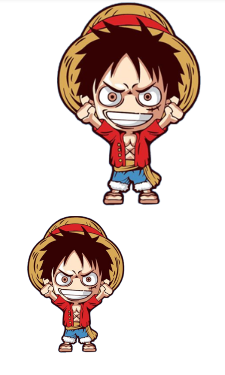
而不是裁剪畫布。也就是直接裁剪圖像,source是待裁剪的源圖像,x,y是裁剪位置的坐標,width和height是裁剪的高度。比如在《Android自定義控件開發入門與實戰》一文中使用:
```
Bitmap.createBitmap(src,src.getWidth()/3,src.getHeight()/3, src.getWidth()/3,src.getHeight()/3);
```
源圖像,其中紅色為輔助線:

最后得到的:
所以這里也可以不裁剪畫布,直接裁剪圖像即可。如下面的代碼:
~~~
private fun init() {
// 關閉硬件加速
setLayerType(LAYER_TYPE_SOFTWARE, null)
// 載入圖像
mBitmap = BitmapFactory.decodeResource(resources, R.drawable.a)
mPaint = Paint(Paint.ANTI_ALIAS_FLAG)
mPaint.color = resources.getColor(R.color.teal_700, null)
mPaint.style = Paint.Style.FILL_AND_STROKE
// 判斷圖像是否大于容器大小
val imagewidth = dp2px(200 - 4)
// 1 表示圖像的寬或者高比容器小,需要放大
// 2 表示圖像大小合適,直接裁剪即可
// 3 表示圖像大小過大,需要縮小
var flag = 1
if (mBitmap.width > imagewidth && mBitmap.height > imagewidth) {
if( mBitmap.height - imagewidth < 500 ) flag = 2
else flag = 3
}
// 縮放圖像
when(flag){
1, 3 -> {
mBitmap = scaleBitmapImage(mBitmap, imagewidth)
}
}
// 計算裁剪畫布的坐標
val clipRectLeft = (mBitmap.width - imagewidth) / 2
val clipRectTop = (mBitmap.width - imagewidth) / 2
val clipRectRight = left + imagewidth
val clipRectBottom = top + imagewidth
translateCanvasX = (resources.displayMetrics.widthPixels - imagewidth) * 1f/ 2
// 裁剪畫布的矩形
mRect = Rect(clipRectLeft, clipRectTop, clipRectRight, clipRectBottom)
}
private fun scaleBitmapImage(bitmap: Bitmap, w: Int): Bitmap {
var scale = 1f
scale = Math.min(scale, w * 1f / bitmap.width)
scale = Math.min(scale, w * 1f / bitmap.height)
return createBitmapByOriginAndScaleValue(bitmap, scale)
}
private fun createBitmapByOriginAndScaleValue(bitmap: Bitmap, scale:Float): Bitmap{
return Bitmap.createScaledBitmap(
bitmap,
(scale * bitmap.width + 0.5f).toInt(),
(scale * bitmap.height + 0.5f).toInt(),
false
)
}
override fun onDraw(canvas: Canvas?) {
super.onDraw(canvas)
canvas?.apply {
val saveLayer = saveLayer(0f, 0f,
translateCanvasX + mBitmap.width.toFloat(),
mBitmap.height.toFloat(),
mPaint
)
clipRect(mRect)
drawBitmap(mBitmap, dp2px(2).toFloat(), dp2px(2).toFloat(), mPaint)
restoreToCount(saveLayer)
}
}
~~~
然后在xml中指定大小和居中:
~~~
<com.weizu.ShaderScaleBitmapDemo
android:layout_width="200dp"
android:layout_height="200dp"
android:layout_gravity="center_horizontal"
/>
~~~
效果:

主要方法也就是:
~~~
private fun createBitmapByOriginAndScaleValue(bitmap: Bitmap, scale:Float): Bitmap{
return Bitmap.createScaledBitmap(
bitmap, // src
(scale * bitmap.width + 0.5f).toInt(), // dstWidth
(scale * bitmap.height + 0.5f).toInt(), // dstHeight
false // filter
)
}
~~~
值得注意的是,在上面的Boolean類型變量filter,這里直接設置為了false。該參數的意義是即是否給圖像添加濾波效果。如果設 置為 true,則能夠減少圖像中由于噪聲引起的突兀的孤立像素點或像素塊。
## 2.4 使用density來進行圖像縮放
Density 用于表示該Bitmap合適的屏幕dpi,可以分為inDensity和inTargetDensity兩個值,當著兩個值不等的時候,它會縮放圖像。比如:先獲取 Bitmap 的原始 Density,然后將 Density 放大兩倍,這樣在 顯示屏幕分辨率不變的情況下,顯示出來的圖片就應該縮小一半。對應代碼:
~~~
class Scale2BitmapDemo : View {
constructor(context: Context?) : super(context) {
init()
}
constructor(context: Context?, attrs: AttributeSet?) : super(context, attrs) {
init()
}
constructor(context: Context?, attrs: AttributeSet?, defStyleAttr: Int) : super(
context,
attrs,
defStyleAttr
) {
init()
}
private lateinit var mPaint: Paint
private lateinit var mBitmap: Bitmap
private fun init() {
// 關閉硬件加速
setLayerType(LAYER_TYPE_SOFTWARE, null)
// 加載圖片
mBitmap = BitmapFactory.decodeResource(resources, R.drawable.lf)
mPaint = Paint(Paint.ANTI_ALIAS_FLAG)
mPaint.color = resources.getColor(R.color.teal_700, null)
mPaint.style = Paint.Style.FILL_AND_STROKE
// 縮小圖片,這里使用inDensity
// 獲取 Bitmap 的原始 Density,然后將 Density 放大兩倍,這樣在
// 顯示屏幕分辨率不變的情況下,顯示出來的圖片就應該縮小一半。
mBitmap.density *= 2
}
override fun onDraw(canvas: Canvas?) {
super.onDraw(canvas)
canvas?.apply {
drawBitmap(mBitmap,0f, 0f, mPaint)
}
}
}
~~~
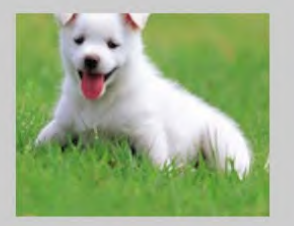
效果:
上面為原圖,下面為縮放后的圖像。
需要注意的是:Bitmap 在內存中的尺寸是沒有變化的,這種設置 Bitmap Density 的方式只會影響顯示縮放,而不會改變 Bitmap 本身在內存中的大。
- 介紹
- UI
- MaterialButton
- MaterialButtonToggleGroup
- 字體相關設置
- Material Design
- Toolbar
- 下拉刷新
- 可折疊式標題欄
- 懸浮按鈕
- 滑動菜單DrawerLayout
- NavigationView
- 可交互提示
- CoordinatorLayout
- 卡片式布局
- 搜索框SearchView
- 自定義View
- 簡單封裝單選
- RecyclerView
- xml設置點擊樣式
- adb
- 連接真機
- 小技巧
- 通過字符串ID獲取資源
- 自定義View組件
- 使用系統控件重新組合
- 旋轉菜單
- 輪播圖
- 下拉輸入框
- 自定義VIew
- 圖片組合的開關按鈕
- 自定義ViewPager
- 聯系人快速索引案例
- 使用ListView定義側滑菜單
- 下拉粘黏效果
- 滑動沖突
- 滑動沖突之非同向沖突
- onMeasure
- 繪制字體
- 設置畫筆Paint
- 貝賽爾曲線
- Invalidate和PostInvalidate
- super.onTouchEvent(event)?
- setShadowLayer與陰影效果
- Shader
- ImageView的scaleType屬性
- 漸變
- LinearGradient
- 圖像混合模式
- PorterDuffXfermode
- 橡皮擦效果
- Matrix
- 離屏繪制
- Canvas和圖層
- Canvas簡介
- Canvas中常用操作總結
- Shape
- 圓角屬性
- Android常見動畫
- Android動畫簡介
- View動畫
- 自定義View動畫
- View動畫的特殊使用場景
- LayoutAnimation
- Activity的切換轉場效果
- 屬性動畫
- 幀動畫
- 屬性動畫監聽
- 插值器和估值器
- 工具
- dp和px的轉換
- 獲取屏幕寬高
- JNI
- javah命令
- C和Java相互調用
- WebView
- Android Studio快捷鍵
- Bitmap和Drawable圖像
- Bitmap簡要介紹
- 圖片縮放和裁剪效果
- 創建指定顏色的Bitmap圖像
- Gradle本地倉庫
- Gradle小技巧
- RxJava+Okhttp+Retrofit構建網絡模塊
- 服務器相關配置
- node環境配置
- 3D特效