
本章讓用戶通過表單更新自己的個人信息,也是本系列文章最后一篇入門分享,之后碰到新穎、常用的功能會繼續分享給大家,如果大家有任何問題歡迎留言,我會盡快線上解答或編輯文章。
之后待我的項目上線時會再編輯一篇項目上線文章。
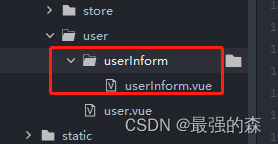
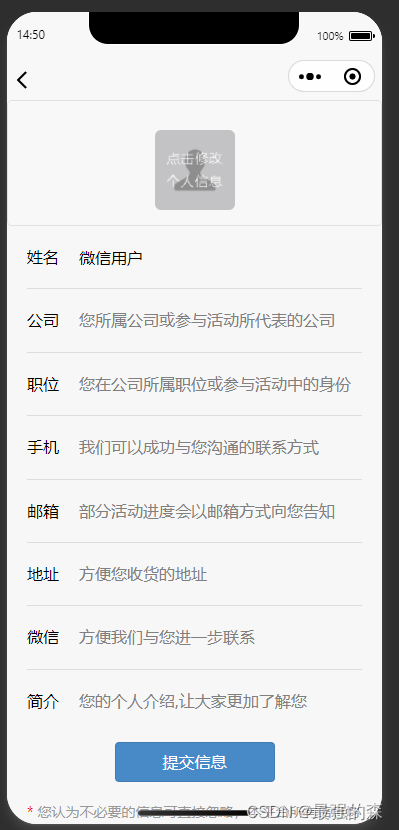
1.用戶信息填寫頁面
右鍵新建頁面,新建一個用戶填寫信息頁面:
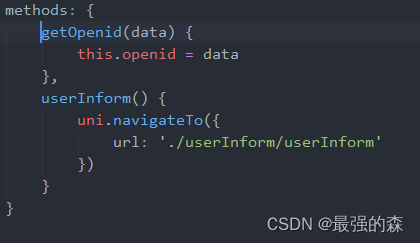
做好跳轉:
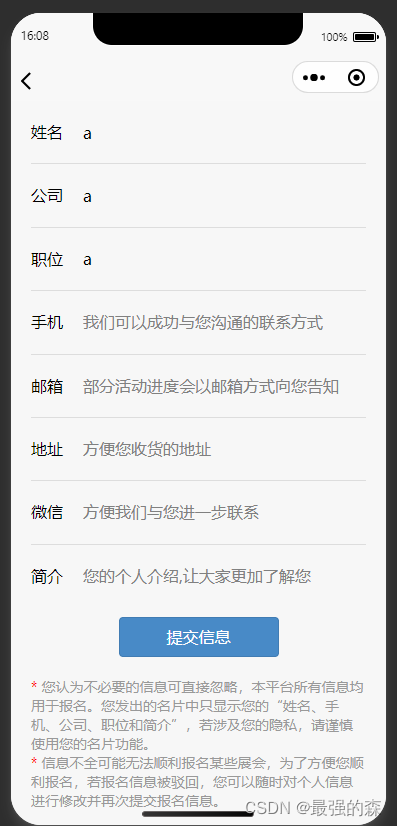
編輯用戶信息填寫頁面的內容:
經過編寫后,發現與之前章節過程差不多,然后我就在代碼中將注釋寫了出來幫助大家理清邏輯。大家直接看源碼研究一下吧:
userInform.vue:
```
<template>
<view>
<view class="uni-common-mt">
<view class="uni-form-item uni-column user-input">
<view class="title">姓名</view>
<view class="input">
<input class="uni-input" @input="onName" :value="information.username" maxlength="10" placeholder="我們對您的稱呼" />
</view>
</view>
<view class="fenjie"></view>
<view class="uni-form-item uni-column user-input">
<view class="title">公司</view>
<view class="input">
<input class="uni-input" @input="onCompany" :value="information.company" maxlength="30" placeholder="您所屬公司或參與活動所代表的公司" />
</view>
</view>
<view class="fenjie"></view>
<view class="uni-form-item uni-column user-input">
<view class="title">職位</view>
<view class="input">
<input class="uni-input" @input="onPosition" :value="information.position" maxlength="20" placeholder="您在公司所屬職位或參與活動中的身份" />
</view>
</view>
<view class="fenjie"></view>
<view class="uni-form-item uni-column user-input">
<view class="title">手機</view>
<view class="input">
<input class="uni-input" type="number" @input="onPhone" :value="information.phone" maxlength="11" placeholder="我們可以成功與您溝通的聯系方式" />
</view>
</view>
<view class="fenjie"></view>
<view class="uni-form-item uni-column user-input">
<view class="title">郵箱</view>
<view class="input">
<input class="uni-input" @input="onEmail" :value="information.email" maxlength="50" placeholder="部分活動進度會以郵箱方式向您告知" />
</view>
</view>
<view class="fenjie"></view>
<view class="uni-form-item uni-column user-input">
<view class="title">地址</view>
<view class="input">
<input class="uni-input" @input="onAddress" :value="information.address" maxlength="30" placeholder="方便您收貨的地址" />
</view>
</view>
<view class="fenjie"></view>
<view class="uni-form-item uni-column user-input">
<view class="title">微信</view>
<view class="input">
<input class="uni-input" @input="onWeixin" :value="information.weixin" maxlength="25" placeholder="方便我們與您進一步聯系" />
</view>
</view>
<view class="fenjie"></view>
<view class="uni-form-item uni-column user-input">
<view class="title">簡介</view>
<view class="input">
<input class="uni-input" @input="onInformation" :value="information.information" maxlength="200" placeholder="您的個人介紹,讓大家更加了解您" />
</view>
</view>
</view>
<button class="up-button" @click="upInfo()">提交信息</button>
<view class="notes">
<p><span>*</span>您認為不必要的信息可直接忽略,本平臺所有信息均用于報名。您發出的名片中只顯示您的“姓名、手機、公司、職位和簡介”,若涉及您的隱私,請謹慎使用您的名片功能。</p>
<p><span>*</span>信息不全可能無法順利報名某些展會,為了方便您順利報名,若報名信息被駁回,您可以隨時對個人信息進行修改并再次提交報名信息。</p>
</view>
</view>
</template>
<script>
export default {
data() {
return {
openid: '',
user: {},
information: {
username: '',
company: '',
position: '',
phone: '',
email: '',
address: '',
weixin: '',
information: '',
},
};
},
// 進入頁面從緩存獲取用戶openid
onShow() {
// console.log('ref', this.$refs)
var that = this
wx.getStorage({
key: 'openid',
success(res) {
// 跳轉userInform方法,傳入openid進行查詢用戶信息
that.userInform(res.data)
}
})
},
methods: {
// 綁定輸入監聽事件
onName(event) {
console.log(event)
this.information.username = event.target.value
},
onCompany(event) {
console.log(event)
this.information.company = event.target.value
},
onPosition(event) {
console.log(event)
this.information.position = event.target.value
},
onPhone(event) {
console.log(event)
this.information.phone = event.target.value
},
onEmail(event) {
console.log(event)
this.information.email = event.target.value
},
onAddress(event) {
console.log(event)
this.information.address = event.target.value
},
onWeixin(event) {
console.log(event)
this.information.weixin = event.target.value
},
onInformation(event) {
console.log(event)
this.information.information = event.target.value
},
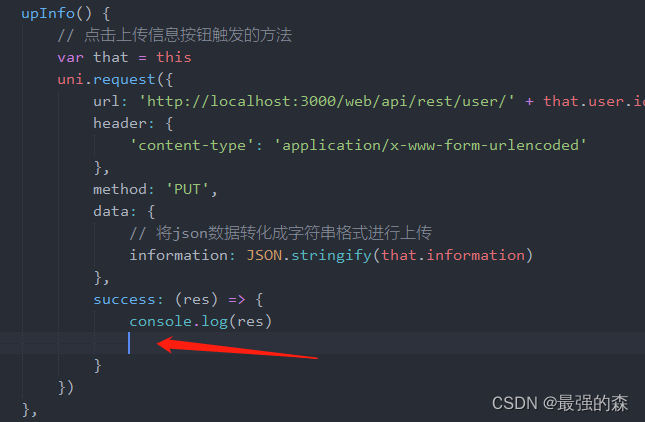
upInfo() {
// 點擊上傳信息按鈕觸發的方法
var that = this
uni.request({
url: 'http://localhost:3000/web/api/rest/user/' + that.user.id,
header: {
'content-type': 'application/x-www-form-urlencoded'
},
method: 'PUT',
data: {
// 將json數據轉化成字符串格式進行上傳
information: JSON.stringify(that.information)
},
success: (res) => {
console.log(res)
}
})
},
// 獲取用戶信息的方法
userInform(openid) {
var that = this
uni.request({
url: 'http://localhost:3000/web/is_register/' + openid,
header: {
'content-type': 'application/x-www-form-urlencoded'
},
method: 'GET',
success(res) {
console.log('用戶信息', res)
that.user = res.data[0]
that.information = that.user.information
},
error(err){
console.log(err)
}
})
}
}
}
</script>
<style lang="scss">
.user-input{
width: 335px;
margin: 20px auto;
display: flex;
.input{
width: 280px;
margin-left: 20px;
}
}
.fenjie{
width: 335px;
height: 1px;
background: #ddd;
margin: 0 auto;
}
.up-button{
width: 160px;
height:40px;
background: #488ac7;
border-radius: 4px;
font-size: 16px;
line-height: 40px;
color: white;
margin-top: 30px;
}
.notes{
width: 335px;
margin: 20px auto 50px;
font-size: 14px;
span{
color: red;
margin-right: 4px;
}
p{
color: #999;
}
}
</style>
```
最終實現的效果:
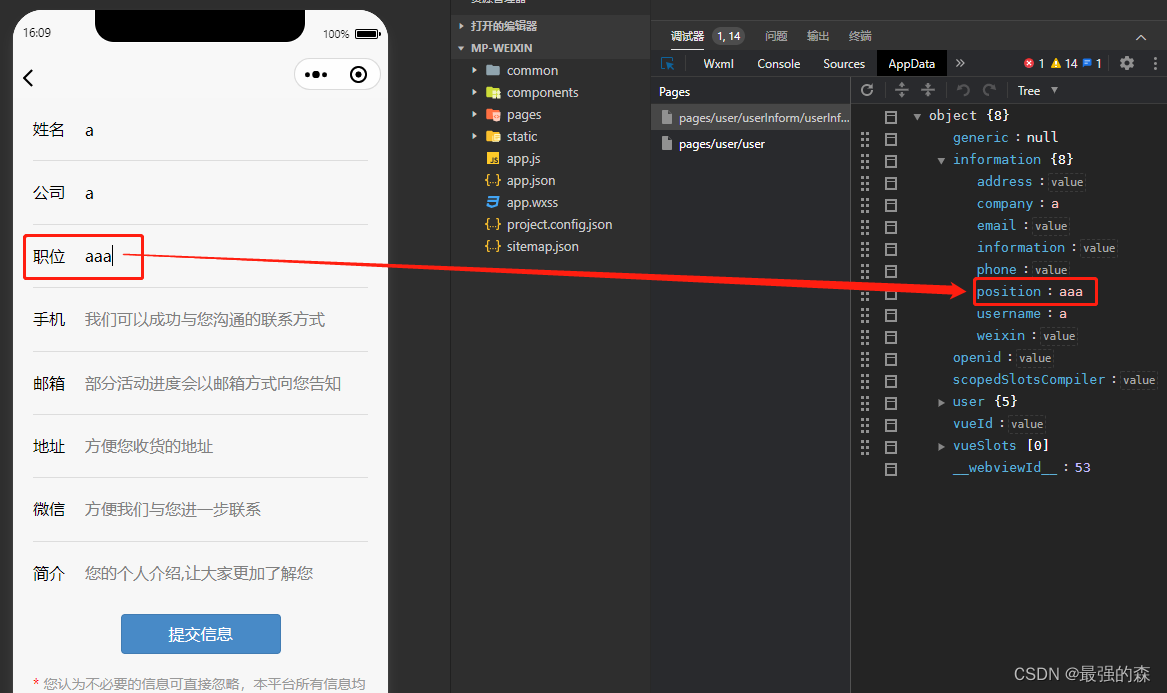
期間可以對照AppData進行綁定測試:
2.后端更新用戶信息接口
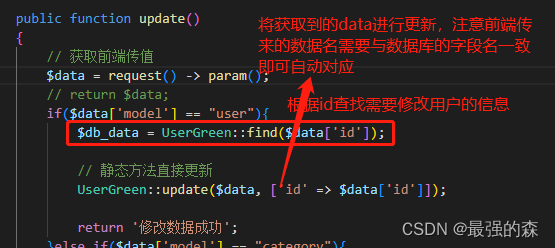
調整好接口傳參,測試調整,最終完成數據庫中的information字段數據更新。
3.整體邏輯
過程就是首先 進入頁面 ,然后 查詢 當前用戶信息,通過input輸入監聽事件 動態綁定 需要修改的用戶信息,然后將當前已修改的信息傳入后端進行 數據上傳 。之后再次進入該頁面查詢到的就是改動后的數據。
4.修改成功后的操作
點擊修改信息后,如果頁面沒有反應,用戶會懷疑自己的信息是否提交成功,所以我們就要給用戶一個反饋,例如 uni.showModal() 方法:
```
uni.showModal({
title: "修改成功",
content: "您已成功修改信息",
showCancel: false
})
```
可以直接在更新數據成功后給予用戶提示:
但根據我的需求,我希望用戶填寫信息后返回上一層,同時給用戶提示信息修改成功。
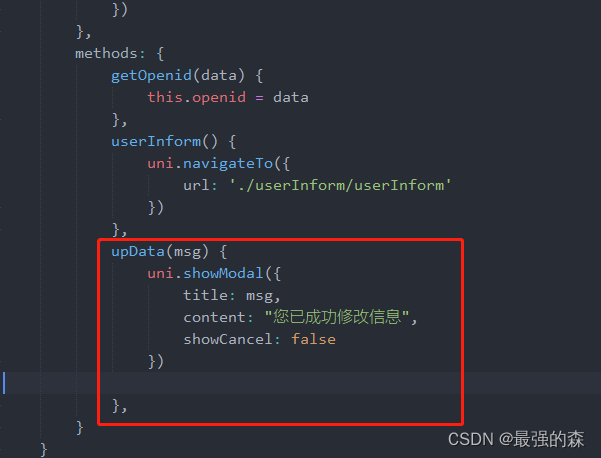
修改 修改用戶信息 的方法:
```
upInfo() {
// 點擊上傳信息按鈕觸發的方法
var that = this
uni.request({
url: 'http://localhost:3000/web/api/rest/user/' + that.user.id,
header: {
'content-type': 'application/x-www-form-urlencoded'
},
method: 'PUT',
data: {
// 將json數據轉化成字符串格式進行上傳
information: JSON.stringify(that.information)
},
success: (res) => {
console.log(res)
// 獲取頁面棧
let pages = getCurrentPages()
// 獲取上一頁棧
let prevPage = pages[ pages.length - 2 ]
// 跳轉上一頁
uni.navigateBack({
delta: 2
});
// 觸發上一頁 upData 函數(并攜帶參數)
prevPage.$vm.upData('數據已更新')
}
})
},
```
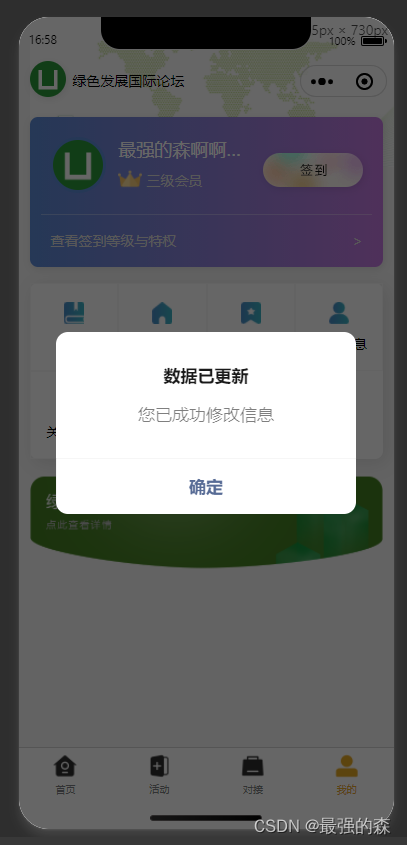
設置完成后,在上一頁中添加一個upData方法,同時在里邊放入彈窗接口:
測試:
到此,大家聯系之前的文章或根據自己的經驗進行研究下,過程都是基礎知識,每次一步一步編輯文章花費好幾個小時效率有些低,而且擔心大家嫌進度慢,所以這次就直接推源碼試一下了。
大家有任何問題可以評論區或私信聯系,我看到了就會及時與大家一起研究、解答。
5.獲取用戶名和頭像的補充
昨天比較急,今天補充一下用戶名和頭像的獲取方法。
之前文章說過,經過 整改后的獲取用戶信息 就是簡單的 上傳圖片和用戶表單 填寫用戶名input,所以本想著直接做表單填寫和圖片上傳就好了。
但仔細看文檔后發現,小程序還是為開發者們留了一些獲取用戶微信昵稱和頭像的機會的。
給大家看下效果:
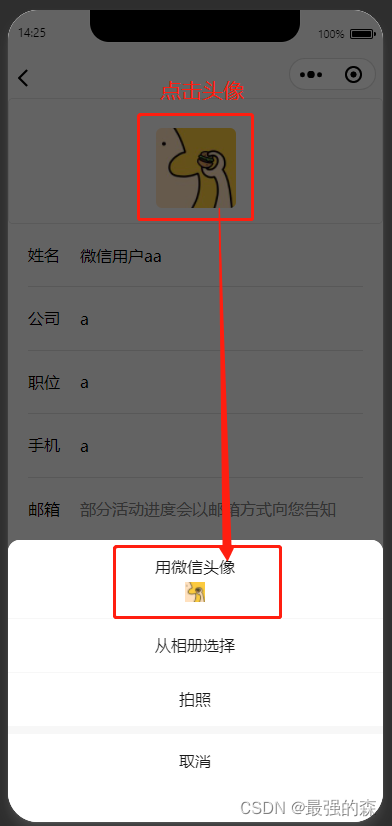
這樣做的好處就是給用戶更多的選擇,可以直接用微信頭像和昵稱,也可以從相冊選擇來自定義。
昵稱更加簡單:
```
<input type="nickname" class="weui-input" placeholder="請輸入昵稱"/>
```
用戶點擊input進行輸入時就會問用戶是否用微信昵稱,這個效果只有在真機時才會顯示。我對這個沒興趣,大家自行測試。
我以頭像的上傳為重點給大家演示一下:
首先 ,使用文檔提供的頭像上傳組件:
```
<button class="avatar-wrapper" open-type="chooseAvatar" @chooseavatar="onChooseAvatar">
<image class="avatar" :src="information.avatarUrl"></image>
</button>
```
第二步 ,綁定onchooseavatar方法:
```
// 綁定輸入監聽事件
onChooseAvatar(event) {
console.log('e', event)
// this.$set(this.information, 'avatarUrl', event.target.avatarUrl)
var that = this
// 開始上傳
uni.uploadFile({
// 服務器接口地址
url: 'http://localhost:3000/web/api/upload',
// PHP服務器需要正確的頭部信息
header: {
'Content-Type': 'multipart/form-data'
},
// 傳遞的參數
formData: {
// 傳入一個值,我是為了以后方便在后臺找圖片,傳openid為圖片命名使用,傳不傳都行,傳了后臺就接收
user: that.information.openid
},
// 本地圖片路徑,
// 通過點擊事件獲取到上傳的圖片,圖片為本地緩存鏈接,直接傳給后臺進行保存
filePath: event.target.avatarUrl,
// 服務器端接收下標 $_FILES['file']
name: 'file',
success: (res) => {
console.log('[圖片上傳] ', res)
// 成功后返回后臺的圖片鏈接,將其渲染到頁面中
that.information.avatarUrl = res.data
},
fail: (e) => {
console.log('上傳失敗', e)
this.showError('上傳失敗')
}
})
},
```
最后 ,我在php(tp6)中接收圖片上傳的接口分享給大家,其他版本的大家自行研究下:
```
public function upload() {
// 獲取表單上傳文件和字段
$file = request() -> file('file');
$data = request() -> param();
if($file && $data){
// 將圖片放置在圖片存放地址
$savename = 'http://127.0.0.1:3000/storage/'.\think\facade\Filesystem::disk('public')->putFile( $data['user'].'\/topic/', $file);
$savename = str_replace("\\", "/", $savename);
// 將地址返回
return $savename;
}
}
```
到此,頭像的獲取就可以了。
關于昵稱和頭像 ,在用戶上傳之前我們給出一個默認的灰色頭像和默認昵稱即可,例如:
- tp6+vue
- 1.工具和本地環境
- 2.啟動項目
- 3.路由、模型與數據庫操作
- 4.優化后端接口,前端使用axios實現接口功能
- 5.用戶登錄,bcrypt(hash)加密與驗證
- 6.用戶登錄(二),token驗證
- 7.分類的模型關聯和通用CRUD接口
- 8.使用vue的markdown編輯器并批量上傳圖片
- Node.js + Vue.js
- 工具,本地環境
- 2.1啟動項目
- 3.element-ui和vue-router路由的安裝和使用
- 4.使用axios,并創建接口上傳數據到mongodb數據庫
- 5.mongoodb數據庫的“刪、改、查”操作
- 6.mongodb數據庫無限層級的數據關聯(子分類)
- 7.使用mongodb數據庫關聯多個分類(關聯多個數據)
- 8.server端使用通用CRUD接口
- 9.圖片上傳
- 10.vue的富文本編輯器(vue2-editor)
- 11.動態添加分欄上傳多組數據
- 12-1.管理員模塊
- 13-1.搭建前臺web端頁面
- 1.使用sass工具搭建前臺web端頁面
- 2.sass工具的變量
- 3.使用flex布局并開始搭建web端
- 4.vue廣告輪播圖,并使用接口引入數據
- 5.使用字體圖標(iconfont)
- 6.卡片組件的封裝
- 14-1.生產環境編譯
- 1.環境編譯
- 2.購買域名服務器并解析域名到服務器
- 3.nginx配置web服務器并安裝網站環境
- 4.git拉取代碼到服務器
- 5.配置Nginx反向代理
- 6.遷移本地數據到服務器(mongodump)
- uni
- 1.工具&本地環境
- 2.頁面制作
- 3.頁面制作、組件與輪播
- 4.頁面跳轉與橫向滑動
- 5.用戶授權登錄和用戶信息獲取
- 6.用戶注冊和數據存儲
- 7.用戶填寫表單信息