
# 應用 StyleNet 和 NeuralStyle 項目
一旦我們對 CNN 進行了圖像識別訓練,我們就可以將網絡本身用于一些有趣的數據和圖像處理。 Stylenet 是一種嘗試從一張圖片中學習圖像樣式并將其應用于第二張圖片同時保持第二圖像結構(或內容)完整的過程。如果我們能夠找到與樣式強烈相關的中間 CNN 節點,這可能是可能的,與圖像的內容分開。
## 做好準備
Stylenet 是一個過程,它接收兩個圖像并將一個圖像的樣式應用于第二個圖像的內容。它基于 2015 年的著名論文“藝術風格的神經算法”(參見下一節的第一個要點)。作者在一些 CNN 中找到了一個屬性,其中存在中間層,它們似乎編碼圖片的樣式,有些編碼圖片的內容。為此,如果我們訓練樣式圖片上的樣式層和原始圖像上的內容層,并反向傳播那些計算的損失,我們可以將原始圖像更改為更像樣式圖像。
為了實現這一目標,我們將下載本文推薦的網絡;叫做 imagenet-vgg-19。還有一個 imagenet-vgg-16 網絡也可以使用,但是本文推薦使用 imagenet-vgg-19。
## 操作步驟
執行以下步驟:
1. 首先,我們將以`mat`格式下載預先訓練好的網絡。 `mat`格式是`matlab`對象,Python 中的`scipy`包有一個可以讀取它的方法。下載`mat`對象的鏈接在這里。我們將此模型保存在 Python 腳本所在的同一文件夾中,以供參考:
```py
http://www.vlfeat.org/matconvnet/models/beta16/imagenet-vgg-verydeep-19.mat
```
1. 我們將通過加載必要的庫來啟動我們的 Python 腳本:
```py
import os
import scipy.io
import scipy.misc
import imageio
from skimage.transform import resize
from operator import mul
from functools import reduce
import numpy as np
import tensorflow as tf
from tensorflow.python.framework import ops
ops.reset_default_graph()
```
1. 然后我們可以聲明兩個圖像的位置:原始圖像和樣式圖像。出于我們的目的,我們將使用本書的封面圖片作為原始圖像;對于風格形象,我們將使用 Vincent van Gough 的星夜。隨意使用您想要的任何兩張圖片。如果您選擇使用這些圖片,可以在本書的 GitHub 網站上找到 [https://github.com/nfmcclure/tensorflow_cookbook](https://github.com/nfmcclure/tensorflow_cookbook) (導航到 Styelnet 部分):
```py
original_image_file = 'temp/book_cover.jpg'
style_image_file = 'temp/starry_night.jpg'
```
1. 我們將為我們的模型設置一些參數:`mat`文件的位置,權重,學習率,代數以及輸出中間圖像的頻率。對于權重,有助于在原始圖像上高度加權樣式圖像。應根據所需結果的變化調整這些超參數:
```py
vgg_path = 'imagenet-vgg-verydeep-19.mat'
original_image_weight = 5.0
style_image_weight = 500.0
regularization_weight = 100
learning_rate = 10
generations = 100
output_generations = 25
beta1 = 0.9
beta2 = 0.999
```
1. 現在我們將使用`scipy`加載兩個圖像并更改樣式圖像以適合原始圖像尺寸:
```py
original_image = imageio.imread(original_image_file)
style_image = imageio.imread(style_image_file)
# Get shape of target and make the style image the same
target_shape = original_image.shape
style_image = resize(style_image, target_shape)
```
1. 從論文中,我們可以按照它們出現的順序定義層。我們將使用作者的命名約定:
```py
vgg_layers = ['conv1_1', 'relu1_1',
'conv1_2', 'relu1_2', 'pool1',
'conv2_1', 'relu2_1',
'conv2_2', 'relu2_2', 'pool2',
'conv3_1', 'relu3_1',
'conv3_2', 'relu3_2',
'conv3_3', 'relu3_3',
'conv3_4', 'relu3_4', 'pool3',
'conv4_1', 'relu4_1',
'conv4_2', 'relu4_2',
'conv4_3', 'relu4_3',
'conv4_4', 'relu4_4', 'pool4',
'conv5_1', 'relu5_1',
'conv5_2', 'relu5_2',
'conv5_3', 'relu5_3',
'conv5_4', 'relu5_4']
```
1. 現在我們將定義一個從`mat`文件中提取參數的函數:
```py
def extract_net_info(path_to_params):
vgg_data = scipy.io.loadmat(path_to_params)
normalization_matrix = vgg_data['normalization'][0][0][0]
mat_mean = np.mean(normalization_matrix, axis=(0,1))
network_weights = vgg_data['layers'][0]
return mat_mean, network_weights
```
1. 根據加載的權重和`layer`定義,我們可以使用以下函數在 TensorFlow 中重新創建網絡。我們將遍歷每一層并使用適當的`weights`和`biases`分配相應的函數,如果適用:
```py
def vgg_network(network_weights, init_image):
network = {}
image = init_image
for i, layer in enumerate(vgg_layers):
if layer[1] == 'c':
weights, bias = network_weights[i][0][0][0][0]
weights = np.transpose(weights, (1, 0, 2, 3))
bias = bias.reshape(-1)
conv_layer = tf.nn.conv2d(image, tf.constant(weights), (1, 1, 1, 1), 'SAME')
image = tf.nn.bias_add(conv_layer, bias)
elif layer[1] == 'r':
image = tf.nn.relu(image)
else:
image = tf.nn.max_pool(image, (1, 2, 2, 1), (1, 2, 2, 1), 'SAME')
network[layer] = image
return(network)
```
1. 本文推薦了一些策略,用于將中間層分配給原始圖像和樣式圖像。雖然我們應該為原始圖像保留`relu4_2`,但我們可以為樣式圖像嘗試其他`reluX_1`層輸出的不同組合:
```py
original_layer = ['relu4_2']
style_layers = ['relu1_1', 'relu2_1', 'relu3_1', 'relu4_1', 'relu5_1']
```
1. 接下來,我們將運行前面的函數來獲取權重和均值。我們還需要均勻設置 VGG19 樣式層權重。如果您愿意,可以通過更改權重進行實驗。現在,我們假設它們對于兩個層都是 0.5:
```py
# Get network parameters
normalization_mean, network_weights = extract_net_info(vgg_path)
shape = (1,) + original_image.shape
style_shape = (1,) + style_image.shape
original_features = {}
style_features = {}
# Set style weights
style_weights = {l: 1./(len(style_layers)) for l in style_layers}
```
1. 為了忠實于原始圖片外觀,我們希望添加一個損失值,將內容/原始特征與原始內容特征進行比較。為此,我們加載 VGG19 模型并計算原始內容特征的內容/原始特征:
```py
g_original = tf.Graph()
with g_original.as_default(), tf.Session() as sess1:
image = tf.placeholder('float', shape=shape)
vgg_net = vgg_network(network_weights, image)
original_minus_mean = original_image - normalization_mean
original_norm = np.array([original_minus_mean])
for layer in original_layers:
original_features[layer] = vgg_net[layer].eval(feed_dict={image: original_norm})
```
1. 與步驟 11 類似,我們希望將原始圖像的樣式特征更改為樣式圖片的樣式特征。為此,我們將為損失函數添加樣式損失值。此損失值需要查看我們預先確定的樣式層中樣式圖像的值。我們還將通過單獨的圖運行此操作。我們按如下方式計算這些樣式特征:
```py
# Get style image network
g_style = tf.Graph()
with g_style.as_default(), tf.Session() as sess2:
image = tf.placeholder('float', shape=style_shape)
vgg_net = vgg_network(network_weights, image)
style_minus_mean = style_image - normalization_mean
style_norm = np.array([style_minus_mean])
for layer in style_layers:
features = vgg_net[layer].eval(feed_dict={image: style_norm})
features = np.reshape(features, (-1, features.shape[3]))
gram = np.matmul(features.T, features) / features.size
style_features[layer] = gram
```
1. 我們啟動默認圖來計算損失和訓練步驟。首先,我們首先將隨機圖像初始化為 TensorFlow 變量:
```py
# Make Combined Image via loss function
with tf.Graph().as_default():
# Get network parameters
initial = tf.random_normal(shape) * 0.256
init_image = tf.Variable(initial)
vgg_net = vgg_network(network_weights, init_image)
```
1. 接下來,我們計算原始內容損失(將其縮進到默認圖下)。這個損失部分將盡可能保持原始圖像的結構完整:
```py
# Loss from Original Image
original_layers_w = {'relu4_2': 0.5, 'relu5_2': 0.5}
original_loss = 0
for o_layer in original_layers:
temp_original_loss = original_layers_w[o_layer] * original_image_weight *\
(2 * tf.nn.l2_loss(vgg_net[o_layer] - original_features[o_layer]))
original_loss += (temp_original_loss / original_features[o_layer].size)
```
1. 仍然在默認圖縮進下,我們創建第二個損失項,即樣式損失。此損失將比較我們預先計算的樣式特征與輸入圖像的樣式特征(隨機初始化):
```py
# Loss from Style Image
style_loss = 0
style_losses = []
for style_layer in style_layers:
layer = vgg_net[style_layer]
feats, height, width, channels = [x.value for x in layer.get_shape()]
size = height * width * channels
features = tf.reshape(layer, (-1, channels))
style_gram_matrix = tf.matmul(tf.transpose(features), features) / size
style_expected = style_features[style_layer]
style_losses.append(style_weights[style_layer] * 2 *
tf.nn.l2_loss(style_gram_matrix - style_expected) /
style_expected.size)
style_loss += style_image_weight * tf.reduce_sum(style_losses)
```
1. 第三個也是最后一個損失條款將有助于平滑圖像。我們在這里使用總變差損失來懲罰相鄰像素的劇烈變化,如下所示:
```py
total_var_x = reduce(mul, init_image[:, 1:, :, :].get_shape().as_list(), 1)
total_var_y = reduce(mul, init_image[:, :, 1:, :].get_shape().as_list(), 1)
first_term = regularization_weight * 2
second_term_numerator = tf.nn.l2_loss(init_image[:, 1:, :, :] - init_image[:, :shape[1]-1, :, :])
second_term = second_term_numerator / total_var_y
third_term = (tf.nn.l2_loss(init_image[:, :, 1:, :] - init_image[:, :, :shape[2]-1, :]) / total_var_x)
total_variation_loss = first_term * (second_term + third_term)
```
1. 接下來,我們結合損失項并創建優化函數和訓練步驟,如下所示:
```py
# Combined Loss
loss = original_loss + style_loss + total_variation_loss
# Declare Optimization Algorithm
optimizer = tf.train.AdamOptimizer(learning_rate, beta1, beta2)
train_step = optimizer.minimize(loss)
```
1. 現在我們運行訓練步驟,保存中間圖像,并保存最終輸出圖像,如下所示:
```py
# Initialize variables and start training
with tf.Session() as sess:
tf.global_variables_initializer().run()
for i in range(generations):
train_step.run()
# Print update and save temporary output
if (i+1) % output_generations == 0:
print('Generation {} out of {}, loss: {}'.format(i + 1, generations, sess.run(loss)))
image_eval = init_image.eval()
best_image_add_mean = image_eval.reshape(shape[1:]) + normalization_mean
output_file = 'temp_output_{}.jpg'.format(i)
imageio.imwrite(output_file, best_image_add_mean.astype(np.uint8))
# Save final image
image_eval = init_image.eval()
best_image_add_mean = image_eval.reshape(shape[1:]) + normalization_mean
output_file = 'final_output.jpg'
scipy.misc.imsave(output_file, best_image_add_mean)
```
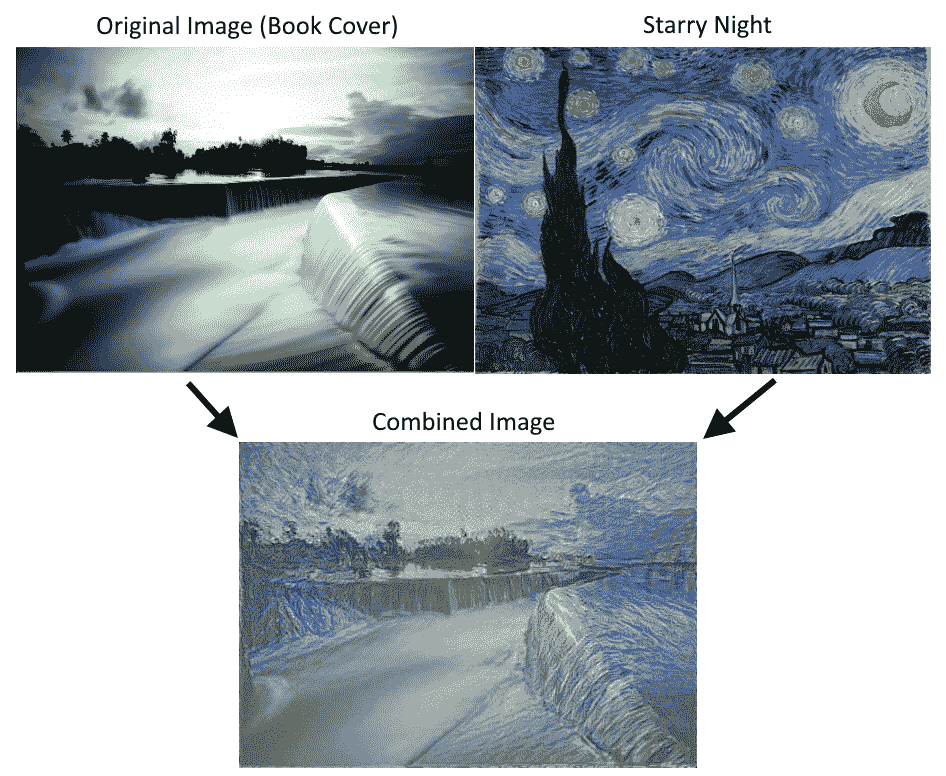
圖 6:使用 Stylenet 算法將書籍封面圖像與 Starry Night 相結合。請注意,可以通過更改腳本開頭的權重來使用不同的樣式重點
## 工作原理
我們首先加載兩個圖像,然后將預先訓練的網絡權重和指定的層加載到原始圖像和樣式圖像。我們計算了三種損失函數:原始圖像損失,樣式損失和總變差損失。然后我們訓練隨機噪聲圖片以使用樣式圖像的樣式和原始圖像的內容。
損失函數受 GitHub 神經風格項目的影響很大: [https://github.com/anishathalye/neural-style](https://github.com/anishathalye/neural-style) 。我們還強烈建議讀者查看這些項目中的代碼以獲得改進,更多細節,以及通常更強大的算法,可以提供更好的結果。
## 另見
* Gatys,Ecker,Bethge 的藝術風格神經算法。 2015 年: [https://arxiv.org/abs/1508.06576](https://arxiv.org/abs/1508.06576)
* Leon Gatys 在 CVPR 2016(計算機視覺和模式識別)上的一個很好的推薦視頻在這里: [https://www.youtube.com/watch?v=UFffxcCQMPQ](https://www.youtube.com/watch?v=UFffxcCQMPQ) [。](https://www.youtube.com/watch?v=UFffxcCQMPQ)
- TensorFlow 入門
- 介紹
- TensorFlow 如何工作
- 聲明變量和張量
- 使用占位符和變量
- 使用矩陣
- 聲明操作符
- 實現激活函數
- 使用數據源
- 其他資源
- TensorFlow 的方式
- 介紹
- 計算圖中的操作
- 對嵌套操作分層
- 使用多個層
- 實現損失函數
- 實現反向傳播
- 使用批量和隨機訓練
- 把所有東西結合在一起
- 評估模型
- 線性回歸
- 介紹
- 使用矩陣逆方法
- 實現分解方法
- 學習 TensorFlow 線性回歸方法
- 理解線性回歸中的損失函數
- 實現 deming 回歸
- 實現套索和嶺回歸
- 實現彈性網絡回歸
- 實現邏輯回歸
- 支持向量機
- 介紹
- 使用線性 SVM
- 簡化為線性回歸
- 在 TensorFlow 中使用內核
- 實現非線性 SVM
- 實現多類 SVM
- 最近鄰方法
- 介紹
- 使用最近鄰
- 使用基于文本的距離
- 使用混合距離函數的計算
- 使用地址匹配的示例
- 使用最近鄰進行圖像識別
- 神經網絡
- 介紹
- 實現操作門
- 使用門和激活函數
- 實現單層神經網絡
- 實現不同的層
- 使用多層神經網絡
- 改進線性模型的預測
- 學習玩井字棋
- 自然語言處理
- 介紹
- 使用詞袋嵌入
- 實現 TF-IDF
- 使用 Skip-Gram 嵌入
- 使用 CBOW 嵌入
- 使用 word2vec 進行預測
- 使用 doc2vec 進行情緒分析
- 卷積神經網絡
- 介紹
- 實現簡單的 CNN
- 實現先進的 CNN
- 重新訓練現有的 CNN 模型
- 應用 StyleNet 和 NeuralStyle 項目
- 實現 DeepDream
- 循環神經網絡
- 介紹
- 為垃圾郵件預測實現 RNN
- 實現 LSTM 模型
- 堆疊多個 LSTM 層
- 創建序列到序列模型
- 訓練 Siamese RNN 相似性度量
- 將 TensorFlow 投入生產
- 介紹
- 實現單元測試
- 使用多個執行程序
- 并行化 TensorFlow
- 將 TensorFlow 投入生產
- 生產環境 TensorFlow 的一個例子
- 使用 TensorFlow 服務
- 更多 TensorFlow
- 介紹
- 可視化 TensorBoard 中的圖
- 使用遺傳算法
- 使用 k 均值聚類
- 求解常微分方程組
- 使用隨機森林
- 使用 TensorFlow 和 Keras