
# 實現 DeepDream
受過訓練的 CNN 的另一個用途是利用一些中間節點檢測標簽特征(例如,貓的耳朵或鳥的羽毛)的事實。利用這一事實,我們可以找到轉換任何圖像的方法,以反映我們選擇的任何節點的節點特征。對于這個秘籍,我們將在 TensorFlow 的網站上瀏覽 DeepDream 教程,但我們將更詳細地介紹基本部分。希望我們可以讓讀者準備好使用 DeepDream 算法來探索 CNN 及其中創建的特征。
## 做好準備
TensorFlow 的官方教程展示了如何通過腳本實現 DeepDream(請參閱下一節中的第一個要點)。這個方法的目的是通過他們提供的腳本并解釋每一行。雖然教程很棒,但有些部分可以跳過,有些部分可以使用更多解釋。我們希望提供更詳細的逐行說明。我們還將在必要時使代碼符合 Python 3 標準。
## 操作步驟
執行以下步驟:
1. 為了開始使用 DeepDream,我們需要下載在 CIFAR-1000 上接受過 CNN 訓練的 GoogleNet:
```py
me@computer:~$ wget https://storage.googleapis.com/download.tensorflow.org/models/inception5h.zip
me@computer:~$ unzip inception5h.zip
```
1. 我們首先加載必要的庫并開始圖會話:
```py
import os
import matplotlib.pyplot as plt
import numpy as np
import PIL.Image
import tensorflow as tf
from io import BytesIO
graph = tf.Graph()
sess = tf.InteractiveSession(graph=graph)
```
1. 我們現在聲明解壓縮模型參數的位置(從步驟 1 開始)并將參數加載到 TensorFlow 圖中:
```py
# Model location
model_fn = 'tensorflow_inception_graph.pb'
# Load graph parameters
with tf.gfile.FastGFile(model_fn, 'rb') as f:
graph_def = tf.GraphDef()
graph_def.ParseFromString(f.read())
```
1. 我們為輸入創建一個占位符,保存 imagenet 平均值 117.0,然后使用正則化占位符導入圖定義:
```py
# Create placeholder for input
t_input = tf.placeholder(np.float32, name='input')
# Imagenet average bias to subtract off images
imagenet_mean = 117.0
t_preprocessed = tf.expand_dims(t_input-imagenet_mean, 0)
tf.import_graph_def(graph_def, {'input':t_preprocessed})
```
1. 接下來,我們將導入卷積層,以便在以后可視化并使用它們進行 DeepDream 處理:
```py
# Create a list of layers that we can refer to later
layers = [op.name for op in graph.get_operations() if op.type=='Conv2D' and 'import/' in op.name]
# Count how many outputs for each layer
feature_nums = [int(graph.get_tensor_by_name(name+':0').get_shape()[-1]) for name in layers]
```
1. 現在我們將選擇一個可視化的層。我們也可以通過名字選擇其他人。我們選擇查看特征號`139`。圖像以隨機噪聲開始:
```py
layer = 'mixed4d_3x3_bottleneck_pre_relu'
channel = 139
img_noise = np.random.uniform(size=(224,224,3)) + 100.0
```
1. 我們聲明了一個繪制圖像數組的函數:
```py
def showarray(a, fmt='jpeg'):
# First make sure everything is between 0 and 255
a = np.uint8(np.clip(a, 0, 1)*255)
# Pick an in-memory format for image display
f = BytesIO()
# Create the in memory image
PIL.Image.fromarray(a).save(f, fmt)
# Show image
plt.imshow(a)
```
1. 我們將通過創建一個從圖中按名稱檢索層的函數來縮短一些重復代碼:
```py
def T(layer): #Helper for getting layer output tensor return graph.get_tensor_by_name("import/%s:0"%layer)
```
1. 我們將創建的下一個函數是一個包裝函數,用于根據我們指定的參數創建占位符:
```py
# The following function returns a function wrapper that will create the placeholder
# inputs of a specified dtype
def tffunc(*argtypes):
'''Helper that transforms TF-graph generating function into a regular one.
See "resize" function below.
'''
placeholders = list(map(tf.placeholder, argtypes))
def wrap(f):
out = f(*placeholders)
def wrapper(*args, **kw):
return out.eval(dict(zip(placeholders, args)), session=kw.get('session'))
return wrapper
return wrap
```
1. 我們還需要一個將圖像大小調整為大小規格的函數。我們使用 TensorFlow 的內置圖像線性插值函數:`tf.image.resize.bilinear()`
```py
# Helper function that uses TF to resize an image
def resize(img, size):
img = tf.expand_dims(img, 0)
# Change 'img' size by linear interpolation
return tf.image.resize_bilinear(img, size)[0,:,:,:]
```
1. 現在我們需要一種方法來更新源圖像,使其更像我們使用的特征。我們通過指定如何計算圖像上的梯度來完成此操作。我們定義了一個函數,用于計算圖像上子區域(圖塊)的梯度,以加快計算速度。為了防止平鋪輸出,我們將在`x`和`y`方向上隨機移動或滾動圖像,這將平滑平鋪效果:
```py
def calc_grad_tiled(img, t_grad, tile_size=512):
'''Compute the value of tensor t_grad over the image in a tiled way.
Random shifts are applied to the image to blur tile boundaries over
multiple iterations.'''
# Pick a subregion square size
sz = tile_size
# Get the image height and width
h, w = img.shape[:2]
# Get a random shift amount in the x and y direction
sx, sy = np.random.randint(sz, size=2)
# Randomly shift the image (roll image) in the x and y directions
img_shift = np.roll(np.roll(img, sx, 1), sy, 0)
# Initialize the while image gradient as zeros
grad = np.zeros_like(img)
# Now we loop through all the sub-tiles in the image
for y in range(0, max(h-sz//2, sz),sz):
for x in range(0, max(w-sz//2, sz),sz):
# Select the sub image tile
sub = img_shift[y:y+sz,x:x+sz]
# Calculate the gradient for the tile
g = sess.run(t_grad, {t_input:sub})
# Apply the gradient of the tile to the whole image gradient
grad[y:y+sz,x:x+sz] = g
# Return the gradient, undoing the roll operation
return np.roll(np.roll(grad, -sx, 1), -sy, 0)
```
1. 現在我們可以聲明 DeepDream 函數。我們算法的目標是我們選擇的特征的平均值。損耗在梯度上運行,這取決于輸入圖像和所選特征之間的距離。策略是將圖像分成高頻和低頻,并計算低頻部分的梯度。將得到的高頻圖像再次分開并重復該過程。原始圖像和低頻圖像的集合稱為`octaves`。對于每次傳遞,我們計算梯度并將它們應用于圖像:
```py
def render_deepdream(t_obj, img0=img_noise,
iter_n=10, step=1.5, octave_n=4, octave_scale=1.4):
# defining the optimization objective, the objective is the mean of the feature
t_score = tf.reduce_mean(t_obj)
# Our gradients will be defined as changing the t_input to get closer to the values of t_score. Here, t_score is the mean of the feature we select.
# t_input will be the image octave (starting with the last)
t_grad = tf.gradients(t_score, t_input)[0] # behold the power of automatic differentiation!
# Store the image
img = img0
# Initialize the image octave list
octaves = []
# Since we stored the image, we need to only calculate n-1 octaves
for i in range(octave_n-1):
# Extract the image shape
hw = img.shape[:2]
# Resize the image, scale by the octave_scale (resize by linear interpolation)
lo = resize(img, np.int32(np.float32(hw)/octave_scale))
# Residual is hi. Where residual = image - (Resize lo to be hw-shape)
hi = img-resize(lo, hw)
# Save the lo image for re-iterating
img = lo
# Save the extracted hi-image
octaves.append(hi)
# generate details octave by octave
for octave in range(octave_n):
if octave>0:
# Start with the last octave
hi = octaves[-octave]
#
img = resize(img, hi.shape[:2])+hi
for i in range(iter_n):
# Calculate gradient of the image.
g = calc_grad_tiled(img, t_grad)
# Ideally, we would just add the gradient, g, but
# we want do a forward step size of it ('step'),
# and divide it by the avg. norm of the gradient, so
# we are adding a gradient of a certain size each step.
# Also, to make sure we aren't dividing by zero, we add 1e-7\.
img += g*(step / (np.abs(g).mean()+1e-7))
print('.',end = ' ')
showarray(img/255.0)
```
1. 通過我們所做的所有特征設置,我們現在可以運行 DeepDream 算法:
```py
# Run Deep Dream
if __name__=="__main__":
# Create resize function that has a wrapper that creates specified placeholder types
resize = tffunc(np.float32, np.int32)(resize)
# Open image
img0 = PIL.Image.open('book_cover.jpg')
img0 = np.float32(img0)
# Show Original Image
showarray(img0/255.0)
# Create deep dream
render_deepdream(T(layer)[:,:,:,139], img0, iter_n=15)
sess.close()
```
輸出如下:
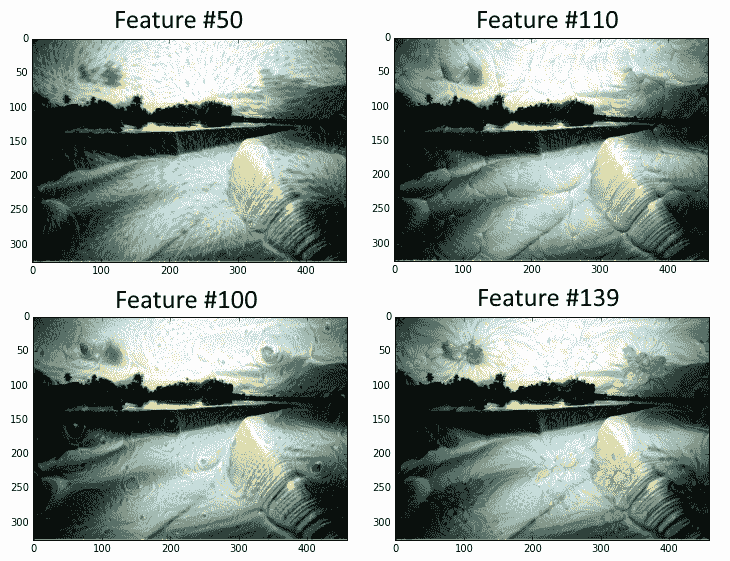
圖 7:本書的封面,貫穿 DeepDream 算法,其特征層編號為 50,110,100 和 139
## 更多
我們敦促讀者使用官方 DeepDream 教程作為進一步信息的來源,并訪問 DeepDream 上的原始 Google 研究博客文章(請參閱下面的第二個要點參見另請參閱部分)。
## 另見
* DeepDream 上的 TensorFlow 教程: [https://github.com/tensorflow/tensorflow/tree/master/tensorflow/examples/tutorials/deepdream](https://github.com/tensorflow/tensorflow/tree/master/tensorflow/examples/tutorials/deepdream)
* 關于 DeepDream 的最初 Google 研究博客文章: [https://research.googleblog.com/2015/06/inceptionism-going-deeper-into-neural.html](https://research.googleblog.com/2015/06/inceptionism-going-deeper-into-neural.html)
- TensorFlow 入門
- 介紹
- TensorFlow 如何工作
- 聲明變量和張量
- 使用占位符和變量
- 使用矩陣
- 聲明操作符
- 實現激活函數
- 使用數據源
- 其他資源
- TensorFlow 的方式
- 介紹
- 計算圖中的操作
- 對嵌套操作分層
- 使用多個層
- 實現損失函數
- 實現反向傳播
- 使用批量和隨機訓練
- 把所有東西結合在一起
- 評估模型
- 線性回歸
- 介紹
- 使用矩陣逆方法
- 實現分解方法
- 學習 TensorFlow 線性回歸方法
- 理解線性回歸中的損失函數
- 實現 deming 回歸
- 實現套索和嶺回歸
- 實現彈性網絡回歸
- 實現邏輯回歸
- 支持向量機
- 介紹
- 使用線性 SVM
- 簡化為線性回歸
- 在 TensorFlow 中使用內核
- 實現非線性 SVM
- 實現多類 SVM
- 最近鄰方法
- 介紹
- 使用最近鄰
- 使用基于文本的距離
- 使用混合距離函數的計算
- 使用地址匹配的示例
- 使用最近鄰進行圖像識別
- 神經網絡
- 介紹
- 實現操作門
- 使用門和激活函數
- 實現單層神經網絡
- 實現不同的層
- 使用多層神經網絡
- 改進線性模型的預測
- 學習玩井字棋
- 自然語言處理
- 介紹
- 使用詞袋嵌入
- 實現 TF-IDF
- 使用 Skip-Gram 嵌入
- 使用 CBOW 嵌入
- 使用 word2vec 進行預測
- 使用 doc2vec 進行情緒分析
- 卷積神經網絡
- 介紹
- 實現簡單的 CNN
- 實現先進的 CNN
- 重新訓練現有的 CNN 模型
- 應用 StyleNet 和 NeuralStyle 項目
- 實現 DeepDream
- 循環神經網絡
- 介紹
- 為垃圾郵件預測實現 RNN
- 實現 LSTM 模型
- 堆疊多個 LSTM 層
- 創建序列到序列模型
- 訓練 Siamese RNN 相似性度量
- 將 TensorFlow 投入生產
- 介紹
- 實現單元測試
- 使用多個執行程序
- 并行化 TensorFlow
- 將 TensorFlow 投入生產
- 生產環境 TensorFlow 的一個例子
- 使用 TensorFlow 服務
- 更多 TensorFlow
- 介紹
- 可視化 TensorBoard 中的圖
- 使用遺傳算法
- 使用 k 均值聚類
- 求解常微分方程組
- 使用隨機森林
- 使用 TensorFlow 和 Keras