
# 使用隨機森林
隨機森林算法建立在隨機選擇的觀察和/或隨機選擇的特征上的聚合決策樹上。我們不會介紹如何訓練決策樹,但會顯示有些類型的隨機森林可以使用梯度提升訓練,TensorFlow 可以為我們計算。
## 做好準備
基于樹的算法傳統上是非平滑的,因為它們基于對數據進行分區以最小化目標輸出中的方差。非光滑方法不適合基于梯度的方法。 TensorFlow 依賴于以下事實:模型中使用的函數是平滑的,并且它自動計算如何更改模型參數以最小化函數損失。 TensorFlow 繞過這個障礙的方式是對決策邊界進行平滑逼近。可以使用 softmax 函數或類似形狀函數來近似決策邊界。
決策樹將通過生成規則在數據集上提供硬拆分,例如,如果`x > 0.5`,則移動到樹的這個分支....這告訴我們整個數據子集將組合在一起或拆分,取決于`x`的值。這個的平滑近似處理概率而不是整個分裂。這意味著數據集的每次觀察都有可能存在于樹的每個末端節點中。下圖比較傳統決策樹和概率決策樹,可以更好地說明這些差異。
下圖說明了兩個示例決策樹之間的區別:
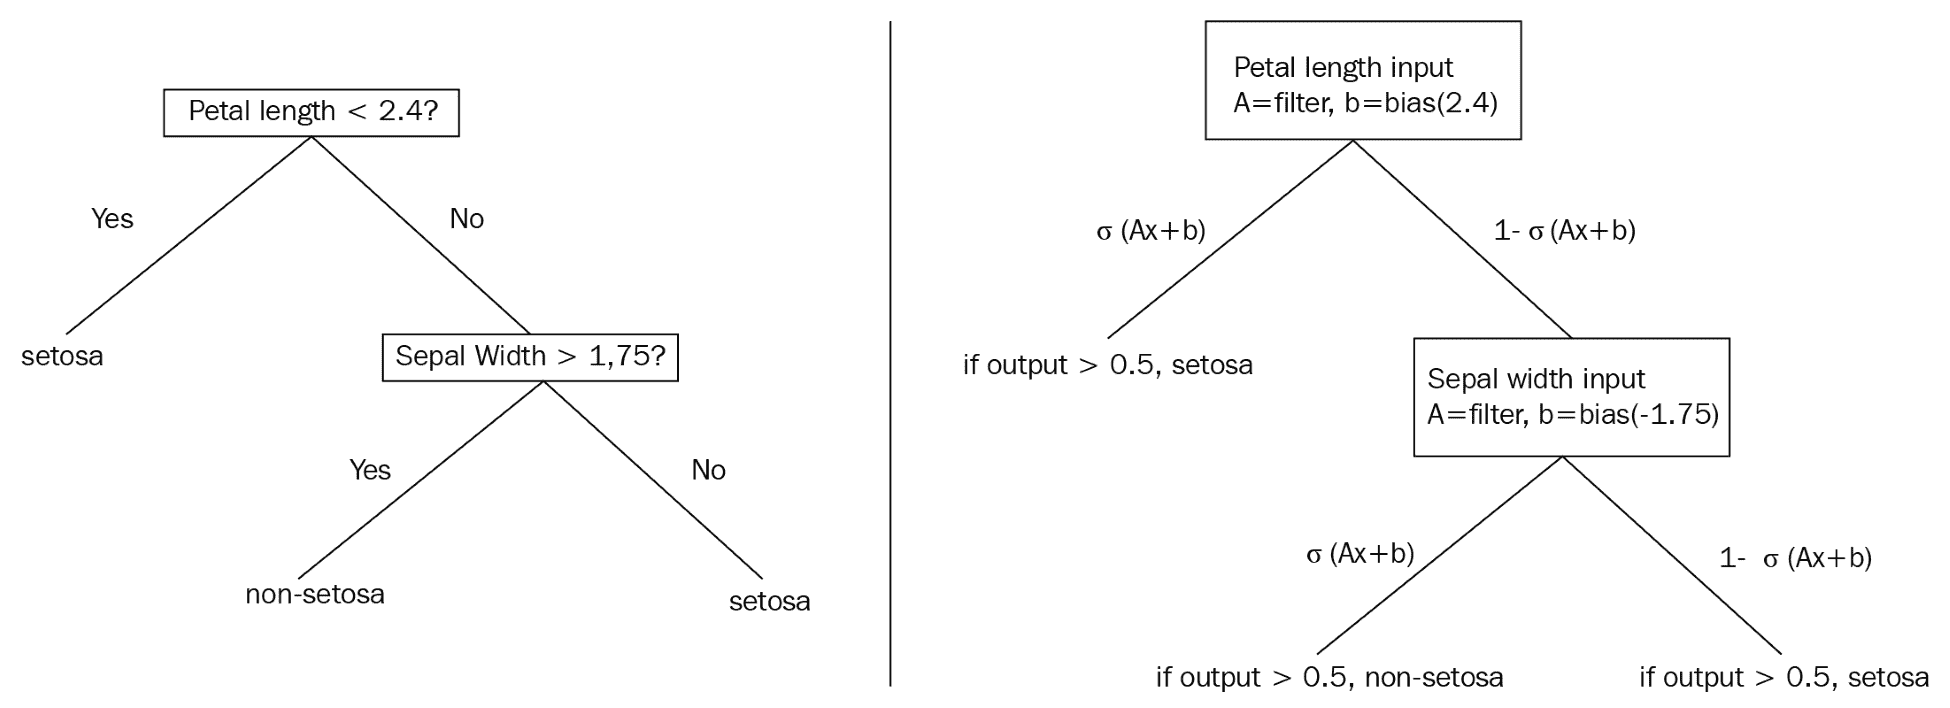
This diagram illustrates a standard decision tree (left) which is non-differentiable, and a smooth decision tree (right), which illustrates the usage of sigmoid functions to develop probabilities of an observation appearing in a labeled leaf or end-node.
> 我們選擇不詳細介紹函數的可微性,連續性和平滑性。本節的目的是提供關于如何通過可微分模型近似非可微分模型的直觀描述。有關更多數學詳細信息,我們建議讀者查看本秘籍末尾的“另請參閱”部分。
## 操作步驟
TensorFlow 包含了一些我們將依賴于此秘籍的默認模型估計函數。有兩個主要的梯度提升模型,回歸樹和分類樹。對于此示例,我們將使用回歸樹來預測波士頓房價數據集( [https://www.cs.toronto.edu/~delve/data/boston/bostonDetail.html](https://www.cs.toronto.edu/~delve/data/boston/bostonDetail.html) )。
1. 首先,我們加載必要的庫:
```py
import numpy as np
import tensorflow as tf
from keras.datasets import boston_housing
from tensorflow.python.framework import ops
ops.reset_default_graph()
```
1. 接下來,我們從 TensorFlow 估計器庫中設置我們將要使用的模型。在這里,我們將使用`BoostedTreesRegressor`模型,該模型用于使用梯度提升樹進行回歸:
```py
regression_classifier = tf.estimator.BoostedTreesRegressor
```
> 或者,對于二分類問題,讀者可以使用估計器`BoostedTreesClassifier`。目前不支持多類別分類,盡管它將來會在路線圖上。
1. 現在,我們可以使用 Keras 數據導入函數將波士頓住房價格數據集加載到一行中,如下所示:
```py
(x_train, y_train), (x_test, y_test) = boston_housing.load_data()
```
1. 在這里,我們可以設置一些模型參數;批量大小是一次訓練的訓練觀測數量,我們將訓練`500`迭代,梯度提升森林將有`100`樹,每棵樹的最大深度(分裂數)為`6`。
```py
# Batch size
batch_size = 32
# Number of training steps
train_steps = 500
# Number of trees in our 'forest'
n_trees = 100
# Maximum depth of any tree in forest
max_depth = 6
```
1. TensorFlow 提供的模型估計器需要輸入函數。我們將為估計器函數創建數據輸入函數。但首先,我們需要將數據放入正確標記的`numpy`數組格式的字典中。這些在 TensorFlow 中稱為特征列。純數字列尚不支持,因此我們將數字列放入自動存儲桶中,如下所示:(a)二進制特征將具有兩個存儲桶,(b)其他連續數字特征將被劃分為 5 個存儲桶。
```py
binary_split_cols = ['CHAS', 'RAD']
col_names = ['CRIM', 'ZN', 'INDUS', 'CHAS', 'NOX', 'RM', 'AGE', 'DIS', 'RAD', 'TAX', 'PTRATIO', 'B', 'LSTAT']
X_dtrain = {col: x_train[:, ix] for ix, col in enumerate(col_names)}
X_dtest = {col: x_test[:, ix] for ix, col in enumerate(col_names)}
# Create feature columns!
feature_cols = []
for ix, column in enumerate(x_train.T):
col_name = col_names[ix]
# Create binary split feature
if col_name in binary_split_cols:
# To create 2 buckets, need 1 boundary - the mean
bucket_boundaries = [column.mean()]
numeric_feature = tf.feature_column.numeric_column(col_name)
final_feature = tf.feature_column.bucketized_column(source_column=numeric_feature, boundaries=bucket_boundaries)
# Create bucketed feature
else:
# To create 5 buckets, need 4 boundaries
bucket_boundaries = list(np.linspace(column.min() * 1.1, column.max() * 0.9, 4))
numeric_feature = tf.feature_column.numeric_column(col_name)
final_feature = tf.feature_column.bucketized_column(source_column=numeric_feature, boundaries=bucket_boundaries)
# Add feature to feature_col list
feature_cols.append(final_feature)
```
> 將輸入函數的 shuffle 選項設置為`True`進行訓練,`False`進行測試是個好主意。我們想在每個周期改變`X`和`Y`訓練集,但不是在測試期間。
1. 我們現在使用 TensorFlow 估計器中輸入庫的`numpy`輸入函數聲明我們的數據輸入函數。我們將指定我們創建的訓練觀察詞典和一組`y`目標。
```py
input_fun = tf.estimator.inputs.numpy_input_fn(X_dtrain, y=y_train, batch_size=batch_size, num_epochs=10, shuffle=True)
```
1. 現在,我們宣布我們的模型并開始訓練:
```py
model = regression_classifier(feature_columns=feature_cols,
n_trees=n_trees,
max_depth=max_depth,
learning_rate=0.25,
n_batches_per_layer=batch_size)
model.train(input_fn=input_fun, steps=train_steps)
```
1. 在訓練期間,我們應該看到類似的輸出如下:
```py
INFO:tensorflow:Using default config.
WARNING:tensorflow:Using temporary folder as model directory: /tmp/tmpqxyd62cu
INFO:tensorflow:Using config: {'_model_dir': '/tmp/tmpqxyd62cu', '_tf_random_seed': None, '_save_summary_steps': 100, '_save_checkpoints_steps': None, '_save_checkpoints_secs': 600, '_session_config': None, '_keep_checkpoint_max': 5, '_keep_checkpoint_every_n_hours': 10000, '_log_step_count_steps': 100, '_train_distribute': None, '_device_fn': None, '_service': None, '_cluster_spec': <tensorflow.python.training.server_lib.ClusterSpec object at 0x7f43129d77b8>, '_task_type': 'worker', '_task_id': 0, '_global_id_in_cluster': 0, '_master': '', '_evaluation_master': '', '_is_chief': True, '_num_ps_replicas': 0, '_num_worker_replicas': 1}
INFO:tensorflow:Calling model_fn.
INFO:tensorflow:Done calling model_fn.
INFO:tensorflow:Create CheckpointSaverHook.
INFO:tensorflow:Graph was finalized.
INFO:tensorflow:Running local_init_op.
INFO:tensorflow:Done running local_init_op.
INFO:tensorflow:Saving checkpoints for 0 into /tmp/tmpqxyd62cu/model.ckpt.
INFO:tensorflow:loss = 691.09814, step = 1
INFO:tensorflow:global_step/sec: 587.923
INFO:tensorflow:loss = 178.62021, step = 101 (0.171 sec)
INFO:tensorflow:Saving checkpoints for 127 into /tmp/tmpqxyd62cu/model.ckpt.
INFO:tensorflow:Loss for final step: 37.436565.
Out[190]: <tensorflow.python.estimator.canned.boosted_trees.BoostedTreesRegressor at 0x7f43129d7470>
```
1. 為了評估我們的模型,我們為測試數據創建了另一個輸入函數,并獲得每個測試數據點的預測。以下是獲取預測并打印平均絕對誤差(MAE)的代碼:
```py
p_input_fun = tf.estimator.inputs.numpy_input_fn(X_dtest, y=y_test, batch_size=batch_size, num_epochs=1, shuffle=False)
# Get predictions
predictions = list(model.predict(input_fn=p_input_fun))
final_preds = [pred['predictions'][0] for pred in predictions]
# Get accuracy (mean absolute error, MAE)
mae = np.mean([np.abs((actual - predicted) / predicted) for actual, predicted in zip(y_test, final_preds)])
print('Mean Abs Err on test set: {}'.format(acc))
```
1. 其中以`0.71`打印出錯誤。請注意,由于隨機播放的隨機性,讀者可能會得到略微不同的結果。為了提高準確率,我們可以考慮增加數字周期或引入更低的學習率甚至是某種類型的衰減學習率(指數或線性):
```py
Mean Abs Err on test set: 0.7111111111111111
```
## 工作原理
在本文中,我們將說明如何使用 TensorFlow 估計器和 TensorFlow 提供的數據輸入函數。這些函數非常強大,不僅使我們的 TensorFlow 代碼更短,更易讀,而且還提高了算法的效率,減少了創建和測試算法所需的開發時間。
## 另見
有關決策樹,隨機森林,梯度提升森林以及可微分性,平滑性和連續性背后的數學的更多參考,我們鼓勵讀者閱讀以下參考文獻。
1. 決策樹教程。來自伯克利的機器學習速成課程。 [https://ml.berkeley.edu/blog/2017/12/26/tutorial-5/](https://ml.berkeley.edu/blog/2017/12/26/tutorial-5/)
2. 隨機森林 python 教程。克里斯阿爾邦。 [https://chrisalbon.com/machine_learning/trees_and_forests/random_forest_classifier_example/](https://chrisalbon.com/machine_learning/trees_and_forests/random_forest_classifier_example/)
3. 關于凸函數的精美 PDF 演示,它們如何用于機器學習,以及平滑度,可微性和連續性之間的差異。由弗朗西斯巴赫。最后還有大約 6 頁有用的參考文獻,讀者可能會覺得有用。 [https://www.di.ens.fr/~fbach/gradsto_allerton.pdf](https://www.di.ens.fr/~fbach/gradsto_allerton.pdf)
4. 關于軟決策樹的文章:將神經網絡提煉為軟決策樹。 Frosst 和 Hinton。 2017\. [https://cex.inf.unibz.it/resources/Frosst+Hinton-CExAIIA_2017.pdf](https://cex.inf.unibz.it/resources/Frosst+Hinton-CExAIIA_2017.pdf)
5. TensorFlow 實現了一個神經樹。作者:Benoit Deschamps。 [https://github.com/benoitdescamps/Neural-Tree](https://github.com/benoitdescamps/Neural-Tree)
- TensorFlow 入門
- 介紹
- TensorFlow 如何工作
- 聲明變量和張量
- 使用占位符和變量
- 使用矩陣
- 聲明操作符
- 實現激活函數
- 使用數據源
- 其他資源
- TensorFlow 的方式
- 介紹
- 計算圖中的操作
- 對嵌套操作分層
- 使用多個層
- 實現損失函數
- 實現反向傳播
- 使用批量和隨機訓練
- 把所有東西結合在一起
- 評估模型
- 線性回歸
- 介紹
- 使用矩陣逆方法
- 實現分解方法
- 學習 TensorFlow 線性回歸方法
- 理解線性回歸中的損失函數
- 實現 deming 回歸
- 實現套索和嶺回歸
- 實現彈性網絡回歸
- 實現邏輯回歸
- 支持向量機
- 介紹
- 使用線性 SVM
- 簡化為線性回歸
- 在 TensorFlow 中使用內核
- 實現非線性 SVM
- 實現多類 SVM
- 最近鄰方法
- 介紹
- 使用最近鄰
- 使用基于文本的距離
- 使用混合距離函數的計算
- 使用地址匹配的示例
- 使用最近鄰進行圖像識別
- 神經網絡
- 介紹
- 實現操作門
- 使用門和激活函數
- 實現單層神經網絡
- 實現不同的層
- 使用多層神經網絡
- 改進線性模型的預測
- 學習玩井字棋
- 自然語言處理
- 介紹
- 使用詞袋嵌入
- 實現 TF-IDF
- 使用 Skip-Gram 嵌入
- 使用 CBOW 嵌入
- 使用 word2vec 進行預測
- 使用 doc2vec 進行情緒分析
- 卷積神經網絡
- 介紹
- 實現簡單的 CNN
- 實現先進的 CNN
- 重新訓練現有的 CNN 模型
- 應用 StyleNet 和 NeuralStyle 項目
- 實現 DeepDream
- 循環神經網絡
- 介紹
- 為垃圾郵件預測實現 RNN
- 實現 LSTM 模型
- 堆疊多個 LSTM 層
- 創建序列到序列模型
- 訓練 Siamese RNN 相似性度量
- 將 TensorFlow 投入生產
- 介紹
- 實現單元測試
- 使用多個執行程序
- 并行化 TensorFlow
- 將 TensorFlow 投入生產
- 生產環境 TensorFlow 的一個例子
- 使用 TensorFlow 服務
- 更多 TensorFlow
- 介紹
- 可視化 TensorBoard 中的圖
- 使用遺傳算法
- 使用 k 均值聚類
- 求解常微分方程組
- 使用隨機森林
- 使用 TensorFlow 和 Keras