
# 9O WebDriver – 定位元素:第 4b 部分(XPath 續)
> 原文: [https://javabeginnerstutorial.com/selenium/9o-webdriver-locating-elements-4b/](https://javabeginnerstutorial.com/selenium/9o-webdriver-locating-elements-4b/)
嗨冠軍! 歡迎來到我們關于定位元素的最后一篇文章。 好極了!!!
這是我們上一篇文章“[9n。 WebDriver – 定位元素:第 4a 部分(由 XPath 提供)](https://javabeginnerstutorial.com/selenium/9n-webdriver-locating-elements-4a/)”。 您以前曾經聽過我說過這個,然后您會再次聽我說過……在繼續使用 XPath 策略之前,請先閱讀第 4a 部分。
在這篇文章中,我們將研究以下技術,
1. 使用`Text()`
2. 使用`starts-with()`
3. 使用 XPath 軸
這些技術以及我們在第 4a 部分中看到的技術可以結合起來,并用于形成有效的 XPath,該 XPath 可以定位網頁上的任何元素。 現在通過示例來介紹當今的技術。
## 1.使用`text()`
通過提供與網頁上顯示的文本**完全相同的**文本,這是一種輕松定位元素的方法。
**注意:**
*當心! 即使錯誤地包含空格,您也可能遇到“`ElementNotFound`”異常。 在代碼中提供的文本必須與可見文本完全匹配,這一點非常重要,我的意思是從字面上看!*
**示例**:讓我們找到“Facebook 注冊”頁面上的“忘記帳戶?”鏈接。
右鍵點擊“忘記帳戶?”鏈接,然后選擇檢查元素以獲取相應的 HTML 代碼,如下所示,
```java
<a href="https://www.facebook.com/recover/initiate?lwv=111"
data-testid="forgot_account_link">Forgot account?</a>
```
讓我們通過提供出現在 Facebook 頁面上的文本來找到此鏈接。
*代碼:*
```java
driver.findElement(By.xpath("//a[text()='Forgot account?']"));
```
如果要查找包含部分文本的所有元素,可以將`contains()`和`text()`技術結合使用。 可以使用`findElements`方法在列表中獲取所有元素。
讓我們嘗試在同一示例中同時實現`contains()`和`text()`。 由于我們只有一個鏈接與該文本,因此將使用`findElement`方法。
```java
driver.findElement(By.xpath("//*[contains(text(),'Forgot')]"));
```
## 2.使用`starts-with()`
通過指定屬性的部分值(前綴),可以使用`starts-with()`查找元素。 當頁面重新加載時屬性值動態更改時,此功能非常有用。
**示例**:讓我們在“Facebook 注冊”頁面上找到“新密碼”文本框。
右鍵點擊“新密碼”文本框,然后選擇檢查元素以獲取相應的 HTML 代碼,
```java
<input class="inputtext _58mg _5dba _2ph-" data-type="text"
name="reg_passwd__" aria-required="1" placeholder="" id="u_0_d"
aria-label="New password" type="password">
```
讓我們通過提供`type`屬性的部分前綴值“通過”來找到此文本框。 請注意,“登錄”部分中的密碼字段還具有`type`作為`password`。
```java
<input class="inputtext" name="pass" id="pass" tabindex="2" type="password">
```
因此,第二個元素必須位于我們的案例中。
*代碼:*
```java
driver.findElement(By.xpath("(//input[starts-with(@type,'pass')])[2]"));
```
## 3.使用 XPath 軸
XPath 軸定義在當前節點瀏覽 DOM 的樹形結構時要考慮的相對于當前節點的節點集或方向。
下表(禮貌性表示: [w3schools](https://www.w3schools.com/xml/xpath_axes.asp) )顯示了所有 13 個可用的 XPath 軸及其結果。
| **軸名稱** | **結果** |
| --- | --- |
| 祖先 | 選擇當前節點的所有祖先(父,祖父級等) |
| 祖先或自己 | 選擇當前節點的所有祖先(父,祖父級等)和當前節點本身 |
| 屬性 | 選擇當前節點的所有屬性 |
| 子項 | 選擇當前節點的所有子節點 |
| 后代 | 選擇當前節點的所有后代(子代,孫代等) |
| 后代或自己 | 選擇當前節點的所有后代(子代,孫代等)和當前節點本身 |
| 之后 | 選擇當前節點的結束標記之后的文檔中的所有內容 |
| 之后的同級 | 選擇當前節點之后的所有同級 |
| 命名空間 | 選擇當前節點的所有名稱空間節點 |
| 父項 | 選擇當前節點的父節點 |
| 之前 | 選擇出現在文檔中當前節點之前的所有節點,但祖先,屬性節點和名稱空間節點除外 |
| 之前的同級 | 選擇當前節點之前的所有同級 |
| 自己 | 選擇當前節點 |
讓我們來看一些重要的
### 3a. 父軸
選擇當前節點的父級。
**示例**:讓我們找到位于 Facebook Sign Up 頁面左上方的 Facebook 徽標的錨標記。
在檢查元素后,
```java
<a href="https://www.facebook.com/" title="Go to Facebook Home">
<i class="fb_logo img sp_euCDsy2vhU4 sx_af4dba">
Facebook
</i>
</a>
```
*代碼:*
```java
driver.findElement(By.xpath("//i[@class='fb_logo']/parent::a"));
```
將找到具有`href`和`title`屬性的父節點“`a`”。
### 3b. 祖先軸
選擇當前節點的所有祖先(父代,祖父級等)。
**示例**:讓我們在“Facebook 注冊”頁面上找到文字“生日”。
Upon inspecting the element,
Birthday
*代碼:*
```java
driver.findElement(By.xpath("//select[@id='month']/ancestor::div[@class='_5k_5']/preceding-sibling::div"));
```
帶有 ID 的“`select`”標簽,選擇了“`month`”。 轉到類“`_5k_5`”的祖先`div`標簽。 然后到其前一個帶有“`div`”標簽的同級節點,其文本為“`Birthday`”。
選擇該特定示例以顯示可以組合多個軸以獲得所需的結果。
### 3c. 子軸
選擇當前節點的所有子節點
**示例**:讓我們找到“Facebook 注冊”頁面上的“登錄”按鈕。
Upon inspecting the element,
```java
<label class="uiButton uiButtonConfirm" for="u_0_q" id="loginbutton"></label>
```
*代碼:*
```java
driver.findElement(By.xpath("//label[@id='loginbutton']/child::input"));
```
標識為“`loginbutton`”的標簽的子節點-標識為“`u_0_q`”的輸入標簽。
### 3d. 后代軸
選擇當前節點的所有后代(子代,孫代等)。
**示例**:讓我們在“Facebook 注冊”頁面上找到“名字”文本框。
Upon inspecting the element,
First name
```java
<input id=”u_0_1″ class=”inputtext _58mg _5dba _2ph-” data-type=”text” name=”firstname” aria-required=”1″ placeholder=”” aria-label=”First name” type=”text”> </div>
```
*代碼:*
```java
driver.findElement(By.xpath("//div[contains(@class,'uiStickyPlaceholderInput')]/descendant::input"));
```
類別為`uiStickyPlaceholderInput`的`div`標簽的后代節點-ID 為`u_o_1`的輸入標簽已找到。
### 3e. 同級軸
選擇當前節點之后的所有同級
**示例**:讓我們在“Facebook 注冊”頁面頁腳部分中找到“登錄”鏈接。
Upon inspecting the element,
```java
<td class="_51m- hLeft plm">
<a href="/r.php" title="Sign Up for Facebook">Sign Up</a>
</td>
<td class="_51m- hLeft plm">
<a href="/login/" title="Log into Facebook">Log In</a>
</td>
```
*代碼:*
```java
driver.findElement(By.xpath("//td[@class='_51m- hLeft plm']/following-sibling::td/child::a"));
```
以下`td`標簽的同級類`_51m-hLeft plm`是另一個`td`標簽,其子對象是帶有標題“登錄 Facebook”的錨標簽。
將后繼同級和子級軸組合在一起,以在頁腳部分中找到“登錄”超鏈接。
### 3f. 上一個同級軸
選擇當前節點之前的所有同級
**示例**:讓我們找到“Facebook 注冊”頁面上的“女性”單選按鈕。
Upon inspecting the element,
```java
<span class="_5k_2 _5dba">
<input id="u_0_g" name="sex" value="1" type="radio">
<label class="_58mt" for="u_0_g">Female</label>
</span>
```
*代碼:*
```java
driver.findElement(By.xpath("//label[@class='_58mt']/preceding-sibling::input"));
```
“標簽”標簽的前面同級是“無線電”類型的`input`標簽。 這樣就找到了所需的單選按鈕。
這樣,就涵蓋了一些常用的 XPath 軸類型。
我們在 BrainBell 方面一直處于停滯狀態。 那為什么要延遲呢? 開始了,
**BrainBell** – **注意!** *注意您的大腦狀態。*
* *癥狀*:沒有任何東西被注冊,開始瀏覽文章或忘記您剛剛閱讀的內容。
* *診斷*:您的大腦超負荷。
* *補救*:休息一下! 但是記得很快回來??
*我將根據我的經驗個人建議 **Pomodoro 技術**。 它非常有效。 試一試!*
## 概覽
讓我們來看一個測試案例,該案例實現了迄今為止本文中涵蓋的所有技術,
*場景*
1. 打開 Firefox 瀏覽器。
2. 導航到 www.facebook.com
3. 使用`text()`找到“忘記帳戶?”鏈接
4. 將鏈接文本打印到控制臺
5. 使用`starts-with()`找到“新密碼”文本框
6. 輸入值“`test1234!`”
7. 使用子軸找到“登錄”按鈕
8. 將值屬性打印到控制臺
9. 使用父軸找到 Facebook 徽標
10. 將其`title`屬性的值打印到控制臺
11. 在頁腳部分的“兄弟姐妹”軸中找到“登錄”鏈接
12. 將其`title`屬性的值打印到控制臺
13. 使用上一個同級軸找到“女性”單選按鈕
14. 點擊單選按鈕
15. 使用祖先軸找到文本“生日”
16. 將其文本打印到控制臺
17. 使用后代軸找到“名字”文本框
18. 輸入值“首先測試”
19. 驗證 Eclipse IDE 控制臺的輸出屏幕和 JUnit 窗格是否成功
此方案的 JUnit 代碼是,
```java
package com.blog.junitTests;
import java.util.concurrent.TimeUnit;
import org.junit.After;
import org.junit.Before;
import org.junit.Test;
import org.openqa.selenium.By;
import org.openqa.selenium.WebDriver;
import org.openqa.selenium.WebElement;
import org.openqa.selenium.firefox.FirefoxDriver;
public class ElementLocatorTest4b {
// Declaring variables
private WebDriver driver;
private String baseUrl;
@Before
public void setUp() throws Exception {
// Selenium version 3 beta releases require system property set up
System.setProperty("webdriver.gecko.driver", "E:\\Softwares\\Selenium\\geckodriver-v0.10.0-win64\\geckodriver.exe");
// Create a new instance for the class FirefoxDriver
// that implements WebDriver interface
driver = new FirefoxDriver();
// Implicit wait for 5 seconds
driver.manage().timeouts().implicitlyWait(5, TimeUnit.SECONDS);
// Assign the URL to be invoked to a String variable
baseUrl = "https://www.facebook.com/";
}
@Test
public void testPageTitle() throws Exception {
// Open baseUrl in Firefox browser window
driver.get(baseUrl);
// Locate 'Forgot Account' link using XPath: text()
WebElement forgotAccLink = driver.findElement(By.xpath("//*[contains(text(),'Forgot')]"));
// Prints the link text to the console
System.out.println("Link text: " + forgotAccLink.getText());
// Locate 'New password' text box by XPath: using starts-with()
WebElement passwordNew = driver.findElement(By.xpath("(//input[starts-with(@type,'pass')])[2]"));
// Clear the default placeholder or any value present
passwordNew.clear();
// Enter/type the value to the text box
passwordNew.sendKeys("test1234!");
// Locate 'Log In' button using XPath: child axis
WebElement logIn = driver.findElement(By.xpath("//label[@id='loginbutton']/child::input"));
// Prints 'value' attribute to console
System.out.println("Child axis: " + logIn.getAttribute("value"));
// Locate 'Facebook' logo using XPath: parent axis
WebElement fbLogo = driver.findElement(By.xpath("//i[contains(@class,'fb_logo')]/parent::a"));
// Prints 'title' attribute's value to console
System.out.println("Parent axis: " + fbLogo.getAttribute("title"));
// Locate 'Log In' link in footer section using XPath: following-sibling axis
WebElement loginFooter = driver.findElement(By.xpath("//td[@class='_51m- hLeft plm']/following-sibling::td/child::a"));
//Prints 'title' attribute's value to console
System.out.println("Following-sibling: " + loginFooter.getAttribute("title"));
// Locate 'female' radio button using XPath: preceding-sibling axis
WebElement femaleRadioBtn = driver.findElement(By.xpath("//label[@class='_58mt']/preceding-sibling::input"));
// Click the radio button
femaleRadioBtn.click();
// Locate 'Birthday' text using XPath: ancestor axis
WebElement birthday = driver.findElement(By.xpath("//select[@id='month']/ancestor::div[@class='_5k_5']/preceding-sibling::div"));
//Prints text to console
System.out.println("Ancestor axis: " + birthday.getText());
// Locate 'first name' test box using XPath: descendant axis
WebElement firstName = driver.findElement(By.xpath("//div[contains(@class,'uiStickyPlaceholderInput')]/descendant::input"));
firstName.clear();
firstName.sendKeys("test first");
}
@After
public void tearDown() throws Exception {
// Close the Firefox browser
driver.close();
}
}
```
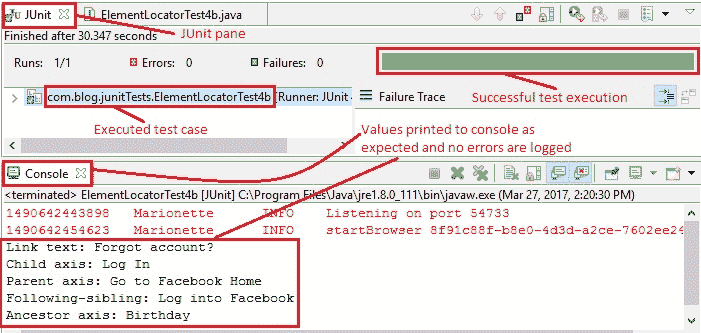
*執行結果:*
這段代碼將作為本文討論的每種技術的一部分進行解釋。
在 JUnit 窗口中,綠色條顯示測試用例已成功執行。 控制臺窗口顯示沒有任何錯誤。 它還可以按預期顯示所有打印結果。
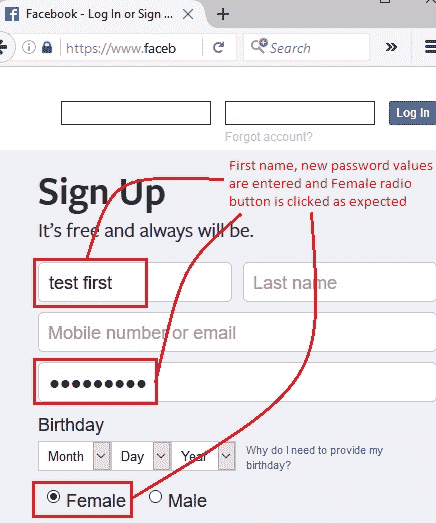
下圖顯示了成功執行測試腳本后獲得的 Firefox 輸出。
好吧! 現在,您應該全都適應定位策略。 我們將在所有即將到來的示例中看到這些策略的應用。 因此,請繼續關注此空間。
在另一個帖子中再見! 祝你有美好的一天!
- JavaBeginnersTutorial 中文系列教程
- Java 教程
- Java 教程 – 入門
- Java 的歷史
- Java 基礎知識:Java 入門
- jdk vs jre vs jvm
- public static void main(string args[])說明
- 面向初學者的 Java 類和對象教程
- Java 構造器
- 使用 Eclipse 編寫 Hello World 程序
- 執行順序
- Java 中的訪問修飾符
- Java 中的非訪問修飾符
- Java 中的數據類型
- Java 中的算術運算符
- Java 語句初學者教程
- 用 Java 創建對象的不同方法
- 內部類
- 字符串構建器
- Java 字符串教程
- Java 教程 – 變量
- Java 中的變量
- Java 中的局部變量
- Java 中的實例變量
- Java 引用變量
- 變量遮蓋
- Java 教程 – 循環
- Java for循環
- Java 教程 – 異常
- Java 異常教程
- 異常處理 – try-with-resources語句
- Java 異常處理 – try catch塊
- Java 教程 – OOPS 概念
- Java 重載
- Java 方法覆蓋
- Java 接口
- 繼承
- Java 教程 – 關鍵字
- Java 中的this關鍵字
- Java static關鍵字
- Java 教程 – 集合
- Java 數組教程
- Java 集合
- Java 集合迭代器
- Java Hashmap教程
- 鏈表
- Java 初學者List集合教程
- Java 初學者的Map集合教程
- Java 初學者的Set教程
- Java 初學者的SortedSet集合教程
- Java 初學者SortedMap集合教程
- Java 教程 – 序列化
- Java 序列化概念和示例
- Java 序列化概念和示例第二部分
- Java 瞬態與靜態變量
- serialVersionUID的用途是什么
- Java 教程 – 枚舉
- Java 枚舉(enum)
- Java 枚舉示例
- 核心 Java 教程 – 線程
- Java 線程教程
- Java 8 功能
- Java Lambda:初學者指南
- Lambda 表達式簡介
- Java 8 Lambda 列表foreach
- Java 8 Lambda 映射foreach
- Java 9
- Java 9 功能
- Java 10
- Java 10 獨特功能
- 核心 Java 教程 – 高級主題
- Java 虛擬機基礎
- Java 類加載器
- Java 開發人員必須知道..
- Selenium 教程
- 1 什么是 Selenium?
- 2 為什么要進行自動化測試?
- 3 Selenium 的歷史
- 4 Selenium 工具套件
- 5 Selenium 工具支持的瀏覽器和平臺
- 6 Selenium 工具:爭霸
- 7A Selenium IDE – 簡介,優點和局限性
- 7B Selenium IDE – Selenium IDE 和 Firebug 安裝
- 7C Selenium IDE – 突破表面:初探
- 7D Selenium IDE – 了解您的 IDE 功能
- 7E Selenium IDE – 了解您的 IDE 功能(續)。
- 7F Selenium IDE – 命令,目標和值
- 7G Selenium IDE – 記錄和運行測試用例
- 7H Selenium IDE – Selenium 命令一覽
- 7I Selenium IDE – 設置超時,斷點,起點
- 7J Selenium IDE – 調試
- 7K Selenium IDE – 定位元素(按 ID,名稱,鏈接文本)
- 7L Selenium IDE – 定位元素(續)
- 7M Selenium IDE – 斷言和驗證
- 7N Selenium IDE – 利用 Firebug 的優勢
- 7O Selenium IDE – 以所需的語言導出測試用例
- 7P Selenium IDE – 其他功能
- 7Q Selenium IDE – 快速瀏覽插件
- 7Q Selenium IDE – 暫停和反射
- 8 給新手的驚喜
- 9A WebDriver – 架構及其工作方式
- 9B WebDriver – 在 Eclipse 中設置
- 9C WebDriver – 啟動 Firefox 的第一個測試腳本
- 9D WebDriver – 執行測試
- 9E WebDriver – 用于啟動其他瀏覽器的代碼示例
- 9F WebDriver – JUnit 環境設置
- 9G WebDriver – 在 JUnit4 中運行 WebDriver 測試
- 9H WebDriver – 隱式等待
- 9I WebDriver – 顯式等待
- 9J WebDriver – 定位元素:第 1 部分(按 ID,名稱,標簽名稱)
- 9K WebDriver – 定位元素:第 2 部分(按className,linkText,partialLinkText)
- 9L WebDriver – 定位元素:第 3a 部分(按cssSelector定位)
- 9M WebDriver – 定位元素:第 3b 部分(cssSelector續)
- 9N WebDriver – 定位元素:第 4a 部分(通過 xpath)
- 9O WebDriver – 定位元素:第 4b 部分(XPath 續)
- 9P WebDriver – 節省時間的捷徑:定位器驗證
- 9Q WebDriver – 處理驗證碼
- 9R WebDriver – 斷言和驗證
- 9S WebDriver – 處理文本框和圖像
- 9T WebDriver – 處理單選按鈕和復選框
- 9U WebDriver – 通過兩種方式選擇項目(下拉菜單和多項選擇)
- 9V WebDriver – 以兩種方式處理表
- 9W WebDriver – 遍歷表元素
- 9X WebDriver – 處理警報/彈出框
- 9Y WebDriver – 處理多個窗口
- 9Z WebDriver – 最大化窗口
- 9AA WebDriver – 執行 JavaScript 代碼
- 9AB WebDriver – 使用動作類
- 9AC WebDriver – 無法輕松定位元素? 繼續閱讀...
- 10A 高級 WebDriver – 使用 Apache ANT
- 10B 高級 WebDriver – 生成 JUnit 報告
- 10C 高級 WebDriver – JUnit 報表自定義
- 10D 高級 WebDriver – JUnit 報告自定義續
- 10E 高級 WebDriver – 生成 PDF 報告
- 10F 高級 WebDriver – 截屏
- 10G 高級 WebDriver – 將屏幕截圖保存到 Word 文檔
- 10H 高級 WebDriver – 發送帶有附件的電子郵件
- 10I 高級 WebDriver – 使用屬性文件
- 10J 高級 WebDriver – 使用 POI 從 excel 讀取數據
- 10K 高級 WebDriver – 使用 Log4j 第 1 部分
- 10L 高級 WebDriver – 使用 Log4j 第 2 部分
- 10M 高級 WebDriver – 以無頭模式運行測試
- Vue 教程
- 1 使用 Vue.js 的 Hello World
- 2 模板語法和反應式的初探
- 3 Vue 指令簡介
- 4 Vue Devtools 設置
- 5 數據綁定第 1 部分(文本,原始 HTML,JavaScript 表達式)
- 6 數據綁定第 2 部分(屬性)
- 7 條件渲染第 1 部分(v-if,v-else,v-else-if)
- 8 條件渲染第 2 部分(v-if和v-show)
- 9 渲染列表第 1 部分(遍歷數組)
- 10 渲染列表第 2 部分(遍歷對象)
- 11 監聽 DOM 事件和事件修飾符
- 12 監聽鍵盤和鼠標事件
- 13 讓我們使用簡寫
- 14 使用v-model進行雙向數據綁定
- 15 表單輸入綁定
- 18 類綁定
- Python 教程
- Python 3 簡介
- Python 基礎知識 - 又稱 Hello World 以及如何實現
- 如何在 Windows 中安裝 python
- 適用于 Windows,Mac,Linux 的 Python 設置
- Python 數字和字符串
- Python 列表
- Python 集
- Python 字典
- Python 條件語句
- Python 循環
- Python 函數
- 面向對象編程(OOP)
- Python 中的面向對象編程
- Python 3 中的異常處理
- Python 3:猜數字
- Python 3:猜數字 – 回顧
- Python 生成器
- Hibernate 教程
- Hibernate 框架基礎
- Hibernate 4 入門教程
- Hibernate 4 注解配置
- Hibernate 4 的實體關系
- Hibernate 4 中的實體繼承模型
- Hibernate 4 查詢語言
- Hibernate 4 數據庫配置
- Hibernate 4 批處理
- Hibernate 4 緩存
- Hibernate 4 審計
- Hibernate 4 的并發控制
- Hibernate 4 的多租戶
- Hibernate 4 連接池
- Hibernate 自舉