
# 如何在 Windows 中安裝 python
> 原文: [https://javabeginnerstutorial.com/python-tutorial/how-to-install-python-in-windows/](https://javabeginnerstutorial.com/python-tutorial/how-to-install-python-in-windows/)
如果使用 Windows,則必須比使用類似 Unix 的系統(Linux,Mac)做更多的配置。
您唯一需要做的就是將 Python 和`pip`添加到`PATH`,以便通過命令行使用它。 這可以通過三種方式實現。
一種是臨時的,您編寫一個批處理腳本,每次您通過此腳本打開命令行時,該腳本都會啟動并設置`PATH`。 我不會更詳細地說明如何實現這一點,因為我認為這不是最好的方法,有時您想從自己所在的位置訪問 Python。
這兩個永久性解??決方案是相同的,唯一的區別是,在一個版本中,您必須手動執行相同的步驟,而另一個版本則需要自動執行。
自動版本是在安裝 Python 時選中“將 Python 3.5 添加到`PATH`”復選框。 這會自動在路徑中創建所需的條目,使您可以通過命令行訪問 Python。
另外,如果您選擇“自定義安裝”,您也可以選擇將 Python 添加到`PATH`中。
**在安裝過程中將 Python 添加到`PATH`**
第二個版本適用于那些錯過了上一步的人。 在這種情況下,您必須手動編輯路徑。 現在是以下步驟:
在 Windows 上打開“開始菜單”,然后選擇“控制面板”:
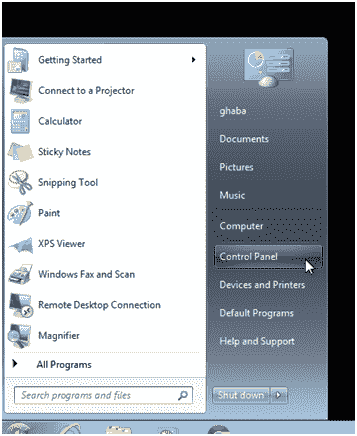
**打開控制面板**
在“控制面板”中選擇“系統和安全性”:
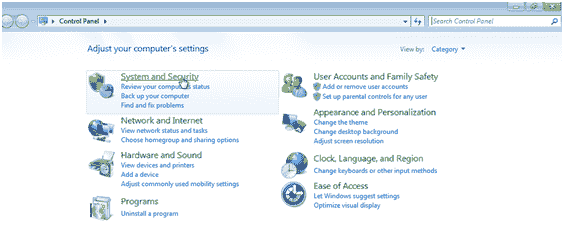
**選擇系統和安全性**
在“系統和安全性”視圖中,選擇“系統”:
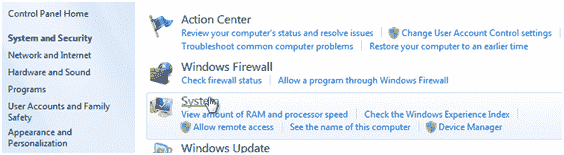
**選擇系統**
在“系統”視圖中,從左側選擇“高級系統設置”:
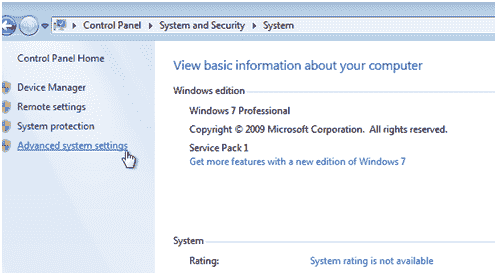
**單擊高級系統設置**
在“高級系統設置”窗口中,從底部選擇“環境變量…”:
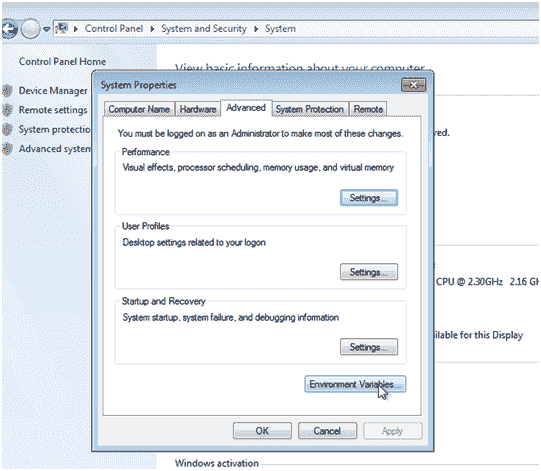
**打開環境變量**
現在,您可以在窗口下部的“系統變量”中搜索“路徑”條目。 在這里,您應該選擇條目,然后單擊“編輯...”。 現在,將 Python 的安裝位置添加到該條目的末尾,并用分號將其與之前的條目分開。 例如,我將輸入以下內容:
`C:\Python3\Scripts\; C:\Python3\`
Python 安裝下的腳本文件夾包含點,因此將其也添加到路徑是明智的。
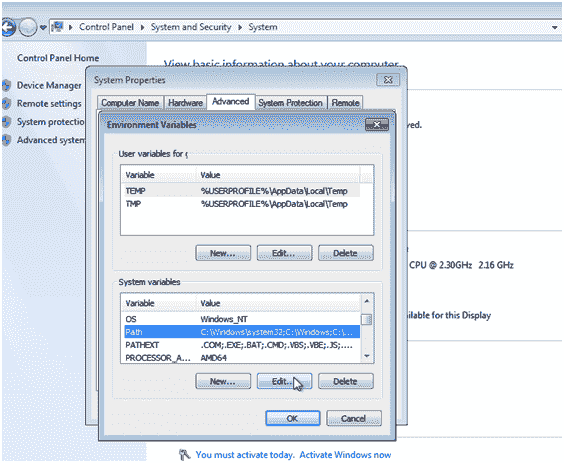
**系統變量**
另外,您可以僅為您的用戶創建一個環境變量。 在這種情況下,在窗口的上部選擇“新建”,稱為“...的用戶變量”,然后添加一個新條目,其中變量設置為“`PATH`”,并且值是您安裝 Python 的位置 - 在上一步中。
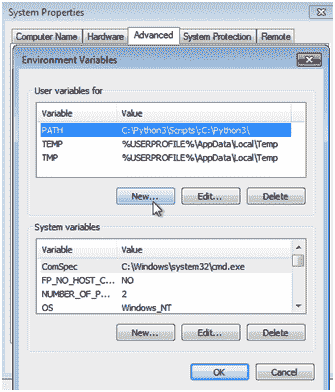
**用戶變量**
現在,如果您打開命令行并輸入 python ,您應該會看到類似以下命令提示符的內容:
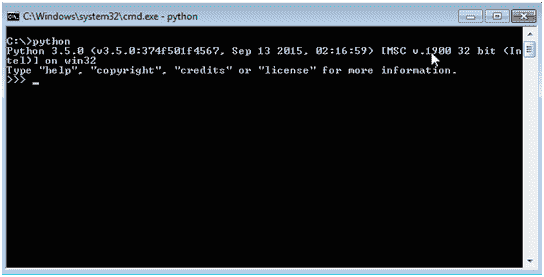
**使用 Python 的命令提示符**
就是這樣。 現在,您每次打開命令行即可訪問 Python。
如果要在其他平臺上安裝 python。 您可能希望在我們討論 [linux python 安裝的地方看到本文](https://javabeginnerstutorial.com/python-tutorial/python-setup-for-windows-mac-linux/)。
### 參考文獻
* [適用于 Windows 的 Python 版本](https://www.python.org/downloads/windows/)
- JavaBeginnersTutorial 中文系列教程
- Java 教程
- Java 教程 – 入門
- Java 的歷史
- Java 基礎知識:Java 入門
- jdk vs jre vs jvm
- public static void main(string args[])說明
- 面向初學者的 Java 類和對象教程
- Java 構造器
- 使用 Eclipse 編寫 Hello World 程序
- 執行順序
- Java 中的訪問修飾符
- Java 中的非訪問修飾符
- Java 中的數據類型
- Java 中的算術運算符
- Java 語句初學者教程
- 用 Java 創建對象的不同方法
- 內部類
- 字符串構建器
- Java 字符串教程
- Java 教程 – 變量
- Java 中的變量
- Java 中的局部變量
- Java 中的實例變量
- Java 引用變量
- 變量遮蓋
- Java 教程 – 循環
- Java for循環
- Java 教程 – 異常
- Java 異常教程
- 異常處理 – try-with-resources語句
- Java 異常處理 – try catch塊
- Java 教程 – OOPS 概念
- Java 重載
- Java 方法覆蓋
- Java 接口
- 繼承
- Java 教程 – 關鍵字
- Java 中的this關鍵字
- Java static關鍵字
- Java 教程 – 集合
- Java 數組教程
- Java 集合
- Java 集合迭代器
- Java Hashmap教程
- 鏈表
- Java 初學者List集合教程
- Java 初學者的Map集合教程
- Java 初學者的Set教程
- Java 初學者的SortedSet集合教程
- Java 初學者SortedMap集合教程
- Java 教程 – 序列化
- Java 序列化概念和示例
- Java 序列化概念和示例第二部分
- Java 瞬態與靜態變量
- serialVersionUID的用途是什么
- Java 教程 – 枚舉
- Java 枚舉(enum)
- Java 枚舉示例
- 核心 Java 教程 – 線程
- Java 線程教程
- Java 8 功能
- Java Lambda:初學者指南
- Lambda 表達式簡介
- Java 8 Lambda 列表foreach
- Java 8 Lambda 映射foreach
- Java 9
- Java 9 功能
- Java 10
- Java 10 獨特功能
- 核心 Java 教程 – 高級主題
- Java 虛擬機基礎
- Java 類加載器
- Java 開發人員必須知道..
- Selenium 教程
- 1 什么是 Selenium?
- 2 為什么要進行自動化測試?
- 3 Selenium 的歷史
- 4 Selenium 工具套件
- 5 Selenium 工具支持的瀏覽器和平臺
- 6 Selenium 工具:爭霸
- 7A Selenium IDE – 簡介,優點和局限性
- 7B Selenium IDE – Selenium IDE 和 Firebug 安裝
- 7C Selenium IDE – 突破表面:初探
- 7D Selenium IDE – 了解您的 IDE 功能
- 7E Selenium IDE – 了解您的 IDE 功能(續)。
- 7F Selenium IDE – 命令,目標和值
- 7G Selenium IDE – 記錄和運行測試用例
- 7H Selenium IDE – Selenium 命令一覽
- 7I Selenium IDE – 設置超時,斷點,起點
- 7J Selenium IDE – 調試
- 7K Selenium IDE – 定位元素(按 ID,名稱,鏈接文本)
- 7L Selenium IDE – 定位元素(續)
- 7M Selenium IDE – 斷言和驗證
- 7N Selenium IDE – 利用 Firebug 的優勢
- 7O Selenium IDE – 以所需的語言導出測試用例
- 7P Selenium IDE – 其他功能
- 7Q Selenium IDE – 快速瀏覽插件
- 7Q Selenium IDE – 暫停和反射
- 8 給新手的驚喜
- 9A WebDriver – 架構及其工作方式
- 9B WebDriver – 在 Eclipse 中設置
- 9C WebDriver – 啟動 Firefox 的第一個測試腳本
- 9D WebDriver – 執行測試
- 9E WebDriver – 用于啟動其他瀏覽器的代碼示例
- 9F WebDriver – JUnit 環境設置
- 9G WebDriver – 在 JUnit4 中運行 WebDriver 測試
- 9H WebDriver – 隱式等待
- 9I WebDriver – 顯式等待
- 9J WebDriver – 定位元素:第 1 部分(按 ID,名稱,標簽名稱)
- 9K WebDriver – 定位元素:第 2 部分(按className,linkText,partialLinkText)
- 9L WebDriver – 定位元素:第 3a 部分(按cssSelector定位)
- 9M WebDriver – 定位元素:第 3b 部分(cssSelector續)
- 9N WebDriver – 定位元素:第 4a 部分(通過 xpath)
- 9O WebDriver – 定位元素:第 4b 部分(XPath 續)
- 9P WebDriver – 節省時間的捷徑:定位器驗證
- 9Q WebDriver – 處理驗證碼
- 9R WebDriver – 斷言和驗證
- 9S WebDriver – 處理文本框和圖像
- 9T WebDriver – 處理單選按鈕和復選框
- 9U WebDriver – 通過兩種方式選擇項目(下拉菜單和多項選擇)
- 9V WebDriver – 以兩種方式處理表
- 9W WebDriver – 遍歷表元素
- 9X WebDriver – 處理警報/彈出框
- 9Y WebDriver – 處理多個窗口
- 9Z WebDriver – 最大化窗口
- 9AA WebDriver – 執行 JavaScript 代碼
- 9AB WebDriver – 使用動作類
- 9AC WebDriver – 無法輕松定位元素? 繼續閱讀...
- 10A 高級 WebDriver – 使用 Apache ANT
- 10B 高級 WebDriver – 生成 JUnit 報告
- 10C 高級 WebDriver – JUnit 報表自定義
- 10D 高級 WebDriver – JUnit 報告自定義續
- 10E 高級 WebDriver – 生成 PDF 報告
- 10F 高級 WebDriver – 截屏
- 10G 高級 WebDriver – 將屏幕截圖保存到 Word 文檔
- 10H 高級 WebDriver – 發送帶有附件的電子郵件
- 10I 高級 WebDriver – 使用屬性文件
- 10J 高級 WebDriver – 使用 POI 從 excel 讀取數據
- 10K 高級 WebDriver – 使用 Log4j 第 1 部分
- 10L 高級 WebDriver – 使用 Log4j 第 2 部分
- 10M 高級 WebDriver – 以無頭模式運行測試
- Vue 教程
- 1 使用 Vue.js 的 Hello World
- 2 模板語法和反應式的初探
- 3 Vue 指令簡介
- 4 Vue Devtools 設置
- 5 數據綁定第 1 部分(文本,原始 HTML,JavaScript 表達式)
- 6 數據綁定第 2 部分(屬性)
- 7 條件渲染第 1 部分(v-if,v-else,v-else-if)
- 8 條件渲染第 2 部分(v-if和v-show)
- 9 渲染列表第 1 部分(遍歷數組)
- 10 渲染列表第 2 部分(遍歷對象)
- 11 監聽 DOM 事件和事件修飾符
- 12 監聽鍵盤和鼠標事件
- 13 讓我們使用簡寫
- 14 使用v-model進行雙向數據綁定
- 15 表單輸入綁定
- 18 類綁定
- Python 教程
- Python 3 簡介
- Python 基礎知識 - 又稱 Hello World 以及如何實現
- 如何在 Windows 中安裝 python
- 適用于 Windows,Mac,Linux 的 Python 設置
- Python 數字和字符串
- Python 列表
- Python 集
- Python 字典
- Python 條件語句
- Python 循環
- Python 函數
- 面向對象編程(OOP)
- Python 中的面向對象編程
- Python 3 中的異常處理
- Python 3:猜數字
- Python 3:猜數字 – 回顧
- Python 生成器
- Hibernate 教程
- Hibernate 框架基礎
- Hibernate 4 入門教程
- Hibernate 4 注解配置
- Hibernate 4 的實體關系
- Hibernate 4 中的實體繼承模型
- Hibernate 4 查詢語言
- Hibernate 4 數據庫配置
- Hibernate 4 批處理
- Hibernate 4 緩存
- Hibernate 4 審計
- Hibernate 4 的并發控制
- Hibernate 4 的多租戶
- Hibernate 4 連接池
- Hibernate 自舉