# 9AB WebDriver – 使用動作類
> 原文: [https://javabeginnerstutorial.com/selenium/9bb-webdriver-actions-class/](https://javabeginnerstutorial.com/selenium/9bb-webdriver-actions-class/)
燈光,攝像頭,動作! 是的,今天所有有關動作的內容。 哦,我不是在談論您在電影中觀看的那些戰斗順序,而是在談論鍵盤和鼠標的動作。 Selenium WebDriver 提供了一個面向用戶的 API,用于執行復雜的用戶手勢。 我們到處都希望自動化! 因此,除了直接使用鍵盤和鼠標,我們還可以使用`Actions`類來執行基本的`click`,`sendKeys`和復雜的操作,例如`dragAndDrop`等。
## 一些可用的鍵盤和鼠標方法是
### 1\. `click(WebElement target)`
參數:`target` – 要單擊的元素。
說明:單擊給定目標的中間。
### 2\.` clickAndHold()`
說明:單擊當前鼠標位置不會釋放。
### 3\. `doubleClick(WebElement target)`
參數:`target` – 要點擊的元素。
說明:在給定目標元素的中間雙擊。 等效于:`Actions.moveToElement(element).doubleClick();`
### 4\. `dragAndDrop(WebElement src, WebElement dest)`
參數:
`source` – 要拖動的元素,即模擬按鈕按下的位置
`target` – 在以下位置移動并釋放鼠標的元素
說明:在源元素的位置單擊并按住,移至目標元素的位置,然后釋放鼠標。
### 5\. `dragAndDropBy(WebElement src, int xOffset, int yOffset)`
參數:
`source` – 模擬按鈕按下的元素。
`xOffset` - 水平移動偏移。
`yOffset` - 垂直移動偏移。
說明:在源元素的位置單擊并按住,在 x 軸上移動給定的`xOffset`,在 y 軸上移動給定的`yOffset`,然后釋放鼠標。
### 6\. `keyDown(java.lang.CharSequencemodifier_key)`
參數:
`Modifier_key` - 可以是`Keys.SHIFT`,`Keys.ALT`或`Keys.CONTROL`。 如果提供的按鍵都不是,則拋出`IllegalArgumentException`。
說明:執行修改鍵,但不釋放鍵。 隨后的交互可以假定按鍵被按下。 請注意,修飾鍵永遠不會隱式釋放-必須調用`keyUp(theKey)`或`sendKeys(Keys.NULL)`才能釋放修飾鍵。
### 7\. `moveByOffset(int xOffset, int yOffset)`
參數:
`xOffset` - 水平偏移。 負值表示將鼠標左移。
`xOffset` - 垂直偏移。 負值表示向上移動鼠標。
說明:將鼠標從其當前位置(或`0, 0`)移動 x 軸上的給定`xOffset`和 y 軸上的`yOffset`。
### 8\. `moveToElement(WebElement target)`
參數:
`target` - 要移動的元素。
說明:將鼠標移到目標元素的中間。
### 9\. `perform()`
描述:執行或執行所有動作。
### 10\. `release()`
說明:在當前鼠標位置釋放按下的鼠標左鍵。
## 概覽
讓我們看一個測試案例,實現我們剛才討論的一些方法,
### 場景
1. 開啟 Chrome 瀏覽器
2. 導航到[演示站點](https://chandanachaitanya.github.io/selenium-practice-site/)
3. 使用`Actions`類執行以下鍵盤和鼠標操作,
1. 找到并點擊“自行車”復選框
2. 找到文本“消息”,然后雙擊以突出顯示它
3. 在大寫文本框中輸入“`hi there`”
4. 將`click()`從第一位置拖放到可排序列表的第三位置
4. 在 Chrome 瀏覽器中驗證輸出
5. 驗證 Eclipse IDE 控制臺輸出屏幕上是否有任何已打印的消息,并驗證 JUnit 窗格是否成功
此方案的 JUnit 代碼是,
```java
import java.util.concurrent.TimeUnit;
import org.junit.After;
import org.junit.Before;
import org.junit.Test;
import org.openqa.selenium.By;
import org.openqa.selenium.Keys;
import org.openqa.selenium.WebDriver;
import org.openqa.selenium.WebElement;
import org.openqa.selenium.chrome.ChromeDriver;
import org.openqa.selenium.interactions.Actions;
public class TestActions {
// Declaring variables
private WebDriver driver;
private String baseUrl;
@Before
public void setUp() throws Exception {
// System property set up for Chrome driver
System.setProperty("webdriver.chrome.driver", "browser-drivers\\chromedriver.exe");
// Create a new instance for the class ChromeDriver
// that implements WebDriver interface
driver = new ChromeDriver();
// Implicit wait for 5 seconds
driver.manage().timeouts().implicitlyWait(5, TimeUnit.SECONDS);
// Assign the URL to be invoked to a String variable
baseUrl = "https://chandanachaitanya.github.io/selenium-practice-site/";
}
@Test
public void testKeyboardAndMouseActions() throws Exception {
// Open baseUrl in Chrome browser window
driver.get(baseUrl);
// Locate 'Bicycle' checkbox using name
WebElement bicyle = driver.findElement(By.name("vehicle1"));
// Locate 'Message' textbox using id
WebElement messageTextBox = driver.findElement(By.id("enterText"));
// Locate 'click()' using id
WebElement element = driver.findElement(By.id("click"));
//Create an instance of the Actions Class
Actions actions = new Actions(driver);
// Perform multiple actions
// Type 'hi there' in uppercase in the text box
actions
.moveToElement(messageTextBox)
.keyDown(Keys.SHIFT)
.sendKeys(messageTextBox, "hi there")
.keyUp(Keys.SHIFT)
.perform();
// Click 'Bicycle' checkbox
actions
.click(bicyle)
.perform();
// Print a message to console
System.out.println("Bicylce checkbox clicked.");
// Double click/highlight the text, 'Message'
actions
.moveToElement(driver.findElement(By.id("labelText")))
.doubleClick()
.perform();
// Print the text of the element that will be dragged and dropped
System.out.println("Element that is dragged : " + element.getText());
// Drag and drop 'click()' using Actions class
actions
.dragAndDropBy(element, 50, 100)
.perform();
} // End of @Test
@After
public void tearDown() throws Exception {
// Close the Chrome browser
driver.close();
System.out.println("Closing the driver");
}
}
```
### 說明:
讓我們破譯一些復雜的動作。
#### 1.突出顯示“消息”文本:
```java
actions
.moveToElement(driver.findElement(By.id("labelText")))
.doubleClick()
.perform();
```
將焦點移至“消息”文本,然后雙擊以突出顯示。 使用`perform()`方法執行操作。
#### 2.在文本框中以大寫字母鍵入“`hi there`”
```java
actions
.moveToElement(text)
.keyDown(Keys.SHIFT)
.sendKeys(text, "hi there")
.keyUp(Keys.SHIFT)
.perform();
```
首先將焦點移至文本框,按住`SHIFT`鍵,鍵入文本“`hi there`”,使其大寫,然后在`keyup`方法的幫助下釋放`SHIFT`鍵。
### 3.拖放“`click()`”
這可以通過兩種方式完成:
```java
actions
.dragAndDropBy(element, 50, 100)
.perform();
```
最簡單的方法是使用`dragAndDropBy`方法,在該方法中,我們可以指定要拖動的元素以及`xOffset`和`yOffset`。
如果您想走復雜路線,看起來像忍者,
```java
actions
.clickAndHold(element)
.moveByOffset(50, 100)
.release()
.perform();
```
單擊目標元素,在本例中為`html()`,并確保不要釋放該喀噠聲。 移動給定的 xOffset 和 yOffset,然后釋放鼠標單擊,以便將元素放置在新位置。 結果,該元素被拖放。
### 執行結果:
為每行代碼提供了注釋,使其其余部分不言自明。 散布演示站點輸出的一些視覺效果,

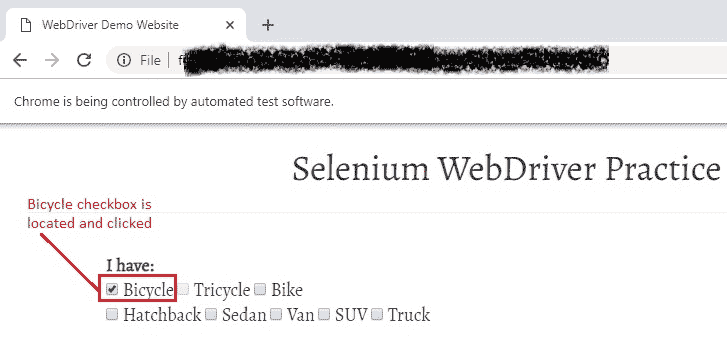
自行車復選框位于并按預期檢查。

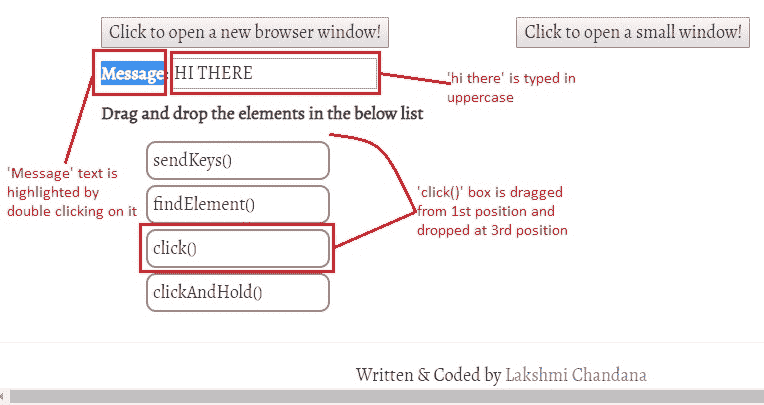
雙擊文本`Message`,結果將突出顯示。 在文本框中,“`hi there`”用大寫字母鍵入。 從可排序列表中將`click()`從其默認的第一位置拖動到第三位置。
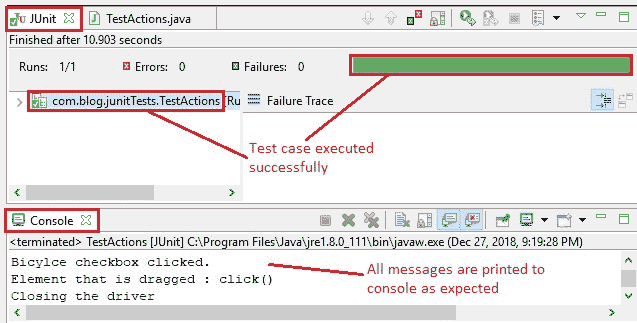
在 JUnit 窗格中,綠色條顯示測試用例已成功執行。 同樣,控制臺窗口顯示沒有錯誤以及所有打印的消息如預期的那樣。

是時候把忍者帶出來了。 嘗試使用盡可能多的動作類方法,并從中獲得樂趣!
上面討論的所有代碼都可以在 [GitHub 倉庫](https://github.com/JBTAdmin/Selenium)的“WebDriver”文件夾中找到。 您可以為倉庫加注星標和分支以方便使用。 請仔細閱讀`README.md`文件以獲取明確說明。
祝你有美好的一天!
- JavaBeginnersTutorial 中文系列教程
- Java 教程
- Java 教程 – 入門
- Java 的歷史
- Java 基礎知識:Java 入門
- jdk vs jre vs jvm
- public static void main(string args[])說明
- 面向初學者的 Java 類和對象教程
- Java 構造器
- 使用 Eclipse 編寫 Hello World 程序
- 執行順序
- Java 中的訪問修飾符
- Java 中的非訪問修飾符
- Java 中的數據類型
- Java 中的算術運算符
- Java 語句初學者教程
- 用 Java 創建對象的不同方法
- 內部類
- 字符串構建器
- Java 字符串教程
- Java 教程 – 變量
- Java 中的變量
- Java 中的局部變量
- Java 中的實例變量
- Java 引用變量
- 變量遮蓋
- Java 教程 – 循環
- Java for循環
- Java 教程 – 異常
- Java 異常教程
- 異常處理 – try-with-resources語句
- Java 異常處理 – try catch塊
- Java 教程 – OOPS 概念
- Java 重載
- Java 方法覆蓋
- Java 接口
- 繼承
- Java 教程 – 關鍵字
- Java 中的this關鍵字
- Java static關鍵字
- Java 教程 – 集合
- Java 數組教程
- Java 集合
- Java 集合迭代器
- Java Hashmap教程
- 鏈表
- Java 初學者List集合教程
- Java 初學者的Map集合教程
- Java 初學者的Set教程
- Java 初學者的SortedSet集合教程
- Java 初學者SortedMap集合教程
- Java 教程 – 序列化
- Java 序列化概念和示例
- Java 序列化概念和示例第二部分
- Java 瞬態與靜態變量
- serialVersionUID的用途是什么
- Java 教程 – 枚舉
- Java 枚舉(enum)
- Java 枚舉示例
- 核心 Java 教程 – 線程
- Java 線程教程
- Java 8 功能
- Java Lambda:初學者指南
- Lambda 表達式簡介
- Java 8 Lambda 列表foreach
- Java 8 Lambda 映射foreach
- Java 9
- Java 9 功能
- Java 10
- Java 10 獨特功能
- 核心 Java 教程 – 高級主題
- Java 虛擬機基礎
- Java 類加載器
- Java 開發人員必須知道..
- Selenium 教程
- 1 什么是 Selenium?
- 2 為什么要進行自動化測試?
- 3 Selenium 的歷史
- 4 Selenium 工具套件
- 5 Selenium 工具支持的瀏覽器和平臺
- 6 Selenium 工具:爭霸
- 7A Selenium IDE – 簡介,優點和局限性
- 7B Selenium IDE – Selenium IDE 和 Firebug 安裝
- 7C Selenium IDE – 突破表面:初探
- 7D Selenium IDE – 了解您的 IDE 功能
- 7E Selenium IDE – 了解您的 IDE 功能(續)。
- 7F Selenium IDE – 命令,目標和值
- 7G Selenium IDE – 記錄和運行測試用例
- 7H Selenium IDE – Selenium 命令一覽
- 7I Selenium IDE – 設置超時,斷點,起點
- 7J Selenium IDE – 調試
- 7K Selenium IDE – 定位元素(按 ID,名稱,鏈接文本)
- 7L Selenium IDE – 定位元素(續)
- 7M Selenium IDE – 斷言和驗證
- 7N Selenium IDE – 利用 Firebug 的優勢
- 7O Selenium IDE – 以所需的語言導出測試用例
- 7P Selenium IDE – 其他功能
- 7Q Selenium IDE – 快速瀏覽插件
- 7Q Selenium IDE – 暫停和反射
- 8 給新手的驚喜
- 9A WebDriver – 架構及其工作方式
- 9B WebDriver – 在 Eclipse 中設置
- 9C WebDriver – 啟動 Firefox 的第一個測試腳本
- 9D WebDriver – 執行測試
- 9E WebDriver – 用于啟動其他瀏覽器的代碼示例
- 9F WebDriver – JUnit 環境設置
- 9G WebDriver – 在 JUnit4 中運行 WebDriver 測試
- 9H WebDriver – 隱式等待
- 9I WebDriver – 顯式等待
- 9J WebDriver – 定位元素:第 1 部分(按 ID,名稱,標簽名稱)
- 9K WebDriver – 定位元素:第 2 部分(按className,linkText,partialLinkText)
- 9L WebDriver – 定位元素:第 3a 部分(按cssSelector定位)
- 9M WebDriver – 定位元素:第 3b 部分(cssSelector續)
- 9N WebDriver – 定位元素:第 4a 部分(通過 xpath)
- 9O WebDriver – 定位元素:第 4b 部分(XPath 續)
- 9P WebDriver – 節省時間的捷徑:定位器驗證
- 9Q WebDriver – 處理驗證碼
- 9R WebDriver – 斷言和驗證
- 9S WebDriver – 處理文本框和圖像
- 9T WebDriver – 處理單選按鈕和復選框
- 9U WebDriver – 通過兩種方式選擇項目(下拉菜單和多項選擇)
- 9V WebDriver – 以兩種方式處理表
- 9W WebDriver – 遍歷表元素
- 9X WebDriver – 處理警報/彈出框
- 9Y WebDriver – 處理多個窗口
- 9Z WebDriver – 最大化窗口
- 9AA WebDriver – 執行 JavaScript 代碼
- 9AB WebDriver – 使用動作類
- 9AC WebDriver – 無法輕松定位元素? 繼續閱讀...
- 10A 高級 WebDriver – 使用 Apache ANT
- 10B 高級 WebDriver – 生成 JUnit 報告
- 10C 高級 WebDriver – JUnit 報表自定義
- 10D 高級 WebDriver – JUnit 報告自定義續
- 10E 高級 WebDriver – 生成 PDF 報告
- 10F 高級 WebDriver – 截屏
- 10G 高級 WebDriver – 將屏幕截圖保存到 Word 文檔
- 10H 高級 WebDriver – 發送帶有附件的電子郵件
- 10I 高級 WebDriver – 使用屬性文件
- 10J 高級 WebDriver – 使用 POI 從 excel 讀取數據
- 10K 高級 WebDriver – 使用 Log4j 第 1 部分
- 10L 高級 WebDriver – 使用 Log4j 第 2 部分
- 10M 高級 WebDriver – 以無頭模式運行測試
- Vue 教程
- 1 使用 Vue.js 的 Hello World
- 2 模板語法和反應式的初探
- 3 Vue 指令簡介
- 4 Vue Devtools 設置
- 5 數據綁定第 1 部分(文本,原始 HTML,JavaScript 表達式)
- 6 數據綁定第 2 部分(屬性)
- 7 條件渲染第 1 部分(v-if,v-else,v-else-if)
- 8 條件渲染第 2 部分(v-if和v-show)
- 9 渲染列表第 1 部分(遍歷數組)
- 10 渲染列表第 2 部分(遍歷對象)
- 11 監聽 DOM 事件和事件修飾符
- 12 監聽鍵盤和鼠標事件
- 13 讓我們使用簡寫
- 14 使用v-model進行雙向數據綁定
- 15 表單輸入綁定
- 18 類綁定
- Python 教程
- Python 3 簡介
- Python 基礎知識 - 又稱 Hello World 以及如何實現
- 如何在 Windows 中安裝 python
- 適用于 Windows,Mac,Linux 的 Python 設置
- Python 數字和字符串
- Python 列表
- Python 集
- Python 字典
- Python 條件語句
- Python 循環
- Python 函數
- 面向對象編程(OOP)
- Python 中的面向對象編程
- Python 3 中的異常處理
- Python 3:猜數字
- Python 3:猜數字 – 回顧
- Python 生成器
- Hibernate 教程
- Hibernate 框架基礎
- Hibernate 4 入門教程
- Hibernate 4 注解配置
- Hibernate 4 的實體關系
- Hibernate 4 中的實體繼承模型
- Hibernate 4 查詢語言
- Hibernate 4 數據庫配置
- Hibernate 4 批處理
- Hibernate 4 緩存
- Hibernate 4 審計
- Hibernate 4 的并發控制
- Hibernate 4 的多租戶
- Hibernate 4 連接池
- Hibernate 自舉
