
# 10G 高級 WebDriver – 將屏幕截圖保存到 Word 文檔
> 原文: [https://javabeginnerstutorial.com/selenium/10g-advanced-webdriver-saving-screenshots-to-word-document/](https://javabeginnerstutorial.com/selenium/10g-advanced-webdriver-saving-screenshots-to-word-document/)
嗨冠軍! 希望您度過愉快的時光[截屏并將其保存在本地](https://javabeginnerstutorial.com/selenium/10f-advanced-webdriver-taking-screenshot/)。 今天,讓我們看看如何創建 Word 文檔,并將在測試用例中捕獲的所有圖像插入其中。 每個測試用例都有一個單獨的文檔,不僅可以幫助我們保持工作空間井井有條,而且搜索特定的屏幕快照也很容易。 最好的部分是,我們將編寫代碼,以便所有這些事情自動發生而無需任何人工干預。
請允許我直截了當。
## 步驟 1:
下載幾個 JAR,使我們的工作更加輕松。
**`java2word-3.3.jar`** - 幫助我們創建 Word 文檔并以所需方式對其進行操作。
**`xstream-1.3.1.jar`** – 處理圖片
讓我們繼續從 [https://code.google.com/archive/p/java2word/downloads](https://code.google.com/archive/p/java2word/downloads) (在撰寫本文時的下載位置)下載這兩個 JAR 文件。 我還將這些 JAR 以及本文中處理的所有其他代碼文件一起放在我們的 [GitHub 倉庫](https://github.com/JBTAdmin/Selenium)中。
## 步驟 2:
將這些 JAR 添加到我們的項目構建路徑中。
之前,我們已經多次看到此過程,因此,我不再重復(有關詳細說明,請參閱[文章](https://javabeginnerstutorial.com/selenium/9b-webdriver-eclipse-setup/)的步驟 3)。
## 步驟 3:
創建一個類“`SaveDocument.java`”。
將以下代碼添加到類文件中,
```java
import java.io.File;
import java.io.FileNotFoundException;
import java.io.PrintWriter;
import word.api.interfaces.IDocument;
import word.w2004.Document2004;
import word.w2004.Document2004.Encoding;
import word.w2004.elements.BreakLine;
import word.w2004.elements.Heading1;
import word.w2004.elements.Heading3;
import word.w2004.elements.Image;
import word.w2004.elements.Paragraph;
import word.w2004.style.HeadingStyle.Align;
public class SaveDocument {
public static void createDoc(String testCaseName, String[] imgFileNames) {
// Create a document object
IDocument myDoc = new Document2004();
myDoc.encoding(Encoding.UTF_8);
// Inserts one breakline
myDoc.addEle(BreakLine.times(1).create());
// Add client logo to document header
myDoc.getHeader().addEle(Image.from_FULL_LOCAL_PATHL("/Selenium/Logo.png")
.setHeight("30")
.setWidth("20")
.getContent());
// Add Project name to document header
myDoc.getHeader().addEle(Heading3.with(" ProjectName").withStyle().align(Align.RIGHT).create());
// Specify Test case name as document heading
myDoc.addEle(Heading1.with(testCaseName + " Test Case").withStyle().align(Align.CENTER).create());
myDoc.addEle(BreakLine.times(1).create());
// Add a description paragraph
myDoc.addEle(Paragraph
.with("Following are the related screenshots")
.create());
myDoc.addEle(BreakLine.times(1).create());
// Add company name to document footer
myDoc.getFooter().addEle(
Paragraph.with("@CompanyName").create());
// Loop through all the image files
for(String file:imgFileNames){
// Insert each image file to the document
myDoc.addEle(Image.from_FULL_LOCAL_PATHL(
"/Selenium/screenshots/" + file + ".png")
.setHeight("350")
.setWidth("500")
.getContent());
// Insert 2 linebreaks at the end of each inserted image
myDoc.addEle(BreakLine.times(2).create());
}
// Insert an image from web
myDoc.addEle(Image
.from_WEB_URL("http://www.google.com/images/logos/ps_logo2.png"));
// Create the word document specifying a location
File fileObj = new File("\\Selenium\\" + testCaseName + ".doc");
PrintWriter writer = null;
try {
writer = new PrintWriter(fileObj);
} catch (FileNotFoundException e) {
e.printStackTrace();
}
String myWord = myDoc.getContent();
writer.println(myWord);
writer.close();
// Print a confirmation image to console
System.out.println("Word document created successfully!");
}
}
```
每行都提供了注釋,以使代碼易于說明。
`public static void createDoc(String testCaseName, String[] imgFileNames)` -此方法有兩個參數。 第一個是一個字符串,它指定測試用例的名稱。 這將是將要創建的單詞文檔的名稱。 第二個參數是作為該測試用例的一部分捕獲的所有屏幕快照名稱的數組。
在這種方法中,我們將創建一個文檔對象并執行諸如
* 添加標題,段落
* 在標題中添加客戶徽標和公司名稱
* 在頁腳中添加公司名稱
* 插入作為特定測試用例一部分捕獲的所有屏幕截圖
* 從網上插入圖片(只是為了證明這種情況也是可行的)
* 將單詞文檔和測試用例的名稱保存在特定位置
## 步驟 4:
對“`SaveScreenshot.java`”文件進行了一些修改。
對我們在[先前文章](https://javabeginnerstutorial.com/selenium/10f-advanced-webdriver-taking-screenshot/)中創建的“`SaveScreenshot.java`”類進行了一些更改。
1. 刪除生成時間戳的函數,并
2. 文件擴展名從“`.jpg`”更改為“`.png`”
現在的代碼看起來像這樣,
```java
import java.io.File;
import java.io.IOException;
import org.apache.commons.io.FileUtils;
import org.openqa.selenium.OutputType;
import org.openqa.selenium.TakesScreenshot;
import org.openqa.selenium.WebDriver;
public class SaveScreenshot {
public static void capture(String screenshotName, WebDriver driver) {
// Cast driver object to TakesScreenshot
TakesScreenshot screenshot = (TakesScreenshot) driver;
// Get the screenshot as an image File
File src = screenshot.getScreenshotAs(OutputType.FILE);
try {
// Specify the destination where the image will be saved
File dest = new File("\\Selenium\\screenshots\\" + screenshotName + ".png");
// Copy the screenshot to destination
FileUtils.copyFile(src, dest);
} catch (IOException ex) {
System.out.println(ex.getMessage());
}
}
}
```
## 示例場景
1. 打開 Firefox 瀏覽器。
2. 導航到 Google 帳戶創建頁面
3. 通過 ID 找到名字文本框
4. 輸入“`fname01`”作為名字
5. 截取屏幕截圖,并將其命名為“`testCaseName+1`”
6. 按名稱找到姓氏文本框
7. 輸入“`lname01`”作為姓氏
8. 截取屏幕截圖并將其命名為“`testCaseName+2`”
9. 在指定位置創建一個 word 文檔,并將這兩個屏幕截圖都插入其中。
### JUnit 代碼:
`WordDocWithScreenshotTest.java`類
```java
import java.util.concurrent.TimeUnit;
import org.junit.After;
import org.junit.Before;
import org.junit.Test;
import org.openqa.selenium.By;
import org.openqa.selenium.WebDriver;
import org.openqa.selenium.WebElement;
import org.openqa.selenium.firefox.FirefoxDriver;
import com.blog.utilities.SaveDocument;
import com.blog.utilities.SaveScreenshot;
public class WordDocWithScreenshotTest {
//Declaring variables
private WebDriver driver;
private String baseUrl;
private String testCaseName = "WordDocWithScreenshot";
@Before
public void setUp() throws Exception{
// Selenium version 3 beta releases require system property set up
System.setProperty("webdriver.gecko.driver", "E:\\Softwares\\"
+ "Selenium\\geckodriver-v0.10.0-win64\\geckodriver.exe");
// Create a new instance for the class FirefoxDriver
// that implements WebDriver interface
driver = new FirefoxDriver();
// Implicit wait for 5 seconds
driver.manage().timeouts().implicitlyWait(5, TimeUnit.SECONDS);
// Assign the URL to be invoked to a String variable
baseUrl = "https://accounts.google.com/SignUp";
}
@Test
public void testPageTitle() throws Exception{
// Open baseUrl in Firefox browser window
driver.get(baseUrl);
// Locate First Name text box by id and
// assign it to a variable of type WebElement
WebElement firstName = driver.findElement(By.id("firstName"));
// Clear the default placeholder or any value present
firstName.clear();
// Enter/type the value to the text box
firstName.sendKeys("fname01");
//Take a screenshot
SaveScreenshot.capture(testCaseName + "1", driver);
// Locate last name text box by name
WebElement lastName = driver.findElement(By.name("lastName"));
// Clear and enter a value
lastName.clear();
lastName.sendKeys("lname01");
// Take a screenshot
SaveScreenshot.capture(testCaseName + "2", driver);
// Create a word document and include all screenshots
SaveDocument.createDoc(testCaseName, new String[]{testCaseName + "1",testCaseName + "2"});
}
@After
public void tearDown() throws Exception{
// Close the Firefox browser
driver.close();
}
}
```
如果遵循注釋,該代碼是不言自明的。 Eclipse 的輸出如下,
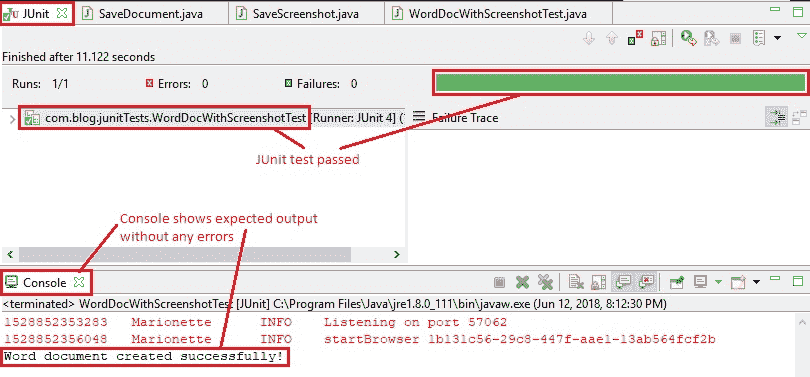
在 Eclipse IDE 中,“JUnit”窗格清楚地顯示了測試用例“`WordDocWithScreenshotTest.java`”已通過,并且控制臺沒有錯誤。 按預期打印“Word 文檔創建成功”。
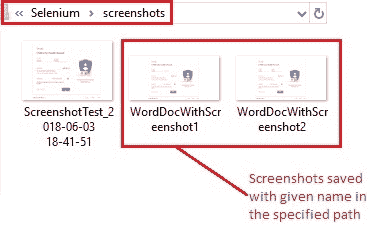
按照代碼中的指定,屏幕快照將以上述格式的名稱保存到“`E:/Selenium/screenshots`”路徑中。
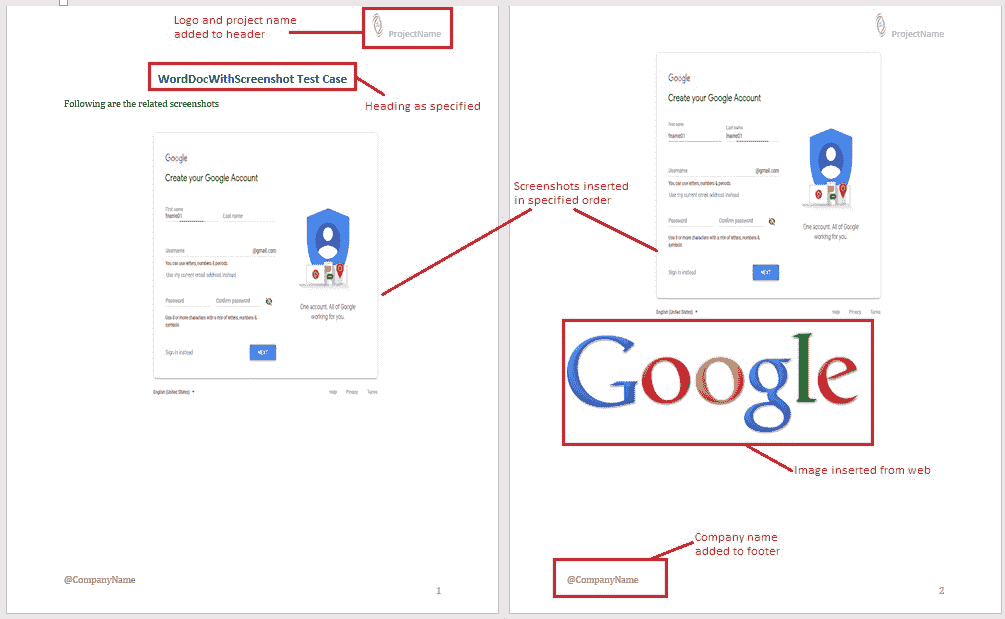
還將創建單詞文檔并將其保存在指定的位置“ `E:/Selenium/`”中。 該文件如下所示,
創建的 Word 文檔,所有代碼文件和 JAR 文件都放置在 [GitHub 倉庫](https://github.com/JBTAdmin/Selenium)中,以便于訪問。 您可以為倉庫加注星標和分支以方便使用。 請仔細閱讀“`README.md`”文件以獲取明確說明。
編碼愉快! 祝你今天愉快!
- JavaBeginnersTutorial 中文系列教程
- Java 教程
- Java 教程 – 入門
- Java 的歷史
- Java 基礎知識:Java 入門
- jdk vs jre vs jvm
- public static void main(string args[])說明
- 面向初學者的 Java 類和對象教程
- Java 構造器
- 使用 Eclipse 編寫 Hello World 程序
- 執行順序
- Java 中的訪問修飾符
- Java 中的非訪問修飾符
- Java 中的數據類型
- Java 中的算術運算符
- Java 語句初學者教程
- 用 Java 創建對象的不同方法
- 內部類
- 字符串構建器
- Java 字符串教程
- Java 教程 – 變量
- Java 中的變量
- Java 中的局部變量
- Java 中的實例變量
- Java 引用變量
- 變量遮蓋
- Java 教程 – 循環
- Java for循環
- Java 教程 – 異常
- Java 異常教程
- 異常處理 – try-with-resources語句
- Java 異常處理 – try catch塊
- Java 教程 – OOPS 概念
- Java 重載
- Java 方法覆蓋
- Java 接口
- 繼承
- Java 教程 – 關鍵字
- Java 中的this關鍵字
- Java static關鍵字
- Java 教程 – 集合
- Java 數組教程
- Java 集合
- Java 集合迭代器
- Java Hashmap教程
- 鏈表
- Java 初學者List集合教程
- Java 初學者的Map集合教程
- Java 初學者的Set教程
- Java 初學者的SortedSet集合教程
- Java 初學者SortedMap集合教程
- Java 教程 – 序列化
- Java 序列化概念和示例
- Java 序列化概念和示例第二部分
- Java 瞬態與靜態變量
- serialVersionUID的用途是什么
- Java 教程 – 枚舉
- Java 枚舉(enum)
- Java 枚舉示例
- 核心 Java 教程 – 線程
- Java 線程教程
- Java 8 功能
- Java Lambda:初學者指南
- Lambda 表達式簡介
- Java 8 Lambda 列表foreach
- Java 8 Lambda 映射foreach
- Java 9
- Java 9 功能
- Java 10
- Java 10 獨特功能
- 核心 Java 教程 – 高級主題
- Java 虛擬機基礎
- Java 類加載器
- Java 開發人員必須知道..
- Selenium 教程
- 1 什么是 Selenium?
- 2 為什么要進行自動化測試?
- 3 Selenium 的歷史
- 4 Selenium 工具套件
- 5 Selenium 工具支持的瀏覽器和平臺
- 6 Selenium 工具:爭霸
- 7A Selenium IDE – 簡介,優點和局限性
- 7B Selenium IDE – Selenium IDE 和 Firebug 安裝
- 7C Selenium IDE – 突破表面:初探
- 7D Selenium IDE – 了解您的 IDE 功能
- 7E Selenium IDE – 了解您的 IDE 功能(續)。
- 7F Selenium IDE – 命令,目標和值
- 7G Selenium IDE – 記錄和運行測試用例
- 7H Selenium IDE – Selenium 命令一覽
- 7I Selenium IDE – 設置超時,斷點,起點
- 7J Selenium IDE – 調試
- 7K Selenium IDE – 定位元素(按 ID,名稱,鏈接文本)
- 7L Selenium IDE – 定位元素(續)
- 7M Selenium IDE – 斷言和驗證
- 7N Selenium IDE – 利用 Firebug 的優勢
- 7O Selenium IDE – 以所需的語言導出測試用例
- 7P Selenium IDE – 其他功能
- 7Q Selenium IDE – 快速瀏覽插件
- 7Q Selenium IDE – 暫停和反射
- 8 給新手的驚喜
- 9A WebDriver – 架構及其工作方式
- 9B WebDriver – 在 Eclipse 中設置
- 9C WebDriver – 啟動 Firefox 的第一個測試腳本
- 9D WebDriver – 執行測試
- 9E WebDriver – 用于啟動其他瀏覽器的代碼示例
- 9F WebDriver – JUnit 環境設置
- 9G WebDriver – 在 JUnit4 中運行 WebDriver 測試
- 9H WebDriver – 隱式等待
- 9I WebDriver – 顯式等待
- 9J WebDriver – 定位元素:第 1 部分(按 ID,名稱,標簽名稱)
- 9K WebDriver – 定位元素:第 2 部分(按className,linkText,partialLinkText)
- 9L WebDriver – 定位元素:第 3a 部分(按cssSelector定位)
- 9M WebDriver – 定位元素:第 3b 部分(cssSelector續)
- 9N WebDriver – 定位元素:第 4a 部分(通過 xpath)
- 9O WebDriver – 定位元素:第 4b 部分(XPath 續)
- 9P WebDriver – 節省時間的捷徑:定位器驗證
- 9Q WebDriver – 處理驗證碼
- 9R WebDriver – 斷言和驗證
- 9S WebDriver – 處理文本框和圖像
- 9T WebDriver – 處理單選按鈕和復選框
- 9U WebDriver – 通過兩種方式選擇項目(下拉菜單和多項選擇)
- 9V WebDriver – 以兩種方式處理表
- 9W WebDriver – 遍歷表元素
- 9X WebDriver – 處理警報/彈出框
- 9Y WebDriver – 處理多個窗口
- 9Z WebDriver – 最大化窗口
- 9AA WebDriver – 執行 JavaScript 代碼
- 9AB WebDriver – 使用動作類
- 9AC WebDriver – 無法輕松定位元素? 繼續閱讀...
- 10A 高級 WebDriver – 使用 Apache ANT
- 10B 高級 WebDriver – 生成 JUnit 報告
- 10C 高級 WebDriver – JUnit 報表自定義
- 10D 高級 WebDriver – JUnit 報告自定義續
- 10E 高級 WebDriver – 生成 PDF 報告
- 10F 高級 WebDriver – 截屏
- 10G 高級 WebDriver – 將屏幕截圖保存到 Word 文檔
- 10H 高級 WebDriver – 發送帶有附件的電子郵件
- 10I 高級 WebDriver – 使用屬性文件
- 10J 高級 WebDriver – 使用 POI 從 excel 讀取數據
- 10K 高級 WebDriver – 使用 Log4j 第 1 部分
- 10L 高級 WebDriver – 使用 Log4j 第 2 部分
- 10M 高級 WebDriver – 以無頭模式運行測試
- Vue 教程
- 1 使用 Vue.js 的 Hello World
- 2 模板語法和反應式的初探
- 3 Vue 指令簡介
- 4 Vue Devtools 設置
- 5 數據綁定第 1 部分(文本,原始 HTML,JavaScript 表達式)
- 6 數據綁定第 2 部分(屬性)
- 7 條件渲染第 1 部分(v-if,v-else,v-else-if)
- 8 條件渲染第 2 部分(v-if和v-show)
- 9 渲染列表第 1 部分(遍歷數組)
- 10 渲染列表第 2 部分(遍歷對象)
- 11 監聽 DOM 事件和事件修飾符
- 12 監聽鍵盤和鼠標事件
- 13 讓我們使用簡寫
- 14 使用v-model進行雙向數據綁定
- 15 表單輸入綁定
- 18 類綁定
- Python 教程
- Python 3 簡介
- Python 基礎知識 - 又稱 Hello World 以及如何實現
- 如何在 Windows 中安裝 python
- 適用于 Windows,Mac,Linux 的 Python 設置
- Python 數字和字符串
- Python 列表
- Python 集
- Python 字典
- Python 條件語句
- Python 循環
- Python 函數
- 面向對象編程(OOP)
- Python 中的面向對象編程
- Python 3 中的異常處理
- Python 3:猜數字
- Python 3:猜數字 – 回顧
- Python 生成器
- Hibernate 教程
- Hibernate 框架基礎
- Hibernate 4 入門教程
- Hibernate 4 注解配置
- Hibernate 4 的實體關系
- Hibernate 4 中的實體繼承模型
- Hibernate 4 查詢語言
- Hibernate 4 數據庫配置
- Hibernate 4 批處理
- Hibernate 4 緩存
- Hibernate 4 審計
- Hibernate 4 的并發控制
- Hibernate 4 的多租戶
- Hibernate 4 連接池
- Hibernate 自舉