
[TOC]
### 1\. 安裝環境要求
> you need to install Storm's dependencies on Nimbus and the worker machines. These are:
>
> 1. Java 7+ (Apache Storm 1.x is tested through travis ci against both java 7 and java 8 JDKs)
> 2. Python 2.6.6 (Python 3.x should work too, but is not tested as part of our CI enviornment)
按照[官方文檔](http://storm.apache.org/releases/1.2.2/Setting-up-a-Storm-cluster.html) 的說明:storm 運行依賴于 Java 7+ 和 Python 2.6.6 +,所以需要預先安裝這兩個軟件。由于這兩個軟件在多個框架中都有依賴,其安裝步驟單獨整理至 :
* [Linux 環境下 JDK 安裝](https://github.com/heibaiying/BigData-Notes/blob/master/notes/installation/Linux%E4%B8%8BJDK%E5%AE%89%E8%A3%85.md)
* [Linux 環境下 Python 安裝](https://github.com/heibaiying/BigData-Notes/blob/master/notes/installation/Linux%E4%B8%8BPython%E5%AE%89%E8%A3%85.md)
### 2\. 下載并解壓
下載并解壓,官方下載地址:[storm.apache.org/downloads.h…](http://storm.apache.org/downloads.html)
~~~
# tar -zxvf apache-storm-1.2.2.tar.gz
~~~
### 3\. 配置環境變量
~~~
# vim /etc/profile
~~~
添加環境變量:
~~~
export STORM_HOME=/usr/app/apache-storm-1.2.2
export PATH=$STORM_HOME/bin:$PATH
復制代碼
~~~
使得配置的環境變量生效:
~~~
# source /etc/profile
~~~
### 4\. 啟動相關進程
因為要啟動多個進程,所以統一采用后臺進程的方式啟動。進入到 `${STORM_HOME}/bin` 目錄下,依次執行下面的命令:
~~~
# 啟動zookeeper
nohup sh storm dev-zookeeper &
# 啟動主節點 nimbus
nohup sh storm nimbus &
# 啟動從節點 supervisor
nohup sh storm supervisor &
# 啟動UI界面 ui
nohup sh storm ui &
# 啟動日志查看服務 logviewer
nohup sh storm logviewer &
~~~
### 5\. 驗證是否啟動成功
驗證方式一:jps 查看進程:
~~~
[root@hadoop001 app]# jps
1074 nimbus
1283 Supervisor
620 dev_zookeeper
1485 core
9630 logviewer
~~~
驗證方式二: 訪問 8080 端口,查看 Web-UI 界面:
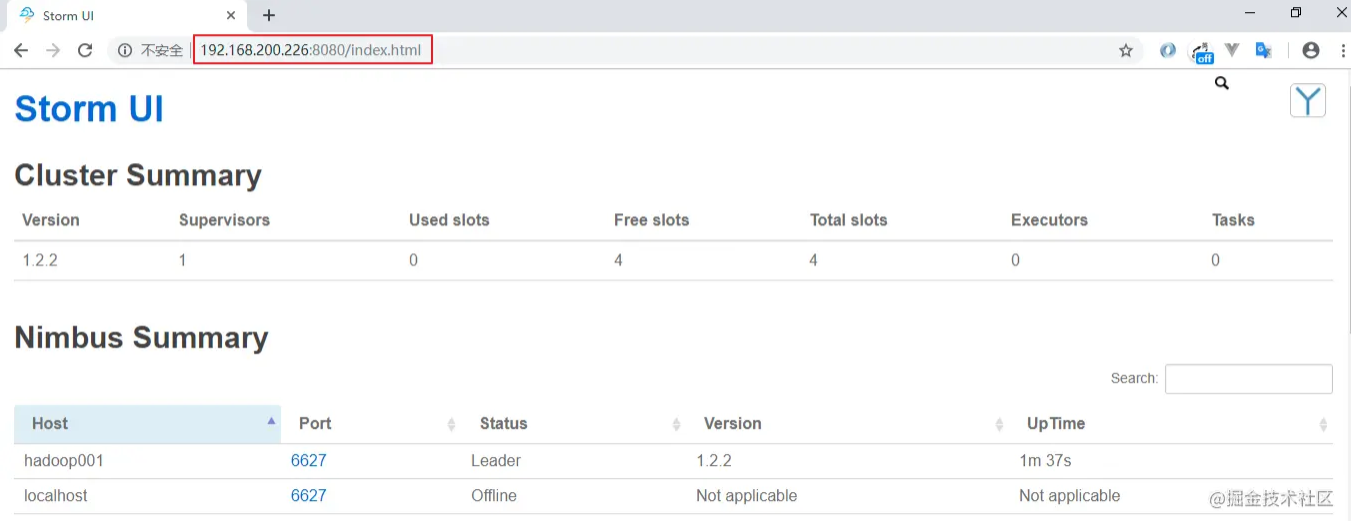
作者:heibaiying
鏈接:https://juejin.cn/post/6844903950035091464
來源:掘金
著作權歸作者所有。商業轉載請聯系作者獲得授權,非商業轉載請注明出處。
- 一.JVM
- 1.1 java代碼是怎么運行的
- 1.2 JVM的內存區域
- 1.3 JVM運行時內存
- 1.4 JVM內存分配策略
- 1.5 JVM類加載機制與對象的生命周期
- 1.6 常用的垃圾回收算法
- 1.7 JVM垃圾收集器
- 1.8 CMS垃圾收集器
- 1.9 G1垃圾收集器
- 2.面試相關文章
- 2.1 可能是把Java內存區域講得最清楚的一篇文章
- 2.0 GC調優參數
- 2.1GC排查系列
- 2.2 內存泄漏和內存溢出
- 2.2.3 深入理解JVM-hotspot虛擬機對象探秘
- 1.10 并發的可達性分析相關問題
- 二.Java集合架構
- 1.ArrayList深入源碼分析
- 2.Vector深入源碼分析
- 3.LinkedList深入源碼分析
- 4.HashMap深入源碼分析
- 5.ConcurrentHashMap深入源碼分析
- 6.HashSet,LinkedHashSet 和 LinkedHashMap
- 7.容器中的設計模式
- 8.集合架構之面試指南
- 9.TreeSet和TreeMap
- 三.Java基礎
- 1.基礎概念
- 1.1 Java程序初始化的順序是怎么樣的
- 1.2 Java和C++的區別
- 1.3 反射
- 1.4 注解
- 1.5 泛型
- 1.6 字節與字符的區別以及訪問修飾符
- 1.7 深拷貝與淺拷貝
- 1.8 字符串常量池
- 2.面向對象
- 3.關鍵字
- 4.基本數據類型與運算
- 5.字符串與數組
- 6.異常處理
- 7.Object 通用方法
- 8.Java8
- 8.1 Java 8 Tutorial
- 8.2 Java 8 數據流(Stream)
- 8.3 Java 8 并發教程:線程和執行器
- 8.4 Java 8 并發教程:同步和鎖
- 8.5 Java 8 并發教程:原子變量和 ConcurrentMap
- 8.6 Java 8 API 示例:字符串、數值、算術和文件
- 8.7 在 Java 8 中避免 Null 檢查
- 8.8 使用 Intellij IDEA 解決 Java 8 的數據流問題
- 四.Java 并發編程
- 1.線程的實現/創建
- 2.線程生命周期/狀態轉換
- 3.線程池
- 4.線程中的協作、中斷
- 5.Java鎖
- 5.1 樂觀鎖、悲觀鎖和自旋鎖
- 5.2 Synchronized
- 5.3 ReentrantLock
- 5.4 公平鎖和非公平鎖
- 5.3.1 說說ReentrantLock的實現原理,以及ReentrantLock的核心源碼是如何實現的?
- 5.5 鎖優化和升級
- 6.多線程的上下文切換
- 7.死鎖的產生和解決
- 8.J.U.C(java.util.concurrent)
- 0.簡化版(快速復習用)
- 9.鎖優化
- 10.Java 內存模型(JMM)
- 11.ThreadLocal詳解
- 12 CAS
- 13.AQS
- 0.ArrayBlockingQueue和LinkedBlockingQueue的實現原理
- 1.DelayQueue的實現原理
- 14.Thread.join()實現原理
- 15.PriorityQueue 的特性和原理
- 16.CyclicBarrier的實際使用場景
- 五.Java I/O NIO
- 1.I/O模型簡述
- 2.Java NIO之緩沖區
- 3.JAVA NIO之文件通道
- 4.Java NIO之套接字通道
- 5.Java NIO之選擇器
- 6.基于 Java NIO 實現簡單的 HTTP 服務器
- 7.BIO-NIO-AIO
- 8.netty(一)
- 9.NIO面試題
- 六.Java設計模式
- 1.單例模式
- 2.策略模式
- 3.模板方法
- 4.適配器模式
- 5.簡單工廠
- 6.門面模式
- 7.代理模式
- 七.數據結構和算法
- 1.什么是紅黑樹
- 2.二叉樹
- 2.1 二叉樹的前序、中序、后序遍歷
- 3.排序算法匯總
- 4.java實現鏈表及鏈表的重用操作
- 4.1算法題-鏈表反轉
- 5.圖的概述
- 6.常見的幾道字符串算法題
- 7.幾道常見的鏈表算法題
- 8.leetcode常見算法題1
- 9.LRU緩存策略
- 10.二進制及位運算
- 10.1.二進制和十進制轉換
- 10.2.位運算
- 11.常見鏈表算法題
- 12.算法好文推薦
- 13.跳表
- 八.Spring 全家桶
- 1.Spring IOC
- 2.Spring AOP
- 3.Spring 事務管理
- 4.SpringMVC 運行流程和手動實現
- 0.Spring 核心技術
- 5.spring如何解決循環依賴問題
- 6.springboot自動裝配原理
- 7.Spring中的循環依賴解決機制中,為什么要三級緩存,用二級緩存不夠嗎
- 8.beanFactory和factoryBean有什么區別
- 九.數據庫
- 1.mybatis
- 1.1 MyBatis-# 與 $ 區別以及 sql 預編譯
- Mybatis系列1-Configuration
- Mybatis系列2-SQL執行過程
- Mybatis系列3-之SqlSession
- Mybatis系列4-之Executor
- Mybatis系列5-StatementHandler
- Mybatis系列6-MappedStatement
- Mybatis系列7-參數設置揭秘(ParameterHandler)
- Mybatis系列8-緩存機制
- 2.淺談聚簇索引和非聚簇索引的區別
- 3.mysql 證明為什么用limit時,offset很大會影響性能
- 4.MySQL中的索引
- 5.數據庫索引2
- 6.面試題收集
- 7.MySQL行鎖、表鎖、間隙鎖詳解
- 8.數據庫MVCC詳解
- 9.一條SQL查詢語句是如何執行的
- 10.MySQL 的 crash-safe 原理解析
- 11.MySQL 性能優化神器 Explain 使用分析
- 12.mysql中,一條update語句執行的過程是怎么樣的?期間用到了mysql的哪些log,分別有什么作用
- 十.Redis
- 0.快速復習回顧Redis
- 1.通俗易懂的Redis數據結構基礎教程
- 2.分布式鎖(一)
- 3.分布式鎖(二)
- 4.延時隊列
- 5.位圖Bitmaps
- 6.Bitmaps(位圖)的使用
- 7.Scan
- 8.redis緩存雪崩、緩存擊穿、緩存穿透
- 9.Redis為什么是單線程、及高并發快的3大原因詳解
- 10.布隆過濾器你值得擁有的開發利器
- 11.Redis哨兵、復制、集群的設計原理與區別
- 12.redis的IO多路復用
- 13.相關redis面試題
- 14.redis集群
- 十一.中間件
- 1.RabbitMQ
- 1.1 RabbitMQ實戰,hello world
- 1.2 RabbitMQ 實戰,工作隊列
- 1.3 RabbitMQ 實戰, 發布訂閱
- 1.4 RabbitMQ 實戰,路由
- 1.5 RabbitMQ 實戰,主題
- 1.6 Spring AMQP 的 AMQP 抽象
- 1.7 Spring AMQP 實戰 – 整合 RabbitMQ 發送郵件
- 1.8 RabbitMQ 的消息持久化與 Spring AMQP 的實現剖析
- 1.9 RabbitMQ必備核心知識
- 2.RocketMQ 的幾個簡單問題與答案
- 2.Kafka
- 2.1 kafka 基礎概念和術語
- 2.2 Kafka的重平衡(Rebalance)
- 2.3.kafka日志機制
- 2.4 kafka是pull還是push的方式傳遞消息的?
- 2.5 Kafka的數據處理流程
- 2.6 Kafka的腦裂預防和處理機制
- 2.7 Kafka中partition副本的Leader選舉機制
- 2.8 如果Leader掛了的時候,follower沒來得及同步,是否會出現數據不一致
- 2.9 kafka的partition副本是否會出現腦裂情況
- 十二.Zookeeper
- 0.什么是Zookeeper(漫畫)
- 1.使用docker安裝Zookeeper偽集群
- 3.ZooKeeper-Plus
- 4.zk實現分布式鎖
- 5.ZooKeeper之Watcher機制
- 6.Zookeeper之選舉及數據一致性
- 十三.計算機網絡
- 1.進制轉換:二進制、八進制、十六進制、十進制之間的轉換
- 2.位運算
- 3.計算機網絡面試題匯總1
- 十四.Docker
- 100.面試題收集合集
- 1.美團面試常見問題總結
- 2.b站部分面試題
- 3.比心面試題
- 4.騰訊面試題
- 5.哈羅部分面試
- 6.筆記
- 十五.Storm
- 1.Storm和流處理簡介
- 2.Storm 核心概念詳解
- 3.Storm 單機版本環境搭建
- 4.Storm 集群環境搭建
- 5.Storm 編程模型詳解
- 6.Storm 項目三種打包方式對比分析
- 7.Storm 集成 Redis 詳解
- 8.Storm 集成 HDFS 和 HBase
- 9.Storm 集成 Kafka
- 十六.Elasticsearch
- 1.初識ElasticSearch
- 2.文檔基本CRUD、集群健康檢查
- 3.shard&replica
- 4.document核心元數據解析及ES的并發控制
- 5.document的批量操作及數據路由原理
- 6.倒排索引
- 十七.分布式相關
- 1.分布式事務解決方案一網打盡
- 2.關于xxx怎么保證高可用的問題
- 3.一致性hash原理與實現
- 4.微服務注冊中心 Nacos 比 Eureka的優勢
- 5.Raft 協議算法
- 6.為什么微服務架構中需要網關
- 0.CAP與BASE理論
- 十八.Dubbo
- 1.快速掌握Dubbo常規應用
- 2.Dubbo應用進階
- 3.Dubbo調用模塊詳解
- 4.Dubbo調用模塊源碼分析
- 6.Dubbo協議模塊