
### 2.5 Binder連接池
上面我們介紹了不同的IPC方式,我們知道,不同的IPC方式有不同的特點和適用場景,當然這個問題會在2.6節進行介紹,在本節中要再次介紹一下ADIL,**原因是AIDL是一種最常用的進程間通信方式,是日常開發中涉及進程間通信時的首選**,所以我們需要額外強調一下它。
如何使用AIDL在上面的一節中已經進行了介紹,這里在回顧一下大致流程:**首先創建一個Service和一個AIDL接口,接著創建一個類繼承自AIDL接口中的Stub類并實現Stub中的抽象方法,在Service的onBind方法中返回這個類的對象,然后客戶端就可以綁定服務端Service,建立連接后就可以訪問遠程服務端的方法了**。
上述過程就是典型的AIDL的使用流程。這本來也沒什么問題,但是現在考慮一種情況:**公司的項目越來越龐大了,現在有10個不同的業務模塊都需要使用AIDL來進行進程間通信,那我們該怎么處理呢**?也許你會說:“就按照AIDL的實現方式一個個來吧”,這是可以的,如果用這種方法,首先我們需要創建10個Service,這好像有點多啊!如果有100個地方需要用到AIDL呢,先創建100個Service?到這里,讀者應該明白問題所在了。**隨著AIDL數量的增加,我們不能無限制地增加Service, Service是四大組件之一,本身就是一種系統資源。而且太多的Service會使得我們的應用看起來很重量級,因為正在運行的Service可以在應用詳情頁看到,當我們的應用詳情顯示有10個服務正在運行時,這看起來并不是什么好事**。針對上述問題,我們**需要減少Service的數量,將所有的AIDL放在同一個Service中去管理**。
在這種模式下,整個工作機制是這樣的:**每個業務模塊創建自己的AIDL接口并實現此接口,這個時候不同業務模塊之間是不能有耦合的,所有實現細節我們要單獨開來,然后向服務端提供自己的唯一標識和其對應的Binder對象;對于服務端來說,只需要一個Service就可以了,服務端提供一個queryBinder接口,這個接口能夠根據業務模塊的特征來返回相應的Binder對象給它們,不同的業務模塊拿到所需的Binder對象后就可以進行遠程方法調用了**。由此可見,**Binder連接池的主要作用就是將每個業務模塊的Binder請求統一轉發到遠程Service中去執行,從而避免了重復創建Service的過程**,它的工作原理如圖2-10所示。
:-: 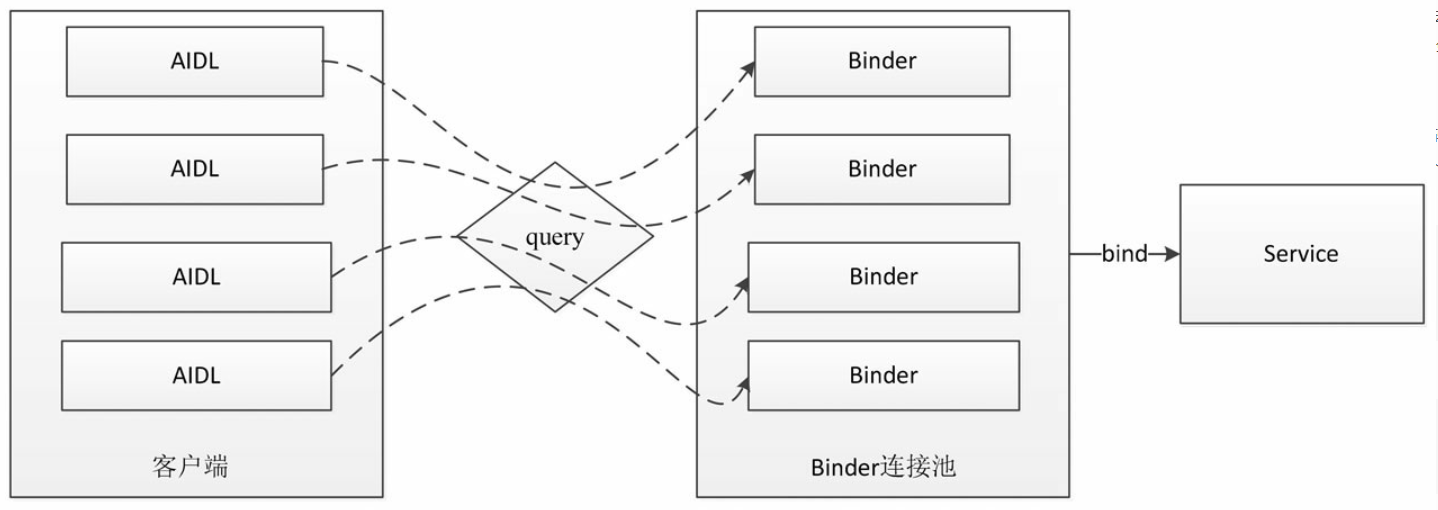
圖2-10 Binder連接池的工作原理
通過上面的理論介紹,也許還有點不好理解,下面對Binder連接池的代碼實現做一下說明。
首先,為了說明問題,我們提供了**兩個AIDL接口(ISecurityCenter和ICompute)來模擬上面提到的多個業務模塊都要使用AIDL的情況**,其中**ISecurityCenter接口提供加解密功能**,聲明如下:
~~~
package com.ryg.chapter_2.binderpool;
interface ISecurityCenter {
String encrypt(String content);
String decrypt(String password);
}
~~~
而**ICompute接口提供計算加法的功能**,聲明如下:
~~~
package com.ryg.chapter_2.binderpool;
interface ICompute {
int add(int a, int b);
}
~~~
雖然說上面兩個接口的功能都比較簡單,但是用于分析Binder連接池的工作原理已經足夠了,讀者可以寫出更復雜的例子。
接著看一下上面兩個AIDL接口的實現,也比較簡單,代碼如下:
**SecurityCenterImpl.java**
~~~
package com.ryg.chapter_2.binderpool;
import android.os.RemoteException;
public class SecurityCenterImpl extends ISecurityCenter.Stub {
private static final char SECRET_CODE = '^';
@Override
public String encrypt(String content) throws RemoteException {
char[] chars = content.toCharArray();
for (int i = 0; i < chars.length; i++) {
chars[i] ^= SECRET_CODE;//相當于chars[i] = chars[i]^SECRET_CODE
}
return new String(chars);
}
@Override
public String decrypt(String password) throws RemoteException {
return encrypt(password);
}
}
~~~
**ComputeImpl.java**
~~~
package com.ryg.chapter_2.binderpool;
import android.os.RemoteException;
public class ComputeImpl extends ICompute.Stub {
@Override
public int add(int a, int b) throws RemoteException {
return a + b;
}
}
~~~
現在**業務模塊的AIDL接口定義和實現都已經完成了**,注意**這里并沒有為每個模塊的AIDL單獨創建Service**,
接下來就是服務端和Binder連接池的工作了。
首先,**為Binder連接池創建AIDL接口`IBinderPool.aidl`**,代碼如下所示。
~~~
package com.ryg.chapter_2.binderpool;
interface IBinderPool {
/**
* @param binderCode, the unique token of specific Binder<br/>
* @return specific Binder who's token is binderCode.
*/
IBinder queryBinder(int binderCode);
}
~~~
接著,為Binder連接池創建遠程Service并實現IBinderPool,下面是queryBinder的具體實現,可以看到請求轉發的實現方法,當Binder連接池連接上遠程服務時,會根據不同模塊的標識即binderCode返回不同的Binder對象,通過這個Binder對象所執行的操作全部發生在遠程服務端。
~~~
@Override
public IBinder queryBinder(int binderCode) throws RemoteException {
IBinder binder = null;
switch (binderCode) {
case BINDER_SECURITY_CENTER: {
binder = new SecurityCenterImpl ();
break;
}
case BINDER_COMPUTE: {
binder = new ComputeImpl ();
break;
}
default:
break;
}
return binder;
}
~~~
**遠程Service的實現**就比較簡單了,代碼如下所示。
**BinderPoolService.java**
~~~
package com.ryg.chapter_2.binderpool;
public class BinderPoolService extends Service {
private static final String TAG = "BinderPoolService";
/**
* 在服務端創建一個連接池,BinderPoolImpl是BinderPool的內部類,
* 它繼承了IBinderPool.Stub,并實現了queryBinder方法。
*/
private Binder mBinderPool = new BinderPool.BinderPoolImpl ();
@Override
public void onCreate() {
super.onCreate ();
}
@Override
public IBinder onBind(Intent intent) {
Log.d (TAG, "onBind");
return mBinderPool;//返回連接池對象
}
@Override
public void onDestroy() {
super.onDestroy ();
}
}
~~~
下面還剩下**Binder連接池的具體實現**,在它的**內部首先它要去綁定遠程服務,綁定成功后,客戶端就可以通過它的queryBinder方法去獲取各自對應的Binder,拿到所需的Binder以后,不同業務模塊就可以進行各自的操作了**,Binder連接池的代碼如下所示。
**BinderPool.java**
~~~
package com.ryg.chapter_2.binderpool;
import java.util.concurrent.CountDownLatch;
public class BinderPool {
private static final String TAG = "BinderPool";
public static final int BINDER_NONE = -1;
public static final int BINDER_COMPUTE = 0;
public static final int BINDER_SECURITY_CENTER = 1;
private Context mContext;
private IBinderPool mBinderPool;
private static volatile BinderPool sInstance;
private CountDownLatch mConnectBinderPoolCountDownLatch;
private BinderPool(Context context) {
mContext = context.getApplicationContext ();
connectBinderPoolService ();
}
//返回BinderPool的實例,如果沒有的話就創建,有的話就直接返回。
public static BinderPool getInsance(Context context) {
if (sInstance == null) {
synchronized (BinderPool.class) {
if (sInstance == null) {
sInstance = new BinderPool (context);
}
}
}
return sInstance;
}
//連接BinderPoolService服務器。 CountDownLatch將bindService這一異步操作轉換成了同步操作
private synchronized void connectBinderPoolService() {
mConnectBinderPoolCountDownLatch = new CountDownLatch (1);
Intent service = new Intent (mContext, BinderPoolService.class);
mContext.bindService (service, mBinderPoolConnection,
Context.BIND_AUTO_CREATE);
try {
mConnectBinderPoolCountDownLatch.await ();
} catch (InterruptedException e) {
e.printStackTrace ();
}
}
/**
* query binder by binderCode from binder pool
*
* @param binderCode the unique token of binder
* @return binder who's token is binderCode<br>
* return null when not found or BinderPoolService died.
*/
public IBinder queryBinder(int binderCode) {
IBinder binder = null;
try {
/*這個mBinderPool是一個BinderPool.BinderPoolImpl對象。
對于客戶端來說調用的是BinderPool的queryBinder方法,
而BinderPool的queryBinder方法又調用了BinderPool.BinderPoolImpl對象的queryBinder方法。
mBinderPool這個對象是服務端返回給BinderPool的,對客戶端是隱藏的,客戶端只知道BinderPool,
mBinderPool是服務端和連接池的橋梁,
BinderPool是客戶端和連接池的橋梁*/
if (mBinderPool != null) {
binder = mBinderPool.queryBinder (binderCode);
}
} catch (RemoteException e) {
e.printStackTrace ();
}
return binder;
}
//連接服務器的時候用的,里面有連接成功和連接斷開后的操作。
private ServiceConnection mBinderPoolConnection = new ServiceConnection () {
@Override
public void onServiceDisconnected(ComponentName name) {
// ignored.
}
@Override
public void onServiceConnected(ComponentName name, IBinder service) {
/*
* 將服務器端的Binder轉換成客戶端所需的AIDL接口對象:
* 服務端返回的是BinderPool連接池,而不是單純的一個Binder對象。
* */
mBinderPool = IBinderPool.Stub.asInterface (service);
try {
//設置死亡代理:
mBinderPool.asBinder ().linkToDeath (mBinderPoolDeathRecipient, 0);
} catch (RemoteException e) {
e.printStackTrace ();
}
mConnectBinderPoolCountDownLatch.countDown ();
}
};
//設置死亡代理:
private IBinder.DeathRecipient mBinderPoolDeathRecipient = new IBinder.DeathRecipient () {
@Override
public void binderDied() {
Log.w (TAG, "binder died.");
mBinderPool.asBinder ().unlinkToDeath (mBinderPoolDeathRecipient, 0);
mBinderPool = null;
connectBinderPoolService ();
}
};
/*
* (1)這個是我們的Binder連接池,它源于IBinderPool.aidl這個AIDL,它里面包含一個queryBinder方法,
* 我們的Binder連接池是放在服務端用,
* 所以在服務端需要有這樣一個BinderPoolImpl的實例,并且它是一個Binder:
* private Binder mBinderPool = new BinderPool.BinderPoolImpl();
* (2)那怎么用呢?
* 我們當前所在的類BinderPool.java就是用來綁定服務端的客戶端,
* 在BinderPool綁定服務端的時候,服務端會將mBinderPool返回給客戶端也就是我們這個類,
* 然后我們可以根據服務端返回的這個Binder來轉換成客戶端所需的AIDL接口對象,還是叫mBinderPool,
* 然后我們這個類中就可以調用mBinderPool中的方法:
* binder = mBinderPool.queryBinder(binderCode);
* (3)那另外的兩個AIDL呢?ICompute.aidl和ISecurityCenter.aidl呢?
* 由于另外的兩個AIDL的使用都是和服務端相關聯的,是服務端的queryBinder方法將它們的Binder返回給客戶端的,
* 客戶端接到這兩個AIDL的Binder以后,依舊是通過轉換成AIDL接口對象來使用這兩個AIDL中的方法的。
* */
public static class BinderPoolImpl extends IBinderPool.Stub {
public BinderPoolImpl() {
super ();
}
@Override
public IBinder queryBinder(int binderCode) throws RemoteException {
IBinder binder = null;
switch (binderCode) {
case BINDER_SECURITY_CENTER: {
binder = new SecurityCenterImpl ();
break;
}
case BINDER_COMPUTE: {
binder = new ComputeImpl ();
break;
}
default:
break;
}
return binder;
}
}
}
~~~
Binder連接池的具體實現就分析完了,它的好處是顯然易見的,針對上面的例子,我們**只需要創建一個Service即可完成多個AIDL接口的工**作,下面我們來驗證一下效果。新創建一個Activity,在線程中執行如下操作:
~~~
package com.ryg.chapter_2.binderpool;
//這里是客戶端
public class BinderPoolActivity extends Activity {
private static final String TAG = "BinderPoolActivity";
private ISecurityCenter mSecurityCenter;
private ICompute mCompute;
@Override
protected void onCreate(Bundle savedInstanceState) {
super.onCreate(savedInstanceState);
setContentView(R.layout.activity_binder_pool);
//在線程中去執行:另開啟一個線程執行,因為在binder連接池的實現中,通過CountDownLatch將bindeService
//異步操作轉換成了同步操作,意味著有可能是耗時的而且binder方法的調用過程可能也是耗時的
new Thread(new Runnable() {
@Override
public void run() {
doWork();
}
}).start();
}
private void doWork() {
// 首先獲取一個BinderPool的實例:這里是帶了上下文的,避免創建多個。
BinderPool binderPool = BinderPool.getInsance(BinderPoolActivity.this);
/*
* 然后根據客戶端編號bindercode查詢Binder,返回的是對應的客戶端的Binder。
* 在binderPool.queryBinder中,是根據在綁定服務端過程中返回的BinderPoolImpl的Binder,
* 這個BinderPoolImpl就是繼承了IBinderPool的,所以也實現了其中的queryBinder的。
* 這樣返回的才是真正對應的securityBinder。
* */
IBinder securityBinder = binderPool
.queryBinder(BinderPool.BINDER_SECURITY_CENTER);
//查到對應的Binder以后,就可以根據這個Binder來轉換成客戶端所需的AIDL接口對象:
mSecurityCenter = (ISecurityCenter) SecurityCenterImpl
.asInterface(securityBinder);
Log.d(TAG, "visit ISecurityCenter");
String msg = "helloworld-安卓";
System.out.println("content:" + msg);
try {
//有了接口對象,自然就可以調用對象中的方法了:
String password = mSecurityCenter.encrypt(msg);
System.out.println("encrypt:" + password);
System.out.println("decrypt:" + mSecurityCenter.decrypt(password));
} catch (RemoteException e) {
e.printStackTrace();
}
//下面這是另一個AIDL模塊,使用方法和上面是一樣的。
Log.d(TAG, "visit ICompute");
IBinder computeBinder = binderPool
.queryBinder(BinderPool.BINDER_COMPUTE);
mCompute = ComputeImpl.asInterface(computeBinder);
try {
System.out.println("3+5=" + mCompute.add(3, 5));
} catch (RemoteException e) {
e.printStackTrace();
}
}
}
~~~
在上述代碼中,我們先后調用了ISecurityCenter和ICompute這兩個AIDL接口中的方法,看一下log,很顯然,工作正常。
```
D/BinderPoolActivity(20270): visit ISecurityCenter
I/System.out(20270): content:helloworld-安卓
I/System.out(20270): encrypt:6;221)1,2:s寗匍
I/System.out(20270): decrypt:helloworld-安卓
D/BinderPoolActivity(20270): visit ICompute
I/System.out(20270): 3+5=8
```
這里需要額外說明一下,**為什么要在線程中去執行呢?**
這是因為**在Binder連接池的實現中,我們通過CountDownLatch將bindService這一異步操作轉換成了同步操作,這就意味著它有可能是耗時的**,然后就是**Binder方法的調用過程也可能是耗時的,因此不建議放在主線程去執行**。
注意到**BinderPool是一個單例實現,因此在同一個進程中只會初始化一次**,所以如果我們**提前初始化BinderPool,那么可以優化程序的體驗**,比如我們**可以放在Application中提前對BinderPool進行初始化**,雖然這不能保證當我們調用BinderPool時它一定是初始化好的,但是在大多數情況下,這種初始化工作(綁定遠程服務)的時間開銷(如果BinderPool沒有提前初始化完成的話)是可以接受的。
另外,**BinderPool中有斷線重連的機制,當遠程服務意外終止時,BinderPool會重新建立連接,這個時候如果業務模塊中的Binder調用出現了異常,也需要手動去重新獲取最新的Binder對象,這個是需要注意的**。
有了BinderPool可以大大方便日常的開發工作,比如**如果有一個新的業務模塊需要添加新的AIDL,那么在它實現了自己的AIDL接口后,只需要修改BinderPoolImpl中的queryBinder方法,給自己添加一個新的binderCode(比如上面的`BINDER_SECURITY_CENTER`和`BINDER_COMPUTE`)并返回對應的Binder對象即可,不需要做其他修改,也不需要創建新的Service**。由此可見,BinderPool能夠極大地提高AIDL的開發效率,并且可以避免大量的Service創建,因此,建議在AIDL開發工作中引入BinderPool機制。
- 前言
- 第1章 Activity的生命周期和啟動模式
- 1.1 Activity的生命周期全面分析
- 1.1.1 典型情況下的生命周期分析
- 1.1.2 異常情況下的生命周期分析
- 1.2 Activity的啟動模式
- 1.2.1 Activity的LaunchMode
- 1.2.2 Activity的Flags
- 1.3 IntentFilter的匹配規則
- 第2章 IPC機制
- 2.1 Android IPC簡介
- 2.2 Android中的多進程模式
- 2.2.1 開啟多進程模式
- 2.2.2 多進程模式的運行機制
- 2.3 IPC基礎概念介紹
- 2.3.1 Serializable接口
- 2.3.2 Parcelable接口
- 2.3.3 Binder
- 2.4 Android中的IPC方式
- 2.4.1 使用Bundle
- 2.4.2 使用文件共享
- 2.4.3 使用Messenger
- 2.4.4 使用AIDL
- 2.4.5 使用ContentProvider
- 2.4.6 使用Socket
- 2.5 Binder連接池
- 2.6 選用合適的IPC方式
- 第3章 View的事件體系
- 3.1 View基礎知識
- 3.1.1 什么是View
- 3.1.2 View的位置參數
- 3.1.3 MotionEvent和TouchSlop
- 3.1.4 VelocityTracker、GestureDetector和Scroller
- 3.2 View的滑動
- 3.2.1 使用scrollTo/scrollBy
- 3.2.2 使用動畫
- 3.2.3 改變布局參數
- 3.2.4 各種滑動方式的對比
- 3.3 彈性滑動
- 3.3.1 使用Scroller7
- 3.3.2 通過動畫
- 3.3.3 使用延時策略
- 3.4 View的事件分發機制
- 3.4.1 點擊事件的傳遞規則
- 3.4.2 事件分發的源碼解析
- 3.5 View的滑動沖突
- 3.5.1 常見的滑動沖突場景
- 3.5.2 滑動沖突的處理規則
- 3.5.3 滑動沖突的解決方式
- 第4章 View的工作原理
- 4.1 初識ViewRoot和DecorView
- 4.2 理解MeasureSpec
- 4.2.1 MeasureSpec
- 4.2.2 MeasureSpec和LayoutParams的對應關系
- 4.3 View的工作流程
- 4.3.1 measure過程
- 4.3.2 layout過程
- 4.3.3 draw過程
- 4.4 自定義View
- 4.4.1 自定義View的分類
- 4.4.2 自定義View須知
- 4.4.3 自定義View示例
- 4.4.4 自定義View的思想
- 第5章 理解RemoteViews
- 5.1 RemoteViews的應用
- 5.1.1 RemoteViews在通知欄上的應用
- 5.1.2 RemoteViews在桌面小部件上的應用
- 5.1.3 PendingIntent概述
- 5.2 RemoteViews的內部機制
- 5.3 RemoteViews的意義
- 第6章 Android的Drawable
- 6.1 Drawable簡介
- 6.2 Drawable的分類
- 6.2.1 BitmapDrawable2
- 6.2.2 ShapeDrawable
- 6.2.3 LayerDrawable
- 6.2.4 StateListDrawable
- 6.2.5 LevelListDrawable
- 6.2.6 TransitionDrawable
- 6.2.7 InsetDrawable
- 6.2.8 ScaleDrawable
- 6.2.9 ClipDrawable
- 6.3 自定義Drawable
- 第7章 Android動畫深入分析
- 7.1 View動畫
- 7.1.1 View動畫的種類
- 7.1.2 自定義View動畫
- 7.1.3 幀動畫
- 7.2 View動畫的特殊使用場景
- 7.2.1 LayoutAnimation
- 7.2.2 Activity的切換效果
- 7.3 屬性動畫
- 7.3.1 使用屬性動畫
- 7.3.2 理解插值器和估值器 /
- 7.3.3 屬性動畫的監聽器
- 7.3.4 對任意屬性做動畫
- 7.3.5 屬性動畫的工作原理
- 7.4 使用動畫的注意事項
- 第8章 理解Window和WindowManager
- 8.1 Window和WindowManager
- 8.2 Window的內部機制
- 8.2.1 Window的添加過程
- 8.2.2 Window的刪除過程
- 8.2.3 Window的更新過程
- 8.3 Window的創建過程
- 8.3.1 Activity的Window創建過程
- 8.3.2 Dialog的Window創建過程
- 8.3.3 Toast的Window創建過程
- 第9章 四大組件的工作過程
- 9.1 四大組件的運行狀態
- 9.2 Activity的工作過程
- 9.3 Service的工作過程
- 9.3.1 Service的啟動過程
- 9.3.2 Service的綁定過程
- 9.4 BroadcastReceiver的工作過程
- 9.4.1 廣播的注冊過程
- 9.4.2 廣播的發送和接收過程
- 9.5 ContentProvider的工作過程
- 第10章 Android的消息機制
- 10.1 Android的消息機制概述
- 10.2 Android的消息機制分析
- 10.2.1 ThreadLocal的工作原理
- 10.2.2 消息隊列的工作原理
- 10.2.3 Looper的工作原理
- 10.2.4 Handler的工作原理
- 10.3 主線程的消息循環
- 第11章 Android的線程和線程池
- 11.1 主線程和子線程
- 11.2 Android中的線程形態
- 11.2.1 AsyncTask
- 11.2.2 AsyncTask的工作原理
- 11.2.3 HandlerThread
- 11.2.4 IntentService
- 11.3 Android中的線程池
- 11.3.1 ThreadPoolExecutor
- 11.3.2 線程池的分類
- 第12章 Bitmap的加載和Cache
- 12.1 Bitmap的高效加載
- 12.2 Android中的緩存策略
- 12.2.1 LruCache
- 12.2.2 DiskLruCache
- 12.2.3 ImageLoader的實現446
- 12.3 ImageLoader的使用
- 12.3.1 照片墻效果
- 12.3.2 優化列表的卡頓現象
- 第13章 綜合技術
- 13.1 使用CrashHandler來獲取應用的crash信息
- 13.2 使用multidex來解決方法數越界
- 13.3 Android的動態加載技術
- 13.4 反編譯初步
- 13.4.1 使用dex2jar和jd-gui反編譯apk
- 13.4.2 使用apktool對apk進行二次打包
- 第14章 JNI和NDK編程
- 14.1 JNI的開發流程
- 14.2 NDK的開發流程
- 14.3 JNI的數據類型和類型簽名
- 14.4 JNI調用Java方法的流程
- 第15章 Android性能優化
- 15.1 Android的性能優化方法
- 15.1.1 布局優化
- 15.1.2 繪制優化
- 15.1.3 內存泄露優化
- 15.1.4 響應速度優化和ANR日志分析
- 15.1.5 ListView和Bitmap優化
- 15.1.6 線程優化
- 15.1.7 一些性能優化建議
- 15.2 內存泄露分析之MAT工具
- 15.3 提高程序的可維護性