
### 9.2 Activity的工作過程
本節講述的內容是Activity的工作過程。為了方便日常的開發工作,系統對四大組件的工作過程進行了很大程度的封裝,這使得開發者無須關注實現細節即可快速地使用四大組件。Activity作為很重要的一個組件,其內部工作過程系統當然也是做了很多的封裝,這種封裝使得啟動一個Activity變得異常簡單。在顯式調用的情形下,只需要通過如下代碼即可完成:
Intent intent = new Intent(this, TestActivity.class);
startActivity(intent);
通過上面的代碼即可啟動一個具體的Activity,然后新Activity就會被系統啟動并展示在用戶的眼前。這個過程對于Android開發者來說最普通不過了,這也是很理所應當的事,但是有沒有想過系統內部到底是如何啟動一個Activity的呢?比如新Activity的對象是在何時創建的?Activity的onCreate方法又是在何時被系統回調的呢?讀者可能會有疑問:在日常開發中并不需要了解Activity底層到底是怎么工作的,那么了解它們又有什么意義呢?沒錯,在日常開發中是不需要了解系統的底層工作原理,但是如果想要在技術上有進一步的提高,那么就必須了解一些系統的工作原理,這是一個開發人員日后成長為高級工程師乃至架構師所必須具備的技術能力。從另外一個角度來說,Android作為一個優秀的基于Linux的移動操作系統,其內部一定有很多值得我們學習和借鑒的地方,因此了解系統的工作過程就是學習Android操作系統。通過對Android操作系統的學習可以提高我們對操作系統在技術實現上的理解,這對于加強開發人員的內功是很有幫助的。但是有一點,由于Android的內部實現多數都比較復雜,在研究內部實現上應該更加側重于對整體流程的把握,而不能深入代碼細節不能自拔,太深入代碼細節往往會導致“只見樹木不見森林”的狀態。處于這種狀態下,無法對整體流程建立足夠的認識,取而代之的是煩瑣的代碼細節,但是代碼細節本身并不具有太多的指導意義,因此這種學習狀態是要極力避免的。鑒于這一點,本章對Activity以及其他三個組件的工作過程的分析將會側重于整體流程的講解,目的是為了讓讀者對四大組件的工作過程有一個感性的認識并能夠給予上層開發一些指導意義。但凡事不是絕對的,如果開發者從事的工作是Android Rom開發,那底層代碼細節還是要有所涉獵的。
本節主要分析Activity的啟動過程,通過本節讀者可以對Activity的啟動過程有一個感性的認識,至于啟動模式以及任務棧等概念本節中并未涉及,讀者感興趣的話可以查看相應的代碼細節即可。
我們從Activity的startActivity方法開始分析,startActivity方法有好幾種重載方式,但它們最終都會調用startActivityForResult方法,它的實現如下所示。
public void startActivityForResult(Intent intent, int requestCode,
@Nullable Bundle options) {
if (mParent == null) {
Instrumentation.ActivityResult ar =
mInstrumentation.execStartActivity(
this, mMainThread.getApplicationThread(), mToken, this,
intent, requestCode, options);
if (ar ! = null) {
mMainThread.sendActivityResult(
mToken, mEmbeddedID, requestCode, ar.getResultCode(),
ar.getResultData());
}
if (requestCode >= 0) {
// If this start is requesting a result, we can avoid making
// the activity visible until the result is received. Setting
// this code during onCreate(Bundle savedInstanceState) or
onResume() will keep the
// activity hidden during this time, to avoid flickering.
// This can only be done when a result is requested because
// that guarantees we will get information back when the
// activity is finished, no matter what happens to it.
mStartedActivity = true;
}
final View decor = mWindow ! = null ? mWindow.peekDecorView() : null;
if (decor ! = null) {
decor.cancelPendingInputEvents();
}
// TODO Consider clearing/flushing other event sources and events
for child windows.
} else {
if (options ! = null) {
mParent.startActivityFromChild(this, intent, requestCode, options);
} else {
// Note we want to go through this method for compatibility with
// existing applications that may have overridden it.
mParent.startActivityFromChild(this, intent, requestCode);
}
}
if (options ! = null && ! isTopOfTask()) {
mActivityTransitionState.startExitOutTransition(this, options);
}
}
在上面的代碼中,我們只需要關注mParent == null這部分邏輯即可。mParent代表的是ActivityGroup, ActivityGroup最開始被用來在一個界面中嵌入多個子Activity,但是其在API 13中已經被廢棄了,系統推薦采用Fragment來代替ActivityGroup, Fragment的好處就不用多說了。在上面的代碼中需要注意mMainThread.getApplicationThread()這個參數,它的類型是ApplicationThread, ApplicationThread是ActivityThread的一個內部類,通過后面的分析可以發現,ApplicationThread和ActivityThread在Activity的啟動過程中發揮著很重要的作用。接著看一下Instrumentation的execStartActivity方法,如下所示。
public ActivityResult execStartActivity(
Context who, IBinder contextThread, IBinder token, Activity target,
Intent intent, int requestCode, Bundle options) {
IApplicationThread whoThread = (IApplicationThread) contextThread;
if (mActivityMonitors ! = null) {
synchronized (mSync) {
final int N = mActivityMonitors.size();
for (int i=0; i<N; i++) {
final ActivityMonitor am = mActivityMonitors.get(i);
if (am.match(who, null, intent)) {
am.mHits++;
if (am.isBlocking()) {
return requestCode >= 0 ? am.getResult() : null;
}
break;
}
}
}
}
try {
intent.migrateExtraStreamToClipData();
intent.prepareToLeaveProcess();
int result = ActivityManagerNative.getDefault()
.startActivity(whoThread, who.getBasePackageName(), intent,
intent.resolveTypeIfNeeded(who.getContentResolver()),
token, target ! = null ? target.mEmbeddedID : null,
requestCode, 0, null, options);
checkStartActivityResult(result, intent);
} catch (RemoteException e) {
}
return null;
}
從上面的代碼可以看出,啟動Activity真正的實現由ActivityManagerNative.getDefault()的startActivity方法來完成。ActivityManagerService(下面簡稱為AMS)繼承自ActivityManagerNative,而ActivityManagerNative繼承自Binder并實現了IActivityManager這個Binder接口,因此AMS也是一個Binder,它是IActivityManager的具體實現。由于ActivityManagerNative.getDefault()其實是一個IActivityManager類型的Binder對象,因此它的具體實現是AMS。可以發現,在ActivityManagerNative中,AMS這個Binder對象采用單例模式對外提供,Singleton是一個單例的封裝類,第一次調用它的get方法時它會通過create方法來初始化AMS這個Binder對象,在后續的調用中則直接返回之前創建的對象,這個過程的源碼如下所示。
static public IActivityManager getDefault() {
return gDefault.get();
}
private static final Singleton<IActivityManager> gDefault = new Singleton
<IActivityManager>() {
protected IActivityManager create() {
IBinder b = ServiceManager.getService("activity");
if (false) {
Log.v("ActivityManager", "default service binder = " + b);
}
IActivityManager am = asInterface(b);
if (false) {
Log.v("ActivityManager", "default service = " + am);
}
return am;
}
};
從上面的分析可以知道,Activity由ActivityManagerNative.getDefault()來啟動,而ActivityManagerNative.getDefault()實際上是AMS,因此Activity的啟動過程又轉移到了AMS中,為了繼續分析這個過程,只需要查看AMS的startActivity方法即可。在分析AMS的的startActivity方法之前,我們先回過頭來看一下Instrumentation的execStartActivity方法,其中有一行代碼:checkStartActivityResult(result, intent),直觀上看起來這個方法的作用像是在檢查啟動Activity的結果,它的具體實現如下所示。
/** @hide */
public static void checkStartActivityResult(int res, Object intent) {
if (res >= ActivityManager.START_SUCCESS) {
return;
}
switch (res) {
case ActivityManager.START_INTENT_NOT_RESOLVED:
case ActivityManager.START_CLASS_NOT_FOUND:
if(intent instanceof Intent&&((Intent)intent).getComponent() ! =
null)
throw new ActivityNotFoundException(
"Unable to find explicit activity class "
+ ((Intent)intent).getComponent().toShortString()
+ "; have you declared this activity in your
AndroidManifest.xml? ");
throw new ActivityNotFoundException(
"No Activity found to handle " + intent);
case ActivityManager.START_PERMISSION_DENIED:
throw new SecurityException("Not allowed to start activity "
+ intent);
case ActivityManager.START_FORWARD_AND_REQUEST_CONFLICT:
throw new AndroidRuntimeException(
"FORWARD_RESULT_FLAG used while also requesting a
result");
case ActivityManager.START_NOT_ACTIVITY:
throw new IllegalArgumentException(
"PendingIntent is not an activity");
case ActivityManager.START_NOT_VOICE_COMPATIBLE:
throw new SecurityException(
"Starting under voice control not allowed for: " +
intent);
default:
throw new AndroidRuntimeException("Unknown error code "
+ res + " when starting " + intent);
}
}
從上面的代碼可以看出,checkStartActivityResult的作用很明顯,就是檢查啟動Activity的結果。當無法正確地啟動一個Activity時,這個方法會拋出異常信息,其中最熟悉不過的就是“Unable to find explicit activity class; have you declared this activity in your AndroidManifest.xml? ”這個異常了,當待啟動的Activity沒有在AndroidManifest中注冊時,就會拋出這個異常。
接著我們繼續分析AMS的startActivity方法,如下所示。
public final int startActivity(IApplicationThread caller, String callingPackage,
Intent intent, String resolvedType, IBinder resultTo, String
resultWho, int requestCode,
int startFlags, ProfilerInfo profilerInfo, Bundle options) {
return startActivityAsUser(caller, callingPackage, intent, resolved-
Type, resultTo,
resultWho, requestCode, startFlags, profilerInfo, options,
UserHandle.getCallingUserId());
}
public final int startActivityAsUser(IApplicationThread caller, String
callingPackage,
Intent intent, String resolvedType, IBinder resultTo, String
resultWho, int requestCode,
int startFlags, ProfilerInfo profilerInfo, Bundle options, int userId) {
enforceNotIsolatedCaller("startActivity");
userId = handleIncomingUser(Binder.getCallingPid(), Binder.getCalling-
Uid(), userId,
false, ALLOW_FULL_ONLY, "startActivity", null);
// TODO: Switch to user app stacks here.
return mStackSupervisor.startActivityMayWait(caller, -1, calling
Package, intent,
resolvedType, null, null, resultTo, resultWho, requestCode,
startFlags,
profilerInfo, null, null, options, userId, null, null);
}
可以看出,Activity的啟動過程又轉移到了ActivityStackSupervisor的startActivity-MayWait方法中了,在startActivityMayWait中又調用了startActivityLocked方法,然后startActivityLocked方法又調用了startActivityUncheckedLocked方法,接著startActivityUncheckedLocked又調用了ActivityStack的resumeTopActivitiesLocked方法,這個時候啟動過程已經從ActivityStackSupervisor轉移到了ActivityStack。
ActivityStack的resumeTopActivitiesLocked方法的實現如下所示。
final boolean resumeTopActivityLocked(ActivityRecord prev, Bundle options) {
if (inResumeTopActivity) {
// Don't even start recursing.
return false;
}
boolean result = false;
try {
// Protect against recursion.
inResumeTopActivity = true;
result = resumeTopActivityInnerLocked(prev, options);
} finally {
inResumeTopActivity = false;
}
return result;
}
從上面的代碼可以看出,resumeTopActivityLocked調用了resumeTopActivityInnerLocked方法,resumeTopActivityInnerLocked方法又調用了ActivityStackSupervisor的startSpecificActivityLocked方法,startSpecificActivityLocked的源碼如下所示。
void startSpecificActivityLocked(ActivityRecord r,
boolean andResume, boolean checkConfig) {
// Is this activity's application already running?
ProcessRecord app = mService.getProcessRecordLocked(r.processName,
r.info.applicationInfo.uid, true);
r.task.stack.setLaunchTime(r);
if (app ! = null && app.thread ! = null) {
try {
if ((r.info.flags&ActivityInfo.FLAG_MULTIPROCESS) == 0
|| ! "android".equals(r.info.packageName)) {
// Don't add this if it is a platform component that is marked
// to run in multiple processes, because this is actually
// part of the framework so doesn't make sense to track as a
// separate apk in the process.
app.addPackage(r.info.packageName, r.info.applicationInfo.
versionCode,
mService.mProcessStats);
}
realStartActivityLocked(r, app, andResume, checkConfig);
return;
} catch (RemoteException e) {
Slog.w(TAG, "Exception when starting activity "
+ r.intent.getComponent().flattenToShortString(), e);
}
// If a dead object exception was thrown -- fall through to
// restart the application.
}
mService.startProcessLocked(r.processName, r.info.applicationInfo, true,0,
"activity", r.intent.getComponent(), false, false, true);
}
從上面代碼可以看出,startSpecificActivityLocked方法調用了realStartActivityLocked方法。為了更清晰地說明Activity的啟動過程在ActivityStackSupervisor和ActivityStack之間的傳遞順序,這里給出了一張流程圖,如圖9-1所示。
:-: 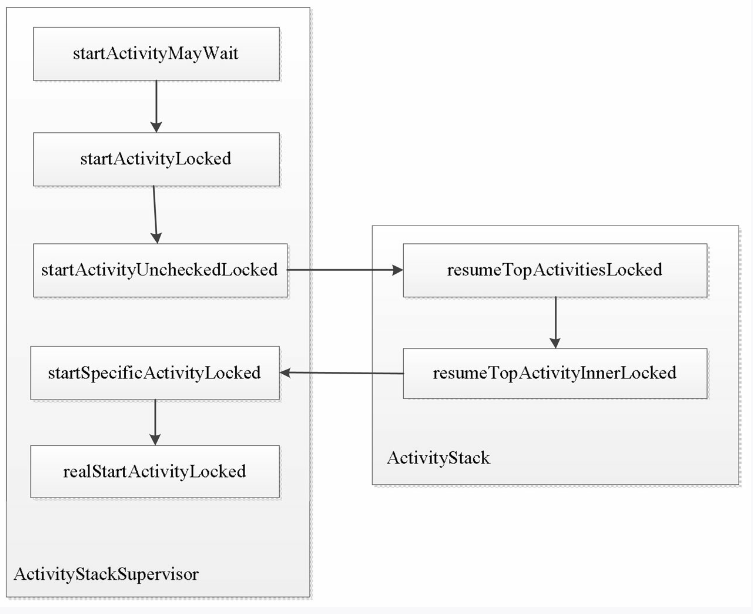
圖9-1 Activity的啟動過程在ActivityStackSupervisor和ActivityStack之間的傳遞順序
在ActivityStackSupervisor的realStartActivityLocked方法中有如下一段代碼:
app.thread.scheduleLaunchActivity(new Intent(r.intent), r.appToken,
System.identityHashCode(r), r.info, new Configuration(mService.
mConfiguration),
r.compat, r.task.voiceInteractor, app.repProcState, r.icicle,
r.persistentState,
results, newIntents, ! andResume, mService.isNextTransitionForward(),
profilerInfo);
上面的這段代碼很重要,其中app.thread的類型為IApplicationThread, IApplicationThread的聲明如下:
public interface IApplicationThread extends IInterface {
void schedulePauseActivity(IBinder token, boolean finished, boolean userLeaving,
int configChanges, boolean dontReport) throws RemoteException;
void scheduleStopActivity(IBinder token, boolean showWindow,
int configChanges) throws RemoteException;
void scheduleWindowVisibility(IBinder token, boolean showWindow) throws
RemoteException;
void scheduleSleeping(IBinder token, boolean sleeping) throws RemoteException;
void scheduleResumeActivity(IBinder token, int procState, boolean
isForward, Bundle resumeArgs)
throws RemoteException;
void scheduleSendResult(IBinder token, List<ResultInfo> results) throws
RemoteException;
void scheduleLaunchActivity(Intent intent, IBinder token, int ident,
ActivityInfo info, Configuration curConfig, CompatibilityInfo
compatInfo,
IVoiceInteractor voiceInteractor, int procState, Bundle state,
PersistableBundle persistentState, List<ResultInfo> pendingResults,
List<Intent> pendingNewIntents, boolean notResumed, boolean
isForward,
ProfilerInfo profilerInfo) throws RemoteException;
void scheduleRelaunchActivity(IBinder token, List<ResultInfo> pending-
Results,
List<Intent> pendingNewIntents, int configChanges,
boolean notResumed, Configuration config) throws RemoteException;
void scheduleNewIntent(List<Intent> intent, IBinder token) throws
RemoteException;
void scheduleDestroyActivity(IBinder token, boolean finished,
int configChanges) throws RemoteException;
void scheduleReceiver(Intent intent, ActivityInfo info, Compatibility-
Info compatInfo,
int resultCode, String data, Bundle extras, boolean sync,
int sendingUser, int processState) throws RemoteException;
static final int BACKUP_MODE_INCREMENTAL = 0;
static final int BACKUP_MODE_FULL = 1;
static final int BACKUP_MODE_RESTORE = 2;
static final int BACKUP_MODE_RESTORE_FULL = 3;
void scheduleCreateBackupAgent(ApplicationInfo app, CompatibilityInfo
compatInfo,
int backupMode) throws RemoteException;
void scheduleDestroyBackupAgent(ApplicationInfo app, CompatibilityInfo
compatInfo)
throws RemoteException;
void scheduleCreateService(IBinder token, ServiceInfo info,
CompatibilityInfo compatInfo, int processState) throws
RemoteException;
void scheduleBindService(IBinder token,
Intent intent, boolean rebind, int processState) throws
RemoteException;
void scheduleUnbindService(IBinder token,
Intent intent) throws RemoteException;
void scheduleServiceArgs(IBinder token, boolean taskRemoved, int
startId,
int flags, Intent args) throws RemoteException;
void scheduleStopService(IBinder token) throws RemoteException;
...
}
因為它繼承了IInterface接口,所以它是一個Binder類型的接口。從IApplicationThread聲明的接口方法可以看出,其內部包含了大量啟動、停止Activity的接口,此外還包含了啟動和停止服務的接口。從接口方法的命名可以猜測,IApplicationThread這個Binder接口的實現者完成了大量和Activity以及Service啟動/停止相關的功能,事實證明的確是這樣的。
那么IApplicationThread的實現者到底是什么呢?答案就是ActivityThread中的內部類ApplicationThread,下面來看一下ApplicationThread的定義,如下所示。
private class ApplicationThread extends ApplicationThreadNative
public abstract class ApplicationThreadNative extends Binder
implements IApplicationThread
可以看出,ApplicationThread繼承了ApplicationThreadNative,而ApplicationThreadNative則繼承了Binder并實現了IApplicationThread接口。如果讀者還記得系統為AIDL文件自動生成的代碼,就會發現ApplicationThreadNative的作用其實和系統為AIDL文件生成的類是一樣的,這方面的知識在第2章已經做了介紹,讀者可以查看第2章的相關內容。
在ApplicationThreadNative的內部,還有一個ApplicationThreadProxy類,這個類的實現如下所示。相信讀者有一種似曾相識的感覺,其實這個內部類也是系統為AIDL文件自動生成的代理類。種種跡象表明,ApplicationThreadNative就是IApplicationThread的實現者,由于ApplicationThreadNative被系統定義為抽象類,所以ApplicationThread就成了IApplicationThread最終的實現者。
class ApplicationThreadProxy implements IApplicationThread {
private final IBinder mRemote;
public ApplicationThreadProxy(IBinder remote) {
mRemote = remote;
}
public final IBinder asBinder() {
return mRemote;
}
public final void schedulePauseActivity(IBinder token, boolean finished,
boolean userLeaving, int configChanges, boolean dontReport)
throws RemoteException {
Parcel data = Parcel.obtain();
data.writeInterfaceToken(IApplicationThread.descriptor);
data.writeStrongBinder(token);
data.writeInt(finished ? 1 : 0);
data.writeInt(userLeaving ? 1 :0);
data.writeInt(configChanges);
data.writeInt(dontReport ? 1 : 0);
mRemote.transact(SCHEDULE_PAUSE_ACTIVITY_TRANSACTION, data, null,
IBinder.FLAG_ONEWAY);
data.recycle();
}
public final void scheduleStopActivity(IBinder token, boolean showWindow,
int configChanges) throws RemoteException {
Parcel data = Parcel.obtain();
data.writeInterfaceToken(IApplicationThread.descriptor);
data.writeStrongBinder(token);
data.writeInt(showWindow ? 1 : 0);
data.writeInt(configChanges);
mRemote.transact(SCHEDULE_STOP_ACTIVITY_TRANSACTION, data, null,
IBinder.FLAG_ONEWAY);
data.recycle();
}
...
}
繞了一大圈,Activity的啟動過程最終回到了ApplicationThread中,ApplicationThread通過scheduleLaunchActivity方法來啟動Activity,代碼如下所示。
// we use token to identify this activity without having to send the
// activity itself back to the activity manager. (matters more with ipc)
public final void scheduleLaunchActivity(Intent intent, IBinder token, int ident,
ActivityInfo info, Configuration curConfig, CompatibilityInfo
compatInfo,
IVoiceInteractor voiceInteractor, int procState, Bundle state,
PersistableBundle persistentState, List<ResultInfo> pendingResults,
List<Intent> pendingNewIntents, boolean notResumed, boolean isForward,
ProfilerInfo profilerInfo) {
updateProcessState(procState, false);
ActivityClientRecord r = new ActivityClientRecord();
r.token = token;
r.ident = ident;
r.intent = intent;
r.voiceInteractor = voiceInteractor;
r.activityInfo = info;
r.compatInfo = compatInfo;
r.state = state;
r.persistentState = persistentState;
r.pendingResults = pendingResults;
r.pendingIntents = pendingNewIntents;
r.startsNotResumed = notResumed;
r.isForward = isForward;
r.profilerInfo = profilerInfo;
updatePendingConfiguration(curConfig);
sendMessage(H.LAUNCH_ACTIVITY, r);
}
在ApplicationThread中,scheduleLaunchActivity的實現很簡單,就是發送一個啟動Activity的消息交由Handler處理,這個Handler有著一個很簡潔的名字:H。sendMessage的作用是發送一個消息給H處理,它的實現如下所示。
private void sendMessage(int what, Object obj, int arg1, int arg2, boolean
async) {
if (DEBUG_MESSAGES) Slog.v(
TAG, "SCHEDULE " + what + " " + mH.codeToString(what)
+ ": " + arg1 + " / " + obj);
Message msg = Message.obtain();
msg.what = what;
msg.obj = obj;
msg.arg1 = arg1;
msg.arg2 = arg2;
if (async) {
msg.setAsynchronous(true);
}
mH.sendMessage(msg);
}
接著來看一下Handler H對消息的處理,如下所示。
private class H extends Handler {
public static final int LAUNCH_ACTIVITY = 100;
public static final int PAUSE_ACTIVITY = 101;
public static final int PAUSE_ACTIVITY_FINISHING = 102;
public static final int STOP_ACTIVITY_SHOW = 103;
public static final int STOP_ACTIVITY_HIDE = 104;
public static final int SHOW_WINDOW = 105;
public static final int HIDE_WINDOW = 106;
public static final int RESUME_ACTIVITY = 107;
...
public void handleMessage(Message msg) {
if (DEBUG_MESSAGES) Slog.v(TAG, ">>> handling: " + codeToString
(msg.what));
switch (msg.what) {
case LAUNCH_ACTIVITY: {
Trace.traceBegin(Trace.TRACE_TAG_ACTIVITY_MANAGER,
"activityStart");
final ActivityClientRecord r = (ActivityClientRecord) msg.obj;
r.packageInfo = getPackageInfoNoCheck(
r.activityInfo.applicationInfo, r.compatInfo);
handleLaunchActivity(r, null);
Trace.traceEnd(Trace.TRACE_TAG_ACTIVITY_MANAGER);
} break;
case RELAUNCH_ACTIVITY: {
Trace.traceBegin(Trace.TRACE_TAG_ACTIVITY_MANAGER,
"activityRestart");
ActivityClientRecord r = (ActivityClientRecord)msg.obj;
handleRelaunchActivity(r);
Trace.traceEnd(Trace.TRACE_TAG_ACTIVITY_MANAGER);
} break;
case PAUSE_ACTIVITY:
Trace.traceBegin(Trace.TRACE_TAG_ACTIVITY_MANAGER,
"activityPause");
handlePauseActivity((IBinder)msg.obj, false, (msg.arg1&1) ! =
0, msg.arg2,
(msg.arg1&2) ! = 0);
maybeSnapshot();
Trace.traceEnd(Trace.TRACE_TAG_ACTIVITY_MANAGER);
break;
...
}
if (DEBUG_MESSAGES) Slog.v(TAG, "<<< done: " + codeToString(msg.what));
}
}
從Handler H對“LAUNCH_ACTIVITY”這個消息的處理可以知道,Activity的啟動過程由ActivityThread的handleLaunchActivity方法來實現,它的源碼如下所示。
private void handleLaunchActivity(ActivityClientRecord r, Intent customIntent){
...
if (localLOGV) Slog.v(
TAG, "Handling launch of " + r);
Activity a = performLaunchActivity(r, customIntent);
if (a ! = null) {
r.createdConfig = new Configuration(mConfiguration);
Bundle oldState = r.state;
handleResumeActivity(r.token, false, r.isForward,
!r.activity.mFinished && ! r.startsNotResumed);
...
}
...
}
從上面的源碼可以看出,performLaunchActivity方法最終完成了Activity對象的創建和啟動過程,并且ActivityThread通過handleResumeActivity方法來調用被啟動Activity的onResume這一生命周期方法。
performLaunchActivity這個方法主要完成了如下幾件事。
* 1.從ActivityCIientRecord中獲取待啟動的Activity的組件信息
ActivityInfo aInfo = r.activityInfo;
if (r.packageInfo == null) {
r.packageInfo = getPackageInfo(aInfo.applicationInfo, r.compatInfo,
Context.CONTEXT_INCLUDE_CODE);
}
ComponentName component = r.intent.getComponent();
if (component == null) {
component = r.intent.resolveActivity(
mInitialApplication.getPackageManager());
r.intent.setComponent(component);
}
if (r.activityInfo.targetActivity ! = null) {
component = new ComponentName(r.activityInfo.packageName,
r.activityInfo.targetActivity);
}
* 2.通過Instrumentation的newActivity方法使用類加載器創建Activity對象
Activity activity = null;
try {
java.lang.ClassLoader cl = r.packageInfo.getClassLoader();
activity = mInstrumentation.newActivity(
cl, component.getClassName(), r.intent);
StrictMode.incrementExpectedActivityCount(activity.getClass());
r.intent.setExtrasClassLoader(cl);
r.intent.prepareToEnterProcess();
if (r.state ! = null) {
r.state.setClassLoader(cl);
}
} catch (Exception e) {
if (! mInstrumentation.onException(activity, e)) {
throw new RuntimeException(
"Unable to instantiate activity " + component
+ ": " + e.toString(), e);
}
}
至于Instrumentation的newActivity,它的實現比較簡單,就是通過類加載器來創建Activity對象:
public Activity newActivity(ClassLoader cl, String className,
Intent intent)
throws InstantiationException, IllegalAccessException,
ClassNotFoundException {
return (Activity)cl.loadClass(className).newInstance();
}
3.通過LoadedApk的makeAppIication方法來嘗試創建AppIication對象
public Application makeApplication(boolean forceDefaultAppClass,
Instrumentation instrumentation) {
if (mApplication ! = null) {
return mApplication;
}
Application app = null;
String appClass = mApplicationInfo.className;
if (forceDefaultAppClass || (appClass == null)) {
appClass = "android.app.Application";
}
try {
java.lang.ClassLoader cl = getClassLoader();
if (! mPackageName.equals("android")) {
initializeJavaContextClassLoader();
}
ContextImpl appContext = ContextImpl.createAppContext(mActivity-
Thread, this);
app = mActivityThread.mInstrumentation.newApplication(
cl, appClass, appContext);
appContext.setOuterContext(app);
} catch (Exception e) {
if (! mActivityThread.mInstrumentation.onException(app, e)) {
throw new RuntimeException(
"Unable to instantiate application " + appClass
+ ": " + e.toString(), e);
}
}
mActivityThread.mAllApplications.add(app);
mApplication = app;
if (instrumentation ! = null) {
try {
instrumentation.callApplicationOnCreate(app);
} catch (Exception e) {
if (! instrumentation.onException(app, e)) {
throw new RuntimeException(
"Unable to create application " + app.getClass().getName()
+ ": " + e.toString(), e);
}
}
}
...
return app;
}
從makeApplication的實現可以看出,如果Application已經被創建過了,那么就不會再重復創建了,這也意味著一個應用只有一個Application對象。Application對象的創建也是通過Instrumentation來完成的,這個過程和Activity對象的創建一樣,都是通過類加載器來實現的。Application創建完畢后,系統會通過Instrumentation的callApplicationOnCreate來調用Application的onCreate方法。
* 4.創建ContextImpI對象并通過Activity的attach方法來完成一些重要數據的初始化
Context appContext = createBaseContextForActivity(r, activity);
CharSequence title = r.activityInfo.loadLabel(appContext.getPackage-
Manager());
Configuration config = new Configuration(mCompatConfiguration);
if (DEBUG_CONFIGURATION) Slog.v(TAG, "Launching activity "
+ r.activityInfo.name + " with config " + config);
activity.attach(appContext, this, getInstrumentation(), r.token,
r.ident, app, r.intent, r.activityInfo, title, r.parent,
r.embeddedID, r.lastNonConfigurationInstances, config,
r.voiceInteractor);
ContextImpl是一個很重要的數據結構,它是Context的具體實現,Context中的大部分邏輯都是由ContextImpl來完成的。ContextImpl是通過Activity的attach方法來和Activity建立關聯的,除此以外,在attach方法中Activity還會完成Window的創建并建立自己和Window的關聯,這樣當Window接收到外部輸入事件后就可以將事件傳遞給Activity。
* 5.調用Activity的onCreate方法
mInstrumentation.callActivityOnCreate(activity, r.state),由于Activity的onCreate已經被調用,這也意味著Activity已經完成了整個啟動過程。
- 前言
- 第1章 Activity的生命周期和啟動模式
- 1.1 Activity的生命周期全面分析
- 1.1.1 典型情況下的生命周期分析
- 1.1.2 異常情況下的生命周期分析
- 1.2 Activity的啟動模式
- 1.2.1 Activity的LaunchMode
- 1.2.2 Activity的Flags
- 1.3 IntentFilter的匹配規則
- 第2章 IPC機制
- 2.1 Android IPC簡介
- 2.2 Android中的多進程模式
- 2.2.1 開啟多進程模式
- 2.2.2 多進程模式的運行機制
- 2.3 IPC基礎概念介紹
- 2.3.1 Serializable接口
- 2.3.2 Parcelable接口
- 2.3.3 Binder
- 2.4 Android中的IPC方式
- 2.4.1 使用Bundle
- 2.4.2 使用文件共享
- 2.4.3 使用Messenger
- 2.4.4 使用AIDL
- 2.4.5 使用ContentProvider
- 2.4.6 使用Socket
- 2.5 Binder連接池
- 2.6 選用合適的IPC方式
- 第3章 View的事件體系
- 3.1 View基礎知識
- 3.1.1 什么是View
- 3.1.2 View的位置參數
- 3.1.3 MotionEvent和TouchSlop
- 3.1.4 VelocityTracker、GestureDetector和Scroller
- 3.2 View的滑動
- 3.2.1 使用scrollTo/scrollBy
- 3.2.2 使用動畫
- 3.2.3 改變布局參數
- 3.2.4 各種滑動方式的對比
- 3.3 彈性滑動
- 3.3.1 使用Scroller7
- 3.3.2 通過動畫
- 3.3.3 使用延時策略
- 3.4 View的事件分發機制
- 3.4.1 點擊事件的傳遞規則
- 3.4.2 事件分發的源碼解析
- 3.5 View的滑動沖突
- 3.5.1 常見的滑動沖突場景
- 3.5.2 滑動沖突的處理規則
- 3.5.3 滑動沖突的解決方式
- 第4章 View的工作原理
- 4.1 初識ViewRoot和DecorView
- 4.2 理解MeasureSpec
- 4.2.1 MeasureSpec
- 4.2.2 MeasureSpec和LayoutParams的對應關系
- 4.3 View的工作流程
- 4.3.1 measure過程
- 4.3.2 layout過程
- 4.3.3 draw過程
- 4.4 自定義View
- 4.4.1 自定義View的分類
- 4.4.2 自定義View須知
- 4.4.3 自定義View示例
- 4.4.4 自定義View的思想
- 第5章 理解RemoteViews
- 5.1 RemoteViews的應用
- 5.1.1 RemoteViews在通知欄上的應用
- 5.1.2 RemoteViews在桌面小部件上的應用
- 5.1.3 PendingIntent概述
- 5.2 RemoteViews的內部機制
- 5.3 RemoteViews的意義
- 第6章 Android的Drawable
- 6.1 Drawable簡介
- 6.2 Drawable的分類
- 6.2.1 BitmapDrawable2
- 6.2.2 ShapeDrawable
- 6.2.3 LayerDrawable
- 6.2.4 StateListDrawable
- 6.2.5 LevelListDrawable
- 6.2.6 TransitionDrawable
- 6.2.7 InsetDrawable
- 6.2.8 ScaleDrawable
- 6.2.9 ClipDrawable
- 6.3 自定義Drawable
- 第7章 Android動畫深入分析
- 7.1 View動畫
- 7.1.1 View動畫的種類
- 7.1.2 自定義View動畫
- 7.1.3 幀動畫
- 7.2 View動畫的特殊使用場景
- 7.2.1 LayoutAnimation
- 7.2.2 Activity的切換效果
- 7.3 屬性動畫
- 7.3.1 使用屬性動畫
- 7.3.2 理解插值器和估值器 /
- 7.3.3 屬性動畫的監聽器
- 7.3.4 對任意屬性做動畫
- 7.3.5 屬性動畫的工作原理
- 7.4 使用動畫的注意事項
- 第8章 理解Window和WindowManager
- 8.1 Window和WindowManager
- 8.2 Window的內部機制
- 8.2.1 Window的添加過程
- 8.2.2 Window的刪除過程
- 8.2.3 Window的更新過程
- 8.3 Window的創建過程
- 8.3.1 Activity的Window創建過程
- 8.3.2 Dialog的Window創建過程
- 8.3.3 Toast的Window創建過程
- 第9章 四大組件的工作過程
- 9.1 四大組件的運行狀態
- 9.2 Activity的工作過程
- 9.3 Service的工作過程
- 9.3.1 Service的啟動過程
- 9.3.2 Service的綁定過程
- 9.4 BroadcastReceiver的工作過程
- 9.4.1 廣播的注冊過程
- 9.4.2 廣播的發送和接收過程
- 9.5 ContentProvider的工作過程
- 第10章 Android的消息機制
- 10.1 Android的消息機制概述
- 10.2 Android的消息機制分析
- 10.2.1 ThreadLocal的工作原理
- 10.2.2 消息隊列的工作原理
- 10.2.3 Looper的工作原理
- 10.2.4 Handler的工作原理
- 10.3 主線程的消息循環
- 第11章 Android的線程和線程池
- 11.1 主線程和子線程
- 11.2 Android中的線程形態
- 11.2.1 AsyncTask
- 11.2.2 AsyncTask的工作原理
- 11.2.3 HandlerThread
- 11.2.4 IntentService
- 11.3 Android中的線程池
- 11.3.1 ThreadPoolExecutor
- 11.3.2 線程池的分類
- 第12章 Bitmap的加載和Cache
- 12.1 Bitmap的高效加載
- 12.2 Android中的緩存策略
- 12.2.1 LruCache
- 12.2.2 DiskLruCache
- 12.2.3 ImageLoader的實現446
- 12.3 ImageLoader的使用
- 12.3.1 照片墻效果
- 12.3.2 優化列表的卡頓現象
- 第13章 綜合技術
- 13.1 使用CrashHandler來獲取應用的crash信息
- 13.2 使用multidex來解決方法數越界
- 13.3 Android的動態加載技術
- 13.4 反編譯初步
- 13.4.1 使用dex2jar和jd-gui反編譯apk
- 13.4.2 使用apktool對apk進行二次打包
- 第14章 JNI和NDK編程
- 14.1 JNI的開發流程
- 14.2 NDK的開發流程
- 14.3 JNI的數據類型和類型簽名
- 14.4 JNI調用Java方法的流程
- 第15章 Android性能優化
- 15.1 Android的性能優化方法
- 15.1.1 布局優化
- 15.1.2 繪制優化
- 15.1.3 內存泄露優化
- 15.1.4 響應速度優化和ANR日志分析
- 15.1.5 ListView和Bitmap優化
- 15.1.6 線程優化
- 15.1.7 一些性能優化建議
- 15.2 內存泄露分析之MAT工具
- 15.3 提高程序的可維護性