人們更愿意交流實實在在的東西,也不是抽像的概念。就像你學習了1年的C語言,也沒有花1個月用C語言做個項目掌握知識更牢固一樣。我們開發項目也是如此。在動手完成功能以前,首先要有原型的支持來告訴大家我們這個項目會做成什么樣。這比寫個10頁的需求文檔來的會更直接、更明了些。
# V層原型
使用IDEA打開前臺項目文件夾(**指上節中下載解壓的文件夾,不是以前的HelloWorld了喲**),并找到`src/app/app.component.html`,刪除該文件中所有的代碼后,添加新代碼如下:
app.component.html
```html
<table>
<tr>
<th>序號</th>
<th>姓名</th>
<th>用戶名</th>
<th>郵箱</th>
<th>性別</th>
<th>操作</th>
</tr>
<tr>
<td>1</td>
<td>張三</td>
<td>zhangsan</td>
<td>zhangsan@yunzhiclub.com</td>
<td>男</td>
<td>刪除</td>
</tr>
<tr>
<td>2</td>
<td>李四</td>
<td>lisi</td>
<td>lisi@yunzhiclub.com</td>
<td>女</td>
<td>刪除</td>
</tr>
</table>
```
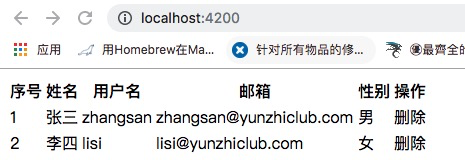
使用`ctrl-s`保存后,瀏覽器將自動刷新頁面:

至此,原型的功能便完成了。原型的數據最終是由C層來傳遞的,下面我們將原型中數據的字義遷移到C層。
# C層原型數據
app.component.ts
```
import {Component} from '@angular/core';
@Component({
selector: 'app-root',
templateUrl: './app.component.html',
styleUrls: ['./app.component.sass']
})
export class AppComponent {
title = 'web-app';
// 定義教師數組
teachers = new Array(
{
id: 1,
name: '張三',
username: 'zhangsan',
email: 'zhangsan@yunzhiclub.com',
sex: '男'
},
{
id: 2,
name: '李四',
username: 'lisi',
email: 'lisi@yunzhiclub.com',
sex: '女',
});
}
```
簡單解釋下這個數組定義的過程:
```
teachers = new Array(); ?
teachers = new Array({},{}); ?
teachers = new Array({
},
{
}); ?
teachers = new Array({
id: 1,
name: '張三',
username: 'zhangsan',
email: 'zhangsan@yunzhiclub.com',
sex: '男',
},
{
}); ?
teachers = new Array(
{
id: 1,
name: '張三',
username: 'zhangsan',
email: 'zhangsan@yunzhiclub.com',
sex: '男',
},
{
id: 2,
name: '李四',
username: 'lisi',
email: 'lisi@yunzhiclub.com',
sex: '女',
}); ?
```
? 初始化初數組
? 使用`{},{}`初始化數組,表示這個數組中有2個元素,每個元素的值均是`{}`
? 加入回車對數據進行格式化(僅僅改變格式),格式化后與?完全相同,只是格式變了。
? 為每一個`{}`加入屬性。
? 為第二個`{}`加入屬性。
# V層中查看數據
為了便于開發,我們在V層正式的使用某個數據前,往往會加入查看數據的測試代碼:
app.component.html
```html
<pre> ?
{{ ?
teachers | json ?
}}
</pre>
<table>
<tr>
<th>序號</th>
<th>姓名</th>
<th>用戶名</th>
<th>郵箱</th>
<th>性別</th>
<th>操作</th>
</tr>
<tr>
<td>1</td>
<td>張三</td>
<td>zhangsan</td>
<td>zhangsan@yunzhiclub.com</td>
<td>男</td>
<td>刪除</td>
</tr>
<tr>
<td>2</td>
<td>李四</td>
<td>lisi</td>
<td>lisi@yunzhiclub.com</td>
<td>女</td>
<td>刪除</td>
</tr>
</table>
```
? 將`JSON對象`轉換為`JSON字符串`
? 在V層中輸出`JSON字符串`
? html標簽,常用于顯示代碼
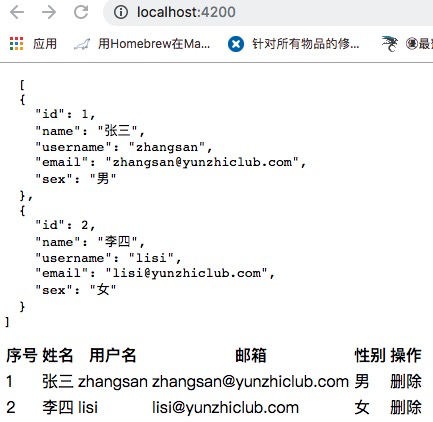
預覽:

## JSON
我們剛剛在C層中定義了1個`JSON對象`,該對象的類型是數組`Array`,該數組中又包括兩個普通的`JSON對象`。
```js
teachers = new Array(
{
id: 1,
name: '張三',
username: 'zhangsan',
email: 'zhangsan@yunzhiclub.com',
sex: '男',
},
{
id: 2,
name: '李四',
username: 'lisi',
email: 'lisi@yunzhiclub.com',
sex: '女',
});
```
然后在V層使用`| json`進行展示時,將這個`JSON對象`轉換成了`JSON字符串`。
```
~~~
[
{
"id": 1,
"name": "張三",
"username": "zhangsan",
"email": "zhangsan@yunzhiclub.com",
"sex": "男"
},
{
"id": 2,
"name": "李四",
"username": "lisi",
"email": "lisi@yunzhiclub.com",
"sex": "女"
}
]
~~~
```
① 在代碼中定義的是`JSON對象`,類型為`Array(Object)`; 在V層中用于顯示的是`JSON字符串`,類型為`string`。
② `JSON對象`可以轉換為`JSON字符串`,進而在V層中輸出;`JSON字符串`也可以轉換為`JSON對象`(轉換過程中可能會報錯,比如:1.5.2小節節)。
③ `JSON字符串`是長的像 `JSON對象`對象的字符串。
④ `JSON字符串` = `var a = '{}'; `JSON對象` = `var a = {};`
# ngFor循環輸出數據
app.component.html部分代碼
```html
<table>
<tr>
<th>序號</th>
<th>姓名</th>
<th>用戶名</th>
<th>郵箱</th>
<th>性別</th>
<th>操作</th>
</tr>
<tr *ngFor="let _teacher of teachers" > ?
<td><pre>{{_teacher | json}}</pre></td> ?
<td>張三</td>
<td>zhangsan</td>
<td>zhangsan@yunzhiclub.com</td>
<td>男</td>
<td>刪除</td>
</tr>
</table>
```
? 對`teachers`變量進行循環,每次循環的變量為`_teacher`
? 直接打印變量的內容,便于調試

完善代碼:
```html
<tr *ngFor="let _teacher of teachers" >
<td>{{_teacher.id}}</td>
<td>{{_teacher.name}}</td>
<td>{{_teacher.username}}</td>
<td>{{_teacher.email}}</td>
<td>{{_teacher.sex}}</td>
<td>刪除</td>
</tr>
```
效果:

# 本節小測
請思索:我們在使用`ngFor`時為什么將循環變量定義為`_teacher`,而不是`teacher`呢? 如果定義為`teacher`可能會有什么問題,為什么?
# 參考文檔
| 名稱 | 鏈接 |
|---- | ---- |
| 表達式與插值 Interpolation and Template Expressions | https://www.angular.cn/guide/template-syntax#interpolation-and-template-expressions |
| ngforof ngfor | https://www.angular.cn/guide/template-syntax#ngforof|
| 源碼 | [https://github.com/mengyunzhi/spring-boot-and-angular-guild/releases/tag/step2.2.1](https://github.com/mengyunzhi/spring-boot-and-angular-guild/releases/tag/step2.2.1) |
- 序言
- 第一章:Hello World
- 第一節:Angular準備工作
- 1 Node.js
- 2 npm
- 3 WebStorm
- 第二節:Hello Angular
- 第三節:Spring Boot準備工作
- 1 JDK
- 2 MAVEN
- 3 IDEA
- 第四節:Hello Spring Boot
- 1 Spring Initializr
- 2 Hello Spring Boot!
- 3 maven國內源配置
- 4 package與import
- 第五節:Hello Spring Boot + Angular
- 1 依賴注入【前】
- 2 HttpClient獲取數據【前】
- 3 數據綁定【前】
- 4 回調函數【選學】
- 第二章 教師管理
- 第一節 數據庫初始化
- 第二節 CRUD之R查數據
- 1 原型初始化【前】
- 2 連接數據庫【后】
- 3 使用JDBC讀取數據【后】
- 4 前后臺對接
- 5 ng-if【前】
- 6 日期管道【前】
- 第三節 CRUD之C增數據
- 1 新建組件并映射路由【前】
- 2 模板驅動表單【前】
- 3 httpClient post請求【前】
- 4 保存數據【后】
- 5 組件間調用【前】
- 第四節 CRUD之U改數據
- 1 路由參數【前】
- 2 請求映射【后】
- 3 前后臺對接【前】
- 4 更新數據【前】
- 5 更新某個教師【后】
- 6 路由器鏈接【前】
- 7 觀察者模式【前】
- 第五節 CRUD之D刪數據
- 1 綁定到用戶輸入事件【前】
- 2 刪除某個教師【后】
- 第六節 代碼重構
- 1 文件夾化【前】
- 2 優化交互體驗【前】
- 3 相對與絕對地址【前】
- 第三章 班級管理
- 第一節 JPA初始化數據表
- 第二節 班級列表
- 1 新建模塊【前】
- 2 初識單元測試【前】
- 3 初始化原型【前】
- 4 面向對象【前】
- 5 測試HTTP請求【前】
- 6 測試INPUT【前】
- 7 測試BUTTON【前】
- 8 @RequestParam【后】
- 9 Repository【后】
- 10 前后臺對接【前】
- 第三節 新增班級
- 1 初始化【前】
- 2 響應式表單【前】
- 3 測試POST請求【前】
- 4 JPA插入數據【后】
- 5 單元測試【后】
- 6 惰性加載【前】
- 7 對接【前】
- 第四節 編輯班級
- 1 FormGroup【前】
- 2 x、[x]、{{x}}與(x)【前】
- 3 模擬路由服務【前】
- 4 測試間諜spy【前】
- 5 使用JPA更新數據【后】
- 6 分層開發【后】
- 7 前后臺對接
- 8 深入imports【前】
- 9 深入exports【前】
- 第五節 選擇教師組件
- 1 初始化【前】
- 2 動態數據綁定【前】
- 3 初識泛型
- 4 @Output()【前】
- 5 @Input()【前】
- 6 再識單元測試【前】
- 7 其它問題
- 第六節 刪除班級
- 1 TDD【前】
- 2 TDD【后】
- 3 前后臺對接
- 第四章 學生管理
- 第一節 引入Bootstrap【前】
- 第二節 NAV導航組件【前】
- 1 初始化
- 2 Bootstrap格式化
- 3 RouterLinkActive
- 第三節 footer組件【前】
- 第四節 歡迎界面【前】
- 第五節 新增學生
- 1 初始化【前】
- 2 選擇班級組件【前】
- 3 復用選擇組件【前】
- 4 完善功能【前】
- 5 MVC【前】
- 6 非NULL校驗【后】
- 7 唯一性校驗【后】
- 8 @PrePersist【后】
- 9 CM層開發【后】
- 10 集成測試
- 第六節 學生列表
- 1 分頁【后】
- 2 HashMap與LinkedHashMap
- 3 初識綜合查詢【后】
- 4 綜合查詢進階【后】
- 5 小試綜合查詢【后】
- 6 初始化【前】
- 7 M層【前】
- 8 單元測試與分頁【前】
- 9 單選與多選【前】
- 10 集成測試
- 第七節 編輯學生
- 1 初始化【前】
- 2 嵌套組件測試【前】
- 3 功能開發【前】
- 4 JsonPath【后】
- 5 spyOn【后】
- 6 集成測試
- 7 @Input 異步傳值【前】
- 8 值傳遞與引入傳遞
- 9 @PreUpdate【后】
- 10 表單驗證【前】
- 第八節 刪除學生
- 1 CSS選擇器【前】
- 2 confirm【前】
- 3 功能開發與測試【后】
- 4 集成測試
- 5 定制提示框【前】
- 6 引入圖標庫【前】
- 第九節 集成測試
- 第五章 登錄與注銷
- 第一節:普通登錄
- 1 原型【前】
- 2 功能設計【前】
- 3 功能設計【后】
- 4 應用登錄組件【前】
- 5 注銷【前】
- 6 保留登錄狀態【前】
- 第二節:你是誰
- 1 過濾器【后】
- 2 令牌機制【后】
- 3 裝飾器模式【后】
- 4 攔截器【前】
- 5 RxJS操作符【前】
- 6 用戶登錄與注銷【后】
- 7 個人中心【前】
- 8 攔截器【后】
- 9 集成測試
- 10 單例模式
- 第六章 課程管理
- 第一節 新增課程
- 1 初始化【前】
- 2 嵌套組件測試【前】
- 3 async管道【前】
- 4 優雅的測試【前】
- 5 功能開發【前】
- 6 實體監聽器【后】
- 7 @ManyToMany【后】
- 8 集成測試【前】
- 9 異步驗證器【前】
- 10 詳解CORS【前】
- 第二節 課程列表
- 第三節 果斷
- 1 初始化【前】
- 2 分頁組件【前】
- 2 分頁組件【前】
- 3 綜合查詢【前】
- 4 綜合查詢【后】
- 4 綜合查詢【后】
- 第節 班級列表
- 第節 教師列表
- 第節 編輯課程
- TODO返回機制【前】
- 4 彈出框組件【前】
- 5 多路由出口【前】
- 第節 刪除課程
- 第七章 權限管理
- 第一節 AOP
- 總結
- 開發規范
- 備用