使用confirm及alert來進行彈窗提醒雖然方便,但瀏覽器為我們提供的彈窗著實欠缺一些友好性。本節來實現一個看起來更漂亮的彈窗。
# 實現原理
人類文明中充滿著各種"trick 戲法",比如你在電腦上看電影時其實是在觀看一張張快速切換的照片,由于這些照片播放的太快了使得我們就像看到了真實的物體在變化一樣;再比如各種第一視角的游戲(比如絕地求生),其實畫面中的"你"一直都是位于屏幕中央的位置而從未動過,由于"你"所處的周邊環境的畫面在變化而使得你感覺就像自己在動一下;再比如被點亮的燈泡的亮度其實一在不停地變化,只是由于變化的頻率太快,從而使得你感覺其亮度是一直不變的而已。
彈窗的實現,也是一種"trick 戲法"。
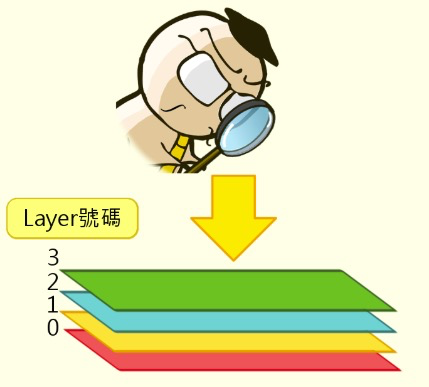
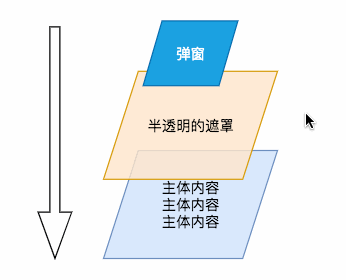
# 圖層
如果你有一些PS基礎,或使用過其它一些圖片(視頻)編輯軟件,對這個概念一定不會陌生。在進行圖片處理時,會將多個圖層由上至下排列,圖片的最終效果則是這些圖片由上及下的合成效果。
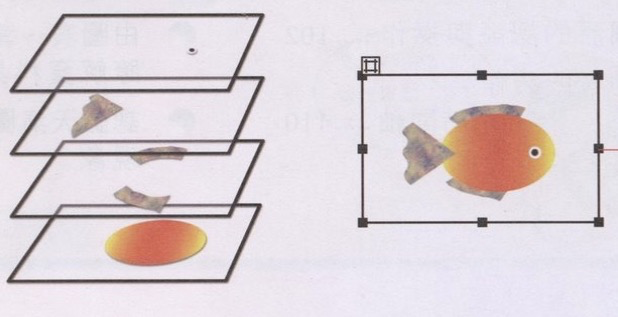
比如下圖便是按上面的理論使用制圖軟件繪制的一條小魚:
其實視頻軟件中像"添加字幕"、"畫中畫"的功能也是類似。如果向上追溯的話,筆者在上世紀90年代讀初中時,曾經接觸過一種叫做幻燈機的東西,至令印象頗深。
>[info] PPT又被稱為"幻燈片"。^_^,你想到了什么?
它的原理如下:
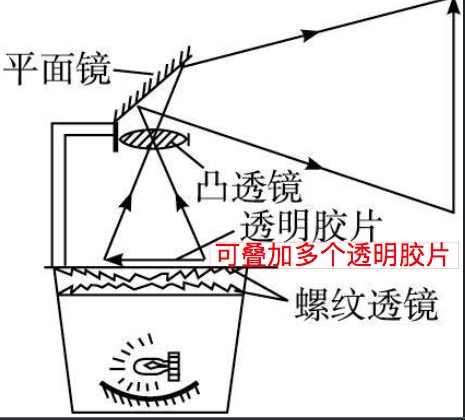
再往上追溯還可以追溯到我國的傳統藝術:皮影。
CSS中其實也有"圖層"的概念,它在CSS中的名字叫:position 定位。
# 彈窗原理
# 實踐
有了原理以后,開始分步嘗試開發,擬分為以下幾步:
1. 建立兩個div。其中一個起半透明的遮罩層的作用;第二個用于定制彈出窗口
2. 用戶點擊刪除時,顯示這兩個DIV。
3. 定制第一個DIV,完成其半透明的遮罩層功能。
4. 定制第二個DIV,使其顯示在遮罩層上方,并且居中顯示
5. 給第二個DIV添加一個說明,一個確認按鈕,一個取消按鈕
6. 給確認按鈕及取消按鈕分別加入對應的功能
7. 集成測試
## 建立DIV
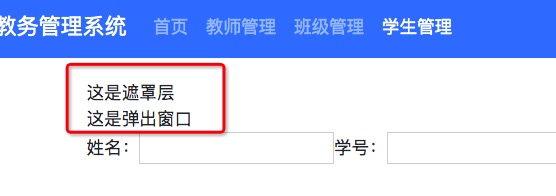
開啟集成測試模式,并來到學生管理界面。找到對應的V層,新建兩個DIV。
src/app/student/index/index.component.html
```html
<div>這是遮罩層</div>
<div>這是彈出窗口</div>
<form (ngSubmit)="onQuery()">
...
```
## 用戶刪除時顯示DIV
首先將其設置為默認隱藏。
src/app/student/index/index.component.html
```html
<div *ngIf="showPopWindow">這是遮罩層</div>
<div *ngIf="showPopWindow">這是彈出窗口</div>
<form (ngSubmit)="onQuery()">
```
src/app/student/index/index.component.ts
```javascript
export class IndexComponent implements OnInit {
...
showPopWindow = false;
```
接著當用戶點擊刪除時,設置`showPopWindow`的值為true,同時為了避免發起真實的刪除操作,在刪除方法中暫時添加return語句。
src/app/student/index/index.component.ts
```javascript
onDelete(student: Student): void {
this.showPopWindow = true;
return;
const result = confirm('這里是提示的消息');
...
```
## 定制遮罩層
遮罩層有以下個特點:
* 位于主體窗口之上
* 大小與瀏覽器窗口相同
* 有個灰色的背景該背景透明
而以上幾個特點則都是由CSS來控制實現的,實現如下:
設置class
src/app/student/index/index.component.html
```html
<div *ngIf="showPopWindow" class="mask">這是遮罩層</div>
...
```
src/app/student/index/index.component.sass
```sass
...
.mask
position: fixed
background-color: green
```
* 使用position: fixed將該div設置為新的圖層
* 設置個背景色以在開發過程中觀察該DIV的大小
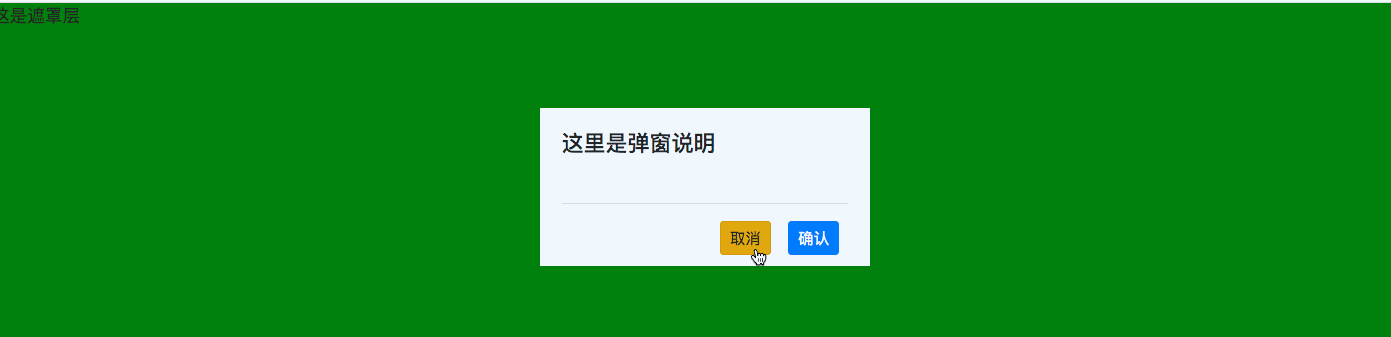
測試:

此時:遮罩層遮擋住了"這是彈出窗口"所在的DIV,表明其位于主體窗口之上成功。但大小不符合要求,繼續設置如下:
src/app/student/index/index.component.sass
```sass
...
.mask
position: fixed
background-color: green
height: 100%
width: 100%
```
測試:
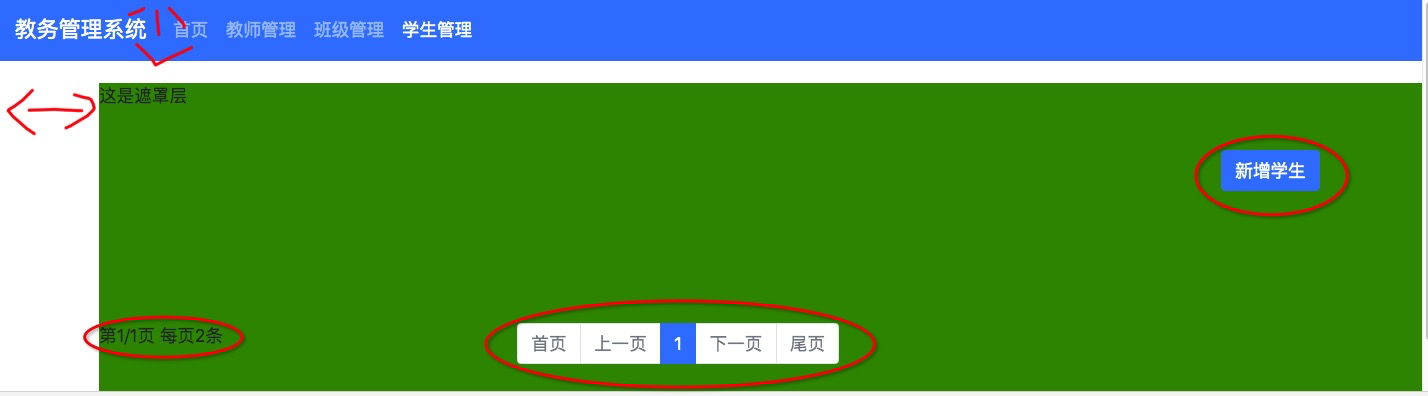
* 該DIV的起始位置處于原位置(未設置fixed屬性前的位置),導致未能占滿整個屏幕。
* 有些元素位于遮罩層之上
問題一,使用top,left自定義該圖層距離瀏覽器上方及左側的距離:
src/app/student/index/index.component.sass
```sass
...
.mask
position: fixed
background-color: green
height: 100%
width: 100%
top: 0px
left: 0px
```
問題二:各個圖層(position: fixed)將z-index的值由大到小,進行由上到下排列,當圖層的z-index值相同時按后出現的圖層排到之前圖層之上。所以,解決該問題的方法是:將mask的index設置為一個較大的值。
src/app/student/index/index.component.sass
```sass
...
.mask
position: fixed
background-color: green
height: 100%
width: 100%
top: 0px
left: 0px
z-index: 1000
```
測試通過。
## 使彈出窗口位于遮罩層上方
有了剛剛的經驗這個就不太難了,實現代碼如下:
src/app/student/index/index.component.html
```html
<div *ngIf="showPopWindow" class="mask">這是遮罩層</div>
<div *ngIf="showPopWindow" class="popWindow">這是彈出窗口</div>
<form (ngSubmit)="onQuery()">
```
src/app/student/index/index.component.sass
```sass
.popWindow
position: fixed
z-index: 1001
```
## 彈窗樣式
src/app/student/index/index.component.sass
```sass
.popWindow
position: fixed
top: 50%
left: 50%
z-index: 1001
```
* 將top與left設置為50%,以達到居中的目的

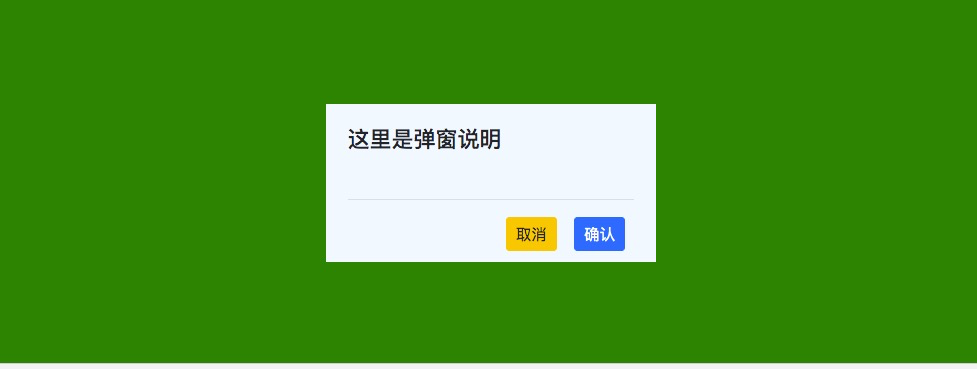
## 添加說明、按鈕細化樣式
src/app/student/index/index.component.html
```html
<div *ngIf="showPopWindow" class="mask">這是遮罩層</div>
<div *ngIf="showPopWindow" class="popWindow">
<h5>這里是彈窗說明</h5>
<hr>
<div class="text-right">
<button class="btn btn-sm btn-warning">取消</button>
<button class="btn btn-sm btn-primary">確認</button>
</div>
</div>
<form (ngSubmit)="onQuery()">
```
細化樣式如下:
src/app/student/index/index.component.sass
```sass
.popWindow
position: fixed
width: 300px
min-height: 140px
top: calc(50% - 70px)
left: calc(50% - 150px)
z-index: 1001
background-color: aliceblue
padding: 20px 20px 10px
.popWindow h5
min-height: 50px
.popWindow button
margin: auto 8px
```
* 使用calc運算符將彈窗進行居中。請思索:為什么要分別減70px及150px
其它的屬性請依次添加后分步查看添加后效果,最終效果如下:
## 加入對應的功能
實現刪除的方法有很多種,在此給出實現簡單的一種,具體的流程如下:
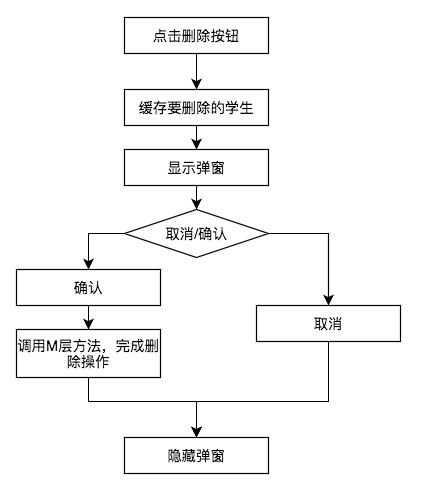
按此流程,依次完善V層及C層代碼:
src/app/student/index/index.component.html
```
<div class="text-right">
<button class="btn btn-sm btn-warning" type="button" (click)="cancel()">取消</button>
<button class="btn btn-sm btn-primary" type="button" (click)="confirm()">確認</button>
</div>
```
src/app/student/index/index.component.ts
```javascript
/*緩存要刪除的學生*/
cacheDeleteStudent: Student;
/**
* 刪除學生
* @param student 學生
*/
onDelete(student: Student): void {
this.cacheDeleteStudent = student;
this.showPopWindow = true;
}
/**
* 刪除緩存的學生后,隱藏彈窗
*/
deleteCacheStudent() {
const student = this.cacheDeleteStudent;
this.studentService.deleteById(student.id)
.subscribe(() => {
this.pageStudent.content.forEach((value, key) => {
if (value === student) {
this.pageStudent.content.splice(key, 1);
}
});
});
}
/**
* 點擊確認
*/
confirm() {
this.deleteCacheStudent();
this.showPopWindow = false;
}
/**
* 點擊取消
*/
cancel() {
this.showPopWindow = false;
}
```
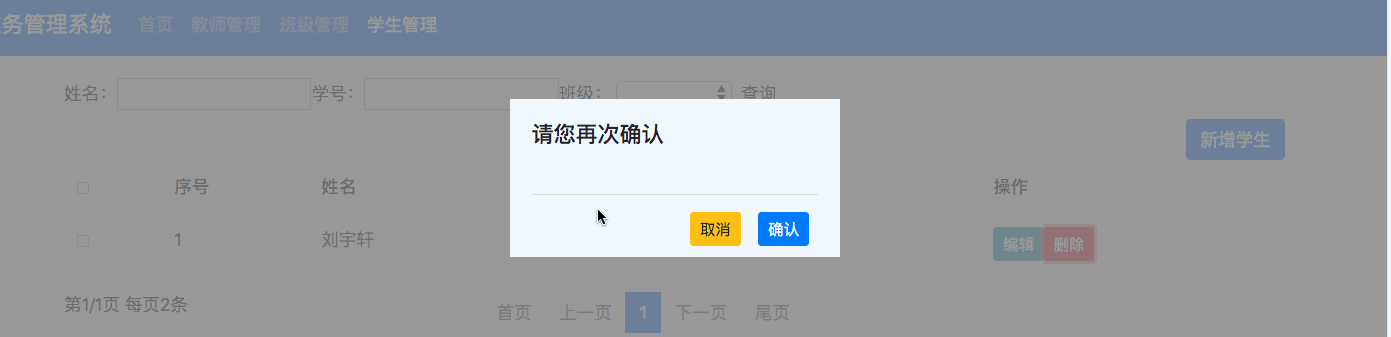
## 集成測試
集成測試過程中發現以下問題:
1. 彈窗說明的文字為:這里是彈窗說明。正確的應該改為:請您再次確認
2. 遮罩層的背景顏色為綠色。正確的應為灰色(介于黑與白之間)
3. 遮罩層沒有半透明設置。正確的應為半透明
4. 左上角遮罩層有測試文字:這是遮罩層。正確的應該沒有文字。
對于1,4兩點請自行修正。對于2,3兩點修正如下:
src/app/student/index/index.component.sass
```sass
.mask
position: fixed
background-color: gray ?
height: 100%
width: 100%
top: 0px
left: 0px
z-index: 1000
opacity: 80% ?
```
* ? 背景色灰色
* ? 不透明度80%
最終效果如下:
## 單元測試
在加入功能的環節中,我們:增加了3個方法,修改了1個方法。對應增加3個測試用例如下:
src/app/student/index/index.component.spec.ts
```javascript
fit('deleteCacheStudent', () => {
});
fit('confirm', () => {
});
fit('cancel', () => {
});
```
### deleteCacheStudent
此方法實際上是將原onDelete方法的部分邏輯進行遷移,在原來onDelete方法的基礎上稍做修正:
src/app/student/index/index.component.spec.ts
```javascript
fit('deleteCacheStudent', () => {
// 替身及模似數據的準備
const studentService = TestBed.get(StudentService);
const subject = new BehaviorSubject<void>(undefined);
spyOn(studentService, 'deleteById').and.returnValue(subject);
// 調用方法,刪除第一個學生
const student = component.pageStudent.content[0];
component.cacheDeleteStudent = student; // ?
component.deleteCacheStudent();
// 斷言刪除的學生成功的由前臺移除
let found = false;
component.pageStudent.content.forEach(value => {
if (value === student) {
found = true;
}
});
expect(found).toBeFalsy();
});
```
* ? 設置緩存的要刪除的學生
### confirm
src/app/student/index/index.component.spec.ts
```javascript
fit('confirm', () => {
// 替身及數據準備
spyOn(component, 'deleteCacheStudent');
component.showPopWindow = true;
// 調用
component.confirm();
// 斷言
expect(component.showPopWindow).toBeFalsy();
expect(component.deleteCacheStudent).toHaveBeenCalled();
});
```
### cancel
src/app/student/index/index.component.spec.ts
```javascript
fit('cancel', () => {
// 替身及數據準備
component.showPopWindow = true;
// 調用
component.cancel();
// 斷言
expect(component.showPopWindow).toBeFalsy();
});
```
### onDelete
src/app/student/index/index.component.spec.ts
```javascript
it('onDelete -> 確認刪除', () => {
// 替身及模似數據的準備
component.showPopWindow = false;
const student = new Student();
// 調用
component.onDelete(student);
// 斷言
expect(component.cacheDeleteStudent).toBeTruthy(student);
expect(component.showPopWindow).toBeTruthy();
});
```
最后,將所有的`f`去除,做全局測試:
錯誤一:

錯誤原因:只有單獨進行某個單元測試時,才可以使用root1根選擇器。在多個單元測試共同進行時,angular會為每個單元測試生成唯一的root編號,比如:root2,root3,root4等。
修正如下:
src/app/student/index/index.component.spec.ts
```javascript
FormTest.clickButton(fixture, '#root1 > table > tr:nth-child(2) > td:nth-child(6) > button'); ?
FormTest.clickButton(fixture, 'table > tr:nth-child(2) > td:nth-child(6) > button'); ?
```
錯誤二:
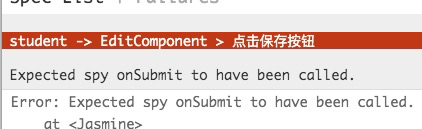
找到對應的測試用例,將`it`變更為`fit`,再次測試:
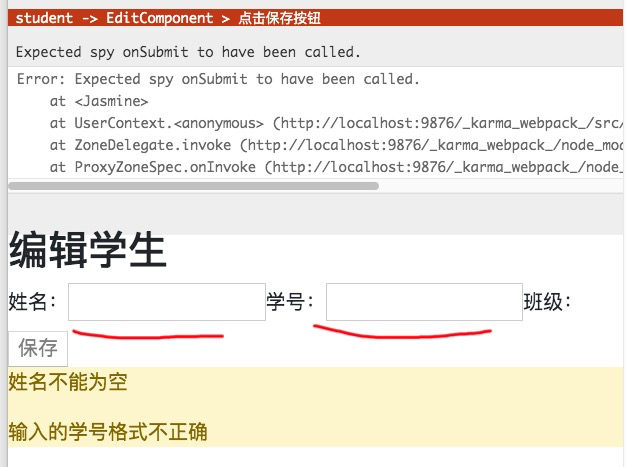
排查看確認是由于校驗規則失效導致C層對應的`submit`方法未生效,修正單元測試如下:
src/app/student/edit/edit.component.spec.ts
```javascript
fit('點擊保存按鈕', () => {
spyOn(component, 'onSubmit');
component.formGroup.get('name').setValue('123'); ?
component.formGroup.get('sno').setValue('123421'); ?
fixture.detectChanges(); ?
const button: HTMLButtonElement = fixture.debugElement.query(By.css('button')).nativeElement;
button.click();
expect(component.onSubmit).toHaveBeenCalled();
});
```
>[success] 單元測試的職責正是如此。當某些邏輯變更時,歷史的單元測試會及時的發出警告信息。
修正后單元測試全部通過,保證了未因增加新功能而對歷史功能的造成影響。
# 參考文檔
| 名稱 | 鏈接 | 預計學習時長(分) |
| --- | --- | --- |
| 源碼地址 | [https://github.com/mengyunzhi/spring-boot-and-angular-guild/releases/tag/step4.8.5](https://github.com/mengyunzhi/spring-boot-and-angular-guild/releases/tag/step4.8.5) | - |
| CSS Position(定位) | [https://www.runoob.com/css/css-positioning.html](https://www.runoob.com/css/css-positioning.html) | 5 |
| CSS z-index 屬性 | [https://www.runoob.com/cssref/pr-pos-z-index.html](https://www.runoob.com/cssref/pr-pos-z-index.html) | 5 |
| CSS3 opacity 屬性 | [https://www.runoob.com/cssref/css3-pr-opacity.html](https://www.runoob.com/cssref/css3-pr-opacity.html) | 5 |
| CSS calc() 函數 | [https://www.runoob.com/cssref/func-calc.html](https://www.runoob.com/cssref/func-calc.html) | 5 |
- 序言
- 第一章:Hello World
- 第一節:Angular準備工作
- 1 Node.js
- 2 npm
- 3 WebStorm
- 第二節:Hello Angular
- 第三節:Spring Boot準備工作
- 1 JDK
- 2 MAVEN
- 3 IDEA
- 第四節:Hello Spring Boot
- 1 Spring Initializr
- 2 Hello Spring Boot!
- 3 maven國內源配置
- 4 package與import
- 第五節:Hello Spring Boot + Angular
- 1 依賴注入【前】
- 2 HttpClient獲取數據【前】
- 3 數據綁定【前】
- 4 回調函數【選學】
- 第二章 教師管理
- 第一節 數據庫初始化
- 第二節 CRUD之R查數據
- 1 原型初始化【前】
- 2 連接數據庫【后】
- 3 使用JDBC讀取數據【后】
- 4 前后臺對接
- 5 ng-if【前】
- 6 日期管道【前】
- 第三節 CRUD之C增數據
- 1 新建組件并映射路由【前】
- 2 模板驅動表單【前】
- 3 httpClient post請求【前】
- 4 保存數據【后】
- 5 組件間調用【前】
- 第四節 CRUD之U改數據
- 1 路由參數【前】
- 2 請求映射【后】
- 3 前后臺對接【前】
- 4 更新數據【前】
- 5 更新某個教師【后】
- 6 路由器鏈接【前】
- 7 觀察者模式【前】
- 第五節 CRUD之D刪數據
- 1 綁定到用戶輸入事件【前】
- 2 刪除某個教師【后】
- 第六節 代碼重構
- 1 文件夾化【前】
- 2 優化交互體驗【前】
- 3 相對與絕對地址【前】
- 第三章 班級管理
- 第一節 JPA初始化數據表
- 第二節 班級列表
- 1 新建模塊【前】
- 2 初識單元測試【前】
- 3 初始化原型【前】
- 4 面向對象【前】
- 5 測試HTTP請求【前】
- 6 測試INPUT【前】
- 7 測試BUTTON【前】
- 8 @RequestParam【后】
- 9 Repository【后】
- 10 前后臺對接【前】
- 第三節 新增班級
- 1 初始化【前】
- 2 響應式表單【前】
- 3 測試POST請求【前】
- 4 JPA插入數據【后】
- 5 單元測試【后】
- 6 惰性加載【前】
- 7 對接【前】
- 第四節 編輯班級
- 1 FormGroup【前】
- 2 x、[x]、{{x}}與(x)【前】
- 3 模擬路由服務【前】
- 4 測試間諜spy【前】
- 5 使用JPA更新數據【后】
- 6 分層開發【后】
- 7 前后臺對接
- 8 深入imports【前】
- 9 深入exports【前】
- 第五節 選擇教師組件
- 1 初始化【前】
- 2 動態數據綁定【前】
- 3 初識泛型
- 4 @Output()【前】
- 5 @Input()【前】
- 6 再識單元測試【前】
- 7 其它問題
- 第六節 刪除班級
- 1 TDD【前】
- 2 TDD【后】
- 3 前后臺對接
- 第四章 學生管理
- 第一節 引入Bootstrap【前】
- 第二節 NAV導航組件【前】
- 1 初始化
- 2 Bootstrap格式化
- 3 RouterLinkActive
- 第三節 footer組件【前】
- 第四節 歡迎界面【前】
- 第五節 新增學生
- 1 初始化【前】
- 2 選擇班級組件【前】
- 3 復用選擇組件【前】
- 4 完善功能【前】
- 5 MVC【前】
- 6 非NULL校驗【后】
- 7 唯一性校驗【后】
- 8 @PrePersist【后】
- 9 CM層開發【后】
- 10 集成測試
- 第六節 學生列表
- 1 分頁【后】
- 2 HashMap與LinkedHashMap
- 3 初識綜合查詢【后】
- 4 綜合查詢進階【后】
- 5 小試綜合查詢【后】
- 6 初始化【前】
- 7 M層【前】
- 8 單元測試與分頁【前】
- 9 單選與多選【前】
- 10 集成測試
- 第七節 編輯學生
- 1 初始化【前】
- 2 嵌套組件測試【前】
- 3 功能開發【前】
- 4 JsonPath【后】
- 5 spyOn【后】
- 6 集成測試
- 7 @Input 異步傳值【前】
- 8 值傳遞與引入傳遞
- 9 @PreUpdate【后】
- 10 表單驗證【前】
- 第八節 刪除學生
- 1 CSS選擇器【前】
- 2 confirm【前】
- 3 功能開發與測試【后】
- 4 集成測試
- 5 定制提示框【前】
- 6 引入圖標庫【前】
- 第九節 集成測試
- 第五章 登錄與注銷
- 第一節:普通登錄
- 1 原型【前】
- 2 功能設計【前】
- 3 功能設計【后】
- 4 應用登錄組件【前】
- 5 注銷【前】
- 6 保留登錄狀態【前】
- 第二節:你是誰
- 1 過濾器【后】
- 2 令牌機制【后】
- 3 裝飾器模式【后】
- 4 攔截器【前】
- 5 RxJS操作符【前】
- 6 用戶登錄與注銷【后】
- 7 個人中心【前】
- 8 攔截器【后】
- 9 集成測試
- 10 單例模式
- 第六章 課程管理
- 第一節 新增課程
- 1 初始化【前】
- 2 嵌套組件測試【前】
- 3 async管道【前】
- 4 優雅的測試【前】
- 5 功能開發【前】
- 6 實體監聽器【后】
- 7 @ManyToMany【后】
- 8 集成測試【前】
- 9 異步驗證器【前】
- 10 詳解CORS【前】
- 第二節 課程列表
- 第三節 果斷
- 1 初始化【前】
- 2 分頁組件【前】
- 2 分頁組件【前】
- 3 綜合查詢【前】
- 4 綜合查詢【后】
- 4 綜合查詢【后】
- 第節 班級列表
- 第節 教師列表
- 第節 編輯課程
- TODO返回機制【前】
- 4 彈出框組件【前】
- 5 多路由出口【前】
- 第節 刪除課程
- 第七章 權限管理
- 第一節 AOP
- 總結
- 開發規范
- 備用