todo:此處直接使用單元測試,跨渡過大。應該先給出傳統初始化CM層的方法,并按傳統計方法對接學生新增后再分步介紹單元測試的方法。
# 實體間關系
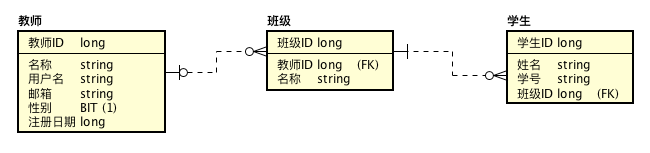
從廣義上講,實體間的關系可以分為:`一對一 1:1`、`一對多 1:n(多對一 n:1)`以及`多對多 m:n`三種。以我們當前的ER圖為例:教師與班級的關系為`一對多`,即每個教師可以管理多個班級,同時每個班級只能被一個教師管理;同時班級與學生的關系也是`一對多`,即每個班級可以有多個學生,同時每個學生只能屬于一個班級。在前期確立實體間的關系時,使用廣義的定義就足夠了。但在處理一些具體的校驗問題時,就顯得力不從心了。比如我們在當前系統中規定,只有存在學生那必須為其指定一個班級,而初始化班級的時候,則該班級中不見得必須有學生。這更符合現實情況,在招生還沒有開始以前,我們允許管理員維護新的班級;在招生工作結束后,我們允許管理員向特定的班級中增加學生。而在錄取的過程中不可能存在沒有班級的學生,所以我們的系統也不允許此類事情的發生。這可以為我們減少人為的失誤給系統帶來的不確定性風險。假設我們不強制要求學生必須存在于班級之中,那么管理員錄入時就可能忘記選擇該學生的所在班級,最終的結果就是系統在任何班級中都無法找到該學生的信息,而如果系統未提供查詢無班級學生功能的話,那么此學生數據就會成為一個永遠也獲取不到的數據。
而狹義的實體關系恰恰能夠很好的描述此類問題。在狹義的定義中,`1`具體表述為`0..1`、`1`,`n`具體表示為`0..n`、`1..n`。以我們當前的項目為例:在初始化學生時必須為其指定班級,班級在初始化時可以沒有任何學生,所以班級與學生的關系具體描述為:`1`:`0..n`,反應到ER圖上如下:
在ER圖上的中  代表1, 這個小圈代表0, 代表n;
所以以下ER圖

則應具體描述為:`教師:班級` = `0..1 : 0..n`;`班級:學生` = `1: 0..n`。也就是說:可以存在沒有教師的班級,但不能存在沒有班級的學生。
## @JoinColumn(nullable = false)
在spring data jpa中,我們使用@JoinColumn(nullable = false)來定義某個關聯實體的字段不能為null。比如按`班級:學生` = `1: 0..n`的關系,我們應該如下初始化Student實體類。
entity/Student.java
```
package com.mengyunzhi.springBootStudy.entity;
import javax.persistence.*;
@Entity
public class Student {
@Id
@GeneratedValue(strategy = GenerationType.IDENTITY)
private Long id;
private String name;
private String sno;
@ManyToOne
@JoinColumn(nullable = false?) ?
private Klass klass;
public Student() {
}
...請自行補充setter/getter
}
```
* ? 對關聯實體字段做個性化設置
* ? 該字段必須有值,不能為null
## 單元測試
讓我們使用單元的方法來測試一下使用@JoinColumn(nullable = false)注解后,當klass的值為null會發生什么錯誤。首先,我們建立更加方便操作Student的倉庫接口。
repository/StudentRepository.java
```
package com.mengyunzhi.springBootStudy.repository;
import com.mengyunzhi.springBootStudy.entity.Student;
import org.springframework.data.repository.CrudRepository;
/**
* 學生
*/
public interface StudentRepository extends CrudRepository<Student, Long> {
}
```
然后使用idea自動生成entity/Student.java對應的測試文件StudnetTest.java,并初始化如下:
entity/StudentTest.java
```
package com.mengyunzhi.springBootStudy.entity;
import com.mengyunzhi.springBootStudy.repository.StudentRepository;
import org.junit.Test;
import org.junit.runner.RunWith;
import org.springframework.beans.factory.annotation.Autowired;
import org.springframework.boot.test.context.SpringBootTest;
import org.springframework.test.context.junit4.SpringRunner;
@SpringBootTest
@RunWith(SpringRunner.class)
public class StudentTest {
@Autowired
StudentRepository studentRepository;
@Test
public void save() {
}
}
```
### 非null校驗一
在save方法中添加語句,來嘗試保存一個沒有班級的學生實體。
```
@Test
public void save() {
Student student = new Student();
this.studentRepository.save(student);
}
```
運行該測試,在控制臺發生如下錯誤:
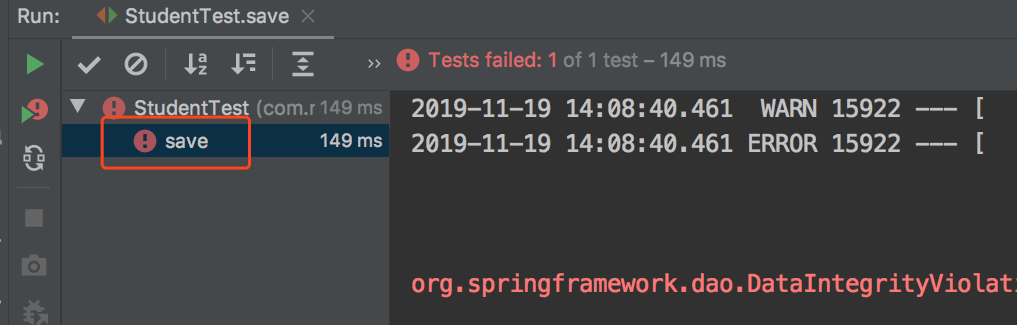
```
2019-11-19 14:08:40.461 WARN 15922 --- [ main] o.h.engine.jdbc.spi.SqlExceptionHelper : SQL Error: 1048, SQLState: 23000
2019-11-19 14:08:40.461 ERROR 15922 --- [ main] o.h.engine.jdbc.spi.SqlExceptionHelper : Column 'klass_id' cannot be null
```
如日志如述,在保存時發生了1048錯誤,錯誤的詳情為:'klass\_id' 列不能為null。而這正是我們想要的。
### 斷言異常
當異常發生而未被正確的處理時,程序將在異常處終止執行。比如我們剛剛的代碼在執行了發生了異常,控制臺顯示此異常的類型為`org.springframework.dao.DataIntegrityViolationException:`,由于我們沒有手動的處理這個異常,所以程序執行到此就終止了。也就是說即使我們繼續在該發生異常的代碼后編寫正確的代碼,也不會被執行。比如我們繼續補充正確的代碼:
entity/StudentTest.java
```
/*班級*/
@Autowired
KlassRepository klassRepository;
/**
* 保存測試
* 1. 直接保存空學生,斷言null異常
* 2. 持久化一個班級
* 3. 設置學生的班級,再保存。成功
*/
@Test
public void save() {
Student student = new Student();
this.studentRepository.save(student);
/*此行及以下代碼將不被執行*/
System.out.println("程序執行到此,打印控制臺");
Klass klass = new Klass();
this.klassRepository.save(klass);
student.setKlass(klass);
this.studentRepository.save(student);
}
```
此時我們重復前面的測試,將得到與上一次相同的運行結果,代碼執行到第二行的this.studentRepository.save(student);發生了異常,因而直接終止了執行。
#### try catch
處理異常最簡單最有效的方法就是try catch,比如我們可以使用以下代碼來使得程序正常執行下去。
entity/StudentTest.java
```
@Test
public void save() {
Student student = new Student();
try { ?
this.studentRepository.save(student);
} catch (DataIntegrityViolationException e) {
System.out.println("發生了異常");
}
System.out.println("程序執行到此,打印控制臺");
```
* ? 使用try catch來獲取異常
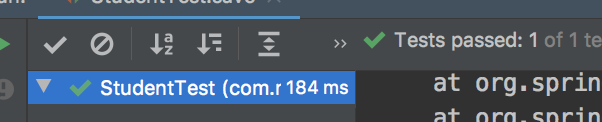
運行測試,單元測試通過,同時控制臺打印了如下信息:
```
2019-11-19 14:25:10.164 WARN 29533 --- [ main] o.h.engine.jdbc.spi.SqlExceptionHelper : SQL Error: 1048, SQLState: 23000
2019-11-19 14:25:10.164 ERROR 29533 --- [ main] o.h.engine.jdbc.spi.SqlExceptionHelper : Column 'klass_id' cannot be null
發生了異常
程序執行到此,打印控制臺
```
雖然單元測試通過了,也于控制臺中打印了應該打印的錯誤信息,但這會有一定的問題。比如我們來到Student實體類,去除klass字段上的@JoinColumn注解,然后再來運行該單元測試。盡管控制臺沒有打印'發生了異常',但單元測試同樣被通過了。這違背了單元測試的初衷:在后續開發中,使用單元測試來保證該功能的正常運行。而我們希望的單元測試來保障:學生實體中的klass屬性不能為null,如果為null那么單元測試就應該來報錯。也就是說我們要在測試代碼中保障該異常必然發生了,同時還不能夠由于該異常的發生而影響后續的功能測試代碼。
#### 小技巧
為此,我們增加一個是否發生異常的狀態字段
```
@Test
public void save() {
Student student = new Student();
boolean called = false; ①
try {
this.studentRepository.save(student);
} catch (DataIntegrityViolationException e) {
System.out.println("發生了異常");
called = true; ②
}
Assertions.assertThat(called).isTrue(); ③
```
* ③ 如果沒有發生異常,則called的值仍然為false,則此條斷言沒法通過
此時,若去除Student實體中klass字段上的@JoinColumn注解,再運行單元測試則會發生以下異常:
```
org.junit.ComparisonFailure:
Expected :true ?
Actual :false ?
<Click to see difference>
at sun.reflect.NativeConstructorAccessorImpl.newInstance0(Native Method)
at sun.reflect.NativeConstructorAccessorImpl.newInstance(NativeConstructorAccessorImpl.java:62)
at sun.reflect.DelegatingConstructorAccessorImpl.newInstance(DelegatingConstructorAccessorImpl.java:45)
at com.mengyunzhi.springBootStudy.entity.StudentTest.save(StudentTest.java:41)
```
* ? 期望called的值為true
* ? 但卻接收到了false
* 說明應該發生異常的點沒有發生異常,單元測試不通過。
### 非null校驗2
按前面原型的設置,學號必須是6位長度的字符串,唯一且不能為空(null)。剛剛學習了使用@JoinColumn(nullable = false)進行字段的非null校驗,那是否也可以將該注解直接添加到sno字段上呢?共同試試看。
```
@JoinColumn(nullable = false) ★
private String sno;
```
我們運行歷史的單元測試,期望該測試能夠發生異常來提醒我們: sno字段不能為null。但事與愿違:
單元測試并沒有發現sno為null的錯誤,這是由于:
* @JoinColumn 注解用于關聯實體的字段上,一般和@ManyToOne、@OneToOne配合使用。
* 一般的非關聯實體的設置需要使用@Column注解。
```
@Column(nullable = false)
private String sno;
```
此時我們再次執行單元測試,將得到如下錯誤:
```
發生了異常
程序執行到此,打印控制臺
2019-11-19 15:00:06.762 WARN 58189 --- [ main] o.h.engine.jdbc.spi.SqlExceptionHelper : SQL Error: 1048, SQLState: 23000
2019-11-19 15:00:06.762 ERROR 58189 --- [ main] o.h.engine.jdbc.spi.SqlExceptionHelper : Column 'sno' cannot be null
org.springframework.dao.DataIntegrityViolationException: could not execute statement; SQL [n/a]; constraint [null]; nested exception is org.hibernate.exception.ConstraintViolationException: could not execute statement
```
觀察控制臺我們發現,單元測試執行第一次save時,發生了異常并被我們正確的獲取到了,但執行第二次的save的時候由于sno為null,所以再次發生了DataIntegrityViolationException類型的異常。
#### 斷言異常
根據剛剛的經驗,我們再次加入try catch來進行斷言。
```
public void save() {
Student student = new Student();
boolean called = false;
try {
this.studentRepository.save(student);
} catch (DataIntegrityViolationException e) {
System.out.println("發生了異常");
called = true;
}
Assertions.assertThat(called).isTrue();
System.out.println("程序執行到此,打印控制臺");
Klass klass = new Klass();
this.klassRepository.save(klass);
called = false;
try {
student.setKlass(klass);
this.studentRepository.save(student);
}catch (DataIntegrityViolationException e) {
System.out.println("發生了異常");
called = true;
}
Assertions.assertThat(called).isTrue();
student.setSno("032282");
this.studentRepository.save(student);
}
```
測試通過。
## 深入思考
雖然我們剛剛通過了單元測試,但單元測試的目的要是保證我們的代碼在以后的很長的一段日子了都會如期運行。而上述代碼中,我們再次刪除Student類中klass字段上的@JoinColumn(nullable = false)注解,單元測試同樣會被通過。
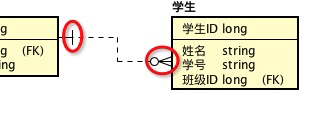
這是由于klass為null與sno為null的異常均為DataIntegrityViolationException類型,所以只通過異常的類型是不能夠確認到是klass為null還是sno為null所導致的。
如上圖所示:第一次第二次全部是由于sno為null觸發的,而我們卻天真的認為第一次必然是由klass為null引發的。此時如果想進一步的區分DataIntegrityViolationException是由klass引起的還是由sno引起的,則需要對其異常的信息進行斷言(判斷)。
在發生異常時,我們會在控制臺中獲取到大面積的紅色的字段的結果:

該結果是在向我們展示:此異常一步步的是由哪個方法拋出的(這個我們當前并不關心),以及在某個異常中打印了什么消息。在JPA進行保存操作發生DataIntegrityViolationException異常時,我們可以由`Caused by: java.sql.SQLIntegrityConstraintViolationException: Column 'klass_id' cannot be null`此句來推斷出異常的具體消息。而我們如果想區域兩個null異常,則需要 ①獲取報錯的全文 ②在全文中搜索關鍵字,當特定的關鍵字出現時,我們則認為發生了我們預期內的異常,方法如下:
```
try {
this.studentRepository.save(student);
} catch (DataIntegrityViolationException e) {
System.out.println("發生了異常");
StringWriter stringWriter = new StringWriter(); ?
e.printStackTrace(new PrintWriter(stringWriter)); ?
Assertions.assertThat(stringWriter.toString()?)
.contains("Column 'klass_id' cannot be null");?
called = true;
}
Assertions.assertThat(called).isTrue();
```
* ?? 固有寫法,先照抄吧。StringWriter可以理解為我們現實生活中的**記事本**,今天寫點放這,明天還可以今天的往后寫。
* ? 獲取當前**記事本**的內容
* ? 斷言該內容中包括特定的定符串
### 補全測試
```
/**
* 保存測試
* 1. 直接保存空學生,斷言klass null異常
* 2. 持久化一個班級
* 3. 設置學生的班級,再保存,斷言sno null異常
* 4. 設置學號
* 5. 保存成功
*/
@Test
public void save() {
Student student = new Student();
boolean called = false;
try {
this.studentRepository.save(student);
} catch (DataIntegrityViolationException e) {
System.out.println("發生了異常");
StringWriter stringWriter = new StringWriter();
e.printStackTrace(new PrintWriter(stringWriter));
Assertions.assertThat(stringWriter.toString())
.contains("Column 'klass_id' cannot be null");
called = true;
}
Assertions.assertThat(called).isTrue();
System.out.println("程序執行到此,打印控制臺");
Klass klass = new Klass();
this.klassRepository.save(klass);
called = false;
try {
student.setKlass(klass);
this.studentRepository.save(student);
} catch (DataIntegrityViolationException e) {
System.out.println("發生了異常");
StringWriter stringWriter = new StringWriter();
e.printStackTrace(new PrintWriter(stringWriter));
Assertions.assertThat(stringWriter.toString())
.contains("Column 'sno' cannot be null");
called = true;
}
Assertions.assertThat(called).isTrue();
student.setSno("032282");
this.studentRepository.save(student);
}
```
至此,實體的非null校驗完成。
## 殊途同歸
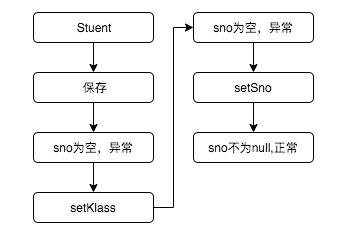
剛剛我們測試的步驟是: 先測試異常,最后再進行正常的測試。如果我們先測試正常的數據,然后再測試異常呢?下面我們使用**排除法**來進行NULL測試。
我們將一個單元測試用例拆分為多個用例,在每個用例前先生成一個可以正常保存的學生實體,然后分別在各個用例中來測試`正常保存`,`klass null異常`和`sno null`異常。
在java的單元測試中,我們使用@Before來標記該方法在每個測試用例執行前執行1次。
entity/StudentTest.java
```
private Klass klass; ①
private Student student; ①
...
/**
* 在每個測試用例前執行一次
* 功能:初始化一個正常的學生
*/
@Before ?
public void before() {
this.student = new Student();
if (this.klass == null) { ?
this.klass = new Klass();
this.klassRepository.save(this.klass);
}
this.student.setName("測試名稱");
this.student.setSno("032282");
this.student.setKlass(this.klass);
}
```
* ? 用于單元測試,表示在每個測試前均執行1次方法
* ? 保證klass只被實例化1次
* ① 私有屬性,作用域為本對象。這使得可以在多個方法中操作同一個對象,也就間接的實現了方法間的傳值 。
### 測試正常保存
```
@Test
public void saveTest() {
this.studentRepository.save(this.student);
}
```
保存過程中未發生異常,保存操作通過。
### 測試klass為null
```
@Test
public void klassNullTest() {
this.student.setKlass(null);
boolean called = false;
try {
this.studentRepository.save(student);
} catch (DataIntegrityViolationException e) {
called = true;
}
Assertions.assertThat(called).isTrue();
}
```
由于前面的saveTest方法保障了this.student正常保存是不會發生異常的。而在此測試中我們僅僅將其klass設置為null,發生異常則足矣說明該異常項是由klass為null而導致的。
如果在某個測試方法中,我們的目標就是為了測試某個異常,上述代碼也可以簡寫為:
```
@Test(expected = DataIntegrityViolationException.class?)
public void klassNullTest() {
this.student.setKlass(null);
this.studentRepository.save(student);
}
```
* ? 本測試期望得到一個DataIntegrityViolationException異常,如果該異常未發生則單元測試失敗
### 測試sno為null
```
@Test(expected = DataIntegrityViolationException.class)
public void snoNullTest() {
this.student.setSno(null);
this.studentRepository.save(student);
}
```
此方法同測試klass為null
### 總結
我們將一個復雜的測試用例拆分為3個小的測試用例,在每個測試用例每別測試了1個小的功能點。方法的拆分降低了我們每個方法在編寫時的思索量,同時代碼也變得更清晰,當在以后的迭代開發中發現錯誤時也更容易的快速來定位到具體的錯誤。而如何進行拆分則更多的是一項技能,一項隨著自己看的多、做的多、模仿的多而自然增長的編程技能。
**請自行完成name字段的null校驗及測試方法后繼續學習**
# 參考文檔
| 名稱 | 鏈接 | 預計學習時長(分) |
| --- | --- | --- |
| 源碼地址 | [https://github.com/mengyunzhi/spring-boot-and-angular-guild/releases/tag/step4.5.6](https://github.com/mengyunzhi/spring-boot-and-angular-guild/releases/tag/step4.5.6) | \- |
| @Column | [https://docs.oracle.com/javaee/7/api/javax/persistence/Column.html](https://docs.oracle.com/javaee/7/api/javax/persistence/Column.html) | 5 |
| @JoinColumn | [https://docs.oracle.com/javaee/7/api/javax/persistence/JoinColumn.html](https://docs.oracle.com/javaee/7/api/javax/persistence/JoinColumn.html) | 5 |
- 序言
- 第一章:Hello World
- 第一節:Angular準備工作
- 1 Node.js
- 2 npm
- 3 WebStorm
- 第二節:Hello Angular
- 第三節:Spring Boot準備工作
- 1 JDK
- 2 MAVEN
- 3 IDEA
- 第四節:Hello Spring Boot
- 1 Spring Initializr
- 2 Hello Spring Boot!
- 3 maven國內源配置
- 4 package與import
- 第五節:Hello Spring Boot + Angular
- 1 依賴注入【前】
- 2 HttpClient獲取數據【前】
- 3 數據綁定【前】
- 4 回調函數【選學】
- 第二章 教師管理
- 第一節 數據庫初始化
- 第二節 CRUD之R查數據
- 1 原型初始化【前】
- 2 連接數據庫【后】
- 3 使用JDBC讀取數據【后】
- 4 前后臺對接
- 5 ng-if【前】
- 6 日期管道【前】
- 第三節 CRUD之C增數據
- 1 新建組件并映射路由【前】
- 2 模板驅動表單【前】
- 3 httpClient post請求【前】
- 4 保存數據【后】
- 5 組件間調用【前】
- 第四節 CRUD之U改數據
- 1 路由參數【前】
- 2 請求映射【后】
- 3 前后臺對接【前】
- 4 更新數據【前】
- 5 更新某個教師【后】
- 6 路由器鏈接【前】
- 7 觀察者模式【前】
- 第五節 CRUD之D刪數據
- 1 綁定到用戶輸入事件【前】
- 2 刪除某個教師【后】
- 第六節 代碼重構
- 1 文件夾化【前】
- 2 優化交互體驗【前】
- 3 相對與絕對地址【前】
- 第三章 班級管理
- 第一節 JPA初始化數據表
- 第二節 班級列表
- 1 新建模塊【前】
- 2 初識單元測試【前】
- 3 初始化原型【前】
- 4 面向對象【前】
- 5 測試HTTP請求【前】
- 6 測試INPUT【前】
- 7 測試BUTTON【前】
- 8 @RequestParam【后】
- 9 Repository【后】
- 10 前后臺對接【前】
- 第三節 新增班級
- 1 初始化【前】
- 2 響應式表單【前】
- 3 測試POST請求【前】
- 4 JPA插入數據【后】
- 5 單元測試【后】
- 6 惰性加載【前】
- 7 對接【前】
- 第四節 編輯班級
- 1 FormGroup【前】
- 2 x、[x]、{{x}}與(x)【前】
- 3 模擬路由服務【前】
- 4 測試間諜spy【前】
- 5 使用JPA更新數據【后】
- 6 分層開發【后】
- 7 前后臺對接
- 8 深入imports【前】
- 9 深入exports【前】
- 第五節 選擇教師組件
- 1 初始化【前】
- 2 動態數據綁定【前】
- 3 初識泛型
- 4 @Output()【前】
- 5 @Input()【前】
- 6 再識單元測試【前】
- 7 其它問題
- 第六節 刪除班級
- 1 TDD【前】
- 2 TDD【后】
- 3 前后臺對接
- 第四章 學生管理
- 第一節 引入Bootstrap【前】
- 第二節 NAV導航組件【前】
- 1 初始化
- 2 Bootstrap格式化
- 3 RouterLinkActive
- 第三節 footer組件【前】
- 第四節 歡迎界面【前】
- 第五節 新增學生
- 1 初始化【前】
- 2 選擇班級組件【前】
- 3 復用選擇組件【前】
- 4 完善功能【前】
- 5 MVC【前】
- 6 非NULL校驗【后】
- 7 唯一性校驗【后】
- 8 @PrePersist【后】
- 9 CM層開發【后】
- 10 集成測試
- 第六節 學生列表
- 1 分頁【后】
- 2 HashMap與LinkedHashMap
- 3 初識綜合查詢【后】
- 4 綜合查詢進階【后】
- 5 小試綜合查詢【后】
- 6 初始化【前】
- 7 M層【前】
- 8 單元測試與分頁【前】
- 9 單選與多選【前】
- 10 集成測試
- 第七節 編輯學生
- 1 初始化【前】
- 2 嵌套組件測試【前】
- 3 功能開發【前】
- 4 JsonPath【后】
- 5 spyOn【后】
- 6 集成測試
- 7 @Input 異步傳值【前】
- 8 值傳遞與引入傳遞
- 9 @PreUpdate【后】
- 10 表單驗證【前】
- 第八節 刪除學生
- 1 CSS選擇器【前】
- 2 confirm【前】
- 3 功能開發與測試【后】
- 4 集成測試
- 5 定制提示框【前】
- 6 引入圖標庫【前】
- 第九節 集成測試
- 第五章 登錄與注銷
- 第一節:普通登錄
- 1 原型【前】
- 2 功能設計【前】
- 3 功能設計【后】
- 4 應用登錄組件【前】
- 5 注銷【前】
- 6 保留登錄狀態【前】
- 第二節:你是誰
- 1 過濾器【后】
- 2 令牌機制【后】
- 3 裝飾器模式【后】
- 4 攔截器【前】
- 5 RxJS操作符【前】
- 6 用戶登錄與注銷【后】
- 7 個人中心【前】
- 8 攔截器【后】
- 9 集成測試
- 10 單例模式
- 第六章 課程管理
- 第一節 新增課程
- 1 初始化【前】
- 2 嵌套組件測試【前】
- 3 async管道【前】
- 4 優雅的測試【前】
- 5 功能開發【前】
- 6 實體監聽器【后】
- 7 @ManyToMany【后】
- 8 集成測試【前】
- 9 異步驗證器【前】
- 10 詳解CORS【前】
- 第二節 課程列表
- 第三節 果斷
- 1 初始化【前】
- 2 分頁組件【前】
- 2 分頁組件【前】
- 3 綜合查詢【前】
- 4 綜合查詢【后】
- 4 綜合查詢【后】
- 第節 班級列表
- 第節 教師列表
- 第節 編輯課程
- TODO返回機制【前】
- 4 彈出框組件【前】
- 5 多路由出口【前】
- 第節 刪除課程
- 第七章 權限管理
- 第一節 AOP
- 總結
- 開發規范
- 備用