和開發其它組件一樣,我們首先進行一些初始化的工作。使用webstorm打開前臺項目,并使用終端進入src/app/student文件夾,使用`ng g c index`自動生成學生模塊中的index組件:
```
panjiedeMac-Pro:student panjie$ pwd
/Users/panjie/github/mengyunzhi/spring-boot-and-angular-guild/web-app/src/app/student
panjiedeMac-Pro:student panjie$ ng g c index
CREATE src/app/student/index/index.component.sass (0 bytes)
CREATE src/app/student/index/index.component.html (20 bytes)
CREATE src/app/student/index/index.component.spec.ts (621 bytes)
CREATE src/app/student/index/index.component.ts (266 bytes)
UPDATE src/app/student/student.module.ts (654 bytes)
panjiedeMac-Pro:student panjie$
```
打開`src/app/student/index/index.component.spec.ts`將`describe`修改為`fdescribe`,并對應修改描述信息:
```
fdescribe('Student -> IndexComponent', () => {
```
在終端中使用`ng test`來啟動單元測試,系統將自動打開chrome并展示當前組件的效果。
# 原型
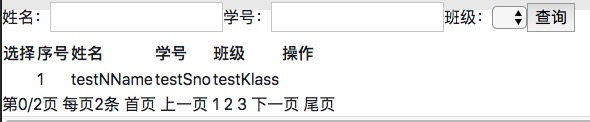
參考前面在紙上畫的原型,編輯V層文件進行原型的開發:
student/index/index.component.html
```javascript
<form>
<label>姓名:<input type="text" /></label>
<label>學號:<input type="text" /></label>
<label>班級:<app-klass-select></app-klass-select></label>
</form>
<table>
<tr>
<th>選擇</th>
<th>序號</th>
<th>姓名</th>
<th>學號</th>
<th>班級</th>
<th>操作</th>
</tr>
<tr>
</tr>
</table>
<div>第4/14頁 每頁10條 首頁 上一頁 1 2 3 下一頁 尾頁</div>
```
## 單元測試
在V層中引入了app-klass-select,增加關聯的測試信息:
student/index/index.component.spec.ts
```javascript
beforeEach(async(() => {
TestBed.configureTestingModule({
declarations: [IndexComponent, KlassSelectComponent?],
imports: [CoreModule, HttpClientTestingModule] ?
})
.compileComponents();
}));
```
本例中我們引用了班級選擇組件,進而需要在單元測試中引用該組件對應的測試代碼,否則班級組件中的數據便是個空值,而**我們太希望在引用其它組件時可以少寫或是不寫其它組件需要的相應測試代碼了!**。我們希望在本組件的單元測試中專注于本組件的功能實現,而盡量少的卻關心其它的組件是如何工作的。
## C層
按需求,我們在C層中需要定義查詢參數及分頁數據兩個屬性:
student/index/index.component.ts
```javascript
export class IndexComponent implements OnInit {
/* 查詢參數 */
params① = {
page: 0,
size: 2,
klass: Klass,
name: new FormControl(),
sno: new FormControl()
};
/* 分頁數據 */
pageStudent② = {
totalPages: 0,
content: new Array<Student>()
};
constructor() {
}
ngOnInit() {
this.pageStudent.totalPages = 2; //③
this.pageStudent.content.push( //③
new Student(
{
id: 1,
name: 'testNName',
sno: 'testSno',
klass: new Klass(1, 'testKlass', null)
}));
}
/* 查詢 */
onQuery() {
console.log('query');
}
}
```
* ① 5項查詢參數。用`=`表示賦初值
* ② 分頁數據,包含基本的兩項數據信息:總頁數及當前數據。字段名根據后臺的返回格式進行命名。
* ③ 初始化分頁信息及當前頁數據
## V層
按C層的屬性值進行V層的數據綁定:
```javascript
<form (ngSubmit)="onQuery()"①>
<label>姓名:<input [formControl]="params.name"② type="text" /></label>
<label>學號:<input [formControl]="params.sno"② type="text" /></label>
<label>班級:<app-klass-select [klass]="params.klass"③></app-klass-select></label>
<button type="submit">查詢</button>
</form>
<table>
<tr>
<th>選擇</th>
<th>序號</th>
<th>姓名</th>
<th>學號</th>
<th>班級</th>
<th>操作</th>
</tr>
<tr *ngFor="let student of pageStudent.content; index as index">④
<td></td>
<td>{{index + 1}}</td>
<td>{{student.name}}</td>
<td>{{student.sno}}</td>
<td>{{student.klass.name}}</td>
<td></td>
</tr>
</table>
<div *ngIf="pageStudent">第{{params.page}}/{{pageStudent.totalPages}}頁 每頁{{params.size}}條 首頁 上一頁 1 2 3 下一頁 尾頁</div>⑤
```
* ① 提交表單綁定onQuery方法
* ② 綁定表單項
* ③ 綁定klass
* ④ 綁定當前頁學生
* ⑤ 綁定分頁信息
## 單元測試
同步修正單元測試的引入:
student/index/index.component.spec.ts
```javascript
beforeEach(async(() => {
TestBed.configureTestingModule({
declarations: [IndexComponent, KlassSelectComponent],
imports: [
ReactiveFormsModule,
FormsModule,
CoreModule,
HttpClientTestingModule]
})
.compileComponents();
}));
```
# 初始化M層
按上一節添加學生的理論,請求學生的分頁數據功能應該抽離到M層。
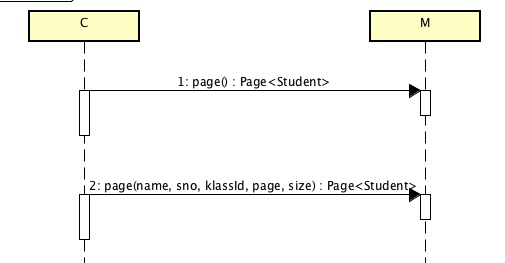
如上圖所示,C層在初始化時將調用M層page方法來獲取默認數據;點用戶點擊查詢按鈕時,將附帶查詢參數調用M層page方法來獲取查詢頁的數據。
service/student.service.ts
```javascript
export class StudentService {
constructor(private httpClient: HttpClient) {
}
/**
* 分頁
* @param params name:名稱,sno:學號,klassId:班級ID,page:第幾頁,size:每頁大小
*/
page(params: {name?①: string, sno?①: string, klassId?①: number, page?: number, size?: number} ): Observable<{totalPages: number, content: Array<Student>}②> {
return null;
}
```
* ① 使用`?`標記可選參數
* ② 定義返回值類型
## 增加測試方法
對應增加page方法的測試:
service/student.service.spec.ts
```javascript
describe('service -> StudentService', () => {
let service: StudentService;
beforeEach(() => TestBed.configureTestingModule({
imports: [HttpClientTestingModule]
}));
beforeEach(() => {
service = TestBed.get(StudentService);
});
/* 分頁測試 */
it('page', () => {
expect(service).toBeTruthy();
});
```
# 在組件中引入M層
有了M層后,我們在C層中進行引入:
student/index/index.component.ts
```javascript
export class IndexComponent implements OnInit {
/* 查詢參數 */
params = {
page: 0,
size: 2,
klass: Klass,
name: new FormControl(),
sno: new FormControl()
};
/* 分頁數據 */
pageStudent = {
totalPages: 0,
content: new Array<Student>()
};
constructor(private studentService: StudentService★) {
}
```
# 總結
本小節我們主要進行組件的CV初始化,以及該組件對應調用M層的初始化。接下來,按調用順序由后向前分步進行開發。
# 參考文檔
| 名稱 | 鏈接 | 預計學習時長(分) |
| --- | --- | --- |
| 源碼地址 | [https://github.com/mengyunzhi/spring-boot-and-angular-guild/releases/tag/step4.6.6](https://github.com/mengyunzhi/spring-boot-and-angular-guild/releases/tag/step4.6.6) | - |
- 序言
- 第一章:Hello World
- 第一節:Angular準備工作
- 1 Node.js
- 2 npm
- 3 WebStorm
- 第二節:Hello Angular
- 第三節:Spring Boot準備工作
- 1 JDK
- 2 MAVEN
- 3 IDEA
- 第四節:Hello Spring Boot
- 1 Spring Initializr
- 2 Hello Spring Boot!
- 3 maven國內源配置
- 4 package與import
- 第五節:Hello Spring Boot + Angular
- 1 依賴注入【前】
- 2 HttpClient獲取數據【前】
- 3 數據綁定【前】
- 4 回調函數【選學】
- 第二章 教師管理
- 第一節 數據庫初始化
- 第二節 CRUD之R查數據
- 1 原型初始化【前】
- 2 連接數據庫【后】
- 3 使用JDBC讀取數據【后】
- 4 前后臺對接
- 5 ng-if【前】
- 6 日期管道【前】
- 第三節 CRUD之C增數據
- 1 新建組件并映射路由【前】
- 2 模板驅動表單【前】
- 3 httpClient post請求【前】
- 4 保存數據【后】
- 5 組件間調用【前】
- 第四節 CRUD之U改數據
- 1 路由參數【前】
- 2 請求映射【后】
- 3 前后臺對接【前】
- 4 更新數據【前】
- 5 更新某個教師【后】
- 6 路由器鏈接【前】
- 7 觀察者模式【前】
- 第五節 CRUD之D刪數據
- 1 綁定到用戶輸入事件【前】
- 2 刪除某個教師【后】
- 第六節 代碼重構
- 1 文件夾化【前】
- 2 優化交互體驗【前】
- 3 相對與絕對地址【前】
- 第三章 班級管理
- 第一節 JPA初始化數據表
- 第二節 班級列表
- 1 新建模塊【前】
- 2 初識單元測試【前】
- 3 初始化原型【前】
- 4 面向對象【前】
- 5 測試HTTP請求【前】
- 6 測試INPUT【前】
- 7 測試BUTTON【前】
- 8 @RequestParam【后】
- 9 Repository【后】
- 10 前后臺對接【前】
- 第三節 新增班級
- 1 初始化【前】
- 2 響應式表單【前】
- 3 測試POST請求【前】
- 4 JPA插入數據【后】
- 5 單元測試【后】
- 6 惰性加載【前】
- 7 對接【前】
- 第四節 編輯班級
- 1 FormGroup【前】
- 2 x、[x]、{{x}}與(x)【前】
- 3 模擬路由服務【前】
- 4 測試間諜spy【前】
- 5 使用JPA更新數據【后】
- 6 分層開發【后】
- 7 前后臺對接
- 8 深入imports【前】
- 9 深入exports【前】
- 第五節 選擇教師組件
- 1 初始化【前】
- 2 動態數據綁定【前】
- 3 初識泛型
- 4 @Output()【前】
- 5 @Input()【前】
- 6 再識單元測試【前】
- 7 其它問題
- 第六節 刪除班級
- 1 TDD【前】
- 2 TDD【后】
- 3 前后臺對接
- 第四章 學生管理
- 第一節 引入Bootstrap【前】
- 第二節 NAV導航組件【前】
- 1 初始化
- 2 Bootstrap格式化
- 3 RouterLinkActive
- 第三節 footer組件【前】
- 第四節 歡迎界面【前】
- 第五節 新增學生
- 1 初始化【前】
- 2 選擇班級組件【前】
- 3 復用選擇組件【前】
- 4 完善功能【前】
- 5 MVC【前】
- 6 非NULL校驗【后】
- 7 唯一性校驗【后】
- 8 @PrePersist【后】
- 9 CM層開發【后】
- 10 集成測試
- 第六節 學生列表
- 1 分頁【后】
- 2 HashMap與LinkedHashMap
- 3 初識綜合查詢【后】
- 4 綜合查詢進階【后】
- 5 小試綜合查詢【后】
- 6 初始化【前】
- 7 M層【前】
- 8 單元測試與分頁【前】
- 9 單選與多選【前】
- 10 集成測試
- 第七節 編輯學生
- 1 初始化【前】
- 2 嵌套組件測試【前】
- 3 功能開發【前】
- 4 JsonPath【后】
- 5 spyOn【后】
- 6 集成測試
- 7 @Input 異步傳值【前】
- 8 值傳遞與引入傳遞
- 9 @PreUpdate【后】
- 10 表單驗證【前】
- 第八節 刪除學生
- 1 CSS選擇器【前】
- 2 confirm【前】
- 3 功能開發與測試【后】
- 4 集成測試
- 5 定制提示框【前】
- 6 引入圖標庫【前】
- 第九節 集成測試
- 第五章 登錄與注銷
- 第一節:普通登錄
- 1 原型【前】
- 2 功能設計【前】
- 3 功能設計【后】
- 4 應用登錄組件【前】
- 5 注銷【前】
- 6 保留登錄狀態【前】
- 第二節:你是誰
- 1 過濾器【后】
- 2 令牌機制【后】
- 3 裝飾器模式【后】
- 4 攔截器【前】
- 5 RxJS操作符【前】
- 6 用戶登錄與注銷【后】
- 7 個人中心【前】
- 8 攔截器【后】
- 9 集成測試
- 10 單例模式
- 第六章 課程管理
- 第一節 新增課程
- 1 初始化【前】
- 2 嵌套組件測試【前】
- 3 async管道【前】
- 4 優雅的測試【前】
- 5 功能開發【前】
- 6 實體監聽器【后】
- 7 @ManyToMany【后】
- 8 集成測試【前】
- 9 異步驗證器【前】
- 10 詳解CORS【前】
- 第二節 課程列表
- 第三節 果斷
- 1 初始化【前】
- 2 分頁組件【前】
- 2 分頁組件【前】
- 3 綜合查詢【前】
- 4 綜合查詢【后】
- 4 綜合查詢【后】
- 第節 班級列表
- 第節 教師列表
- 第節 編輯課程
- TODO返回機制【前】
- 4 彈出框組件【前】
- 5 多路由出口【前】
- 第節 刪除課程
- 第七章 權限管理
- 第一節 AOP
- 總結
- 開發規范
- 備用