在進行功能測試以前,首先嘗試畫一張流程圖來梳理下功能點:
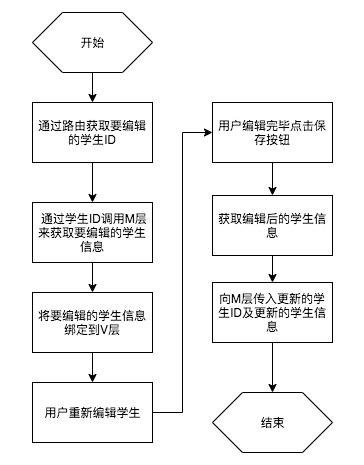
接下來,按圖索驥分別進行功能開發及測試:
# 通過路由獲取要編輯的學生ID
人類的記憶有個規律:記憶結束以后,遺忘馬上開始。基于這個基本的規律,我們發現好像已經忘卻了如何獲取路由中的參數值了。但是沒有關系,因為大腦除了遺忘一些繁文縟節以后,還為我們記憶了更為關鍵的信息:我們曾經做過類似的"編輯教師"與"編輯班級"。此時,我們可以依靠這個簡短的記憶來快速的找到 2.4.1或3.4.1小節,參考其中的代碼來快速的完成本功能。這也是為什么我們會自嘲上班只做兩件事--"ctrl+c"與"ctrl+v"的原因。
## 引入路由
src/app/student/edit/edit.component.ts
```javascript
constructor(private activatedRoute: ActivatedRoute?) { }
ngOnInit() {
this.activatedRoute.params.subscribe((param: {id: number}) => { ?
this.student.id = param.id; ?
}); ?
this.formGroup = new FormGroup({
name: new FormControl(''),
sno: new FormControl('')
});
}
```
## 單元測試
單元測試的方法同樣可能參考班級管理中的編輯功能測試。在班級編輯功能的測試中,新建了`ActivatedRouteStub`來提供路由的服務。在此依然采用該方法。
src/app/student/edit/edit.component.spec.ts
```javascript
import {ActivatedRouteStub} from '../../klass/edit/activated-route-stub'; ①
...
beforeEach(async(() => {
TestBed.configureTestingModule({
declarations: [ EditComponent, KlassSelectComponentStub ],
imports: [
ReactiveFormsModule,
],
providers: [
{provide: ActivatedRoute, useClass: ActivatedRouteStub} ②
]
})
.compileComponents();
}));
...
fit('通過路由獲取要編輯的學生ID', () => { ③
});
```
* ① 在測試模塊中,直接使用班級編輯測試中的模擬路由樁(替身)
* ② 聲明提供者:當測試模塊需要ActivatedRoute時,提供ActivatedRouteStub
* ③ 新建測試用例
單元測試點:使用路由發送請求參數時,被測試組件成功的接收到發送的參數。代碼如下:
```javascript
fit('通過路由獲取要編輯的學生ID', () => {
expect(component.student.id).toBeUndefined(); ①
const activatedRoute: ActivatedRouteStub = TestBed.get(ActivatedRoute); ②
const id = Math.floor(Math.random() * 100); ③
activatedRoute.subject.next({id}); ④
expect(component.student.id).toBe(id); ⑤
});
```
* ① 斷言初始化時ID為undefined
* ② 獲取ActivatedRoute的替身
* ③ 獲取一個100以內的隨機數
* ④ 路由發送ID。`{id}`等價于`{id: id}`
* ⑤ 斷言組件接收到了ID,且使用該ID為組件的student.id賦值
# 通過學生ID調用M層來獲取要編輯的學生信息
同樣還是參考以前已有組件的編輯功能。在獲取數據時不應該直接向后臺發起http請求,而應該選擇調用對應的service。
src/app/student/edit/edit.component.ts
```javascript
constructor(private activatedRoute: ActivatedRoute,
private studentService: StudentService ?) { }
ngOnInit() {
this.activatedRoute.params.subscribe((param: {id: number}) => {
this.student.id = param.id;
this.loadStudentById(this.student.id); ?
});
this.formGroup = new FormGroup({
name: new FormControl(''),
sno: new FormControl('')
});
}
/**
* 加載學生 ? ①
* @param id 學生ID
*/
loadStudentById(id: number) {
this.studentService.getById(id)
.subscribe(student => {
this.student = student;
});
}
```
* ① 調用M層,傳入ID獲取要編輯的學生
此時`studentService`尚無`getById`方法,為此打開`studentService`并新建對應的方法及設置相關的返回值。
src/app/service/student.service.ts
```javascript
/**
* 獲取某個學生
* @param id 學生ID
*/
getById(id: number): Observable<Student> {
return null;
}
```
## 單元測試
單元測試時我們無形中遵守了以下原則:1. 有參考的代碼,堅決在第一時間參考。2. 可以使用替身的,堅持不用真身。
對于原則2,我們已經學習過了很多種建立替身的方法,比如前面剛剛使用`provide`來為某位真身來指定替身;使用定義與真身相同的`selector`的方法來為某個組件來定制替身。除以上兩個方法外,在第三章第四節的第4小節中還使用了另外一種創建替身的方法:`jasmine.createSpyObj`,此方法具有簡單、高效的優點,缺點是難以復用。適合于低頻調用的測試場合。比如此時只有當前組件會調用`StudentService.getById`方法,可以認為這是一種低頻調用,適用于使用:`jasmine.createSpyObj`來創建替身。在此,使用該方法來協助進行單元測試。
src/app/student/edit/edit.component.spec.ts
```javascript
beforeEach(async(() => {
const studentServiceSpy: SpyObj<StudentService> = jasmine.createSpyObj<StudentService>(['getById']); ? ①
TestBed.configureTestingModule({
declarations: [ EditComponent, KlassSelectComponentStub ],
imports: [
ReactiveFormsModule,
],
providers: [
{provide: ActivatedRoute, useClass: ActivatedRouteStub},
{provide: StudentService, useValue: studentServiceSpy} ? ②
]
})
.compileComponents();
}));
```
* ① 創建一個StudentService的間諜(替身),該替身擁有`getById`方法。該替身的類型為SpyObj。
* ② 聲明提供者:當測試模塊需要基于StudentService的實例時,提供StudentService間諜。
按功能制定測試點如下:1. ngOnit方法成功調用了loadStudentById方法。2.loadStudentById方法成功調用了StudentService的getById方法。
功能點1測試:
src/app/student/edit/edit.component.spec.ts
```javascript
fit('通過路由獲取要編輯的學生ID', () => {
expect(component.student.id).toBeUndefined();
spyOn(component, 'loadStudentById'); ①
const activatedRoute: ActivatedRouteStub = TestBed.get(ActivatedRoute);
const id = Math.floor(Math.random() * 100);
activatedRoute.subject.next({id});
expect(component.student.id).toBe(id);
expect(component.loadStudentById).toHaveBeenCalledWith(id); ②
});
```
* ① 在當前組件的loadStudentById方法上創建間諜(方法的替身),當調用此方法時實際上調用的為該方法的替身。
* ② 斷言間諜的方法被調用,且參數值正確。
功能點2測試:
src/app/student/edit/edit.component.spec.ts
```javascript
fit('通過學生ID調用M層來獲取要編輯的學生信息 loadStudentById', () => {
console.log('測試準備');
const studentServiceSpy: SpyObj<StudentService>① = TestBed.get(StudentService);
const id = Math.floor(Math.random() * 100);
const mockResultStudent = new Student();
studentServiceSpy.getById.and.returnValue(of(mockResultStudent)); ①
console.log('調用方法。并斷言參數傳值正確,接收返回值正確');
component.loadStudentById(id);
expect(studentServiceSpy.getById).toHaveBeenCalledWith(id);
expect(component.student).toBe(mockResultStudent);
});
```
* ① 這的類型很重要:在此測試模塊中,我們為`StudentService`提供的類型是個由`jasmine.createSpyObj`所創建的替身,而該替身的類型應為`SpyObj<StudentService>`,所以在此使用`TestBed.get`(StudentService)獲取對象時,其類型也應當為`SpyObj<StudentService>`。在此手動指定其類型的目的主要是觸發編輯器的自動提示功能,沒有任何功能方面的影響。也就是說我們完全可以使用`const studentServiceSpy = TestBed.get(StudentService);`。
* ② 使用`of`發送`Observable`類型的值。
本測試用例的開發思想為:先準備好傳入的參數及返回值,接著進行調用,最后進行傳入參數及返回值的斷言。
# 將要編輯的學生信息綁定到V層
由于form數據的綁定是由angular內置模塊實現的,所以在進行綁定測試時,我們測試的目的是:是否綁定成功。而雙向綁定成功的標準有兩個(任一一個滿足即可):C層向V層綁定成功、V層向C層綁定成功;單向綁定成功的標準僅一個:C層向V層綁定成功。鑒于此,測試中選擇的標準為通用的:驗證C層向V層是否成功綁定。
> tips: 要實現分功能點測試,就需要為每個功能點建立獨立的方法:
src/app/student/edit/edit.component.ts
```javascript
/**
* 加載學生
* @param id 學生ID
*/
loadStudentById(id: number) {
this.studentService.getById(id)
.subscribe(student => {
this.student = student;
this.setFormGroupValue(this.student); ?
});
}
/**
* 設置表單值 ? ①
* @param student 學生
*/
setFormGroupValue(student: Student) {
this.formGroup.setValue({
name: student.name,
sno: student.sno
});
}
```
* ① 為此功能點建立獨立的方法,這可以大幅度的降低單元測試間的耦合度。我們再也不需要在一個測試用例中輸出千百行代碼了。
有了獨立的方法后,首先要確定該獨立方法被loadStudentById方法成功的調用了。
src/app/student/edit/edit.component.spec.ts
```javascript
fit('通過學生ID調用M層來獲取要編輯的學生信息 loadStudentById', () => {
console.log('測試準備');
spyOn(component, 'setFormGroupValue'); ?
const studentServiceSpy: SpyObj<StudentService> = TestBed.get(StudentService);
const id = Math.floor(Math.random() * 100);
const mockResultStudent = new Student();
studentServiceSpy.getById.and.returnValue(of(mockResultStudent));
console.log('調用方法。并斷言參數傳值正確,接收返回值正確');
component.loadStudentById(id);
expect(studentServiceSpy.getById).toHaveBeenCalledWith(id);
expect(component.student).toBe(mockResultStudent);
expect(component.setFormGroupValue).toHaveBeenCalledWith(mockResultStudent); ?
});
```
接下來,開始單獨測試該方法:
src/app/student/edit/edit.component.spec.ts
```javascript
fit('C層向V層綁定表單是否成功 setFormGroupValue', () => {
console.log('數據準備及方法調用');
const student = new Student();
student.name = Math.random().toString(36).slice(-10);
student.sno = Math.floor(Math.random() * 100).toString();
component.setFormGroupValue(student);
console.log('重新渲染V層,獲取表單的值并進行斷言');
fixture.detectChanges();
const nameInput: HTMLInputElement = fixture.debugElement.query(By.css('input[name="name"]')).nativeElement;
expect(nameInput.value).toEqual(student.name);
const snoInput: HTMLInputElement = fixture.debugElement.query(By.css('input[name="sno"]')).nativeElement;
expect(snoInput.value).toEqual(student.sno);
});
```
測試的步驟同其它的V層綁定測試:首先準備數據、接著將準備好的數據傳給組件、最后重新渲染組件并進行斷言。
# 用戶重新編輯學生
獲取到學生的信息并展示給用戶后,用戶可以編輯姓名、學號及班級信息。姓名與學號是通過綁定form的input來實現的。而班級信息則是通過選擇班級組件來實現的。對于姓名與學號在前面已經做了數據綁定的測試,有了功能健壯性的保障。但選擇班級組件在這里是否可以正常的工作,卻沒有得到驗證。為避免正常的"不小心"錯誤引發的組件間交互失效的問題,筆者認為還應該為這種在組件中引用另一種組件的組件交互情況提供相應的單元測試支持。即:測試組件交互中的輸入與輸出是否符合預期。但筆者查閱了angular的官方教程,并未找到相關的資料。筆者**猜想**這可能是由于angular官方認為組件間的交互測試應該放到`e2e test`中而非`unit test`中的原因吧。
> 事實上,此時選擇班級組件恰好有一個小的BUG。在后續的教程中我們會嘗試使用一種非官方的方法來解決這個問題。
# 用戶編輯完畢點擊保存按鈕
用戶的交互操作(比如在V層中點擊了保存按鈕)往往需要兩個單元來支撐。第一個單元測試來保障:用戶點擊保存按鈕后成功的觸發C層的方法。第二個單元測試來保障C層對應方法的邏輯正確性。按照這個理論,此處只需要測試點擊保存按鈕后成功的觸發C層的方法即可。這樣以來測試的思想簡單的可以總結為:獲取保存按鈕,進行點擊,斷言C層的方法得到了觸發。
src/app/student/edit/edit.component.spec.ts
```javascript
fit('點擊保存按鈕', () => {
spyOn(component, 'onSubmit');
});
```
和其它單元測試的思想一致。用戶點擊保存按鈕后,預期應觸發`onSubmit`方法,所以在此首先使用spyOn方法來在被測組件的`onSubmit`方法上創建一個替身。這樣一來可以實現兩個目標:1. 可以測試這個替身是否被調用過。 2. 當在測試過程中有需要調用`onSubmit`方法轉而調用此替身,從而避免調用真正的`onSubmit`方法可能觸發的異常。
但此時編輯器給我們了一個小的提示:

把鼠標滑上去會得到一個在component上沒有`onSubmit`的方法的錯誤。聰明的編輯器正是如此,和編輯器提示的相同:雖然在V層中設置了`(ngSubmit)`,但在C層初始化的過程中,我們并沒有對應的`onSubmit`方法。除此以外,在嵌套的班級選擇組件中的`selected`對應的`onSelectKlass()`方法同樣也沒有存在于C層中。此時如果不夠仔細,則相當于給集成測試挖了一個大不大小的坑。
> 期望angular后續版本的單元測試能直接告之我這個錯誤。
按編輯器的提示增加`onSubmit`方法:
src/app/student/edit/edit.component.ts
```javascript
onSubmit() {
}
```
然后繼續補充單元測試如下:
src/app/student/edit/edit.component.spec.ts
```javascript
fit('點擊保存按鈕', () => {
spyOn(component, 'onSubmit');
const button: HTMLButtonElement = fixture.debugElement.query(By.css('button')).nativeElement;
button.click();
expect(component.onSubmit).toHaveBeenCalled();
});
```
# 獲取編輯后的學生信息
C層的方法并成功觸發后,接下來的工作便是收集用戶編輯后的學生信息,為下一步向M層發送要更新的學生信息做準備。也就是要測試剛剛講過的第二點:保障C層對應方法的邏輯正確性:
測試點:成功將表單及班級選擇組件中的值更新到學生信息中。
src/app/student/edit/edit.component.spec.ts
```javascript
fit('onSubmit', () => {
// 設置formGroup的值
// 設置班級選擇組件的值
// 調用onSubmit方法
// 斷言已使用formGroup及班級選擇組件的值更新了學生信息
});
```
按注釋繼續被充測試內容:
```javascript
fit('onSubmit', () => {
// 設置formGroup的值
const name = Math.random().toString(36).slice(-10);
const sno = Math.random().toString(36).slice(-10);
component.formGroup.get('name').setValue(name);
component.formGroup.get('sno').setValue(sno);
// 設置班級選擇組件的值
// todo: 在官方文檔中暫未找到相應的示例代碼
// 調用onSubmit方法
component.onSubmit();
// 斷言已使用formGroup及班級選擇組件的值更新了學生信息
expect(component.student.name).toBe(name);
expect(component.student.sno).toBe(sno);
// expect(component.student.klass).toBe(null); todo: 原則上這里要測試發射值
});
```
功能代碼:
src/app/student/edit/edit.component.ts
```javascript
onSubmit() {
this.student.name = this.formGroup.get('name').value;
this.student.sno = this.formGroup.get('sno').value;
this.student.klass = this.student.klass; ①
}
```
* ① 此行代碼沒有作用,在此謹表示在獲取更新的信息時
# 向M層傳入更新的學生ID及更新的學生信息
與獲取用戶的信息調用M層的思想相同,更新學生時也應該調用M層而避免直接向后臺發起請求。
> 單元測試的關鍵在于:先Thinking, 再coding。在學習的過程中,如果感覺先有單元測試的這種開發方法讓自己沒有頭緒,那么原因可能有2點:1.對普通的業務還不熟悉。2.急于求成,在繼續閱讀前沒有靜心思索功能的實際過程。
src/app/student/edit/edit.component.ts
```javascript
fit('onSubmit', () => {
......
// 斷言調用 向M層傳入更新的學生ID及更新的學生信息 方法
});
fit('向M層傳入更新的學生ID及更新的學生信息', () => {
// 在M層對應的方法上建立間諜
// 為間諜準備返回值
// 方法調用
// 斷言間諜調用成功,間諜接收參數符合預期
// 斷言接收返回值符合預期
});
```
src/app/student/edit/edit.component.ts
```javascript
update(student: Student) {
}
```
src/app/service/student.service.ts
```javascript
/**
* 更新學生
* @param id id
* @param student 學生
*/
update(id: number, student: Student): Observable<Student> {
return null;
}
```
按注釋補充代碼:
```javascript
beforeEach(async(() => {
const studentServiceSpy: SpyObj<StudentService> = jasmine.createSpyObj<StudentService>(['getById', 'update'? ①]);
...
fit('向M層傳入更新的學生ID及更新的學生信息', () => {
// 在M層對應的方法上建立間諜 (見foreach)
// 為間諜準備返回值
const studentService: SpyObj<StudentService> = TestBed.get(StudentService);
const student = new Student();
studentService.update.and.returnValue(of(student));
// 方法調用
const student1 = new Student();
student1.id = Math.floor(Math.random() * 100);
component.update(student1);
// 斷言間諜調用成功,間諜接收參數符合預期
expect(studentService.update).toHaveBeenCalledWith(student1.id, student1);
// 斷言接收返回值符合預期
expect(component.student).toBe(student);
});
```
* ① 為studentService間諜再增加一個update方法
* 此處需要提前思維的量較大,建立先查看功能實現代碼。功能實現代碼完成后,再回看單元測試代碼。
充分的理解單元測試代碼后,功能性的代碼便顯得十分簡單了,當然這也正是我們想要的效果。
src/app/student/edit/edit.component.ts
```javascript
/**
* 更新學生
* @param student 學生
*/
update(student: Student) {
this.studentService.update(student.id, student)
.subscribe((result) => {
this.student = result; ①
});
}
```
* ① 將返回值賦值給this.student,主要的作用的是增加可測試性
單元測試通過。繼續補充M層的功能。
# StudentService -> getByid
先thinking
src/app/service/student.service.spec.ts
```javascript
fit('getById', () => {
// 調用方法并訂閱
// 斷言發起了http請求
// 斷言請求的參數及方法符合預期
// 模擬返回數據
// 斷言接收數據
});
```
再coding
```javascript
fit('getById', () => {
// 調用方法并訂閱
const id = Math.floor(Math.random() * 100);
let resultStudent;
service.getById(id)
.subscribe((student) => {
resultStudent = student;
});
// 斷言發起了http請求
const httpTestingController: HttpTestingController = TestBed.get(HttpTestingController);
const req = httpTestingController.expectOne(`http://localhost:8080/Student/${id}`);
// 斷言請求的參數及方法符合預期
expect(req.request.method).toEqual('GET');
// 模擬返回數據
const mockStudent = new Student();
req.flush(mockStudent);
// 斷言接收數據
expect(resultStudent).toBe(mockStudent);
});
```
功能代碼:
src/app/service/student.service.ts
```javascript
/**
* 獲取某個學生
* @param id 學生ID
*/
getById(id: number): Observable<Student> {
const url = `http://localhost:8080/Student/${id}`;
return this.httpClient.get<Student>(url);
}
```
# StudentSErvice -> udpate
先Thinking
```javascript
fit('update', () => {
// 調用方法并訂閱
// 斷言發起了http請求
// 斷言請求的參數及方法符合預期
// 模擬返回數據
// 斷言接收數據
});
```
再coding
```javascript
fit('update', () => {
// 調用方法并訂閱
const student = new Student();
student.id = Math.floor(Math.random() * 100);
let resultStudent;
service.update(student.id, student)
.subscribe(result => {
resultStudent = result;
});
// 斷言發起了http請求
const httpTestingController: HttpTestingController = TestBed.get(HttpTestingController);
const req = httpTestingController.expectOne(`http://localhost:8080/Student/${student.id}`);
// 斷言請求的參數及方法符合預期
expect(req.request.method).toEqual('PUT');
expect(req.request.body).toBe(student);
// 模擬返回數據
const mockStudent = new Student();
req.flush(mockStudent);
// 斷言接收數據
expect(resultStudent).toBe(mockStudent);
});
```
相對簡單的功能性代碼:
```javascript
/**
* 更新學生
* @param id id
* @param student 學生
*/
update(id: number, student: Student): Observable<Student> {
const url = `http://localhost:8080/Student/${id}`;
return this.httpClient.put<Student>(url, student);
}
```
# 總結
本小節中并沒有涉及的新的語法或是開發思想。在開發過程中,我們盡量地降低單個方法中的代碼長度,縮小被測試代碼的粒度。這樣以來,整個開發的過程就像搭積木一樣。我猜想這便是一些開源的有名氣的框架每個方法都很簡潔的原因之一吧。
# 參考文檔
| 名稱 | 鏈接 | 預計學習時長(分) |
| --- | --- | --- |
| 源碼地址 | [https://github.com/mengyunzhi/spring-boot-and-angular-guild/releases/tag/step4.7.3](https://github.com/mengyunzhi/spring-boot-and-angular-guild/releases/tag/step4.7.3) | - |
- 序言
- 第一章:Hello World
- 第一節:Angular準備工作
- 1 Node.js
- 2 npm
- 3 WebStorm
- 第二節:Hello Angular
- 第三節:Spring Boot準備工作
- 1 JDK
- 2 MAVEN
- 3 IDEA
- 第四節:Hello Spring Boot
- 1 Spring Initializr
- 2 Hello Spring Boot!
- 3 maven國內源配置
- 4 package與import
- 第五節:Hello Spring Boot + Angular
- 1 依賴注入【前】
- 2 HttpClient獲取數據【前】
- 3 數據綁定【前】
- 4 回調函數【選學】
- 第二章 教師管理
- 第一節 數據庫初始化
- 第二節 CRUD之R查數據
- 1 原型初始化【前】
- 2 連接數據庫【后】
- 3 使用JDBC讀取數據【后】
- 4 前后臺對接
- 5 ng-if【前】
- 6 日期管道【前】
- 第三節 CRUD之C增數據
- 1 新建組件并映射路由【前】
- 2 模板驅動表單【前】
- 3 httpClient post請求【前】
- 4 保存數據【后】
- 5 組件間調用【前】
- 第四節 CRUD之U改數據
- 1 路由參數【前】
- 2 請求映射【后】
- 3 前后臺對接【前】
- 4 更新數據【前】
- 5 更新某個教師【后】
- 6 路由器鏈接【前】
- 7 觀察者模式【前】
- 第五節 CRUD之D刪數據
- 1 綁定到用戶輸入事件【前】
- 2 刪除某個教師【后】
- 第六節 代碼重構
- 1 文件夾化【前】
- 2 優化交互體驗【前】
- 3 相對與絕對地址【前】
- 第三章 班級管理
- 第一節 JPA初始化數據表
- 第二節 班級列表
- 1 新建模塊【前】
- 2 初識單元測試【前】
- 3 初始化原型【前】
- 4 面向對象【前】
- 5 測試HTTP請求【前】
- 6 測試INPUT【前】
- 7 測試BUTTON【前】
- 8 @RequestParam【后】
- 9 Repository【后】
- 10 前后臺對接【前】
- 第三節 新增班級
- 1 初始化【前】
- 2 響應式表單【前】
- 3 測試POST請求【前】
- 4 JPA插入數據【后】
- 5 單元測試【后】
- 6 惰性加載【前】
- 7 對接【前】
- 第四節 編輯班級
- 1 FormGroup【前】
- 2 x、[x]、{{x}}與(x)【前】
- 3 模擬路由服務【前】
- 4 測試間諜spy【前】
- 5 使用JPA更新數據【后】
- 6 分層開發【后】
- 7 前后臺對接
- 8 深入imports【前】
- 9 深入exports【前】
- 第五節 選擇教師組件
- 1 初始化【前】
- 2 動態數據綁定【前】
- 3 初識泛型
- 4 @Output()【前】
- 5 @Input()【前】
- 6 再識單元測試【前】
- 7 其它問題
- 第六節 刪除班級
- 1 TDD【前】
- 2 TDD【后】
- 3 前后臺對接
- 第四章 學生管理
- 第一節 引入Bootstrap【前】
- 第二節 NAV導航組件【前】
- 1 初始化
- 2 Bootstrap格式化
- 3 RouterLinkActive
- 第三節 footer組件【前】
- 第四節 歡迎界面【前】
- 第五節 新增學生
- 1 初始化【前】
- 2 選擇班級組件【前】
- 3 復用選擇組件【前】
- 4 完善功能【前】
- 5 MVC【前】
- 6 非NULL校驗【后】
- 7 唯一性校驗【后】
- 8 @PrePersist【后】
- 9 CM層開發【后】
- 10 集成測試
- 第六節 學生列表
- 1 分頁【后】
- 2 HashMap與LinkedHashMap
- 3 初識綜合查詢【后】
- 4 綜合查詢進階【后】
- 5 小試綜合查詢【后】
- 6 初始化【前】
- 7 M層【前】
- 8 單元測試與分頁【前】
- 9 單選與多選【前】
- 10 集成測試
- 第七節 編輯學生
- 1 初始化【前】
- 2 嵌套組件測試【前】
- 3 功能開發【前】
- 4 JsonPath【后】
- 5 spyOn【后】
- 6 集成測試
- 7 @Input 異步傳值【前】
- 8 值傳遞與引入傳遞
- 9 @PreUpdate【后】
- 10 表單驗證【前】
- 第八節 刪除學生
- 1 CSS選擇器【前】
- 2 confirm【前】
- 3 功能開發與測試【后】
- 4 集成測試
- 5 定制提示框【前】
- 6 引入圖標庫【前】
- 第九節 集成測試
- 第五章 登錄與注銷
- 第一節:普通登錄
- 1 原型【前】
- 2 功能設計【前】
- 3 功能設計【后】
- 4 應用登錄組件【前】
- 5 注銷【前】
- 6 保留登錄狀態【前】
- 第二節:你是誰
- 1 過濾器【后】
- 2 令牌機制【后】
- 3 裝飾器模式【后】
- 4 攔截器【前】
- 5 RxJS操作符【前】
- 6 用戶登錄與注銷【后】
- 7 個人中心【前】
- 8 攔截器【后】
- 9 集成測試
- 10 單例模式
- 第六章 課程管理
- 第一節 新增課程
- 1 初始化【前】
- 2 嵌套組件測試【前】
- 3 async管道【前】
- 4 優雅的測試【前】
- 5 功能開發【前】
- 6 實體監聽器【后】
- 7 @ManyToMany【后】
- 8 集成測試【前】
- 9 異步驗證器【前】
- 10 詳解CORS【前】
- 第二節 課程列表
- 第三節 果斷
- 1 初始化【前】
- 2 分頁組件【前】
- 2 分頁組件【前】
- 3 綜合查詢【前】
- 4 綜合查詢【后】
- 4 綜合查詢【后】
- 第節 班級列表
- 第節 教師列表
- 第節 編輯課程
- TODO返回機制【前】
- 4 彈出框組件【前】
- 5 多路由出口【前】
- 第節 刪除課程
- 第七章 權限管理
- 第一節 AOP
- 總結
- 開發規范
- 備用