在繼續學習如何在前臺獲取后臺返回的token以前,先帶領大家了解下RxJS操作符。
可能你還不清楚什么是RxJS,但實際上你早早的就已經用上它了。每寫一次`this.httpClient().subscribe()`,你便使用了一次RxJS。
至于RxJS具體是什么,又有著什么樣的功能。怕是需要一個單獨的教程來使用較長的篇幅來介紹它。而我們在此需要清楚的是RxJS是一種編程的模式(思想),具體來講是一種面向數據流的編程思想。
# 生活中的數據流
筆者所在的院校至今還保持著訂閱報刊的習慣,如果對某些報刊有需求可以選擇在開學初向教務員提出訂閱申請,在預算允許的情況下。此后每個月(月刊)或每半個月(半月刊)都會收到在開學初訂閱的報刊。不僅如何,有時候還會收到一些意想不到的增刊(臨時增加印刷的)。而這個報刊訂閱便像極了RxJS的數據流。
對筆者而言,教務員便是數據流的來源;而教務員是不提供發行報刊的服務的,所以其訂閱報刊時需要找到校級部門,而報刊最終也是由校級部門進行分發;同樣的,校級部門向上可以需要找郵局,依次累推最終達到雜志社。下發報刊的過程也相同,雜志社將報刊向下交付,然后逐級的交到筆者的手中。而最終交付的報刊就是剛剛提到的**數據**,多份報刊不定期的由雜志社向讀者傳遞,便是**數據流**。
如果RxJS中的數據流和現實生活中的報刊訂閱是一個概念的話,那么我猜想它一定具有以下的性質:
1. 在進行報刊訂閱時,由于是逐級向上訂閱的,所以訂閱過程可能失敗(比如領導自認為該報刊不適合訂閱或經費不足);那么RxJS的數據訂閱過程也必然會面臨失敗的情況。
2. 報刊發行后,可能由于其內容過于吸引人,可能會被校級或院級教務員扣留,待其閱讀后再分發給筆者;那么RxJS的數據發行,也必然可能出現被中間的轉發者暫緩扣留而未得到及時轉發的可能。
3. 報刊發行后,由于校級教務員的疏忽,可能導致忘記分發給筆者了;那么RxJS也必然存在在發行過程中,數據中斷的情況。
4. 基于3,當教務員收到下一期的報刊時,突然發現上一期的還在這呢,此時一并發給筆者;那么RxJS也必然存在將兩份數據員合并后發送給讀者的情況。
5. 筆者訂閱的兩份報刊總是先后隔一天送達,教務員感覺兩天送兩次太難受,所以每次都是等兩份報刊到齊了以后再統一發送給筆者;那么RxJS也必然存在訂閱了兩個數據源后,只有當滿足兩個數據源全部返回后才下發數據的情況。
6. 報刊發行后,教務員提前瀏覽的時候,不小心將報刊損壞或不經意的在報刊的內容上進行了批注,然后將損壞或批注的報刊給了筆者;那么RxJS中在進行數據傳遞的過程中,必然會出現數據被修改后才下發的情況。
7. 報刊發行后,教務員對自己感興趣的報刊進行閱讀后再下發給筆者,而對不感興趣的報刊選擇直接下發給筆者;那么RxJS中必然可以設置某些條件,當滿足條件時對數據進行處理,而當不滿足條件時直接下發數據。
沒錯,只要在現實生活中能想到的報刊訂閱的情況RxJS均可滿足!RxJS中提供了豐富的**操作符**來操作返回的數據流,每個操作符都有著其特殊的功能。此外如果RxJS中提供的操作符不能滿足一些對數據流處理的要求,我們還可以自定義自己的操作符。
# 在響應header中獲取auth-token
攔截器的本質正是生活中的"教務員",它接收其它訂閱者的訂閱,并將此后的數據按訂閱的情況分發給對應的訂閱者,對于"院教務員"而言,報刊訂閱反饋到代碼中如下:
src/app/core/auth-token-interceptor.ts
```javascript
intercept(req: HttpRequest<any> ?, next: HttpHandler ?): Observable<HttpEvent<any>> ? {
return? next.handle(reqClone) ?
}
```
* ? 向其發起訂閱的筆者
* ? 用以發起訂閱的校教務員
* ? 訂閱的報刊種類
* ? 向校教務員發起訂閱
* ? 將校教務員送達的報刊發送給筆者
# pipe()
在RxJS中,可以使用pipe()方法處理一些分發的數據。pipe方法接收一個或多個參數,每個參數都是一個**操作符**,被分發的數據在轉發以前,依次通過pipe中規定的幾個**操作符**。比如:
```javascript
return next.handle(reqClone).pipe(操作符1(傳入的數據0) => {處理后的數據1}, 操作符2(傳入的數據1) => {處理后的數據2})
```

## demo
訂閱、發送報刊與訂閱、發送數字是一個道理,在此簡單展示下RxJS是如何發送由數字組成的數據流以及如何使用pipe操作即將下發的數據流的。
情景:每1秒種發送一個0-100的隨機數字,如果生成的是數字尾數是1則終止發送。有三個操作符來影響它,第一個操作符:將得到的數字進行平方,再將平方以后的數字向后發送;第二個操作符:對得到的數據與10進行模運算,將取模后的值向后發送;第三個操作符:如果得到的數據是奇數,則向后發送,否則不發送。則示例代碼如下:
src/app/core/auth-token-interceptor.ts
```javascript
import {Observable, Subject} from 'rxjs';
import {filter, map} from 'rxjs/operators';
...
intercept(req: HttpRequest<any>, next: HttpHandler): Observable<HttpEvent<any>> {
const sendNumbers = new Subject<number>(); ?
const pipeNumber = sendNumbers.pipe?(map?((x) => {
console.log('1接收到的數字為 ' + x);
return x * x;
}), map(x => {
console.log('2接收到的數字為 ' + x);
return x % 10;
}), filter?(x => {
console.log('3接收到的數字為 ' + x);
return x % 2 === 0; ?
}));
pipeNumber.subscribe((value) => {
console.log('接收到了 ' + value);
});
const sendNumber = () => setTimeout(() => { ?
const n = Math.floor(Math.random() * 100);
console.log('生成的數字是' + n.toString());
sendNumbers.next(n); ?
if (n % 10 !== 1) {
sendNumber();
}
}, 1000);
sendNumber(); ?
const reqClone = req.clone({
setHeaders: {'auth-token': 'af1c0c77-67d0-4ec2-8321-2f88e32f76af'}
});
return next.handle(reqClone);
}
```
* ? 定義了一個可以發送數字的數據源
* ? 使用pipe對接收到的數據進行**操作**
* ? map是一個**操作符**,它的作用時:接收數據、處理數字、轉發處理后的數據
* ? filter也是一個**操作符**,它的作用時:當接收到的值滿足其中規定的條件時,則轉發數據。否則不轉發。
* ? 此條件為true時?轉發數據,為false時不轉發數據。
* ? 每1秒鐘發送1個數據
* ? 發送數據
運行結果如下:
```
auth-token-interceptor.ts:28 生成的數字是42
auth-token-interceptor.ts:12 1接收到的數字為 42
auth-token-interceptor.ts:15 2接收到的數字為 1764
auth-token-interceptor.ts:18 3接收到的數字為 4
auth-token-interceptor.ts:23 接收到了 4
auth-token-interceptor.ts:28 生成的數字是65
auth-token-interceptor.ts:12 1接收到的數字為 65
auth-token-interceptor.ts:15 2接收到的數字為 4225
auth-token-interceptor.ts:18 3接收到的數字為 5
auth-token-interceptor.ts:28 生成的數字是74
auth-token-interceptor.ts:12 1接收到的數字為 74
auth-token-interceptor.ts:15 2接收到的數字為 5476
auth-token-interceptor.ts:18 3接收到的數字為 6
auth-token-interceptor.ts:23 接收到了 6
auth-token-interceptor.ts:28 生成的數字是95
auth-token-interceptor.ts:12 1接收到的數字為 95
auth-token-interceptor.ts:15 2接收到的數字為 9025
auth-token-interceptor.ts:18 3接收到的數字為 5
auth-token-interceptor.ts:28 生成的數字是91
auth-token-interceptor.ts:12 1接收到的數字為 91
auth-token-interceptor.ts:15 2接收到的數字為 8281
auth-token-interceptor.ts:18 3接收到的數字為 1
```
# 獲取auth-token
終于到了使用pipe來獲取token的時候了:
src/app/core/auth-token-interceptor.ts
```javascript
intercept(req: HttpRequest<any>, next: HttpHandler): Observable<HttpEvent<any>> {
const reqClone = req.clone({
setHeaders: {'auth-token': 'af1c0c77-67d0-4ec2-8321-2f88e32f76af'}
});
return next.handle(reqClone).pipe?(map?((httpEvent) => {
console.log(httpEvent); ?
return httpEvent;
}));
}
```
* ? 使用pipe設置操作數據的操作符
* ? map操作符的作用的是:將return的結果進行轉發
* ? 打印個日志看看
控制臺顯示該變量的值類型為HttpResponse,對應的基本信息如下:
```
{
"headers": {
"normalizedNames": {},
"lazyUpdate": null
},
"status": 200,
"statusText": "OK",
"url": "http://localhost:8080/Teacher/",
"ok": true,
"type": 4,
"body": [
{
"id": 1,
"name": "panjie",
"sex": false,
"username": "yqac",
"email": "3792535@qq.com",
"createTime": 0,
"updateTime": 0
}
]
}
```
近一步進行類型轉化來獲取auth-token的值。
src/app/core/auth-token-interceptor.ts
```javascript
intercept(req: HttpRequest<any>, next: HttpHandler): Observable<HttpEvent<any>> {
const reqClone = req.clone({
setHeaders: {'auth-token': 'af1c0c77-67d0-4ec2-8321-2f88e32f76af'}
});
return next.handle(reqClone).pipe(map((httpEvent) => {
if (httpEvent instanceof HttpResponse) { ?
const httpResponse = httpEvent as HttpResponse<any>; ?
const authToken = httpResponse.headers.get('auth-token');
console.log('獲取到的authToken為' + authToken);
}
return httpEvent;
}));
}
```
* ? 使用if進行類型判斷,以防止異常(HttpEvent不止HttpResponse一種類型)
* ? 類型轉換
* ? 獲取authToken
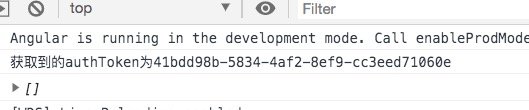
測試:

很失望,竟然獲取到了null,查看網絡確認是否真的返回了auth-token呢?
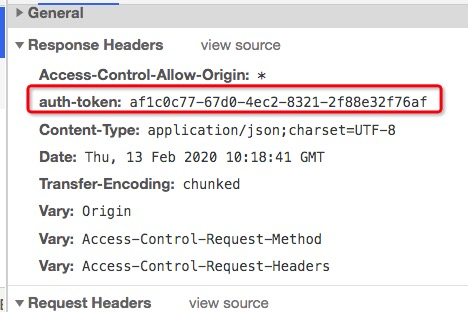
詭異的事情發生了,在控制臺中明明返回了auth-token,但為什么獲取不到呢?莫非`httpResponse.headers.get('auth-token');`這個寫法不正確嗎?答案并不是這樣的。`httpResponse.headers.get('auth-token');`這個寫法完全正確,之所以在此時獲取不到`auth-token`是由瀏覽器的安全策略決定的。為了某些安全方面的問題,瀏覽器僅允許js獲`Cache-Control`,`Content-Language`,`Content-Type`,`Expires`,`Last-Modified`以及`Pragma`幾個header信息。而若要獲取其它的header的信息,則需要由在header中返回`Access-Control-Expose-Headers 訪問控制允許暴露的headers`來指定。但當前的后臺并未指定允許暴露的任何header信息,所以此時獲取`auth-token`是不被瀏覽器所允許的。
解決的方法是打開后臺,設置`Access-Control-Expose-Headers`并將`auth-token`加入其中。
config/WebConfig.java
```java
public void addCorsMappings(CorsRegistry registry) {
registry.addMapping("/**")
.allowedOrigins("http://localhost:4200")
.allowedMethods("PUT", "DELETE", "POST", "GET", "PATCH")
.exposedHeaders("auth-token"); ?
}
```
* ? 設置允許前臺獲取的額外header信息
重新啟動后臺后再次測試:
# 緩存auth-token
行百里者,半九十。最后建立緩存服務把獲取到的token信息緩存起來,以便在下起發起請求的時候,加入此auth-token信息。這樣便能夠達到在非首次請求中使用首次請求獲取到的auth-token的目的。
```
panjiedeMac-Pro:web-app panjie$ cd src/app/service/
panjiedeMac-Pro:service panjie$ ng g s cache
CREATE src/app/service/cache.service.spec.ts (328 bytes)
CREATE src/app/service/cache.service.ts (134 bytes)
```
初始化如下:
src/app/service/cache.service.ts
```javascript
import {Injectable} from '@angular/core';
/**
* 緩存
*/
@Injectable({
providedIn: 'root'
})
export class CacheService {
/** 認證令牌 */
private static authToken: string = undefined;
constructor() {
}
static setAuthToken(token: string) {
CacheService.authToken = token;
}
static getAuthToken() {
if (CacheService.authToken === undefined) {
return '';
}
return CacheService.authToken;
}
}
```
在攔截器中使用緩存
src/app/core/auth-token-interceptor.ts
```javascript
intercept(req: HttpRequest<any>, next: HttpHandler): Observable<HttpEvent<any>> {
const reqClone = req.clone({
setHeaders: {'auth-token': CacheService.getAuthToken()?}
});
return next.handle(reqClone).pipe(map((httpEvent) => {
if (httpEvent instanceof HttpResponse) {
const httpResponse = httpEvent as HttpResponse<any>;
const authToken = httpResponse.headers.get('auth-token');
CacheService.setAuthToken(authToken)?;
}
return httpEvent;
}));
}
```
先后點擊次教師管理進行測試:
如上圖所示:
首次訪問時傳入了空的auth-token,接收到了后臺分發的auth-token: `70fb8229-7cf9-4326-b5a6-dbe911bf8e51`。進行第二次訪問時,前臺自動攜帶了該auth-token向后臺發起了請求,同時后臺在響應將發起的請示的token原值返回。這符合我們設定的令牌認證邏輯:

# 參考文檔
| 名稱 | 鏈接 | 預計學習時長(分) |
| --- | --- | --- |
| 源碼地址 | [https://github.com/mengyunzhi/spring-boot-and-angular-guild/releases/tag/step5.2.5](https://github.com/mengyunzhi/spring-boot-and-angular-guild/releases/tag/step5.2.5) | - |
| Access-Control-Expose-Headers | [https://developer.mozilla.org/en-US/docs/Web/HTTP/Headers/Access-Control-Expose-Headers](https://developer.mozilla.org/en-US/docs/Web/HTTP/Headers/Access-Control-Expose-Headers) | - |
|RxJS 庫 | [https://angular.cn/guide/rx-library](https://angular.cn/guide/rx-library) | 15 |
- 序言
- 第一章:Hello World
- 第一節:Angular準備工作
- 1 Node.js
- 2 npm
- 3 WebStorm
- 第二節:Hello Angular
- 第三節:Spring Boot準備工作
- 1 JDK
- 2 MAVEN
- 3 IDEA
- 第四節:Hello Spring Boot
- 1 Spring Initializr
- 2 Hello Spring Boot!
- 3 maven國內源配置
- 4 package與import
- 第五節:Hello Spring Boot + Angular
- 1 依賴注入【前】
- 2 HttpClient獲取數據【前】
- 3 數據綁定【前】
- 4 回調函數【選學】
- 第二章 教師管理
- 第一節 數據庫初始化
- 第二節 CRUD之R查數據
- 1 原型初始化【前】
- 2 連接數據庫【后】
- 3 使用JDBC讀取數據【后】
- 4 前后臺對接
- 5 ng-if【前】
- 6 日期管道【前】
- 第三節 CRUD之C增數據
- 1 新建組件并映射路由【前】
- 2 模板驅動表單【前】
- 3 httpClient post請求【前】
- 4 保存數據【后】
- 5 組件間調用【前】
- 第四節 CRUD之U改數據
- 1 路由參數【前】
- 2 請求映射【后】
- 3 前后臺對接【前】
- 4 更新數據【前】
- 5 更新某個教師【后】
- 6 路由器鏈接【前】
- 7 觀察者模式【前】
- 第五節 CRUD之D刪數據
- 1 綁定到用戶輸入事件【前】
- 2 刪除某個教師【后】
- 第六節 代碼重構
- 1 文件夾化【前】
- 2 優化交互體驗【前】
- 3 相對與絕對地址【前】
- 第三章 班級管理
- 第一節 JPA初始化數據表
- 第二節 班級列表
- 1 新建模塊【前】
- 2 初識單元測試【前】
- 3 初始化原型【前】
- 4 面向對象【前】
- 5 測試HTTP請求【前】
- 6 測試INPUT【前】
- 7 測試BUTTON【前】
- 8 @RequestParam【后】
- 9 Repository【后】
- 10 前后臺對接【前】
- 第三節 新增班級
- 1 初始化【前】
- 2 響應式表單【前】
- 3 測試POST請求【前】
- 4 JPA插入數據【后】
- 5 單元測試【后】
- 6 惰性加載【前】
- 7 對接【前】
- 第四節 編輯班級
- 1 FormGroup【前】
- 2 x、[x]、{{x}}與(x)【前】
- 3 模擬路由服務【前】
- 4 測試間諜spy【前】
- 5 使用JPA更新數據【后】
- 6 分層開發【后】
- 7 前后臺對接
- 8 深入imports【前】
- 9 深入exports【前】
- 第五節 選擇教師組件
- 1 初始化【前】
- 2 動態數據綁定【前】
- 3 初識泛型
- 4 @Output()【前】
- 5 @Input()【前】
- 6 再識單元測試【前】
- 7 其它問題
- 第六節 刪除班級
- 1 TDD【前】
- 2 TDD【后】
- 3 前后臺對接
- 第四章 學生管理
- 第一節 引入Bootstrap【前】
- 第二節 NAV導航組件【前】
- 1 初始化
- 2 Bootstrap格式化
- 3 RouterLinkActive
- 第三節 footer組件【前】
- 第四節 歡迎界面【前】
- 第五節 新增學生
- 1 初始化【前】
- 2 選擇班級組件【前】
- 3 復用選擇組件【前】
- 4 完善功能【前】
- 5 MVC【前】
- 6 非NULL校驗【后】
- 7 唯一性校驗【后】
- 8 @PrePersist【后】
- 9 CM層開發【后】
- 10 集成測試
- 第六節 學生列表
- 1 分頁【后】
- 2 HashMap與LinkedHashMap
- 3 初識綜合查詢【后】
- 4 綜合查詢進階【后】
- 5 小試綜合查詢【后】
- 6 初始化【前】
- 7 M層【前】
- 8 單元測試與分頁【前】
- 9 單選與多選【前】
- 10 集成測試
- 第七節 編輯學生
- 1 初始化【前】
- 2 嵌套組件測試【前】
- 3 功能開發【前】
- 4 JsonPath【后】
- 5 spyOn【后】
- 6 集成測試
- 7 @Input 異步傳值【前】
- 8 值傳遞與引入傳遞
- 9 @PreUpdate【后】
- 10 表單驗證【前】
- 第八節 刪除學生
- 1 CSS選擇器【前】
- 2 confirm【前】
- 3 功能開發與測試【后】
- 4 集成測試
- 5 定制提示框【前】
- 6 引入圖標庫【前】
- 第九節 集成測試
- 第五章 登錄與注銷
- 第一節:普通登錄
- 1 原型【前】
- 2 功能設計【前】
- 3 功能設計【后】
- 4 應用登錄組件【前】
- 5 注銷【前】
- 6 保留登錄狀態【前】
- 第二節:你是誰
- 1 過濾器【后】
- 2 令牌機制【后】
- 3 裝飾器模式【后】
- 4 攔截器【前】
- 5 RxJS操作符【前】
- 6 用戶登錄與注銷【后】
- 7 個人中心【前】
- 8 攔截器【后】
- 9 集成測試
- 10 單例模式
- 第六章 課程管理
- 第一節 新增課程
- 1 初始化【前】
- 2 嵌套組件測試【前】
- 3 async管道【前】
- 4 優雅的測試【前】
- 5 功能開發【前】
- 6 實體監聽器【后】
- 7 @ManyToMany【后】
- 8 集成測試【前】
- 9 異步驗證器【前】
- 10 詳解CORS【前】
- 第二節 課程列表
- 第三節 果斷
- 1 初始化【前】
- 2 分頁組件【前】
- 2 分頁組件【前】
- 3 綜合查詢【前】
- 4 綜合查詢【后】
- 4 綜合查詢【后】
- 第節 班級列表
- 第節 教師列表
- 第節 編輯課程
- TODO返回機制【前】
- 4 彈出框組件【前】
- 5 多路由出口【前】
- 第節 刪除課程
- 第七章 權限管理
- 第一節 AOP
- 總結
- 開發規范
- 備用