很少有項目是僅僅有一個模塊組成的。我們當前的前臺`app`目錄如下:
```
.
├── app-routing.module.ts
├── app.component.html
├── app.component.sass
├── app.component.spec.ts
├── app.component.ts
├── app.module.ts
├── teacher-add.component.html
├── teacher-add.component.ts
├── teacher-edit.component.html
└── teacher-edit.component.ts
```
如果再有其它的模塊(比如我們馬上要進行開發的班級管理模塊),則會面臨如下問題:
* 教師管理模塊占用了入口組件AppComponent,其它模塊沒有地方安置。
* 教師的增加、編輯生了四個新文件,隨著模塊數量的增加,該目錄面臨文件數過多。
* 直接使用`/add`路徑來增加教師,語義沒有`/teacher/add`明確。
* 路由配置文件app-routing.module單一,多人開發時容易產生沖突。
* 路由配置文件app-routing.module單一,隨著模塊的增多,將文件內容會過長而變得無法維護。
引入班級管理后,我們希望看到如下的路由:
| URL | 組件 | 功能 |
| ---- | ---- | ---- |
| <空> | App | 首頁,顯示歡迎界面,顯示導航欄 |
| `/teacher` | TeacherIndex | 教師列表頁 |
| `/teacher/add` | TeacherAdd | 增加教師 |
| `/teacher/edit/<id>` | TeacherEdit | 編輯教師 |
| `/klass` | KlassIndex | 班級列表頁 |
| `/klass/add` | KlassAdd | 增加班級 |
| `/Klass/edit/<id>` | KlassEdit | 編輯班級 |
# 文件夾化
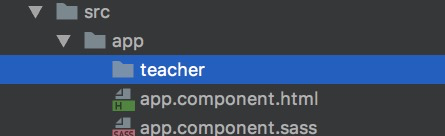
對項目文件進行重構最簡單有效的方法便是劃分文件夾,比如我們把教師管理的文件全部放到`app/teacher`文件夾下,把班級管理的文件全部放到`app/klass`文件夾下:
然后借助于`webstorm`來完成遷移:

> **注意:** 不能批量選中遷移否則`webstorm`無法為我們自動處理引用路徑的問題。
遷移后目錄如下:
```
.
├── app-routing.module.ts
├── app.component.html
├── app.component.sass
├── app.component.spec.ts
├── app.component.ts
├── app.module.ts
└── teacher
├── teacher-add.component.html
├── teacher-add.component.ts
├── teacher-edit.component.html
└── teacher-edit.component.ts
```
## 新建TeacherIndex組件
新建TeacherIndex組件,并復制原App組件中相關的代碼至:
teacher/teacher-index.component.ts
```
import {Component, OnInit} from '@angular/core';
import {HttpClient} from '@angular/common/http';
@Component({
templateUrl: './teacher-index.component.html',
})
export class TeacherIndexComponent implements OnInit {
// 定義教師數組
teachers = new Array();
constructor(private httpClient: HttpClient) {
}
/**
* 該方法將在組件準備完畢后被調用
*/
ngOnInit() {
/* 后臺數據的請求地址,如果變量定義后不再重新賦值,則應該使用const來定義 */
const url = 'http://localhost:8080/Teacher/';
/* 使用get方法請求url,請求一旦成功后,將調用傳入的第一個方法;如果請求失敗,將調用傳入的第二個方法 */
this.httpClient.get(url)
.subscribe((response: any) => {
console.log(response);
this.teachers = response;
}, (response) => {
console.log(response);
console.error('請求出錯');
});
}
/**
* 點擊刪除按鈕時刪除對應的教師
* @param teacher 要刪除的教師
*/
onDelete(teacher: { id: string }): void {
const url = 'http://localhost:8080/Teacher/' + teacher.id;
this.httpClient.delete(url)
.subscribe(() => {
console.log('刪除成功');
this.ngOnInit();
}, () => {
console.log('刪除失敗');
});
}
}
```
將app組件的V層轉移至teacher/teacher-index.component.html
```
<router-outlet></router-outlet>
<table>
<tr>
<th>序號</th>
<th>姓名</th>
<th>用戶名</th>
<th>郵箱</th>
<th>性別</th>
<th>注冊時間</th>
<th>操作</th>
</tr>
<tr *ngFor="let teacher of teachers">
<td>{{teacher.id}}</td>
<td>{{teacher.name}}</td>
<td>{{teacher.username}}</td>
<td>{{teacher.email}}</td>
<td>
<span *ngIf="teacher.sex">女</span>
<span *ngIf="!teacher.sex">男</span>
</td>
<td>{{teacher.createTime | date: 'yyyy-MM-dd'}}</td>
<td><a [routerLink]="['/edit', teacher.id]">編輯</a> <button (click)="onDelete(teacher)">刪除</button></td>
</tr>
</table>
```
## 去冗余代碼
此時教師列表已經被我們轉到了新的TeacherIndex組件中,我們恢復下App組件的代碼:
app.component.html
```
<h2>歡迎使用河北工業大學教務管理系統</h2>
<router-outlet></router-outlet>
```
app.component
```
import {Component} from '@angular/core';
@Component({
selector: 'app-root',
templateUrl: './app.component.html',
styleUrls: ['./app.component.sass']
})
export class AppComponent implements OnInit{
ngOnInit(): void {
}
}
```
## 新組件添加至模塊
app.module
```
import {TeacherIndexComponent} from './teacher/teacher-index.component'; ①
@NgModule({
declarations: [
AppComponent,
TeacherAddComponent,
TeacherEditComponent,
TeacherIndexComponent ②
],
```
## 測試
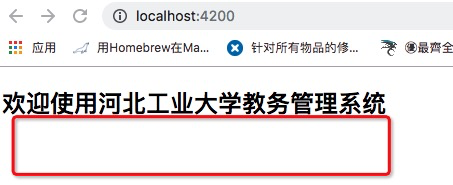
測試我們發現,教師列表沒有了。
這是由于在重構前我們使用了`App`組件來顯示教師列表;重構以后`App`組件僅顯示歡迎信息,當然教師列表就隨著不存在了。下面使用定義空路由路徑的方法來默認顯示教師列表組件。
## 重新定義路由
app-routing.module
```
import {TeacherIndexComponent} from './teacher/teacher-index.component';
const routes: Routes = [
{
path: '', ?
component: TeacherIndexComponent ?
},
{
path: 'add',
component: TeacherAddComponent
},
{
path: 'edit/:id',
component: TeacherEditComponent
}
];
```
* ?路徑為空時,匹配?TeacherIndexComponent組件
此時當訪問[http://localhost:4200/](http://localhost:4200/)時,則默認匹配上了空路徑,進而將顯示教師列表組件。
# 測試
打開[http://localhost:4200](http://localhost:4200)及控制臺。查看功能是否正常。
# 參考文檔
| 名稱 | 鏈接 | 預計學習時長(分) |
| --- | --- | --- |
| 源碼地址 | [https://github.com/mengyunzhi/spring-boot-and-angular-guild/releases/tag/step2.6.1](https://github.com/mengyunzhi/spring-boot-and-angular-guild/releases/tag/step2.6.1) | - |
- 序言
- 第一章:Hello World
- 第一節:Angular準備工作
- 1 Node.js
- 2 npm
- 3 WebStorm
- 第二節:Hello Angular
- 第三節:Spring Boot準備工作
- 1 JDK
- 2 MAVEN
- 3 IDEA
- 第四節:Hello Spring Boot
- 1 Spring Initializr
- 2 Hello Spring Boot!
- 3 maven國內源配置
- 4 package與import
- 第五節:Hello Spring Boot + Angular
- 1 依賴注入【前】
- 2 HttpClient獲取數據【前】
- 3 數據綁定【前】
- 4 回調函數【選學】
- 第二章 教師管理
- 第一節 數據庫初始化
- 第二節 CRUD之R查數據
- 1 原型初始化【前】
- 2 連接數據庫【后】
- 3 使用JDBC讀取數據【后】
- 4 前后臺對接
- 5 ng-if【前】
- 6 日期管道【前】
- 第三節 CRUD之C增數據
- 1 新建組件并映射路由【前】
- 2 模板驅動表單【前】
- 3 httpClient post請求【前】
- 4 保存數據【后】
- 5 組件間調用【前】
- 第四節 CRUD之U改數據
- 1 路由參數【前】
- 2 請求映射【后】
- 3 前后臺對接【前】
- 4 更新數據【前】
- 5 更新某個教師【后】
- 6 路由器鏈接【前】
- 7 觀察者模式【前】
- 第五節 CRUD之D刪數據
- 1 綁定到用戶輸入事件【前】
- 2 刪除某個教師【后】
- 第六節 代碼重構
- 1 文件夾化【前】
- 2 優化交互體驗【前】
- 3 相對與絕對地址【前】
- 第三章 班級管理
- 第一節 JPA初始化數據表
- 第二節 班級列表
- 1 新建模塊【前】
- 2 初識單元測試【前】
- 3 初始化原型【前】
- 4 面向對象【前】
- 5 測試HTTP請求【前】
- 6 測試INPUT【前】
- 7 測試BUTTON【前】
- 8 @RequestParam【后】
- 9 Repository【后】
- 10 前后臺對接【前】
- 第三節 新增班級
- 1 初始化【前】
- 2 響應式表單【前】
- 3 測試POST請求【前】
- 4 JPA插入數據【后】
- 5 單元測試【后】
- 6 惰性加載【前】
- 7 對接【前】
- 第四節 編輯班級
- 1 FormGroup【前】
- 2 x、[x]、{{x}}與(x)【前】
- 3 模擬路由服務【前】
- 4 測試間諜spy【前】
- 5 使用JPA更新數據【后】
- 6 分層開發【后】
- 7 前后臺對接
- 8 深入imports【前】
- 9 深入exports【前】
- 第五節 選擇教師組件
- 1 初始化【前】
- 2 動態數據綁定【前】
- 3 初識泛型
- 4 @Output()【前】
- 5 @Input()【前】
- 6 再識單元測試【前】
- 7 其它問題
- 第六節 刪除班級
- 1 TDD【前】
- 2 TDD【后】
- 3 前后臺對接
- 第四章 學生管理
- 第一節 引入Bootstrap【前】
- 第二節 NAV導航組件【前】
- 1 初始化
- 2 Bootstrap格式化
- 3 RouterLinkActive
- 第三節 footer組件【前】
- 第四節 歡迎界面【前】
- 第五節 新增學生
- 1 初始化【前】
- 2 選擇班級組件【前】
- 3 復用選擇組件【前】
- 4 完善功能【前】
- 5 MVC【前】
- 6 非NULL校驗【后】
- 7 唯一性校驗【后】
- 8 @PrePersist【后】
- 9 CM層開發【后】
- 10 集成測試
- 第六節 學生列表
- 1 分頁【后】
- 2 HashMap與LinkedHashMap
- 3 初識綜合查詢【后】
- 4 綜合查詢進階【后】
- 5 小試綜合查詢【后】
- 6 初始化【前】
- 7 M層【前】
- 8 單元測試與分頁【前】
- 9 單選與多選【前】
- 10 集成測試
- 第七節 編輯學生
- 1 初始化【前】
- 2 嵌套組件測試【前】
- 3 功能開發【前】
- 4 JsonPath【后】
- 5 spyOn【后】
- 6 集成測試
- 7 @Input 異步傳值【前】
- 8 值傳遞與引入傳遞
- 9 @PreUpdate【后】
- 10 表單驗證【前】
- 第八節 刪除學生
- 1 CSS選擇器【前】
- 2 confirm【前】
- 3 功能開發與測試【后】
- 4 集成測試
- 5 定制提示框【前】
- 6 引入圖標庫【前】
- 第九節 集成測試
- 第五章 登錄與注銷
- 第一節:普通登錄
- 1 原型【前】
- 2 功能設計【前】
- 3 功能設計【后】
- 4 應用登錄組件【前】
- 5 注銷【前】
- 6 保留登錄狀態【前】
- 第二節:你是誰
- 1 過濾器【后】
- 2 令牌機制【后】
- 3 裝飾器模式【后】
- 4 攔截器【前】
- 5 RxJS操作符【前】
- 6 用戶登錄與注銷【后】
- 7 個人中心【前】
- 8 攔截器【后】
- 9 集成測試
- 10 單例模式
- 第六章 課程管理
- 第一節 新增課程
- 1 初始化【前】
- 2 嵌套組件測試【前】
- 3 async管道【前】
- 4 優雅的測試【前】
- 5 功能開發【前】
- 6 實體監聽器【后】
- 7 @ManyToMany【后】
- 8 集成測試【前】
- 9 異步驗證器【前】
- 10 詳解CORS【前】
- 第二節 課程列表
- 第三節 果斷
- 1 初始化【前】
- 2 分頁組件【前】
- 2 分頁組件【前】
- 3 綜合查詢【前】
- 4 綜合查詢【后】
- 4 綜合查詢【后】
- 第節 班級列表
- 第節 教師列表
- 第節 編輯課程
- TODO返回機制【前】
- 4 彈出框組件【前】
- 5 多路由出口【前】
- 第節 刪除課程
- 第七章 權限管理
- 第一節 AOP
- 總結
- 開發規范
- 備用