
# 6.2 數據存儲與訪問之——SharedPreferences保存用戶偏好參數
## 本節引言:
> 本節給大家介紹的是第二種存儲用戶數據的方式,使用SharedPreferences(保存用戶偏好參數)保存數據, 當我們的應用想要保存用戶的一些偏好參數,比如是否自動登陸,是否記住賬號密碼,是否在Wifi下才能 聯網等相關信息,如果使用數據庫的話,顯得有點大材小用了!我們把上面這些配置信息稱為用戶的偏好 設置,就是用戶偏好的設置,而這些配置信息通常是保存在特定的文件中!比如windows使用ini文件, 而J2SE中使用properties屬性文件與xml文件來保存軟件的配置信息;而在Android中我們通常使用 一個輕量級的存儲類——SharedPreferences來保存用戶偏好的參數!SharedPreferences也是使用xml文件, 然后類似于Map集合,使用鍵-值的形式來存儲數據;我們只需要調用SharedPreferences的getXxx(name), 就可以根據鍵獲得對應的值!使用起來很方便!
## 1.SharedPreferences使用示例:
**使用流程圖**:
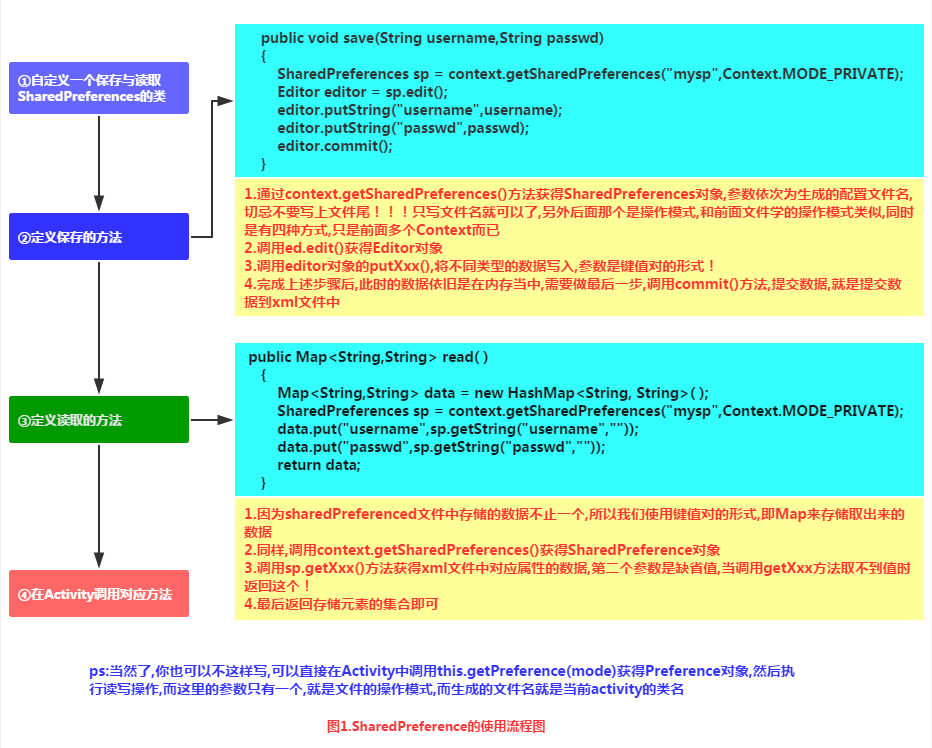
**實現代碼示例**:
**運行效果圖**:
流程是輸入賬號密碼后點擊登錄,將信息保存到SharedPreference文件中, 然后重啟app,看到數據已經顯示在文本框中了
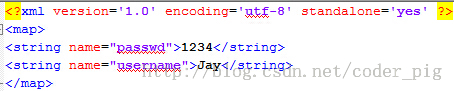
另外保存后,我們可以在File Expoler打開data/data/<包名>可以看到在shared_prefs目錄下 生成了一個xml文件(因為N5沒root,這里找了以前的效果圖):

點擊導出到桌面可以看到里面的內容:
**代碼實現**:
布局文件**activity_main.xml**的編寫:
```
<LinearLayout xmlns:android="http://schemas.android.com/apk/res/android"
xmlns:tools="http://schemas.android.com/tools"
android:layout_width="match_parent"
android:layout_height="match_parent"
android:orientation="vertical"
tools:context=".MyActivity">
<TextView
android:layout_width="wrap_content"
android:layout_height="wrap_content"
android:text="用戶登陸" />
<TextView
android:layout_width="wrap_content"
android:layout_height="wrap_content"
android:layout_marginTop="10dp"
android:text="請輸入用戶名" />
<EditText
android:id="@+id/editname"
android:layout_width="match_parent"
android:layout_height="wrap_content"
android:hint="用戶名" />
<TextView
android:layout_width="wrap_content"
android:layout_height="wrap_content"
android:text="請輸入密碼" />
<EditText
android:id="@+id/editpasswd"
android:layout_width="match_parent"
android:layout_height="wrap_content"
android:hint="密碼"
android:inputType="textPassword" />
<Button
android:id="@+id/btnlogin"
android:layout_width="wrap_content"
android:layout_height="wrap_content"
android:text="登錄" />
</LinearLayout>
```
編寫簡單的SP工具類:**SharedHelper.java**:
```
/**
* Created by Jay on 2015/9/2 0002.
*/
public class SharedHelper {
private Context mContext;
public SharedHelper() {
}
public SharedHelper(Context mContext) {
this.mContext = mContext;
}
//定義一個保存數據的方法
public void save(String username, String passwd) {
SharedPreferences sp = mContext.getSharedPreferences("mysp", Context.MODE_PRIVATE);
SharedPreferences.Editor editor = sp.edit();
editor.putString("username", username);
editor.putString("passwd", passwd);
editor.commit();
Toast.makeText(mContext, "信息已寫入SharedPreference中", Toast.LENGTH_SHORT).show();
}
//定義一個讀取SP文件的方法
public Map<String, String> read() {
Map<String, String> data = new HashMap<String, String>();
SharedPreferences sp = mContext.getSharedPreferences("mysp", Context.MODE_PRIVATE);
data.put("username", sp.getString("username", ""));
data.put("passwd", sp.getString("passwd", ""));
return data;
}
}
```
最后是**MainActivity.java**實現相關邏輯:
```
public class MainActivity extends AppCompatActivity {
private EditText editname;
private EditText editpasswd;
private Button btnlogin;
private String strname;
private String strpasswd;
private SharedHelper sh;
private Context mContext;
@Override
protected void onCreate(Bundle savedInstanceState) {
super.onCreate(savedInstanceState);
setContentView(R.layout.activity_main);
mContext = getApplicationContext();
sh = new SharedHelper(mContext);
bindViews();
}
private void bindViews() {
editname = (EditText)findViewById(R.id.editname);
editpasswd = (EditText)findViewById(R.id.editpasswd);
btnlogin = (Button)findViewById(R.id.btnlogin);
btnlogin.setOnClickListener(new View.OnClickListener() {
@Override
public void onClick(View v) {
strname = editname.getText().toString();
strpasswd = editpasswd.getText().toString();
sh.save(strname,strpasswd);
}
});
}
@Override
protected void onStart() {
super.onStart();
Map<String,String> data = sh.read();
editname.setText(data.get("username"));
editpasswd.setText(data.get("passwd"));
}
}
```
## 2.讀取其他應用的SharedPreferences
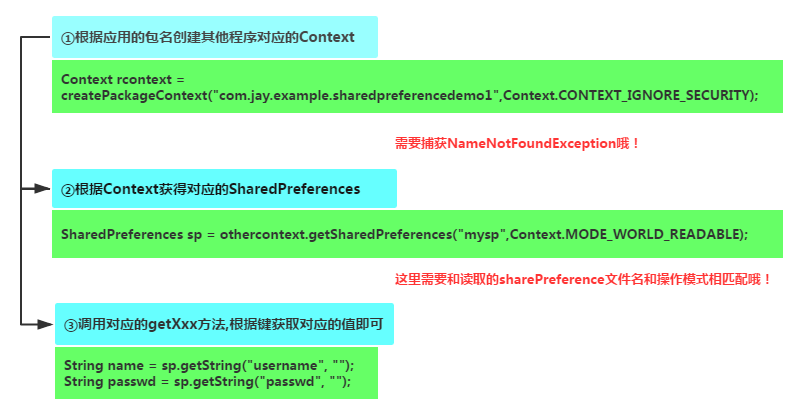
> **核心**: 獲得其他app的Context,而這個Context代表訪問該app的全局信息的接口,而決定應用的唯一標識 是應用的包名,所以我們可以通過應用包名獲得對應app的Context 另外有一點要注意的是:其他應用的SP文件是否能被讀寫的前提就是SP文件是否指定了可讀或者 可寫的權限,我們上面創建的是MODE_PRIVATE的就不可以了~所以說你像讀別人的SP里的數據, 很難,另外,一些關鍵的信息,比如密碼保存到SP里,一般都是會做加密的,所以只能自己寫自己玩~ 等下會講下常用的MD5加密方法!
**實現流程圖**:
**代碼示例:**
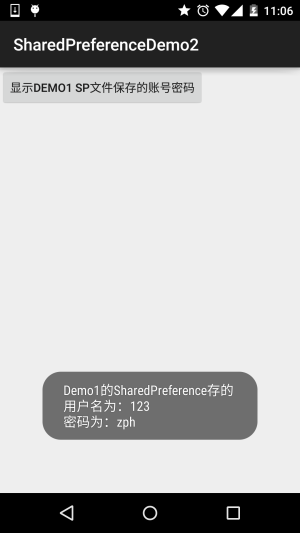
**運行效果圖**:
**代碼實現**:
我們讀取SP的操作放在MainActivity.java中完成,點擊按鈕后讀取SP,并通過Toast顯示出來:
```
public class MainActivity extends AppCompatActivity {
private Context othercontext;
private SharedPreferences sp;
@Override
protected void onCreate(Bundle savedInstanceState) {
super.onCreate(savedInstanceState);
setContentView(R.layout.activity_main);
Button btnshow = (Button) findViewById(R.id.btnshow);
btnshow.setOnClickListener(new View.OnClickListener() {
@Override
public void onClick(View v) {
//獲得第一個應用的包名,從而獲得對應的Context,需要對異常進行捕獲
try {
othercontext = createPackageContext("com.jay.sharedpreferencedemo", Context.CONTEXT_IGNORE_SECURITY);
} catch (PackageManager.NameNotFoundException e) {
e.printStackTrace();
}
//根據Context取得對應的SharedPreferences
sp = othercontext.getSharedPreferences("mysp", Context.MODE_WORLD_READABLE);
String name = sp.getString("username", "");
String passwd = sp.getString("passwd", "");
Toast.makeText(getApplicationContext(), "Demo1的SharedPreference存的\n用戶名為:" + name + "\n密碼為:" + passwd, Toast.LENGTH_SHORT).show();
}
});
}
}
```
## 3.使用MD5對SharedPreference的重要數據進行加密
> 嘿嘿,上面我們這樣直接把賬號密碼保存到sp里,如果沒root的手機,別的應用倒無法訪問手機, 如果root了,然后數據給其他應用獲取到,然后造成了一些后果,這...就不怪我們了,哈哈, 誰叫你root了~,這鍋我們不背,的確是這樣!但是作為一名有責任心的APP開發人員,我們總不能 這樣是吧,我們可以使用一些加密算法對用戶密碼進行加密,另外我們一般加密的都是用戶密碼! 下面我們簡畫個簡單的圖幫助大家理解下加密的處理的流程:
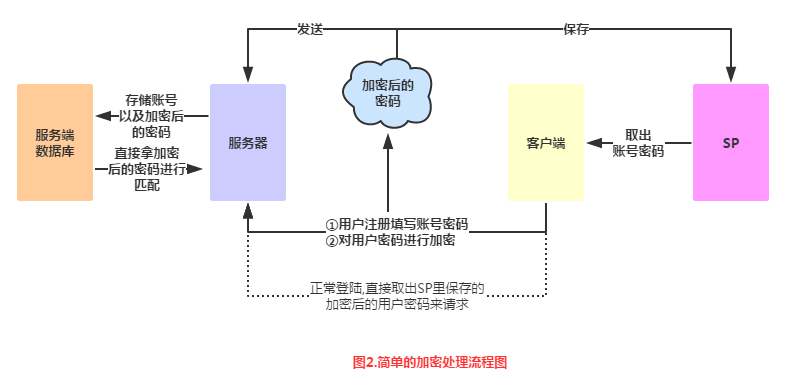
### 1.簡單的加密處理流程
**流程圖如下**:
**流程圖解析**:
> * **Step 1**.用戶注冊賬號密碼,賬號密碼校驗后(賬號是否重復,密碼位數 > 6位等), 即賬號密碼有效,注冊成功后,我們提交給服務器的賬號,以及本地加密過的密碼!
> * **Step 2**.服務器端將用戶提交的賬號,加密過的密碼保存到服務端的數據庫中,也就是服務 端并不會保存我們的明文密碼(原始)密碼!
> * **Step 3**.說回客戶端,如果注冊成功或者登陸成功,你想保存賬號密碼到SP中,保存的的密碼 也需要走一趟加密流程!即明文密碼——>加密,再保存!如果不保存,每次請求的時候,明文密碼 也要走一趟家里流程,然后拿著加密后的密碼來請求服務器!
> * **Step 4**.服務器驗證賬號以及加密密碼,成功,分配客戶端一個session標識,后續客戶端可以拿著 這個session來訪問服務端提供的相關服務!
嘿嘿,理解了吧,加密的方法有很多種,小豬也不是這方面的高玩,以前使用過的加密方法是MD5 加密,本節也給大家簡單介紹一下這個MD5加密,以及演示下用法~
### 2.MD5簡單介紹:
**1)MD5是什么鬼?:**
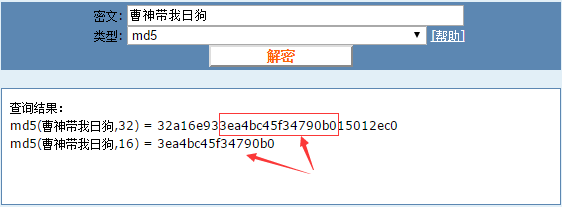
> 答:Message Digest Algorithm MD5(中文名為消息摘要算法第五版)為計算機安全領域廣泛 使用的一種散列函數,用以提供消息的完整性保護——摘自《百度百科》 簡單點說就是一種加密算法,可以將一個字符串,或者文件,壓縮包,執行MD5加密后, 就可以生產一個固定長度為128bit的串!這個串基本唯一!另外我們都知道:一個十六進制 需要用4個bit來表示,那么對應的MD5的字符串長度就為:128 / 4 = 32位了!另外可能 你看到一些md5是16位的,只是將32位MD5碼去掉了前八位以及后八位!不信么,我們來試試 百度一下:md5在線解密,第一個:[http://www.cmd5.com/](http://www.cmd5.com/)
>
> 
**2)MD5能破解嗎?**
> 答:MD5不可逆,就是說沒有對應的算法,無法從生成的md5值逆向得到原始數據! 當然暴力破解除外,簡單的MD5加密后可以查MD5庫~
**3)MD5值唯一嗎?**
> 答:不唯一,一個原始數據只對應一個MD5值,但是一個MD5值可能對應多個原始數據!
### 3.MD5加密實現例子:
其實網上有很多寫好的MD5的例子,百度或者谷歌一搜一大堆,這里提供下小豬用的MD5加密工具類!
**Md5Util.java**:
```
/**
* Created by Jay on 2015/9/2 0002.
*/
public class MD5 {
public static String getMD5(String content) {
try {
MessageDigest digest = MessageDigest.getInstance("MD5");
digest.update(content.getBytes());
return getHashString(digest);
} catch (NoSuchAlgorithmException e) {
e.printStackTrace();
}
return null;
}
private static String getHashString(MessageDigest digest) {
StringBuilder builder = new StringBuilder();
for (byte b : digest.digest()) {
builder.append(Integer.toHexString((b >> 4) & 0xf));
builder.append(Integer.toHexString(b & 0xf));
}
return builder.toString();
}
}
```
**MainActivity.java**直接調用getMD5這個靜態方法:
```
Log.e("HeHe", MD5.getMD5("呵呵"));
```
我們可以看到Logcat上打印出:

這就是加密過后的呵呵了,我們可以把這串密文拷貝到上面這個md5的在線解密網站:
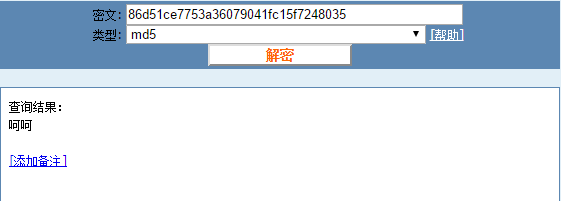
嘿嘿,果然,只是這樣加密一次,就直接破解了,有點不安全的樣子,那就加密100次咯, 就是將加密后的字符串再加密,重復100次,我們在原先的基礎上加個加密一百次的方法:
```
public static String getMD5x100(String content){
String s1 = content;
for(int i = 0;i < 100;i++){
s1 = getMD5(s1);
}
return s1;
}
```
然后調用下,發現打印這個的Log:

復制界面網站上:

好的,裝B成功~
## 4.SharedPreference工具類:
> 每次都要自行實例化SP相關的類,肯定很麻煩,這里貼個SP的工具類,大家可以貼到 自己的項目中,工具類來源于鴻洋大神的blog~
**SPUtils.java**
```
package com.jay.sharedpreferencedemo3;
import android.content.Context;
import android.content.SharedPreferences;
import java.util.Map;
/**
* Created by Jay on 2015/9/2 0002.
*/
public class SPUtils {
/**
* 保存在手機里的SP文件名
*/
public static final String FILE_NAME = "my_sp";
/**
* 保存數據
*/
public static void put(Context context, String key, Object obj) {
SharedPreferences sp = context.getSharedPreferences(FILE_NAME, context.MODE_PRIVATE);
SharedPreferences.Editor editor = sp.edit();
if (obj instanceof Boolean) {
editor.putBoolean(key, (Boolean) obj);
} else if (obj instanceof Float) {
editor.putFloat(key, (Float) obj);
} else if (obj instanceof Integer) {
editor.putInt(key, (Integer) obj);
} else if (obj instanceof Long) {
editor.putLong(key, (Long) obj);
} else {
editor.putString(key, (String) obj);
}
editor.commit();
}
/**
* 獲取指定數據
*/
public static Object get(Context context, String key, Object defaultObj) {
SharedPreferences sp = context.getSharedPreferences(FILE_NAME, context.MODE_PRIVATE);
if (defaultObj instanceof Boolean) {
return sp.getBoolean(key, (Boolean) defaultObj);
} else if (defaultObj instanceof Float) {
return sp.getFloat(key, (Float) defaultObj);
} else if (defaultObj instanceof Integer) {
return sp.getInt(key, (Integer) defaultObj);
} else if (defaultObj instanceof Long) {
return sp.getLong(key, (Long) defaultObj);
} else if (defaultObj instanceof String) {
return sp.getString(key, (String) defaultObj);
}
return null;
}
/**
* 刪除指定數據
*/
public static void remove(Context context, String key) {
SharedPreferences sp = context.getSharedPreferences(FILE_NAME, context.MODE_PRIVATE);
SharedPreferences.Editor editor = sp.edit();
editor.remove(key);
editor.commit();
}
/**
* 返回所有鍵值對
*/
public static Map<String, ?> getAll(Context context) {
SharedPreferences sp = context.getSharedPreferences(FILE_NAME, context.MODE_PRIVATE);
Map<String, ?> map = sp.getAll();
return map;
}
/**
* 刪除所有數據
*/
public static void clear(Context context) {
SharedPreferences sp = context.getSharedPreferences(FILE_NAME, context.MODE_PRIVATE);
SharedPreferences.Editor editor = sp.edit();
editor.clear();
editor.commit();
}
/**
* 檢查key對應的數據是否存在
*/
public static boolean contains(Context context, String key) {
SharedPreferences sp = context.getSharedPreferences(FILE_NAME, context.MODE_PRIVATE);
return sp.contains(key);
}
}
```
## 5.代碼下載:
**SharedPreferenceDemo.zip**:[下載 SharedPreferenceDemo.zip](/try/download/SharedPreferenceDemo.zip) **SharedPreferenceDemo2.zip**:[下載 SharedPreferenceDemo2.zip](/try/download/SharedPreferenceDemo2.zip) **SharedPreferenceDemo3.zip**:[下載 SharedPreferenceDemo3.zip](/try/download/SharedPreferenceDemo3.zip)
## 本節小結:
> 好的,關于Android存儲數據的第二種方式:SharedPreference保存用戶偏好參數的內容就這么多, 應該可以滿足你日常開發使用SP的需求,如果有什么遺漏,歡迎提出,謝謝~
- 1.0 Android基礎入門教程
- 1.0.1 2015年最新Android基礎入門教程目錄
- 1.1 背景相關與系統架構分析
- 1.2 開發環境搭建
- 1.2.1 使用Eclipse + ADT + SDK開發Android APP
- 1.2.2 使用Android Studio開發Android APP
- 1.3 SDK更新不了問題解決
- 1.4 Genymotion模擬器安裝
- 1.5.1 Git使用教程之本地倉庫的基本操作
- 1.5.2 Git之使用GitHub搭建遠程倉庫
- 1.6 .9(九妹)圖片怎么玩
- 1.7 界面原型設計
- 1.8 工程相關解析(各種文件,資源訪問)
- 1.9 Android程序簽名打包
- 1.11 反編譯APK獲取代碼&資源
- 2.1 View與ViewGroup的概念
- 2.2.1 LinearLayout(線性布局)
- 2.2.2 RelativeLayout(相對布局)
- 2.2.3 TableLayout(表格布局)
- 2.2.4 FrameLayout(幀布局)
- 2.2.5 GridLayout(網格布局)
- 2.2.6 AbsoluteLayout(絕對布局)
- 2.3.1 TextView(文本框)詳解
- 2.3.2 EditText(輸入框)詳解
- 2.3.3 Button(按鈕)與ImageButton(圖像按鈕)
- 2.3.4 ImageView(圖像視圖)
- 2.3.5.RadioButton(單選按鈕)&Checkbox(復選框)
- 2.3.6 開關按鈕ToggleButton和開關Switch
- 2.3.7 ProgressBar(進度條)
- 2.3.8 SeekBar(拖動條)
- 2.3.9 RatingBar(星級評分條)
- 2.4.1 ScrollView(滾動條)
- 2.4.2 Date & Time組件(上)
- 2.4.3 Date & Time組件(下)
- 2.4.4 Adapter基礎講解
- 2.4.5 ListView簡單實用
- 2.4.6 BaseAdapter優化
- 2.4.7ListView的焦點問題
- 2.4.8 ListView之checkbox錯位問題解決
- 2.4.9 ListView的數據更新問題
- 2.5.0 構建一個可復用的自定義BaseAdapter
- 2.5.1 ListView Item多布局的實現
- 2.5.2 GridView(網格視圖)的基本使用
- 2.5.3 Spinner(列表選項框)的基本使用
- 2.5.4 AutoCompleteTextView(自動完成文本框)的基本使用
- 2.5.5 ExpandableListView(可折疊列表)的基本使用
- 2.5.6 ViewFlipper(翻轉視圖)的基本使用
- 2.5.7 Toast(吐司)的基本使用
- 2.5.8 Notification(狀態欄通知)詳解
- 2.5.9 AlertDialog(對話框)詳解
- 2.6.0 其他幾種常用對話框基本使用
- 2.6.1 PopupWindow(懸浮框)的基本使用
- 2.6.2 菜單(Menu)
- 2.6.3 ViewPager的簡單使用
- 2.6.4 DrawerLayout(官方側滑菜單)的簡單使用
- 3.1.1 基于監聽的事件處理機制
- 3.2 基于回調的事件處理機制
- 3.3 Handler消息傳遞機制淺析
- 3.4 TouchListener PK OnTouchEvent + 多點觸碰
- 3.5 監聽EditText的內容變化
- 3.6 響應系統設置的事件(Configuration類)
- 3.7 AnsyncTask異步任務
- 3.8 Gestures(手勢)
- 4.1.1 Activity初學乍練
- 4.1.2 Activity初窺門徑
- 4.1.3 Activity登堂入室
- 4.2.1 Service初涉
- 4.2.2 Service進階
- 4.2.3 Service精通
- 4.3.1 BroadcastReceiver牛刀小試
- 4.3.2 BroadcastReceiver庖丁解牛
- 4.4.2 ContentProvider再探——Document Provider
- 4.5.1 Intent的基本使用
- 4.5.2 Intent之復雜數據的傳遞
- 5.1 Fragment基本概述
- 5.2.1 Fragment實例精講——底部導航欄的實現(方法1)
- 5.2.2 Fragment實例精講——底部導航欄的實現(方法2)
- 5.2.3 Fragment實例精講——底部導航欄的實現(方法3)
- 5.2.4 Fragment實例精講——底部導航欄+ViewPager滑動切換頁面
- 5.2.5 Fragment實例精講——新聞(購物)類App列表Fragment的簡單實現
- 6.1 數據存儲與訪問之——文件存儲讀寫
- 6.2 數據存儲與訪問之——SharedPreferences保存用戶偏好參數
- 6.3.1 數據存儲與訪問之——初見SQLite數據庫
- 6.3.2 數據存儲與訪問之——又見SQLite數據庫
- 7.1.1 Android網絡編程要學的東西與Http協議學習
- 7.1.2 Android Http請求頭與響應頭的學習
- 7.1.3 Android HTTP請求方式:HttpURLConnection
- 7.1.4 Android HTTP請求方式:HttpClient
- 7.2.1 Android XML數據解析
- 7.2.2 Android JSON數據解析
- 7.3.1 Android 文件上傳
- 7.3.2 Android 文件下載(1)
- 7.3.3 Android 文件下載(2)
- 7.4 Android 調用 WebService
- 7.5.1 WebView(網頁視圖)基本用法
- 7.5.2 WebView和JavaScrip交互基礎
- 7.5.3 Android 4.4后WebView的一些注意事項
- 7.5.4 WebView文件下載
- 7.5.5 WebView緩存問題
- 7.5.6 WebView處理網頁返回的錯誤碼信息
- 7.6.1 Socket學習網絡基礎準備
- 7.6.2 基于TCP協議的Socket通信(1)
- 7.6.3 基于TCP協議的Socket通信(2)
- 7.6.4 基于UDP協議的Socket通信
- 8.1.1 Android中的13種Drawable小結 Part 1
- 8.1.2 Android中的13種Drawable小結 Part 2
- 8.1.3 Android中的13種Drawable小結 Part 3
- 8.2.1 Bitmap(位圖)全解析 Part 1
- 8.2.2 Bitmap引起的OOM問題
- 8.3.1 三個繪圖工具類詳解
- 8.3.2 繪圖類實戰示例
- 8.3.3 Paint API之—— MaskFilter(面具)
- 8.3.4 Paint API之—— Xfermode與PorterDuff詳解(一)
- 8.3.5 Paint API之—— Xfermode與PorterDuff詳解(二)
- 8.3.6 Paint API之—— Xfermode與PorterDuff詳解(三)
- 8.3.7 Paint API之—— Xfermode與PorterDuff詳解(四)
- 8.3.8 Paint API之—— Xfermode與PorterDuff詳解(五)
- 8.3.9 Paint API之—— ColorFilter(顏色過濾器)(1/3)
- 8.3.10 Paint API之—— ColorFilter(顏色過濾器)(2-3)
- 8.3.11 Paint API之—— ColorFilter(顏色過濾器)(3-3)
- 8.3.12 Paint API之—— PathEffect(路徑效果)
- 8.3.13 Paint API之—— Shader(圖像渲染)
- 8.3.14 Paint幾個枚舉/常量值以及ShadowLayer陰影效果
- 8.3.15 Paint API之——Typeface(字型)
- 8.3.16 Canvas API詳解(Part 1)
- 8.3.17 Canvas API詳解(Part 2)剪切方法合集
- 8.3.18 Canvas API詳解(Part 3)Matrix和drawBitmapMash
- 8.4.1 Android動畫合集之幀動畫
- 8.4.2 Android動畫合集之補間動畫
- 8.4.3 Android動畫合集之屬性動畫-初見
- 8.4.4 Android動畫合集之屬性動畫-又見
- 9.1 使用SoundPool播放音效(Duang~)
- 9.2 MediaPlayer播放音頻與視頻
- 9.3 使用Camera拍照
- 9.4 使用MediaRecord錄音
- 10.1 TelephonyManager(電話管理器)
- 10.2 SmsManager(短信管理器)
- 10.3 AudioManager(音頻管理器)
- 10.4 Vibrator(振動器)
- 10.5 AlarmManager(鬧鐘服務)
- 10.6 PowerManager(電源服務)
- 10.7 WindowManager(窗口管理服務)
- 10.8 LayoutInflater(布局服務)
- 10.9 WallpaperManager(壁紙管理器)
- 10.10 傳感器專題(1)——相關介紹
- 10.11 傳感器專題(2)——方向傳感器
- 10.12 傳感器專題(3)——加速度/陀螺儀傳感器
- 10.12 傳感器專題(4)——其他傳感器了解
- 10.14 Android GPS初涉
- 11.0《2015最新Android基礎入門教程》完結散花~