# 在 Kubernetes 部署
我們繼續在 Kubernotes 中進行部署,如下所示:
1. 使用以下內容創建`mnist.yaml`文件:
```py
apiVersion: extensions/v1beta1
kind: Deployment
metadata:
name: mnist-deployment
spec:
replicas: 3
template:
metadata: labels: app: mnist-server
spec:
containers: - name: mnist-container
image: neurasights/mnist-serving
command:
- /bin/sh
args:
- -c
- tensorflow_model_server --model_name=mnist --model_base_path=/tmp/mnist_model
ports:
- containerPort: 8500
---
apiVersion: v1
kind: Service
metadata:
labels: run: mnist-service
name: mnist-service
spec:
ports: - port: 8500
targetPort: 8500
selector:
app: mnist-server
# type: LoadBalancer
```
如果您在 AWS 或 GCP 云中運行它,則取消注釋前一個文件中的`LoadBalancer`行。 由于我們在單個節點上本地運行整個集群,因此我們沒有外部 LoadBalancer。
1. 創建 Kubernetes 部署和服務:
```py
$ kubectl create -f mnist.yaml
deployment "mnist-deployment" created
service "mnist-service" created
```
1. 檢查部署,窗格和服務:
```py
$ kubectl get deployments
NAME DESIRED CURRENT UP-TO-DATE AVAILABLE AGE
mnist-deployment 3 3 3 0 1m
$ kubectl get pods
NAME READY STATUS RESTARTS AGE
default-http-backend-bbchw 1/1 Running 3 9d
mnist-deployment-554f4b674b-pwk8z 0/1 ContainerCreating 0 1m
mnist-deployment-554f4b674b-vn6sd 0/1 ContainerCreating 0 1m
mnist-deployment-554f4b674b-zt4xt 0/1 ContainerCreating 0 1m
nginx-ingress-controller-724n5 1/1 Running 2 9d
```
```py
$ kubectl get services
NAME TYPE CLUSTER-IP EXTERNAL-IP PORT(S) AGE
default-http-backend ClusterIP 10.152.183.223 <none> 80/TCP 9d
kubernetes ClusterIP 10.152.183.1 <none> 443/TCP 9d
mnist-service LoadBalancer 10.152.183.66 <pending> 8500:32414/TCP 1m
```
```py
$ kubectl describe service mnist-service
Name: mnist-service
Namespace: default
Labels: run=mnist-service
Annotations: <none>
Selector: app=mnist-server
Type: LoadBalancer
IP: 10.152.183.66
Port: <unset> 8500/TCP
TargetPort: 8500/TCP
NodePort: <unset> 32414/TCP
Endpoints: 10.1.43.122:8500,10.1.43.123:8500,10.1.43.124:8500
Session Affinity: None
External Traffic Policy: Cluster
Events: <none>
```
1. 等到所有 pod 的狀態為`Running`:
```py
$ kubectl get pods
NAME READY STATUS RESTARTS AGE
default-http-backend-bbchw 1/1 Running 3 9d
mnist-deployment-554f4b674b-pwk8z 1/1 Running 0 3m
mnist-deployment-554f4b674b-vn6sd 1/1 Running 0 3m
mnist-deployment-554f4b674b-zt4xt 1/1 Running 0 3m
nginx-ingress-controller-724n5 1/1 Running 2 9d
```
1. 檢查其中一個 pod 的日志,您應該看到如下內容:
```py
$ kubectl logs mnist-deployment-59dfc5df64-g7prf
I tensorflow_serving/model_servers/main.cc:147] Building single TensorFlow model file config: model_name: mnist model_base_path: /tmp/mnist_model
I tensorflow_serving/model_servers/server_core.cc:441] Adding/updating models.
I tensorflow_serving/model_servers/server_core.cc:492] (Re-)adding model: mnist
I tensorflow_serving/core/basic_manager.cc:705] Successfully reserved resources to load servable {name: mnist version: 1}
I tensorflow_serving/core/loader_harness.cc:66] Approving load for servable version {name: mnist version: 1}
I tensorflow_serving/core/loader_harness.cc:74] Loading servable version {name: mnist version: 1}
I external/org_tensorflow/tensorflow/contrib/session_bundle/bundle_shim.cc:360] Attempting to load native SavedModelBundle in bundle-shim from: /tmp/mnist_model/1
I external/org_tensorflow/tensorflow/cc/saved_model/loader.cc:236] Loading SavedModel from: /tmp/mnist_model/1
I external/org_tensorflow/tensorflow/core/platform/cpu_feature_guard.cc:137] Your CPU supports instructions that this TensorFlow binary was not compiled to use: AVX2 FMA
I external/org_tensorflow/tensorflow/cc/saved_model/loader.cc:155] Restoring SavedModel bundle.
I external/org_tensorflow/tensorflow/cc/saved_model/loader.cc:190] Running LegacyInitOp on SavedModel bundle.
I external/org_tensorflow/tensorflow/cc/saved_model/loader.cc:284] Loading SavedModel: success. Took 45319 microseconds.
I tensorflow_serving/core/loader_harness.cc:86] Successfully loaded servable version {name: mnist version: 1}
E1122 12:18:04.566415410 6 ev_epoll1_linux.c:1051] grpc epoll fd: 3
I tensorflow_serving/model_servers/main.cc:288] Running ModelServer at 0.0.0.0:8500 ...
```
1. 您還可以使用以下命令查看 UI 控制臺:
```py
$ kubectl proxy xdg-open http://localhost:8001/ui
```
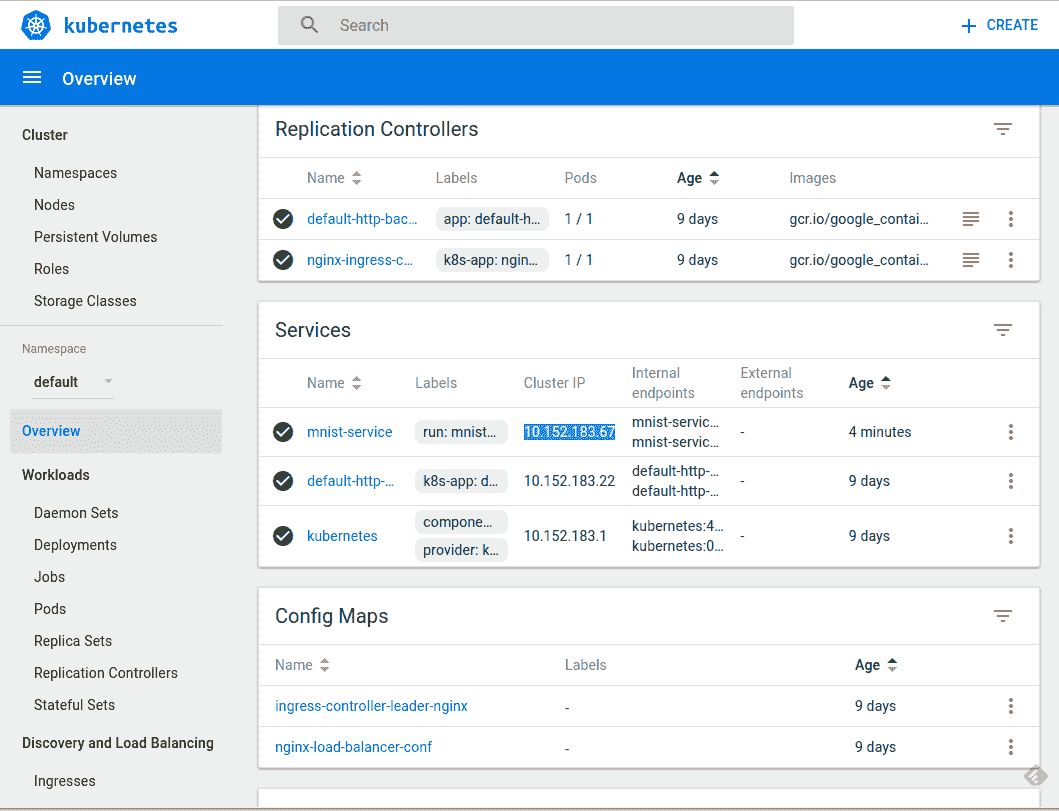
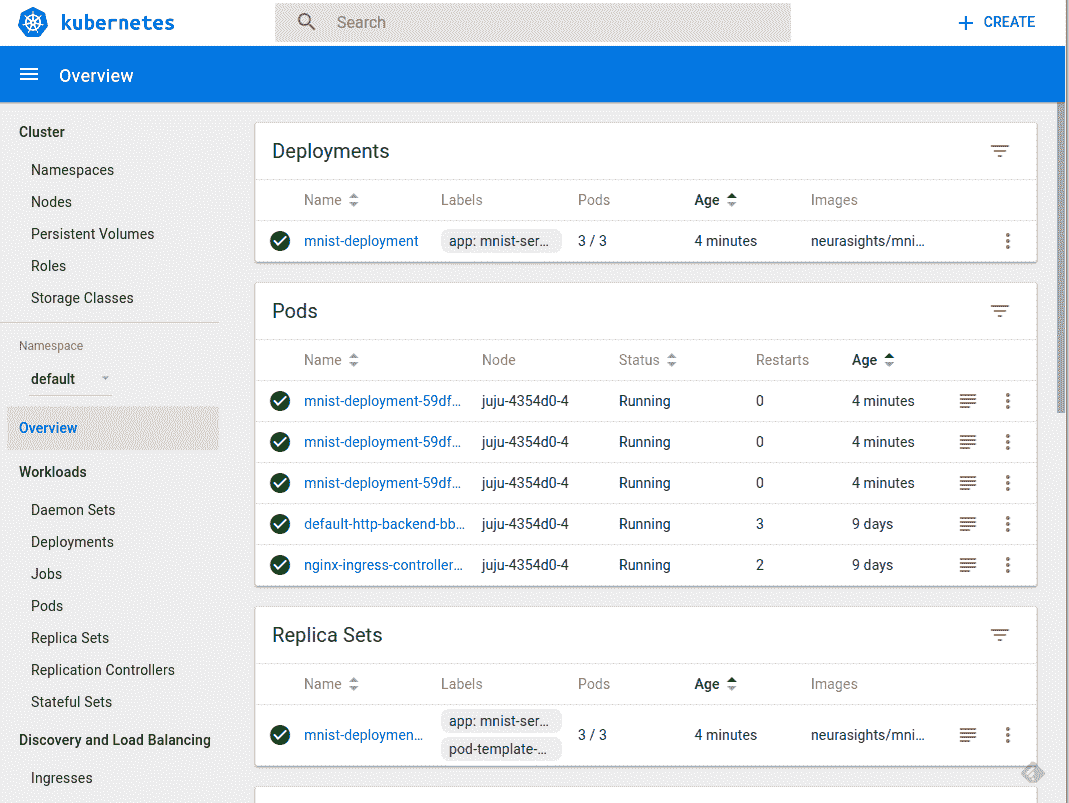
Kubernetes UI 控制臺如下圖所示:

由于我們在單個節點上本地運行集群,因此我們的服務僅在集群中公開,無法從外部訪問。登錄我們剛剛實例化的三個 pod 中的一個:
```py
$ kubectl exec -it mnist-deployment-59dfc5df64-bb24q -- /bin/bash
```
切換到主目錄并運行 MNIST 客戶端來測試服務:
```py
$ kubectl exec -it mnist-deployment-59dfc5df64-bb24q -- /bin/bash
root@mnist-deployment-59dfc5df64-bb24q:/# cd
root@mnist-deployment-59dfc5df64-bb24q:~# python serving/tensorflow_serving/example/mnist_client.py --num_tests=100 --server=10.152.183.67:8500
Extracting /tmp/train-images-idx3-ubyte.gz
Extracting /tmp/train-labels-idx1-ubyte.gz
Extracting /tmp/t10k-images-idx3-ubyte.gz
Extracting /tmp/t10k-labels-idx1-ubyte.gz
....................................................................................................
Inference error rate: 7.0%
root@mnist-deployment-59dfc5df64-bb24q:~#
```
我們學習了如何在本地單個節點上運行的 Kubernetes 集群上部署 TensorFlow 服務。您可以使用相同的概念知識在您的場所內的公共云或私有云上部署服務。
- TensorFlow 101
- 什么是 TensorFlow?
- TensorFlow 核心
- 代碼預熱 - Hello TensorFlow
- 張量
- 常量
- 操作
- 占位符
- 從 Python 對象創建張量
- 變量
- 從庫函數生成的張量
- 使用相同的值填充張量元素
- 用序列填充張量元素
- 使用隨機分布填充張量元素
- 使用tf.get_variable()獲取變量
- 數據流圖或計算圖
- 執行順序和延遲加載
- 跨計算設備執行圖 - CPU 和 GPU
- 將圖節點放置在特定的計算設備上
- 簡單放置
- 動態展示位置
- 軟放置
- GPU 內存處理
- 多個圖
- TensorBoard
- TensorBoard 最小的例子
- TensorBoard 詳情
- 總結
- TensorFlow 的高級庫
- TF Estimator - 以前的 TF 學習
- TF Slim
- TFLearn
- 創建 TFLearn 層
- TFLearn 核心層
- TFLearn 卷積層
- TFLearn 循環層
- TFLearn 正則化層
- TFLearn 嵌入層
- TFLearn 合并層
- TFLearn 估計層
- 創建 TFLearn 模型
- TFLearn 模型的類型
- 訓練 TFLearn 模型
- 使用 TFLearn 模型
- PrettyTensor
- Sonnet
- 總結
- Keras 101
- 安裝 Keras
- Keras 中的神經網絡模型
- 在 Keras 建立模型的工作流程
- 創建 Keras 模型
- 用于創建 Keras 模型的順序 API
- 用于創建 Keras 模型的函數式 API
- Keras 層
- Keras 核心層
- Keras 卷積層
- Keras 池化層
- Keras 本地連接層
- Keras 循環層
- Keras 嵌入層
- Keras 合并層
- Keras 高級激活層
- Keras 正則化層
- Keras 噪音層
- 將層添加到 Keras 模型
- 用于將層添加到 Keras 模型的順序 API
- 用于向 Keras 模型添加層的函數式 API
- 編譯 Keras 模型
- 訓練 Keras 模型
- 使用 Keras 模型進行預測
- Keras 的附加模塊
- MNIST 數據集的 Keras 序列模型示例
- 總結
- 使用 TensorFlow 進行經典機器學習
- 簡單的線性回歸
- 數據準備
- 構建一個簡單的回歸模型
- 定義輸入,參數和其他變量
- 定義模型
- 定義損失函數
- 定義優化器函數
- 訓練模型
- 使用訓練的模型進行預測
- 多元回歸
- 正則化回歸
- 套索正則化
- 嶺正則化
- ElasticNet 正則化
- 使用邏輯回歸進行分類
- 二分類的邏輯回歸
- 多類分類的邏輯回歸
- 二分類
- 多類分類
- 總結
- 使用 TensorFlow 和 Keras 的神經網絡和 MLP
- 感知機
- 多層感知機
- 用于圖像分類的 MLP
- 用于 MNIST 分類的基于 TensorFlow 的 MLP
- 用于 MNIST 分類的基于 Keras 的 MLP
- 用于 MNIST 分類的基于 TFLearn 的 MLP
- 使用 TensorFlow,Keras 和 TFLearn 的 MLP 總結
- 用于時間序列回歸的 MLP
- 總結
- 使用 TensorFlow 和 Keras 的 RNN
- 簡單循環神經網絡
- RNN 變種
- LSTM 網絡
- GRU 網絡
- TensorFlow RNN
- TensorFlow RNN 單元類
- TensorFlow RNN 模型構建類
- TensorFlow RNN 單元包裝器類
- 適用于 RNN 的 Keras
- RNN 的應用領域
- 用于 MNIST 數據的 Keras 中的 RNN
- 總結
- 使用 TensorFlow 和 Keras 的時間序列數據的 RNN
- 航空公司乘客數據集
- 加載 airpass 數據集
- 可視化 airpass 數據集
- 使用 TensorFlow RNN 模型預處理數據集
- TensorFlow 中的簡單 RNN
- TensorFlow 中的 LSTM
- TensorFlow 中的 GRU
- 使用 Keras RNN 模型預處理數據集
- 使用 Keras 的簡單 RNN
- 使用 Keras 的 LSTM
- 使用 Keras 的 GRU
- 總結
- 使用 TensorFlow 和 Keras 的文本數據的 RNN
- 詞向量表示
- 為 word2vec 模型準備數據
- 加載和準備 PTB 數據集
- 加載和準備 text8 數據集
- 準備小驗證集
- 使用 TensorFlow 的 skip-gram 模型
- 使用 t-SNE 可視化單詞嵌入
- keras 的 skip-gram 模型
- 使用 TensorFlow 和 Keras 中的 RNN 模型生成文本
- TensorFlow 中的 LSTM 文本生成
- Keras 中的 LSTM 文本生成
- 總結
- 使用 TensorFlow 和 Keras 的 CNN
- 理解卷積
- 了解池化
- CNN 架構模式 - LeNet
- 用于 MNIST 數據的 LeNet
- 使用 TensorFlow 的用于 MNIST 的 LeNet CNN
- 使用 Keras 的用于 MNIST 的 LeNet CNN
- 用于 CIFAR10 數據的 LeNet
- 使用 TensorFlow 的用于 CIFAR10 的 ConvNets
- 使用 Keras 的用于 CIFAR10 的 ConvNets
- 總結
- 使用 TensorFlow 和 Keras 的自編碼器
- 自編碼器類型
- TensorFlow 中的棧式自編碼器
- Keras 中的棧式自編碼器
- TensorFlow 中的去噪自編碼器
- Keras 中的去噪自編碼器
- TensorFlow 中的變分自編碼器
- Keras 中的變分自編碼器
- 總結
- TF 服務:生產中的 TensorFlow 模型
- 在 TensorFlow 中保存和恢復模型
- 使用保護程序類保存和恢復所有圖變量
- 使用保護程序類保存和恢復所選變量
- 保存和恢復 Keras 模型
- TensorFlow 服務
- 安裝 TF 服務
- 保存 TF 服務的模型
- 提供 TF 服務模型
- 在 Docker 容器中提供 TF 服務
- 安裝 Docker
- 為 TF 服務構建 Docker 鏡像
- 在 Docker 容器中提供模型
- Kubernetes 中的 TensorFlow 服務
- 安裝 Kubernetes
- 將 Docker 鏡像上傳到 dockerhub
- 在 Kubernetes 部署
- 總結
- 遷移學習和預訓練模型
- ImageNet 數據集
- 再訓練或微調模型
- COCO 動物數據集和預處理圖像
- TensorFlow 中的 VGG16
- 使用 TensorFlow 中預訓練的 VGG16 進行圖像分類
- TensorFlow 中的圖像預處理,用于預訓練的 VGG16
- 使用 TensorFlow 中的再訓練的 VGG16 進行圖像分類
- Keras 的 VGG16
- 使用 Keras 中預訓練的 VGG16 進行圖像分類
- 使用 Keras 中再訓練的 VGG16 進行圖像分類
- TensorFlow 中的 Inception v3
- 使用 TensorFlow 中的 Inception v3 進行圖像分類
- 使用 TensorFlow 中的再訓練的 Inception v3 進行圖像分類
- 總結
- 深度強化學習
- OpenAI Gym 101
- 將簡單的策略應用于 cartpole 游戲
- 強化學習 101
- Q 函數(在模型不可用時學習優化)
- RL 算法的探索與開發
- V 函數(模型可用時學習優化)
- 強化學習技巧
- 強化學習的樸素神經網絡策略
- 實現 Q-Learning
- Q-Learning 的初始化和離散化
- 使用 Q-Table 進行 Q-Learning
- Q-Network 或深 Q 網絡(DQN)的 Q-Learning
- 總結
- 生成性對抗網絡
- 生成性對抗網絡 101
- 建立和訓練 GAN 的最佳實踐
- 使用 TensorFlow 的簡單的 GAN
- 使用 Keras 的簡單的 GAN
- 使用 TensorFlow 和 Keras 的深度卷積 GAN
- 總結
- 使用 TensorFlow 集群的分布式模型
- 分布式執行策略
- TensorFlow 集群
- 定義集群規范
- 創建服務器實例
- 定義服務器和設備之間的參數和操作
- 定義并訓練圖以進行異步更新
- 定義并訓練圖以進行同步更新
- 總結
- 移動和嵌入式平臺上的 TensorFlow 模型
- 移動平臺上的 TensorFlow
- Android 應用中的 TF Mobile
- Android 上的 TF Mobile 演示
- iOS 應用中的 TF Mobile
- iOS 上的 TF Mobile 演示
- TensorFlow Lite
- Android 上的 TF Lite 演示
- iOS 上的 TF Lite 演示
- 總結
- R 中的 TensorFlow 和 Keras
- 在 R 中安裝 TensorFlow 和 Keras 軟件包
- R 中的 TF 核心 API
- R 中的 TF 估計器 API
- R 中的 Keras API
- R 中的 TensorBoard
- R 中的 tfruns 包
- 總結
- 調試 TensorFlow 模型
- 使用tf.Session.run()獲取張量值
- 使用tf.Print()打印張量值
- 用tf.Assert()斷言條件
- 使用 TensorFlow 調試器(tfdbg)進行調試
- 總結
- 張量處理單元
