
# 使用 Keras 的簡單的 GAN
您可以按照 Jupyter 筆記本中的代碼`ch-14a_SimpleGAN`。
現在讓我們在 Keras 實現相同的模型:
1. 超參數定義與上一節保持一致:
```py
# graph hyperparameters
g_learning_rate = 0.00001
d_learning_rate = 0.01
n_x = 784 # number of pixels in the MNIST image
# number of hidden layers for generator and discriminator
g_n_layers = 3
d_n_layers = 1
# neurons in each hidden layer
g_n_neurons = [256, 512, 1024]
d_n_neurons = [256]
```
1. 接下來,定義生成器網絡:
```py
# define generator
g_model = Sequential()
g_model.add(Dense(units=g_n_neurons[0],
input_shape=(n_z,),
name='g_0'))
g_model.add(LeakyReLU())
for i in range(1,g_n_layers):
g_model.add(Dense(units=g_n_neurons[i],
name='g_{}'.format(i)
))
g_model.add(LeakyReLU())
g_model.add(Dense(units=n_x, activation='tanh',name='g_out'))
print('Generator:')
g_model.summary()
g_model.compile(loss='binary_crossentropy',
optimizer=keras.optimizers.Adam(lr=g_learning_rate)
)
```
這就是生成器模型的樣子:
```py
Generator:
_________________________________________________________________
Layer (type) Output Shape Param #
=================================================================
g_0 (Dense) (None, 256) 65792
_________________________________________________________________
leaky_re_lu_1 (LeakyReLU) (None, 256) 0
_________________________________________________________________
g_1 (Dense) (None, 512) 131584
_________________________________________________________________
leaky_re_lu_2 (LeakyReLU) (None, 512) 0
_________________________________________________________________
g_2 (Dense) (None, 1024) 525312
_________________________________________________________________
leaky_re_lu_3 (LeakyReLU) (None, 1024) 0
_________________________________________________________________
g_out (Dense) (None, 784) 803600
=================================================================
Total params: 1,526,288
Trainable params: 1,526,288
Non-trainable params: 0
_________________________________________________________________
```
1. 在 Keras 示例中,我們沒有定義兩個判別器網絡,就像我們在 TensorFlow 示例中定義的那樣。相反,我們定義一個判別器網絡,然后將生成器和判別器網絡縫合到 GAN 網絡中。然后,GAN 網絡僅用于訓練生成器參數,判別器網絡用于訓練判別器參數:
```py
# define discriminator
d_model = Sequential()
d_model.add(Dense(units=d_n_neurons[0],
input_shape=(n_x,),
name='d_0'
))
d_model.add(LeakyReLU())
d_model.add(Dropout(0.3))
for i in range(1,d_n_layers):
d_model.add(Dense(units=d_n_neurons[i],
name='d_{}'.format(i)
))
d_model.add(LeakyReLU())
d_model.add(Dropout(0.3))
d_model.add(Dense(units=1, activation='sigmoid',name='d_out'))
print('Discriminator:')
d_model.summary()
d_model.compile(loss='binary_crossentropy',
optimizer=keras.optimizers.SGD(lr=d_learning_rate)
)
```
這是判別器模型的外觀:
```py
Discriminator:
_________________________________________________________________
Layer (type) Output Shape Param #
=================================================================
d_0 (Dense) (None, 256) 200960
_________________________________________________________________
leaky_re_lu_4 (LeakyReLU) (None, 256) 0
_________________________________________________________________
dropout_1 (Dropout) (None, 256) 0
_________________________________________________________________
d_out (Dense) (None, 1) 257
=================================================================
Total params: 201,217
Trainable params: 201,217
Non-trainable params: 0
_________________________________________________________________
```
1. 接下來,定義 GAN 網絡,并將判別器模型的可訓練屬性轉換為`false`,因為 GAN 僅用于訓練生成器:
```py
# define GAN network
d_model.trainable=False
z_in = Input(shape=(n_z,),name='z_in')
x_in = g_model(z_in)
gan_out = d_model(x_in)
gan_model = Model(inputs=z_in,outputs=gan_out,name='gan')
print('GAN:')
gan_model.summary()
```
```py
gan_model.compile(loss='binary_crossentropy',
optimizer=keras.optimizers.Adam(lr=g_learning_rate)
)
```
這就是 GAN 模型的樣子:
```py
GAN:
_________________________________________________________________
Layer (type) Output Shape Param #
=================================================================
z_in (InputLayer) (None, 256) 0
_________________________________________________________________
sequential_1 (Sequential) (None, 784) 1526288
_________________________________________________________________
sequential_2 (Sequential) (None, 1) 201217
=================================================================
Total params: 1,727,505
Trainable params: 1,526,288
Non-trainable params: 201,217
_________________________________________________________________
```
1. 太好了,現在我們已經定義了三個模型,我們必須訓練模型。訓練按照以下算法進行:
```py
For each epoch:
For each batch: get real images x_batch
generate noise z_batch
generate images g_batch using generator model
combine g_batch and x_batch into x_in and create labels y_out
set discriminator model as trainable
train discriminator using x_in and y_out
generate noise z_batch
set x_in = z_batch and labels y_out = 1
set discriminator model as non-trainable
train gan model using x_in and y_out,
(effectively training generator model)
```
為了設置標簽,我們分別對真實和假圖像應用標簽 0.9 和 0.1。通常,建議您使用標簽平滑,通過為假數據選擇 0.0 到 0.3 的隨機值,為實際數據選擇 0.8 到 1.0。
以下是筆記本電腦訓練的完整代碼:
```py
n_epochs = 400
batch_size = 100
n_batches = int(mnist.train.num_examples / batch_size)
n_epochs_print = 50
for epoch in range(n_epochs+1):
epoch_d_loss = 0.0
epoch_g_loss = 0.0
for batch in range(n_batches):
x_batch, _ = mnist.train.next_batch(batch_size)
x_batch = norm(x_batch)
z_batch = np.random.uniform(-1.0,1.0,size=[batch_size,n_z])
g_batch = g_model.predict(z_batch)
x_in = np.concatenate([x_batch,g_batch])
y_out = np.ones(batch_size*2)
y_out[:batch_size]=0.9
y_out[batch_size:]=0.1
d_model.trainable=True
batch_d_loss = d_model.train_on_batch(x_in,y_out)
z_batch = np.random.uniform(-1.0,1.0,size=[batch_size,n_z])
x_in=z_batch
y_out = np.ones(batch_size)
d_model.trainable=False
batch_g_loss = gan_model.train_on_batch(x_in,y_out)
epoch_d_loss += batch_d_loss
epoch_g_loss += batch_g_loss
if epoch%n_epochs_print == 0:
average_d_loss = epoch_d_loss / n_batches
average_g_loss = epoch_g_loss / n_batches
print('epoch: {0:04d} d_loss = {1:0.6f} g_loss = {2:0.6f}'
.format(epoch,average_d_loss,average_g_loss))
# predict images using generator model trained
x_pred = g_model.predict(z_test)
display_images(x_pred.reshape(-1,pixel_size,pixel_size))
```
我們每 50 個周期印刷結果,最多 350 個周期:
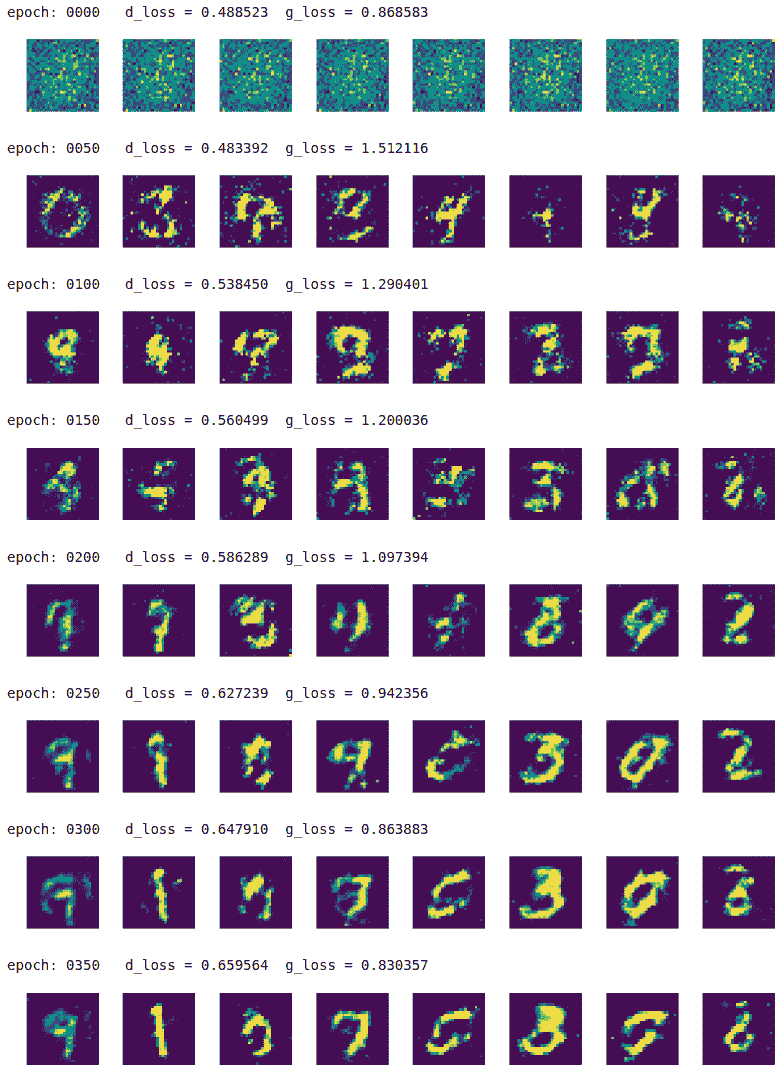
該模型慢慢地學習從隨機噪聲中生成高質量的手寫數字圖像。
GAN 有如此多的變化,它將需要另一本書來涵蓋所有不同類型的 GAN。但是,實現技術幾乎與我們在此處所示的相似。
- TensorFlow 101
- 什么是 TensorFlow?
- TensorFlow 核心
- 代碼預熱 - Hello TensorFlow
- 張量
- 常量
- 操作
- 占位符
- 從 Python 對象創建張量
- 變量
- 從庫函數生成的張量
- 使用相同的值填充張量元素
- 用序列填充張量元素
- 使用隨機分布填充張量元素
- 使用tf.get_variable()獲取變量
- 數據流圖或計算圖
- 執行順序和延遲加載
- 跨計算設備執行圖 - CPU 和 GPU
- 將圖節點放置在特定的計算設備上
- 簡單放置
- 動態展示位置
- 軟放置
- GPU 內存處理
- 多個圖
- TensorBoard
- TensorBoard 最小的例子
- TensorBoard 詳情
- 總結
- TensorFlow 的高級庫
- TF Estimator - 以前的 TF 學習
- TF Slim
- TFLearn
- 創建 TFLearn 層
- TFLearn 核心層
- TFLearn 卷積層
- TFLearn 循環層
- TFLearn 正則化層
- TFLearn 嵌入層
- TFLearn 合并層
- TFLearn 估計層
- 創建 TFLearn 模型
- TFLearn 模型的類型
- 訓練 TFLearn 模型
- 使用 TFLearn 模型
- PrettyTensor
- Sonnet
- 總結
- Keras 101
- 安裝 Keras
- Keras 中的神經網絡模型
- 在 Keras 建立模型的工作流程
- 創建 Keras 模型
- 用于創建 Keras 模型的順序 API
- 用于創建 Keras 模型的函數式 API
- Keras 層
- Keras 核心層
- Keras 卷積層
- Keras 池化層
- Keras 本地連接層
- Keras 循環層
- Keras 嵌入層
- Keras 合并層
- Keras 高級激活層
- Keras 正則化層
- Keras 噪音層
- 將層添加到 Keras 模型
- 用于將層添加到 Keras 模型的順序 API
- 用于向 Keras 模型添加層的函數式 API
- 編譯 Keras 模型
- 訓練 Keras 模型
- 使用 Keras 模型進行預測
- Keras 的附加模塊
- MNIST 數據集的 Keras 序列模型示例
- 總結
- 使用 TensorFlow 進行經典機器學習
- 簡單的線性回歸
- 數據準備
- 構建一個簡單的回歸模型
- 定義輸入,參數和其他變量
- 定義模型
- 定義損失函數
- 定義優化器函數
- 訓練模型
- 使用訓練的模型進行預測
- 多元回歸
- 正則化回歸
- 套索正則化
- 嶺正則化
- ElasticNet 正則化
- 使用邏輯回歸進行分類
- 二分類的邏輯回歸
- 多類分類的邏輯回歸
- 二分類
- 多類分類
- 總結
- 使用 TensorFlow 和 Keras 的神經網絡和 MLP
- 感知機
- 多層感知機
- 用于圖像分類的 MLP
- 用于 MNIST 分類的基于 TensorFlow 的 MLP
- 用于 MNIST 分類的基于 Keras 的 MLP
- 用于 MNIST 分類的基于 TFLearn 的 MLP
- 使用 TensorFlow,Keras 和 TFLearn 的 MLP 總結
- 用于時間序列回歸的 MLP
- 總結
- 使用 TensorFlow 和 Keras 的 RNN
- 簡單循環神經網絡
- RNN 變種
- LSTM 網絡
- GRU 網絡
- TensorFlow RNN
- TensorFlow RNN 單元類
- TensorFlow RNN 模型構建類
- TensorFlow RNN 單元包裝器類
- 適用于 RNN 的 Keras
- RNN 的應用領域
- 用于 MNIST 數據的 Keras 中的 RNN
- 總結
- 使用 TensorFlow 和 Keras 的時間序列數據的 RNN
- 航空公司乘客數據集
- 加載 airpass 數據集
- 可視化 airpass 數據集
- 使用 TensorFlow RNN 模型預處理數據集
- TensorFlow 中的簡單 RNN
- TensorFlow 中的 LSTM
- TensorFlow 中的 GRU
- 使用 Keras RNN 模型預處理數據集
- 使用 Keras 的簡單 RNN
- 使用 Keras 的 LSTM
- 使用 Keras 的 GRU
- 總結
- 使用 TensorFlow 和 Keras 的文本數據的 RNN
- 詞向量表示
- 為 word2vec 模型準備數據
- 加載和準備 PTB 數據集
- 加載和準備 text8 數據集
- 準備小驗證集
- 使用 TensorFlow 的 skip-gram 模型
- 使用 t-SNE 可視化單詞嵌入
- keras 的 skip-gram 模型
- 使用 TensorFlow 和 Keras 中的 RNN 模型生成文本
- TensorFlow 中的 LSTM 文本生成
- Keras 中的 LSTM 文本生成
- 總結
- 使用 TensorFlow 和 Keras 的 CNN
- 理解卷積
- 了解池化
- CNN 架構模式 - LeNet
- 用于 MNIST 數據的 LeNet
- 使用 TensorFlow 的用于 MNIST 的 LeNet CNN
- 使用 Keras 的用于 MNIST 的 LeNet CNN
- 用于 CIFAR10 數據的 LeNet
- 使用 TensorFlow 的用于 CIFAR10 的 ConvNets
- 使用 Keras 的用于 CIFAR10 的 ConvNets
- 總結
- 使用 TensorFlow 和 Keras 的自編碼器
- 自編碼器類型
- TensorFlow 中的棧式自編碼器
- Keras 中的棧式自編碼器
- TensorFlow 中的去噪自編碼器
- Keras 中的去噪自編碼器
- TensorFlow 中的變分自編碼器
- Keras 中的變分自編碼器
- 總結
- TF 服務:生產中的 TensorFlow 模型
- 在 TensorFlow 中保存和恢復模型
- 使用保護程序類保存和恢復所有圖變量
- 使用保護程序類保存和恢復所選變量
- 保存和恢復 Keras 模型
- TensorFlow 服務
- 安裝 TF 服務
- 保存 TF 服務的模型
- 提供 TF 服務模型
- 在 Docker 容器中提供 TF 服務
- 安裝 Docker
- 為 TF 服務構建 Docker 鏡像
- 在 Docker 容器中提供模型
- Kubernetes 中的 TensorFlow 服務
- 安裝 Kubernetes
- 將 Docker 鏡像上傳到 dockerhub
- 在 Kubernetes 部署
- 總結
- 遷移學習和預訓練模型
- ImageNet 數據集
- 再訓練或微調模型
- COCO 動物數據集和預處理圖像
- TensorFlow 中的 VGG16
- 使用 TensorFlow 中預訓練的 VGG16 進行圖像分類
- TensorFlow 中的圖像預處理,用于預訓練的 VGG16
- 使用 TensorFlow 中的再訓練的 VGG16 進行圖像分類
- Keras 的 VGG16
- 使用 Keras 中預訓練的 VGG16 進行圖像分類
- 使用 Keras 中再訓練的 VGG16 進行圖像分類
- TensorFlow 中的 Inception v3
- 使用 TensorFlow 中的 Inception v3 進行圖像分類
- 使用 TensorFlow 中的再訓練的 Inception v3 進行圖像分類
- 總結
- 深度強化學習
- OpenAI Gym 101
- 將簡單的策略應用于 cartpole 游戲
- 強化學習 101
- Q 函數(在模型不可用時學習優化)
- RL 算法的探索與開發
- V 函數(模型可用時學習優化)
- 強化學習技巧
- 強化學習的樸素神經網絡策略
- 實現 Q-Learning
- Q-Learning 的初始化和離散化
- 使用 Q-Table 進行 Q-Learning
- Q-Network 或深 Q 網絡(DQN)的 Q-Learning
- 總結
- 生成性對抗網絡
- 生成性對抗網絡 101
- 建立和訓練 GAN 的最佳實踐
- 使用 TensorFlow 的簡單的 GAN
- 使用 Keras 的簡單的 GAN
- 使用 TensorFlow 和 Keras 的深度卷積 GAN
- 總結
- 使用 TensorFlow 集群的分布式模型
- 分布式執行策略
- TensorFlow 集群
- 定義集群規范
- 創建服務器實例
- 定義服務器和設備之間的參數和操作
- 定義并訓練圖以進行異步更新
- 定義并訓練圖以進行同步更新
- 總結
- 移動和嵌入式平臺上的 TensorFlow 模型
- 移動平臺上的 TensorFlow
- Android 應用中的 TF Mobile
- Android 上的 TF Mobile 演示
- iOS 應用中的 TF Mobile
- iOS 上的 TF Mobile 演示
- TensorFlow Lite
- Android 上的 TF Lite 演示
- iOS 上的 TF Lite 演示
- 總結
- R 中的 TensorFlow 和 Keras
- 在 R 中安裝 TensorFlow 和 Keras 軟件包
- R 中的 TF 核心 API
- R 中的 TF 估計器 API
- R 中的 Keras API
- R 中的 TensorBoard
- R 中的 tfruns 包
- 總結
- 調試 TensorFlow 模型
- 使用tf.Session.run()獲取張量值
- 使用tf.Print()打印張量值
- 用tf.Assert()斷言條件
- 使用 TensorFlow 調試器(tfdbg)進行調試
- 總結
- 張量處理單元