# Qt5 中的繪圖
> 原文: [http://zetcode.com/gui/qt5/painting/](http://zetcode.com/gui/qt5/painting/)
在 Qt5 C++ 編程教程的這一部分中,我們將進行繪圖。
當我們在 Qt5 中進行繪圖時,`QPainter`類非常有用。 對`paintEvent()`方法的反應是使用`QPainter`類完成的。
## 直線
在第一個示例中,我們將在窗口的客戶區域上繪制一些線。
`lines.h`
```cpp
#pragma once
#include <QWidget>
class Lines : public QWidget {
public:
Lines(QWidget *parent = 0);
protected:
void paintEvent(QPaintEvent *event);
void drawLines(QPainter *qp);
};
```
這是頭文件。
`lines.cpp`
```cpp
#include <QPainter>
#include "lines.h"
Lines::Lines(QWidget *parent)
: QWidget(parent)
{ }
void Lines::paintEvent(QPaintEvent *e) {
Q_UNUSED(e);
QPainter qp(this);
drawLines(&qp);
}
void Lines::drawLines(QPainter *qp) {
QPen pen(Qt::black, 2, Qt::SolidLine);
qp->setPen(pen);
qp->drawLine(20, 40, 250, 40);
pen.setStyle(Qt::DashLine);
qp->setPen(pen);
qp->drawLine(20, 80, 250, 80);
pen.setStyle(Qt::DashDotLine);
qp->setPen(pen);
qp->drawLine(20, 120, 250, 120);
pen.setStyle(Qt::DotLine);
qp->setPen(pen);
qp->drawLine(20, 160, 250, 160);
pen.setStyle(Qt::DashDotDotLine);
qp->setPen(pen);
qp->drawLine(20, 200, 250, 200);
QVector<qreal> dashes;
qreal space = 4;
dashes << 1 << space << 5 << space;
pen.setStyle(Qt::CustomDashLine);
pen.setDashPattern(dashes);
qp->setPen(pen);
qp->drawLine(20, 240, 250, 240);
}
```
我們在窗口上畫了六行; 每條線都有不同的筆樣式。
```cpp
void Lines::paintEvent(QPaintEvent *e) {
Q_UNUSED(e);
QPainter qp(this);
drawLines(&qp);
}
```
更新小部件時將調用`paintEvent()`。 在這里我們創建`QPainter`對象并進行繪制。 由于我們不使用`QPaintEvent`對象,因此可以通過`Q_UNUSED`宏來抑制編譯器警告。 實際圖形委托給`drawLines()`方法。
```cpp
QPen pen(Qt::black, 2, Qt::SolidLine);
qp->setPen(pen);
```
我們創建一個`QPen`對象。 筆是實心的,2px 粗,是黑色的。 筆用于繪制線條和形狀輪廓。 使用`setPen()`方法將筆設置為畫家對象。
```cpp
qp->drawLine(20, 40, 250, 40);
```
`drawLine()`方法畫一條線。 四個參數是窗口上兩個點的坐標。
```cpp
pen.setStyle(Qt::DashLine);
```
`QPen`行的`setStyle()`方法設置筆樣式-`Qt::DashLine`。
`main.cpp`
```cpp
#include <QApplication>
#include "lines.h"
int main(int argc, char *argv[]) {
QApplication app(argc, argv);
Lines window;
window.resize(280, 270);
window.setWindowTitle("Lines");
window.show();
return app.exec();
}
```
這是主文件。
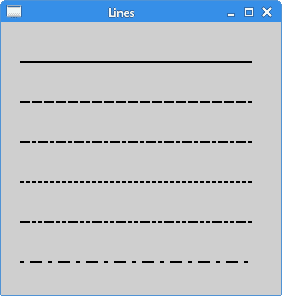
圖:直線
## 顏色
顏色是代表紅色,綠色和藍色(RGB)強度值的組合的對象。 有效的 RGB 值在 0 到 255 之間。在下面的示例中,我們繪制了九個矩形,其中填充了九種不同的顏色。
`colours.h`
```cpp
#pragma once
#include <QWidget>
class Colours : public QWidget {
public:
Colours(QWidget *parent = 0);
protected:
void paintEvent(QPaintEvent *e);
private:
void doPainting();
};
```
這是頭文件。
`colours.cpp`
```cpp
#include <QPainter>
#include "colours.h"
Colours::Colours(QWidget *parent)
: QWidget(parent)
{ }
void Colours::paintEvent(QPaintEvent *e) {
Q_UNUSED(e);
doPainting();
}
void Colours::doPainting() {
QPainter painter(this);
painter.setPen(QColor("#d4d4d4"));
painter.setBrush(QBrush("#c56c00"));
painter.drawRect(10, 15, 90, 60);
painter.setBrush(QBrush("#1ac500"));
painter.drawRect(130, 15, 90, 60);
painter.setBrush(QBrush("#539e47"));
painter.drawRect(250, 15, 90, 60);
painter.setBrush(QBrush("#004fc5"));
painter.drawRect(10, 105, 90, 60);
painter.setBrush(QBrush("#c50024"));
painter.drawRect(130, 105, 90, 60);
painter.setBrush(QBrush("#9e4757"));
painter.drawRect(250, 105, 90, 60);
painter.setBrush(QBrush("#5f3b00"));
painter.drawRect(10, 195, 90, 60);
painter.setBrush(QBrush("#4c4c4c"));
painter.drawRect(130, 195, 90, 60);
painter.setBrush(QBrush("#785f36"));
painter.drawRect(250, 195, 90, 60);
}
```
我們繪制九個不同顏色填充的矩形。 矩形的輪廓是灰色的。
```cpp
painter.setBrush(QBrush("#c56c00"));
painter.drawRect(10, 15, 90, 60);
```
`QBrush`類定義`QPainter`繪制的形狀的填充圖案。 `drawRect()`方法繪制一個矩形。 它繪制一個矩形,其左上角位于 x,y 點,并具有給定的寬度和高度。 我們使用十六進制表示法來指定顏色值。
`main.cpp`
```cpp
#include <QApplication>
#include "colours.h"
int main(int argc, char *argv[]) {
QApplication app(argc, argv);
Colours window;
window.resize(360, 280);
window.setWindowTitle("Colours");
window.show();
return app.exec();
}
```
這是主文件。
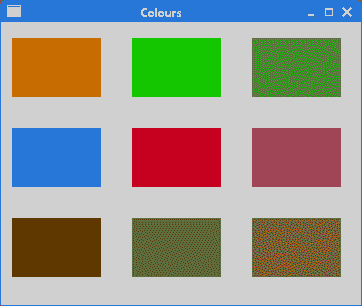
圖:顏色
## 圖案
以下編程代碼示例與上一個示例相似。 這次我們用各種預定義的圖案填充矩形。
`patterns.h`
```cpp
#pragma once
#include <QWidget>
class Patterns : public QWidget {
public:
Patterns(QWidget *parent = 0);
protected:
void paintEvent(QPaintEvent *e);
private:
void doPainting();
};
```
這是頭文件。
`patterns.cpp`
```cpp
#include <QApplication>
#include <QPainter>
#include "patterns.h"
Patterns::Patterns(QWidget *parent)
: QWidget(parent)
{ }
void Patterns::paintEvent(QPaintEvent *e) {
Q_UNUSED(e);
doPainting();
}
void Patterns::doPainting() {
QPainter painter(this);
painter.setPen(Qt::NoPen);
painter.setBrush(Qt::HorPattern);
painter.drawRect(10, 15, 90, 60);
painter.setBrush(Qt::VerPattern);
painter.drawRect(130, 15, 90, 60);
painter.setBrush(Qt::CrossPattern);
painter.drawRect(250, 15, 90, 60);
painter.setBrush(Qt::Dense7Pattern);
painter.drawRect(10, 105, 90, 60);
painter.setBrush(Qt::Dense6Pattern);
painter.drawRect(130, 105, 90, 60);
painter.setBrush(Qt::Dense5Pattern);
painter.drawRect(250, 105, 90, 60);
painter.setBrush(Qt::BDiagPattern);
painter.drawRect(10, 195, 90, 60);
painter.setBrush(Qt::FDiagPattern);
painter.drawRect(130, 195, 90, 60);
painter.setBrush(Qt::DiagCrossPattern);
painter.drawRect(250, 195, 90, 60);
}
```
我們用各種畫筆圖案繪制了九個矩形。
```cpp
painter.setBrush(Qt::HorPattern);
painter.drawRect(10, 15, 90, 60);
```
我們繪制具有特定圖案的矩形。 `Qt::HorPattern`是用于創建水平線條圖案的常數。
`main.cpp`
```cpp
#include <QDesktopWidget>
#include <QApplication>
#include "patterns.h"
int main(int argc, char *argv[]) {
QApplication app(argc, argv);
Patterns window;
window.resize(350, 280);
window.setWindowTitle("Patterns");
window.show();
return app.exec();
}
```
這是主文件。
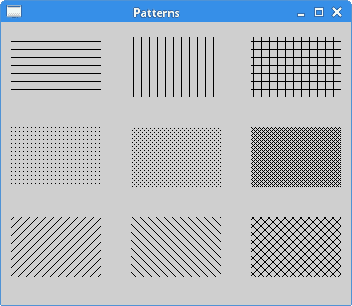
圖:圖案
## 透明矩形
透明性是指能夠透視材料的質量。 了解透明度的最簡單方法是想象一塊玻璃或水。 從技術上講,光線可以穿過玻璃,這樣我們就可以看到玻璃后面的物體。
在計算機圖形學中,我們可以使用 alpha 合成來實現透明效果。 Alpha 合成是將圖像與背景組合以創建部分透明外觀的過程。 合成過程使用 Alpha 通道。
`transparent_rectangles.h`
```cpp
#pragma once
#include <QWidget>
class TransparentRectangles : public QWidget {
public:
TransparentRectangles(QWidget *parent = 0);
protected:
void paintEvent(QPaintEvent *event);
void doPainting();
};
```
這是頭文件。
`transparent_rectangles.cpp`
```cpp
#include <QApplication>
#include <QPainter>
#include <QPainterPath>
#include "transparent_rectangles.h"
TransparentRectangles::TransparentRectangles(QWidget *parent)
: QWidget(parent)
{ }
void TransparentRectangles::paintEvent(QPaintEvent *e) {
Q_UNUSED(e);
doPainting();
}
void TransparentRectangles::doPainting() {
QPainter painter(this);
for (int i=1; i<=11; i++) {
painter.setOpacity(i*0.1);
painter.fillRect(50*i, 20, 40, 40, Qt::darkGray);
}
}
```
該示例繪制了十個透明度不同的矩形。
```cpp
painter.setOpacity(i*0.1);
```
`setOpacity()`方法設置畫家的不透明度。 該值應在 0.0 到 1.0 的范圍內,其中 0.0 是完全透明的,而 1.0 是完全不透明的。
`main.cpp`
```cpp
#include <QDesktopWidget>
#include <QApplication>
#include "transparent_rectangles.h"
int main(int argc, char *argv[]) {
QApplication app(argc, argv);
TransparentRectangles window;
window.resize(630, 90);
window.setWindowTitle("Transparent rectangles");
window.show();
return app.exec();
}
```
這是主文件。

圖:透明矩形
## 甜甜圈
在下面的示例中,我們將創建一個甜甜圈形狀。
`donut.h`
```cpp
#pragma once
#include <QWidget>
class Donut : public QWidget {
public:
Donut(QWidget *parent = 0);
protected:
void paintEvent(QPaintEvent *e);
private:
void doPainting();
};
```
這是頭文件。
`donut.cpp`
```cpp
#include <QApplication>
#include <QPainter>
#include "donut.h"
Donut::Donut(QWidget *parent)
: QWidget(parent)
{ }
void Donut::paintEvent(QPaintEvent *e) {
Q_UNUSED(e);
doPainting();
}
void Donut::doPainting() {
QPainter painter(this);
painter.setPen(QPen(QBrush("#535353"), 0.5));
painter.setRenderHint(QPainter::Antialiasing);
int h = height();
int w = width();
painter.translate(QPoint(w/2, h/2));
for (qreal rot=0; rot < 360.0; rot+=5.0 ) {
painter.drawEllipse(-125, -40, 250, 80);
painter.rotate(5.0);
}
}
```
“甜甜圈”是類似于此類食物的高級幾何形狀。 我們通過繪制 72 個旋轉橢圓來創建它。
```cpp
painter.setRenderHint(QPainter::Antialiasing);
```
我們將以抗鋸齒模式繪制。 渲染將具有更高的質量。
```cpp
int h = height();
int w = width();
painter.translate(QPoint(w/2, h/2));
```
這些行將坐標系的起點移到窗口的中間。 默認情況下,它位于 0、0 點。 換句話說,在窗口的左上角。 通過移動坐標系,繪圖會容易得多。
```cpp
for (qreal rot=0; rot < 360.0; rot+=5.0 ) {
painter.drawEllipse(-125, -40, 250, 80);
painter.rotate(5.0);
}
```
在此循環中,我們繪制了 72 個旋轉的橢圓。
`main.cpp`
```cpp
#include <QDesktopWidget>
#include <QApplication>
#include "donut.h"
int main(int argc, char *argv[]) {
QApplication app(argc, argv);
Donut window;
window.resize(350, 280);
window.setWindowTitle("Donut");
window.show();
return app.exec();
}
```
這是主文件。
## 形狀
Qt5 繪圖 API 可以繪制各種形狀。 以下編程代碼示例顯示了其中一些。
`shapes.h`
```cpp
#pragma once
#include <QWidget>
class Shapes : public QWidget {
public:
Shapes(QWidget *parent = 0);
protected:
void paintEvent(QPaintEvent *e);
private:
void doPainting();
};
```
這是頭文件。
`shapes.cpp`
```cpp
#include <QApplication>
#include <QPainter>
#include <QPainterPath>
#include "shapes.h"
Shapes::Shapes(QWidget *parent)
: QWidget(parent)
{ }
void Shapes::paintEvent(QPaintEvent *e) {
Q_UNUSED(e);
doPainting();
}
void Shapes::doPainting() {
QPainter painter(this);
painter.setRenderHint(QPainter::Antialiasing);
painter.setPen(QPen(QBrush("#888"), 1));
painter.setBrush(QBrush(QColor("#888")));
QPainterPath path1;
path1.moveTo(5, 5);
path1.cubicTo(40, 5, 50, 50, 99, 99);
path1.cubicTo(5, 99, 50, 50, 5, 5);
painter.drawPath(path1);
painter.drawPie(130, 20, 90, 60, 30*16, 120*16);
painter.drawChord(240, 30, 90, 60, 0, 16*180);
painter.drawRoundRect(20, 120, 80, 50);
QPolygon polygon({QPoint(130, 140), QPoint(180, 170), QPoint(180, 140),
QPoint(220, 110), QPoint(140, 100)});
painter.drawPolygon(polygon);
painter.drawRect(250, 110, 60, 60);
QPointF baseline(20, 250);
QFont font("Georgia", 55);
QPainterPath path2;
path2.addText(baseline, font, "Q");
painter.drawPath(path2);
painter.drawEllipse(140, 200, 60, 60);
painter.drawEllipse(240, 200, 90, 60);
}
```
我們繪制了九種不同的形狀。
```cpp
QPainterPath path1;
path1.moveTo(5, 5);
path1.cubicTo(40, 5, 50, 50, 99, 99);
path1.cubicTo(5, 99, 50, 50, 5, 5);
painter.drawPath(path1);
```
`QPainterPath`是用于創建復雜形狀的對象。 我們用它來繪制貝塞爾曲線。
```cpp
painter.drawPie(130, 20, 90, 60, 30*16, 120*16);
painter.drawChord(240, 30, 90, 60, 0, 16*180);
painter.drawRoundRect(20, 120, 80, 50);
```
這些代碼行繪制了一個餅圖,一個和弦和一個圓角矩形。
```cpp
QPolygon polygon({QPoint(130, 140), QPoint(180, 170), QPoint(180, 140),
QPoint(220, 110), QPoint(140, 100)});
painter.drawPolygon(polygon);
```
在這里,我們使用`drawPolygon()`方法繪制一個多邊形。 多邊形由五個點組成。
```cpp
QPointF baseline(20, 250);
QFont font("Georgia", 55);
QPainterPath path2;
path2.addText(baseline, font, "Q");
painter.drawPath(path2);
```
Qt5 允許基于字體字符創建路徑。
```cpp
painter.drawEllipse(140, 200, 60, 60);
painter.drawEllipse(240, 200, 90, 60);
```
`drawEllipse()`也會繪制一個橢圓和一個圓。 圓是橢圓的特例。 參數是矩形起點的 x 和 y 坐標以及橢圓邊界矩形的寬度和高度。
`main.cpp`
```cpp
#include <QDesktopWidget>
#include <QApplication>
#include "shapes.h"
int main(int argc, char *argv[]) {
QApplication app(argc, argv);
Shapes window;
window.resize(350, 280);
window.setWindowTitle("Shapes");
window.show();
return app.exec();
}
```
這是示例的主文件。
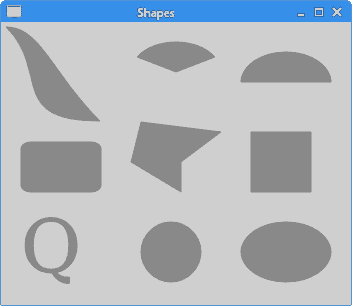
圖:形狀
## 漸變
在計算機圖形學中,漸變是從淺到深或從一種顏色到另一種顏色的陰影的平滑混合。 在 2D 繪圖程序和繪圖程序中,漸變用于創建彩色背景和特殊效果以及模擬燈光和陰影。
以下代碼示例顯示了如何創建線性漸變。
`linear_gradients.h`
```cpp
#pragma once
#include <QWidget>
class LinearGradients : public QWidget {
public:
LinearGradients(QWidget *parent = 0);
protected:
void paintEvent(QPaintEvent *e);
private:
void doPainting();
};
```
這是頭文件。
`linear_gradients.cpp`
```cpp
#include <QApplication>
#include <QPainter>
#include "linear_gradients.h"
LinearGradients::LinearGradients(QWidget *parent)
: QWidget(parent)
{ }
void LinearGradients::paintEvent(QPaintEvent *e) {
Q_UNUSED(e);
doPainting();
}
void LinearGradients::doPainting() {
QPainter painter(this);
QLinearGradient grad1(0, 20, 0, 110);
grad1.setColorAt(0.1, Qt::black);
grad1.setColorAt(0.5, Qt::yellow);
grad1.setColorAt(0.9, Qt::black);
painter.fillRect(20, 20, 300, 90, grad1);
QLinearGradient grad2(0, 55, 250, 0);
grad2.setColorAt(0.2, Qt::black);
grad2.setColorAt(0.5, Qt::red);
grad2.setColorAt(0.8, Qt::black);
painter.fillRect(20, 140, 300, 100, grad2);
}
```
在代碼示例中,我們繪制了兩個矩形,并用線性漸變填充它們。
```cpp
QLinearGradient grad1(0, 20, 0, 110);
```
`QLinearGradient`構造線性漸變,并在兩個點之間作為參數提供插值區域。
```cpp
grad1.setColorAt(0.1, Qt::black);
grad1.setColorAt(0.5, Qt::yellow);
grad1.setColorAt(0.9, Qt::black);
```
使用停止點定義漸變中的顏色。 `setColorAt()`在給定位置以給定顏色創建一個停止點。
```cpp
painter.fillRect(20, 20, 300, 90, grad1);
```
我們用漸變填充矩形。
`main.cpp`
```cpp
#include <QApplication>
#include "linear_gradients.h"
int main(int argc, char *argv[]) {
QApplication app(argc, argv);
LinearGradients window;
window.resize(350, 260);
window.setWindowTitle("Linear gradients");
window.show();
return app.exec();
}
```
這是主文件。
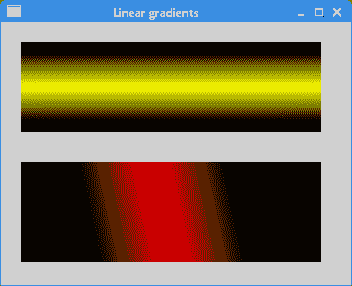
圖:線性漸變
## 徑向漸變
徑向漸變是兩個圓之間顏色或陰影的混合。
`radial_gradient.h`
```cpp
#pragma once
#include <QWidget>
class RadialGradient : public QWidget {
public:
RadialGradient(QWidget *parent = 0);
protected:
void paintEvent(QPaintEvent *e);
private:
void doPainting();
};
```
這是頭文件。
`radial_gradient.cpp`
```cpp
#include <QApplication>
#include <QPainter>
#include "radial_gradient.h"
RadialGradient::RadialGradient(QWidget *parent)
: QWidget(parent)
{ }
void RadialGradient::paintEvent(QPaintEvent *e) {
Q_UNUSED(e);
doPainting();
}
void RadialGradient::doPainting() {
QPainter painter(this);
int h = height();
int w = width();
QRadialGradient grad1(w/2, h/2, 80);
grad1.setColorAt(0, QColor("#032E91"));
grad1.setColorAt(0.3, Qt::white);
grad1.setColorAt(1, QColor("#032E91"));
painter.fillRect(0, 0, w, h, grad1);
}
```
該示例創建了一個徑向漸變; 漸變從窗口的中心擴散。
```cpp
QRadialGradient grad1(w/2, h/2, 80);
```
`QRadialGradient`創建一個徑向漸變; 它在焦點和圍繞它的圓上的端點之間插入顏色。 參數是圓心和半徑的坐標。 焦點位于圓的中心。
```cpp
grad1.setColorAt(0, QColor("#032E91"));
grad1.setColorAt(0.3, Qt::white);
grad1.setColorAt(1, QColor("#032E91"));
```
`setColorAt()`方法定義彩色擋塊。
```cpp
painter.fillRect(0, 0, w, h, grad1);
```
窗口的整個區域都充滿了徑向漸變。
`main.cpp`
```cpp
#include <QApplication>
#include "radial_gradient.h"
int main(int argc, char *argv[]) {
QApplication app(argc, argv);
RadialGradient window;
window.resize(300, 250);
window.setWindowTitle("Radial gradient");
window.show();
return app.exec();
}
```
這是主文件。
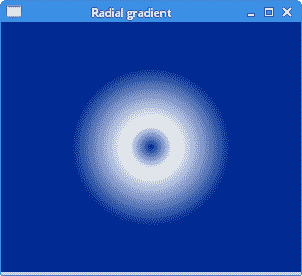
圖:徑向漸變
## 泡泡
在本 C++ Qt5 教程章節的最后一個示例中,我們創建一個泡泡效果。 該示例顯示一個不斷增長的居中文本,該文本從某個點逐漸淡出。 這是一種非常常見的效果,您通常可以在網絡上的 Flash 動畫中看到這種效果。
`puff.h`
```cpp
#pragma once
#include <QWidget>
class Puff : public QWidget {
public:
Puff(QWidget *parent = 0);
protected:
void paintEvent(QPaintEvent *event);
void timerEvent(QTimerEvent *event);
private:
int x;
qreal opacity;
int timerId;
void doPainting();
};
```
在頭文件中,我們定義了兩個事件處理器:繪圖事件處理器和計時器處理器。
`puff.cpp`
```cpp
#include <QPainter>
#include <QTimer>
#include <QTextStream>
#include "puff.h"
Puff::Puff(QWidget *parent)
: QWidget(parent) {
x = 1;
opacity = 1.0;
timerId = startTimer(15);
}
void Puff::paintEvent(QPaintEvent *e) {
Q_UNUSED(e);
doPainting();
}
void Puff::doPainting() {
QPainter painter(this);
QTextStream out(stdout);
QString text = "ZetCode";
painter.setPen(QPen(QBrush("#575555"), 1));
QFont font("Courier", x, QFont::DemiBold);
QFontMetrics fm(font);
int textWidth = fm.width(text);
painter.setFont(font);
if (x > 10) {
opacity -= 0.01;
painter.setOpacity(opacity);
}
if (opacity <= 0) {
killTimer(timerId);
out << "timer stopped" << endl;
}
int h = height();
int w = width();
painter.translate(QPoint(w/2, h/2));
painter.drawText(-textWidth/2, 0, text);
}
void Puff::timerEvent(QTimerEvent *e) {
Q_UNUSED(e);
x += 1;
repaint();
}
```
這是`puff.cpp`文件。
```cpp
Puff::Puff(QWidget *parent)
: QWidget(parent) {
x = 1;
opacity = 1.0;
timerId = startTimer(15);
}
```
在構造器中,我們啟動計時器。 每 15ms 會生成一個計時器事件。
```cpp
void Puff::timerEvent(QTimerEvent *e) {
Q_UNUSED(e);
x += 1;
repaint();
}
```
在`timerEvent()`內,我們增加字體大小并重新繪制小部件。
```cpp
if (x > 10) {
opacity -= 0.01;
painter.setOpacity(opacity);
}
```
如果字體大小大于 10 磅,我們將逐漸降低不透明度; 文字開始消失。
```cpp
if (opacity <= 0) {
killTimer(timerId);
out << "timer stopped" << endl;
}
```
如果文字完全消失,我們將殺死計時器。
`main.cpp`
```cpp
#include <QApplication>
#include "puff.h"
int main(int argc, char *argv[]) {
QApplication app(argc, argv);
Puff window;
window.resize(350, 280);
window.setWindowTitle("Puff");
window.show();
return app.exec();
}
```
這是主文件。
本章是關于 Qt5 中的繪圖的。
- ZetCode 數據庫教程
- MySQL 教程
- MySQL 簡介
- MySQL 安裝
- MySQL 的第一步
- MySQL 快速教程
- MySQL 存儲引擎
- MySQL 數據類型
- 在 MySQL 中創建,更改和刪除表
- MySQL 表達式
- 在 MySQL 中插入,更新和刪除數據
- MySQL 中的SELECT語句
- MySQL 子查詢
- MySQL 約束
- 在 MySQL 中導出和導入數據
- 在 MySQL 中連接表
- MySQL 函數
- MySQL 中的視圖
- MySQL 中的事務
- MySQL 存儲過程
- MySQL Python 教程
- MySQL Perl 教程
- MySQL & Perl DBI
- 使用 Perl 連接到 MySQL 數據庫
- MySQL 中的 Perl 錯誤處理
- 使用 Perl 進行 MySQL 查詢
- 在 MySQL 中使用 Perl 綁定參數&列
- 在 MySQL 中使用 Perl 處理圖像
- 使用 Perl 獲取 MySQL 元數據
- Perl 的 MySQL 事務
- MySQL C API 編程教程
- MySQL Visual Basic 教程
- MySQL PHP 教程
- MySQL Java 教程
- MySQL Ruby 教程
- MySQL C# 教程
- SQLite 教程
- SQLite 簡介
- sqlite3 命令行工具
- 在 SQLite 中創建,刪除和更改表
- SQLite 表達式
- SQLite 插入,更新,刪除數據
- SQLite SELECT語句
- SQLite 約束
- SQLite 連接表
- SQLite 函數
- SQLite 視圖,觸發器,事務
- SQLite C 教程
- SQLite Python 教程
- SQLite Perl 教程
- Perl DBI
- 使用 Perl 連接到 SQLite 數據庫
- SQLite Perl 錯誤處理
- 使用 Perl 的 SQLite 查詢
- 使用 Perl 綁定 SQLite 參數&列
- 使用 Perl 在 SQLite 中處理圖像
- 使用 Perl 獲取 SQLite 元數據
- 使用 Perl 進行 SQLite 事務
- SQLite Ruby 教程
- 連接到 SQLite 數據庫
- 在 SQLite 中使用 Ruby 進行 SQL 查詢
- 綁定參數
- 處理圖像
- 使用 Ruby 獲取 SQLite 元數據
- Ruby 的 SQLite 事務
- SQLite C# 教程
- SQLite C# 簡介
- 使用SqliteDataReader檢索數據
- ADO.NET 數據集
- 使用 C# 在 SQLite 中處理圖像
- 使用 C# 獲取 SQLite 元數據
- 使用 C# 的 SQLite 事務
- SQLite Visual Basic 教程
- SQLite Visual Basic 簡介
- 使用SqliteDataReader檢索數據
- ADO.NET 的數據集
- 使用 Visual Basic 在 SQLite 中處理圖像
- 使用 Visual Basic 獲取 SQLite 元數據
- 使用 Visual Basic 的 SQLite 事務
- PostgreSQL C 教程
- PostgreSQL Ruby 教程
- PostgreSQL PHP 教程
- PostgreSQL PHP 編程簡介
- 在 PostgreSQL 中使用 PHP 檢索數據
- 在 PostgreSQL 中使用 PHP 處理圖像
- 用 PHP 獲取 PostgreSQL 元數據
- 在 PostgreSQL 中使用 PHP 進行事務
- PostgreSQL Java 教程
- Apache Derby 教程
- Derby 簡介
- Derby 的安裝&配置
- Derby 工具
- ij 工具
- Derby 中的 SQL 查詢
- 在 Derby 中使用 JDBC 進行編程
- Derby 安全
- 使用 Derby & Apache Tomcat
- NetBeans 和 Derby
- SQLAlchemy 教程
- SQLAlchemy 簡介
- 原始 SQL
- 模式定義語言
- SQL 表達式語言
- SQLAlchemy 中的對象關系映射器
- MongoDB PHP 教程
- MongoDB JavaScript 教程
- MongoDB Ruby 教程
- Spring JdbcTemplate 教程
- JDBI 教程
- MyBatis 教程
- Hibernate Derby 教程
- ZetCode .NET 教程
- Visual Basic 教程
- Visual Basic
- Visual Basic 語法結構
- 基本概念
- Visual Basic 數據類型
- Visual Basic 中的字符串
- 運算符
- 控制流
- Visual Basic 數組
- Visual Basic 中的過程&函數
- 在 Visual Basic 中組織代碼
- 面向對象編程
- Visual Basic 中的面向對象編程 II
- Visual Basic 中的集合
- 輸入和輸出
- C# 教程
- C# 語言
- C# 語法結構
- C# 基礎
- C# 數據類型
- C# 中的字符串
- C# 運算符
- C# 中的流控制
- C# 數組
- C# 面向對象編程
- C# 中的方法
- C# 面向對象編程 II
- C# 屬性
- C# 結構
- C# 委托
- 命名空間
- C# 集合
- C# 輸入和輸出
- C# 目錄教程
- C# 字典教程
- 在 C# 中讀取文本文件
- C# 中的日期和時間
- 在 C# 中讀取網頁
- C# HttpClient教程
- ASP.NET Core 教程
- ZetCode 圖形教程
- Java 2D 游戲教程
- Java 游戲基礎
- 動畫
- 移動精靈
- 碰撞檢測
- Java 益智游戲
- Java Snake
- Breakout 游戲
- Java 俄羅斯方塊
- Java 吃豆人
- Java 太空侵略者
- Java 掃雷
- Java 推箱子
- Java 2D 教程
- 介紹
- 基本繪圖
- 形狀和填充
- 透明度
- 合成
- 剪裁
- 變換
- 特效
- 圖像
- 文字和字體
- 命中測試,移動物體
- 俄羅斯方塊
- Cario 圖形教程
- Cario 圖形庫
- Cario 定義
- Cairo 后端
- Cairo 基本圖形
- 形狀和填充
- 漸變
- 透明度
- 合成
- 剪裁和遮罩
- 變換
- Cairo 文字
- Cairo 中的圖像
- 根窗口
- PyCairo 教程
- PyCairo 簡介
- PyCairo 后端
- PyCairo 中的基本繪圖
- PyCairo 形狀和填充
- PyCairo 漸變
- PyCairo 剪裁&遮罩
- PyCairo 的透明度
- PyCairo 中的變換
- PyCairo 中的文字
- PyCairo 中的圖像
- 根窗口
- HTML5 畫布教程
- 介紹
- HTML5 畫布中的直線
- HTML5 畫布形狀
- HTML5 畫布填充
- HTML5 畫布中的透明度
- HTML5 畫布合成
- HTML5 canvas 中的變換
- HTML5 畫布中的文字
- HTML5 畫布中的動畫
- HTML5 畫布中的 Snake
- ZetCode GUI 教程
- Windows API 教程
- Windows API 簡介
- Windows API main函數
- Windows API 中的系統函數
- Windows API 中的字符串
- Windows API 中的日期和時間
- Windows API 中的一個窗口
- UI 的第一步
- Windows API 菜單
- Windows API 對話框
- Windows API 控件 I
- Windows API 控件 II
- Windows API 控件 III
- Windows API 中的高級控件
- Windows API 中的自定義控件
- Windows API 中的 GDI
- PyQt4 教程
- PyQt4 簡介
- PyQt4 中的第一個程序
- PyQt4 中的菜單和工具欄
- PyQt4 中的布局管理
- PyQt4 中的事件和信號
- PyQt4 中的對話框
- PyQt4 小部件
- PyQt4 小部件 II
- PyQt4 中的拖放
- PyQt4 中的繪圖
- PyQt4 中的自定義小部件
- PyQt4 中的俄羅斯方塊游戲
- PyQt5 教程
- PyQt5 簡介
- PyQt5 日期和時間
- PyQt5 中的第一個程序
- PyQt5 中的菜單和工具欄
- PyQt5 中的布局管理
- PyQt5 中的事件和信號
- PyQt5 中的對話框
- PyQt5 小部件
- PyQt5 小部件 II
- PyQt5 拖放
- PyQt5 中的繪圖
- PyQt5 中的自定義小部件
- PyQt5 中的俄羅斯方塊
- Qt4 教程
- Qt4 工具包簡介
- Qt4 工具類
- Qt4 中的字符串
- Qt4 中的日期和時間
- 在 Qt4 中使用文件和目錄
- Qt4 中的第一個程序
- Qt4 中的菜單和工具欄
- Qt4 中的布局管理
- Qt4 中的事件和信號
- Qt4 小部件
- Qt4 小部件 II
- Qt4 中的繪圖
- Qt4 中的自定義小部件
- Qt4 中的打磚塊游戲
- Qt5 教程
- Qt5 工具包簡介
- Qt5 中的字符串
- Qt5 中的日期和時間
- Qt5 中的容器
- 在 Qt5 中處理文件和目錄
- Qt5 中的第一個程序
- Qt5 中的菜單和工具欄
- Qt5 中的布局管理
- Qt5 中的事件和信號
- Qt5 小部件
- Qt5 小部件 II
- Qt5 中的繪圖
- Qt5 中的自定義小部件
- Qt5 中的貪食蛇
- Qt5 中的打磚塊游戲
- PySide 教程
- PySide 工具包簡介
- PySide 中的第一個程序
- PySide 中的菜單和工具欄
- PySide 中的布局管理
- PySide 中的事件和信號
- PySide 中的對話框
- PySide 小部件
- PySide 小部件 II
- 在 PySide 中拖放
- 在 PySide 中繪圖
- PySide 中的自定義小部件
- PySide 中的俄羅斯方塊游戲
- Tkinter 教程
- Tkinter 簡介
- Tkinter 中的布局管理
- Tkinter 標準小部件屬性
- Tkinter 小部件
- Tkinter 中的菜單和工具欄
- Tkinter 中的對話框
- Tkinter 中的繪圖
- Tkinter 中的貪食蛇
- Tcl/Tk 教程
- Tcl/Tk 簡介
- Tcl/Tk 中的布局管理
- Tcl/Tk 小部件
- Tcl/Tk 中的菜單和工具欄
- Tcl/Tk 中的對話框
- Tcl/Tk 繪圖
- 貪食蛇
- Qt 快速教程
- Java Swing 教程
- Java Swing 簡介
- Java Swing 首個程序
- Java Swing 中的菜單和工具欄
- Swing 布局管理
- GroupLayout管理器
- Java Swing 事件
- 基本的 Swing 組件
- 基本的 Swing 組件 II
- Java Swing 對話框
- Java Swing 模型架構
- Swing 中的拖放
- Swing 中的繪圖
- Java Swing 中的可調整大小的組件
- Java Swing 中的益智游戲
- 俄羅斯方塊
- JavaFX 教程
- JavaFX 簡介
- JavaFX 首個程序
- JavaFX 布局窗格
- 基本的 JavaFX 控件
- 基本 JavaFX 控件 II
- JavaFX 事件
- JavaFX 效果
- JavaFX 動畫
- JavaFX 畫布
- JavaFX 圖表
- Java SWT 教程
- Java SWT 簡介
- Java SWT 中的布局管理
- Java SWT 中的菜單和工具欄
- Java SWT 中的小部件
- Table小部件
- Java SWT 中的對話框
- Java SWT 繪圖
- Java SWT 中的貪食蛇
- wxWidgets 教程
- wxWidgets 簡介
- wxWidgets 助手類
- wxWidgets 中的第一個程序
- wxWidgets 中的菜單和工具欄
- wxWidgets 中的布局管理
- wxWidgets 中的事件
- wxWidgets 中的對話框
- wxWidgets 小部件
- wxWidgets 小部件 II
- wxWidgets 中的拖放
- wxWidgets 中的設備上下文
- wxWidgets 中的自定義小部件
- wxWidgets 中的俄羅斯方塊游戲
- wxPython 教程
- wxPython 簡介
- 第一步
- 菜單和工具欄
- wxPython 中的布局管理
- wxPython 中的事件
- wxPython 對話框
- 小部件
- wxPython 中的高級小部件
- wxPython 中的拖放
- wxPython 圖形
- 創建自定義小部件
- wxPython 中的應用框架
- wxPython 中的俄羅斯方塊游戲
- C# Winforms Mono 教程
- Mono Winforms 簡介
- Mono Winforms 中的第一步
- Mono Winforms 中的布局管理
- Mono Winforms 中的菜單和工具欄
- Mono Winforms 中的基本控件
- Mono Winforms 中的高級控件
- 對話框
- Mono Winforms 中的拖放
- Mono Winforms 中的繪圖
- Mono Winforms 中的貪食蛇
- Java Gnome 教程
- Java Gnome 簡介
- Java Gnome 的第一步
- Java Gnome 中的布局管理
- Java Gnome 中的布局管理 II
- Java Gnome 中的菜單
- Java Gnome 中的工具欄
- Java Gnome 中的事件
- Java Gnome 中的小部件
- Java Gnome 中的小部件 II
- Java Gnome 中的高級小部件
- Java Gnome 中的對話框
- Java Gnome 中的 Pango
- 在 Java Gnome 中用 Cairo 繪圖
- Cario 繪圖 II
- Java Gnome 中的貪食蛇
- QtJambi 教程
- QtJambi 簡介
- QtJambi 中的布局管理
- QtJambi 中的小部件
- QtJambi 中的菜單和工具欄
- QtJambi 對話框
- QtJambi 中的繪圖
- QtJambi 中的自定義小部件
- 貪食蛇
- GTK+ 教程
- GTK+ 簡介
- GTK+ 中的第一個程序
- GTK+ 中的菜單和工具欄
- GTK+ 布局管理
- GTK+ 事件和信號
- GTK+ 對話框
- GTK+ 小部件
- GTK+ 小部件 II
- GtkTreeView小部件
- GtkTextView小部件
- 自定義 GTK+ 小部件
- Ruby GTK 教程
- Ruby GTK 簡介
- Ruby GTK 中的布局管理
- Ruby GTK 中的小部件
- Ruby GTK 中的菜單和工具欄
- Ruby GTK 中的對話框
- Ruby GTK Cario 繪圖
- Ruby GTK 中的自定義小部件
- Ruby GTK 中的貪食蛇
- GTK# 教程
- GTK# 簡介
- GTK 的第一步
- GTK# 中的布局管理
- GTK 中的菜單
- GTK# 中的工具欄
- GTK# 中的事件
- GTK# 中的小部件
- GTK 中的小部件 II
- GTK# 中的高級小部件
- GTK# 中的對話框
- Pango
- GTK# 中的 Cario 繪圖
- GTK# 中的 Cario 繪圖 II
- GTK# 中的自定義小部件
- Visual Basic GTK# 教程
- Visual Basic GTK# 簡介
- 布局管理
- 小部件
- 菜單和工具欄
- 對話框
- Cario 繪圖
- 自定義小部件
- 貪食蛇
- PyGTK 教程
- PyGTK 簡介
- PyGTK 的第一步
- PyGTK 中的布局管理
- PyGTK 中的菜單
- PyGTK 中的工具欄
- PyGTK 中的事件和信號
- PyGTK 中的小部件
- PyGTK 中的小部件 II
- PyGTK 中的高級小部件
- PyGTK 中的對話框
- Pango
- Pango II
- PyGTK 中的 Cario 繪圖
- Cario 繪圖 II
- PyGTK 中的貪食蛇游戲
- PyGTK 中的自定義小部件
- PHP GTK 教程
- PHP GTK 簡介
- PHP GTK 中的布局管理
- PHP GTK 中的小部件
- PHP GTK 中的菜單和工具欄
- 對話框
- Cario 繪圖
- 自定義小部件
- 貪食蛇
- C# Qyoto 教程
- Qyoto 介紹
- 布局管理
- Qyoto 中的小部件
- Qyoto 中的菜單和工具欄
- Qyoto 對話框
- Qyoto 中的繪圖
- Qyoto 中的繪圖 II
- Qyoto 中的自定義小部件
- 貪食蛇
- Ruby Qt 教程
- Ruby Qt 簡介
- Ruby Qt 中的布局管理
- Ruby Qt 中的小部件
- 菜單和工具欄
- Ruby Qt 中的對話框
- 用 Ruby Qt 繪圖
- Ruby Qt 中的自定義小部件
- Ruby Qt 中的貪食蛇
- Visual Basic Qyoto 教程
- Qyoto 介紹
- 布局管理
- Qyoto 中的小部件
- Qyoto 中的菜單和工具欄
- Qyoto 對話框
- Qyoto 中的繪圖
- Qyoto 中的自定義小部件
- 貪食蛇
- Mono IronPython Winforms 教程
- 介紹
- IronPython Mono Winforms 中的第一步
- 布局管理
- 菜單和工具欄
- Mono Winforms 中的基本控件
- Mono Winforms 中的基本控件 II
- Mono Winforms 中的高級控件
- 對話框
- Mono Winforms 中的拖放
- 繪圖
- IronPython Mono Winforms 中的繪圖 II
- IronPython Mono Winforms 中的貪食蛇
- IronPython Mono Winforms 中的俄羅斯方塊游戲
- FreeBASIC GTK 教程
- Jython Swing 教程
- Jython Swing 簡介
- Jython Swing 中的布局管理
- Jython Swing 中的組件
- Jython Swing 中的菜單和工具欄
- Jython Swing 中的對話框
- Jython Swing 中的繪圖
- Jython Swing 中的半字節
- JRuby Swing 教程
- JRuby Swing 簡介
- JRuby Swing 中的布局管理
- JRuby Swing 中的組件
- 菜單和工具欄
- JRuby Swing 中的對話框
- 在 JRuby Swing 中繪圖
- JRuby Swing 中的貪食蛇
- Visual Basic Winforms 教程
- Visual Basic Winforms 簡介
- 布局管理
- 基本控制
- 進階控件
- 菜單和工具欄
- 對話框
- 繪圖
- 拖放
- 貪食蛇
- JavaScript GTK 教程
- JavaScript GTK 簡介
- 布局管理
- JavaScript GTK 中的小部件
- JavaScript GTK 中的菜單和工具欄
- JavaScript GTK 中的對話框
- JavaScript GTK 中的 Cario 繪圖
- ZetCode Java 教程
- Java 教程
- Java 語言
- Java 語法結構
- Java 基礎
- Java 數據類型
- Java 數據類型 II
- Java 字符串
- Java 數組
- Java 表達式
- Java 控制流程
- Java 面向對象的編程
- Java 方法
- Java 面向對象編程 II
- Java 包
- Java 中的異常
- Java 集合
- Java 流
- Java Future 教程
- Java Comparable和Comparator
- Java DOM 教程
- Java MVC 教程
- Java SAX 教程
- Java JAXB 教程
- Java JSON 處理教程
- Java H2 教程
- MongoDB Java 教程
- Java 正則表達式教程
- Java PDFBox 教程
- Java 文件教程
- Java Files.list教程
- Java Files.walk教程
- Java DirectoryStream教程
- Java 外部與內部迭代器
- Java 文件大小
- 用 Java 創建目錄
- 用 Java 創建文件
- Java Log4j 教程
- Gson 教程
- Java RequestDispatcher
- Java HTTP GET/POST 請求
- Java InputStream教程
- Java FileOutputStream教程
- Java FileInputStream教程
- Java ZipInputStream教程
- Java FileWriter教程
- EJB 簡介
- Java forEach教程
- Jetty 教程
- Tomcat Derby 教程
- Stripes 介紹
- 使用 Stripes 的 Java webapp,MyBatis,& Derby
- EclipseLink 簡介
- Java 中的數據源
- JSTL 中的 SQL 查詢標記
- Java 驗證過濾器
- Hibernate 驗證器
- 用 Java 顯示圖像
- Play 框架簡介
- Spark Java 簡介
- Java ResourceBundle教程
- Jtwig 教程
- Java Servlet 教程
- Java 套接字教程
- FreeMarker 教程
- Android 教程
- Java EE 5 教程
- JSoup 教程
- JFreeChart 教程
- ImageIcon教程
- 用 Java 復制文件
- Java 文件時間教程
- 如何使用 Java 獲取當前日期時間
- Java 列出目錄內容
- Java 附加到文件
- Java ArrayList教程
- 用 Java 讀寫 ICO 圖像
- Java int到String的轉換
- Java HashSet教程
- Java HashMap教程
- Java static關鍵字
- Java 中的HashMap迭代
- 用 Java 過濾列表
- 在 Java 中讀取網頁
- Java 控制臺應用
- Java 集合的便利工廠方法
- Google Guava 簡介
- OpenCSV 教程
- 用 Java8 的StringJoiner連接字符串
- Java 中元素迭代的歷史
- Java 謂詞
- Java StringBuilder
- Java 分割字串教學
- Java NumberFormat
- Java TemporalAdjusters教程
- Apache FileUtils教程
- Java Stream 過濾器
- Java 流歸約
- Java 流映射
- Java InputStreamReader教程
- 在 Java 中讀取文本文件
- Java Unix 時間
- Java LocalTime
- Java 斐波那契
- Java ProcessBuilder教程
- Java 11 的新功能
- ZetCode JavaScript 教程
- Ramda 教程
- Lodash 教程
- Collect.js 教程
- Node.js 簡介
- Node HTTP 教程
- Node-config 教程
- Dotenv 教程
- Joi 教程
- Liquid.js 教程
- faker.js 教程
- Handsontable 教程
- PouchDB 教程
- Cheerio 教程
- Axios 教程
- Jest 教程
- JavaScript 正則表達式
- 用 JavaScript 創建對象
- Big.js 教程
- Moment.js 教程
- Day.js 教程
- JavaScript Mustache 教程
- Knex.js 教程
- MongoDB JavaScript 教程
- Sequelize 教程
- Bookshelf.js 教程
- Node Postgres 教程
- Node Sass 教程
- Document.querySelector教程
- Document.all教程
- JSON 服務器教程
- JavaScript 貪食蛇教程
- JavaScript 構建器模式教程
- JavaScript 數組
- XMLHttpRequest教程
- 從 JavaScript 中的 URL 讀取 JSON
- 在 JavaScript 中循環遍歷 JSON 數組
- jQuery 教程
- Google 圖表教程
- ZetCode Kotlin 教程
- Kotlin Hello World 教程
- Kotlin 變量
- Kotlin 的運算符
- Kotlin when表達式
- Kotlin 數組
- Kotlin 范圍
- Kotlin Snake
- Kotlin Swing 教程
- Kotlin 字符串
- Kotlin 列表
- Kotlin 映射
- Kotlin 集合
- Kotlin 控制流程
- Kotlin 寫入文件
- Kotlin 讀取文件教程
- Kotlin 正則表達式
- ZetCode 其它教程
- TCL 教程
- Tcl
- Tcl 語法結構
- Tcl 中的基本命令
- Tcl 中的表達式
- Tcl 中的控制流
- Tcl 中的字符串
- Tcl 列表
- Tcl 中的數組
- Tcl 中的過程
- 輸入&輸出
- AWK 教程
- Vaadin 教程
- Vaadin 框架介紹
- Vaadin Grid教程
- Vaadin TextArea教程
- Vaadin ComboBox教程
- Vaadin Slider教程
- Vaadin CheckBox教程
- Vaadin Button教程
- Vaadin DateField教程
- Vaadin Link教程
- ZetCode PHP 教程
- PHP 教程
- PHP
- PHP 語法結構
- PHP 基礎
- PHP 數據類型
- PHP 字符串
- PHP 運算符
- PHP 中的控制流
- PHP 數組
- PHP 數組函數
- PHP 中的函數
- PHP 正則表達式
- PHP 中的面向對象編程
- PHP 中的面向對象編程 II
- PHP Carbon 教程
- PHP Monolog 教程
- PHP 配置教程
- PHP Faker 教程
- Twig 教程
- Valitron 教程
- Doctrine DBAL QueryBuilder 教程
- PHP Respect 驗證教程
- PHP Rakit 驗證教程
- PHP PDO 教程
- CakePHP 數據庫教程
- PHP SQLite3 教程
- PHP 文件系統函數
- ZetCode Python 教程
- Python 教程
- Python 語言
- 交互式 Python
- Python 語法結構
- Python 數據類型
- Python 字符串
- Python 列表
- Python 字典
- Python 運算符
- Python 關鍵字
- Python 函數
- Python 中的文件
- Python 中的面向對象編程
- Python 模塊
- Python 中的包
- Python 異常
- Python 迭代器和生成器
- Python 內省
- Python Faker 教程
- Python f 字符串教程
- Python bcrypt 教程
- Python 套接字教程
- Python smtplib教程
- OpenPyXL 教程
- Python pathlib教程
- Python YAML 教程
- Python 哈希教程
- Python ConfigParser教程
- Python 日志教程
- Python argparse 教程
- Python SQLite 教程
- Python Cerberus 教程
- Python PostgreSQL 教程
- PyMongo 教程
- PyMySQL 教程
- Peewee 教程
- pyDAL 教程
- pytest 教程
- Bottle 教程
- Python Jinja 教程
- PrettyTable 教程
- BeautifulSoup 教程
- pyquery 教程
- Python for循環
- Python 反轉
- Python Lambda 函數
- Python 集合
- Python 映射
- Python CSV 教程-讀寫 CSV
- Python 正則表達式
- Python SimpleJson 教程
- SymPy 教程
- Pandas 教程
- Matplotlib 教程
- Pillow 教程
- Python FTP 教程
- Python Requests 教程
- Python Arrow 教程
- Python 列表推導式
- Python 魔術方法
- PyQt 中的QPropertyAnimation
- PyQt 中的QNetworkAccessManager
- ZetCode Ruby 教程
- Ruby 教程
- Ruby
- Ruby 語法結構
- Ruby 基礎
- Ruby 變量
- Ruby 中的對象
- Ruby 數據類型
- Ruby 字符串
- Ruby 表達式
- Ruby 控制流
- Ruby 數組
- Ruby 哈希
- Ruby 中的面向對象編程
- Ruby 中的面向對象編程 II
- Ruby 正則表達式
- Ruby 輸入&輸出
- Ruby HTTPClient教程
- Ruby Faraday 教程
- Ruby Net::HTTP教程
- ZetCode Servlet 教程
- 從 Java Servlet 提供純文本
- Java Servlet JSON 教程
- Java Servlet HTTP 標頭
- Java Servlet 復選框教程
- Java servlet 發送圖像教程
- Java Servlet JQuery 列表教程
- Servlet FreeMarker JdbcTemplate 教程-CRUD 操作
- jQuery 自動補全教程
- Java servlet PDF 教程
- servlet 從 WAR 內讀取 CSV 文件
- Java HttpServletMapping
- EasyUI datagrid
- Java Servlet RESTFul 客戶端
- Java Servlet Log4j 教程
- Java Servlet 圖表教程
- Java ServletConfig教程
- Java Servlet 讀取網頁
- 嵌入式 Tomcat
- Java Servlet 分頁
- Java Servlet Weld 教程
- Java Servlet 上傳文件
- Java Servlet 提供 XML
- Java Servlet 教程
- JSTL forEach標簽
- 使用 jsGrid 組件
- ZetCode Spring 教程
- Spring @Bean注解教程
- Spring @Autowired教程
- Spring @GetMapping教程
- Spring @PostMapping教程
- Spring @DeleteMapping教程
- Spring @RequestMapping教程
- Spring @PathVariable教程
- Spring @RequestBody教程
- Spring @RequestHeader教程
- Spring Cookies 教程
- Spring 資源教程
- Spring 重定向教程
- Spring 轉發教程
- Spring ModelAndView教程
- Spring MessageSource教程
- Spring AnnotationConfigApplicationContext
- Spring BeanFactoryPostProcessor教程
- Spring BeanFactory教程
- Spring context:property-placeholder教程
- Spring @PropertySource注解教程
- Spring @ComponentScan教程
- Spring @Configuration教程
- Spring C 命名空間教程
- Spring P 命名空間教程
- Spring bean 引用教程
- Spring @Qualifier注解教程
- Spring ClassPathResource教程
- Spring 原型作用域 bean
- Spring Inject List XML 教程
- Spring 概要文件 XML 教程
- Spring BeanDefinitionBuilder教程
- Spring 單例作用域 bean
- 獨立的 Spring 應用
- 經典 Spring 應用中的JdbcTemplate
- Spring EmbeddedDatabaseBuilder教程
- Spring HikariCP 教程
- Spring Web 應用簡介
- Spring BeanPropertyRowMapper教程
- Spring DefaultServlet教程
- Spring WebSocket 教程
- Spring WebJars 教程
- Spring @MatrixVariable教程
- Spring Jetty 教程
- Spring 自定義 404 錯誤頁面教程
- Spring WebApplicationInitializer教程
- Spring BindingResult教程
- Spring FreeMarker 教程
- Spring Thymeleaf 教程
- Spring ResourceHandlerRegistry教程
- SpringRunner 教程
- Spring MockMvc 教程
- ZetCode Spring Boot 教程
- Spring Boot 發送電子郵件教程
- Spring Boot WebFlux 教程
- Spring Boot ViewControllerRegistry教程
- Spring Boot CommandLineRunner教程
- Spring Boot ApplicationReadyEvent 教程
- Spring Boot CORS 教程
- Spring Boot @Order教程
- Spring Boot @Lazy教程
- Spring Boot Flash 屬性
- Spring Boot CrudRepository 教程
- Spring Boot JpaRepository 教程
- Spring Boot findById 教程
- Spring Boot Data JPA @NamedQuery教程
- Spring Boot Data JPA @Query教程
- Spring Boot Querydsl 教程
- Spring Boot Data JPA 排序教程
- Spring Boot @DataJpaTest教程
- Spring Boot TestEntityManager 教程
- Spring Boot Data JPA 派生的查詢
- Spring Boot Data JPA 查詢示例
- Spring Boot Jersey 教程
- Spring Boot CSV 教程
- SpringBootServletInitializer教程
- 在 Spring Boot 中加載資源
- Spring Boot H2 REST 教程
- Spring Boot RestTemplate
- Spring Boot REST XML 教程
- Spring Boot Moustache 教程
- Spring Boot Thymeleaf 配置
- Spring Boot 自動控制器
- Spring Boot FreeMarker 教程
- Spring Boot Environment
- Spring Boot Swing 集成教程
- 在 Spring Boot 中提供圖像文件
- 在 Spring Boot 中創建 PDF 報告
- Spring Boot 基本注解
- Spring Boot @ResponseBody教程
- Spring Boot @PathVariable教程
- Spring Boot REST Data JPA 教程
- Spring Boot @RequestParam教程
- Spring Boot 列出 bean
- Spring Boot @Bean
- Spring Boot @Qualifier教程
- 在 Spring Boot 中提供靜態內容
- Spring Boot Whitelabel 錯誤
- Spring Boot DataSourceBuilder 教程
- Spring Boot H2 教程
- Spring Boot Web JasperReports 集成
- Spring Boot iText 教程
- Spring Boot cmd JasperReports 集成
- Spring Boot RESTFul 應用
- Spring Boot 第一個 Web 應用
- Spring Boot Groovy CLI
- Spring Boot 上傳文件
- Spring Boot @ExceptionHandler
- Spring Boot @ResponseStatus
- Spring Boot ResponseEntity
- Spring Boot @Controller
- Spring Boot @RestController
- Spring Boot @PostConstruct
- Spring Boot @Component
- Spring Boot @ConfigurationProperties教程
- Spring Boot @Repository
- Spring Boot MongoDB 教程
- Spring Boot MongoDB Reactor 教程
- Spring Boot PostgreSQL 教程
- Spring Boot @ModelAttribute
- Spring Boot 提交表單教程
- Spring Boot Model
- Spring Boot MySQL 教程
- Spring Boot GenericApplicationContext
- SpringApplicationBuilder教程
- Spring Boot Undertow 教程
- Spring Boot 登錄頁面教程
- Spring Boot RouterFunction 教程
- ZetCode Symfony 教程
- Symfony DBAL 教程
- Symfony 表單教程
- Symfony CSRF 教程
- Symfony Vue 教程
- Symfony 簡介
- Symfony 請求教程
- Symfony HttpClient教程
- Symfony Flash 消息
- 在 Symfony 中發送郵件
- Symfony 保留表單值
- Symfony @Route注解教程
- Symfony 創建路由
- Symfony 控制臺命令教程
- Symfony 上傳文件
- Symfony 服務教程
- Symfony 驗證教程
- Symfony 翻譯教程
