# 更新教師
本節我們開始定制保存按鈕觸發的`onSubmit()`方法來完成與后臺的對接,完成教師的更新功能。
我們為大家提供的后臺接口信息如下:
```bash
PUT /teacher/{id}
```
| **類型Type** | **名稱Name** | **描述Description** | **類型Schema** |
| ------------ | ------------ | ------------------- | ------------------------------------------------------------ |
| Body | teacher | 教師 | `{username: string, name: string, email: string, sex: boolean}` |
| Response | 成功 | Status Code: 204 | `{id: number, username: string, name: string, email: string, sex: boolean}` |
## 雙向數據綁定
Angular模板驅動表單的`[(ngModel)]`提供了一種機制:當用戶變更表單中的內容時,內容會實時的更新到C層的變量上;C層變量發生變更時,內容也會實時的更新到表單中。我們把這種機制稱為:雙向數據綁定。
我們簡單改寫下`onSubmit()`方法,使其打印當前的`teacher`屬性至控制臺:
```typescript
+++ b/first-app/src/app/edit/edit.component.ts
@@ -33,6 +33,6 @@ export class EditComponent implements OnInit {
}
onSubmit(): void {
- console.log('點擊提交按鈕');
+ console.log(this.teacher);
}
}
```
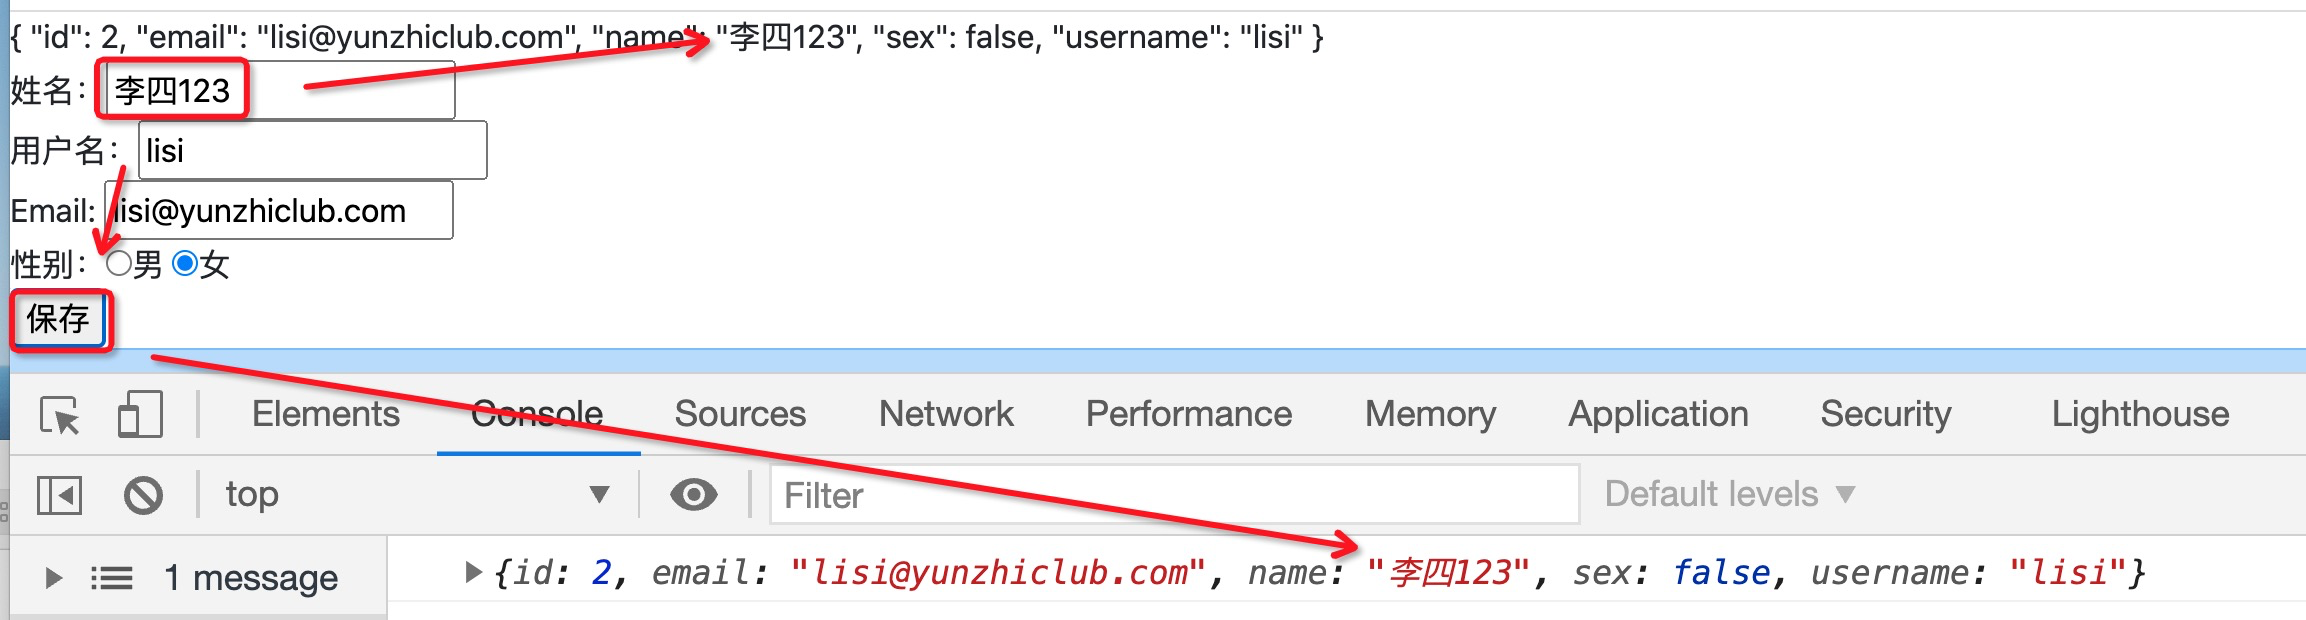
此時當我們變更姓名時,能夠在V層的中能過`{{teacher | json}}`實時地查看到C層`teacher`的變化情況,點擊保存按鈕時可以看到`name`的值也進行了同步變更。
這便是**雙向數據綁定**的魅力 ---- 當一方數據變化時,另一方的數據也同步發生變化。
## 數據更新
接下來開始完成數據更新功能,首先:寫注釋!
```typescript
+++ b/first-app/src/app/edit/edit.component.ts
@@ -33,6 +33,8 @@ export class EditComponent implements OnInit {
}
onSubmit(): void {
- console.log('點擊提交按鈕');
+ console.log(this.teacher);
+ // 獲取ID,拼接URL
+ // 發起請求,更新教師,成功時打印請求結果并刷新教師列表查看效果,失敗時打印失敗結果
}
}
```
然后才是功能開發:
```typescript
+++ b/first-app/src/app/edit/edit.component.ts
@@ -35,6 +35,11 @@ export class EditComponent implements OnInit {
onSubmit(): void {
console.log(this.teacher);
// 獲取ID,拼接URL
+ const url = 'http://angular.api.codedemo.club:81/teacher/' +
+ this.activeRoute.snapshot.params.id;
// 發起請求,更新教師,成功時打印請求結果并刷新教師列表查看效果,失敗時打印失敗結果
+ this.httpClient.put(url, this.teacher)
+ .subscribe(data => console.log('更新成功', data),
+ error => console.log('更新錯誤', error));
}
}
```
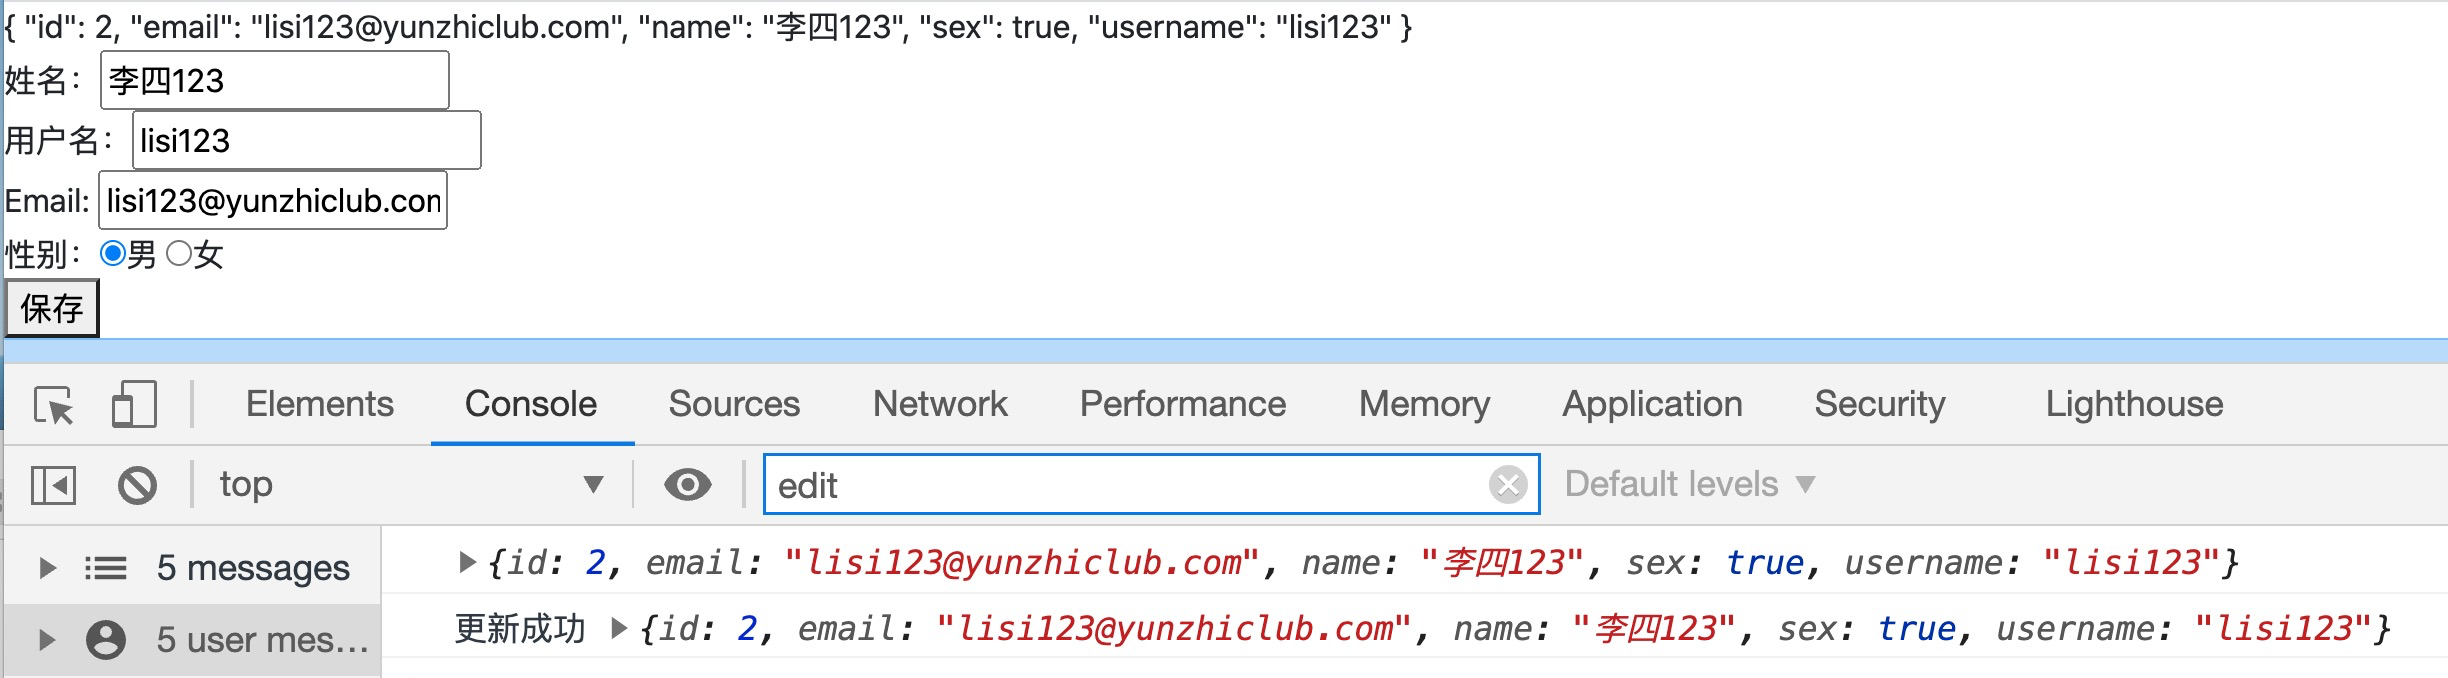
再次刷新當前頁面,教師列表中的數據也同步的更新了。

嗯,甚好。
## 父子組件
如果編輯組件更新某個教師后,教師列表能夠同步的刷新。那當然也是極好的。為此,我們需要深入對當前的教師列表、教師編輯組件進行學習。
若要教師列表組件的數據被更新,首先我們要找到其組件中數據更新對應的代碼,打開組件C層文件后發現其`ngOnInit`方法中完成了獲取后臺教師列表的功能:
```typescript
/**
* 組件初始化完成后將被自動執行一次
*/
ngOnInit(): void {
this.httpClient.get<[]>('http://angular.api.codedemo.club:81/teacher')
.subscribe(teachers => this.teachers = teachers);
}
}
```
如若實現更新后刷新教師列表,則想辦法調用該`ngOnInit`方法即可:
```typescript
+++ b/first-app/src/app/edit/edit.component.ts
@@ -39,7 +39,10 @@ export class EditComponent implements OnInit {
this.activeRoute.snapshot.params.id;
// 發起請求,更新教師,成功時打印請求結果并刷新教師列表查看效果,失敗時打印失敗結果
this.httpClient.put(url, this.teacher)
- .subscribe(data => console.log('更新成功', data),
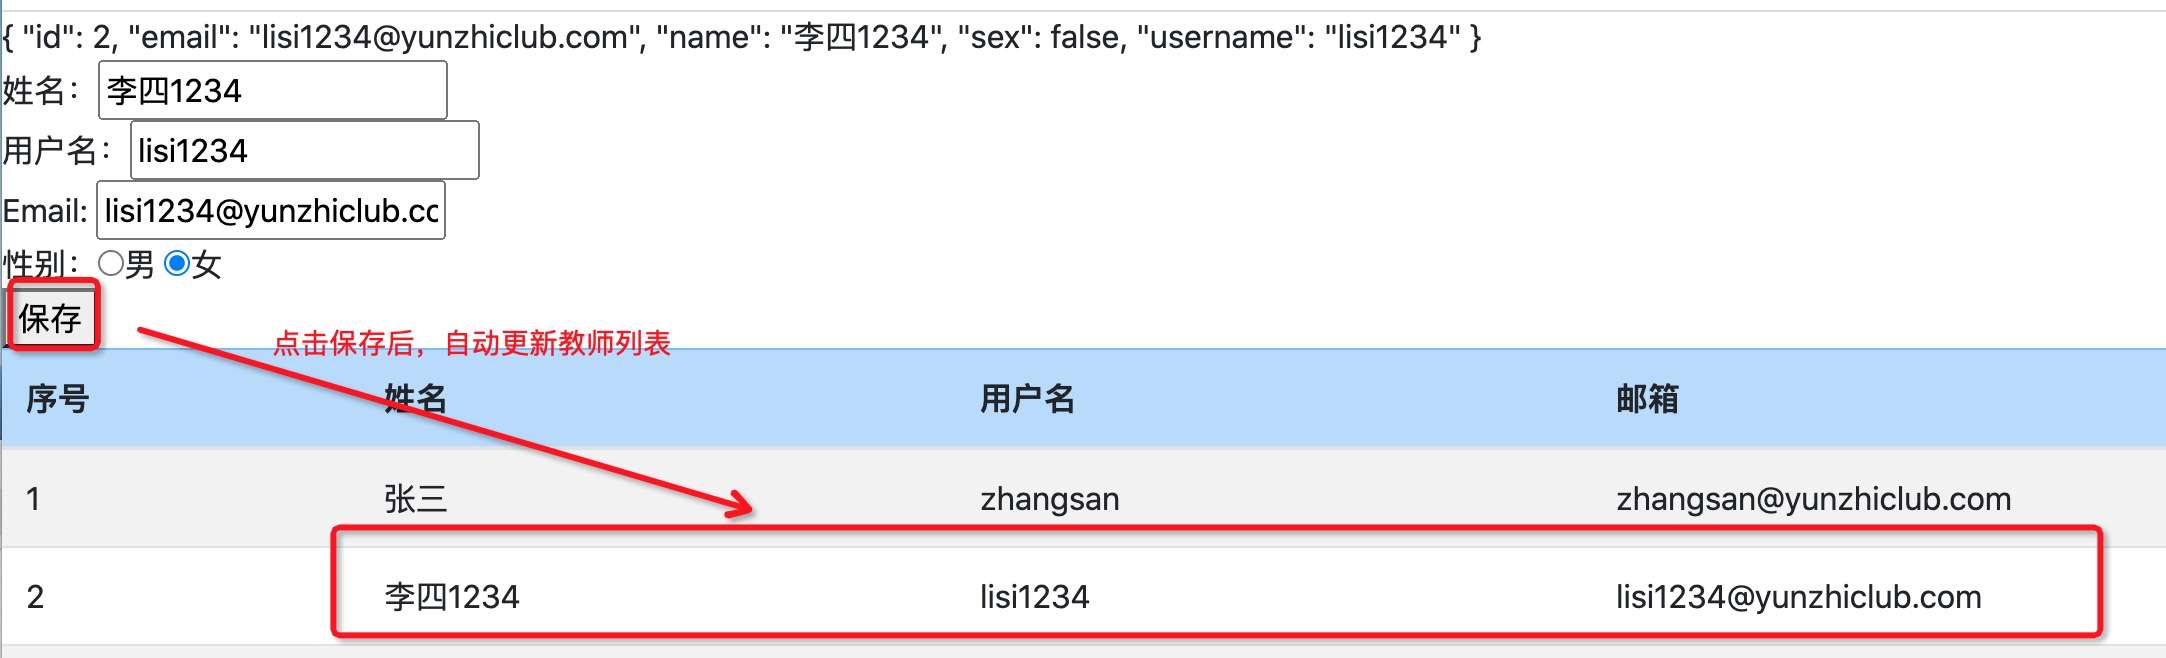
+ .subscribe(data => {
+ console.log('更新成功', data);
+ // 在此調用教師列表App組個的ngOnInit方法,即可實現更新后重新刷新教師列表的功能
+ },
error => console.log('更新錯誤', error));
}
}
```
非常幸運的是可能由于Angular早到想到了這層需求(實際上沒有,因為Anguar并不推薦我們這么樣),我們可以在子組件Edit中以依賴注入的方式來獲取到其父App組件:
```typescript
+++ b/first-app/src/app/edit/edit.component.ts
@@ -1,6 +1,7 @@
import {Component, OnInit} from '@angular/core';
import {ActivatedRoute} from '@angular/router';
import {HttpClient} from '@angular/common/http';
+import {AppComponent} from '../app.component';
@Component({
selector: 'app-edit',
@@ -17,7 +18,8 @@ export class EditComponent implements OnInit {
};
constructor(private activeRoute: ActivatedRoute,
- private httpClient: HttpClient) {
+ private httpClient: HttpClient,
+ private appComponent: AppComponent) {
}
ngOnInit(): void {
```
接著調用該父組件對應的`ngOnInit`方法,便可實現更新后自動刷新教師列表的功能:
```typescript
--- a/first-app/src/app/edit/edit.component.ts
+++ b/first-app/src/app/edit/edit.component.ts
@@ -44,6 +44,7 @@ export class EditComponent implements OnInit {
.subscribe(data => {
console.log('更新成功', data);
// 在此調用教師列表App組個的ngOnInit方法,即可實現更新后重新刷新教師列表的功能
+ this.appComponent.ngOnInit();
},
error => console.log('更新錯誤', error));
}
```
總結:Angular的依賴注入不僅僅能注入服務,還可以注入父組件。依賴注入只所以會成功,是因為 Angular有注入該類型實例的能力;而依賴注入只所以會失敗,則是因為Anuglar沒有注入該類型實例的能力。
## 本節作業
參考教師添加組件,為教師編輯組件添加樣式,美化該教師編輯組件界面(如果在第一小節中已完成,請忽略)。同時去除在V層的測試痕跡`{{teacher | json}}`。
> 紙上得來終覺淺,絕知此事要躬行。看似簡單的bootstrap界面美化,你成功了嗎?
本節作業無參考答案,請完成本節作業后繼續學習下一節。
| 名稱 | 地址 | |
| -------- | ------------------------------------------------------------ | ---- |
| 雙向綁定 | [https://angular.cn/guide/two-way-binding#two-way-binding](https://angular.cn/guide/two-way-binding#two-way-binding) | |
| 本節源碼 | [https://github.com/mengyunzhi/angular11-guild/archive/step2.4.5.zip](https://github.com/mengyunzhi/angular11-guild/archive/step2.4.5.zip) | |
- 序言
- 第一章 Hello World
- 1.1 環境安裝
- 1.2 Hello Angular
- 1.3 Hello World!
- 第二章 教師管理
- 2.1 教師列表
- 2.1.1 初始化原型
- 2.1.2 組件生命周期之初始化
- 2.1.3 ngFor
- 2.1.4 ngIf、ngTemplate
- 2.1.5 引用 Bootstrap
- 2.2 請求后臺數據
- 2.2.1 HttpClient
- 2.2.2 請求數據
- 2.2.3 模塊與依賴注入
- 2.2.4 異步與回調函數
- 2.2.5 集成測試
- 2.2.6 本章小節
- 2.3 新增教師
- 2.3.1 組件初始化
- 2.3.2 [(ngModel)]
- 2.3.3 對接后臺
- 2.3.4 路由
- 2.4 編輯教師
- 2.4.1 組件初始化
- 2.4.2 獲取路由參數
- 2.4.3 插值與模板表達式
- 2.4.4 初識泛型
- 2.4.5 更新教師
- 2.4.6 測試中的路由
- 2.5 刪除教師
- 2.6 收尾工作
- 2.6.1 RouterLink
- 2.6.2 fontawesome圖標庫
- 2.6.3 firefox
- 2.7 總結
- 第三章 用戶登錄
- 3.1 初識單元測試
- 3.2 http概述
- 3.3 Basic access authentication
- 3.4 著陸組件
- 3.5 @Output
- 3.6 TypeScript 類
- 3.7 瀏覽器緩存
- 3.8 總結
- 第四章 個人中心
- 4.1 原型
- 4.2 管道
- 4.3 對接后臺
- 4.4 x-auth-token認證
- 4.5 攔截器
- 4.6 小結
- 第五章 系統菜單
- 5.1 延遲及測試
- 5.2 手動創建組件
- 5.3 隱藏測試信息
- 5.4 規劃路由
- 5.5 定義菜單
- 5.6 注銷
- 5.7 小結
- 第六章 班級管理
- 6.1 新增班級
- 6.1.1 組件初始化
- 6.1.2 MockApi 新建班級
- 6.1.3 ApiInterceptor
- 6.1.4 數據驗證
- 6.1.5 教師選擇列表
- 6.1.6 MockApi 教師列表
- 6.1.7 代碼重構
- 6.1.8 小結
- 6.2 教師列表組件
- 6.2.1 初始化
- 6.2.2 響應式表單
- 6.2.3 getTestScheduler()
- 6.2.4 應用組件
- 6.2.5 小結
- 6.3 班級列表
- 6.3.1 原型設計
- 6.3.2 初始化分頁
- 6.3.3 MockApi
- 6.3.4 靜態分頁
- 6.3.5 動態分頁
- 6.3.6 @Input()
- 6.4 編輯班級
- 6.4.1 測試模塊
- 6.4.2 響應式表單驗證
- 6.4.3 @Input()
- 6.4.4 FormGroup
- 6.4.5 自定義FormControl
- 6.4.6 代碼重構
- 6.4.7 小結
- 6.5 刪除班級
- 6.6 集成測試
- 6.6.1 惰性加載
- 6.6.2 API攔截器
- 6.6.3 路由與跳轉
- 6.6.4 ngStyle
- 6.7 初識Service
- 6.7.1 catchError
- 6.7.2 單例服務
- 6.7.3 單元測試
- 6.8 小結
- 第七章 學生管理
- 7.1 班級列表組件
- 7.2 新增學生
- 7.2.1 exports
- 7.2.2 自定義驗證器
- 7.2.3 異步驗證器
- 7.2.4 再識DI
- 7.2.5 屬性型指令
- 7.2.6 完成功能
- 7.2.7 小結
- 7.3 單元測試進階
- 7.4 學生列表
- 7.4.1 JSON對象與對象
- 7.4.2 單元測試
- 7.4.3 分頁模塊
- 7.4.4 子組件測試
- 7.4.5 重構分頁
- 7.5 刪除學生
- 7.5.1 第三方dialog
- 7.5.2 批量刪除
- 7.5.3 面向對象
- 7.6 集成測試
- 7.7 編輯學生
- 7.7.1 初始化
- 7.7.2 自定義provider
- 7.7.3 更新學生
- 7.7.4 集成測試
- 7.7.5 可訂閱的路由參數
- 7.7.6 小結
- 7.8 總結
- 第八章 其它
- 8.1 打包構建
- 8.2 發布部署
- 第九章 總結