前面的章節中我們都是直接給出了后臺的Api情況。其實如果團隊中都是全棧工程師的話,后臺Api的定義往往是在前臺開發過程中被逐步規定的。后臺的開發會在前臺基本完成,DEMO能夠跑通的情況下進行。我們本節也模擬這個過程,在開發過程中逐步的完成后臺的模擬接口的設定。
## Service
來到`student.servicer.ts`增加`pageOfCurrentTeacher`方法用于查詢當前登錄教師管理的學生分頁信息:
```typescript
+++ b/first-app/src/app/service/student.service.ts
@@ -26,4 +27,15 @@ export class StudentService {
// 將預請求信息返回
return this.httpClient.post<Student>('/student', student);
}
+
+ /**
+ * 當前登錄用戶的分頁信息
+ * @param data 分頁信息
+ */
+ pageOfCurrentTeacher(①{②page = 0, ②size = 20}③: { page④?: number, size④?: number }): Observable<Page<Student>> {
+ const httpParams = new HttpParams()
+ .append('page', page.toString())
+ .append('size', size.toString());
+ return this.httpClient.get<Page<Student>>('/student/pageOfCurrentTeacher', {params: httpParams});
+ }
}
```
定義上述方法時我們使用了幾個小技巧:
- ① 不定義參數名,直接在參數中使用`{}`
- ② 使用`xxx=yyy`的方法設置默認值
- ③ 使用`:`來指明參數的類型
- ④ 使用`?`標記該參數可選
在以上技巧的支持下,實現了多參數默認值的設置,同時由于該參數的類型為`{}`,所以上述方法支持以下調用形式:
```typescript
service.pageOfCurrentTeacher({});
service.pageOfCurrentTeacher({page: 1});
service.pageOfCurrentTeacher({page: 1, size: 2});
service.pageOfCurrentTeacher({size: 2});
service.pageOfCurrentTeacher({size: 2, page: 1});
```
### JSON對象與對象
如果你仔細觀察前面我們寫過的MockApi的話,應該會發現一個現象:我們特意的規避了在Mock中使用`new`關鍵字,而是使用了`as`關鍵字。比如我們在返回學生時使用如下代碼:
```typescript
result: {
name: 'xxx'
} as Student;
```
而不是:
```
result: new Student({name: 'xxx'})
```
我們為什么在這么做,上述兩種寫法本質上又有何區別呢?
這是由于真實的后臺返回返回的數據就是`as`的形式,表示:把返回值**看做是**某個類型,這正好是`as`所要表達的意思。而如果在模擬的后臺API中使用`new`,則表示:返回值**是**某個類型。這完全是兩個不同的概念,**看做是**則意味著可能是,也可能不是。
在交流中,我們有時也把這種**看做是**的類型稱為**JSON對象**,而把使用`new`關鍵字生成的對象稱為**對象**,為此隨意找個單元測試簡單演示一下來查看下二者的區別:
```typescript
fit('JSON對象與對象', () => {
class A {
a: string;
constructor(a: string) {
this.a = a;
}
}
const a1 = new A('123');
console.log('對象;', a1);
const a2 = {a: '123'} as A;
console.log('JSON對象:', a2);
});
```
控制臺打印信息如下:
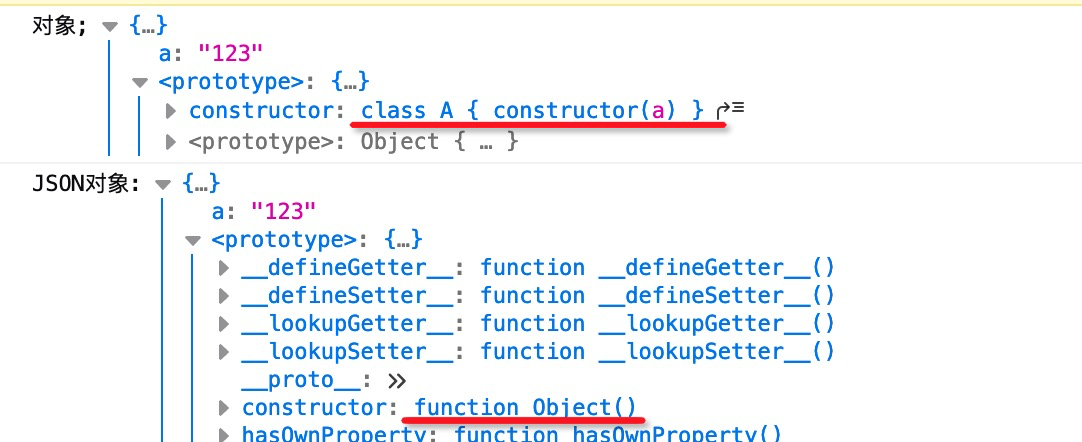
可見:對象a1原型鏈對應了類A;而JSON對象雖然通過`as`將類型聲明為`A`,但其本質(原型鏈)仍然是`object`。當前類A僅有一個`a`屬性,并不存在其它的方法。在未為類A定義方法前,上述兩種定義方法并不會有什么不同,但如果類A類中定義一些方法,就不一樣了:
```typescript
fit('JSON對象與對象', () => {
class A {
a: string;
constructor(a: string) {
this.a = a;
}
getA(): string {
return this.a;
}
}
const a1 = new A('123');
console.log('對象;', a1);
console.log(a1.getA());
const a2 = {a: '123'} as A;
console.log('JSON對象:', a2);
?? console.log(a2.getA());
});
```
?? 由于a2實際的類型并不是A,僅僅是當做A來看待,所以在嘗試調用`getA()`方法時將會觸發一個異常。

查看控制臺信息也的確如此,第二個使用`as`方法聲明的JSON對象并不存在`getA()`方法:
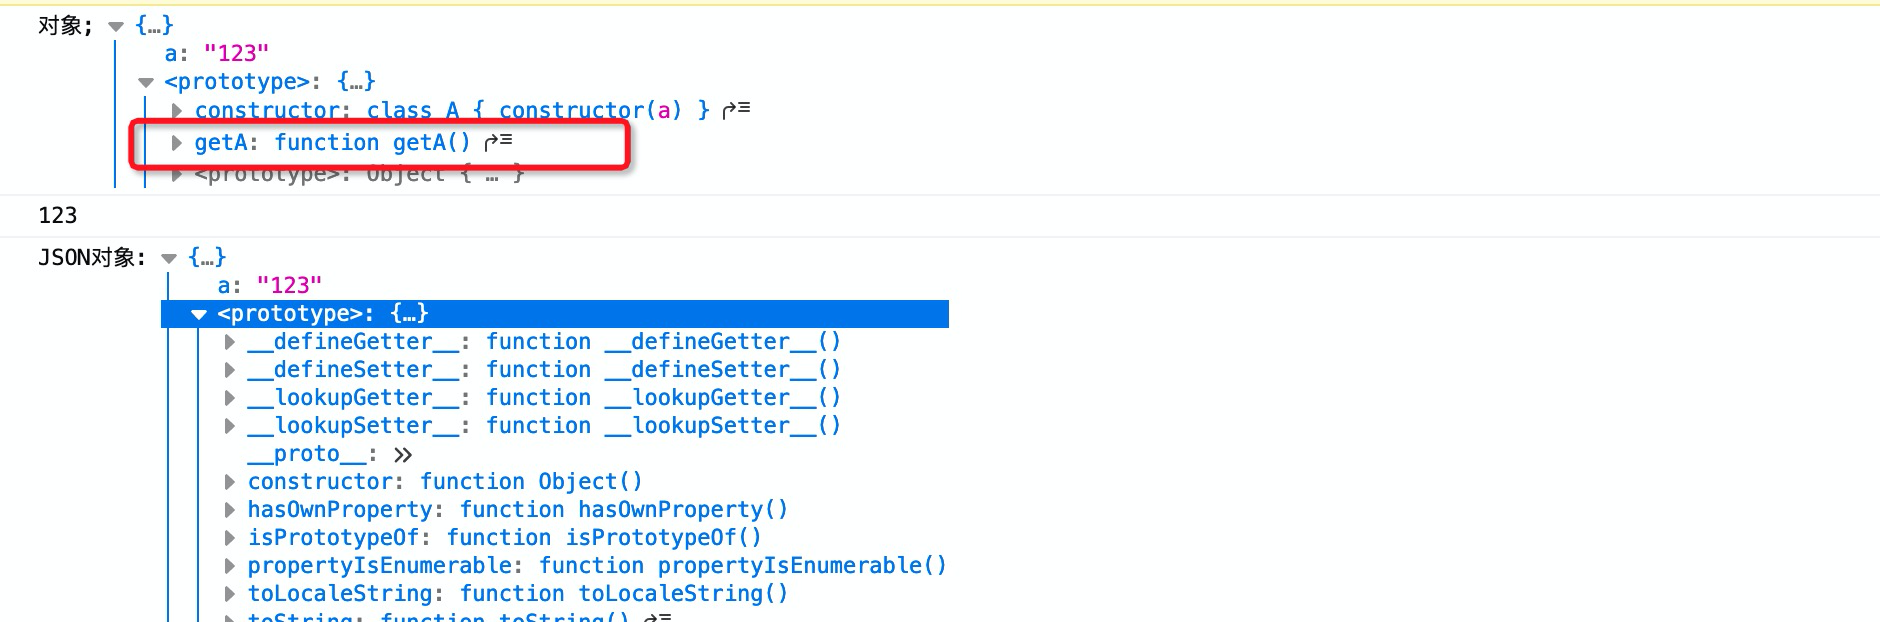
實際上由于JSON對象的本質是個`object`,在javascript中,任意對象的本質都是`object`,這個`object`是`javascript`的最基礎的類。
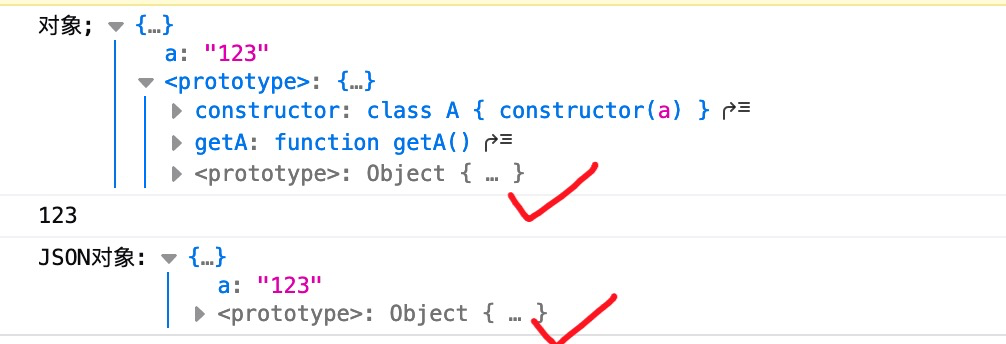
如上圖示對象`a1`由類A實例化而來,而A的父類(原型)同樣也是`object`。
通過上述學習我們發現使用`new`關鍵字來實例化對象與使用`as`關鍵字來將某對象**看做**是某類的實例化,其實是有些本質區別的。而`this.httpClient.get<T>`中的`T`的本質則是一個`as`,也就是說`httpClient`會將請求的數據標識為我們傳入`T`,而不是根據`T`的的類型返回一`T`的實例。
所以在MockApi中我們也應該用`as`關鍵字將JSON對象**標識**為返回值類型,而不是用`new`關鍵字真正返回某個類的實例。
最后我們加入對異常的斷言,以使上述單元測試順利通過:
```typescript
+++ b/first-app/src/app/yz-validators.spec.ts
@@ -61,6 +61,12 @@ describe('YzValidators', () => {
const a2 = {a: '123'} as A;
console.log('JSON對象:', a2);
- console.log(a2.getA());
+ let catchException = false;
+ try {
+ console.log(a2.getA());
+ } catch (e) {
+ catchException = true;
+ }
+ expect(catchException).toBeTrue();
});
});
```
上述代碼展示了測試異常的一種常規方法:在調用異常的代碼前定義個boolean類型的局部變量并設置為fasle,然后在`try`中執行異常代碼,在`catch`中將boolean值設置為true。如果代碼如我們期望的一樣執行,則boolean類型的值必然為true,此時斷言通過。否則斷言不通過。所以斷言是否通過可以做為驗證執行某些代碼是否發生了異常的依據。
> [info] 初次接觸前臺這個即簡單又深奧的領域時,搞不太清JSON對象與對象的異同是很正常的事情。所以看完上面的講解仍然云里霧里的話,這并不是你的錯,而是我們在這里為大家講解的篇幅太少了。在教程中及以后的生產開發中,我們只需要記住:在MocaApi中不能夠使用`new`關鍵字來返回數據便可以了。
## MockApi
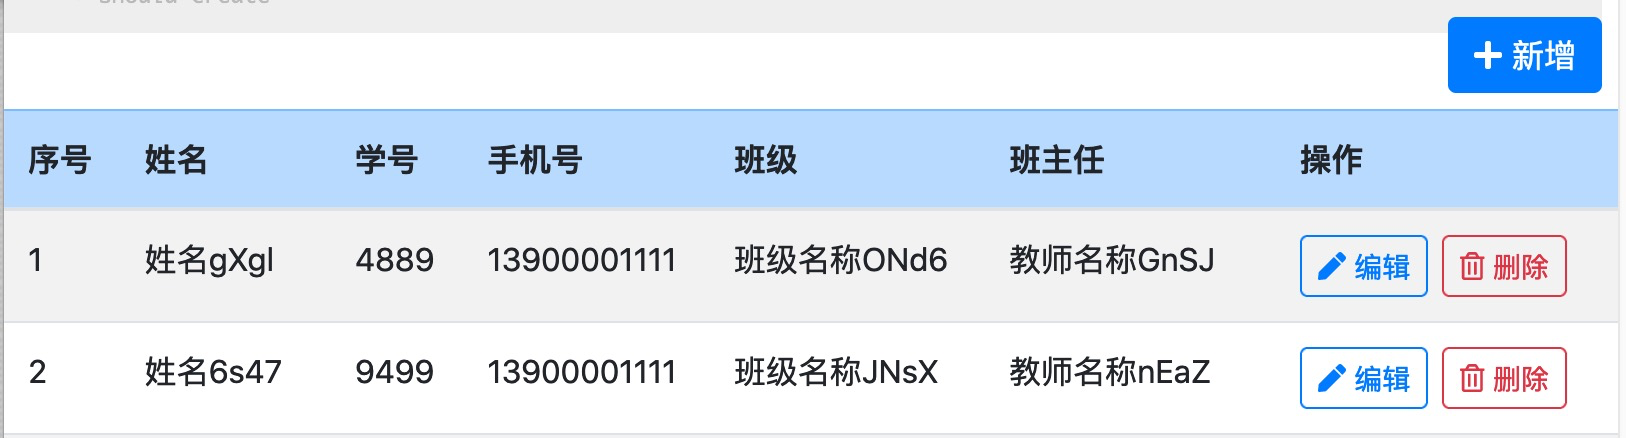
我們繼續使用`as`關鍵字來返回一個`Page`類型,打開`student.mock.api.ts`添加如下API:
```typescript
{
method: 'GET',
url: '/student/pageOfCurrentTeacher',
result: (urlMatches: string[], options: RequestOptions) => {
const httpParams = options.params as HttpParams;
const page = +(httpParams.get('page') as string);
const size = +(httpParams.get('size') as string);
Assert.isNumber(page, size, 'page size must be number');
const students = [] as Array<Student>;
for (let i = 0; i < size; i++) {
students.push({
id: i + 1,
name: randomString('姓名'),
number: randomNumber(10000).toString(),
phone: '13900001111',
clazz: {
name: randomString('班級名稱'),
teacher: {
name: randomString('教師名稱')
} as Teacher
} as Clazz
} as Student);
}
return {
content: students,
number: page,
size,
totalPages: (page + 1 + randomNumber(10)) * size
} as Page<Student>;
}
}
```
## 測試
確保某一段代碼是否正常運行的最簡單的方法是寫個單元測試,這比用鼠標點一點,鍵盤輸入一下要可靠、穩定的多。而且從長久來看也省時的多。當Service以及MockApi都準備好以后,我們啟用單元測試來測試一下,以保證`Service`發起請求后MockApi可以做出響應:
```typescript
+++ b/first-app/src/app/service/student.service.spec.ts
@@ -3,6 +3,7 @@ import {TestBed} from '@angular/core/testing';
import {StudentService} from './student.service';
import {MockApiTestingModule} from '../mock-api/mock-api-testing.module';
import {HttpClient} from '@angular/common/http';
+import {getTestScheduler} from 'jasmine-marbles';
describe('StudentService', () => {
let service: StudentService;
@@ -24,4 +25,19 @@ describe('StudentService', () => {
.subscribe(success => console.log('success', success),
error => console.log('error', error));
});
+
+ fit('pageOfCurrentTeacher', () => {
+ let called = false;
+ service.pageOfCurrentTeacher({page: 1, size: 2})
+ .subscribe(data => {
+ // 當called為true時,說明接收到了數據
+ called = true;
+ expect(data.number).toBe(1);
+ expect(data.size).toBe(2);
+ });
+
+ // 手動發送數據并斷言已成功接收
+ getTestScheduler().flush();
+ expect(called).toBeTrue();
+ });
});
```
測試通過。

有了測試保證的Service,接下來完成組件C層初始化的對接。
## C層
在C層的`ngOnInit()`方法中增加后臺請求的代碼。雖然我們可以將組件初始化的代碼直接寫在構造函數中,但Angular官方并不建議我們這樣做,之所以這樣Angular給出的答案是:這樣會更高效。
```typescript
+++ b/first-app/src/app/student/student.component.ts
@@ -1,6 +1,7 @@
import {Component, OnInit} from '@angular/core';
import {Page} from '../entity/page';
import {Student} from '../entity/student';
+import {StudentService} from '../service/student.service';
@Component({
selector: 'app-student',
@@ -9,11 +10,17 @@ import {Student} from '../entity/student';
})
export class StudentComponent implements OnInit {
pageData = {} as Page<Student>;
+ page = 0;
+ size = 20;
- constructor() {
+ constructor(private studentService: StudentService) {
}
ngOnInit(): void {
+ this.studentService.pageOfCurrentTeacher({
+ page: this.page,
+ size: this.size
+ }).subscribe(data => this.pageData = data);
}
onDelete(index: number, id: number): void {
```
## 測試
測試大家已經輕車熟路了:
```typescript
+++ b/first-app/src/app/student/student.component.spec.ts
@@ -2,6 +2,8 @@ import {ComponentFixture, TestBed} from '@angular/core/testing';
import {StudentComponent} from './student.component';
import {RouterTestingModule} from '@angular/router/testing';
+import {getTestScheduler} from 'jasmine-marbles';
+import {MockApiTestingModule} from '../mock-api/mock-api-testing.module';
describe('StudentComponent', () => {
let component: StudentComponent;
@@ -11,7 +13,8 @@ describe('StudentComponent', () => {
await TestBed.configureTestingModule({
declarations: [StudentComponent],
imports: [
- RouterTestingModule
+ RouterTestingModule,
+ MockApiTestingModule
]
})
.compileComponents();
@@ -26,4 +29,9 @@ describe('StudentComponent', () => {
it('should create', () => {
expect(component).toBeTruthy();
});
+
+ fit('onInit', () => {
+ getTestScheduler().flush();
+ fixture.autoDetectChanges();
+ });
});
```
| 名稱 | 鏈接 |
| -------- | ------------------------------------------------------------ |
| 本節源碼 | [https://github.com/mengyunzhi/angular11-guild/archive/step7.4.1.zip](https://github.com/mengyunzhi/angular11-guild/archive/step7.4.1.zip) |
- 序言
- 第一章 Hello World
- 1.1 環境安裝
- 1.2 Hello Angular
- 1.3 Hello World!
- 第二章 教師管理
- 2.1 教師列表
- 2.1.1 初始化原型
- 2.1.2 組件生命周期之初始化
- 2.1.3 ngFor
- 2.1.4 ngIf、ngTemplate
- 2.1.5 引用 Bootstrap
- 2.2 請求后臺數據
- 2.2.1 HttpClient
- 2.2.2 請求數據
- 2.2.3 模塊與依賴注入
- 2.2.4 異步與回調函數
- 2.2.5 集成測試
- 2.2.6 本章小節
- 2.3 新增教師
- 2.3.1 組件初始化
- 2.3.2 [(ngModel)]
- 2.3.3 對接后臺
- 2.3.4 路由
- 2.4 編輯教師
- 2.4.1 組件初始化
- 2.4.2 獲取路由參數
- 2.4.3 插值與模板表達式
- 2.4.4 初識泛型
- 2.4.5 更新教師
- 2.4.6 測試中的路由
- 2.5 刪除教師
- 2.6 收尾工作
- 2.6.1 RouterLink
- 2.6.2 fontawesome圖標庫
- 2.6.3 firefox
- 2.7 總結
- 第三章 用戶登錄
- 3.1 初識單元測試
- 3.2 http概述
- 3.3 Basic access authentication
- 3.4 著陸組件
- 3.5 @Output
- 3.6 TypeScript 類
- 3.7 瀏覽器緩存
- 3.8 總結
- 第四章 個人中心
- 4.1 原型
- 4.2 管道
- 4.3 對接后臺
- 4.4 x-auth-token認證
- 4.5 攔截器
- 4.6 小結
- 第五章 系統菜單
- 5.1 延遲及測試
- 5.2 手動創建組件
- 5.3 隱藏測試信息
- 5.4 規劃路由
- 5.5 定義菜單
- 5.6 注銷
- 5.7 小結
- 第六章 班級管理
- 6.1 新增班級
- 6.1.1 組件初始化
- 6.1.2 MockApi 新建班級
- 6.1.3 ApiInterceptor
- 6.1.4 數據驗證
- 6.1.5 教師選擇列表
- 6.1.6 MockApi 教師列表
- 6.1.7 代碼重構
- 6.1.8 小結
- 6.2 教師列表組件
- 6.2.1 初始化
- 6.2.2 響應式表單
- 6.2.3 getTestScheduler()
- 6.2.4 應用組件
- 6.2.5 小結
- 6.3 班級列表
- 6.3.1 原型設計
- 6.3.2 初始化分頁
- 6.3.3 MockApi
- 6.3.4 靜態分頁
- 6.3.5 動態分頁
- 6.3.6 @Input()
- 6.4 編輯班級
- 6.4.1 測試模塊
- 6.4.2 響應式表單驗證
- 6.4.3 @Input()
- 6.4.4 FormGroup
- 6.4.5 自定義FormControl
- 6.4.6 代碼重構
- 6.4.7 小結
- 6.5 刪除班級
- 6.6 集成測試
- 6.6.1 惰性加載
- 6.6.2 API攔截器
- 6.6.3 路由與跳轉
- 6.6.4 ngStyle
- 6.7 初識Service
- 6.7.1 catchError
- 6.7.2 單例服務
- 6.7.3 單元測試
- 6.8 小結
- 第七章 學生管理
- 7.1 班級列表組件
- 7.2 新增學生
- 7.2.1 exports
- 7.2.2 自定義驗證器
- 7.2.3 異步驗證器
- 7.2.4 再識DI
- 7.2.5 屬性型指令
- 7.2.6 完成功能
- 7.2.7 小結
- 7.3 單元測試進階
- 7.4 學生列表
- 7.4.1 JSON對象與對象
- 7.4.2 單元測試
- 7.4.3 分頁模塊
- 7.4.4 子組件測試
- 7.4.5 重構分頁
- 7.5 刪除學生
- 7.5.1 第三方dialog
- 7.5.2 批量刪除
- 7.5.3 面向對象
- 7.6 集成測試
- 7.7 編輯學生
- 7.7.1 初始化
- 7.7.2 自定義provider
- 7.7.3 更新學生
- 7.7.4 集成測試
- 7.7.5 可訂閱的路由參數
- 7.7.6 小結
- 7.8 總結
- 第八章 其它
- 8.1 打包構建
- 8.2 發布部署
- 第九章 總結