我們在`src/app/clazz`文件夾中,新建klassSelect組件:
> 筆者在這犯了一個命名錯誤,組件的名稱應該是`TeacherSelect`,而不是`KlassSelect`。
```bash
panjie@panjies-Mac-Pro clazz % pwd
/Users/panjie/github/mengyunzhi/angular11-guild/first-app/src/app/clazz
panjie@panjies-Mac-Pro clazz % ng g c klassSelect
CREATE src/app/clazz/klass-select/klass-select.component.css (0 bytes)
CREATE src/app/clazz/klass-select/klass-select.component.html (27 bytes)
CREATE src/app/clazz/klass-select/klass-select.component.spec.ts (662 bytes)
CREATE src/app/clazz/klass-select/klass-select.component.ts (298 bytes)
UPDATE src/app/clazz/clazz.module.ts (409 bytes)
```
然后把班級添加組件中的相關的V層代碼復制過來:
```html
+++ b/first-app/src/app/clazz/klass-select/klass-select.component.html
<select id="teacher" class="form-control"
name="teacher"
[(ngModel)]="clazz.teacherId">
<option *ngFor="let teacher of teachers" [ngValue]="teacher.id">
{{teacher.name}}
</option>
</select>
```
再把班級添加組件中的相關的C層代碼復制過來:
```typescript
+++ b/first-app/src/app/clazz/klass-select/klass-select.component.ts
export class KlassSelectComponent implements OnInit {
teachers = new Array<Teacher>();
teacherId: number | undefined;
constructor(private httpClient: HttpClient) {
}
ngOnInit(): void {
// 獲取所有教師
this.httpClient.get<Array<Teacher>>('teacher')
.subscribe(teachers => this.teachers = teachers);
}
}
```
最后變更當V層中的`ngModel`,并使用`ng t`開啟測試。
```html
+++ b/first-app/src/app/clazz/klass-select/klass-select.component.html
@@ -1,6 +1,5 @@
<select id="teacher" class="form-control"
- [(ngModel)]="clazz.teacherId">
+ [(ngModel)]="teacherId">
name="teacher">
<option *ngFor="let teacher of teachers" [ngValue]="teacher.id">
{{teacher.name}}
</option>
```
## MockApi
在單元測試的動態測試模塊中,引用`MockApiInterceptor`以及`HttpModule`,并加`TeacherMockApi`以提供teacher相關的后臺模塊數據。
```typescript
+++ b/first-app/src/app/clazz/klass-select/klass-select.component.spec.ts
@@ -1,6 +1,9 @@
import {ComponentFixture, TestBed} from '@angular/core/testing';
import {KlassSelectComponent} from './klass-select.component';
+import {HTTP_INTERCEPTORS, HttpClientModule} from '@angular/common/http';
+import {MockApiInterceptor} from '@yunzhi/ng-mock-api';
+import {TeacherMockApi} from '../../mock-api/teacher.mock.api';
describe('KlassSelectComponent', () => {
let component: KlassSelectComponent;
@@ -8,7 +11,18 @@ describe('KlassSelectComponent', () => {
beforeEach(async () => {
await TestBed.configureTestingModule({
- declarations: [KlassSelectComponent]
+ declarations: [KlassSelectComponent],
+ imports: [
+ HttpClientModule
+ ],
+ providers: [
+ {
+ provide: HTTP_INTERCEPTORS, multi: true,
+ useClass: MockApiInterceptor.forRoot([
+ TeacherMockApi
+ ])
+ }
+ ]
})
.compileComponents();
});
```
最后也是最關鍵的,保證整個項目中僅有當前一個 `fit`,并且在其中啟用自動檢測變更機制:
```typescript
+++ b/first-app/src/app/clazz/klass-select/klass-select.component.spec.ts
@@ -35,5 +35,6 @@ describe('KlassSelectComponent', () => {
fit('should create', () => {
expect(component).toBeTruthy();
+ fixture.autoDetectChanges();
});
});
```

效果有了,還需要關注控制臺:

提示說`option`上不能綁定`ngValue`,原因是`ngValue`并不是個已知的屬性。請嘗試解決后繼續學習。
## @Output()
教師被用戶選擇后,我們需要將被選擇的數據通過`output()`方法將數據彈出。在前面的章節中我們已經學習過`@Output()`的使用方法,在此我們大概可以總結出:如果一個組件需要向外傳送數據,則需要加入`@Output()`注解,該注解的字段類型為`EventEmitter`,用于向父組件彈射數據。
```typescript
+++ b/first-app/src/app/clazz/klass-select/klass-select.component.ts
@@ -1,7 +1,8 @@
-import {Component, OnInit} from '@angular/core';
+import {Component, OnInit, EventEmitter, Output} from '@angular/core';
import {Teacher} from '../../entity/teacher';
import {HttpClient} from '@angular/common/http';
+
@Component({
selector: 'app-klass-select',
templateUrl: './klass-select.component.html',
@@ -11,6 +12,9 @@ import {HttpClient} from '@angular/common/http';
export class KlassSelectComponent implements OnInit {
teachers = new Array<Teacher>();
teacherId: number | undefined;
+ @Output()
+ beChange = new EventEmitter<any>();
+
constructor(private httpClient: HttpClient) {
}
```
而至于誰會成為自己的父組件,當前組件并不關心也不需要關心,因為成為自己父組件的前提僅僅是在組件的V層中引入`app-klass-select`,所以任意組件都可以成為自己的父組件。而無論誰成為自己的父組件,當前組件均是通過`@Output()`向其彈值。
## 數據監聽
教師能選擇了,`@Output`也有了。當下的問題是如何感知用戶選擇了某個教師并在選擇后通過`@Output()`向外發送通知。Angular最少提供了兩種方案來解決此類問題。
> 這種對數據的感知又被稱為**數據監聽Data Listen**,完成這項功能的又被稱為**數據監聽器 Data Listener**。
### (change)事件
Angular提供的`(change)`事件可以感知表單項的變化,在變化時被調用一次:
```html
+++ b/first-app/src/app/clazz/klass-select/klass-select.component.html
@@ -1,6 +1,7 @@
<select id="teacher" class="form-control"
name="teacher"
- [(ngModel)]="teacherId">
+ [(ngModel)]="teacherId"
+ (change)="onChange()">
<option *ngFor="let teacher of teachers" [ngValue]="teacher.id">
{{teacher.name}}
</option>
```
C層創建對應的方法:
```typescript
+++ b/first-app/src/app/clazz/klass-select/klass-select.component.ts
@@ -24,4 +24,7 @@ export class KlassSelectComponent implements OnInit {
.subscribe(teachers => this.teachers = teachers);
}
+ onChange(): void {
+ console.log('change called');
+ }
}
```
此時,我們選擇教師列表中的教師時,C層中的`onChange`方法將被調用一次:
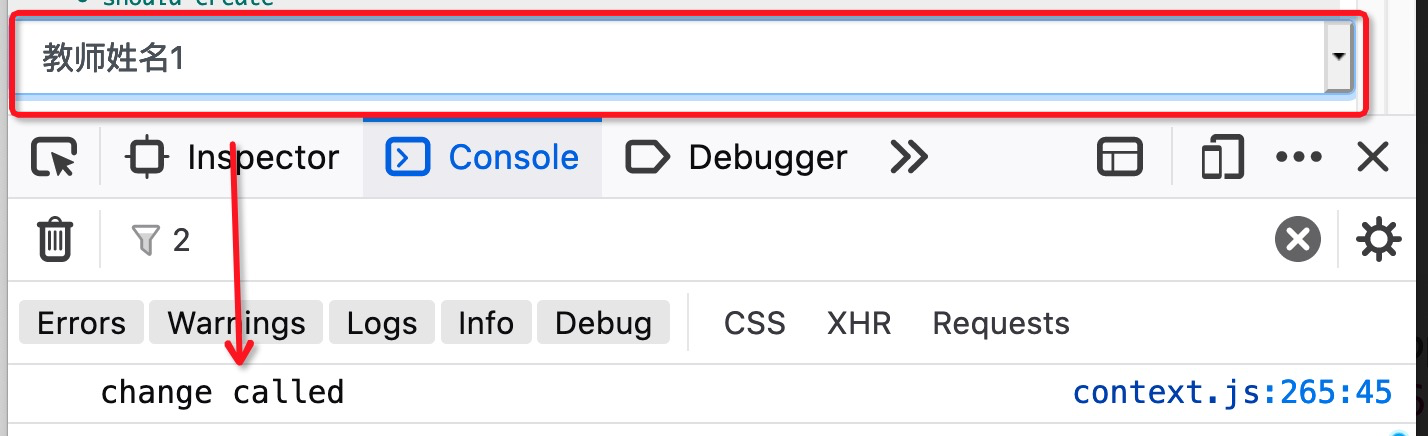
如此以來,選擇教師后調用`onChange()`方法,接著便可以在`onChange()`方法中向外彈出選擇的教師ID了。
```typescript
+++ b/first-app/src/app/clazz/klass-select/klass-select.component.ts
@@ -24,4 +24,9 @@ export class KlassSelectComponent implements OnInit {
.subscribe(teachers => this.teachers = teachers);
}
+ onChange(): void {
+ console.log('change called');
+ console.log(this.teacherId);
+ this.beChange.emit(this.teacherId);
+ }
}
```
#### 測試
凡事都不能想當然,除非你有百分百的把握(即使是這樣,實際中也會犯錯?),數據彈射出是否被成功接收,還需要進行測試:
```typescript
+++ b/first-app/src/app/clazz/klass-select/klass-select.component.spec.ts
@@ -38,5 +38,7 @@ describe('KlassSelectComponent', () => {
fit('should create', () => {
expect(component).toBeTruthy();
fixture.autoDetectChanges();
+ component.beChange
+ .subscribe((data: any) => console.log('接收到了彈出的數據', data));
});
});
```

最后,我們規范一下`beChange`事件彈出器的數據類型:
```typescript
+++ b/first-app/src/app/clazz/klass-select/klass-select.component.ts
@@ -13,7 +13,7 @@ export class KlassSelectComponent implements OnInit {
teacherId: number | undefined;
@Output()
- beChange = new EventEmitter<any>();
+ beChange = new EventEmitter<number>();
constructor(private httpClient: HttpClient) {
}
```
同步修正單元測試:
```typescript
+++ b/first-app/src/app/clazz/klass-select/klass-select.component.spec.ts
@@ -39,6 +39,6 @@ describe('KlassSelectComponent', () => {
expect(component).toBeTruthy();
fixture.autoDetectChanges();
component.beChange
- .subscribe((data: any) => console.log('接收到了彈出的數據', data));
+ .subscribe((data: number) => console.log('接收到了彈出的數據', data));
});
});
```
### 響應式表單
`(beChange)`事件雖然可用,但實際上卻是沿用了AngularJS(Angular的前身)的思路。而Angular則提供了效率更高,更加面向對應的響應式表單來解決此類問題。
由于**響應式表單**是Angular的核心知識點之一,我們單獨在下下節內容中進行講解。
| 名稱 | 鏈接 |
| --------- | ------------------------------------------------------------ |
| OnChanges | [https://angular.cn/api/core/OnChanges](https://angular.cn/api/core/OnChanges) |
| 本節源碼 | [https://github.com/mengyunzhi/angular11-guild/archive/step6.2.1.zip](https://github.com/mengyunzhi/angular11-guild/archive/step6.2.1.zip) |
- 序言
- 第一章 Hello World
- 1.1 環境安裝
- 1.2 Hello Angular
- 1.3 Hello World!
- 第二章 教師管理
- 2.1 教師列表
- 2.1.1 初始化原型
- 2.1.2 組件生命周期之初始化
- 2.1.3 ngFor
- 2.1.4 ngIf、ngTemplate
- 2.1.5 引用 Bootstrap
- 2.2 請求后臺數據
- 2.2.1 HttpClient
- 2.2.2 請求數據
- 2.2.3 模塊與依賴注入
- 2.2.4 異步與回調函數
- 2.2.5 集成測試
- 2.2.6 本章小節
- 2.3 新增教師
- 2.3.1 組件初始化
- 2.3.2 [(ngModel)]
- 2.3.3 對接后臺
- 2.3.4 路由
- 2.4 編輯教師
- 2.4.1 組件初始化
- 2.4.2 獲取路由參數
- 2.4.3 插值與模板表達式
- 2.4.4 初識泛型
- 2.4.5 更新教師
- 2.4.6 測試中的路由
- 2.5 刪除教師
- 2.6 收尾工作
- 2.6.1 RouterLink
- 2.6.2 fontawesome圖標庫
- 2.6.3 firefox
- 2.7 總結
- 第三章 用戶登錄
- 3.1 初識單元測試
- 3.2 http概述
- 3.3 Basic access authentication
- 3.4 著陸組件
- 3.5 @Output
- 3.6 TypeScript 類
- 3.7 瀏覽器緩存
- 3.8 總結
- 第四章 個人中心
- 4.1 原型
- 4.2 管道
- 4.3 對接后臺
- 4.4 x-auth-token認證
- 4.5 攔截器
- 4.6 小結
- 第五章 系統菜單
- 5.1 延遲及測試
- 5.2 手動創建組件
- 5.3 隱藏測試信息
- 5.4 規劃路由
- 5.5 定義菜單
- 5.6 注銷
- 5.7 小結
- 第六章 班級管理
- 6.1 新增班級
- 6.1.1 組件初始化
- 6.1.2 MockApi 新建班級
- 6.1.3 ApiInterceptor
- 6.1.4 數據驗證
- 6.1.5 教師選擇列表
- 6.1.6 MockApi 教師列表
- 6.1.7 代碼重構
- 6.1.8 小結
- 6.2 教師列表組件
- 6.2.1 初始化
- 6.2.2 響應式表單
- 6.2.3 getTestScheduler()
- 6.2.4 應用組件
- 6.2.5 小結
- 6.3 班級列表
- 6.3.1 原型設計
- 6.3.2 初始化分頁
- 6.3.3 MockApi
- 6.3.4 靜態分頁
- 6.3.5 動態分頁
- 6.3.6 @Input()
- 6.4 編輯班級
- 6.4.1 測試模塊
- 6.4.2 響應式表單驗證
- 6.4.3 @Input()
- 6.4.4 FormGroup
- 6.4.5 自定義FormControl
- 6.4.6 代碼重構
- 6.4.7 小結
- 6.5 刪除班級
- 6.6 集成測試
- 6.6.1 惰性加載
- 6.6.2 API攔截器
- 6.6.3 路由與跳轉
- 6.6.4 ngStyle
- 6.7 初識Service
- 6.7.1 catchError
- 6.7.2 單例服務
- 6.7.3 單元測試
- 6.8 小結
- 第七章 學生管理
- 7.1 班級列表組件
- 7.2 新增學生
- 7.2.1 exports
- 7.2.2 自定義驗證器
- 7.2.3 異步驗證器
- 7.2.4 再識DI
- 7.2.5 屬性型指令
- 7.2.6 完成功能
- 7.2.7 小結
- 7.3 單元測試進階
- 7.4 學生列表
- 7.4.1 JSON對象與對象
- 7.4.2 單元測試
- 7.4.3 分頁模塊
- 7.4.4 子組件測試
- 7.4.5 重構分頁
- 7.5 刪除學生
- 7.5.1 第三方dialog
- 7.5.2 批量刪除
- 7.5.3 面向對象
- 7.6 集成測試
- 7.7 編輯學生
- 7.7.1 初始化
- 7.7.2 自定義provider
- 7.7.3 更新學生
- 7.7.4 集成測試
- 7.7.5 可訂閱的路由參數
- 7.7.6 小結
- 7.8 總結
- 第八章 其它
- 8.1 打包構建
- 8.2 發布部署
- 第九章 總結