# 攔截器
完成上節的作業后,我們發現我們好像做了一個比較笨的工作。因為如果按在個人中心中加入
Login組件獲取的token的話,則意味著我們以后所有需要用戶認證的請求,都需要手動在請求時加入`x-auth-token`。而以懶人自居的我們,怎么能容忍這么冗余的動作呢?
除此以外,如果我們在每個需要認證的請求上都手動的加入`x-auth-token`,則會大幅降低整個項目的靈活性。比如后臺哪個抽瘋說咱換個認證方式,不使用`x-auth-token`了。這時候我們希望自己能做的不是罵街,而是能快速的響應這種需求。
> 世間唯有變化是永恒不變的。
為此,我們再來看看這個cookie的原理:
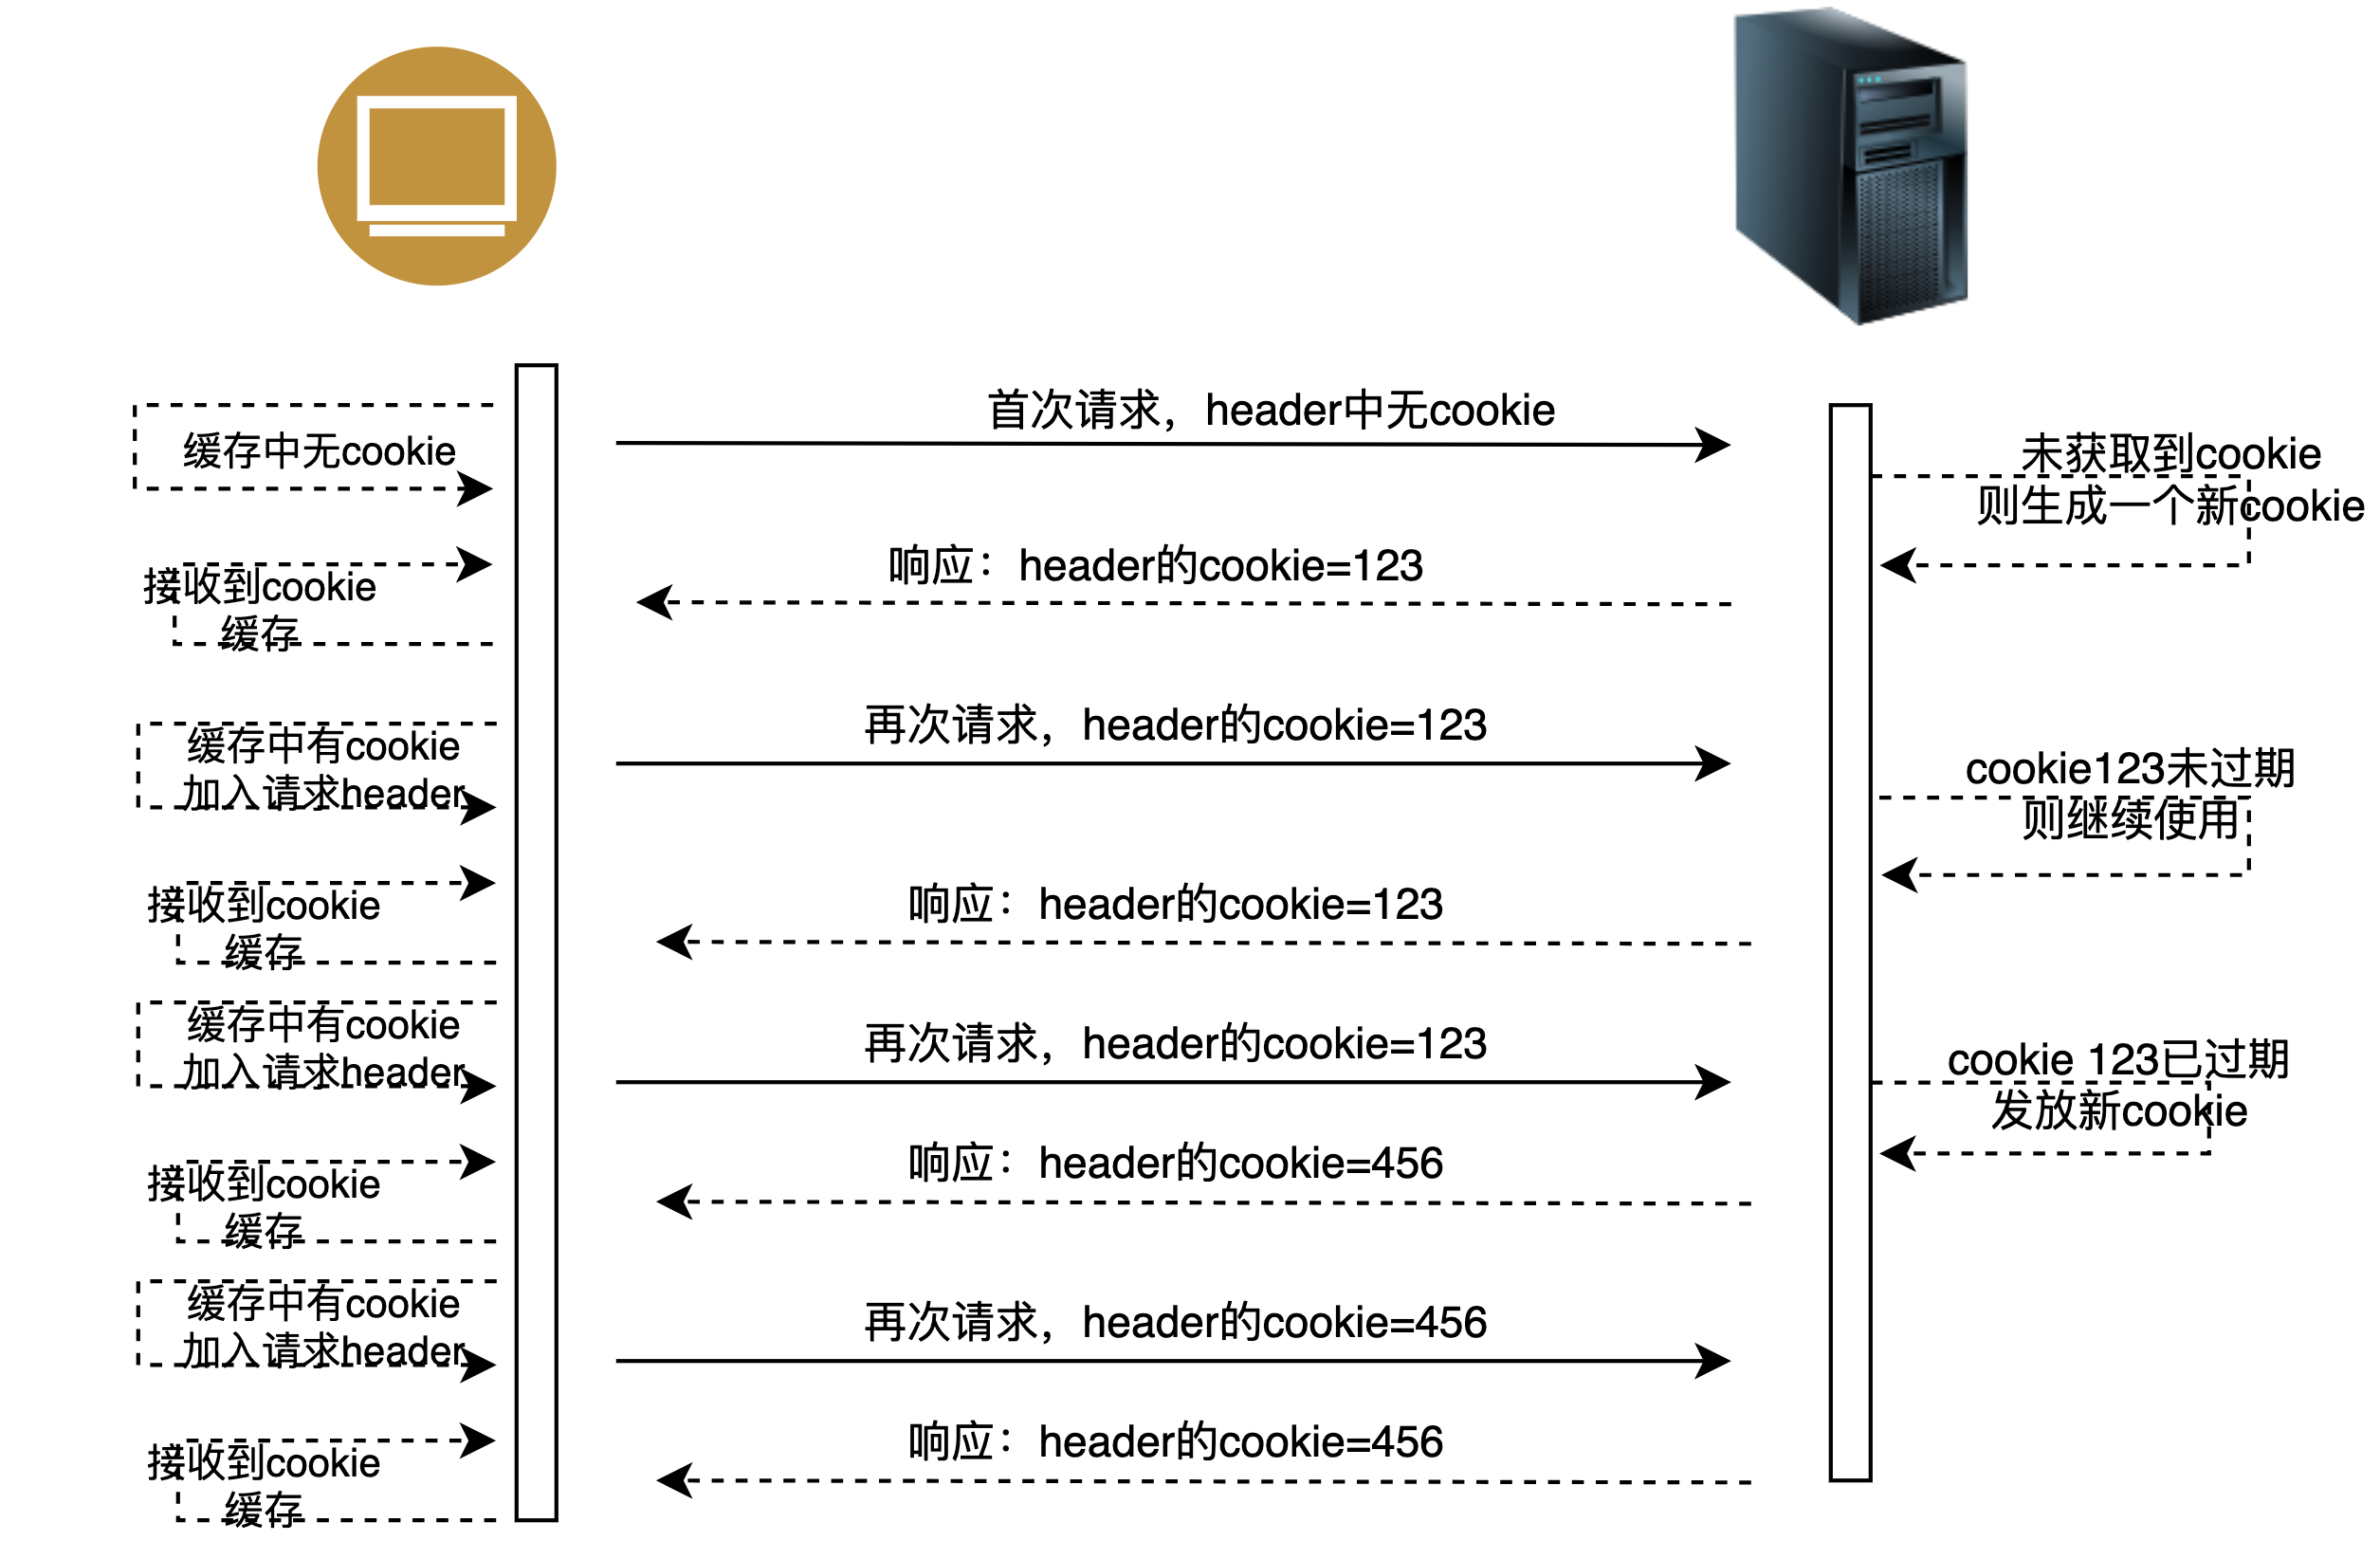
不然發現瀏覽器在處理cookie時,與用戶是否請求登錄無關。只是有請求,瀏覽器變會自動處理cookie,而不去管這個請求到底在實現什么邏輯功能。
其實我們當前后臺為我們提供的`x-auth-token`也是這樣的。我們在前臺向后臺發起任意請求時,后臺都會按上圖處理cookie的邏輯來處理`x-auth-token`。
那么,我們便可以使用Angular提供的**Interceptor攔截器**來快速完成在每次請求時自動處理`x-auth-token`的功能。
## Interceptor攔截器
Angular提供的攔截器,可以在前臺發起任何的http請求時進行攔截。
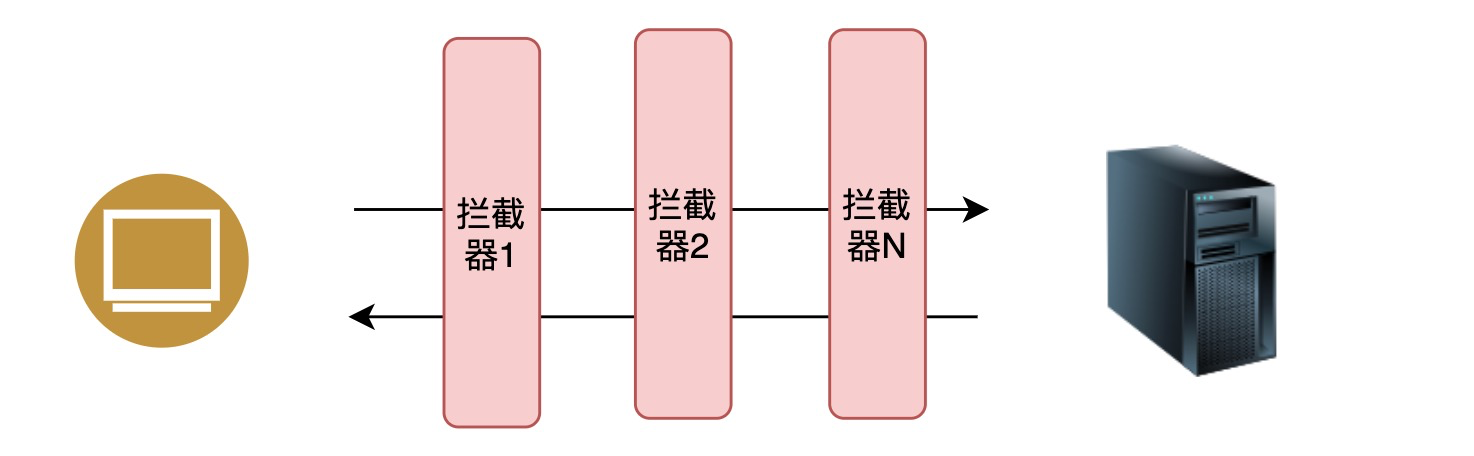
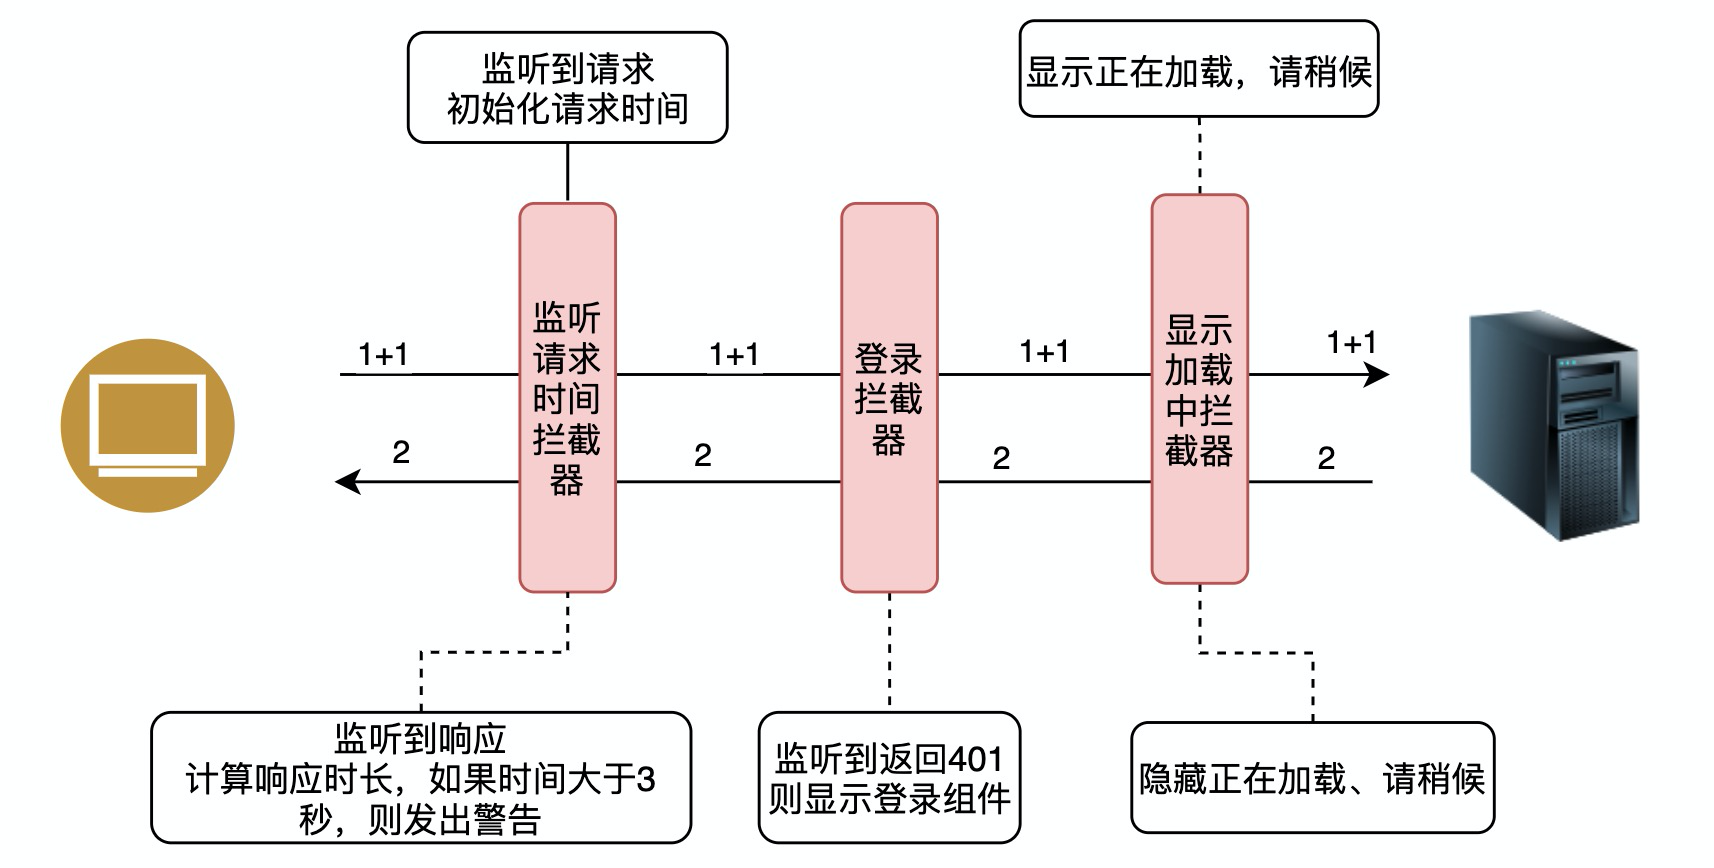
我們可以為Angular中的模塊配置多個攔截器,這些攔截器能夠對http請求以及響應進行攔截。近而提供:監視請求、響應數據;改變請求、響應數據等功能。比如在生產項目,我們可以使用攔截器來完成監聽長請求、監聽用戶需要授權、顯示loading等功能。
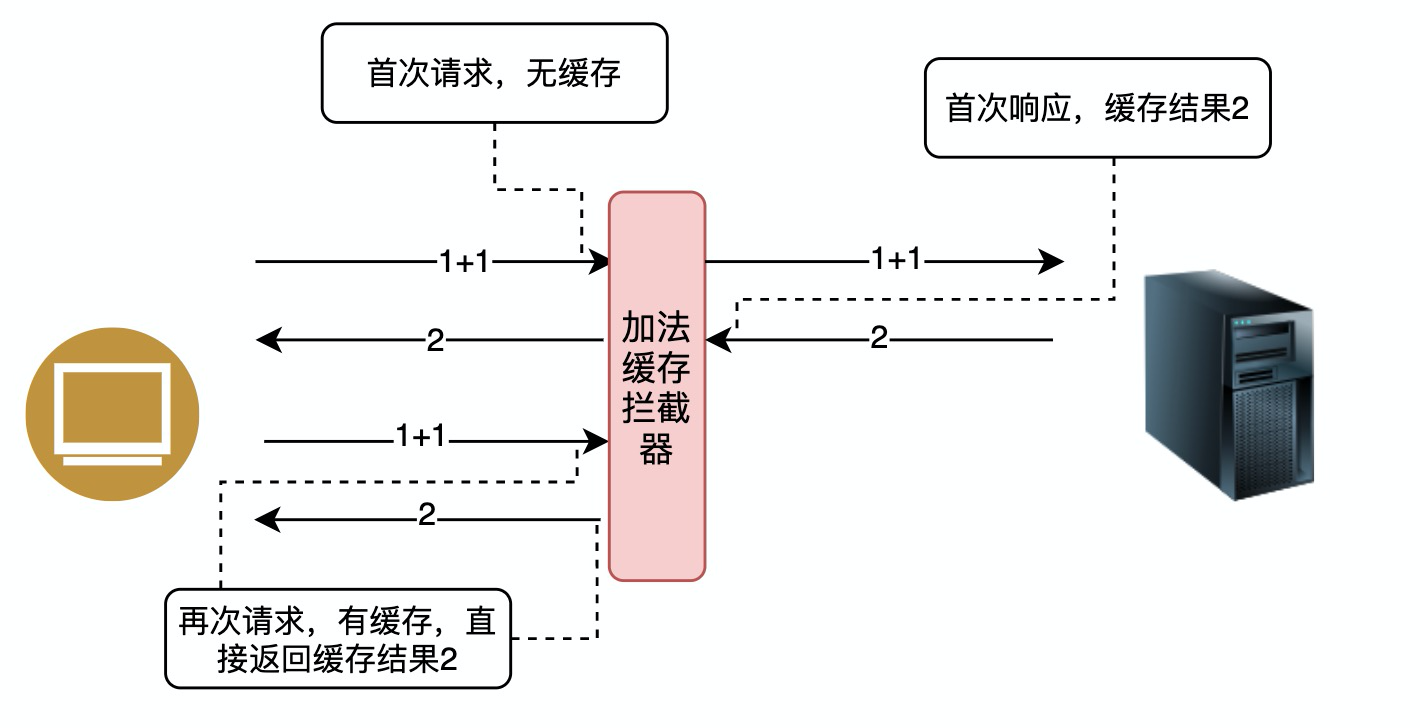
除此以外,還可以在攔截器中加入緩存:
`x-auth-token`實現正是攔截器的基于監視請求、響應數據、改變請求數據三個基本的功能。

其處理流程如下:
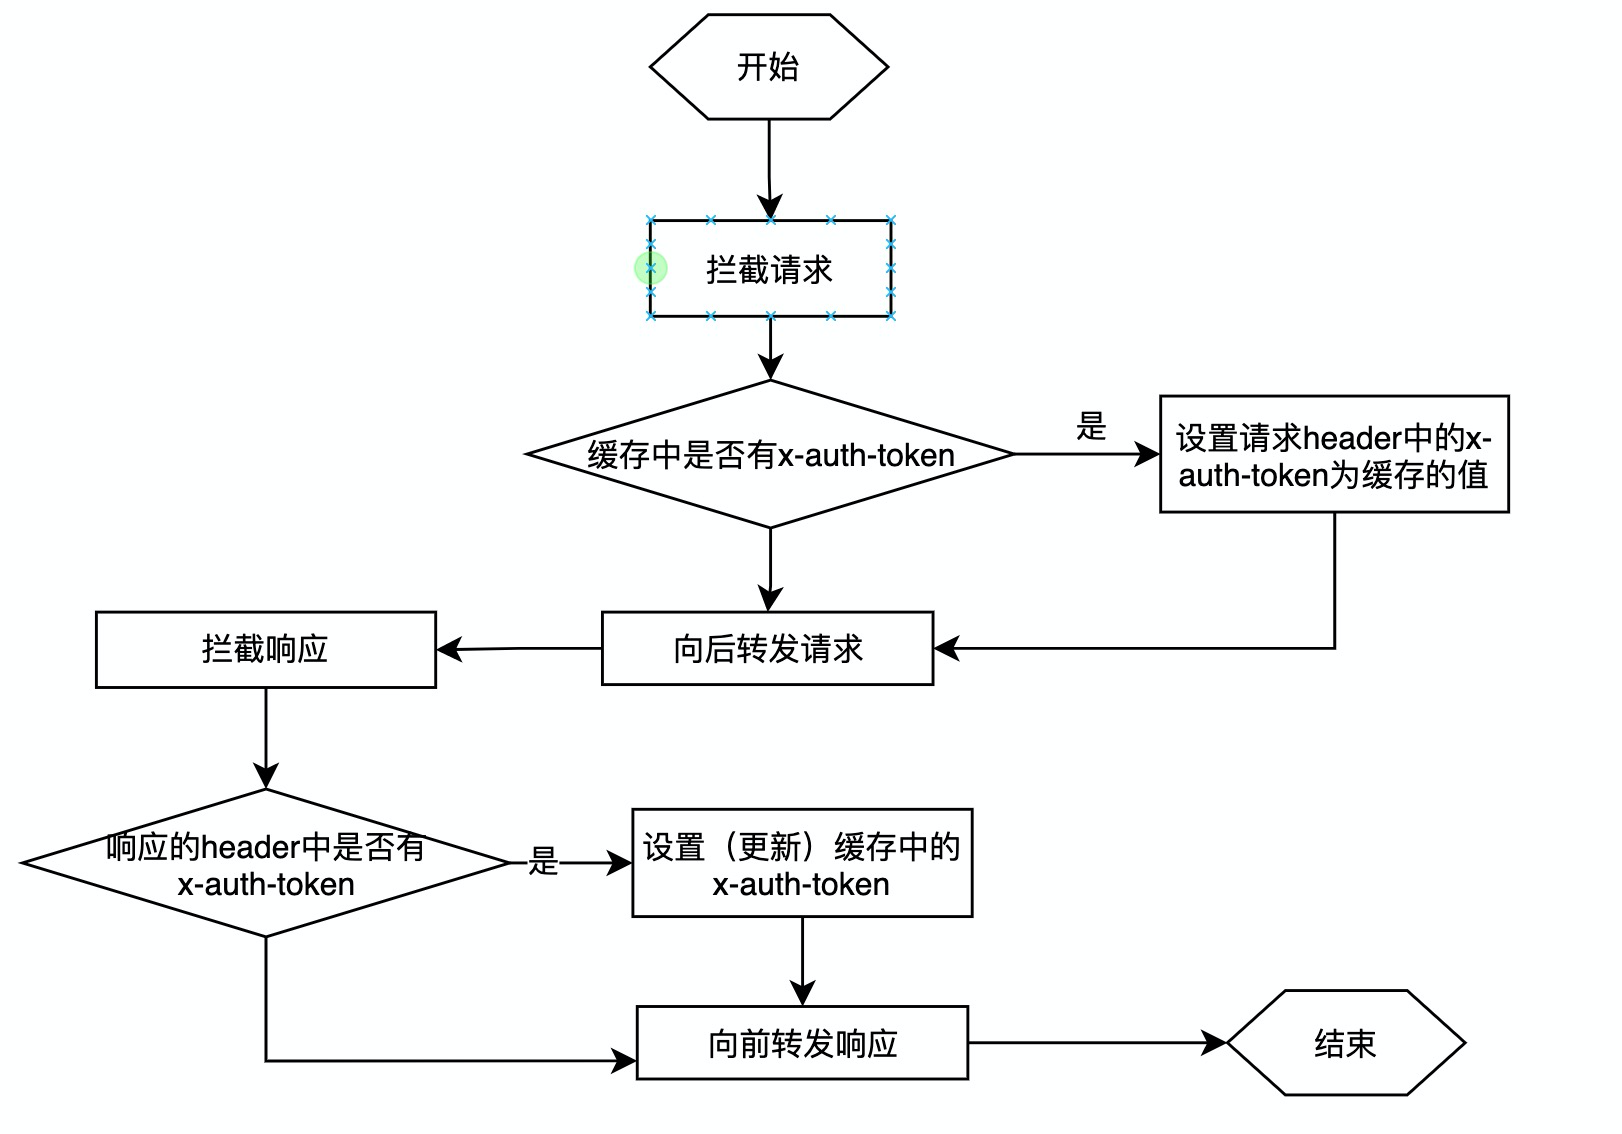
## 定義攔截器
打開shell并定位到`src/app`文件夾,使用以下命令初始化xAuthToken攔截器:
```bash
panjiedeMacBook-Pro:app panjie$ pwd
/Users/panjie/github/mengyunzhi/angular11-guild/first-app/src/app
panjiedeMacBook-Pro:app panjie$ ng g interceptor xAuthToken
CREATE src/app/x-auth-token.interceptor.spec.ts (442 bytes)
CREATE src/app/x-auth-token.interceptor.ts (415 bytes)
```
在`x-auth-token.interceptor.ts`打如下斷點,以驗證其是否執行:
```typescript
+++ b/first-app/src/app/x-auth-token.interceptor.ts
@@ -13,6 +13,7 @@ export class XAuthTokenInterceptor implements HttpInterceptor {
constructor() {}
intercept(request: HttpRequest<unknown>, next: HttpHandler): Observable<HttpEvent<unknown>> {
+ console.log('xAuthTokenInterceptor is called');
return next.handle(request);
}
}
```
然后在任意測試模塊中加入此攔截器,比如我們將其加入到login組件對應的動態測試模塊中:
```typescript
+++ b/first-app/src/app/login/login.component.spec.ts
-import {HttpClientModule} from "@angular/common/http";
+import {HttpClientModule, HTTP_INTERCEPTORS} from "@angular/common/http";
@@ -16,6 +16,9 @@ describe('LoginComponent', () => {
imports: [
FormsModule,
HttpClientModule
+ ],
+ providers: [
+ {provide: HTTP_INTERCEPTORS, useClass: XAuthTokenInterceptor, multi: true}
]
})
.compileComponents();
@@ -44,7 +47,7 @@ describe('LoginComponent', () => {
expect(component.onSubmit).toHaveBeenCalledTimes(1);
});
- it('onSubmit 用戶登錄', () => {
+ fit('onSubmit 用戶登錄', () => {
// 啟動自動變更檢測
fixture.autoDetectChanges();
component.teacher = {username: '張三', password: 'codedemo.club'} as Teacher;
```
`providers`譯為**具有某種能力的提供者**,我們在其中聲明了一個具有提供`HTTP_INTERCEPTORS HTTP`**攔截器**能力的提供者`XAuthTokenInterceptor`,使用`multi: true`來表時當前提供者為多個具有這種能力的一個(使用該方案保證了可以定義多個攔截器)。
Angular在發起Http請求時,會查詢當前模塊是否有`HTTP_INTERCEPTORS`的提供者, 如果有則會使用該提供者對請求進行攔截。我們使用`ng t`來觸發該單元測試:
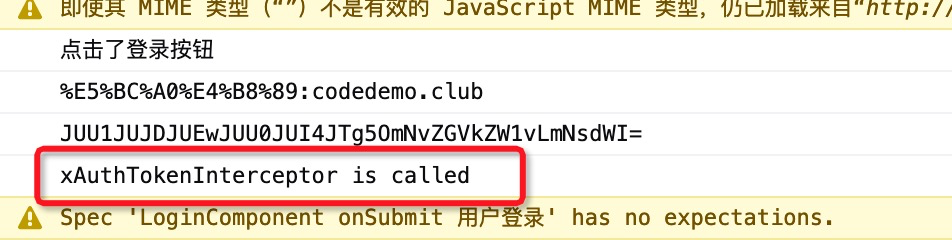
控制臺的成功打印了信息,表明在發請http請求時該攔截器中的代碼被調用,攔截器起作用了。
## 初識Observable
```typescript
intercept(request: HttpRequest<unknown>, next: HttpHandler): Observable<HttpEvent<unknown>> { ??
console.log('xAuthTokenInterceptor is called');
return next.handle(request);
}
```
intercept方法中有兩個參數,顧名思義第一個參數為請求,第二個參數為下一個處理者(可能是攔截器)。所以我們可以通過request來獲取關于請求的相關信息,那么如何攔截到響應信息呢?這要深入學習下`Observable`這個返回值類型。
其實我們早早的就接觸了`Observable`,該類型是設計模式中**觀察者模式**在js中的具體體現。我們可以在此返回值上調用`subscribe(success, error, complete)`方法。當`Observable`發送數據時,則會觸發`success`;當`Observable`發生錯誤時,則會調用`error` ;此外,`Observable`還會發送一個`完成`的通知,當`Observable`發送完所有的數據時,就會調用`complete`。
所以才有了我們在進行http請求時的如下代碼:
```typescript
httpClient.get(url)
.subscribe(data => console.log('成功', data),
error => console.log('失敗', error),
() => console.log('數據發送完畢'));
```
也就說`httpClient.get()`方法實際上返回了一個`Observable`,當請求成功時,`Observable`開始發送數據,觸發`data => console.log('成功', data)`;請求失敗時,觸發`error => console.log('失敗', error),`;在http請求中無論成功或是失敗,后臺都會一次性的把數據發送回來,也就說請求的過程都完成了,所以`() => console.log('數據發送完畢')`在上述代碼中必然執行。
語言描述是空洞的,我們在攔截器對應的單元測試文件中建立如下測試代碼:
```typescript
+++ b/first-app/src/app/x-auth-token.interceptor.spec.ts
@@ -1,6 +1,7 @@
import {TestBed} from '@angular/core/testing';
import {XAuthTokenInterceptor} from './x-auth-token.interceptor';
+import {of} from 'rxjs';
describe('XAuthTokenInterceptor', () => {
beforeEach(() => TestBed.configureTestingModule({
@@ -9,8 +10,17 @@ describe('XAuthTokenInterceptor', () => {
]
}));
- it('should be created', () => {
+ fit('should be created', () => {
const interceptor: XAuthTokenInterceptor = TestBed.inject(XAuthTokenInterceptor);
expect(interceptor).toBeTruthy();
+
+ // 定義一個observable,在其上調用subscribe將得到數字1
+ const observable = of(1);
+ observable.subscribe(
+ data => console.log(data),
+ error => {
+ },
+ () => console.log('complete')
+ );
});
});
```
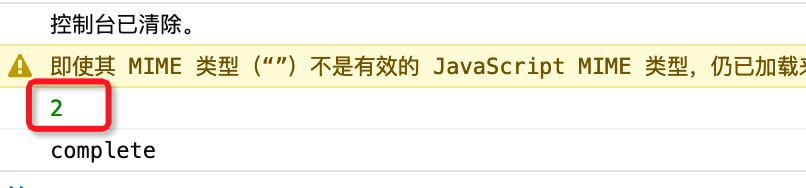
執行結果如下:

## 再識管道
在V層顯示性別的時候,我們接觸了管道的概念。數據由第一個管道的這頭流入,最后由最后一個管道的那頭流出。`Observable`也支持了管道的思想,我們可以在`Observable`類型上添加任意多個管道,它們使得`Observable`在向外發送數據前,先將這些數據依次通過這些管道。
`Observable`提供了`pipe()`方法來快速的添加管道:
```typescript
- const observable = of(1);
+ const observable = of(1).pipe();
```
如果我們想使值在管道中發生變化,則可以使用`map()`管道。在`Observable`的世界里,所有的管道都被習慣稱為`操作符`。`map()`便是一個可以改變數據值的操作符:
```typescript
+++ b/first-app/src/app/x-auth-token.interceptor.spec.ts
@@ -2,6 +2,7 @@ import {TestBed} from '@angular/core/testing';
import {XAuthTokenInterceptor} from './x-auth-token.interceptor';
import {of} from 'rxjs';
+import {map} from 'rxjs/operators';
describe('XAuthTokenInterceptor', () => {
beforeEach(() => TestBed.configureTestingModule({
@@ -15,7 +16,7 @@ describe('XAuthTokenInterceptor', () => {
expect(interceptor).toBeTruthy();
// 定義一個observable,在其上調用subscribe將得到數字1
- const observable = of(1).pipe();
+ const observable = of(1).pipe(map(input => input * 2));
observable.subscribe(
```
`map`操作符中的參數類型是個回調函數,該函數的參數`input`為流入,而方法中的函數則為流出,所以最終控制臺打印如下:
其實`Observable`并不是Angular的特性,而是屬于一個叫做`rxjs`的分支。我們可以搜索關鍵字`rxjs`以獲取更多的信息,`rxjs`同時提供了多的記不過來的操作符來滿足現實編程中的各種環境。
## tap操作符
我們再回來攔截器攔截響應的需求上來。攔截器的如下代碼返回了一個`Observable`,http請求的數據將通過該`Observable`向前返回。而我們則可以利用`Observable`可設置管道的特性,在其上設置一個監聽管道,以起到監聽header中的x-auth-token的目的。而rxjs提供的tap操作符的作用正合適:
```typescript
+++ b/first-app/src/app/x-auth-token.interceptor.ts
@@ -6,6 +6,7 @@ import {
HttpInterceptor
} from '@angular/common/http';
import { Observable } from 'rxjs';
+import {tap} from 'rxjs/operators';
@Injectable()
export class XAuthTokenInterceptor implements HttpInterceptor {
@@ -14,6 +15,6 @@ export class XAuthTokenInterceptor implements HttpInterceptor {
intercept(request: HttpRequest<unknown>, next: HttpHandler): Observable<HttpEvent<unknown>> {
console.log('xAuthTokenInterceptor is called');
- return next.handle(request);
+ return next.handle(request).pipe(tap(input => console.log('監聽到響應', input)));
}
}
```
繼續使用login組件單元測試文件進行測試:
```typescript
+++ b/first-app/src/app/login/login.component.spec.ts
@@ -47,7 +47,7 @@ describe('LoginComponent', () => {
expect(component.onSubmit).toHaveBeenCalledTimes(1);
});
- it('onSubmit 用戶登錄', () => {
+ fit('onSubmit 用戶登錄', () => {
// 啟動自動變更檢測
fixture.autoDetectChanges();
component.teacher = {username: '張三', password: 'codedemo.club'} as Teacher;
```
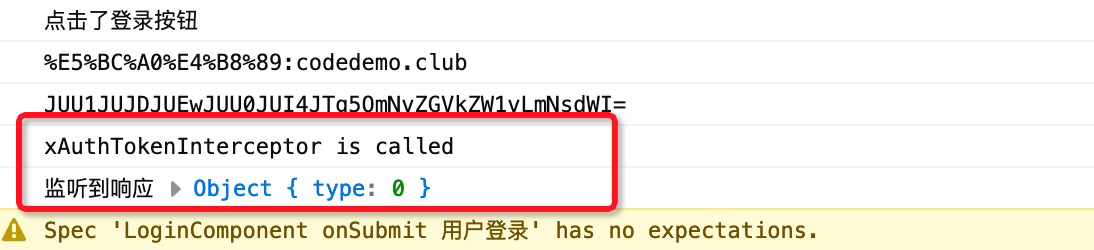
## HttpEvent
`Observable`支持泛型,當前攔截器泛型對應的為`HttpEvent<unknown>`:
```typescript
intercept(request: HttpRequest<unknown>, next: HttpHandler): Observable<HttpEvent<unknown>> {
```
`HttpEvent`是個由5種類型組成的混合類型:
```typescript
export declare type HttpEvent<T> = HttpSentEvent | HttpHeaderResponse | HttpResponse<T> | HttpProgressEvent | HttpUserEvent<T>;
```
在此并不是所有的返回類型都攜帶了header信息(可在IDE中依次點擊其類型查看,不在詳細闡述原因),攜帶有header信息的信息為:`HttpHeaderResponse`以及`HttpResponse`,這兩個類型又全部繼承于`HttpResponseBase`,所以在進行監聽時,我們僅監聽這兩種類型的數據。
在TypeScirpt中,可以使用`instance of`對類型進行判斷。
## 完成功能
當一切**知識盲區**都被我們解決掉的時候,完成功能則成為了最簡單的一環。下面,我們實現x-auth-token攔截器的功能:
```typescript
+++ b/first-app/src/app/x-auth-token.interceptor.ts
@@ -1,20 +1,48 @@
-import { Injectable } from '@angular/core';
+import {Injectable} from '@angular/core';
import {
HttpRequest,
HttpHandler,
HttpEvent,
- HttpInterceptor
+ HttpInterceptor, HttpResponseBase
} from '@angular/common/http';
-import { Observable } from 'rxjs';
+import {Observable} from 'rxjs';
import {tap} from 'rxjs/operators';
@Injectable()
export class XAuthTokenInterceptor implements HttpInterceptor {
+ /**
+ * 由緩存中獲取token,防止頁面刷新后失效
+ */
+ private token = window.sessionStorage.getItem('x-auth-token');
- constructor() {}
+ constructor() {
+ }
intercept(request: HttpRequest<unknown>, next: HttpHandler): Observable<HttpEvent<unknown>> {
- console.log('xAuthTokenInterceptor is called');
- return next.handle(request).pipe(tap(input => console.log('監聽到響應', input)));
+ if (this.token !== null) {
+ request.headers.set('x-auth-token', this.token);
+ }
+ return next.handle(request).pipe(tap(input => {
+ // 僅當input類型為HttpResponseBase,才嘗試獲取token并更新
+ if (input instanceof HttpResponseBase) {
+ const httpHeader = input.headers;
+ const xAuthToken = httpHeader.get('x-auth-token');
+ if (xAuthToken !== null) {
+ this.setToken(xAuthToken);
+ }
+ }
+ }));
+ }
+
+ /**
+ * 設置token
+ * 如果接收到了新的token則更新,否則什么也不做
+ * @param xAuthToken token
+ */
+ private setToken(xAuthToken: string): void {
+ if (this.token !== xAuthToken) {
+ this.token = xAuthToken;
+ window.sessionStorage.setItem('x-auth-token', this.token);
+ }
}
}
```
## 測試
任何沒有經過測試代碼都是坑隊友的利器。由于我們夢想著攔截器會有登錄組件、個人中心組件中自動發揮作用,所以我們在此應該使用`ng s`來完成測試。
### 添加攔截器
為使其在`ng s`生效,則需要將其配置到`AppModule`中:
```typescript
+++ b/first-app/src/app/app.module.ts
@@ -3,7 +3,7 @@ import {NgModule} from '@angular/core';
import {AppRoutingModule} from './app-routing.module';
import {AppComponent} from './app.component';
-import {HttpClientModule} from '@angular/common/http';
+import {HTTP_INTERCEPTORS, HttpClientModule} from '@angular/common/http';
import {AddComponent} from './add/add.component';
import {FormsModule} from '@angular/forms';
import {EditComponent} from './edit/edit.component';
@@ -12,6 +12,7 @@ import {LoginComponent} from './login/login.component';
import {IndexComponent} from './index/index.component';
import { PersonalCenterComponent } from './personal-center/personal-center.component';
import { SexPipe } from './personal-center/sex.pipe';
+import {XAuthTokenInterceptor} from './x-auth-token.interceptor';
@NgModule({
@@ -31,7 +32,9 @@ import { SexPipe } from './personal-center/sex.pipe';
FormsModule,
RouterModule
],
- providers: [],
+ providers: [
+ {provide: HTTP_INTERCEPTORS, useClass: XAuthTokenInterceptor, multi: true}
+ ],
bootstrap: [IndexComponent]
})
export class AppModule {
```
### 刪除冗余代碼
然后刪除個人中心組件進行后臺請求時手動添加header的代碼,將其恢復為:
```typescript
+++ b/first-app/src/app/personal-center/personal-center.component.ts
ngOnInit(): void {
const url = 'http://angular.api.codedemo.club:81/teacher/me';
this.httpClient.get<Teacher>(url)
.subscribe(teacher => {
console.log('請求當前登錄用戶成功');
this.me = teacher;
},
error => console.log('請求當前登錄用戶發生錯誤', error));
}
```
### 定制路由
```typescript
+++ b/first-app/src/app/app-routing.module.ts
@@ -2,6 +2,7 @@ import {NgModule} from '@angular/core';
import {Routes, RouterModule} from '@angular/router';
import {AddComponent} from './add/add.component';
import {EditComponent} from './edit/edit.component';
+import {PersonalCenterComponent} from './personal-center/personal-center.component';
const routes: Routes = [
{
@@ -11,6 +12,10 @@ const routes: Routes = [
{
path: 'edit/:id',
component: EditComponent
+ },
+ {
+ path: 'personal-center',
+ component: PersonalCenterComponent
}
];
```
## 測試
使用正常的用戶名密碼登錄后,打開http://localhost:4200/personal-center,卻在控制臺中發生了錯誤:

此時,我們正常人做的一定是去盯代碼,然后開始意念是哪塊的代碼出了錯誤,接著就開始了萬劫不復之旅。正確的做法應該是去科學的`debug`。
既然用戶認證發生了錯誤,那么說明在請求時要么沒有帶入`x-auth-token`信息,要么帶入的`x-auth-token`是無效的。所以我們第一步應該去找到網絡選項卡,并找到個人中心的請求,查看其請求頭中是否存在`x-auth-token`:

由上圖得知并未攜帶`x-auth-token`。那么未攜帶的原因有兩種:1. 首次與后臺交互時攔截器并未成功緩存這個`x-auth-token`;2. 雖然攔截器緩存了,并由于書寫失誤,在請求時忘了加入此`x-auth-token`了。攔截器是否緩存了該值應該去控制臺中的sessionStorege中查看:
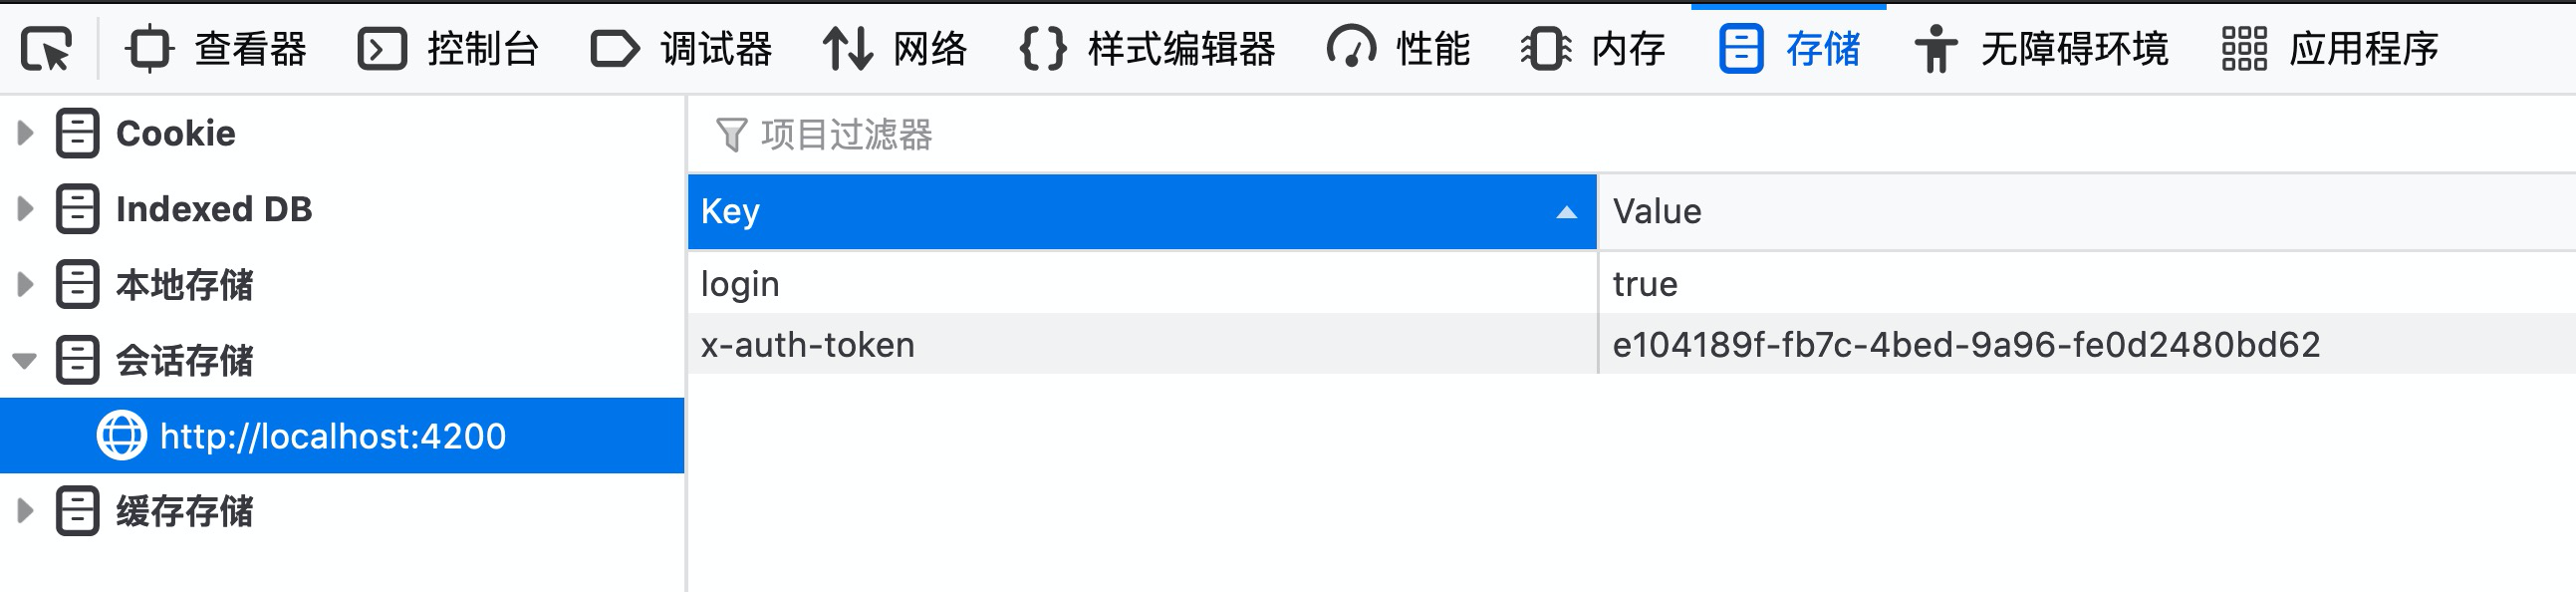
可見,瀏覽器已存儲該值。則問題應該出現在攔截器請求時加入x-auth-token的代碼上了,那就乖乖的打斷點吧:
```typescript
+++ b/first-app/src/app/x-auth-token.interceptor.ts
@@ -20,7 +20,9 @@ export class XAuthTokenInterceptor implements HttpInterceptor {
intercept(request: HttpRequest<unknown>, next: HttpHandler): Observable<HttpEvent<unknown>> {
if (this.token !== null) {
+ console.log('設置token', this.token);
request.headers.set('x-auth-token', this.token);
+ console.log(request.headers.get('x-auth-token'));
}
return next.handle(request).pipe(tap(input => {
// 僅當input類型為HttpResponseBase,才嘗試獲取token并更新
```
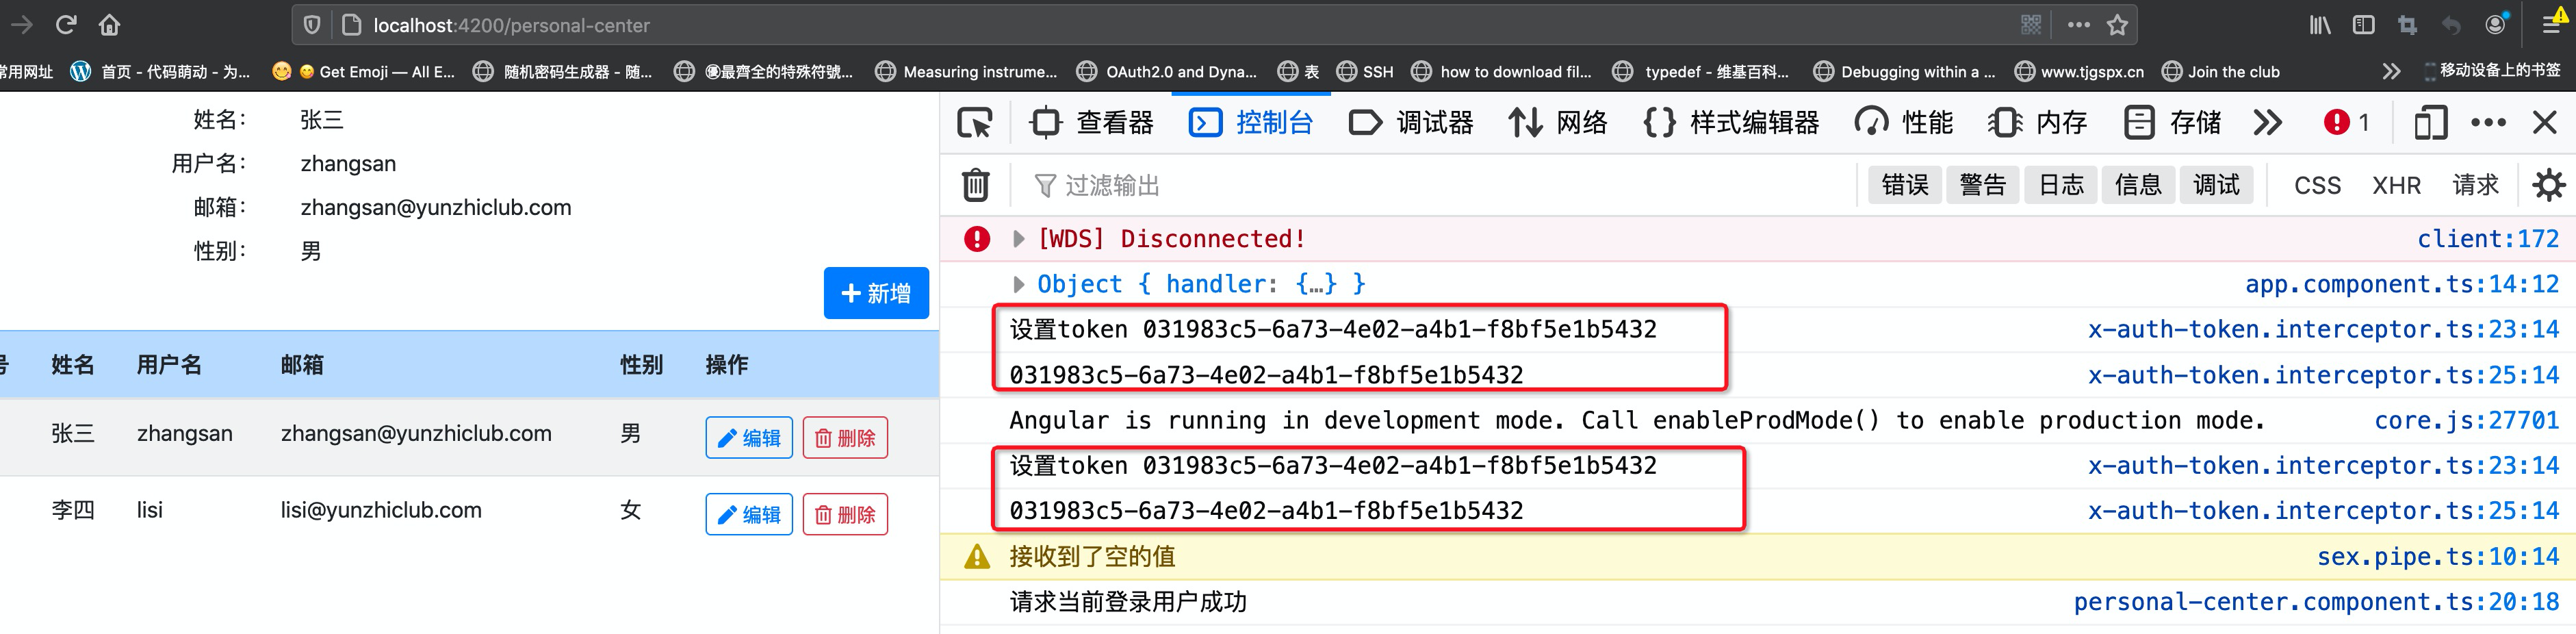
結果另我們想不到:

控制臺顯示了如上信息,表明`if`中的程序塊已執行;23行中顯示了`this.token`的值;24行設置值后,25行卻獲取到了`null`。該情況已經超出了我們的認識,那么下一步做的就是去相應的google了:

除此以外,另外一種更便捷的方法是讀官方文檔,我們點擊`request.headers.set`后進入其源碼,查看注釋信息如下:
```typescript
/**
* Sets or modifies a value for a given header in a clone of the original instance.
* If the header already exists, its value is replaced with the given value
* in the returned object.
*
* @param name The header name.
* @param value The value or values to set or overide for the given header.
*
* @returns A clone of the HTTP headers object with the newly set header value.
*/
```
譯文:
```typescript
/**
* 在源實際的 克隆 上設置或是修改header值
* If the header already exists, its value is replaced with the given value
* in the returned object.
*
* @param name The header name.
* @param value The value or values to set or overide for the given header.
*
* @returns 一個HTTP頭對象的 克隆,該克隆對象中header值是設置過的
*/
```
原來更快的解決方案在于官方文檔中!由于` request.headers.set('x-auth-token', this.token);`并未改變原實例`request.headers`,所以在原實例上獲取`x-auth-token`仍為null,也就是說請求并未帶入`x-auth-token`。原因有了,解決方案當然也就隨著頁出來:

好事多磨,當我們想使用返回的新實例來設置`request.header`時,卻又發生了read-only錯誤。這并不是angular的專利,在其它的框架中也是不允許我們直接對請求對象修改的。好在Angular提供了clone方法來解決此問題:
```typescript
+++ b/first-app/src/app/x-auth-token.interceptor.ts
@@ -21,7 +21,7 @@ export class XAuthTokenInterceptor implements HttpInterceptor {
intercept(request: HttpRequest<unknown>, next: HttpHandler): Observable<HttpEvent<unknown>> {
if (this.token !== null) {
console.log('設置token', this.token);
- request.headers.set('x-auth-token', this.token);
+ request = request.clone({setHeaders: {'x-auth-token': this.token}});
console.log(request.headers.get('x-auth-token'));
}
return next.handle(request).pipe(tap(input => {
```
我們關閉原窗口(防止登錄過期問題),再重新打開一個,訪問http://localhost:4200/personal-center進行測試。
成功的請求到個人中心的信息,盡情地享受這種喜悅吧。
## 本節作業
1. 在前面的已學教程中,我們成功的規避掉了設置header時原header實例并未改變的情況,請把它們找出來。
2. 本節最后一張圖片打印了兩次token值,請解釋其原因。
3. 在同一個瀏覽器的兩個窗口中分別打開http://localhost:4200,A窗口中完成登錄后,在B窗口中刷新界面B窗口仍然需要登錄。但大多數我們所使用的應用(比如思否、京東等)并非如此,你能解釋這其中的原因嗎?
| 名稱 | 地址 | |
| --------------- | ------------------------------------------------------------ | ---- |
| 請求攔截和響應 | [https://angular.cn/guide/http#intercepting-requests-and-responses](https://angular.cn/guide/http#intercepting-requests-and-responses) | |
| Observable | [https://cn.rx.js.org/class/es6/Observable.js~Observable.html](https://cn.rx.js.org/class/es6/Observable.js~Observable.html) | |
| Of | [https://cn.rx.js.org/class/es6/Observable.js~Observable.html#static-method-of](https://cn.rx.js.org/class/es6/Observable.js~Observable.html#static-method-of) | |
| subscribe | [https://cn.rx.js.org/class/es6/Observable.js~Observable.html#instance-method-subscribe](https://cn.rx.js.org/class/es6/Observable.js~Observable.html#instance-method-subscribe) | |
| Pipeable 操作符 | [https://cn.rx.js.org/manual/usage.html](https://cn.rx.js.org/manual/usage.html) | |
| Map | [https://rxjs-cn.github.io/learn-rxjs-operators/operators/transformation/map.html](https://rxjs-cn.github.io/learn-rxjs-operators/operators/transformation/map.html) | |
| 本節源碼 | [https://github.com/mengyunzhi/angular11-guild/archive/step4.5.zip](https://github.com/mengyunzhi/angular11-guild/archive/step4.5.zip) | |
- 序言
- 第一章 Hello World
- 1.1 環境安裝
- 1.2 Hello Angular
- 1.3 Hello World!
- 第二章 教師管理
- 2.1 教師列表
- 2.1.1 初始化原型
- 2.1.2 組件生命周期之初始化
- 2.1.3 ngFor
- 2.1.4 ngIf、ngTemplate
- 2.1.5 引用 Bootstrap
- 2.2 請求后臺數據
- 2.2.1 HttpClient
- 2.2.2 請求數據
- 2.2.3 模塊與依賴注入
- 2.2.4 異步與回調函數
- 2.2.5 集成測試
- 2.2.6 本章小節
- 2.3 新增教師
- 2.3.1 組件初始化
- 2.3.2 [(ngModel)]
- 2.3.3 對接后臺
- 2.3.4 路由
- 2.4 編輯教師
- 2.4.1 組件初始化
- 2.4.2 獲取路由參數
- 2.4.3 插值與模板表達式
- 2.4.4 初識泛型
- 2.4.5 更新教師
- 2.4.6 測試中的路由
- 2.5 刪除教師
- 2.6 收尾工作
- 2.6.1 RouterLink
- 2.6.2 fontawesome圖標庫
- 2.6.3 firefox
- 2.7 總結
- 第三章 用戶登錄
- 3.1 初識單元測試
- 3.2 http概述
- 3.3 Basic access authentication
- 3.4 著陸組件
- 3.5 @Output
- 3.6 TypeScript 類
- 3.7 瀏覽器緩存
- 3.8 總結
- 第四章 個人中心
- 4.1 原型
- 4.2 管道
- 4.3 對接后臺
- 4.4 x-auth-token認證
- 4.5 攔截器
- 4.6 小結
- 第五章 系統菜單
- 5.1 延遲及測試
- 5.2 手動創建組件
- 5.3 隱藏測試信息
- 5.4 規劃路由
- 5.5 定義菜單
- 5.6 注銷
- 5.7 小結
- 第六章 班級管理
- 6.1 新增班級
- 6.1.1 組件初始化
- 6.1.2 MockApi 新建班級
- 6.1.3 ApiInterceptor
- 6.1.4 數據驗證
- 6.1.5 教師選擇列表
- 6.1.6 MockApi 教師列表
- 6.1.7 代碼重構
- 6.1.8 小結
- 6.2 教師列表組件
- 6.2.1 初始化
- 6.2.2 響應式表單
- 6.2.3 getTestScheduler()
- 6.2.4 應用組件
- 6.2.5 小結
- 6.3 班級列表
- 6.3.1 原型設計
- 6.3.2 初始化分頁
- 6.3.3 MockApi
- 6.3.4 靜態分頁
- 6.3.5 動態分頁
- 6.3.6 @Input()
- 6.4 編輯班級
- 6.4.1 測試模塊
- 6.4.2 響應式表單驗證
- 6.4.3 @Input()
- 6.4.4 FormGroup
- 6.4.5 自定義FormControl
- 6.4.6 代碼重構
- 6.4.7 小結
- 6.5 刪除班級
- 6.6 集成測試
- 6.6.1 惰性加載
- 6.6.2 API攔截器
- 6.6.3 路由與跳轉
- 6.6.4 ngStyle
- 6.7 初識Service
- 6.7.1 catchError
- 6.7.2 單例服務
- 6.7.3 單元測試
- 6.8 小結
- 第七章 學生管理
- 7.1 班級列表組件
- 7.2 新增學生
- 7.2.1 exports
- 7.2.2 自定義驗證器
- 7.2.3 異步驗證器
- 7.2.4 再識DI
- 7.2.5 屬性型指令
- 7.2.6 完成功能
- 7.2.7 小結
- 7.3 單元測試進階
- 7.4 學生列表
- 7.4.1 JSON對象與對象
- 7.4.2 單元測試
- 7.4.3 分頁模塊
- 7.4.4 子組件測試
- 7.4.5 重構分頁
- 7.5 刪除學生
- 7.5.1 第三方dialog
- 7.5.2 批量刪除
- 7.5.3 面向對象
- 7.6 集成測試
- 7.7 編輯學生
- 7.7.1 初始化
- 7.7.2 自定義provider
- 7.7.3 更新學生
- 7.7.4 集成測試
- 7.7.5 可訂閱的路由參數
- 7.7.6 小結
- 7.8 總結
- 第八章 其它
- 8.1 打包構建
- 8.2 發布部署
- 第九章 總結