
# 十、移動計算
在本章中,我們將討論在移動設備上使用深度學習的問題,并為以下內容提供一些方法:
* 安裝適用于 macOS 和 Android 的 TensorFlow Mobile
* 玩轉 TensorFlow 和 Android 示例
* 為 MacOS 和 iPhone 安裝 TensorFlow Mobile
* 為移動設備優化 TensorFlow 圖
* 轉換移動設備的 TensorFlow 圖
# 介紹
在本節中,我們將介紹移動深度學習的一些用例。 這與臺式機或云深度學習的情況大不相同,在臺式機或云深度學習中,GPU 和電力通常可用。 實際上,在移動設備上,保存電池非常重要,并且 GPU 經常不可用。 但是,深度學習在許多情況下可能非常有用。 讓我們回顧一下:
* **圖像識別**:現代手機具有功能強大的攝像頭,用戶熱衷于嘗試對圖像和圖片產生效果。 通常,了解圖片中的內容也很重要,并且有多種適用于此的預訓練模型,如專用于 CNN 的章節所述。 [這里給出了用于圖像識別的模型的一個很好的例子](https://github.com/tensorflow/models/tree/master/official/resnet)。
* **對象定位**:識別運動對象是一項關鍵操作,對于視頻和圖像處理是必需的。 例如,可以想象如果在圖像中識別出多個人,那么相機將使用多個對焦點。 [這里提供了對象本地化示例的集合](https://github.com/tensorflow/models/tree/master/research/object_detection)。
* **光學字符識別**:在許多活動(例如文本分類和推薦)中,識別手寫字符都是至關重要的。 深度學習可以為開展這些活動提供根本幫助。 在專用于 CNN 的章節中,我們研究了 MNIST 識別的一些示例。 關于 MNIST 的信息也可以在[這個頁面](https://github.com/TensorFlow/models/tree/master/official/mnist)中找到。
* **語音識別**:語音識別是訪問現代電話的常用界面。 因此,深度學習用于識別語音和口頭命令。 在過去的幾年中,這方面的進展令人印象深刻。
* **翻譯**:處理多種語言是現代多元文化世界的一部分。 手機在各種語言之間進行即時翻譯的準確率越來越高,深度學習幫助打破了障礙,而這在幾年前是無法想象的。 在專門針對 RNN 的一章中,我們研究了一些機器翻譯示例。
* **手勢識別**:電話開始使用手勢作為接收命令的界面。 當然,有一些模型。
* **壓縮**:壓縮是手機的關鍵方面。 可以想象,在通過網絡發送圖像或視頻之前減少空間是有益的。 同樣,在本地存儲在設備上之前壓縮數據可能會很方便。 在所有這些情況下,深度學習都可以提供幫助。 使用 RNNS 進行壓縮的模型位于[這里](https://github.com/tensorflow/models/tree/master/research/compression)。
# TensorFlow,移動和云
如上所述,電話通常沒有 GPU,因此節省電池電量非常重要。 為了減輕成本,需要將許多昂貴的計算卸載到云中。 當然,要折衷考慮各種因素,包括在移動設備上執行深度學習模型的成本,將數據移至云的成本,用于此傳輸的電池成本以及云計算的成本。 沒有單一的解決方案,最佳策略取決于您的具體情況。
# 安裝適用于 macOS 和 Android 的 TensorFlow Mobile
在本秘籍中,我們將學習如何為移動環境設置 TensorFlow。 我的環境是 macOS,我為 Android 開發。 但是,在以下秘籍中將描述其他配置。
# 準備
我們將使用 Android Studio,這是適用于 Google Android 操作系統的官方**集成開發環境**(**IDE**)。
# 操作步驟
我們繼續按以下步驟安裝適用于 macOS 和 Android 的 TensorFlow mobile:
1. 從[這里](https://developer.android.com/studio/install.html)安裝 Android Studio。
2. 創建一個新的項目名稱`AndroidExampleTensorflow`,如以下屏幕截圖所示:
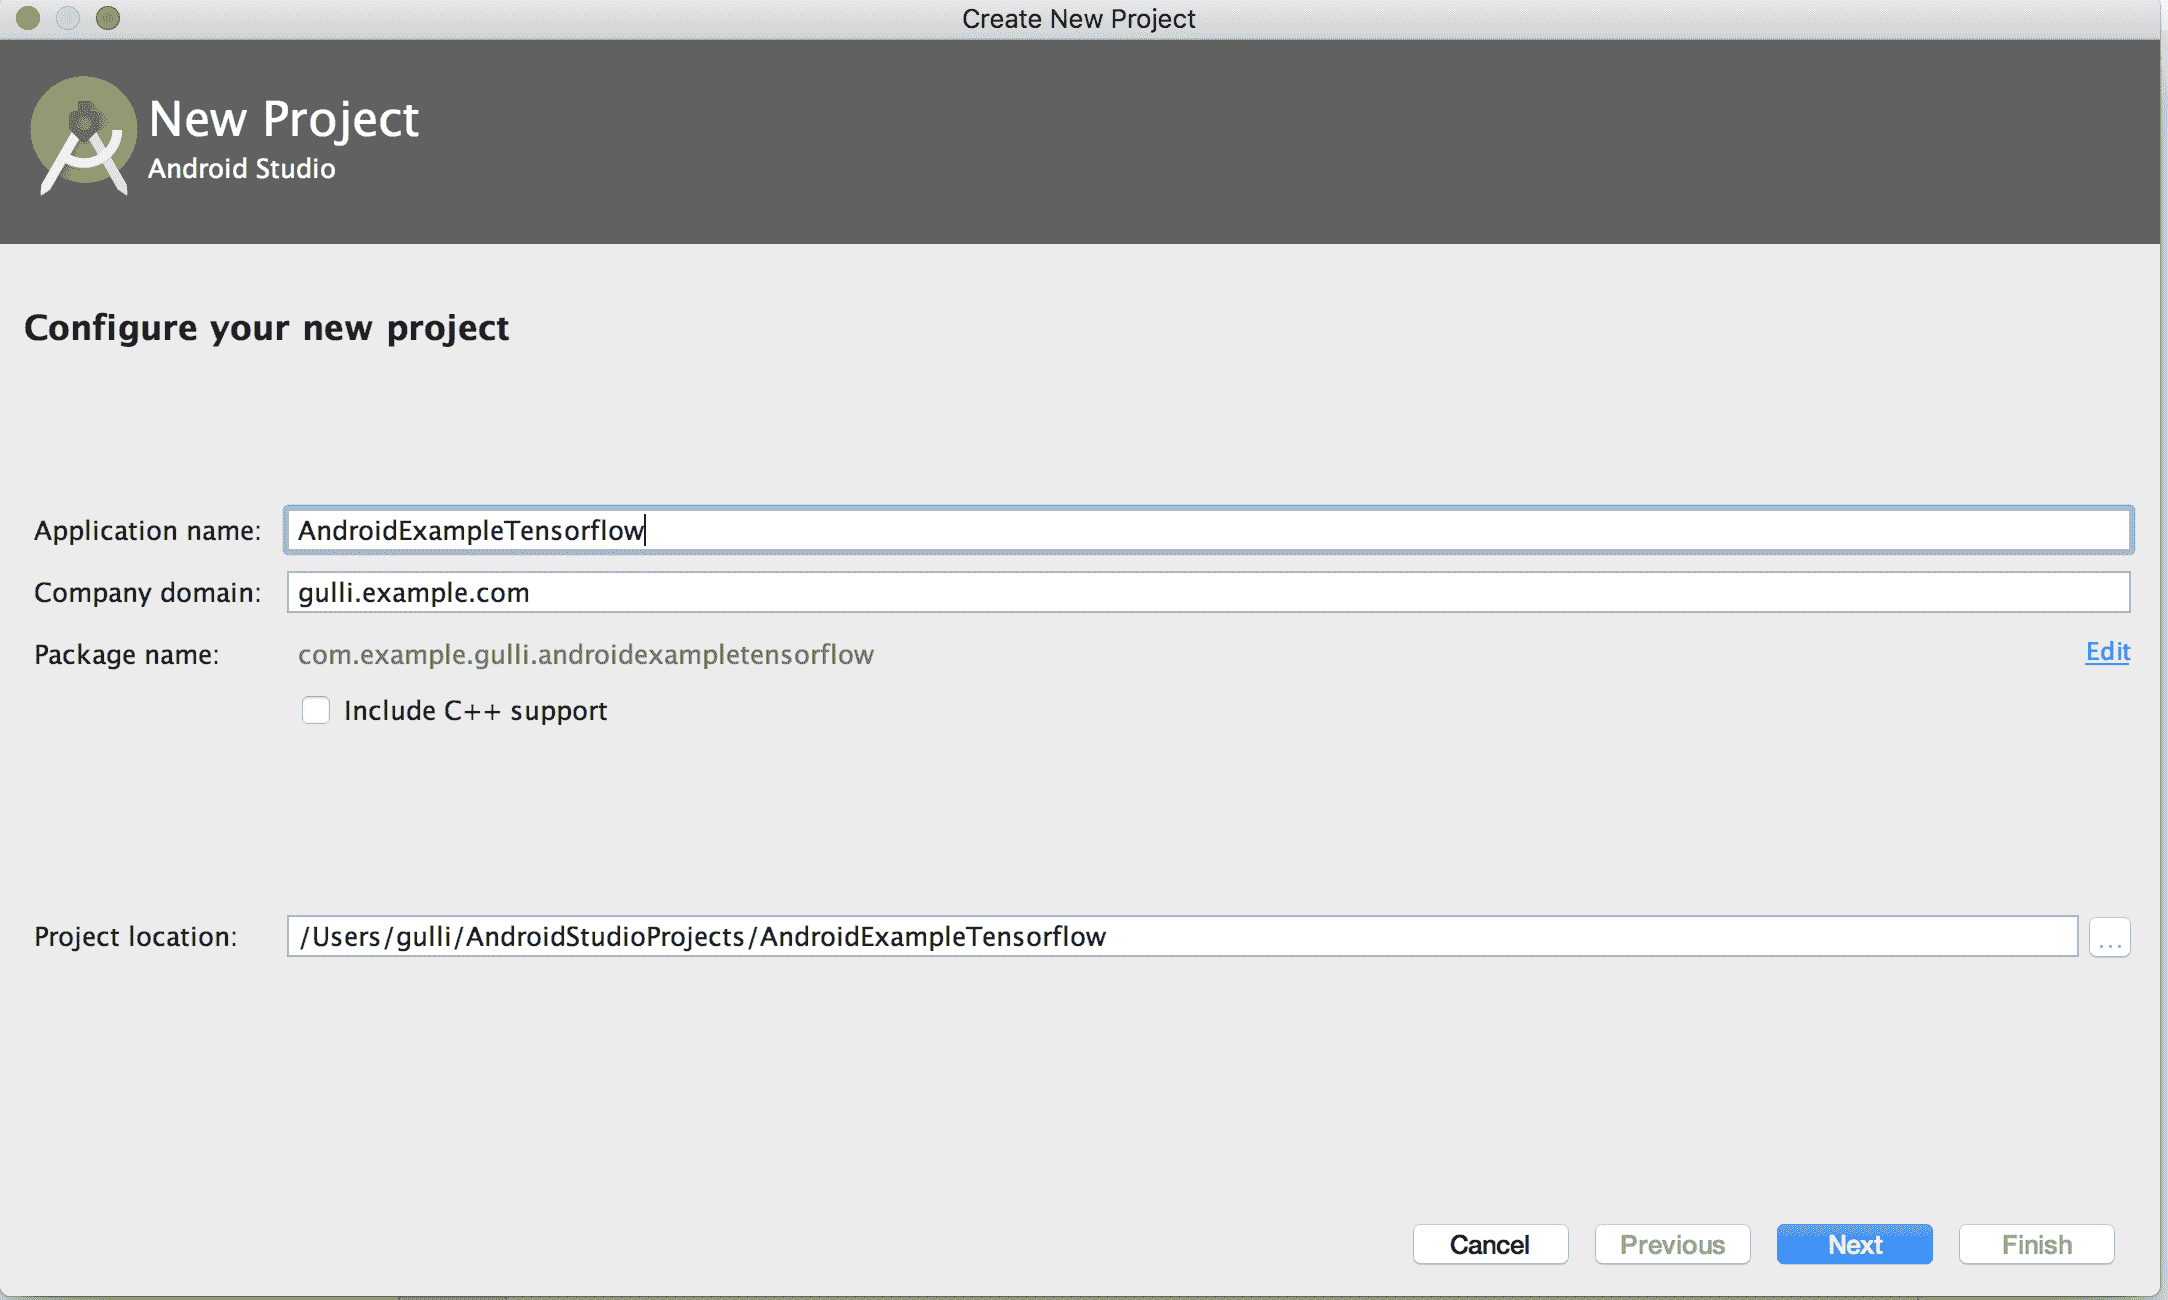
在 AndroidStudio 中創建 TensorFlow 移動應用的示例,第一步如下圖所示:選擇電話和表格選項:
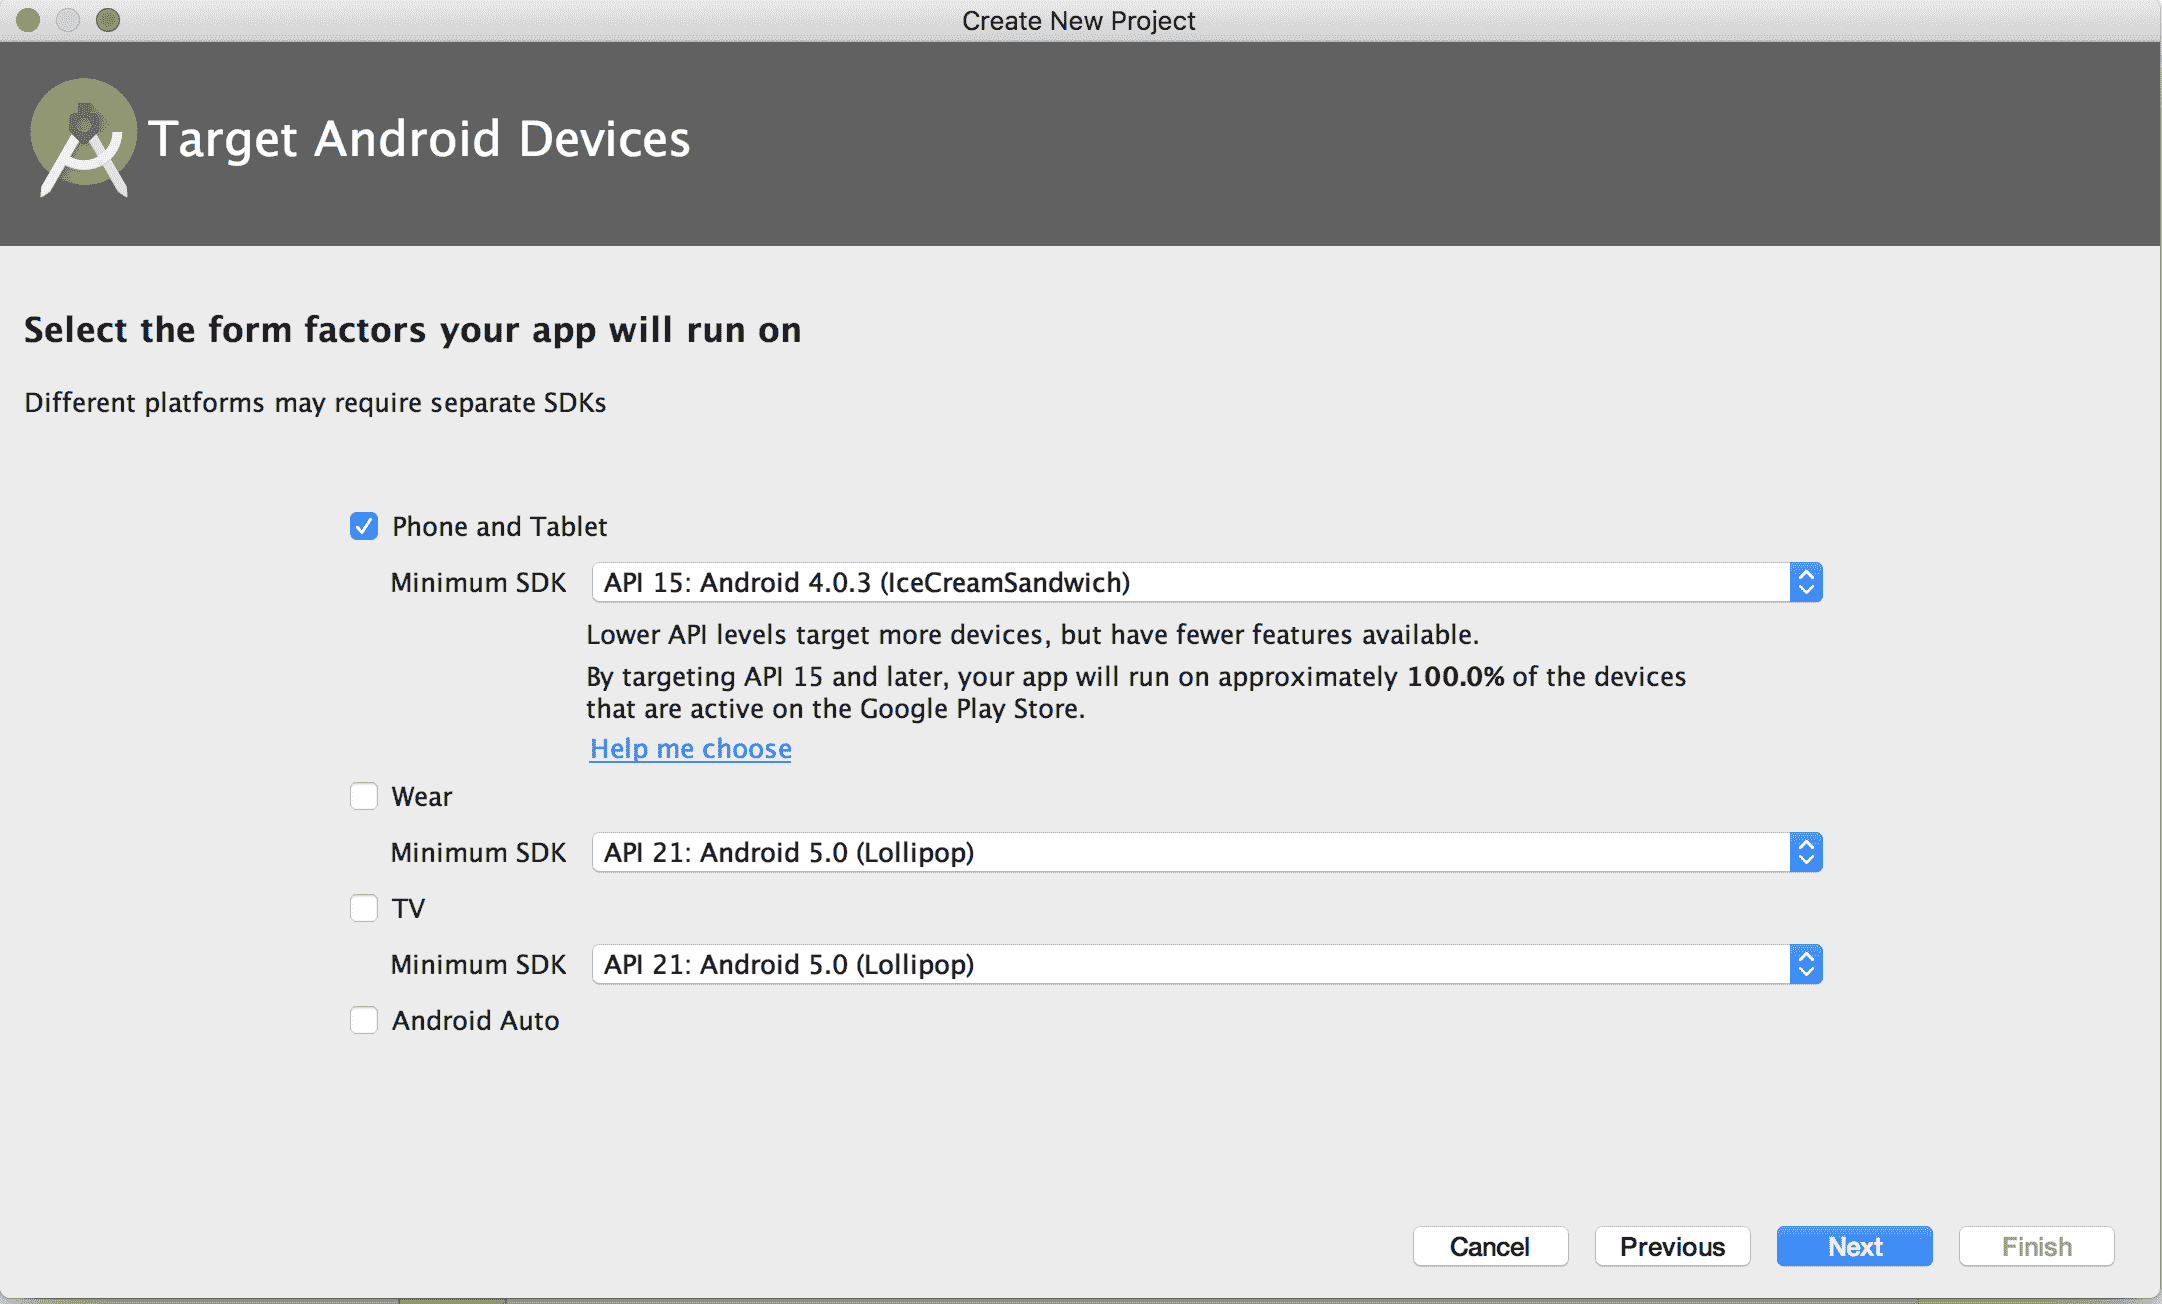
在 AndroidStudio 中創建 TensorFlow 移動應用的示例,第二步并選擇一個空活動,如下圖所示:
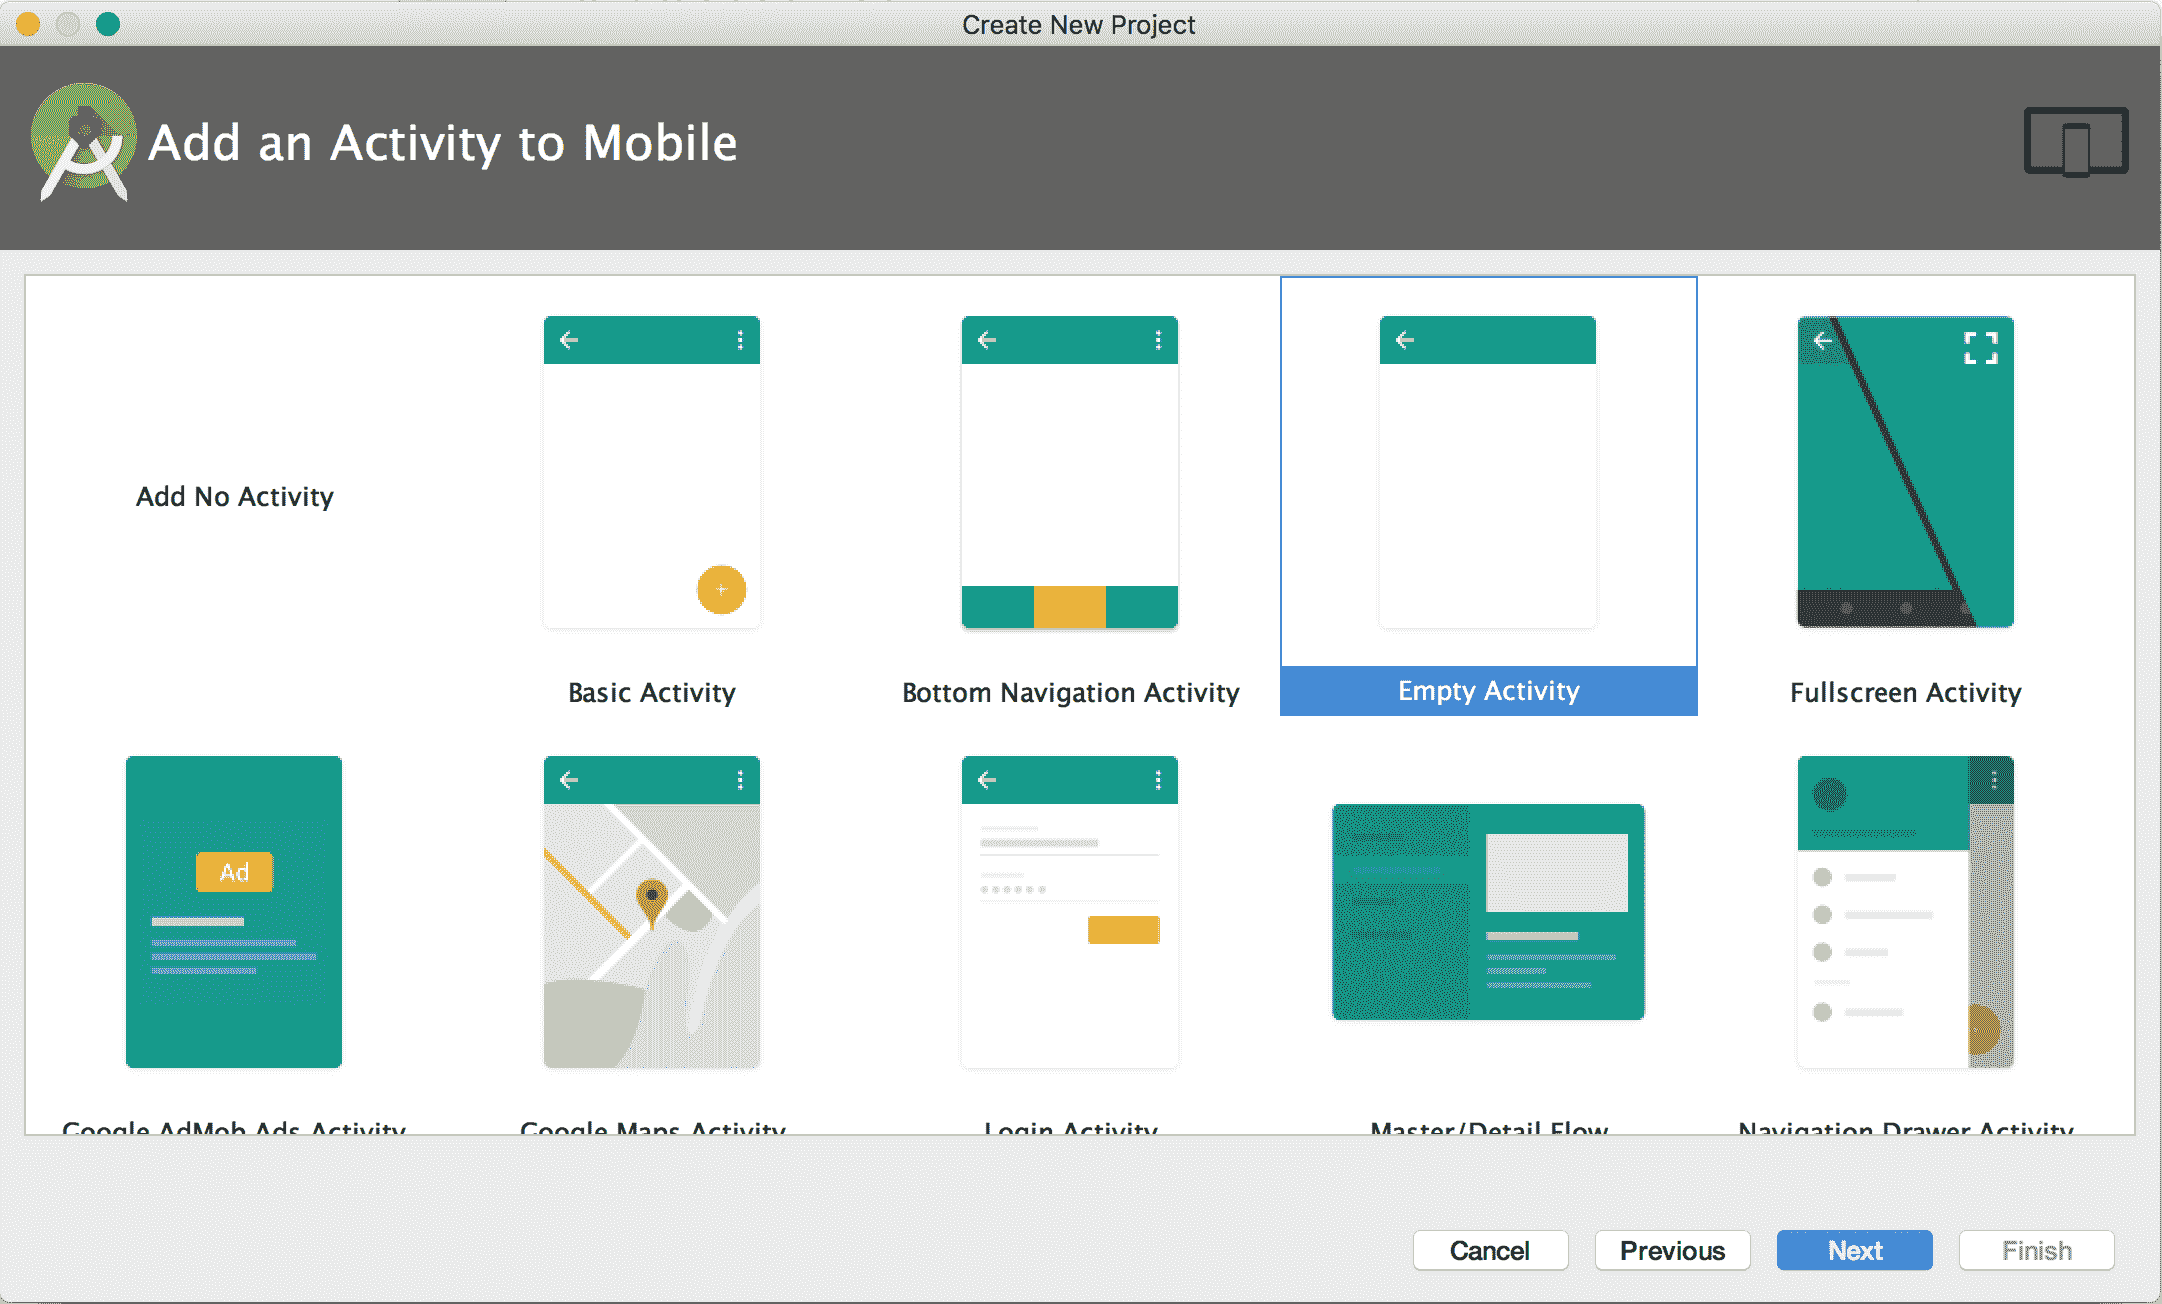
在 AndroidStudio 中創建 TensorFlow 移動應用的示例,第三步然后自定義`MainActivity`,如下圖所示:

在 AndroidStudio 中創建 TensorFlow 移動應用的示例,第四步稱為“基礎神經節”,根據神經科學,它負責選擇動作,即幫助我們確定在任何給定時間執行幾個可能動作中的哪個。
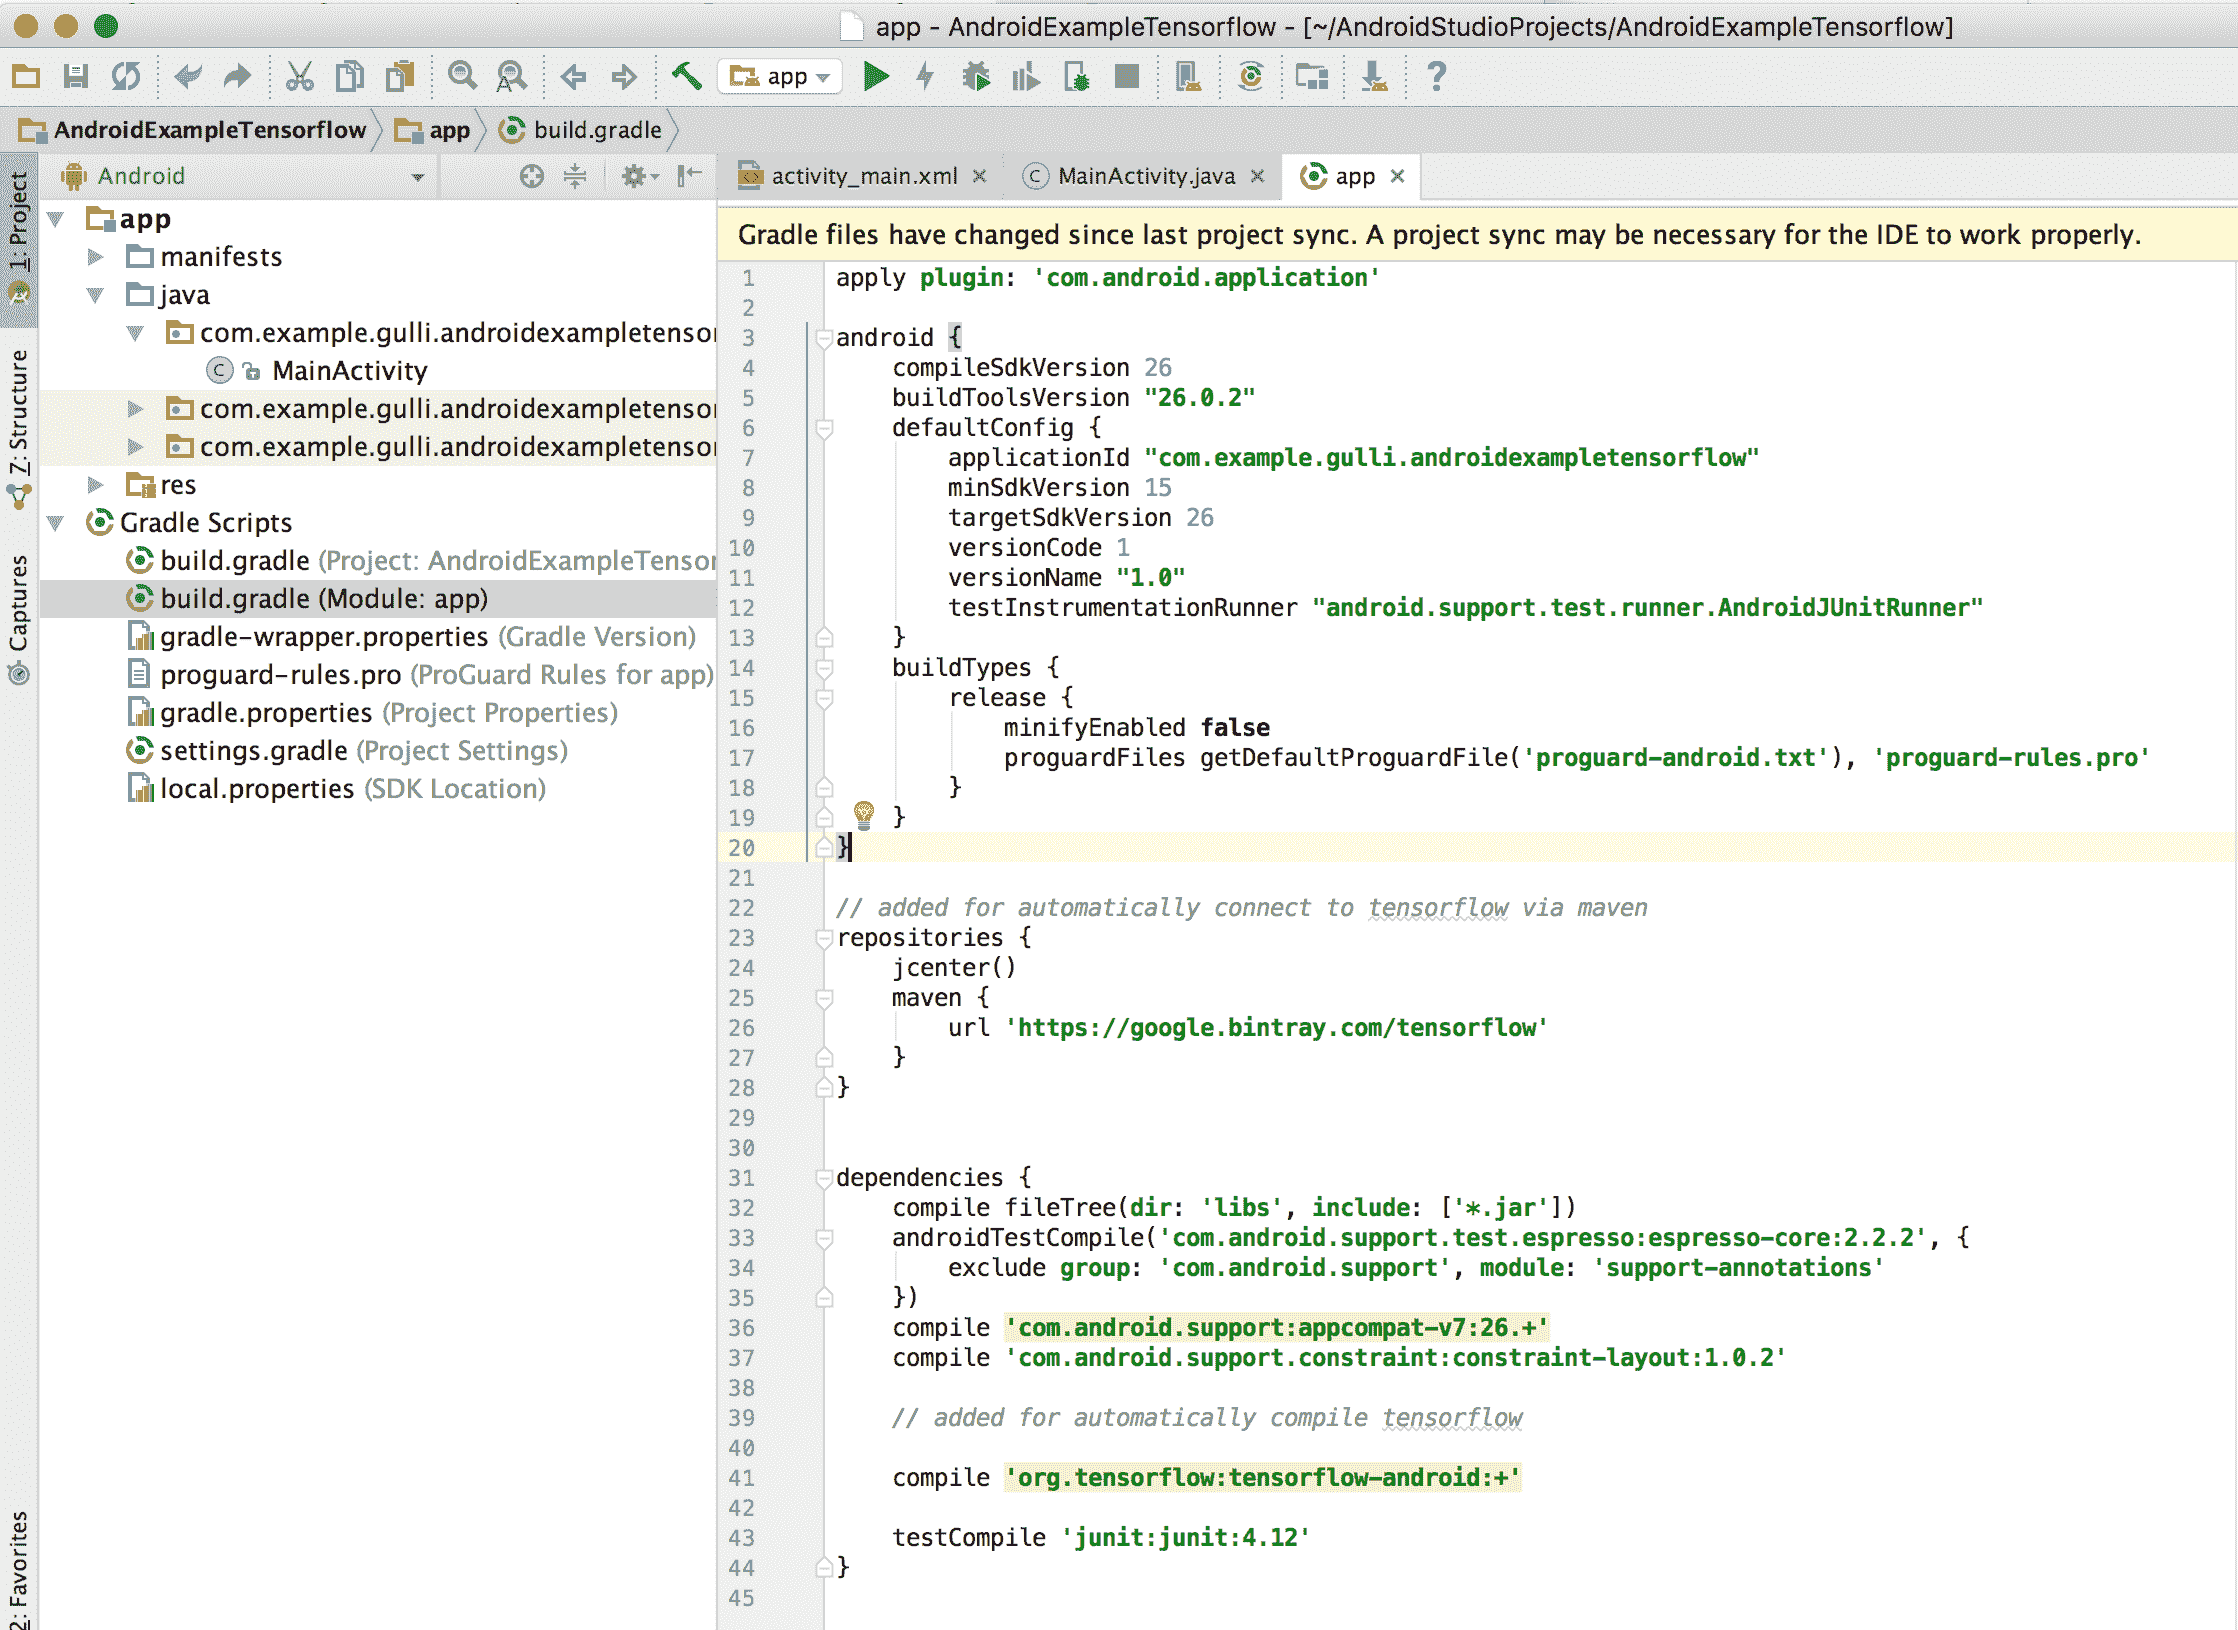
3. 將以下行插入`build.gradle`應用中,如以下代碼所示:
```py
// added for automatically connect to TensorFlow via maven
repositories {
jcenter()
maven {
url 'https://google.bintray.com/TensorFlow'
}
}
dependencies {
compile fileTree(dir: 'libs', include: ['*.jar'])
androidTestCompile('com.android.support.test.espresso:espresso-core:2.2.2', {
exclude group: 'com.android.support', module: 'support-annotations'
})
compile 'com.android.support:appcompat-v7:26.+'
compile 'com.android.support.constraint:constraint-layout:1.0.2'
// added for automatically compile TensorFlow
compile 'org.TensorFlow:TensorFlow-android:+'
testCompile 'junit:junit:4.12'
}
```
以下屏幕截圖顯示了插入的代碼:
4. 運行項目并獲得結果:
使用 AndroidStudio 進行編譯的示例,其中顯示了連接的設備。
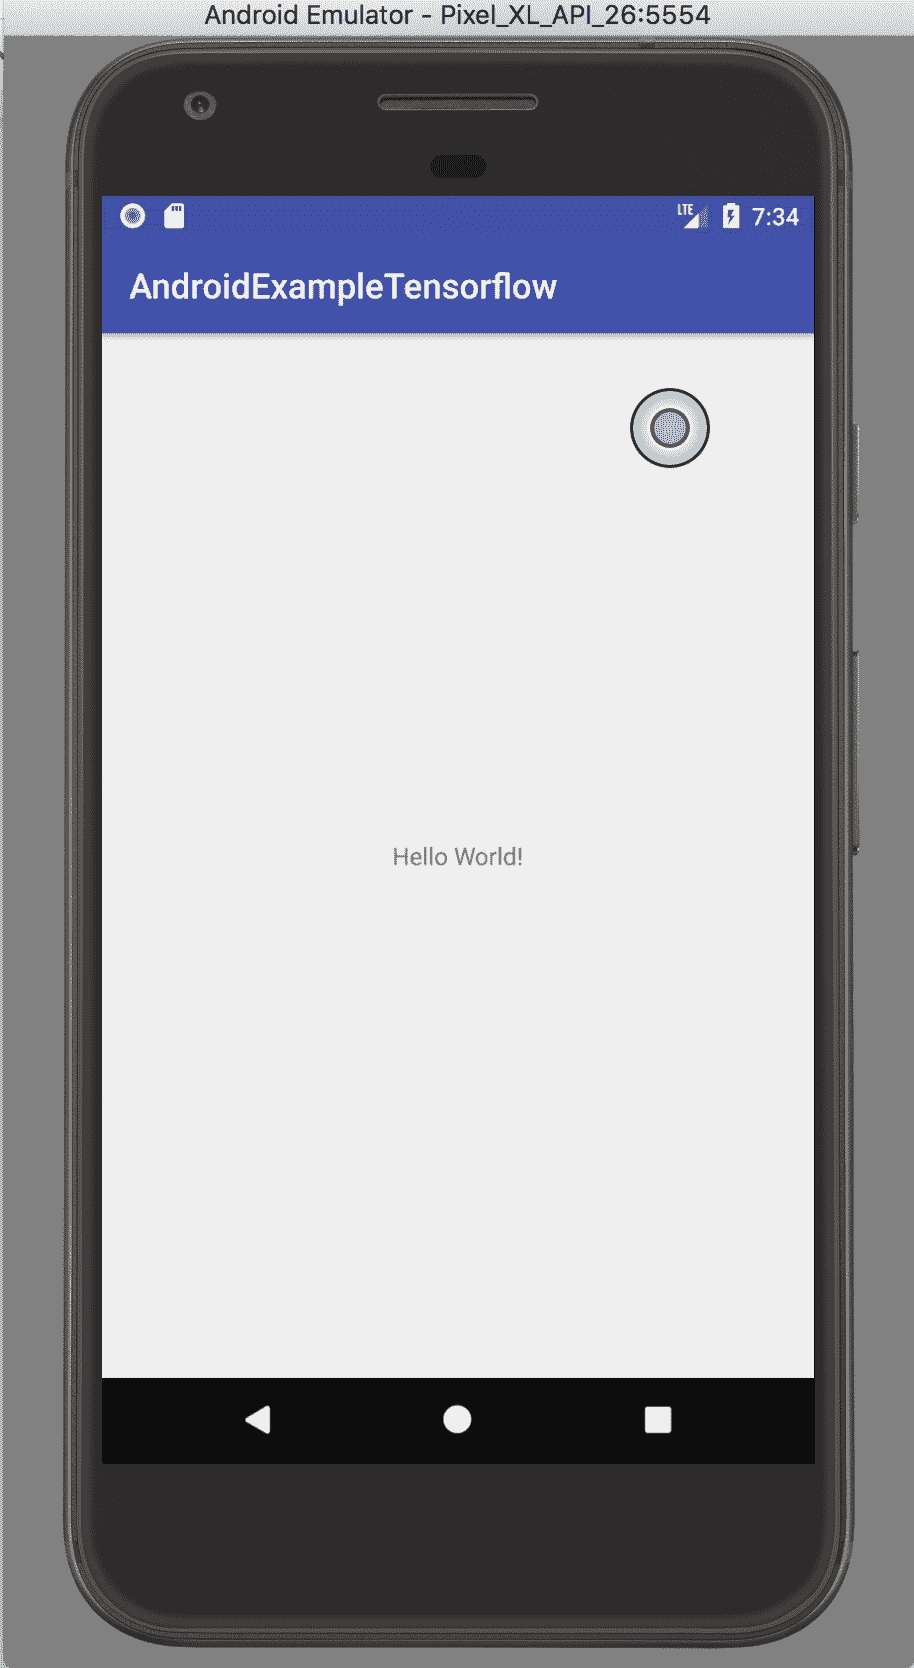
在 AndroidStudio 中創建 TensorFlow 移動應用的示例。 一個簡單的`Hello World`應用
# 工作原理
使用 Android Studio 設置 Android TensorFlow 非常簡單。 您只需要在應用的`build.gradle`文件中添加一些配置行,Android Studio 就會代表您執行所有操作。
# 更多
如果要直接從 TensorFlow 源構建,則需要安裝 Bazel 和 TensorFlow。 Bazel 是一個快速,可擴展,多語言和可擴展的構建系統。 Google 內部使用了構建工具 Blaze,并將 Blaze 工具的開源部分稱為 Bazel。 名稱是 Blaze 的字謎。
[此頁面將指導您完成該過程](https://github.com/tensorflow/tensorflow/tree/master/tensorflow/examples/android/)。
如果您正在運行 macOS,則過程非常簡單:
1. 按照[這個頁面](https://docs.bazel.build/versions/master/install.html)上的說明安裝 Bazel。 對于 macOS,我們將使用 Homebrew:
```py
/usr/bin/ruby -e "$(curl -fsSL \
https://raw.githubusercontent.com/Homebrew/install/master/install)"
brew install bazel
bazel version
brew upgrade bazel
```
2. 從 GitHub 克隆 TensorFlow 發行版。
```py
git clone https://github.com/TensorFlow/TensorFlow.git
```
# 玩轉 TensorFlow 和 Android 示例
在本秘籍中,我們將考慮 TensorFlow 發行版中提供的標準 Android 示例并將其安裝在我們的移動設備上。
# 準備
TensorFlow 移動 Android 應用[可在 GitHub 上的以下地址獲得](https://github.com/tensorflow/tensorflow/tree/master/tensorflow/examples/android)。 2017 年 10 月,該頁面包含以下示例:
* **TF 分類**:使用 Google Inception 模型實時對相機幀進行分類,并在相機圖像上以重疊顯示頂部結果。
* **TF 檢測**:演示使用 TensorFlow 對象檢測 API 訓練的 SSD-Mobilenet 模型。 這是在現代卷積目標檢測器的速度/精度折衷中引入的,以實時定位和跟蹤攝像機預覽中的目標(來自 80 個類別)。
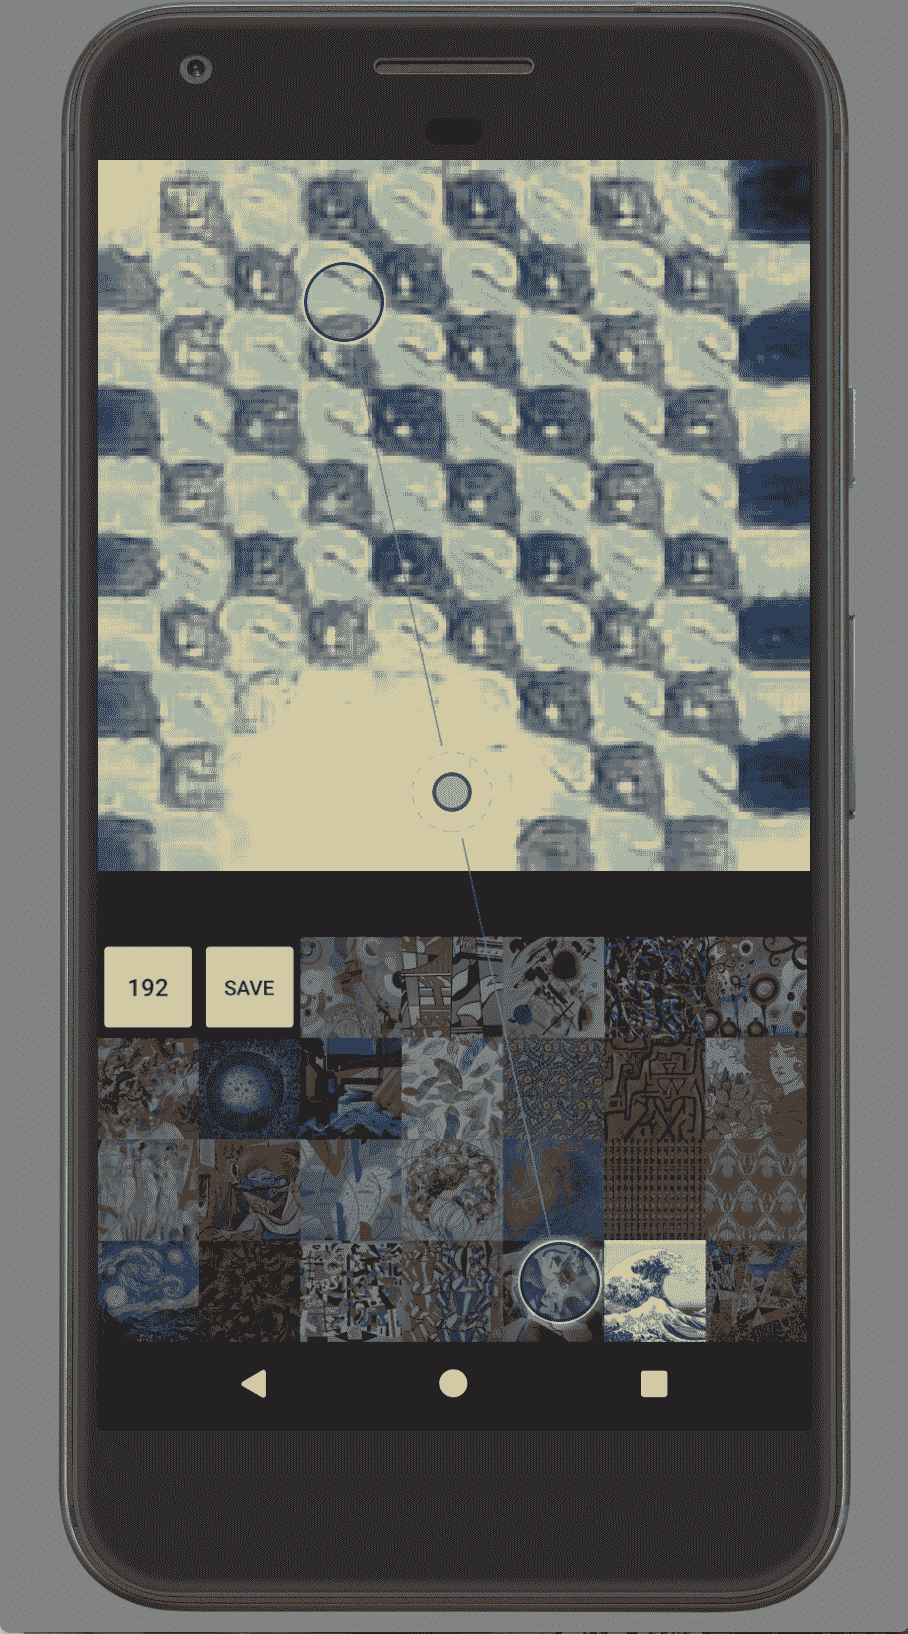
* **TF 風格化**:使用基于*藝術風格的學習表示*的模型將相機預覽圖像重新設置為許多不同藝術風格的圖像。
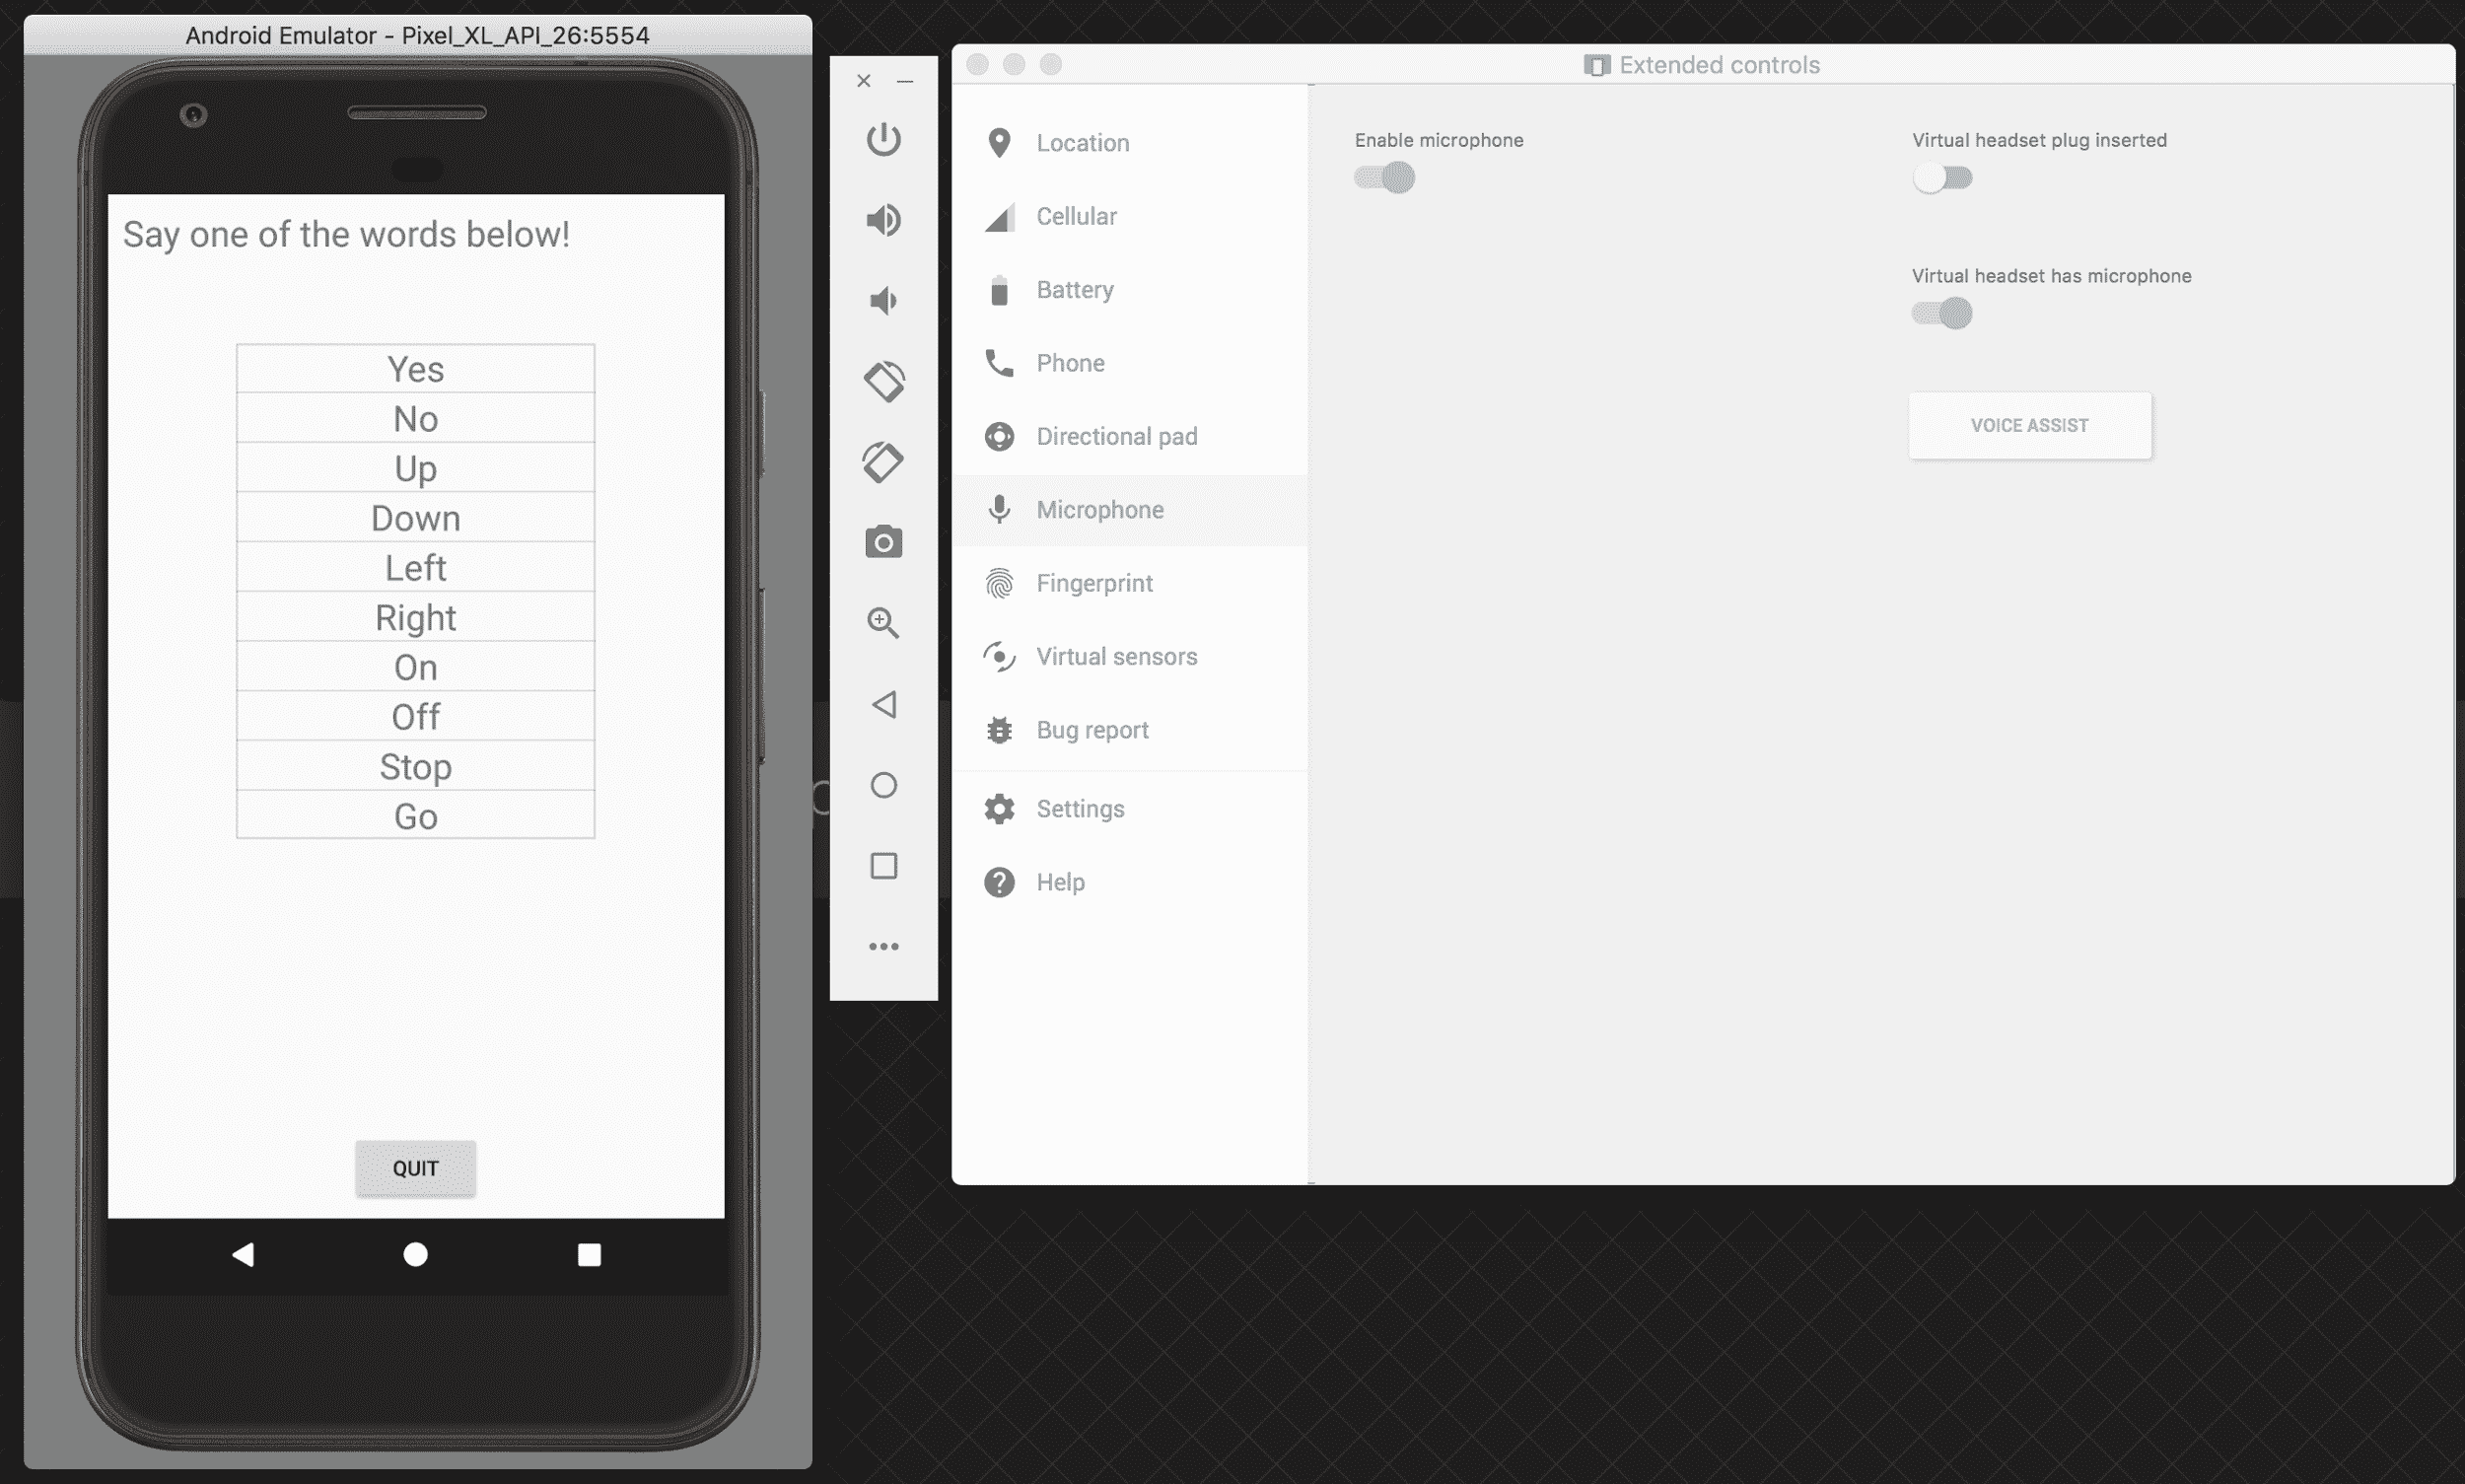
* **TF 語音**:運行在音頻訓練教程中構建的簡單語音識別模型。 監聽一小部分單詞,并在識別它們時在 UI 中突出顯示它們。
# 操作步驟
我們按以下步驟進行:
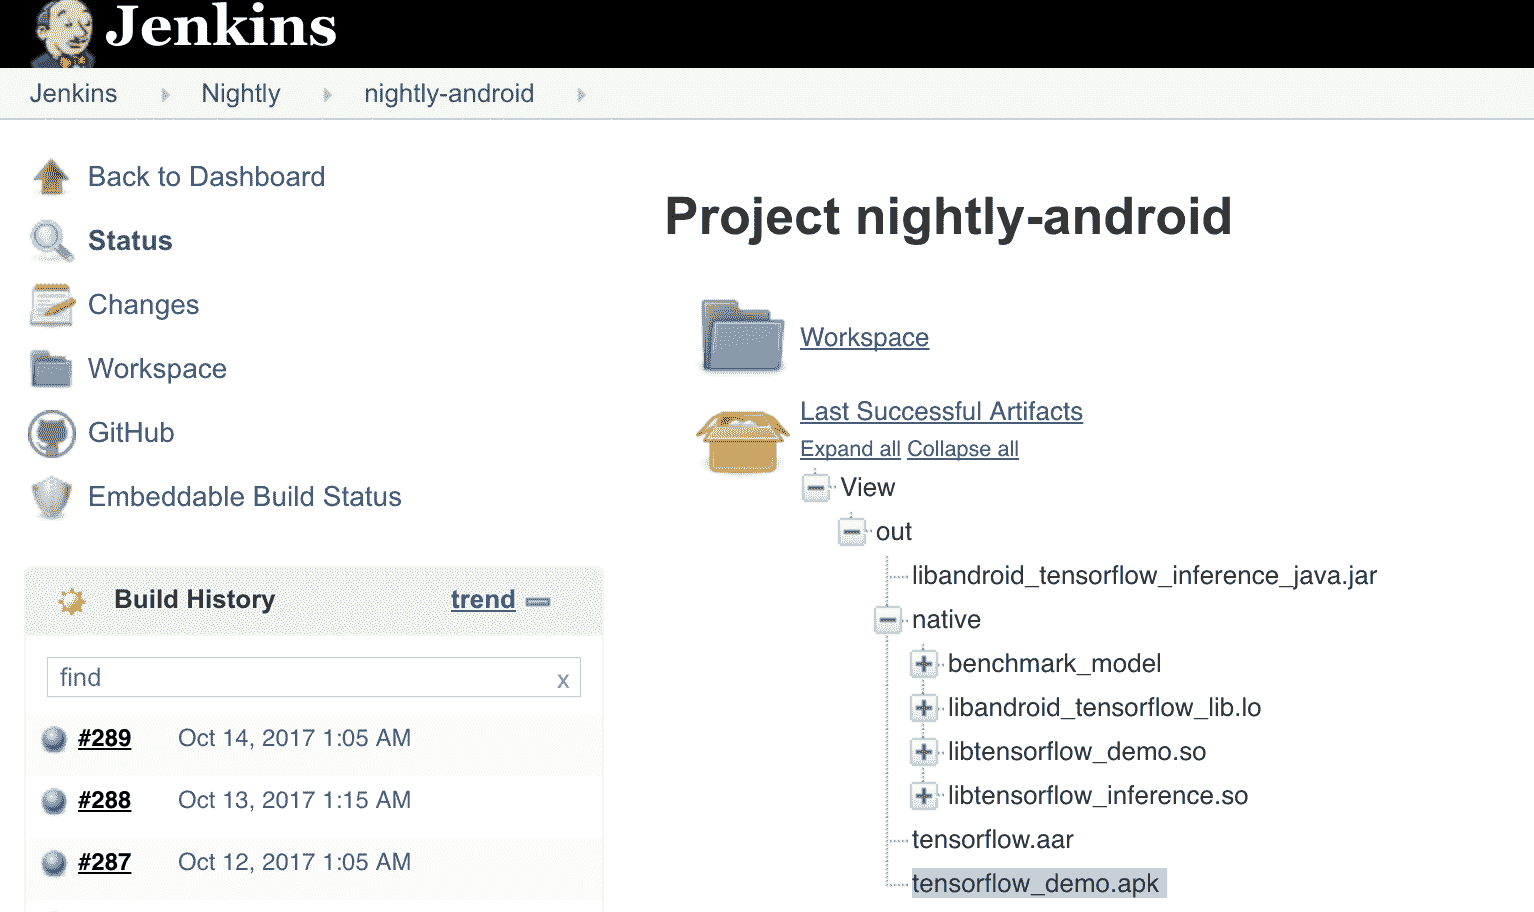
1. 安裝包的最佳方法是使用每晚創建的預構建 APK。 將瀏覽器指向[這里](https://ci.tensorflow.org/view/Nightly/job/nightly-android/)并下載`TensorFlow_demo.apk`,如以下屏幕截圖所示:
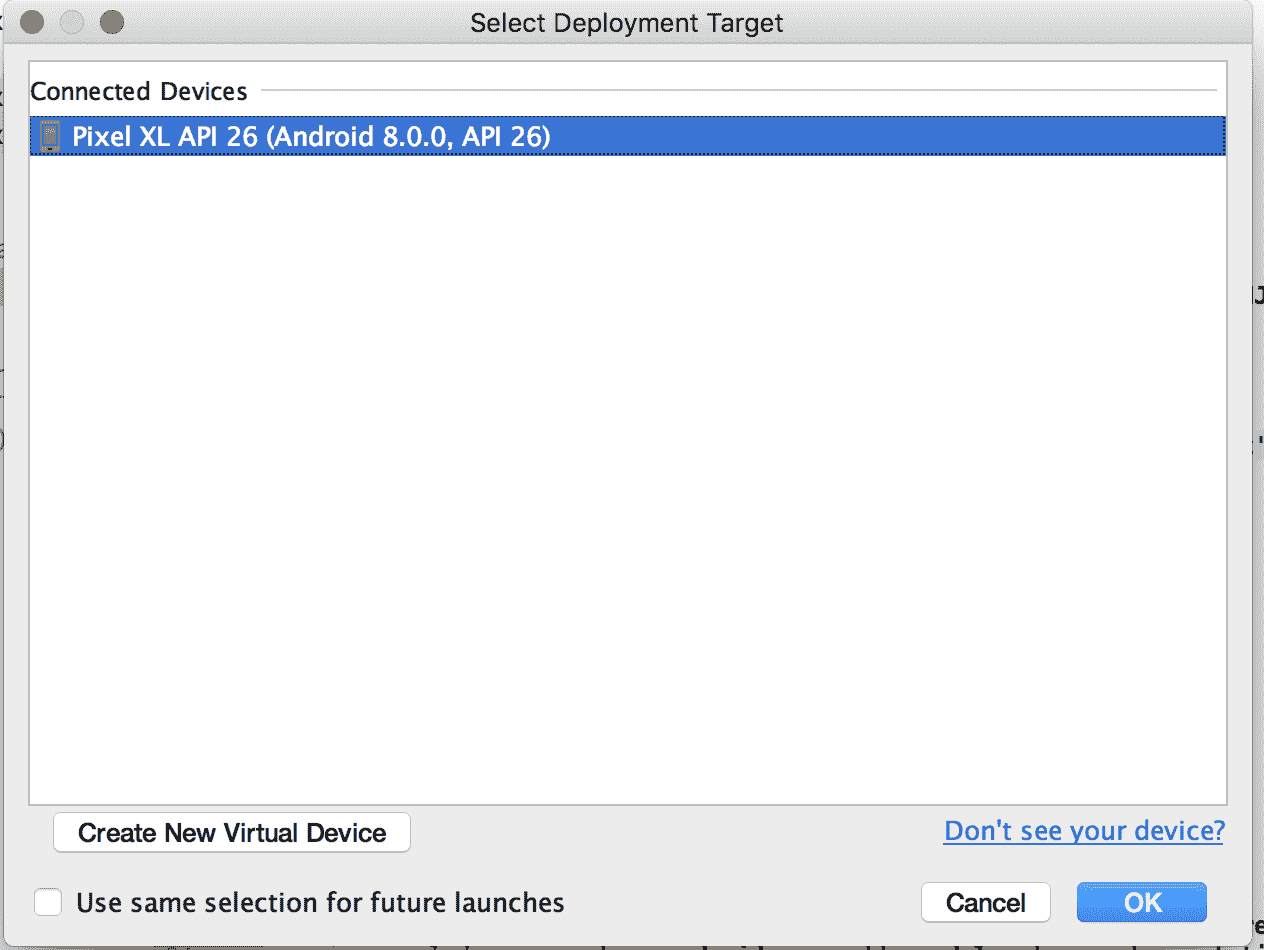
2. 在您的設備上安裝應用。 在我的示例中,我將使用 Android Studio 中可用的 Pixel XL 仿真設備。 這是直接從 Android Studio 內部模擬的終端設備。 命令`adb devices`列出所有連接的設備。 在這種情況下,我有一個 Pixel XL 模擬器,可以安裝`TensorFlow_demo apk`。
```py
adb devices
List of devices attached
emulator-5554 device
adb install -r TensorFlow_demo.apk
```
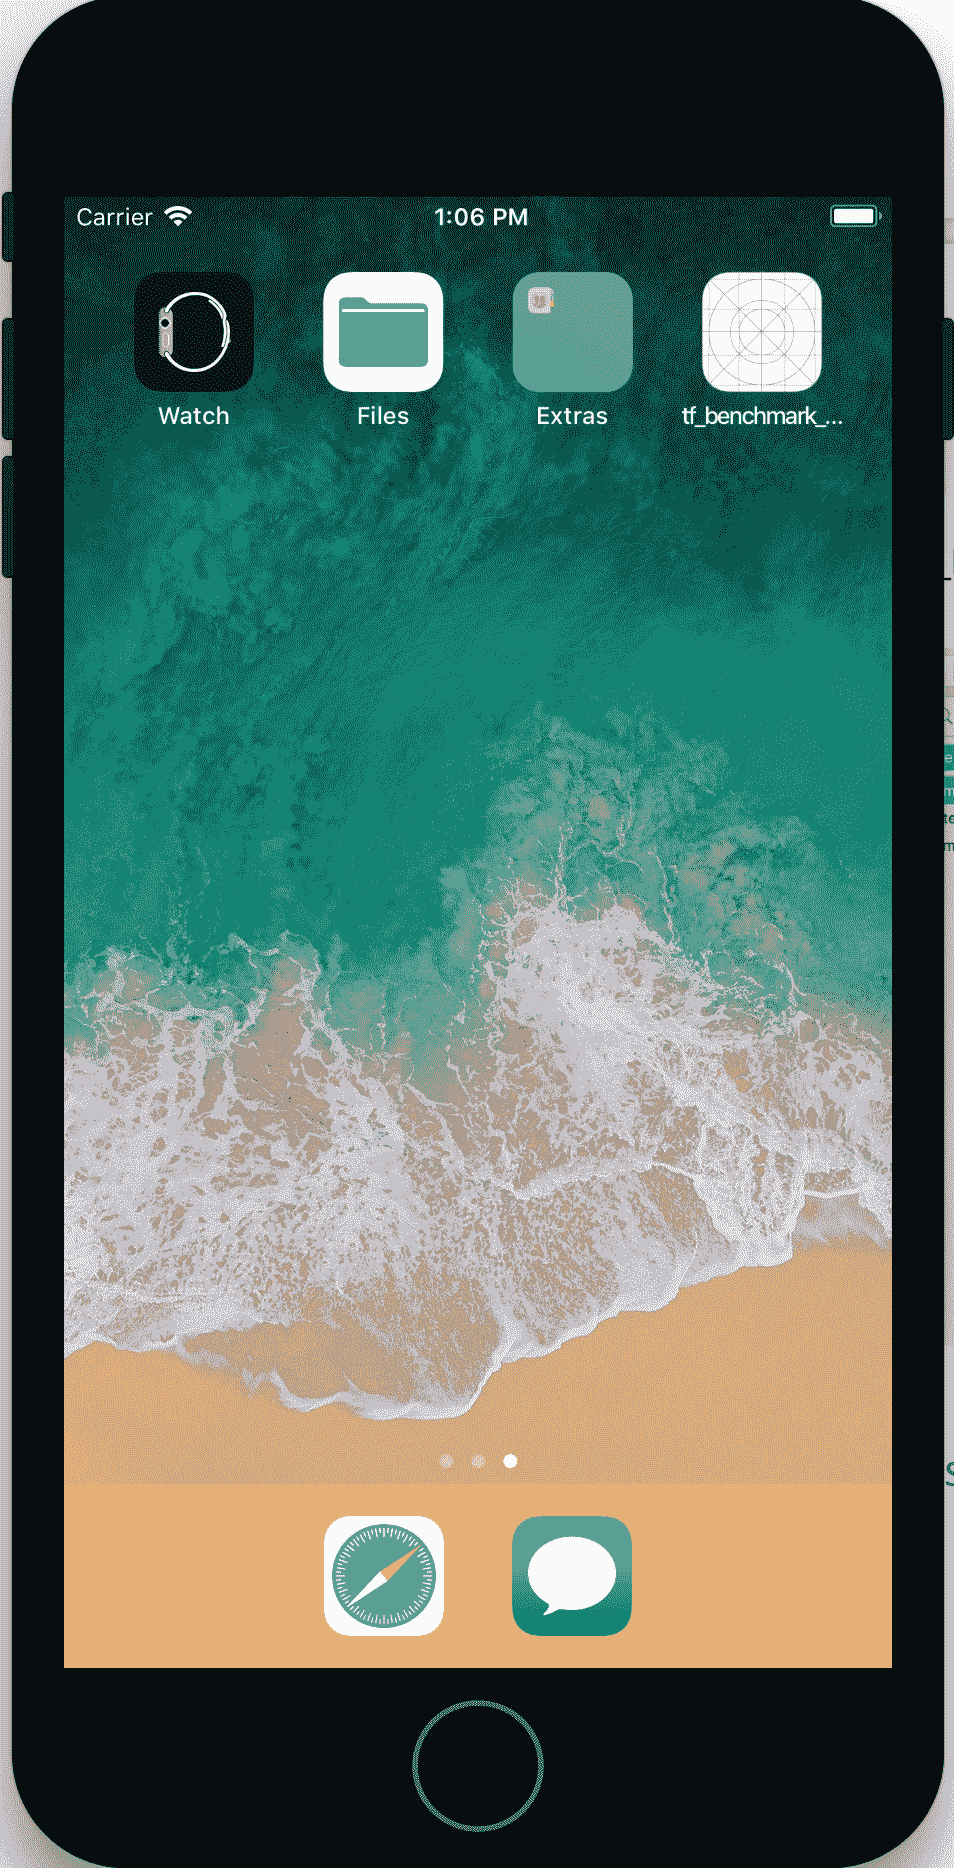
安裝后,仿真器將具有一組新的 TensorFlow 應用可供使用,如下圖所示。

3. 運行您喜歡的應用。 例如,以下圖像是 TF Stylize 的示例,用于通過 Transfer Learning 將相機預覽圖像重新設置為多種不同藝術風格的圖像:
下圖是 TF 語音的示例(請記住為仿真器激活麥克風):
# 工作原理
如果您使用夜間構建演示和`adb`工具在設備上安裝 APK,則安裝 Android 的 TensorFlow 示例非常容易。
# 為 MacOS 和 iPhone 安裝 TensorFlow Mobile
在本秘籍中,我們將學習如何在移動環境中設置 TensorFlow。 我的環境是 macOS,這里的想法是為 iOS 和 iPhone 開發。
# 準備
我們將使用 Xcode 開發環境和 CocoaPods 來預安裝 TensorFlow。 我將假定您的環境中已經安裝了 Xcode。 如果沒有,請從[這里](https://developer.apple.com/xcode/)下載。
# 操作步驟
我們將按照以下步驟進行操作:
1. 使用以下命令安裝 CocoaPods
```py
sudo gem install cocoapods
pod setup
Setting up CocoaPods master repo
$ /usr/local/git/current/bin/git clone https://github.com/CocoaPods/Specs.git master --progress
Cloning into 'master'...
remote: Counting objects: 1602077, done.
remote: Compressing objects: 100% (243/243), done.
remote: Total 1602077 (delta 125), reused 172 (delta 74), pack-reused 1601747
Receiving objects: 100% (1602077/1602077), 432.12 MiB | 1.83 MiB/s, done.
Resolving deltas: 100% (849517/849517), done.
Checking out files: 100% (188907/188907), done.
```
2. 使用 CocoaPods 安裝 TensorFlow 發行版:
```py
cd TensorFlow/TensorFlow/examples/ios/benchmark
pod install
Analyzing dependencies
Downloading dependencies
Installing TensorFlow-experimental (1.1.1)
Generating Pods project
Integrating client project
[!] Please close any current Xcode sessions and use `tf_benchmark_example.xcworkspace` for this project from now on.
Sending stats
Pod installation complete! There is 1 dependency from the Podfile and 1 total pod installed.
```
3. 從 Inception v1 下載一些樣本數據。 將標簽和圖文件提取到`simple`和`camera`文件夾內的數據文件夾中:
```py
mkdir -p ~/graphs
curl -o ~/graphs/inception5h.zip \
https://storage.googleapis.com/download.TensorFlow.org/models/inception5h.zip \
&& unzip ~/graphs/inception5h.zip -d ~/graphs/inception5h
cp ~/graphs/inception5h/* TensorFlow/examples/ios/benchmark/data/
cp ~/graphs/inception5h/* TensorFlow/examples/ios/camera/data/
cp ~/graphs/inception5h/* TensorFlow/examples/ios/simple/data/
```
4. 從中下載用作測試的圖像并將其復制到基準目錄:
<https://upload.wikimedia.org/wikipedia/commons/5/55/Grace_Hopper.jpg>
```py
cp grace_hopper.jpg ../../benchmark/data/
```

Grace Hopper 的圖片
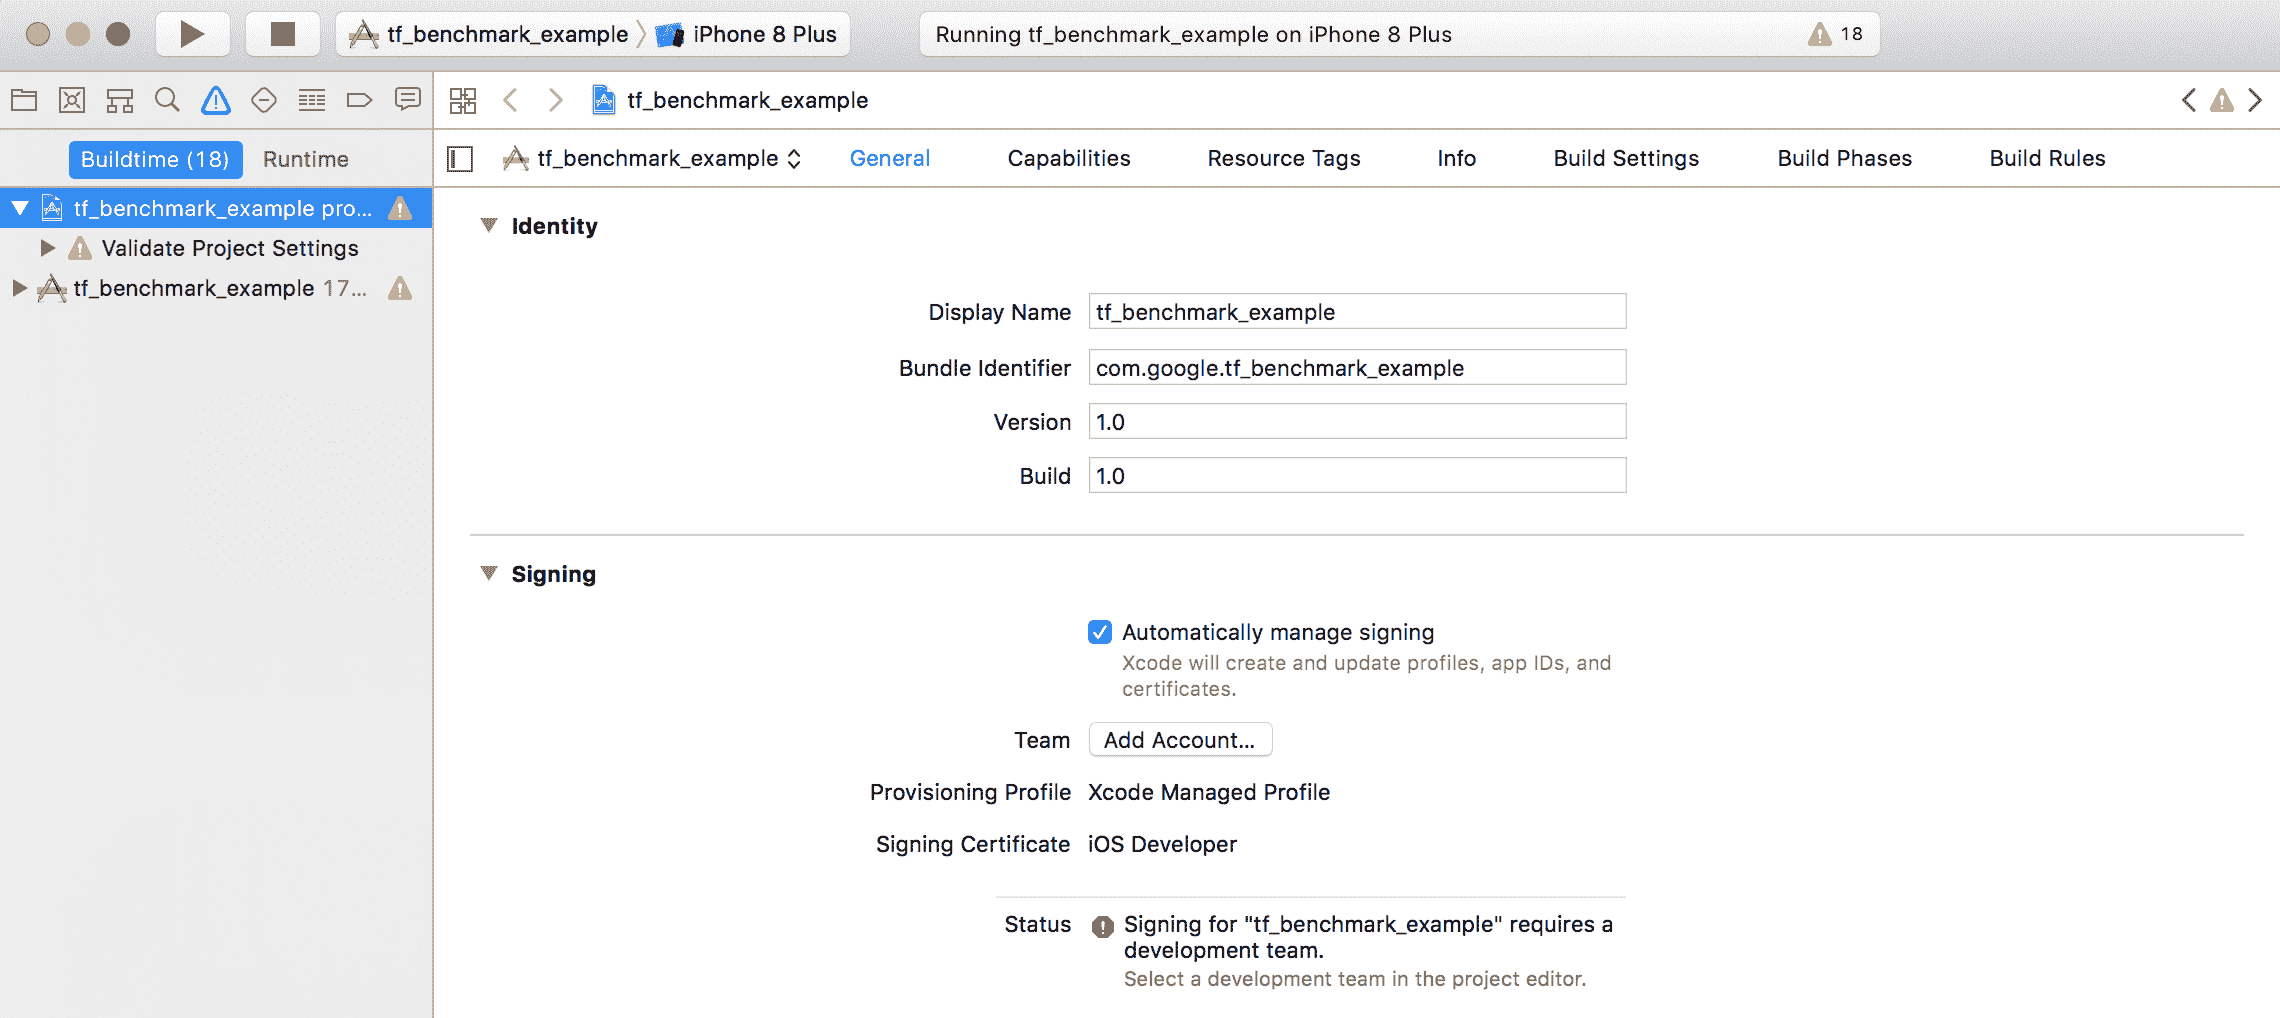
5. 打開以前使用的示例項目。 以下命令將打開已經可用的 TensorFlow 的 Xcode 之后,運行編譯,如以下代碼和圖像所示:
```py
open tf_benchmark_example.xcworkspace
```
6. 在 iPhone 模擬器中查看結果。 根據 Inception v1 類別,將步驟 4 中使用的圖像識別為*軍服*的圖像:
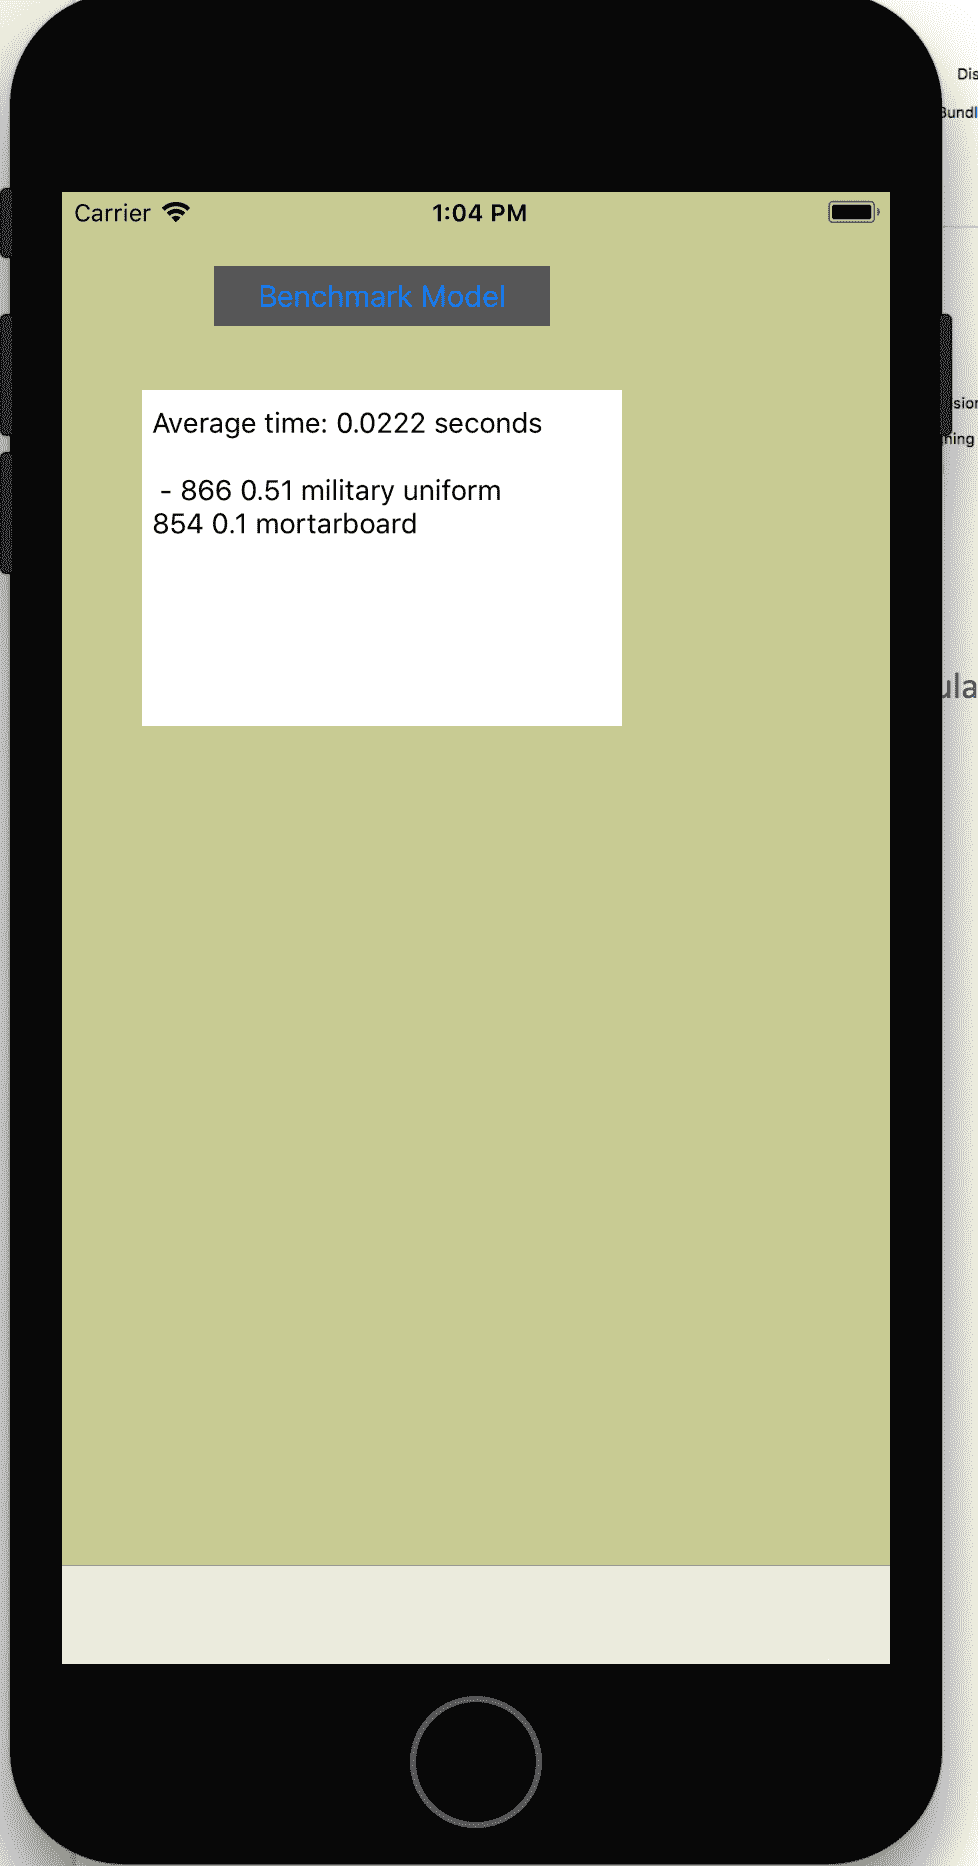
用于 Tensorflow 計算的 Iphone 應用示例
# 工作原理
Xcode 和 CocoaPods 用于編譯 TensorFlow 應用,該應用用于對不同 Inception 類別中的圖像進行分類。 結果使用 iPhone 模擬器可視化。
# 更多
您可以直接在應用中使用 TensorFlow。 [可在此處獲得更多信息](https://github.com/TensorFlow/TensorFlow/blob/master/TensorFlow/examples/ios/README.md)。
# 為移動設備優化 TensorFlow 圖
在本秘籍中,我們將考慮不同的選項來優化在移動設備上運行的 TensorFlow 代碼。 從減小模型的大小到量化,分析了不同的選項。
# 準備
我們將使用 Bazel 構建 TensorFlow 的不同組件。 因此,第一步是確保同時安裝了 Bazel 和 TensorFlow。
# 操作步驟
我們按以下步驟進行優化:
1. 從[這里](https://developer.android.com/studio/install.html)安裝 Android Studio。
2. 按照[這個頁面](https://docs.bazel.build/versions/master/install.html)上的說明安裝 Bazel。 對于 macOS,我們將使用 Homebrew:
```py
/usr/bin/ruby -e "$(curl -fsSL \
https://raw.githubusercontent.com/Homebrew/install/master/install)"
brew install bazel
bazel version
brew upgrade bazel
```
3. 從 GitHub 克隆 TensorFlow 發行版:
```py
git clone https://github.com/TensorFlow/TensorFlow.git
```
4. 構建一個圖轉換器,匯總一下圖本身:
```py
cd ~/TensorFlow/
bazel build TensorFlow/tools/graph_transforms:summarize_graph
[2,326 / 2,531] Compiling TensorFlow/core/kernels/cwise_op_greater.cc
INFO: From Linking TensorFlow/tools/graph_transforms/summarize_graph:
clang: warning: argument unused during compilation: '-pthread' [-Wunused-command-line-argument]
Target //TensorFlow/tools/graph_transforms:summarize_graph up-to-date:
bazel-bin/TensorFlow/tools/graph_transforms/summarize_graph
INFO: Elapsed time: 1521.260s, Critical Path: 103.87s
```
7. 下載 TensorFlow 圖以用作示例。 在這種情況下,我們將使用 Inception v1 TensorFlow 圖:
```py
mkdir -p ~/graphs
curl -o ~/graphs/inception5h.zip \
https://storage.googleapis.com/download.TensorFlow.org/models/inception5h.zip \
&& unzip ~/graphs/inception5h.zip -d ~/graphs/inception5h
```
8. 匯總 Inception 圖并注意常參數的數量:1,346 萬。 它們每個都存儲有 32 位浮點數,這非常昂貴:
```py
bazel-bin/TensorFlow/tools/graph_transforms/summarize_graph --in_graph=/Users/gulli/graphs/TensorFlow_inception_graph.pb
Found 1 possible inputs: (name=input, type=float(1), shape=[])
No variables spotted.
Found 3 possible outputs: (name=output, op=Identity) (name=output1, op=Identity) (name=output2, op=Identity)
Found 13462015 (13.46M) const parameters, 0 (0) variable parameters, and 0 control_edges
370 nodes assigned to device '/cpu:0'Op types used: 142 Const, 64 BiasAdd, 61 Relu, 59 Conv2D, 13 MaxPool, 9 Concat, 5 Reshape, 5 MatMul, 3 Softmax, 3 Identity, 3 AvgPool, 2 LRN, 1 Placeholder
To use with TensorFlow/tools/benchmark:benchmark_model try these arguments:
bazel run TensorFlow/tools/benchmark:benchmark_model -- --graph=/Users/gulli/graphs/TensorFlow_inception_graph.pb --show_flops --input_layer=input --input_layer_type=float --input_layer_shape= --output_layer=output,output1,output2
```
9. 編譯該工具以將常量操作截斷至 8 位:
```py
bazel build TensorFlow/tools/graph_transforms:transform_graph
INFO: From Linking TensorFlow/tools/graph_transforms/transform_graph:
clang: warning: argument unused during compilation: '-pthread' [-Wunused-command-line-argument]
Target //TensorFlow/tools/graph_transforms:transform_graph up-to-date:
bazel-bin/TensorFlow/tools/graph_transforms/transform_graph
INFO: Elapsed time: 294.421s, Critical Path: 28.83s
```
10. 運行該工具以量化 Inception V1 圖:
```py
bazel-bin/TensorFlow/tools/graph_transforms/transform_graph --in_graph=/Users/gulli/graphs/inception5h/TensorFlow_inception_graph.pb --out_graph=/tmp/TensorFlow_inception_quantized.pb --inputs='Mul:0' --outputs='softmax:0' --transforms='quantize_weights'
2017-10-15 18:56:01.192498: I TensorFlow/tools/graph_transforms/transform_graph.cc:264] Applying quantize_weights
```
11. 比較兩個模型:
```py
ls -lah /Users/gulli/graphs/inception5h/TensorFlow_inception_graph.pb
-rw-r----- 1 gulli 5001 51M Nov 19 2015 /Users/gulli/graphs/inception5h/TensorFlow_inception_graph.pb
ls -lah /tmp/TensorFlow_inception_quantized.pb
-rw-r--r-- 1 gulli wheel 13M Oct 15 18:56 /tmp/TensorFlow_inception_quantized.pb
```
# 工作原理
量化通過將常量操作從 32 位縮減為 8 位來幫助減小模型的大小。 通常,該模型不會遭受表現的顯著降低。 但是,這必須根據具體情況進行驗證。
# 為移動設備分析 TensorFlow 圖
在本秘籍中,我們將考慮不同的選項來優化 TensorFlow 代碼以在移動設備上運行。 從減小模型的大小到量化,分析了不同的選項。
# 準備
我們將使用 Bazel 構建 TensorFlow 的不同組件。 因此,第一步是確保同時安裝了 Bazel 和 TensorFlow。
# 操作步驟
我們進行如下分析:
1. 從[這里](https://developer.android.com/studio/install.html)安裝 Android Studio。
2. 按照[這個頁面](https://docs.bazel.build/versions/master/install.html)上的說明安裝 Bazel。 對于 macOS,我們將使用 Homebrew:
```py
/usr/bin/ruby -e "$(curl -fsSL \
https://raw.githubusercontent.com/Homebrew/install/master/install)"
brew install bazel
bazel version
brew upgrade bazel
```
3. 從 GitHub 克隆 TensorFlow 發行版:
```py
git clone https://github.com/TensorFlow/TensorFlow.git
```
4. 構建圖變壓器,該圖變壓器對圖本身進行配置:
```py
cd ~/TensorFlow/
bazel build -c opt TensorFlow/tools/benchmark:benchmark_model
INFO: Found 1 target...
Target //TensorFlow/tools/benchmark:benchmark_model up-to-date:
bazel-bin/TensorFlow/tools/benchmark/benchmark_model
INFO: Elapsed time: 0.493s, Critical Path: 0.01s
```
5. 通過在桌面上運行以下命令來對模型進行基準測試:
```py
bazel-bin/TensorFlow/tools/benchmark/benchmark_model --graph=/Users/gulli/graphs/TensorFlow_inception_graph.pb --show_run_order=false --show_time=false --show_memory=false --show_summary=true --show_flops=true
Graph: [/Users/gulli/graphs/TensorFlow_inception_graph.pb]
Input layers: [input:0]
Input shapes: [1,224,224,3]
Input types: [float]
Output layers: [output:0]
Num runs: [1000]
Inter-inference delay (seconds): [-1.0]
Inter-benchmark delay (seconds): [-1.0]
Num threads: [-1]
Benchmark name: []
Output prefix: []
Show sizes: [0]
Warmup runs: [2]
Loading TensorFlow.
Got config, 0 devices
Running benchmark for max 2 iterations, max -1 seconds without detailed stat logging, with -1s sleep between inferences
count=2 first=279182 curr=41827 min=41827 max=279182 avg=160504 std=118677
Running benchmark for max 1000 iterations, max 10 seconds without detailed stat logging, with -1s sleep between inferences
count=259 first=39945 curr=44189 min=36539 max=51743 avg=38651.1 std=1886
Running benchmark for max 1000 iterations, max 10 seconds with detailed stat logging, with -1s sleep between inferences
count=241 first=40794 curr=39178 min=37634 max=153345 avg=41644.8 std=8092
Average inference timings in us: Warmup: 160504, no stats: 38651, with stats: 41644
```
6. 通過在運行 64 位 ARM 處理器的目標 android 設備上運行以下命令來對模型進行基準測試。 請注意,以下命令將初始圖推送到設備上并運行可在其中執行基準測試的外殼程序:
```py
bazel build -c opt --config=android_arm64 \ TensorFlow/tools/benchmark:benchmark_model
adb push bazel-bin/TensorFlow/tools/benchmark/benchmark_model \ /data/local/tmp
adb push /tmp/TensorFlow_inception_graph.pb /data/local/tmp/
adb push ~gulli/graphs/inception5h/TensorFlow_inception_graph.pb /data/local/tmp/
/Users/gulli/graphs/inception5h/TensorFlow_inception_graph.pb: 1 file pushed. 83.2 MB/s (53884595 bytes in 0.618s)
adb shell
generic_x86:/ $
/data/local/tmp/benchmark_model --graph=/data/local/tmp/TensorFlow_inception_graph.pb --show_run_order=false --show_time=false --show_memory=false --show_summary=true
```
# 工作原理
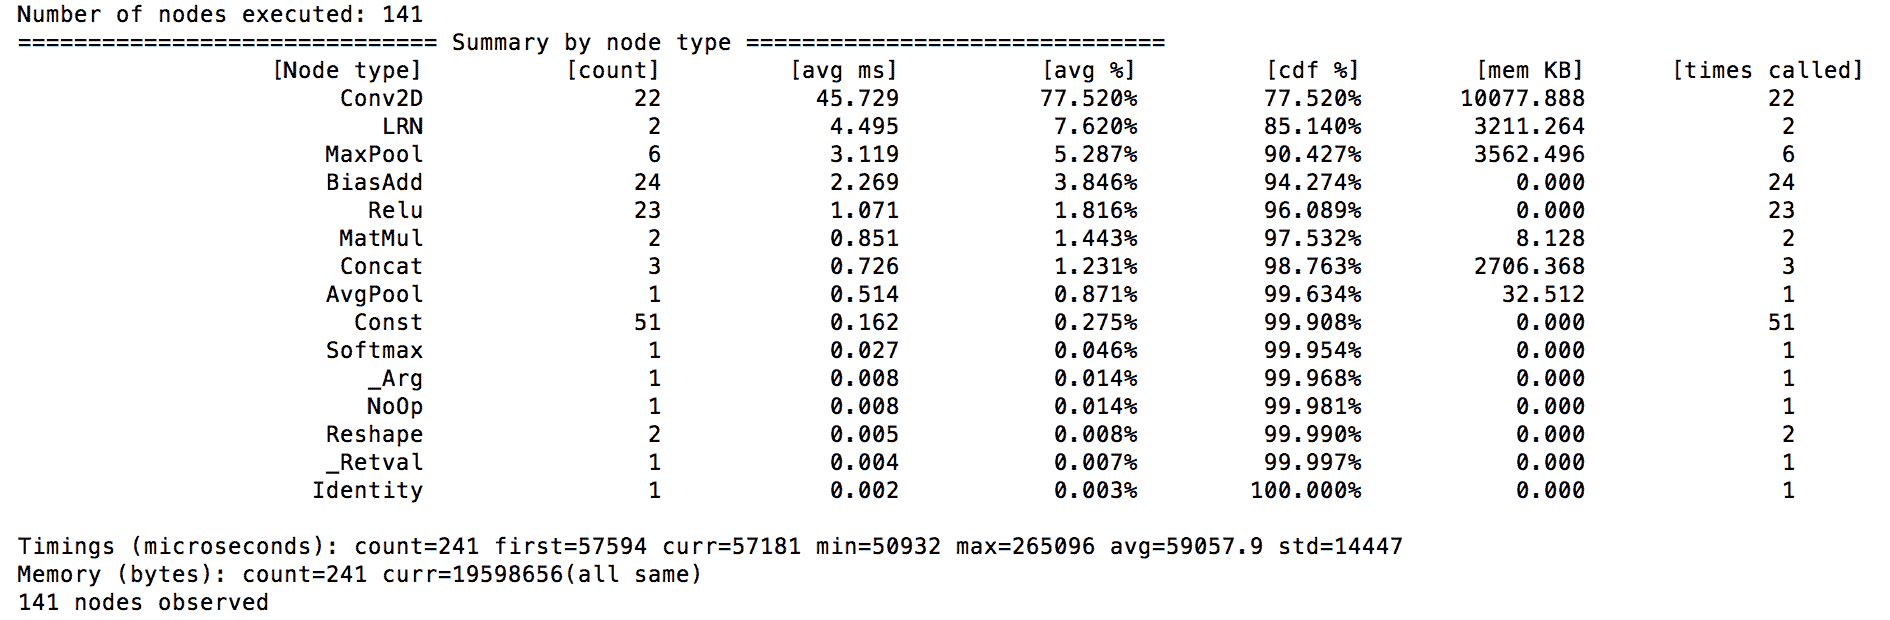
正如預期的那樣,該模型在 Conv2D 操作上花費了大量時間。 總體而言,這大約占我臺式機平均時間的 77.5%。 如果在移動設備上運行此程序,那么花時間執行神經網絡中的每一層并確保它們處于受控狀態至關重要。 要考慮的另一個方面是內存占用。 在這種情況下,桌面執行約為 10 Mb。
# 轉換移動設備的 TensorFlow 圖
在本秘籍中,我們將學習如何轉換 TensorFlow 圖,以便刪除所有僅訓練節點。 這將減小圖的大小,使其更適合于移動設備。
**What is a graph transform tool?** According to https://github.com/tensorflow/tensorflow/blob/master/tensorflow/tools/graph_transforms/README.md "When you have finished training a model and want to deploy it in production, you'll often want to modify it to better run in its final environment. For example if you're targeting a phone you might want to shrink the file size by quantizing the weights, or optimize away batch normalization or other training-only features. The Graph Transform framework offers a suite of tools for modifying computational graphs, and a framework to make it easy to write your own modifications".
# 準備
我們將使用 Bazel 構建 TensorFlow 的不同組件。 因此,第一步是確保同時安裝了 Bazel 和 TensorFlow。
# 操作步驟
這是我們如何轉換 TensorFlow 的方法:
1. 從[這里](https://developer.android.com/studio/install.html)安裝 Android Studio。
2. 按照[這個頁面](https://docs.bazel.build/versions/master/install.html)上的說明安裝 Bazel。 對于 macOS,我們將使用 Homebrew:
```py
/usr/bin/ruby -e "$(curl -fsSL \
https://raw.githubusercontent.com/Homebrew/install/master/install)"
brew install bazel
bazel version
brew upgrade bazel
```
3. 從 GitHub 克隆 TensorFlow 發行版:
```py
git clone https://github.com/TensorFlow/TensorFlow.git
```
4. 構建一個圖轉換器,它匯總了圖本身:
```py
bazel run TensorFlow/tools/graph_transforms:summarize_graph -- --in_graph=/Users/gulli/graphs/inception5h/TensorFlow_inception_graph.pb
WARNING: /Users/gulli/TensorFlow/TensorFlow/core/BUILD:1783:1: in includes attribute of cc_library rule //TensorFlow/core:framework_headers_lib: '../../external/nsync/public' resolves to 'external/nsync/public' not below the relative path of its package 'TensorFlow/core'. This will be an error in the future. Since this rule was created by the macro 'cc_header_only_library', the error might have been caused by the macro implementation in /Users/gulli/TensorFlow/TensorFlow/TensorFlow.bzl:1054:30.
INFO: Found 1 target...
Target //TensorFlow/tools/graph_transforms:summarize_graph up-to-date:
bazel-bin/TensorFlow/tools/graph_transforms/summarize_graph
INFO: Elapsed time: 0.395s, Critical Path: 0.01s
INFO: Running command line: bazel-bin/TensorFlow/tools/graph_transforms/summarize_graph '--in_graph=/Users/gulli/graphs/inception5h/TensorFlow_inception_graph.pb'
Found 1 possible inputs: (name=input, type=float(1), shape=[])
No variables spotted.
Found 3 possible outputs: (name=output, op=Identity) (name=output1, op=Identity) (name=output2, op=Identity)
Found 13462015 (13.46M) const parameters, 0 (0) variable parameters, and 0 control_edges
370 nodes assigned to device '/cpu:0'Op types used: 142 Const, 64 BiasAdd, 61 Relu, 59 Conv2D, 13 MaxPool, 9 Concat, 5 Reshape, 5 MatMul, 3 Softmax, 3 Identity, 3 AvgPool, 2 LRN, 1 Placeholder
To use with TensorFlow/tools/benchmark:benchmark_model try these arguments:
bazel run TensorFlow/tools/benchmark:benchmark_model -- --graph=/Users/gulli/graphs/inception5h/TensorFlow_inception_graph.pb --show_flops --input_layer=input --input_layer_type=float --input_layer_shape= --output_layer=output,output1,output2
```
5. 剝去用于訓練的所有節點,當在移動設備上使用圖進行推理時,不需要這些節點:
```py
bazel run TensorFlow/tools/graph_transforms:transform_graph -- --in_graph=/Users/gulli/graphs/inception5h/TensorFlow_inception_graph.pb --out_graph=/tmp/optimized_inception_graph.pb --transforms="strip_unused_nodes fold_constants(ignore_errors=true) fold_batch_norms fold_old_batch_norms"
WARNING: /Users/gulli/TensorFlow/TensorFlow/core/BUILD:1783:1: in includes attribute of cc_library rule //TensorFlow/core:framework_headers_lib: '../../external/nsync/public' resolves to 'external/nsync/public' not below the relative path of its package 'TensorFlow/core'. This will be an error in the future. Since this rule was created by the macro 'cc_header_only_library', the error might have been caused by the macro implementation in /Users/gulli/TensorFlow/TensorFlow/TensorFlow.bzl:1054:30.
INFO: Found 1 target...
Target //TensorFlow/tools/graph_transforms:transform_graph up-to-date:
bazel-bin/TensorFlow/tools/graph_transforms/transform_graph
INFO: Elapsed time: 0.578s, Critical Path: 0.01s
INFO: Running command line: bazel-bin/TensorFlow/tools/graph_transforms/transform_graph '--in_graph=/Users/gulli/graphs/inception5h/TensorFlow_inception_graph.pb' '--out_graph=/tmp/optimized_inception_graph.pb' '--transforms=strip_unused_nodes fold_constants(ignore_errors=true) fold_batch_norms fold_old_batch_norms'
2017-10-15 22:26:59.357129: I TensorFlow/tools/graph_transforms/transform_graph.cc:264] Applying strip_unused_nodes
2017-10-15 22:26:59.367997: I TensorFlow/tools/graph_transforms/transform_graph.cc:264] Applying fold_constants
2017-10-15 22:26:59.387800: I TensorFlow/core/platform/cpu_feature_guard.cc:137] Your CPU supports instructions that this TensorFlow binary was not compiled to use: SSE4.2 AVX AVX2 FMA
2017-10-15 22:26:59.388676: E TensorFlow/tools/graph_transforms/transform_graph.cc:279] fold_constants: Ignoring error Must specify at least one target to fetch or execute.
2017-10-15 22:26:59.388695: I TensorFlow/tools/graph_transforms/transform_graph.cc:264] Applying fold_batch_norms
2017-10-15 22:26:59.388721: I TensorFlow/tools/graph_transforms/transform_graph.cc:264] Applying fold_old_batch_norms
```
# 工作原理
為了創建可以在設備上加載的更輕的模型,我們使用了圖變換工具應用的`strip_unused_nodes`規則刪除了所有不需要的節點。 該操作將刪除用于學習的所有操作,并保留用于推理的操作。
- TensorFlow 1.x 深度學習秘籍
- 零、前言
- 一、TensorFlow 簡介
- 二、回歸
- 三、神經網絡:感知器
- 四、卷積神經網絡
- 五、高級卷積神經網絡
- 六、循環神經網絡
- 七、無監督學習
- 八、自編碼器
- 九、強化學習
- 十、移動計算
- 十一、生成模型和 CapsNet
- 十二、分布式 TensorFlow 和云深度學習
- 十三、AutoML 和學習如何學習(元學習)
- 十四、TensorFlow 處理單元
- 使用 TensorFlow 構建機器學習項目中文版
- 一、探索和轉換數據
- 二、聚類
- 三、線性回歸
- 四、邏輯回歸
- 五、簡單的前饋神經網絡
- 六、卷積神經網絡
- 七、循環神經網絡和 LSTM
- 八、深度神經網絡
- 九、大規模運行模型 -- GPU 和服務
- 十、庫安裝和其他提示
- TensorFlow 深度學習中文第二版
- 一、人工神經網絡
- 二、TensorFlow v1.6 的新功能是什么?
- 三、實現前饋神經網絡
- 四、CNN 實戰
- 五、使用 TensorFlow 實現自編碼器
- 六、RNN 和梯度消失或爆炸問題
- 七、TensorFlow GPU 配置
- 八、TFLearn
- 九、使用協同過濾的電影推薦
- 十、OpenAI Gym
- TensorFlow 深度學習實戰指南中文版
- 一、入門
- 二、深度神經網絡
- 三、卷積神經網絡
- 四、循環神經網絡介紹
- 五、總結
- 精通 TensorFlow 1.x
- 一、TensorFlow 101
- 二、TensorFlow 的高級庫
- 三、Keras 101
- 四、TensorFlow 中的經典機器學習
- 五、TensorFlow 和 Keras 中的神經網絡和 MLP
- 六、TensorFlow 和 Keras 中的 RNN
- 七、TensorFlow 和 Keras 中的用于時間序列數據的 RNN
- 八、TensorFlow 和 Keras 中的用于文本數據的 RNN
- 九、TensorFlow 和 Keras 中的 CNN
- 十、TensorFlow 和 Keras 中的自編碼器
- 十一、TF 服務:生產中的 TensorFlow 模型
- 十二、遷移學習和預訓練模型
- 十三、深度強化學習
- 十四、生成對抗網絡
- 十五、TensorFlow 集群的分布式模型
- 十六、移動和嵌入式平臺上的 TensorFlow 模型
- 十七、R 中的 TensorFlow 和 Keras
- 十八、調試 TensorFlow 模型
- 十九、張量處理單元
- TensorFlow 機器學習秘籍中文第二版
- 一、TensorFlow 入門
- 二、TensorFlow 的方式
- 三、線性回歸
- 四、支持向量機
- 五、最近鄰方法
- 六、神經網絡
- 七、自然語言處理
- 八、卷積神經網絡
- 九、循環神經網絡
- 十、將 TensorFlow 投入生產
- 十一、更多 TensorFlow
- 與 TensorFlow 的初次接觸
- 前言
- 1.?TensorFlow 基礎知識
- 2. TensorFlow 中的線性回歸
- 3. TensorFlow 中的聚類
- 4. TensorFlow 中的單層神經網絡
- 5. TensorFlow 中的多層神經網絡
- 6. 并行
- 后記
- TensorFlow 學習指南
- 一、基礎
- 二、線性模型
- 三、學習
- 四、分布式
- TensorFlow Rager 教程
- 一、如何使用 TensorFlow Eager 構建簡單的神經網絡
- 二、在 Eager 模式中使用指標
- 三、如何保存和恢復訓練模型
- 四、文本序列到 TFRecords
- 五、如何將原始圖片數據轉換為 TFRecords
- 六、如何使用 TensorFlow Eager 從 TFRecords 批量讀取數據
- 七、使用 TensorFlow Eager 構建用于情感識別的卷積神經網絡(CNN)
- 八、用于 TensorFlow Eager 序列分類的動態循壞神經網絡
- 九、用于 TensorFlow Eager 時間序列回歸的遞歸神經網絡
- TensorFlow 高效編程
- 圖嵌入綜述:問題,技術與應用
- 一、引言
- 三、圖嵌入的問題設定
- 四、圖嵌入技術
- 基于邊重構的優化問題
- 應用
- 基于深度學習的推薦系統:綜述和新視角
- 引言
- 基于深度學習的推薦:最先進的技術
- 基于卷積神經網絡的推薦
- 關于卷積神經網絡我們理解了什么
- 第1章概論
- 第2章多層網絡
- 2.1.4生成對抗網絡
- 2.2.1最近ConvNets演變中的關鍵架構
- 2.2.2走向ConvNet不變性
- 2.3時空卷積網絡
- 第3章了解ConvNets構建塊
- 3.2整改
- 3.3規范化
- 3.4匯集
- 第四章現狀
- 4.2打開問題
- 參考
- 機器學習超級復習筆記
- Python 遷移學習實用指南
- 零、前言
- 一、機器學習基礎
- 二、深度學習基礎
- 三、了解深度學習架構
- 四、遷移學習基礎
- 五、釋放遷移學習的力量
- 六、圖像識別與分類
- 七、文本文件分類
- 八、音頻事件識別與分類
- 九、DeepDream
- 十、自動圖像字幕生成器
- 十一、圖像著色
- 面向計算機視覺的深度學習
- 零、前言
- 一、入門
- 二、圖像分類
- 三、圖像檢索
- 四、對象檢測
- 五、語義分割
- 六、相似性學習
- 七、圖像字幕
- 八、生成模型
- 九、視頻分類
- 十、部署
- 深度學習快速參考
- 零、前言
- 一、深度學習的基礎
- 二、使用深度學習解決回歸問題
- 三、使用 TensorBoard 監控網絡訓練
- 四、使用深度學習解決二分類問題
- 五、使用 Keras 解決多分類問題
- 六、超參數優化
- 七、從頭開始訓練 CNN
- 八、將預訓練的 CNN 用于遷移學習
- 九、從頭開始訓練 RNN
- 十、使用詞嵌入從頭開始訓練 LSTM
- 十一、訓練 Seq2Seq 模型
- 十二、深度強化學習
- 十三、生成對抗網絡
- TensorFlow 2.0 快速入門指南
- 零、前言
- 第 1 部分:TensorFlow 2.00 Alpha 簡介
- 一、TensorFlow 2 簡介
- 二、Keras:TensorFlow 2 的高級 API
- 三、TensorFlow 2 和 ANN 技術
- 第 2 部分:TensorFlow 2.00 Alpha 中的監督和無監督學習
- 四、TensorFlow 2 和監督機器學習
- 五、TensorFlow 2 和無監督學習
- 第 3 部分:TensorFlow 2.00 Alpha 的神經網絡應用
- 六、使用 TensorFlow 2 識別圖像
- 七、TensorFlow 2 和神經風格遷移
- 八、TensorFlow 2 和循環神經網絡
- 九、TensorFlow 估計器和 TensorFlow HUB
- 十、從 tf1.12 轉換為 tf2
- TensorFlow 入門
- 零、前言
- 一、TensorFlow 基本概念
- 二、TensorFlow 數學運算
- 三、機器學習入門
- 四、神經網絡簡介
- 五、深度學習
- 六、TensorFlow GPU 編程和服務
- TensorFlow 卷積神經網絡實用指南
- 零、前言
- 一、TensorFlow 的設置和介紹
- 二、深度學習和卷積神經網絡
- 三、TensorFlow 中的圖像分類
- 四、目標檢測與分割
- 五、VGG,Inception,ResNet 和 MobileNets
- 六、自編碼器,變分自編碼器和生成對抗網絡
- 七、遷移學習
- 八、機器學習最佳實踐和故障排除
- 九、大規模訓練
- 十、參考文獻