
# 十二、遷移學習和預訓練模型
簡單來說,**遷移學習**意味著你需要訓練有素的預訓練模型來預測一種類,然后直接使用它或僅再訓練它的一小部分,以便預測另一種類。例如,您可以采用預訓練的模型來識別貓的類型,然后僅對狗的類型再訓練模型的小部分,然后使用它來預測狗的類型。
如果沒有遷移學習,在大型數據集上訓練一個巨大的模型需要幾天甚至幾個月。然而,通過遷移學習,通過采用預訓練的模型,并且僅訓練最后幾層,我們可以節省大量時間從頭開始訓練模型。
當沒有龐大的數據集時,遷移學習也很有用。在小型數據集上訓練的模型可能無法檢測在大型數據集上訓練的模型可以進行的特征。因此,通過遷移學習,即使數據集較小,也可以獲得更好的模型。
在本章中,我們將采用預訓練的模型并對新物體進行訓練。我們展示了帶有圖像的預訓練模型的示例,并將它們應用于圖像分類問題。 您應該嘗試找到其他預訓練的模型,并將它們應用于不同的問題,如對象檢測,文本生成或機器翻譯。本章將介紹以下主題:
* ImageNet 數據集
* 再訓練或微調模型
* COCO 動物數據集和預處理
* 使用 TensorFlow 中預訓練的 VGG16 進行圖像分類
* TensorFlow 中的圖像預處理,用于預訓練的 VGG16
* 在 TensorFlow 中使用**再訓練的** VGG16 進行圖像分類
* 使用 Keras 中預訓練的 VGG16 進行圖像分類
* 使用**再訓練的** VGG16 在 Keras 中進行圖像分類
* 使用 TensorFlow 中的 InceptionV3 進行圖像分類
* 在 TensorFlow 中使用**再訓練的** InceptionV3 進行圖像分類
# ImageNet 數據集
根據 [ImageNet](http://image-net.org):
ImageNet 是根據 WordNet 層次結構組織的圖像數據集。WordNet 中的每個有意義的概念,可能由多個單詞或單詞短語描述,稱為同義詞集或 synset。
ImageNet 有大約 100K 個同義詞集,平均每個同義詞集約有 1,000 個人工標注圖像。 ImageNet 僅存儲對圖像的引用,而圖像存儲在互聯網上的原始位置。在深度學習論文中,ImageNet-1K 是指作為 ImageNet 的**大規模視覺識別挑戰**(**ILSVRC**)的一部分發布的數據集,用于將數據集分類為 1,000 個類別:
可以在以下 URL 找到 1,000 個挑戰類別:
+ <http://image-net.org/challenges/LSVRC/2017/browse-synsets>
+ <http://image-net.org/challenges/LSVRC/2016/browse-synsets>
+ <http://image-net.org/challenges/LSVRC/2015/browse-synsets>
+ <http://image-net.org/challenges/LSVRC/2014/browse-synsets>
+ <http://image-net.org/challenges/LSVRC/2013/browse-synsets>
+ <http://image-net.org/challenges/LSVRC/2012/browse-synsets>
+ <http://image-net.org/challenges/LSVRC/2011/browse-synsets>
+ <http://image-net.org/challenges/LSVRC/2010/browse-synsets>
我們編寫了一個自定義函數來從 Google 下載 ImageNet 標簽:
```py
def build_id2label(self):
base_url = 'https://raw.githubusercontent.com/tensorflow/models/master/research/inception/inception/data/'
synset_url = '{}/imagenet_lsvrc_2015_synsets.txt'.format(base_url)
synset_to_human_url = '{}/imagenet_metadata.txt'.format(base_url)
filename, _ = urllib.request.urlretrieve(synset_url)
synset_list = [s.strip() for s in open(filename).readlines()]
num_synsets_in_ilsvrc = len(synset_list)
assert num_synsets_in_ilsvrc == 1000
filename, _ = urllib.request.urlretrieve(synset_to_human_url)
synset_to_human_list = open(filename).readlines()
num_synsets_in_all_imagenet = len(synset_to_human_list)
assert num_synsets_in_all_imagenet == 21842
synset2name = {}
for s in synset_to_human_list:
parts = s.strip().split('\t')
assert len(parts) == 2
synset = parts[0]
name = parts[1]
synset2name[synset] = name
if self.n_classes == 1001:
id2label={0:'empty'}
id=1
else:
id2label = {}
id=0
for synset in synset_list:
label = synset2name[synset]
id2label[id] = label
id += 1
return id2label
```
我們將這些標簽加載到我們的 Jupyter 筆記本中,如下所示:
```py
### Load ImageNet dataset for labels
from datasetslib.imagenet import imageNet
inet = imageNet()
inet.load_data(n_classes=1000)
#n_classes is 1001 for Inception models and 1000 for VGG models
```
在 ImageNet-1K 數據集上訓練過的熱門預訓練圖像分類模型如下表所示:
| **模型名稱** | **Top-1 準確率** | **Top-5 準確率** | **Top-5 錯誤率** | **原始文件的鏈接** |
| --- | --- | --- | --- | --- |
| AlexNet | | | 15.3% | <https://www.cs.toronto.edu/~fritz/absps/imagenet.pdf> |
| Inception 也稱為 InceptionV1 | 69.8 | 89.6 | 6.67% | <https://arxiv.org/abs/1409.4842> |
| BN-Inception-V2 也稱為 InceptionV2 | 73.9 | 91.8 | 4.9% | <https://arxiv.org/abs/1502.03167> |
| InceptionV3 | 78.0 | 93.9 | 3.46% | <https://arxiv.org/abs/1512.00567> |
| InceptionV4 | 80.2 | 95.2 | | <http://arxiv.org/abs/1602.07261> |
| Inception-Resnet-V2 | 80.4 | 95.2 | | <http://arxiv.org/abs/1602.07261> |
| VGG16 | 71.5 | 89.8 | 7.4% | <https://arxiv.org/abs/1409.1556> |
| VGG19 | 71.1 | 89.8 | 7.3% | <https://arxiv.org/abs/1409.1556> |
| ResNetV1 50 | 75.2 | 92.2 | 7.24% | <https://arxiv.org/abs/1512.03385> |
| ResNetV1 101 | 76.4 | 92.9 | | <https://arxiv.org/abs/1512.03385> |
| ResNetV1 152 | 76.8 | 93.2 | | <https://arxiv.org/abs/1512.03385> |
| ResNetV2 50 | 75.6 | 92.8 | | <https://arxiv.org/abs/1603.05027> |
| ResNetV2 101 | 77.0 | 93.7 | | <https://arxiv.org/abs/1603.05027> |
| ResNetV2 152 | 77.8 | 94.1 | | <https://arxiv.org/abs/1603.05027> |
| ResNetV2 200 | 79.9 | 95.2 | | <https://arxiv.org/abs/1603.05027> |
| Xception | 79.0 | 94.5 | | <https://arxiv.org/abs/1610.02357> |
| MobileNet V1 | 41.3 至 70.7 | 66.2 至 89.5 | | <https://arxiv.org/pdf/1704.04861.pdf> |
在上表中,Top-1 和 Top-5 指標指的是模型在 ImageNet 驗證數據集上的表現。
Google Research 最近發布了一種名為 MobileNets 的新模型。 MobileNets 采用移動優先策略開發,犧牲了低資源使用的準確率。 MobileNets 旨在消耗低功耗并提供低延遲,以便在移動和嵌入式設備上提供更好的體驗。谷歌為 MobileNet 模型提供了 16 個預訓練好的檢查點文件,每個模型提供不同數量的參數和**乘法累加**(**MAC**)。 MAC 和參數越高,資源使用和延遲就越高。因此,您可以在更高的準確率與更高的資源使用/延遲之間進行選擇。
| **模型檢查點** | **百萬 MAC** | **百萬參數** | **Top-1 準確率** | **Top-5 準確率** |
| --- | --- | --- | --- | --- |
| [MobileNet_v1_1.0_224](http://download.tensorflow.org/models/mobilenet_v1_1.0_224_2017_06_14.tar.gz) | 569 | 4.24 | 70.7 | 89.5 |
| [MobileNet_v1_1.0_192](http://download.tensorflow.org/models/mobilenet_v1_1.0_192_2017_06_14.tar.gz) | 418 | 4.24 | 69.3 | 88.9 |
| [MobileNet_v1_1.0_160](http://download.tensorflow.org/models/mobilenet_v1_1.0_160_2017_06_14.tar.gz) | 291 | 4.24 | 67.2 | 87.5 |
| [MobileNet_v1_1.0_128](http://download.tensorflow.org/models/mobilenet_v1_1.0_128_2017_06_14.tar.gz) | 186 | 4.24 | 64.1 | 85.3 |
| [MobileNet_v1_0.75_224](http://http//download.tensorflow.org/models/mobilenet_v1_0.75_224_2017_06_14.tar.gz) | 317 | 2.59 | 68.4 | 88.2 |
| [MobileNet_v1_0.75_192](http://download.tensorflow.org/models/mobilenet_v1_0.75_192_2017_06_14.tar.gz) | 233 | 2.59 | 67.4 | 87.3 |
| [MobileNet_v1_0.75_160](http://download.tensorflow.org/models/mobilenet_v1_0.75_160_2017_06_14.tar.gz) | 162 | 2.59 | 65.2 | 86.1 |
| [MobileNet_v1_0.75_128](http://download.tensorflow.org/models/mobilenet_v1_0.75_128_2017_06_14.tar.gz) | 104 | 2.59 | 61.8 | 83.6 |
| [MobileNet_v1_0.50_224](http://download.tensorflow.org/models/mobilenet_v1_0.50_224_2017_06_14.tar.gz) | 150 | 1.34 | 64.0 | 85.4 |
| [MobileNet_v1_0.50_192](http://download.tensorflow.org/models/mobilenet_v1_0.50_192_2017_06_14.tar.gz) | 110 | 1.34 | 62.1 | 84.0 |
| [MobileNet_v1_0.50_160](http://download.tensorflow.org/models/mobilenet_v1_0.50_160_2017_06_14.tar.gz) | 77 | 1.34 | 59.9 | 82.5 |
| [MobileNet_v1_0.50_128](http://download.tensorflow.org/models/mobilenet_v1_0.50_128_2017_06_14.tar.gz) | 49 | 1.34 | 56.2 | 79.6 |
| [MobileNet_v1_0.25_224](http://download.tensorflow.org/models/mobilenet_v1_0.25_224_2017_06_14.tar.gz) | 41 | 0.47 | 50.6 | 75.0 |
| [MobileNet_v1_0.25_192](http://download.tensorflow.org/models/mobilenet_v1_0.25_192_2017_06_14.tar.gz) | 34 | 0.47 | 49.0 | 73.6 |
| [MobileNet_v1_0.25_160](http://download.tensorflow.org/models/mobilenet_v1_0.25_160_2017_06_14.tar.gz) | 21 | 0.47 | 46.0 | 70.7 |
| [MobileNet_v1_0.25_128](http://download.tensorflow.org/models/mobilenet_v1_0.25_128_2017_06_14.tar.gz) | 14 | 0.47 | 41.3 | 66.2 |
有關 MobileNets 的更多信息,請訪問以下資源:
<https://research.googleblog.com/2017/06/mobilenets-open-source-models-for.html>
<https://github.com/tensorflow/models/blob/master/research/slim/nets/mobilenet_v1.md>
<https://arxiv.org/pdf/1704.04861.pdf>
# 再訓練或微調模型
在像 ImageNet 這樣的大型和多樣化數據集上訓練的模型能夠檢測和捕獲一些通用特征,如曲線,邊緣和形狀。其中一些特征很容易適用于其他類型的數據集。因此,在遷移學習中,我們采用這樣的通用模型,并使用以下一些技術來微調或再訓練它們到我們的數據集:
* **廢除并替換最后一層**: 通常的做法是刪除最后一層并添加與我們的數據集匹配的新分類層。例如,ImageNet 模型使用 1,000 個類別進行訓練,但我們的 COCO 動物數據集只有 8 個類別,因此我們刪除了 softmax 層,該層使用 softmax 層生成 1,000 個類別的概率,該層生成 8 個類別的概率。通常,當新數據集幾乎與訓練模型的數據集類似時使用此技術,因此僅需要再訓練最后一層。
* **凍結前幾層**:另一種常見做法是凍結前幾層,以便僅使用新數據集更新最后未凍結層的權重。我們將看到一個例子,我們凍結前 15 層,同時只再訓練最后 10 層。通常,當新數據集與訓練模型的數據集非常不相似時使用此技術,因此不僅需要訓練最后的層。
* **調整超參數**:您還可以在再訓練之前調整超參數,例如更改學習率或嘗試不同的損失函數或不同的優化器。
TensorFlow 和 Keras 均提供預訓練模型。
我們將在文件夾`tensorflow/models/research/slim/nets`中通過 TensorFlow Slim 演示我們的示例,TensorFlow Slim 在編寫時有幾個預訓練的模型。我們將使用 TensorFlow Slim 來實例化預訓練的模型,然后從下載的檢查點文件加載權重。然后,加載的模型將用于使用新數據集進行預測。然后我們將再訓練模型以微調預測。
我們還將通過`keras.applications`模塊中提供的 Keras 預訓練模型演示遷移學習。雖然 TensorFlow 有大約 20 多個預訓練模型,但`keras.appplications`只有以下 7 種預訓練模型:
* [Xception](https://keras.io/applications/#xception)
* [VGG16](https://keras.io/applications/#vgg16)
* [VGG19](https://keras.io/applications/#vgg19)
* [ResNet50](https://keras.io/applications/#resnet50)
* [InceptionV3](https://keras.io/applications/#inceptionv3)
* [InceptionResNetV2](https://keras.io/applications/#inceptionresnetv2)
* [MobileNet](https://keras.io/applications/#mobilenet)
# COCO 動物數據集和預處理圖像
對于我們的例子,我們將使用 COCO 動物數據集,[這是 COCO 數據集的一小部分,由斯坦福大學的研究人員提供](http://cs231n.stanford.edu/coco-animals.zip)。 COCO 動物數據集有 800 個訓練圖像和 200 個動物類別的測試圖像:熊,鳥,貓,狗,長頸鹿,馬,綿羊和斑馬。為 VGG16 和 Inception 模型下載和預處理圖像。
對于 VGG 模型,圖像大小為`224 x 224`,預處理步驟如下:
1. 將圖像調整為`224×224`,其函數類似于來自 TensorFlow 的`tf.image.resize_image_with_crop_or_pad`函數。我們實現了這個函數如下:
```py
def resize_image(self,in_image:PIL.Image, new_width,
new_height, crop_or_pad=True):
img = in_image
if crop_or_pad:
half_width = img.size[0] // 2
half_height = img.size[1] // 2
half_new_width = new_width // 2
half_new_height = new_height // 2
img = img.crop((half_width-half_new_width,
half_height-half_new_height,
half_width+half_new_width,
half_height+half_new_height
))
img = img.resize(size=(new_width, new_height))
return img
```
1. 調整大小后,將圖像從`PIL.Image`轉換為 NumPy 數組并檢查圖像是否有深度通道,因為數據集中的某些圖像僅為灰度。
```py
img = self.pil_to_nparray(img)
if len(img.shape)==2:
# greyscale or no channels then add three channels
h=img.shape[0]
w=img.shape[1]
img = np.dstack([img]*3)
```
1. 然后我們從圖像中減去 VGG 數據集平均值以使數據居中。我們將新訓練圖像的數據居中的原因是這些特征具有與用于降雨模型的初始數據類似的范圍。通過在相似范圍內制作特征,我們確保再訓練期間的梯度不會變得太高或太低。同樣通過使數據居中,學習過程變得更快,因為對于以零均值為中心的每個通道,梯度變得均勻。
```py
means = np.array([[[123.68, 116.78, 103.94]]]) #shape=[1, 1, 3]
img = img - means
```
完整的預處理函數如下:
```py
def preprocess_for_vgg(self,incoming, height, width):
if isinstance(incoming, six.string_types):
img = self.load_image(incoming)
else:
img=incoming
img_size = vgg.vgg_16.default_image_size
height = img_size
width = img_size
img = self.resize_image(img,height,width)
img = self.pil_to_nparray(img)
if len(img.shape)==2:
# greyscale or no channels then add three channels
h=img.shape[0]
w=img.shape[1]
img = np.dstack([img]*3)
means = np.array([[[123.68, 116.78, 103.94]]]) #shape=[1, 1, 3]
try:
img = img - means
except Exception as ex:
print('Error preprocessing ',incoming)
print(ex)
return img
```
對于 Inception 模型,圖像大小為`299 x 299`,預處理步驟如下:
1. 圖像大小調整為`299 x 299`,其函數類似于來自 TensorFlow 的`tf.image.resize_image_with_crop_or_pad`函數。我們實現了之前在 VGG 預處理步驟中定義的此函數。
2. 然后使用以下代碼將圖像縮放到范圍`(-1, +1)`:
```py
img = ((img/255.0) - 0.5) * 2.0
```
完整的預處理函數如下:
```py
def preprocess_for_inception(self,incoming):
img_size = inception.inception_v3.default_image_size
height = img_size
width = img_size
if isinstance(incoming, six.string_types):
img = self.load_image(incoming)
else:
img=incoming
img = self.resize_image(img,height,width)
img = self.pil_to_nparray(img)
if len(img.shape)==2:
# greyscale or no channels then add three channels
h=img.shape[0]
w=img.shape[1]
img = np.dstack([img]*3)
img = ((img/255.0) - 0.5) * 2.0
return img
```
讓我們加載 COCO 動物數據集:
```py
from datasetslib.coco import coco_animals
coco = coco_animals()
x_train_files, y_train, x_val_files, x_val = coco.load_data()
```
我們從驗證集中的每個類中取一個圖像,制作列表,`x_test`并預處理圖像以制作列表`images_test`:
```py
x_test = [x_val_files[25*x] for x in range(8)]
images_test=np.array([coco.preprocess_for_vgg(x) for x in x_test])
```
我們使用這個輔助函數來顯示與圖像相關的前五個類的圖像和概率:
```py
# helper function
def disp(images,id2label=None,probs=None,n_top=5,scale=False):
if scale:
imgs = np.abs(images + np.array([[[[123.68,
116.78, 103.94]]]]))/255.0
else:
imgs = images
ids={}
for j in range(len(images)):
if scale:
plt.figure(figsize=(5,5))
plt.imshow(imgs[j])
else:
plt.imshow(imgs[j].astype(np.uint8) )
plt.show()
if probs is not None:
ids[j] = [i[0] for i in sorted(enumerate(-probs[j]),
key=lambda x:x[1])]
for k in range(n_top):
id = ids[j][k]
print('Probability {0:1.2f}% of[{1:}]'
.format(100*probs[j,id],id2label[id]))
```
上述函數中的以下代碼恢復為預處理的效果,以便顯示原始圖像而不是預處理圖像:
```py
imgs = np.abs(images + np.array([[[[123.68, 116.78, 103.94]]]]))/255.0
```
在 Inception 模型的情況下,用于反轉預處理的代碼如下:
```py
imgs = (images / 2.0) + 0.5
```
您可以使用以下代碼查看測試圖像:
```py
images=np.array([mpimg.imread(x) for x in x_test])
disp(images)
```
按照 Jupyter 筆記本中的代碼查看圖像。它們看起來都有不同的尺寸,所以讓我們打印它們的原始尺寸:
```py
print([x.shape for x in images])
```
尺寸是:
```py
[(640, 425, 3), (373, 500, 3), (367, 640, 3), (427, 640, 3), (428, 640, 3), (426, 640, 3), (480, 640, 3), (612, 612, 3)]
```
讓我們預處理測試圖像并查看尺寸:
```py
images_test=np.array([coco.preprocess_for_vgg(x) for x in x_test])
print(images_test.shape)
```
維度為:
```py
(8, 224, 224, 3)
```
在 Inception 的情況下,維度是:
```py
(8, 299, 299, 3)
```
Inception 的預處理圖像不可見,但讓我們打印 VGG 的預處理圖像,以了解它們的外觀:
```py
disp(images_test)
```
| | |
| --- | --- |
|  |  |
|  |  |
| 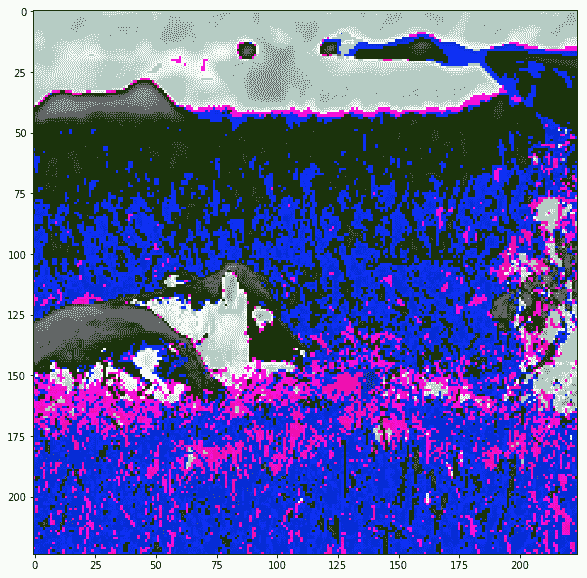 | 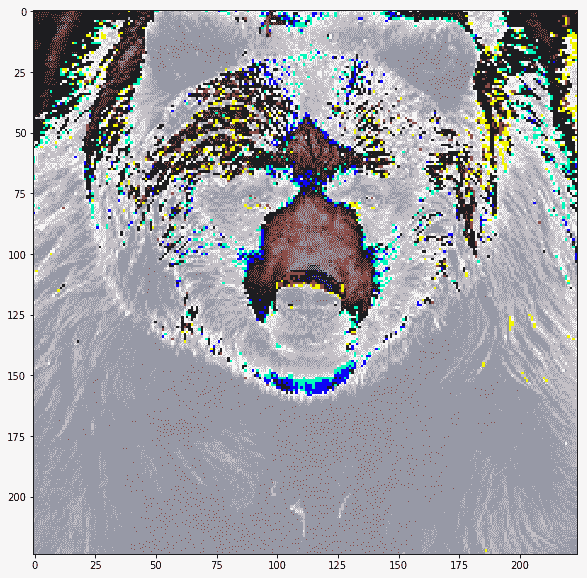 |
| 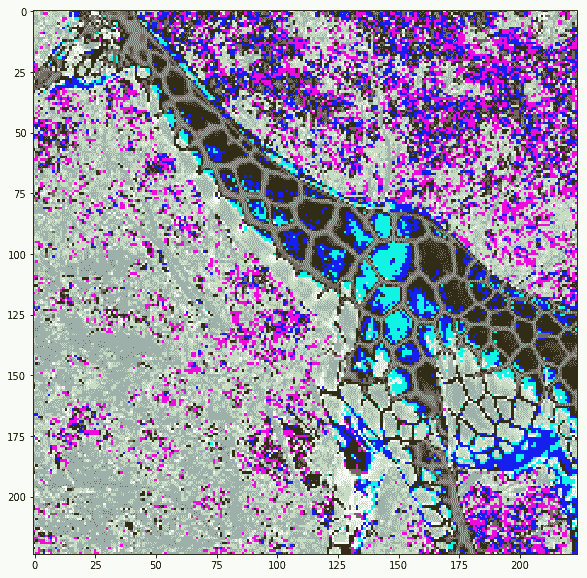 |  |
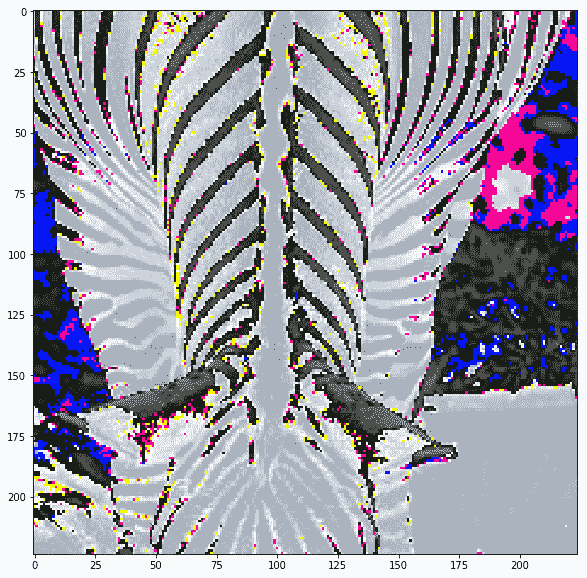
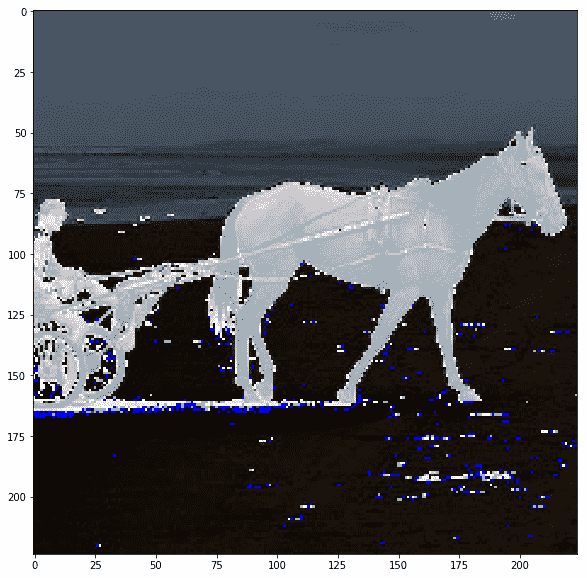
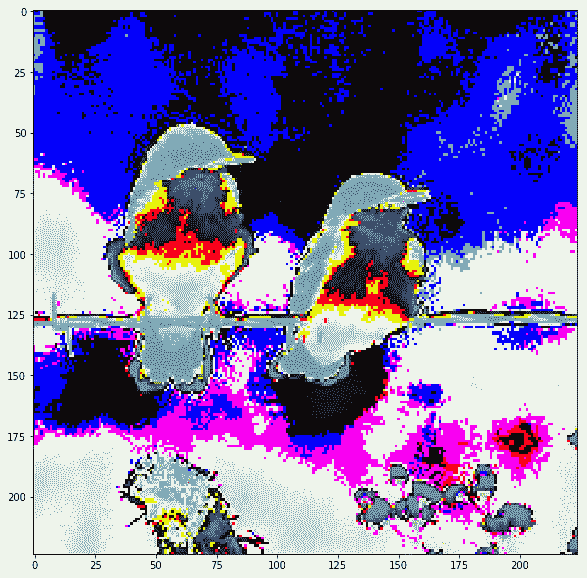
實際上圖像被裁剪了,我們可以看到當我們在保持裁剪的同時反轉預處理時它們的樣子:
| | |
| --- | --- |
|  |  |
|  |  |
|  |  |
|  |  |
現在我們已經有來自 ImageNet 的標簽以及來自 COCO 圖像數據集的圖像和標簽,我們試試遷移學習示例。
# TensorFlow 中的 VGG16
您可以按照 Jupyter 筆記本中的代碼`ch-12a_VGG16_TensorFlow`。
對于 TensorFlow 中 VGG16 的所有示例,我們首先從[這里](http://download.tensorflow.org/models/vgg_16_2016_08_28.tar.gz)下載檢查點文件并使用以下內容初始化變量碼:
```py
model_name='vgg_16'
model_url='http://download.tensorflow.org/models/'
model_files=['vgg_16_2016_08_28.tar.gz']
model_home=os.path.join(models_root,model_name)
dsu.download_dataset(source_url=model_url,
source_files=model_files,
dest_dir = model_home,
force=False,
extract=True)
```
我們還定義了一些常見的導入和變量:
```py
from tensorflow.contrib import slim
from tensorflow.contrib.slim.nets import vgg
image_height=vgg.vgg_16.default_image_size
image_width=vgg.vgg_16.default_image_size
```
# TensorFlow 中的預訓練 VGG16 的圖像分類
現在讓我們首先嘗試預測測試圖像的類別,而不進行再訓練。首先,我們清除默認圖并定義圖像的占位符:
```py
tf.reset_default_graph()
x_p = tf.placeholder(shape=(None,image_height, image_width,3),
dtype=tf.float32,name='x_p')
```
占位符`x_p`的形狀是`(?, 224, 224, 3)`。接下來,加載`vgg16`模型:
```py
with slim.arg_scope(vgg.vgg_arg_scope()):
logits,_ = vgg.vgg_16(x_p,num_classes=inet.n_classes,
is_training=False)
```
添加 softmax 層以生成類的概率:
```py
probabilities = tf.nn.softmax(logits)
```
定義初始化函數以恢復變量,例如檢查點文件中的權重和偏差。
```py
init = slim.assign_from_checkpoint_fn(
os.path.join(model_home, '{}.ckpt'.format(model_name)),
slim.get_variables_to_restore())
```
在 TensorFlow 會話中,初始化變量并運行概率張量以獲取每個圖像的概率:
```py
with tf.Session() as tfs:
init(tfs)
probs = tfs.run([probabilities],feed_dict={x_p:images_test})
probs=probs[0]
```
讓我們看看我們得到的類:
```py
disp(images_test,id2label=inet.id2label,probs=probs,scale=True)
```

```py
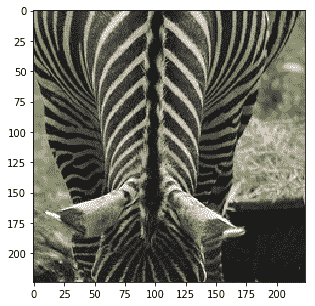
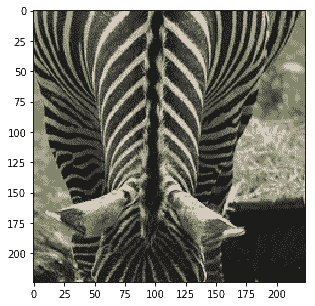
Probability 99.15% of [zebra]
Probability 0.37% of [tiger cat]
Probability 0.33% of [tiger, Panthera tigris]
Probability 0.04% of [goose]
Probability 0.02% of [tabby, tabby cat]
```
---

```py
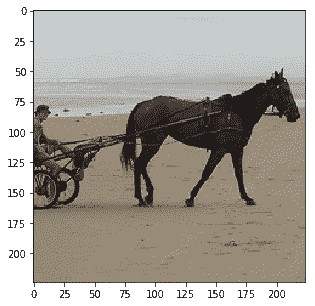
Probability 99.50% of [horse cart, horse-cart]
Probability 0.37% of [plow, plough]
Probability 0.06% of [Arabian camel, dromedary, Camelus dromedarius]
Probability 0.05% of [sorrel]
Probability 0.01% of [barrel, cask]
```
---

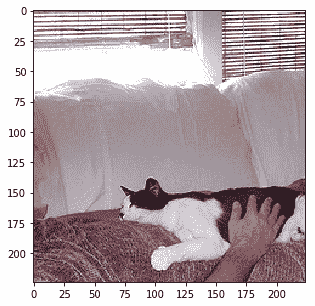
```py
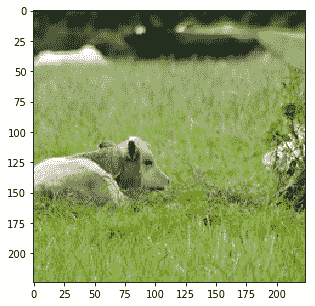
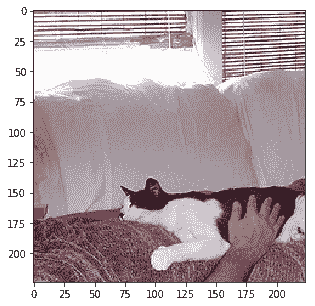
Probability 19.32% of [Cardigan, Cardigan Welsh corgi] Probability 11.78% of [papillon] Probability 9.01% of [Shetland sheepdog, Shetland sheep dog, Shetland] Probability 7.09% of [Siamese cat, Siamese] Probability 6.27% of [Pembroke, Pembroke Welsh corgi]
```
---

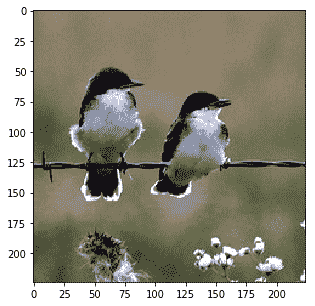
```py
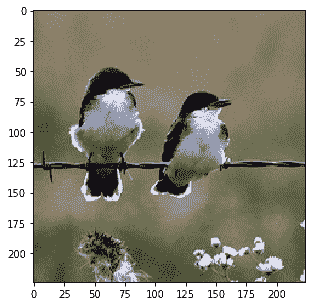
Probability 97.09% of [chickadee]
Probability 2.52% of [water ouzel, dipper]
Probability 0.23% of [junco, snowbird]
Probability 0.09% of [hummingbird]
Probability 0.04% of [bulbul]
```
---

```py
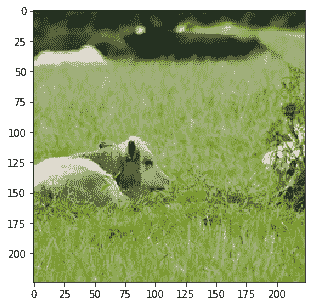
Probability 24.98% of [whippet]
Probability 16.48% of [lion, king of beasts, Panthera leo]
Probability 5.54% of [Saluki, gazelle hound]
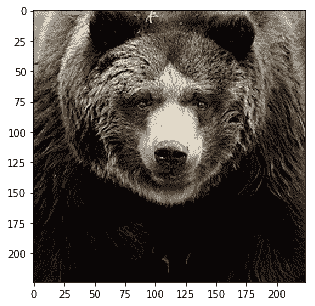
Probability 4.99% of [brown bear, bruin, Ursus arctos]
Probability 4.11% of [wire-haired fox terrier]
```
---

```py
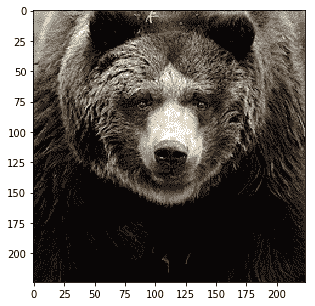
Probability 98.56% of [brown bear, bruin, Ursus arctos]
Probability 1.40% of [American black bear, black bear, Ursus americanus, Euarctos americanus]
Probability 0.03% of [sloth bear, Melursus ursinus, Ursus ursinus]
Probability 0.00% of [wombat]
Probability 0.00% of [beaver]
```
---

```py
Probability 20.84% of [leopard, Panthera pardus]
Probability 12.81% of [cheetah, chetah, Acinonyx jubatus]
Probability 12.26% of [banded gecko]
Probability 10.28% of [jaguar, panther, Panthera onca, Felis onca]
Probability 5.30% of [gazelle]
```
---

```py
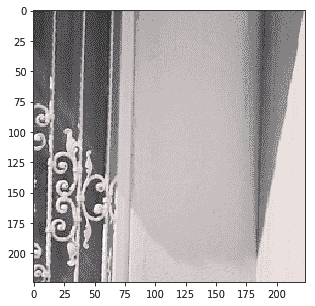
Probability 8.09% of [shower curtain]
Probability 3.59% of [binder, ring-binder]
Probability 3.32% of [accordion, piano accordion, squeeze box]
Probability 3.12% of [radiator]
Probability 1.81% of [abaya]
```
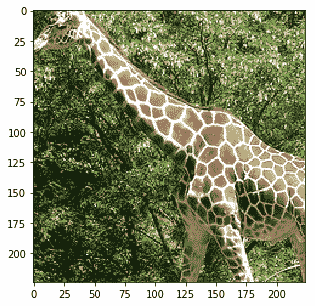
從未見過我們數據集中的圖像,并且對數據集中的類沒有任何了解的預訓練模型已正確識別斑馬,馬車,鳥和熊。它沒能認出長頸鹿,因為它以前從未見過長頸鹿。我們將在我們的數據集上再訓練這個模型,只需要更少的工作量和 800 個圖像的較小數據集大小。但在我們這樣做之前,讓我們看看在 TensorFlow 中進行相同的圖像預處理。
# 為 TensorFlow 中的預訓練 VGG16 預處理圖像
我們為 TensorFlow 中的預處理步驟定義一個函數,如下所示:
```py
def tf_preprocess(filelist):
images=[]
for filename in filelist:
image_string = tf.read_file(filename)
image_decoded = tf.image.decode_jpeg(image_string, channels=3)
image_float = tf.cast(image_decoded, tf.float32)
resize_fn = tf.image.resize_image_with_crop_or_pad
image_resized = resize_fn(image_float, image_height, image_width)
means = tf.reshape(tf.constant([123.68, 116.78, 103.94]),
[1, 1, 3])
image = image_resized - means
images.append(image)
images = tf.stack(images)
return images
```
在這里,我們創建`images`變量而不是占位符:
```py
images=tf_preprocess([x for x in x_test])
```
我們按照與以前相同的過程來定義 VGG16 模型,恢復變量然后運行預測:
```py
with slim.arg_scope(vgg.vgg_arg_scope()):
logits,_ = vgg.vgg_16(images,
num_classes=inet.n_classes,
is_training=False
)
probabilities = tf.nn.softmax(logits)
init = slim.assign_from_checkpoint_fn(
os.path.join(model_home, '{}.ckpt'.format(model_name)),
slim.get_variables_to_restore())
```
我們獲得與以前相同的類概率。我們只是想證明預處理也可以在 TensorFlow 中完成。但是,TensorFlow 中的預處理僅限于 TensorFlow 提供的功能,并將您與框架深深聯系在一起。
我們建議您將預處理管道與 TensorFlow 模型訓練和預測代碼分開。 保持獨立使其具有模塊化并具有其他優勢,例如您可以保存數據以便在多個模型中重復使用。
# TensorFlow 中的再訓練 VGG16 的圖像分類
現在,我們將為 COCO 動物數據集再訓練 VGG16 模型。讓我們從定義三個占位符開始:
* `is_training`占位符指定我們是否將模型用于訓練或預測
* `x_p`是輸入占位符,形狀為`(None, image_height, image_width, 3)`
* `y_p`是輸出占位符,形狀為`(None, 1)`
```py
is_training = tf.placeholder(tf.bool,name='is_training')
x_p = tf.placeholder(shape=(None,image_height, image_width,3),
dtype=tf.float32,name='x_p')
y_p = tf.placeholder(shape=(None,1),dtype=tf.int32,name='y_p')
```
正如我們在策略部分中所解釋的那樣,我們將從檢查點文件中恢復除最后一層之外的層,這被稱為`vgg/fc8`層:
```py
with slim.arg_scope(vgg.vgg_arg_scope()):
logits, _ = vgg.vgg_16(x_p,num_classes=coco.n_classes,
is_training=is_training)
probabilities = tf.nn.softmax(logits)
# restore except last last layer fc8
fc7_variables=tf.contrib.framework.get_variables_to_restore(exclude=['vgg_16/fc8'])
fc7_init = tf.contrib.framework.assign_from_checkpoint_fn(
os.path.join(model_home, '{}.ckpt'.format(model_name)),
fc7_variables)
```
接下來,定義要初始化但未恢復的最后一個層的變量:
```py
# fc8 layer
fc8_variables = tf.contrib.framework.get_variables('vgg_16/fc8')
fc8_init = tf.variables_initializer(fc8_variables)
```
正如我們在前面章節中所學到的,用`tf.losses.` `sparse_softmax_cross_entropy()`定義損失函數。
```py
tf.losses.sparse_softmax_cross_entropy(labels=y_p, logits=logits)
loss = tf.losses.get_total_loss()
```
訓練最后一層幾個周期,然后訓練整個網絡幾層。因此,定義兩個單獨的優化器和訓練操作。
```py
learning_rate = 0.001
fc8_optimizer = tf.train.GradientDescentOptimizer(learning_rate)
fc8_train_op = fc8_optimizer.minimize(loss, var_list=fc8_variables)
full_optimizer = tf.train.GradientDescentOptimizer(learning_rate)
full_train_op = full_optimizer.minimize(loss)
```
我們決定對兩個優化器函數使用相同的學習率,但如果您決定進一步調整超參數,則可以定義單獨的學習率。
像往常一樣定義精度函數:
```py
y_pred = tf.to_int32(tf.argmax(logits, 1))
n_correct_pred = tf.equal(y_pred, y_p)
accuracy = tf.reduce_mean(tf.cast(n_correct_pred, tf.float32))
```
最后,我們運行最后一層 10 個周期的訓練,然后使用批量大小為 32 的 10 個周期的完整網絡。我們還使用相同的會話來預測類:
```py
fc8_epochs = 10
full_epochs = 10
coco.y_onehot = False
coco.batch_size = 32
coco.batch_shuffle = True
total_images = len(x_train_files)
n_batches = total_images // coco.batch_size
with tf.Session() as tfs:
fc7_init(tfs)
tfs.run(fc8_init)
for epoch in range(fc8_epochs):
print('Starting fc8 epoch ',epoch)
coco.reset_index()
epoch_accuracy=0
for batch in range(n_batches):
x_batch, y_batch = coco.next_batch()
images=np.array([coco.preprocess_for_vgg(x) \
for x in x_batch])
feed_dict={x_p:images,y_p:y_batch,is_training:True}
tfs.run(fc8_train_op, feed_dict = feed_dict)
feed_dict={x_p:images,y_p:y_batch,is_training:False}
batch_accuracy = tfs.run(accuracy,feed_dict=feed_dict)
epoch_accuracy += batch_accuracy
except Exception as ex:
epoch_accuracy /= n_batches
print('Train accuracy in epoch {}:{}'
.format(epoch,epoch_accuracy))
for epoch in range(full_epochs):
print('Starting full epoch ',epoch)
coco.reset_index()
epoch_accuracy=0
for batch in range(n_batches):
x_batch, y_batch = coco.next_batch()
images=np.array([coco.preprocess_for_vgg(x) \
for x in x_batch])
feed_dict={x_p:images,y_p:y_batch,is_training:True}
tfs.run(full_train_op, feed_dict = feed_dict )
feed_dict={x_p:images,y_p:y_batch,is_training:False}
batch_accuracy = tfs.run(accuracy,feed_dict=feed_dict)
epoch_accuracy += batch_accuracy
epoch_accuracy /= n_batches
print('Train accuracy in epoch {}:{}'
.format(epoch,epoch_accuracy))
# now run the predictions
feed_dict={x_p:images_test,is_training: False}
probs = tfs.run([probabilities],feed_dict=feed_dict)
probs=probs[0]
```
讓我們看看打印我們的預測結果:
```py
disp(images_test,id2label=coco.id2label,probs=probs,scale=True)
```

```py
Probability 100.00% of [zebra]
```
---
```py
Probability 100.00% of [horse]
```
---
```py
Probability 98.88% of [cat]
```
---
```py
Probability 100.00% of [bird]
```
---
```py
Probability 68.88% of [bear]
Probability 31.06% of [sheep]
Probability 0.02% of [dog]
Probability 0.02% of [bird]
Probability 0.01% of [horse]
```
---
```py
Probability 100.00% of [bear]
Probability 0.00% of [dog]
Probability 0.00% of [bird]
Probability 0.00% of [sheep]
Probability 0.00% of [cat]
```
---
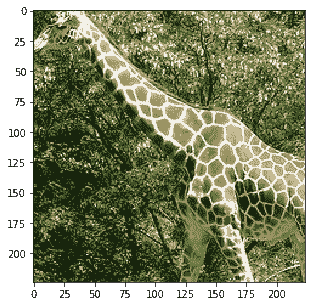
```py
Probability 100.00% of [giraffe]
```
---
```py
Probability 61.36% of [cat]
Probability 16.70% of [dog]
Probability 7.46% of [bird]
Probability 5.34% of [bear]
Probability 3.65% of [giraffe]
```
它正確識別了貓和長頸鹿,并將其他概率提高到 100%。它仍然犯了一些錯誤,因為最后一張照片被歸類為貓,這實際上是裁剪后的噪音圖片。我們會根據這些結果對您進行改進。
# Keras 的 VGG16
您可以按照 Jupyter 筆記本`ch-12a_VGG16_Keras`中的代碼進行操作。
現在讓我們對 Keras 進行相同的分類和再訓練。您將看到我們可以輕松地使用較少量的代碼在 Keras 中使用 VGG16 預訓練模型。
# Keras 中的預訓練 VGG16 的圖像分類
加載模型是一個單行操作:
```py
from keras.applications import VGG16
model=VGG16(weights='imagenet')
```
我們可以使用這個模型來預測類的概率:
```py
probs = model.predict(images_test)
```
以下是此分類的結果:
```py
Probability 99.41% of [zebra]
Probability 0.19% of [tiger cat]
Probability 0.13% of [goose]
Probability 0.09% of [tiger, Panthera tigris]
Probability 0.02% of [mushroom]
```
---

```py
Probability 87.50% of [horse cart, horse-cart]
Probability 5.58% of [Arabian camel, dromedary, Camelus dromedarius]
Probability 4.72% of [plow, plough]
Probability 1.03% of [dogsled, dog sled, dog sleigh]
Probability 0.31% of [wreck]
```
---

```py
Probability 34.96% of [Siamese cat, Siamese]
Probability 12.71% of [toy terrier]
Probability 10.15% of [Boston bull, Boston terrier]
Probability 6.53% of [Italian greyhound]
Probability 6.01% of [Cardigan, Cardigan Welsh corgi]
```
---

```py
Probability 56.41% of [junco, snowbird]
Probability 38.08% of [chickadee]
Probability 1.93% of [bulbul]
Probability 1.35% of [hummingbird]
Probability 1.09% of [house finch, linnet, Carpodacus mexicanus]
```
---

```py
Probability 54.19% of [brown bear, bruin, Ursus arctos]
Probability 28.07% of [lion, king of beasts, Panthera leo]
Probability 0.87% of [Norwich terrier]
Probability 0.82% of [Lakeland terrier]
Probability 0.73% of [wild boar, boar, Sus scrofa]
```
---

```py
Probability 88.64% of [brown bear, bruin, Ursus arctos]
Probability 7.22% of [American black bear, black bear, Ursus americanus, Euarctos americanus]
Probability 4.13% of [sloth bear, Melursus ursinus, Ursus ursinus]
Probability 0.00% of [badger]
Probability 0.00% of [wombat]
```
---

```py
Probability 38.70% of [jaguar, panther, Panthera onca, Felis onca]
Probability 33.78% of [leopard, Panthera pardus]
Probability 14.22% of [cheetah, chetah, Acinonyx jubatus]
Probability 6.15% of [banded gecko]
Probability 1.53% of [snow leopard, ounce, Panthera uncia]
```
---

```py
Probability 12.54% of [shower curtain]
Probability 2.82% of [binder, ring-binder]
Probability 2.28% of [toilet tissue,
toilet paper, bathroom tissue]
Probability 2.12% of [accordion, piano accordion, squeeze box]
Probability 2.05% of [bath towel]
```
它無法識別綿羊,長頸鹿以及狗的圖像被裁剪出來的最后一張噪音圖像。現在,讓我們用我們的數據集再訓練 Keras 中的模型。
# Keras 中的再訓練 VGG16 的圖像分類
讓我們使用 COCO 圖像數據集來再訓練模型以微調分類任務。我們將刪除 Keras 模型中的最后一層,并添加我們自己的完全連接層,其中`softmax`激活 8 個類。我們還將通過將前 15 層的`trainable`屬性設置為`False`來演示凍結前幾層。
1. 首先導入 VGG16 模型而不使用頂層變量,方法是將`include_top`設置為`False`:
```py
# load the vgg model
from keras.applications import VGG16
base_model=VGG16(weights='imagenet',include_top=False, input_shape=(224,224,3))
```
我們還在上面的代碼中指定了`input_shape`,否則 Keras 會在以后拋出異常。
1. 現在我們構建分類器模型以置于導入的 VGG 模型之上:
```py
top_model = Sequential()
top_model.add(Flatten(input_shape=base_model.output_shape[1:]))
top_model.add(Dense(256, activation='relu'))
top_model.add(Dropout(0.5))
top_model.add(Dense(coco.n_classes, activation='softmax'))
```
1. 接下來,在 VGG 基礎之上添加模型:
```py
model=Model(inputs=base_model.input, outputs=top_model(base_model.output))
```
1. 凍結前 15 層:
```py
for layer in model.layers[:15]:
layer.trainable = False
```
1. 我們隨機挑選了 15 層凍結,你可能想要玩這個數字。讓我們編譯模型并打印模型摘要:
```py
model.compile(loss='categorical_crossentropy',
optimizer=optimizers.SGD(lr=1e-4, momentum=0.9),
metrics=['accuracy'])
model.summary()
```
```py
_________________________________________________________________
Layer (type) Output Shape Param #
=================================================================
input_1 (InputLayer) (None, 224, 224, 3) 0
_________________________________________________________________
block1_conv1 (Conv2D) (None, 224, 224, 64) 1792
_________________________________________________________________
block1_conv2 (Conv2D) (None, 224, 224, 64) 36928
_________________________________________________________________
block1_pool (MaxPooling2D) (None, 112, 112, 64) 0
_________________________________________________________________
block2_conv1 (Conv2D) (None, 112, 112, 128) 73856
_________________________________________________________________
block2_conv2 (Conv2D) (None, 112, 112, 128) 147584
_________________________________________________________________
block2_pool (MaxPooling2D) (None, 56, 56, 128) 0
_________________________________________________________________
block3_conv1 (Conv2D) (None, 56, 56, 256) 295168
_________________________________________________________________
block3_conv2 (Conv2D) (None, 56, 56, 256) 590080
_________________________________________________________________
block3_conv3 (Conv2D) (None, 56, 56, 256) 590080
_________________________________________________________________
block3_pool (MaxPooling2D) (None, 28, 28, 256) 0
_________________________________________________________________
block4_conv1 (Conv2D) (None, 28, 28, 512) 1180160
_________________________________________________________________
block4_conv2 (Conv2D) (None, 28, 28, 512) 2359808
_________________________________________________________________
block4_conv3 (Conv2D) (None, 28, 28, 512) 2359808
_________________________________________________________________
block4_pool (MaxPooling2D) (None, 14, 14, 512) 0
_________________________________________________________________
block5_conv1 (Conv2D) (None, 14, 14, 512) 2359808
_________________________________________________________________
block5_conv2 (Conv2D) (None, 14, 14, 512) 2359808
_________________________________________________________________
block5_conv3 (Conv2D) (None, 14, 14, 512) 2359808
_________________________________________________________________
block5_pool (MaxPooling2D) (None, 7, 7, 512) 0
_________________________________________________________________
sequential_1 (Sequential) (None, 8) 6424840
=================================================================
Total params: 21,139,528
Trainable params: 13,504,264
Non-trainable params: 7,635,264
```
我們看到近 40% 的參數是凍結的和不可訓練的。
1. 接下來,訓練 Keras 模型 20 個周期,批量大小為 32:
```py
from keras.utils import np_utils
batch_size=32
n_epochs=20
total_images = len(x_train_files)
n_batches = total_images // batch_size
for epoch in range(n_epochs):
print('Starting epoch ',epoch)
coco.reset_index_in_epoch()
for batch in range(n_batches):
try:
x_batch, y_batch = coco.next_batch(batch_size=batch_size)
images=np.array([coco.preprocess_image(x) for x in x_batch])
y_onehot = np_utils.to_categorical(y_batch,
num_classes=coco.n_classes)
model.fit(x=images,y=y_onehot,verbose=0)
except Exception as ex:
print('error in epoch {} batch {}'.format(epoch,batch))
print(ex)
```
1. 讓我們使用再訓練的新模型執行圖像分類:
```py
probs = model.predict(images_test)
```
以下是分類結果:

```py
Probability 100.00% of [zebra]
Probability 0.00% of [dog]
Probability 0.00% of [horse]
Probability 0.00% of [giraffe]
Probability 0.00% of [bear]
```
---

```py
Probability 96.11% of [horse]
Probability 1.85% of [cat]
Probability 0.77% of [bird]
Probability 0.43% of [giraffe]
Probability 0.40% of [sheep]
```
---

```py
Probability 99.75% of [dog] Probability 0.22% of [cat] Probability 0.03% of [horse] Probability 0.00% of [bear] Probability 0.00% of [zebra]
```
---

```py
Probability 99.88% of [bird]
Probability 0.11% of [horse]
Probability 0.00% of [giraffe]
Probability 0.00% of [bear]
Probability 0.00% of [cat]
```
---

```py
Probability 65.28% of [bear]
Probability 27.09% of [sheep]
Probability 4.34% of [bird]
Probability 1.71% of [giraffe]
Probability 0.63% of [dog]
```
---

```py
Probability 100.00% of [bear]
Probability 0.00% of [sheep]
Probability 0.00% of [dog]
Probability 0.00% of [cat]
Probability 0.00% of [giraffe]
```
---

```py
Probability 100.00% of [giraffe]
Probability 0.00% of [bird]
Probability 0.00% of [bear]
Probability 0.00% of [sheep]
Probability 0.00% of [zebra]
```
---

```py
Probability 81.05% of [cat]
Probability 15.68% of [dog]
Probability 1.64% of [bird]
Probability 0.90% of [horse]
Probability 0.43% of [bear]
```
除了最后的嘈雜圖像外,所有類別都已正確識別。通過適當的超參數調整,也可以進行改進。
到目前為止,您已經看到了使用預訓練模型進行分類并對預訓練模型進行微調的示例。接下來,我們將使用 InceptionV3 模型顯示分類示例。
# TensorFlow 中的 InceptionV3
您可以按照 Jupyter 筆記本中的代碼`ch-12c_InceptionV3_TensorFlow`。
TensorFlow 的 InceptionV3 在 1,001 個標簽上訓練,而不是 1,000 個。此外,用于訓練的圖像被不同地預處理。我們在前面的部分中展示了預處理代碼。讓我們直接深入了解使用 TensorFlow 恢復 InceptionV3 模型。
讓我們下載 InceptionV3 的檢查點文件:
```py
# load the InceptionV3 model
model_name='inception_v3'
model_url='http://download.tensorflow.org/models/'
model_files=['inception_v3_2016_08_28.tar.gz']
model_home=os.path.join(models_root,model_name)
dsu.download_dataset(source_url=model_url,
source_files=model_files,
dest_dir = model_home,
force=False,
extract=True)
```
定義初始模塊和變量的常見導入:
```py
### define common imports and variables
from tensorflow.contrib.slim.nets import inception
image_height=inception.inception_v3.default_image_size
image_width=inception.inception_v3.default_image_size
```
# TensorFlow 中的 InceptionV3 的圖像分類
圖像分類與使用 VGG 16 模型的上一節中說明的相同。 InceptionV3 模型的完整代碼如下:
```py
x_p = tf.placeholder(shape=(None,
image_height,
image_width,
3
),
dtype=tf.float32,
name='x_p')
with slim.arg_scope(inception.inception_v3_arg_scope()):
logits,_ = inception.inception_v3(x_p,
num_classes=inet.n_classes,
is_training=False
)
probabilities = tf.nn.softmax(logits)
init = slim.assign_from_checkpoint_fn(
os.path.join(model_home, '{}.ckpt'.format(model_name)),
slim.get_variables_to_restore())
with tf.Session() as tfs:
init(tfs)
probs = tfs.run([probabilities],feed_dict={x_p:images_test})
probs=probs[0]
```
讓我們看看我們的模型如何處理測試圖像:

```py
Probability 95.15% of [zebra]
Probability 0.07% of [ostrich, Struthio camelus]
Probability 0.07% of [hartebeest]
Probability 0.03% of [sock]
Probability 0.03% of [warthog]
```
---

```py
Probability 93.09% of [horse cart, horse-cart]
Probability 0.47% of [plow, plough]
Probability 0.07% of [oxcart]
Probability 0.07% of [seashore, coast, seacoast, sea-coast]
Probability 0.06% of [military uniform]
```
---

```py
Probability 18.94% of [Cardigan, Cardigan Welsh corgi]
Probability 8.19% of [Pembroke, Pembroke Welsh corgi]
Probability 7.86% of [studio couch, day bed]
Probability 5.36% of [English springer, English springer spaniel]
Probability 4.16% of [Border collie]
```
---

```py
Probability 27.18% of [water ouzel, dipper]
Probability 24.38% of [junco, snowbird]
Probability 6.91% of [chickadee]
Probability 0.99% of [magpie]
Probability 0.73% of [brambling, Fringilla montifringilla]
```
---

```py
Probability 93.00% of [hog, pig, grunter, squealer, Sus scrofa]
Probability 2.23% of [wild boar, boar, Sus scrofa]
Probability 0.65% of [ram, tup]
Probability 0.43% of [ox]
Probability 0.23% of [marmot]
```
---

```py
Probability 84.27% of [brown bear, bruin, Ursus arctos]
Probability 1.57% of [American black bear, black bear, Ursus americanus, Euarctos americanus]
Probability 1.34% of [sloth bear, Melursus ursinus, Ursus ursinus]
Probability 0.13% of [lesser panda, red panda, panda, bear cat, cat bear, Ailurus fulgens]
Probability 0.12% of [ice bear, polar bear, Ursus Maritimus, Thalarctos maritimus]
```
---

```py
Probability 20.20% of [honeycomb]
Probability 6.52% of [gazelle]
Probability 5.14% of [sorrel]
Probability 3.72% of [impala, Aepyceros melampus]
Probability 2.44% of [Saluki, gazelle hound]
```
---

```py
Probability 41.17% of [harp]
Probability 13.64% of [accordion, piano accordion, squeeze box]
Probability 2.97% of [window shade]
Probability 1.59% of [chain]
Probability 1.55% of [pay-phone, pay-station]
```
雖然它在與 VGG 模型幾乎相同的地方失敗了,但并不算太糟糕。現在讓我們用 COCO 動物圖像和標簽再訓練這個模型。
# TensorFlow 中的再訓練 InceptionV3 的圖像分類
InceptionV3 的再訓練與 VGG16 不同,因為我們使用 softmax 激活層作為輸出,`tf.losses.softmax_cross_entropy()`作為損耗函數。
1. 首先定義占位符:
```py
is_training = tf.placeholder(tf.bool,name='is_training')
x_p = tf.placeholder(shape=(None,
image_height,
image_width,
3
),
dtype=tf.float32,
name='x_p')
y_p = tf.placeholder(shape=(None,coco.n_classes),
dtype=tf.int32,
name='y_p')
```
1. 接下來,加載模型:
```py
with slim.arg_scope(inception.inception_v3_arg_scope()):
logits,_ = inception.inception_v3(x_p,
num_classes=coco.n_classes,
is_training=True
)
probabilities = tf.nn.softmax(logits)
```
1. 接下來,定義函數以恢復除最后一層之外的變量:
```py
with slim.arg_scope(inception.inception_v3_arg_scope()):
logits,_ = inception.inception_v3(x_p,
num_classes=coco.n_classes,
is_training=True
)
probabilities = tf.nn.softmax(logits)
# restore except last layer
checkpoint_exclude_scopes=["InceptionV3/Logits",
"InceptionV3/AuxLogits"]
exclusions = [scope.strip() for scope in checkpoint_exclude_scopes]
variables_to_restore = []
for var in slim.get_model_variables():
excluded = False
for exclusion in exclusions:
if var.op.name.startswith(exclusion):
excluded = True
break
if not excluded:
variables_to_restore.append(var)
init_fn = slim.assign_from_checkpoint_fn(
os.path.join(model_home, '{}.ckpt'.format(model_name)),
variables_to_restore)
```
1. 定義損失,優化器和訓練操作:
```py
tf.losses.softmax_cross_entropy(onehot_labels=y_p, logits=logits)
loss = tf.losses.get_total_loss()
learning_rate = 0.001
optimizer = tf.train.GradientDescentOptimizer(learning_rate)
train_op = optimizer.minimize(loss)
```
1. 訓練模型并在同一會話中完成訓練后運行預測:
```py
n_epochs=10
coco.y_onehot = True
coco.batch_size = 32
coco.batch_shuffle = True
total_images = len(x_train_files)
n_batches = total_images // coco.batch_size
with tf.Session() as tfs:
tfs.run(tf.global_variables_initializer())
init_fn(tfs)
for epoch in range(n_epochs):
print('Starting epoch ',epoch)
coco.reset_index()
epoch_accuracy=0
epoch_loss=0
for batch in range(n_batches):
x_batch, y_batch = coco.next_batch()
images=np.array([coco.preprocess_for_inception(x) \
for x in x_batch])
feed_dict={x_p:images,y_p:y_batch,is_training:True}
batch_loss,_ = tfs.run([loss,train_op],
feed_dict = feed_dict)
epoch_loss += batch_loss
epoch_loss /= n_batches
print('Train loss in epoch {}:{}'
.format(epoch,epoch_loss))
# now run the predictions
feed_dict={x_p:images_test,is_training: False}
probs = tfs.run([probabilities],feed_dict=feed_dict)
probs=probs[0]
```
我們看到每個周期的損失都在減少:
```py
INFO:tensorflow:Restoring parameters from /home/armando/models/inception_v3/inception_v3.ckpt
Starting epoch 0
Train loss in epoch 0:2.7896385192871094
Starting epoch 1
Train loss in epoch 1:1.6651896286010741
Starting epoch 2
Train loss in epoch 2:1.2332031989097596
Starting epoch 3
Train loss in epoch 3:0.9912329530715942
Starting epoch 4
Train loss in epoch 4:0.8110128355026245
Starting epoch 5
Train loss in epoch 5:0.7177265572547913
Starting epoch 6
Train loss in epoch 6:0.6175705575942994
Starting epoch 7
Train loss in epoch 7:0.5542363750934601
Starting epoch 8
Train loss in epoch 8:0.523461252450943
Starting epoch 9
Train loss in epoch 9:0.4923107647895813
```
這次結果正確識別了綿羊,但錯誤地將貓圖片識別為狗:

```py
Probability 98.84% of [zebra]
Probability 0.84% of [giraffe]
Probability 0.11% of [sheep]
Probability 0.07% of [cat]
Probability 0.06% of [dog]
```
---

```py
Probability 95.77% of [horse]
Probability 1.34% of [dog]
Probability 0.89% of [zebra]
Probability 0.68% of [bird]
Probability 0.61% of [sheep]
```
---

```py
Probability 94.83% of [dog]
Probability 4.53% of [cat]
Probability 0.56% of [sheep]
Probability 0.04% of [bear]
Probability 0.02% of [zebra]
```
---

```py
Probability 42.80% of [bird]
Probability 25.64% of [cat]
Probability 15.56% of [bear]
Probability 8.77% of [giraffe]
Probability 3.39% of [sheep]
```
---

```py
Probability 72.58% of [sheep]
Probability 8.40% of [bear]
Probability 7.64% of [giraffe]
Probability 4.02% of [horse]
Probability 3.65% of [bird]
```
---

```py
Probability 98.03% of [bear]
Probability 0.74% of [cat]
Probability 0.54% of [sheep]
Probability 0.28% of [bird]
Probability 0.17% of [horse]
```
---

```py
Probability 96.43% of [giraffe]
Probability 1.78% of [bird]
Probability 1.10% of [sheep]
Probability 0.32% of [zebra]
Probability 0.14% of [bear]
```
---

```py
Probability 34.43% of [horse]
Probability 23.53% of [dog]
Probability 16.03% of [zebra]
Probability 9.76% of [cat]
Probability 9.02% of [giraffe]
```
# 總結
遷移學習是一項偉大的發現,它允許我們通過將在較大數據集中訓練的模型應用于不同的數據集來節省時間。當數據集很小時,遷移學習也有助于熱啟動訓練過程。在本章中,我們學習了如何使用預訓練的模型,如 VGG16 和 InceptionV3,將不同數據集中的圖像分類為他們所訓練的數據集。我們還學習了如何使用 TensorFlow 和 Keras 中的示例再訓練預訓練模型,以及如何預處理圖像以供給兩個模型。
我們還了解到有幾種模型在 ImageNet 數據集上進行了訓練。嘗試查找在不同數據集上訓練的其他模型,例如視頻數據集,語音數據集或文本/ NLP 數據集。嘗試使用這些模型再訓練并在您自己的數據集中使用您自己的深度學習問題。
- TensorFlow 1.x 深度學習秘籍
- 零、前言
- 一、TensorFlow 簡介
- 二、回歸
- 三、神經網絡:感知器
- 四、卷積神經網絡
- 五、高級卷積神經網絡
- 六、循環神經網絡
- 七、無監督學習
- 八、自編碼器
- 九、強化學習
- 十、移動計算
- 十一、生成模型和 CapsNet
- 十二、分布式 TensorFlow 和云深度學習
- 十三、AutoML 和學習如何學習(元學習)
- 十四、TensorFlow 處理單元
- 使用 TensorFlow 構建機器學習項目中文版
- 一、探索和轉換數據
- 二、聚類
- 三、線性回歸
- 四、邏輯回歸
- 五、簡單的前饋神經網絡
- 六、卷積神經網絡
- 七、循環神經網絡和 LSTM
- 八、深度神經網絡
- 九、大規模運行模型 -- GPU 和服務
- 十、庫安裝和其他提示
- TensorFlow 深度學習中文第二版
- 一、人工神經網絡
- 二、TensorFlow v1.6 的新功能是什么?
- 三、實現前饋神經網絡
- 四、CNN 實戰
- 五、使用 TensorFlow 實現自編碼器
- 六、RNN 和梯度消失或爆炸問題
- 七、TensorFlow GPU 配置
- 八、TFLearn
- 九、使用協同過濾的電影推薦
- 十、OpenAI Gym
- TensorFlow 深度學習實戰指南中文版
- 一、入門
- 二、深度神經網絡
- 三、卷積神經網絡
- 四、循環神經網絡介紹
- 五、總結
- 精通 TensorFlow 1.x
- 一、TensorFlow 101
- 二、TensorFlow 的高級庫
- 三、Keras 101
- 四、TensorFlow 中的經典機器學習
- 五、TensorFlow 和 Keras 中的神經網絡和 MLP
- 六、TensorFlow 和 Keras 中的 RNN
- 七、TensorFlow 和 Keras 中的用于時間序列數據的 RNN
- 八、TensorFlow 和 Keras 中的用于文本數據的 RNN
- 九、TensorFlow 和 Keras 中的 CNN
- 十、TensorFlow 和 Keras 中的自編碼器
- 十一、TF 服務:生產中的 TensorFlow 模型
- 十二、遷移學習和預訓練模型
- 十三、深度強化學習
- 十四、生成對抗網絡
- 十五、TensorFlow 集群的分布式模型
- 十六、移動和嵌入式平臺上的 TensorFlow 模型
- 十七、R 中的 TensorFlow 和 Keras
- 十八、調試 TensorFlow 模型
- 十九、張量處理單元
- TensorFlow 機器學習秘籍中文第二版
- 一、TensorFlow 入門
- 二、TensorFlow 的方式
- 三、線性回歸
- 四、支持向量機
- 五、最近鄰方法
- 六、神經網絡
- 七、自然語言處理
- 八、卷積神經網絡
- 九、循環神經網絡
- 十、將 TensorFlow 投入生產
- 十一、更多 TensorFlow
- 與 TensorFlow 的初次接觸
- 前言
- 1.?TensorFlow 基礎知識
- 2. TensorFlow 中的線性回歸
- 3. TensorFlow 中的聚類
- 4. TensorFlow 中的單層神經網絡
- 5. TensorFlow 中的多層神經網絡
- 6. 并行
- 后記
- TensorFlow 學習指南
- 一、基礎
- 二、線性模型
- 三、學習
- 四、分布式
- TensorFlow Rager 教程
- 一、如何使用 TensorFlow Eager 構建簡單的神經網絡
- 二、在 Eager 模式中使用指標
- 三、如何保存和恢復訓練模型
- 四、文本序列到 TFRecords
- 五、如何將原始圖片數據轉換為 TFRecords
- 六、如何使用 TensorFlow Eager 從 TFRecords 批量讀取數據
- 七、使用 TensorFlow Eager 構建用于情感識別的卷積神經網絡(CNN)
- 八、用于 TensorFlow Eager 序列分類的動態循壞神經網絡
- 九、用于 TensorFlow Eager 時間序列回歸的遞歸神經網絡
- TensorFlow 高效編程
- 圖嵌入綜述:問題,技術與應用
- 一、引言
- 三、圖嵌入的問題設定
- 四、圖嵌入技術
- 基于邊重構的優化問題
- 應用
- 基于深度學習的推薦系統:綜述和新視角
- 引言
- 基于深度學習的推薦:最先進的技術
- 基于卷積神經網絡的推薦
- 關于卷積神經網絡我們理解了什么
- 第1章概論
- 第2章多層網絡
- 2.1.4生成對抗網絡
- 2.2.1最近ConvNets演變中的關鍵架構
- 2.2.2走向ConvNet不變性
- 2.3時空卷積網絡
- 第3章了解ConvNets構建塊
- 3.2整改
- 3.3規范化
- 3.4匯集
- 第四章現狀
- 4.2打開問題
- 參考
- 機器學習超級復習筆記
- Python 遷移學習實用指南
- 零、前言
- 一、機器學習基礎
- 二、深度學習基礎
- 三、了解深度學習架構
- 四、遷移學習基礎
- 五、釋放遷移學習的力量
- 六、圖像識別與分類
- 七、文本文件分類
- 八、音頻事件識別與分類
- 九、DeepDream
- 十、自動圖像字幕生成器
- 十一、圖像著色
- 面向計算機視覺的深度學習
- 零、前言
- 一、入門
- 二、圖像分類
- 三、圖像檢索
- 四、對象檢測
- 五、語義分割
- 六、相似性學習
- 七、圖像字幕
- 八、生成模型
- 九、視頻分類
- 十、部署
- 深度學習快速參考
- 零、前言
- 一、深度學習的基礎
- 二、使用深度學習解決回歸問題
- 三、使用 TensorBoard 監控網絡訓練
- 四、使用深度學習解決二分類問題
- 五、使用 Keras 解決多分類問題
- 六、超參數優化
- 七、從頭開始訓練 CNN
- 八、將預訓練的 CNN 用于遷移學習
- 九、從頭開始訓練 RNN
- 十、使用詞嵌入從頭開始訓練 LSTM
- 十一、訓練 Seq2Seq 模型
- 十二、深度強化學習
- 十三、生成對抗網絡
- TensorFlow 2.0 快速入門指南
- 零、前言
- 第 1 部分:TensorFlow 2.00 Alpha 簡介
- 一、TensorFlow 2 簡介
- 二、Keras:TensorFlow 2 的高級 API
- 三、TensorFlow 2 和 ANN 技術
- 第 2 部分:TensorFlow 2.00 Alpha 中的監督和無監督學習
- 四、TensorFlow 2 和監督機器學習
- 五、TensorFlow 2 和無監督學習
- 第 3 部分:TensorFlow 2.00 Alpha 的神經網絡應用
- 六、使用 TensorFlow 2 識別圖像
- 七、TensorFlow 2 和神經風格遷移
- 八、TensorFlow 2 和循環神經網絡
- 九、TensorFlow 估計器和 TensorFlow HUB
- 十、從 tf1.12 轉換為 tf2
- TensorFlow 入門
- 零、前言
- 一、TensorFlow 基本概念
- 二、TensorFlow 數學運算
- 三、機器學習入門
- 四、神經網絡簡介
- 五、深度學習
- 六、TensorFlow GPU 編程和服務
- TensorFlow 卷積神經網絡實用指南
- 零、前言
- 一、TensorFlow 的設置和介紹
- 二、深度學習和卷積神經網絡
- 三、TensorFlow 中的圖像分類
- 四、目標檢測與分割
- 五、VGG,Inception,ResNet 和 MobileNets
- 六、自編碼器,變分自編碼器和生成對抗網絡
- 七、遷移學習
- 八、機器學習最佳實踐和故障排除
- 九、大規模訓練
- 十、參考文獻