
# 六、如何使用 TensorFlow Eager 從 TFRecords 批量讀取數據
大家好,本教程再次關注輸入流水線。 這很簡單,但我記得當我第一次開始批量讀取數據時,我陷入了相當多的細節,所以我想我可能會在這里分享我的方法。 我真的希望它對你們中的一些人有用。
教程的流程圖:
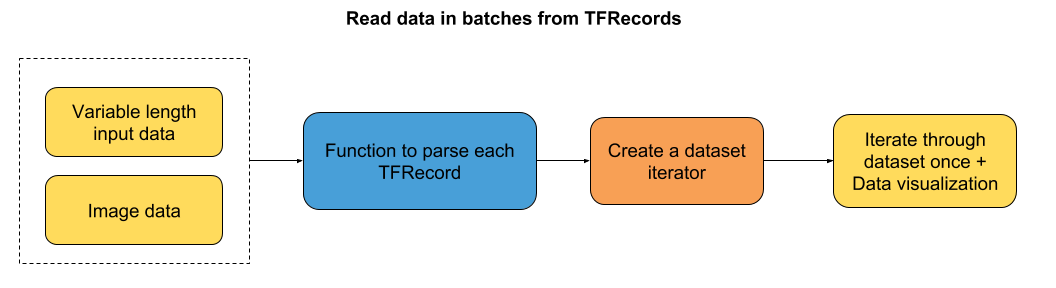
我們將研究兩種情況:
+ 可變序列長度的輸入數據 - 在這種情況下,我們將填充批次到最大序列長度。
+ 圖像數據
兩種情況的數據都存儲為 TFRecords。 你可以查看教程的第四和第五章,了解如何將原始數轉換為 TFRecords。
那么,讓我們直接開始編程!
### 導入有用的庫
```py
# 導入數據可視化庫
import matplotlib.pyplot as plt
# 使繪圖內嵌在筆記本中
%matplotlib inline
# 導入 TensorFlow 和 TensorFlow Eager
import tensorflow as tf
import tensorflow.contrib.eager as tfe
# 開啟 Eager 模式。一旦開啟不能撤銷!只執行一次。
tfe.enable_eager_execution()
```
## 第一部分:讀取可變序列長度的數據
本教程的第一部分向你介紹如何讀取不同長度的輸入數據。 在我們的例子中,我們使用了大型電影數據庫中的虛擬 IMDB 評論。 你可以想象,每個評論都有不同的單詞數。 因此,當我們讀取一批數據時,我們將序列填充到批次中的最大序列長度。
為了了解我如何獲得單詞索引序列,以及標簽和序列長度,請參閱第四章。
### 創建函數來解析每個 TFRecord
```py
def parse_imdb_sequence(record):
'''
用于解析 imdb tfrecords 的腳本
Returns:
token_indexes: sequence of token indexes present in the review.
target: the target of the movie review.
sequence_length: the length of the sequence.
'''
context_features = {
'sequence_length': tf.FixedLenFeature([], dtype=tf.int64),
'target': tf.FixedLenFeature([], dtype=tf.int64),
}
sequence_features = {
'token_indexes': tf.FixedLenSequenceFeature([], dtype=tf.int64),
}
context_parsed, sequence_parsed = tf.parse_single_sequence_example(record,
context_features=context_features, sequence_features=sequence_features)
return (sequence_parsed['token_indexes'], context_parsed['target'],
context_parsed['sequence_length'])
```
### 創建數據集迭代器
正如你在上面的函數中所看到的,在解析每個記錄之后,我們返回一系列單詞索引,評論標簽和序列長度。 在`padded_batch`方法中,我們只填充記錄的第一個元素:單詞索引的序列。 在每個示例中,標簽和序列長度不需要填充,因為它們只是單個數字。 因此,`padded_shapes`將是:
+ `[None]` -> 將序列填充到最大維度,還不知道,因此是`None`。
+ `[]` -> 標簽沒有填充。
+ `[]` -> 序列長度沒有填充。
```py
# 選取批量大小
batch_size = 2
# 從 TFRecords 創建數據集
dataset = tf.data.TFRecordDataset('datasets/dummy_text/dummy.tfrecords')
dataset = dataset.map(parse_imdb_sequence).shuffle(buffer_size=10000)
dataset = dataset.padded_batch(batch_size, padded_shapes=([None],[],[]))
```
### 遍歷數據一次
```py
for review, target, sequence_length in tfe.Iterator(dataset):
print(target)
'''
tf.Tensor([0 1], shape=(2,), dtype=int64)
tf.Tensor([1 0], shape=(2,), dtype=int64)
tf.Tensor([0 1], shape=(2,), dtype=int64)
'''
for review, target, sequence_length in tfe.Iterator(dataset):
print(review.shape)
'''
(2, 145)
(2, 139)
(2, 171)
'''
for review, target, sequence_length in tfe.Iterator(dataset):
print(sequence_length)
'''
tf.Tensor([137 151], shape=(2,), dtype=int64)
tf.Tensor([139 171], shape=(2,), dtype=int64)
tf.Tensor([145 124], shape=(2,), dtype=int64)
'''
```
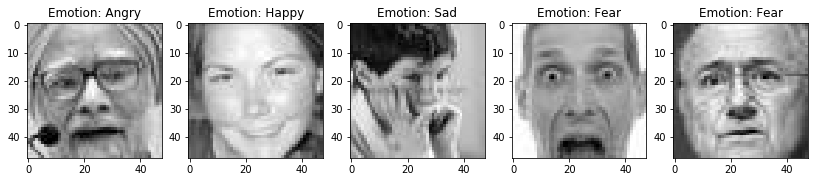
## 第二部分:批量讀取圖像(以及它們的標簽)
在本教程的第二部分中,我們將通過批量讀取圖像,將存儲為 TFRecords 的圖像可視化。 這些圖像是 FER2013 數據集中的一個小型子樣本。
### 創建函數來解析每個記錄并解碼圖片
```py
def parser(record):
'''
解析 TFRecords 樣本的函數
Returns:
img: decoded image.
label: the corresponding label of the image.
'''
# 定義你想要解析的特征
features = {'image': tf.FixedLenFeature((), tf.string),
'label': tf.FixedLenFeature((), tf.int64)}
# 解析樣本
parsed = tf.parse_single_example(record, features)
# 解碼圖像
img = tf.image.decode_image(parsed['image'])
return img, parsed['label']
```
### 創建數據集迭代器
```py
# 選取批量大小
batch_size = 5
# 從 TFRecords 創建數據集
dataset = tf.data.TFRecordDataset('datasets/dummy_images/dummy.tfrecords')
dataset = dataset.map(parser).shuffle(buffer_size=10000)
dataset = dataset.batch(batch_size)
```
### 遍歷數據集一次。展示圖像。
```py
# Dictionary that stores the correspondence between integer labels and the emotions
emotion_cat = {0:'Angry', 1:'Disgust', 2:'Fear', 3:'Happy', 4:'Sad', 5:'Surprise', 6:'Neutral'}
# 遍歷數據集一次
for image, label in tfe.Iterator(dataset):
# 為每個圖像批量創建子圖
f, axarr = plt.subplots(1, int(image.shape[0]), figsize=(14, 6))
# 繪制圖像
for i in range(image.shape[0]):
axarr[i].imshow(image[i,:,:,0], cmap='gray')
axarr[i].set_title('Emotion: %s' %emotion_cat[label[i].numpy()])
```
如果你希望我在本教程中添加任何內容,請與我們聯系。 我會盡力添加它!
- TensorFlow 1.x 深度學習秘籍
- 零、前言
- 一、TensorFlow 簡介
- 二、回歸
- 三、神經網絡:感知器
- 四、卷積神經網絡
- 五、高級卷積神經網絡
- 六、循環神經網絡
- 七、無監督學習
- 八、自編碼器
- 九、強化學習
- 十、移動計算
- 十一、生成模型和 CapsNet
- 十二、分布式 TensorFlow 和云深度學習
- 十三、AutoML 和學習如何學習(元學習)
- 十四、TensorFlow 處理單元
- 使用 TensorFlow 構建機器學習項目中文版
- 一、探索和轉換數據
- 二、聚類
- 三、線性回歸
- 四、邏輯回歸
- 五、簡單的前饋神經網絡
- 六、卷積神經網絡
- 七、循環神經網絡和 LSTM
- 八、深度神經網絡
- 九、大規模運行模型 -- GPU 和服務
- 十、庫安裝和其他提示
- TensorFlow 深度學習中文第二版
- 一、人工神經網絡
- 二、TensorFlow v1.6 的新功能是什么?
- 三、實現前饋神經網絡
- 四、CNN 實戰
- 五、使用 TensorFlow 實現自編碼器
- 六、RNN 和梯度消失或爆炸問題
- 七、TensorFlow GPU 配置
- 八、TFLearn
- 九、使用協同過濾的電影推薦
- 十、OpenAI Gym
- TensorFlow 深度學習實戰指南中文版
- 一、入門
- 二、深度神經網絡
- 三、卷積神經網絡
- 四、循環神經網絡介紹
- 五、總結
- 精通 TensorFlow 1.x
- 一、TensorFlow 101
- 二、TensorFlow 的高級庫
- 三、Keras 101
- 四、TensorFlow 中的經典機器學習
- 五、TensorFlow 和 Keras 中的神經網絡和 MLP
- 六、TensorFlow 和 Keras 中的 RNN
- 七、TensorFlow 和 Keras 中的用于時間序列數據的 RNN
- 八、TensorFlow 和 Keras 中的用于文本數據的 RNN
- 九、TensorFlow 和 Keras 中的 CNN
- 十、TensorFlow 和 Keras 中的自編碼器
- 十一、TF 服務:生產中的 TensorFlow 模型
- 十二、遷移學習和預訓練模型
- 十三、深度強化學習
- 十四、生成對抗網絡
- 十五、TensorFlow 集群的分布式模型
- 十六、移動和嵌入式平臺上的 TensorFlow 模型
- 十七、R 中的 TensorFlow 和 Keras
- 十八、調試 TensorFlow 模型
- 十九、張量處理單元
- TensorFlow 機器學習秘籍中文第二版
- 一、TensorFlow 入門
- 二、TensorFlow 的方式
- 三、線性回歸
- 四、支持向量機
- 五、最近鄰方法
- 六、神經網絡
- 七、自然語言處理
- 八、卷積神經網絡
- 九、循環神經網絡
- 十、將 TensorFlow 投入生產
- 十一、更多 TensorFlow
- 與 TensorFlow 的初次接觸
- 前言
- 1.?TensorFlow 基礎知識
- 2. TensorFlow 中的線性回歸
- 3. TensorFlow 中的聚類
- 4. TensorFlow 中的單層神經網絡
- 5. TensorFlow 中的多層神經網絡
- 6. 并行
- 后記
- TensorFlow 學習指南
- 一、基礎
- 二、線性模型
- 三、學習
- 四、分布式
- TensorFlow Rager 教程
- 一、如何使用 TensorFlow Eager 構建簡單的神經網絡
- 二、在 Eager 模式中使用指標
- 三、如何保存和恢復訓練模型
- 四、文本序列到 TFRecords
- 五、如何將原始圖片數據轉換為 TFRecords
- 六、如何使用 TensorFlow Eager 從 TFRecords 批量讀取數據
- 七、使用 TensorFlow Eager 構建用于情感識別的卷積神經網絡(CNN)
- 八、用于 TensorFlow Eager 序列分類的動態循壞神經網絡
- 九、用于 TensorFlow Eager 時間序列回歸的遞歸神經網絡
- TensorFlow 高效編程
- 圖嵌入綜述:問題,技術與應用
- 一、引言
- 三、圖嵌入的問題設定
- 四、圖嵌入技術
- 基于邊重構的優化問題
- 應用
- 基于深度學習的推薦系統:綜述和新視角
- 引言
- 基于深度學習的推薦:最先進的技術
- 基于卷積神經網絡的推薦
- 關于卷積神經網絡我們理解了什么
- 第1章概論
- 第2章多層網絡
- 2.1.4生成對抗網絡
- 2.2.1最近ConvNets演變中的關鍵架構
- 2.2.2走向ConvNet不變性
- 2.3時空卷積網絡
- 第3章了解ConvNets構建塊
- 3.2整改
- 3.3規范化
- 3.4匯集
- 第四章現狀
- 4.2打開問題
- 參考
- 機器學習超級復習筆記
- Python 遷移學習實用指南
- 零、前言
- 一、機器學習基礎
- 二、深度學習基礎
- 三、了解深度學習架構
- 四、遷移學習基礎
- 五、釋放遷移學習的力量
- 六、圖像識別與分類
- 七、文本文件分類
- 八、音頻事件識別與分類
- 九、DeepDream
- 十、自動圖像字幕生成器
- 十一、圖像著色
- 面向計算機視覺的深度學習
- 零、前言
- 一、入門
- 二、圖像分類
- 三、圖像檢索
- 四、對象檢測
- 五、語義分割
- 六、相似性學習
- 七、圖像字幕
- 八、生成模型
- 九、視頻分類
- 十、部署
- 深度學習快速參考
- 零、前言
- 一、深度學習的基礎
- 二、使用深度學習解決回歸問題
- 三、使用 TensorBoard 監控網絡訓練
- 四、使用深度學習解決二分類問題
- 五、使用 Keras 解決多分類問題
- 六、超參數優化
- 七、從頭開始訓練 CNN
- 八、將預訓練的 CNN 用于遷移學習
- 九、從頭開始訓練 RNN
- 十、使用詞嵌入從頭開始訓練 LSTM
- 十一、訓練 Seq2Seq 模型
- 十二、深度強化學習
- 十三、生成對抗網絡
- TensorFlow 2.0 快速入門指南
- 零、前言
- 第 1 部分:TensorFlow 2.00 Alpha 簡介
- 一、TensorFlow 2 簡介
- 二、Keras:TensorFlow 2 的高級 API
- 三、TensorFlow 2 和 ANN 技術
- 第 2 部分:TensorFlow 2.00 Alpha 中的監督和無監督學習
- 四、TensorFlow 2 和監督機器學習
- 五、TensorFlow 2 和無監督學習
- 第 3 部分:TensorFlow 2.00 Alpha 的神經網絡應用
- 六、使用 TensorFlow 2 識別圖像
- 七、TensorFlow 2 和神經風格遷移
- 八、TensorFlow 2 和循環神經網絡
- 九、TensorFlow 估計器和 TensorFlow HUB
- 十、從 tf1.12 轉換為 tf2
- TensorFlow 入門
- 零、前言
- 一、TensorFlow 基本概念
- 二、TensorFlow 數學運算
- 三、機器學習入門
- 四、神經網絡簡介
- 五、深度學習
- 六、TensorFlow GPU 編程和服務
- TensorFlow 卷積神經網絡實用指南
- 零、前言
- 一、TensorFlow 的設置和介紹
- 二、深度學習和卷積神經網絡
- 三、TensorFlow 中的圖像分類
- 四、目標檢測與分割
- 五、VGG,Inception,ResNet 和 MobileNets
- 六、自編碼器,變分自編碼器和生成對抗網絡
- 七、遷移學習
- 八、機器學習最佳實踐和故障排除
- 九、大規模訓練
- 十、參考文獻