
# 八、深度神經網絡
在本章中,我們將回顧機器學習,深度神經網絡中最先進的技術,也是研究最多的領域之一。
# 深度神經網絡定義
這是一個新聞技術領域蓬勃發展的領域,每天我們都聽到成功地將 DNN 用于解決新問題的實驗,例如計算機視覺,自動駕駛,語音和文本理解等。
在前幾章中,我們使用了與 DNN 相關的技術,尤其是在涉及卷積神經網絡的技術中。
出于實際原因,我們將指深度學習和深度神經網絡,即其中層數明顯優于幾個相似層的架構,我們將指代具有數十個層的神經網絡架構,或者復雜結構的組合。
# 穿越時空的深度網絡架構
在本節中,我們將回顧從 LeNet5 開始在整個深度學習歷史中出現的里程碑架構。
## LeNet 5
在 1980 年代和 1990 年代,神經網絡領域一直保持沉默。 盡管付出了一些努力,但是架構非常簡單,并且需要大的(通常是不可用的)機器力量來嘗試更復雜的方法。
1998 年左右,在貝爾實驗室中,在圍繞手寫校驗數字分類的研究中,Ian LeCun 開始了一種新趨勢,該趨勢實現了所謂的“深度學習——卷積神經網絡”的基礎,我們已經在第 5 章,簡單的前饋神經網絡中對其進行了研究。
在那些年里,SVM 和其他更嚴格定義的技術被用來解決這類問題,但是有關 CNN 的基礎論文表明,與當時的現有方法相比,神經網絡的表現可以與之媲美或更好。
# Alexnet
經過幾年的中斷(即使 LeCun 繼續將其網絡應用到其他任務,例如人臉和物體識別),可用結構化數據和原始處理能力的指數增長,使團隊得以增長和調整模型, 在某種程度上被認為是不可能的,因此可以增加模型的復雜性,而無需等待數月的訓練。
來自許多技術公司和大學的計算機研究團隊開始競爭一些非常艱巨的任務,包括圖像識別。 對于以下挑戰之一,即 Imagenet 分類挑戰,開發了 Alexnet 架構:
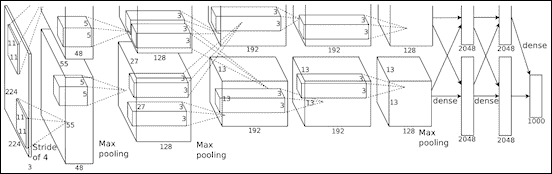
Alexnet 架構
## 主要功能
從其第一層具有卷積運算的意義上講,Alexnet 可以看作是增強的 LeNet5。 但要添加未使用過的最大池化層,然后添加一系列密集的連接層,以建立最后的輸出類別概率層。 視覺幾何組(VGG)模型
圖像分類挑戰的其他主要競爭者之一是牛津大學的 VGG。
VGG 網絡架構的主要特征是它們將卷積濾波器的大小減小到一個簡單的`3x3`,并按順序組合它們。
微小的卷積內核的想法破壞了 LeNet 及其后繼者 Alexnet 的最初想法,后者最初使用的過濾器高達`11x11`過濾器,但復雜得多且表現低下。 過濾器大小的這種變化是當前趨勢的開始:
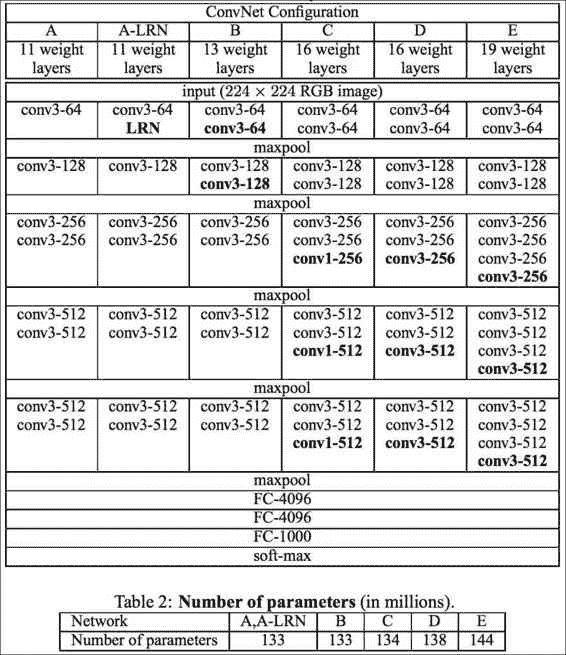
VGG 中每層的參數編號摘要
然而,使用一系列小的卷積權重的積極變化,總的設置是相當數量的參數(數以百萬計的數量級),因此它必須受到許多措施的限制。
## 原始的初始模型
在由 Alexnet 和 VGG 主導的兩個主要研究周期之后,Google 憑借非常強大的架構 Inception 打破了挑戰,該架構具有多次迭代。
這些迭代的第一個迭代是從其自己的基于卷積神經網絡層的架構版本(稱為 GoogLeNet)開始的,該架構的名稱讓人想起了始于網絡的方法。
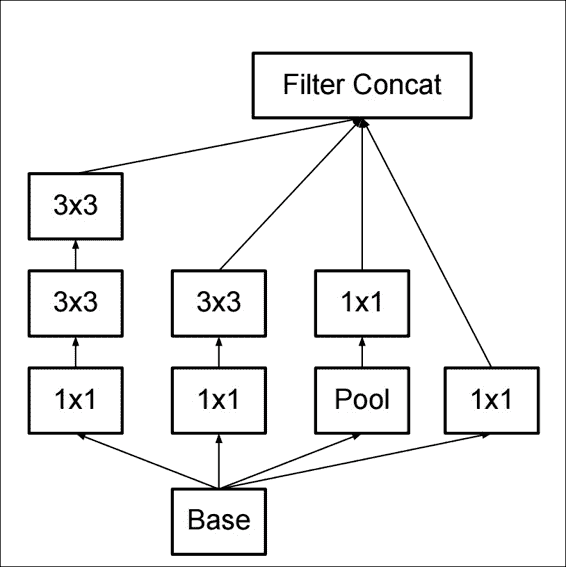
## GoogLenet(InceptionV1)
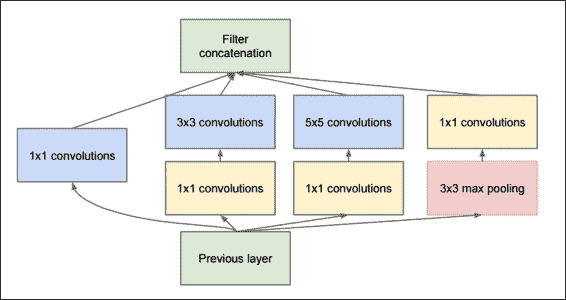
InceptionV1
GoogLeNet 是這項工作的第一個迭代,如下圖所示,它具有非常深的架構,但是它具有九個鏈式初始模塊的令人毛骨悚然的總和,幾乎沒有或根本沒有修改:
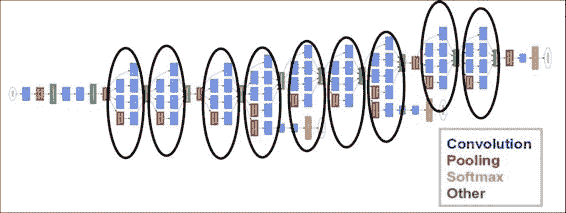
盜夢空間原始架構
與兩年前發布的 Alexnet 相比,它是如此復雜,但它設法減少了所需的參數數量并提高了準確率。
但是,由于幾乎所有結構都由相同原始結構層構建塊的確定排列和重復組成,因此提高了此復雜架構的理解和可伸縮性。
## 批量歸一化初始化(V2)
2015 年最先進的神經網絡在提高迭代效率的同時,還存在訓練不穩定的問題。
為了理解問題的構成,首先我們將記住在前面的示例中應用的簡單正則化步驟。 它主要包括將這些值以零為中心,然后除以最大值或標準偏差,以便為反向傳播的梯度提供良好的基線。
在訓練非常大的數據集的過程中,發生的事情是,經過大量訓練示例之后,不同的值振蕩開始放大平均參數值,就像在共振現象中一樣。 我們非常簡單地描述的被稱為協方差平移。

有和沒有批量歸一化的表現比較
這是開發批歸一化技術的主要原因。
再次簡化了過程描述,它不僅包括對原始輸入值進行歸一化,還對每一層上的輸出值進行了歸一化,避免了在層之間出現不穩定性之前就開始影響或漂移這些值。
這是 Google 在 2015 年 2 月發布的改進版 GoogLeNet 實現中提供的主要功能,也稱為 InceptionV2。
# InceptionV3
快進到 2015 年 12 月,Inception 架構有了新的迭代。 兩次發行之間月份的不同使我們對新迭代的開發速度有了一個想法。
此架構的基本修改如下:
* 將卷積數減少到最大`3x3`
* 增加網絡的總體深度
* 在每一層使用寬度擴展技術來改善特征組合
下圖說明了如何解釋改進的啟動模塊:
InceptionV3 基本模塊
這是整個 V3 架構的表示形式,其中包含通用構建模塊的許多實例:
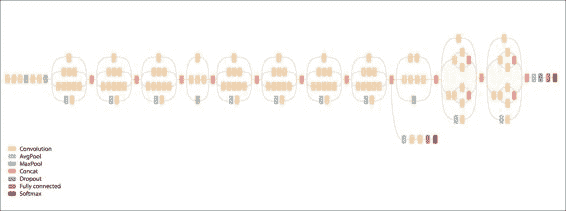
InceptionV3 總體圖
# 殘差網絡(ResNet)
殘差網絡架構于 2015 年 12 月出現(與 InceptionV3 幾乎同時出現),它帶來了一個簡單而新穎的想法:不僅使用每個構成層的輸出,還將該層的輸出與原始輸入結合。
在下圖中,我們觀察到 ResNet 模塊之一的簡化??視圖。 它清楚地顯示了卷積層棧末尾的求和運算,以及最終的 relu 運算:

ResNet 一般架構
模塊的卷積部分包括將特征從 256 個值減少到 64 個值,一個保留特征數的`3x3`過濾層以及一個從 64 x 256 個值增加`1x1`層的特征。 在最近的發展中,ResNet 的使用深度還不到 30 層,分布廣泛。
## 其他深度神經網絡架構
最近開發了很多神經網絡架構。 實際上,這個領域是如此活躍,以至于我們每年或多或少都有新的杰出架構外觀。 最有前途的神經網絡架構的列表是:
* SqueezeNet:此架構旨在減少 Alexnet 的參數數量和復雜性,聲稱減少了 50 倍的參數數量
* 高效神經網絡(Enet):旨在構建更簡單,低延遲的浮點運算數量,具有實時結果的神經網絡
* Fractalnet:它的主要特征是非常深的網絡的實現,不需要殘留的架構,將結構布局組織為截斷的分形
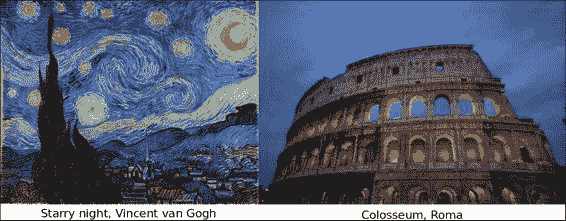
# 示例 -- 風格繪畫 -- VGG 風格遷移
在此示例中,我們將配合 Leon Gatys 的論文《藝術風格的神經算法》的實現。
### 注意
此練習的原始代碼由 [Anish Athalye](http://www.anishathalye.com/) 提供。
我們必須注意,此練習沒有訓練內容。 我們將僅加載由 VLFeat 提供的預訓練系數矩陣,該矩陣是預訓練模型的數據庫,可用于處理模型,從而避免了通常需要大量計算的訓練:

風格遷移主要概念
## 有用的庫和方法
* 使用`scipy.io.loadmat`加載參數文件
* 我們將使用的第一個有用的庫是`scipy.io`模塊,用于加載系數數據,該數據另存為 matlab 的 MAT 格式。
* 上一個參數的用法:
```py
scipy.io.loadmat(file_name, mdict=None, appendmat=True, **kwargs)
```
* 返回前一個參數:
`mat_dict : dict :dictionary`,變量名作為鍵,加載的矩陣作為值。 如果填充了`mdict`參數,則將結果分配給它。
## 數據集說明和加載
為了解決這個問題,我們將使用預訓練的數據集,即 VGG 神經網絡的再訓練系數和 Imagenet 數據集。
## 數據集預處理
假設系數是在加載的參數矩陣中給出的,那么關于初始數據集的工作就不多了。
## 模型架構
模型架構主要分為兩部分:風格和內容。
為了生成最終圖像,使用了沒有最終完全連接層的 VGG 網絡。
## 損失函數
該架構定義了兩個不同的損失函數來優化最終圖像的兩個不同方面,一個用于內容,另一個用于風格。
### 內容損失函數
`content_loss`函數的代碼如下:
```py
# content loss
content_loss = content_weight * (2 * tf.nn.l2_loss(
net[CONTENT_LAYER] - content_features[CONTENT_LAYER]) /
content_features[CONTENT_LAYER].size)
```
## 風格損失函數
### 損失優化循環
損耗優化循環的代碼如下:
```py
best_loss = float('inf')
best = None
with tf.Session() as sess:
sess.run(tf.initialize_all_variables())
for i in range(iterations):
last_step = (i == iterations - 1)
print_progress(i, last=last_step)
train_step.run()
if (checkpoint_iterations and i % checkpoint_iterations == 0) or last_step:
this_loss = loss.eval()
if this_loss < best_loss:
best_loss = this_loss
best = image.eval()
yield (
(None if last_step else i),
vgg.unprocess(best.reshape(shape[1:]), mean_pixel)
)
```
## 收斂性測試
在此示例中,我們將僅檢查指示的迭代次數(迭代參數)。
## 程序執行
為了以良好的迭代次數(大約 1000 個)執行該程序,我們建議至少有 8GB 的 RAM 內存可用:
```py
python neural_style.py --content examples/2-content.jpg --styles examples/2-style1.jpg --checkpoint-iterations=100 --iterations=1000 --checkpoint-output=out%s.jpg --output=outfinal
```
前面命令的結果如下:
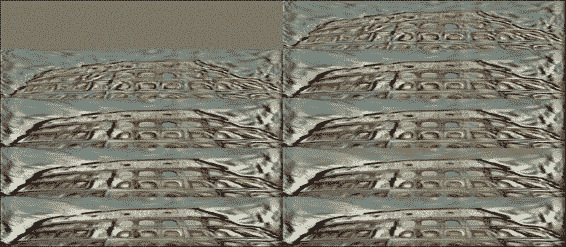
風格遷移步驟
控制臺輸出如下:
```py
Iteration 1/1000
Iteration 2/1000
Iteration 3/1000
Iteration 4/1000
...
Iteration 999/1000
Iteration 1000/1000
content loss: 908786
style loss: 261789
tv loss: 25639.9
total loss: 1.19621e+06
```
## 完整源代碼
`neural_style.py`的代碼如下:
```py
import os
import numpy as np
import scipy.misc
from stylize import stylize
import math
from argparse import ArgumentParser
# default arguments
CONTENT_WEIGHT = 5e0
STYLE_WEIGHT = 1e2
TV_WEIGHT = 1e2
LEARNING_RATE = 1e1
STYLE_SCALE = 1.0
ITERATIONS = 100
VGG_PATH = 'imagenet-vgg-verydeep-19.mat'
def build_parser():
parser = ArgumentParser()
parser.add_argument('--content',
dest='content', help='content image',
metavar='CONTENT', required=True)
parser.add_argument('--styles',
dest='styles',
nargs='+', help='one or more style images',
metavar='STYLE', required=True)
parser.add_argument('--output',
dest='output', help='output path',
metavar='OUTPUT', required=True)
parser.add_argument('--checkpoint-output',
dest='checkpoint_output', help='checkpoint output format',
metavar='OUTPUT')
parser.add_argument('--iterations', type=int,
dest='iterations', help='iterations (default %(default)s)',
metavar='ITERATIONS', default=ITERATIONS)
parser.add_argument('--width', type=int,
dest='width', help='output width',
metavar='WIDTH')
parser.add_argument('--style-scales', type=float,
dest='style_scales',
nargs='+', help='one or more style scales',
metavar='STYLE_SCALE')
parser.add_argument('--network',
dest='network', help='path to network parameters (default %(default)s)',
metavar='VGG_PATH', default=VGG_PATH)
parser.add_argument('--content-weight', type=float,
dest='content_weight', help='content weight (default %(default)s)',
metavar='CONTENT_WEIGHT', default=CONTENT_WEIGHT)
parser.add_argument('--style-weight', type=float,
dest='style_weight', help='style weight (default %(default)s)',
metavar='STYLE_WEIGHT', default=STYLE_WEIGHT)
parser.add_argument('--style-blend-weights', type=float,
dest='style_blend_weights', help='style blending weights',
nargs='+', metavar='STYLE_BLEND_WEIGHT')
parser.add_argument('--tv-weight', type=float,
dest='tv_weight', help='total variation regularization weight (default %(default)s)',
metavar='TV_WEIGHT', default=TV_WEIGHT)
parser.add_argument('--learning-rate', type=float,
dest='learning_rate', help='learning rate (default %(default)s)',
metavar='LEARNING_RATE', default=LEARNING_RATE)
parser.add_argument('--initial',
dest='initial', help='initial image',
metavar='INITIAL')
parser.add_argument('--print-iterations', type=int,
dest='print_iterations', help='statistics printing frequency',
metavar='PRINT_ITERATIONS')
parser.add_argument('--checkpoint-iterations', type=int,
dest='checkpoint_iterations', help='checkpoint frequency',
metavar='CHECKPOINT_ITERATIONS')
return parser
def main():
parser = build_parser()
options = parser.parse_args()
if not os.path.isfile(options.network):
parser.error("Network %s does not exist. (Did you forget to download it?)" % options.network)
content_image = imread(options.content)
style_images = [imread(style) for style in options.styles]
width = options.width
if width is not None:
new_shape = (int(math.floor(float(content_image.shape[0]) /
content_image.shape[1] * width)), width)
content_image = scipy.misc.imresize(content_image, new_shape)
target_shape = content_image.shape
for i in range(len(style_images)):
style_scale = STYLE_SCALE
if options.style_scales is not None:
style_scale = options.style_scales[i]
style_images[i] = scipy.misc.imresize(style_images[i], style_scale *
target_shape[1] / style_images[i].shape[1])
style_blend_weights = options.style_blend_weights
if style_blend_weights is None:
# default is equal weights
style_blend_weights = [1.0/len(style_images) for _ in style_images]
else:
total_blend_weight = sum(style_blend_weights)
style_blend_weights = [weight/total_blend_weight
for weight in style_blend_weights]
initial = options.initial
if initial is not None:
initial = scipy.misc.imresize(imread(initial), content_image.shape[:2])
if options.checkpoint_output and "%s" not in options.checkpoint_output:
parser.error("To save intermediate images, the checkpoint output "
"parameter must contain `%s` (e.g. `foo%s.jpg`)")
for iteration, image in stylize(
network=options.network,
initial=initial,
content=content_image,
styles=style_images,
iterations=options.iterations,
content_weight=options.content_weight,
style_weight=options.style_weight,
style_blend_weights=style_blend_weights,
tv_weight=options.tv_weight,
learning_rate=options.learning_rate,
print_iterations=options.print_iterations,
checkpoint_iterations=options.checkpoint_iterations
):
output_file = None
if iteration is not None:
if options.checkpoint_output:
output_file = options.checkpoint_output % iteration
else:
output_file = options.output
if output_file:
imsave(output_file, image)
def imread(path):
return scipy.misc.imread(path).astype(np.float)
def imsave(path, img):
img = np.clip(img, 0, 255).astype(np.uint8)
scipy.misc.imsave(path, img)
if __name__ == '__main__':
main()
```
`Stilize.py`的代碼如下:
```py
import vgg
import tensorflow as tf
import numpy as np
from sys import stderr
CONTENT_LAYER = 'relu4_2'
STYLE_LAYERS = ('relu1_1', 'relu2_1', 'relu3_1', 'relu4_1', 'relu5_1')
try:
reduce
except NameError:
from functools import reduce
def stylize(network, initial, content, styles, iterations,
content_weight, style_weight, style_blend_weights, tv_weight,
learning_rate, print_iterations=None, checkpoint_iterations=None):
"""
Stylize images.
This function yields tuples (iteration, image); `iteration` is None
if this is the final image (the last iteration). Other tuples are yielded
every `checkpoint_iterations` iterations.
:rtype: iterator[tuple[int|None,image]]
"""
shape = (1,) + content.shape
style_shapes = [(1,) + style.shape for style in styles]
content_features = {}
style_features = [{} for _ in styles]
# compute content features in feedforward mode
g = tf.Graph()
with g.as_default(), g.device('/cpu:0'), tf.Session() as sess:
image = tf.placeholder('float', shape=shape)
net, mean_pixel = vgg.net(network, image)
content_pre = np.array([vgg.preprocess(content, mean_pixel)])
content_features[CONTENT_LAYER] = net[CONTENT_LAYER].eval(
feed_dict={image: content_pre})
# compute style features in feedforward mode
for i in range(len(styles)):
g = tf.Graph()
with g.as_default(), g.device('/cpu:0'), tf.Session() as sess:
image = tf.placeholder('float', shape=style_shapes[i])
net, _ = vgg.net(network, image)
style_pre = np.array([vgg.preprocess(styles[i], mean_pixel)])
for layer in STYLE_LAYERS:
features = net[layer].eval(feed_dict={image: style_pre})
features = np.reshape(features, (-1, features.shape[3]))
gram = np.matmul(features.T, features) / features.size
style_features[i][layer] = gram
# make stylized image using backpropogation
with tf.Graph().as_default():
if initial is None:
noise = np.random.normal(size=shape, scale=np.std(content) * 0.1)
initial = tf.random_normal(shape) * 0.256
else:
initial = np.array([vgg.preprocess(initial, mean_pixel)])
initial = initial.astype('float32')
image = tf.Variable(initial)
net, _ = vgg.net(network, image)
# content loss
content_loss = content_weight * (2 * tf.nn.l2_loss(
net[CONTENT_LAYER] - content_features[CONTENT_LAYER]) /
content_features[CONTENT_LAYER].size)
# style loss
style_loss = 0
for i in range(len(styles)):
style_losses = []
for style_layer in STYLE_LAYERS:
layer = net[style_layer]
_, height, width, number = map(lambda i: i.value, layer.get_shape())
size = height * width * number
feats = tf.reshape(layer, (-1, number))
gram = tf.matmul(tf.transpose(feats), feats) / size
style_gram = style_features[i][style_layer]
style_losses.append(2 * tf.nn.l2_loss(gram - style_gram) / style_gram.size)
style_loss += style_weight * style_blend_weights[i] * reduce(tf.add, style_losses)
# total variation denoising
tv_y_size = _tensor_size(image[:,1:,:,:])
tv_x_size = _tensor_size(image[:,:,1:,:])
tv_loss = tv_weight * 2 * (
(tf.nn.l2_loss(image[:,1:,:,:] - image[:,:shape[1]-1,:,:]) /
tv_y_size) +
(tf.nn.l2_loss(image[:,:,1:,:] - image[:,:,:shape[2]-1,:]) /
tv_x_size))
# overall loss
loss = content_loss + style_loss + tv_loss
# optimizer setup
train_step = tf.train.AdamOptimizer(learning_rate).minimize(loss)
def print_progress(i, last=False):
stderr.write('Iteration %d/%d\n' % (i + 1, iterations))
if last or (print_iterations and i % print_iterations == 0):
stderr.write(' content loss: %g\n' % content_loss.eval())
stderr.write(' style loss: %g\n' % style_loss.eval())
stderr.write(' tv loss: %g\n' % tv_loss.eval())
stderr.write(' total loss: %g\n' % loss.eval())
# optimization
best_loss = float('inf')
best = None
with tf.Session() as sess:
sess.run(tf.initialize_all_variables())
for i in range(iterations):
last_step = (i == iterations - 1)
print_progress(i, last=last_step)
train_step.run()
if (checkpoint_iterations and i % checkpoint_iterations == 0) or last_step:
this_loss = loss.eval()
if this_loss < best_loss:
best_loss = this_loss
best = image.eval()
yield (
(None if last_step else i),
vgg.unprocess(best.reshape(shape[1:]), mean_pixel)
)
def _tensor_size(tensor):
from operator import mul
return reduce(mul, (d.value for d in tensor.get_shape()), 1)
vgg.py
import tensorflow as tf
import numpy as np
import scipy.io
def net(data_path, input_image):
layers = (
'conv1_1', 'relu1_1', 'conv1_2', 'relu1_2', 'pool1',
'conv2_1', 'relu2_1', 'conv2_2', 'relu2_2', 'pool2',
'conv3_1', 'relu3_1', 'conv3_2', 'relu3_2', 'conv3_3',
'relu3_3', 'conv3_4', 'relu3_4', 'pool3',
'conv4_1', 'relu4_1', 'conv4_2', 'relu4_2', 'conv4_3',
'relu4_3', 'conv4_4', 'relu4_4', 'pool4',
'conv5_1', 'relu5_1', 'conv5_2', 'relu5_2', 'conv5_3',
'relu5_3', 'conv5_4', 'relu5_4'
)
data = scipy.io.loadmat(data_path)
mean = data['normalization'][0][0][0]
mean_pixel = np.mean(mean, axis=(0, 1))
weights = data['layers'][0]
net = {}
current = input_image
for i, name in enumerate(layers):
kind = name[:4]
if kind == 'conv':
kernels, bias = weights[i][0][0][0][0]
# matconvnet: weights are [width, height, in_channels, out_channels]
# tensorflow: weights are [height, width, in_channels, out_channels]
kernels = np.transpose(kernels, (1, 0, 2, 3))
bias = bias.reshape(-1)
current = _conv_layer(current, kernels, bias)
elif kind == 'relu':
current = tf.nn.relu(current)
elif kind == 'pool':
current = _pool_layer(current)
net[name] = current
assert len(net) == len(layers)
return net, mean_pixel
def _conv_layer(input, weights, bias):
conv = tf.nn.conv2d(input, tf.constant(weights), strides=(1, 1, 1, 1),
padding='SAME')
return tf.nn.bias_add(conv, bias)
def _pool_layer(input):
return tf.nn.max_pool(input, ksize=(1, 2, 2, 1), strides=(1, 2, 2, 1),
padding='SAME')
def preprocess(image, mean_pixel):
return image - mean_pixel
def unprocess(image, mean_pixel):
return image + mean_pixel
```
# 總結
在本章中,我們一直在學習不同的深度神經網絡架構。
我們了解了如何構建近年來最著名的架構之一 VGG,以及如何使用它來生成可轉換藝術風格的圖像。
在下一章中,我們將使用機器學習中最有用的技術之一:圖形處理單元。 我們將回顧安裝具有 GPU 支持的 TensorFlow 所需的步驟并對其進行訓練,并將執行時間與唯一運行的模型 CPU 進行比較。
- TensorFlow 1.x 深度學習秘籍
- 零、前言
- 一、TensorFlow 簡介
- 二、回歸
- 三、神經網絡:感知器
- 四、卷積神經網絡
- 五、高級卷積神經網絡
- 六、循環神經網絡
- 七、無監督學習
- 八、自編碼器
- 九、強化學習
- 十、移動計算
- 十一、生成模型和 CapsNet
- 十二、分布式 TensorFlow 和云深度學習
- 十三、AutoML 和學習如何學習(元學習)
- 十四、TensorFlow 處理單元
- 使用 TensorFlow 構建機器學習項目中文版
- 一、探索和轉換數據
- 二、聚類
- 三、線性回歸
- 四、邏輯回歸
- 五、簡單的前饋神經網絡
- 六、卷積神經網絡
- 七、循環神經網絡和 LSTM
- 八、深度神經網絡
- 九、大規模運行模型 -- GPU 和服務
- 十、庫安裝和其他提示
- TensorFlow 深度學習中文第二版
- 一、人工神經網絡
- 二、TensorFlow v1.6 的新功能是什么?
- 三、實現前饋神經網絡
- 四、CNN 實戰
- 五、使用 TensorFlow 實現自編碼器
- 六、RNN 和梯度消失或爆炸問題
- 七、TensorFlow GPU 配置
- 八、TFLearn
- 九、使用協同過濾的電影推薦
- 十、OpenAI Gym
- TensorFlow 深度學習實戰指南中文版
- 一、入門
- 二、深度神經網絡
- 三、卷積神經網絡
- 四、循環神經網絡介紹
- 五、總結
- 精通 TensorFlow 1.x
- 一、TensorFlow 101
- 二、TensorFlow 的高級庫
- 三、Keras 101
- 四、TensorFlow 中的經典機器學習
- 五、TensorFlow 和 Keras 中的神經網絡和 MLP
- 六、TensorFlow 和 Keras 中的 RNN
- 七、TensorFlow 和 Keras 中的用于時間序列數據的 RNN
- 八、TensorFlow 和 Keras 中的用于文本數據的 RNN
- 九、TensorFlow 和 Keras 中的 CNN
- 十、TensorFlow 和 Keras 中的自編碼器
- 十一、TF 服務:生產中的 TensorFlow 模型
- 十二、遷移學習和預訓練模型
- 十三、深度強化學習
- 十四、生成對抗網絡
- 十五、TensorFlow 集群的分布式模型
- 十六、移動和嵌入式平臺上的 TensorFlow 模型
- 十七、R 中的 TensorFlow 和 Keras
- 十八、調試 TensorFlow 模型
- 十九、張量處理單元
- TensorFlow 機器學習秘籍中文第二版
- 一、TensorFlow 入門
- 二、TensorFlow 的方式
- 三、線性回歸
- 四、支持向量機
- 五、最近鄰方法
- 六、神經網絡
- 七、自然語言處理
- 八、卷積神經網絡
- 九、循環神經網絡
- 十、將 TensorFlow 投入生產
- 十一、更多 TensorFlow
- 與 TensorFlow 的初次接觸
- 前言
- 1.?TensorFlow 基礎知識
- 2. TensorFlow 中的線性回歸
- 3. TensorFlow 中的聚類
- 4. TensorFlow 中的單層神經網絡
- 5. TensorFlow 中的多層神經網絡
- 6. 并行
- 后記
- TensorFlow 學習指南
- 一、基礎
- 二、線性模型
- 三、學習
- 四、分布式
- TensorFlow Rager 教程
- 一、如何使用 TensorFlow Eager 構建簡單的神經網絡
- 二、在 Eager 模式中使用指標
- 三、如何保存和恢復訓練模型
- 四、文本序列到 TFRecords
- 五、如何將原始圖片數據轉換為 TFRecords
- 六、如何使用 TensorFlow Eager 從 TFRecords 批量讀取數據
- 七、使用 TensorFlow Eager 構建用于情感識別的卷積神經網絡(CNN)
- 八、用于 TensorFlow Eager 序列分類的動態循壞神經網絡
- 九、用于 TensorFlow Eager 時間序列回歸的遞歸神經網絡
- TensorFlow 高效編程
- 圖嵌入綜述:問題,技術與應用
- 一、引言
- 三、圖嵌入的問題設定
- 四、圖嵌入技術
- 基于邊重構的優化問題
- 應用
- 基于深度學習的推薦系統:綜述和新視角
- 引言
- 基于深度學習的推薦:最先進的技術
- 基于卷積神經網絡的推薦
- 關于卷積神經網絡我們理解了什么
- 第1章概論
- 第2章多層網絡
- 2.1.4生成對抗網絡
- 2.2.1最近ConvNets演變中的關鍵架構
- 2.2.2走向ConvNet不變性
- 2.3時空卷積網絡
- 第3章了解ConvNets構建塊
- 3.2整改
- 3.3規范化
- 3.4匯集
- 第四章現狀
- 4.2打開問題
- 參考
- 機器學習超級復習筆記
- Python 遷移學習實用指南
- 零、前言
- 一、機器學習基礎
- 二、深度學習基礎
- 三、了解深度學習架構
- 四、遷移學習基礎
- 五、釋放遷移學習的力量
- 六、圖像識別與分類
- 七、文本文件分類
- 八、音頻事件識別與分類
- 九、DeepDream
- 十、自動圖像字幕生成器
- 十一、圖像著色
- 面向計算機視覺的深度學習
- 零、前言
- 一、入門
- 二、圖像分類
- 三、圖像檢索
- 四、對象檢測
- 五、語義分割
- 六、相似性學習
- 七、圖像字幕
- 八、生成模型
- 九、視頻分類
- 十、部署
- 深度學習快速參考
- 零、前言
- 一、深度學習的基礎
- 二、使用深度學習解決回歸問題
- 三、使用 TensorBoard 監控網絡訓練
- 四、使用深度學習解決二分類問題
- 五、使用 Keras 解決多分類問題
- 六、超參數優化
- 七、從頭開始訓練 CNN
- 八、將預訓練的 CNN 用于遷移學習
- 九、從頭開始訓練 RNN
- 十、使用詞嵌入從頭開始訓練 LSTM
- 十一、訓練 Seq2Seq 模型
- 十二、深度強化學習
- 十三、生成對抗網絡
- TensorFlow 2.0 快速入門指南
- 零、前言
- 第 1 部分:TensorFlow 2.00 Alpha 簡介
- 一、TensorFlow 2 簡介
- 二、Keras:TensorFlow 2 的高級 API
- 三、TensorFlow 2 和 ANN 技術
- 第 2 部分:TensorFlow 2.00 Alpha 中的監督和無監督學習
- 四、TensorFlow 2 和監督機器學習
- 五、TensorFlow 2 和無監督學習
- 第 3 部分:TensorFlow 2.00 Alpha 的神經網絡應用
- 六、使用 TensorFlow 2 識別圖像
- 七、TensorFlow 2 和神經風格遷移
- 八、TensorFlow 2 和循環神經網絡
- 九、TensorFlow 估計器和 TensorFlow HUB
- 十、從 tf1.12 轉換為 tf2
- TensorFlow 入門
- 零、前言
- 一、TensorFlow 基本概念
- 二、TensorFlow 數學運算
- 三、機器學習入門
- 四、神經網絡簡介
- 五、深度學習
- 六、TensorFlow GPU 編程和服務
- TensorFlow 卷積神經網絡實用指南
- 零、前言
- 一、TensorFlow 的設置和介紹
- 二、深度學習和卷積神經網絡
- 三、TensorFlow 中的圖像分類
- 四、目標檢測與分割
- 五、VGG,Inception,ResNet 和 MobileNets
- 六、自編碼器,變分自編碼器和生成對抗網絡
- 七、遷移學習
- 八、機器學習最佳實踐和故障排除
- 九、大規模訓練
- 十、參考文獻