
# 十二、分布式 TensorFlow 和云深度學習
在本章中,我們將討論使用分布式 TensorFlow 和云深度學習。 我們將為您提供一些秘籍:
* 使用 TensorFlow 和 GPU
* 使用分布式 TensorFlow:多個 GPU 和一個 CPU
* 使用分布式 TensorFlow:多臺服務器
* 訓練分布式 TensorFlow MNIST 分類器
* 使用 TensorFlow Serving 和 Docker
* 使用 Compute Engine 在 Google Cloud(GCP)上運行分布式 TensorFlow
* 在 Google CloudML 上運行分布式 TensorFlow
* 在 Microsoft Azure 上運行分布式 TensorFlow
* 在 Amazon AWS 上運行分布式 TensorFlow
# 介紹
每個 TensorFlow 計算均以圖描述。 這允許在結構和操作的放置方面具有自然的靈活性,可以在計算的分布式節點之間拆分操作。 該圖可以拆分為多個子圖,這些子圖分配給服務器集群中的不同節點。
我強烈建議讀者看一看[大型分布式深度網絡](https://research.google.com/archive/large_deep_networks_nips2012.html)(Jeffrey Dean,Greg S.Corrado,Rajat Monga,Kai Chen,Matthieu Devin,Quoc V.Le,Mark Z.Mao,Marc'Aurelio Ranzato,Andrew Senior ,Paul Tucker,Ke Yang 和 Andrew Y. Ng。 NIPS,2012 年)
本文的一項關鍵結果是證明可以運行分布式**隨機梯度下降**(**SGD**),其中多個節點在數據碎片上并行工作,并且通過將更新發送到參數服務器,來實現梯度的獨立和異步更新。 引用論文摘要:
我們的實驗揭示了關于大規模非凸優化的幾個令人驚訝的結果。 首先,異步 SGD 很少用于非凸問題,對于訓練深度網絡非常有效,特別是與 Adagrad 自適應學習率結合使用時。
下圖取自論文本身,很好地說明了這一點:
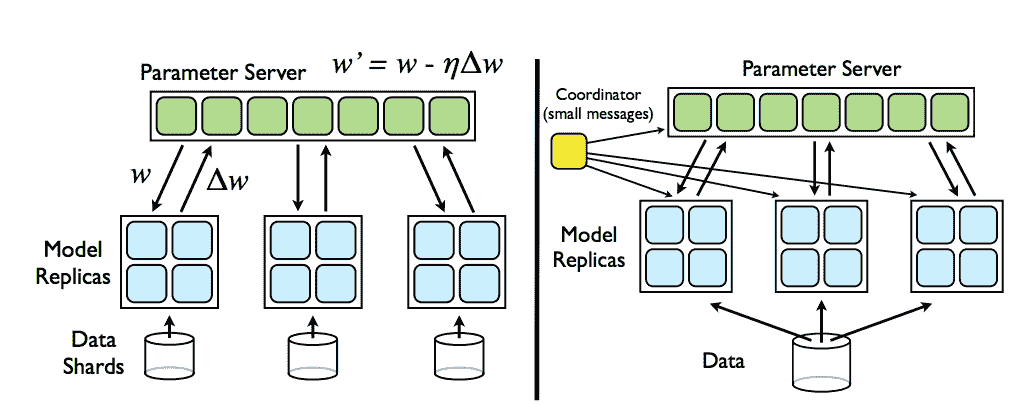
[來自參數服務器的分布式梯度下降示例](https://research.google.com/archive/large_deep_networks_nips2012.html)
您應該閱讀的另一份文檔是白皮書[《TensorFlow:異構分布式系統上的大規模機器學習》](http://download.tensorflow.org/paper/whitepaper2015.pdf)(MartínAbadi 等人,2015 年 11 月)
考慮其中包含的一些示例,我們可以在下面的圖片的左側看到 TensorFlow 代碼的片段,然后將其表示為右側的圖形:
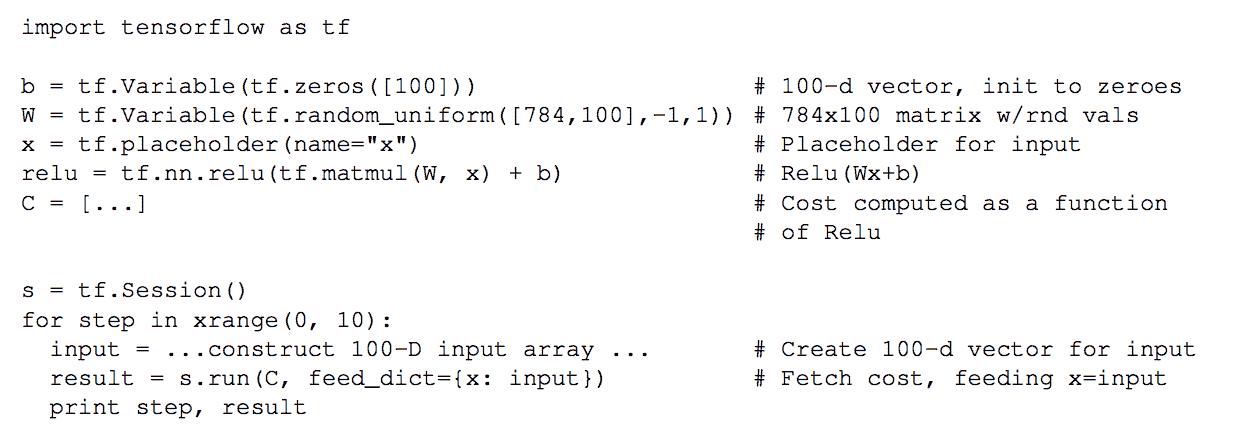
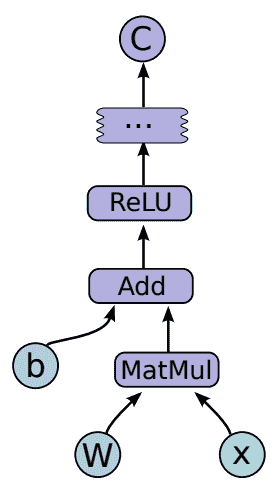
[TensorFlow 圖的示例](http://download.tensorflow.org/paper/whitepaper2015.pdf)
通過進行本地計算并在需要時透明地將遠程通信節點添加到圖,可以在多個節點之間劃分圖。 下圖中對此作了很好的解釋,該圖仍取自前面提到的論文:
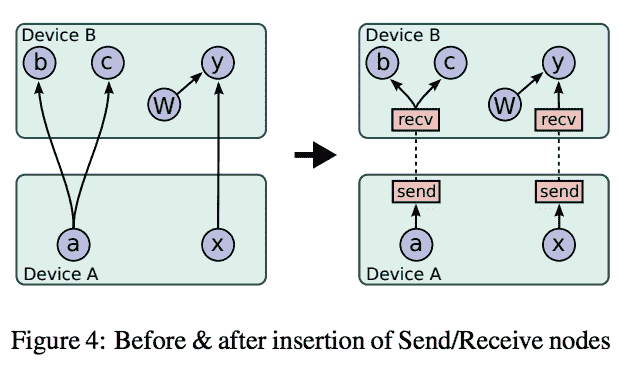
[摘自以下內容的分布式 TensorFlow 圖計算示例](http://download.tensorflow.org/paper/whitepaper2015.pdf)
可以通過集中方式(下圖的左側)或分布式方式(右側)來計算梯度下降和所有主要的優化器算法。 后者涉及一個主進程,該主進程與調配 GPU 和 CPU 的多個工作器進行對話:
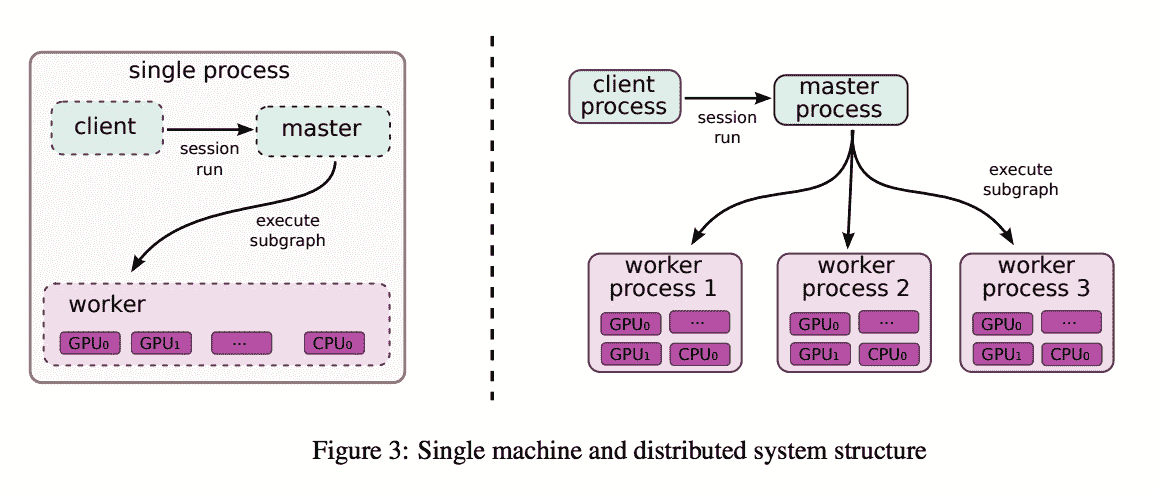
[摘自以下內容的單機和分布式系統結構示例和分布式 TensorFlow 圖計算示例](http://download.tensorflow.org/paper/whitepaper2015.pdf)
分布式計算既可以是同步的(所有工作程序都在同時更新分片數據上的梯度),也可以是異步的(更新沒有同時發生)。 后者通常可以實現更高的可伸縮性,并且在收斂到最佳解決方案方面,較大的圖計算仍然可以很好地工作。 同樣,這些圖片均來自 TensorFlow 白皮書,如果您想了解更多信息,我強烈建議有興趣的讀者閱讀本文:
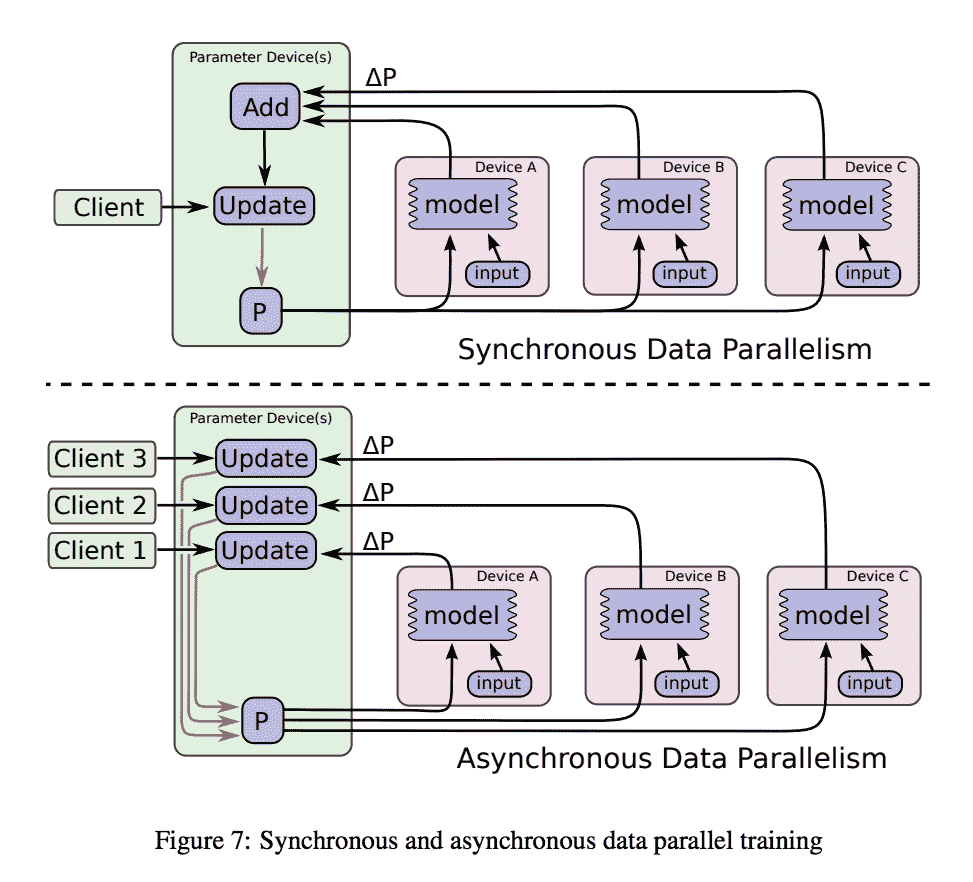
同步和異步數據并行訓練的示例
# 使用 TensorFlow 和 GPU
在本秘籍中,我們將學習如何在 GPU 上使用 TensorFlow:執行的操作是在 CPU 或 GPU 上的簡單矩陣乘法。
# 準備
第一步是安裝支持 GPU 的 TensorFlow 版本。 [正式的 TensorFlow 安裝說明是您的起點](https://www.tensorflow.org/)。 請記住,您需要一個通過 CUDA 或 CuDNN 支持 GPU 的環境。
# 操作步驟
我們按以下步驟進行:
1. 首先導入一些模塊
```py
import sys
import numpy as np
import tensorflow as tf
from datetime import datetime
```
2. 從命令行獲取要使用的處理單元的類型(`"gpu"`或`"cpu"`)
```py
device_name = sys.argv[1] # Choose device from cmd line. Options: gpu or cpu
shape = (int(sys.argv[2]), int(sys.argv[2]))
if device_name == "gpu":
device_name = "/gpu:0"
else:
device_name = "/cpu:0"
```
3. 在 GPU 或 CPU 上執行矩陣乘法。 按鍵說明與`tf.device(device_name)`一起使用。 它創建一個新的上下文管理器,告訴 TensorFlow 在 GPU 或 CPU 上執行這些操作
```py
with tf.device(device_name):
random_matrix = tf.random_uniform(shape=shape, minval=0, maxval=1)
dot_operation = tf.matmul(random_matrix, tf.transpose(random_matrix))
sum_operation = tf.reduce_sum(dot_operation)
startTime = datetime.now()
with tf.Session(config=tf.ConfigProto(log_device_placement=True)) as session:
result = session.run(sum_operation)
print(result)
```
4.打印一些調試時間,只是為了驗證 CPU 和 GPU 有什么區別
```py
print("Shape:", shape, "Device:", device_name)
print("Time taken:", datetime.now() - startTime)
```
# 工作原理
本秘籍說明了如何將 TensorFlow 計算分配給 CPU 或 GPU。 該代碼非常簡單,它將用作下一個秘籍的基礎。
# 使用分布式 TensorFlow:多個 GPU 和一個 CPU
我們將展示一個數據并行化的示例,其中數據被拆分到多個 GPU 中
# 準備
此秘籍的靈感來自尼爾·特內霍爾茨(Neil Tenenholtz)撰寫的一篇不錯的博客文章,[該文章可在線獲取](https://clindatsci.com/blog/2017/5/31/distributed-tensorflow)
# 操作步驟
我們按以下步驟進行:
1. 考慮這段在單個 GPU 上運行矩陣乘法的代碼。
```py
# single GPU (baseline)
import tensorflow as tf
# place the initial data on the cpu
with tf.device('/cpu:0'):
input_data = tf.Variable([[1., 2., 3.],
[4., 5., 6.],
[7., 8., 9.],
[10., 11., 12.]])
b = tf.Variable([[1.], [1.], [2.]])
# compute the result on the 0th gpu
with tf.device('/gpu:0'):
output = tf.matmul(input_data, b)
# create a session and run
with tf.Session() as sess:
sess.run(tf.global_variables_initializer())
print sess.run(output)
```
2. 如圖 2 所示,在 2 個不同的 GPU 之間使用代碼復制對代碼進行分區。 請注意,CPU 充當主節點來分發圖并收集最終結果。
```py
# in-graph replication
import tensorflow as tf
num_gpus = 2
# place the initial data on the cpu
with tf.device('/cpu:0'):
input_data = tf.Variable([[1., 2., 3.],
[4., 5., 6.],
[7., 8., 9.],
[10., 11., 12.]])
b = tf.Variable([[1.], [1.], [2.]])
# split the data into chunks for each gpu
inputs = tf.split(input_data, num_gpus)
outputs = []
# loop over available gpus and pass input data
for i in range(num_gpus):
with tf.device('/gpu:'+str(i)):
outputs.append(tf.matmul(inputs[i], b))
# merge the results of the devices
with tf.device('/cpu:0'):
output = tf.concat(outputs, axis=0)
# create a session and run
with tf.Session() as sess:
sess.run(tf.global_variables_initializer())
print sess.run(output)
```
# 工作原理
這是一個非常簡單的方法,其中通過將 CPU 用作主對象并將其分配到兩個用作分布式工作程序的 GPU,將圖分為兩部分。 計算結果被收集回 CPU。
# 使用分布式 TensorFlow:多臺服務器
在本秘籍中,我們將學習如何在多個服務器之間分配 TensorFlow 計算。 關鍵假設是工作程序和參數服務器的代碼都相同。 因此,每個計算節點的角色都傳遞給命令行參數。
# 準備
同樣,此秘籍的靈感來自尼爾·特納霍爾茨(Neil Tenenholtz)撰寫的一篇不錯的博客文章,[該文章可在線獲取](https://clindatsci.com/blog/2017/5/31/distributed-tensorflow)
# 操作步驟
我們按以下步驟進行:
1. 考慮這段代碼,在此我們指定集群架構,其中一個主服務器運行在`192.168.1.1:1111`上,兩個工作服務器分別運行在`192.168.1.2:1111`和`192.168.1.3:1111`上。
```py
import sys
import tensorflow as tf
# specify the cluster's architecture
cluster = tf.train.ClusterSpec({'ps': ['192.168.1.1:1111'],
'worker': ['192.168.1.2:1111',
'192.168.1.3:1111']
})
```
2. 請注意,代碼是在多臺機器上復制的,因此了解當前執行節點的作用很重要。 我們從命令行獲得此信息。 機器可以是工作程序,也可以是參數服務器(`ps`)。
```py
# parse command-line to specify machine
job_type = sys.argv[1] # job type: "worker" or "ps"
task_idx = sys.argv[2] # index job in the worker or ps list
# as defined in the ClusterSpec
```
3. 在給定群集的情況下運行訓練服務器,我們為每個計算賦予一個角色(工作者或`ps`)和一個 ID。
```py
# create TensorFlow Server. This is how the machines communicate.
server = tf.train.Server(cluster, job_name=job_type, task_index=task_idx)
```
4. 根據特定計算節點的角色,計算是不同的:
* 如果角色是參數服務器,則條件是要加入服務器。 請注意,在這種情況下,沒有代碼要執行,因為工作進程將不斷推送更新,并且參數服務器唯一要做的就是等待。
* 否則,工作程序代碼將在集群中的特定設備上執行。 這部分代碼類似于在一臺機器上執行的代碼,在該機器上我們首先構建模型,然后在本地對其進行訓練。 請注意,所有工作分配和更新結果的收集都是由 Tensoflow 透明完成的。 請注意,TensorFlow 提供了方便的`tf.train.replica_device_setter`,可自動將操作分配給設備。
```py
# parameter server is updated by remote clients.
# will not proceed beyond this if statement.
if job_type == 'ps':
server.join()
else:
# workers only
with tf.device(tf.train.replica_device_setter(
worker_device='/job:worker/task:'+task_idx,
cluster=cluster)):
# build your model here as if you only were using a single machine
with tf.Session(server.target):
# train your model here
```
# 工作原理
在本秘籍中,我們已經看到了如何創建具有多個計算節點的集群。 節點既可以扮演參數服務器的角色,也可以扮演工作者的角色。
在這兩種情況下,根據從命令行收集的參數,執行的代碼相同,但是代碼的執行不同。 參數服務器僅需要等待,直到工作器發送更新。 請注意,`tf.train.replica_device_setter(..)`的作用是將操作自動分配給可用設備,而`tf.train.ClusterSpec(..)`則用于集群設置。
# 更多
可以在[這個頁面](https://github.com/ischlag/distributed-tensorflow-example/blob/master/example.py)在線獲取針對 MNIST 的分布式訓練的示例。
此外,請注意,出于效率考慮,您可以決定擁有多個參數服務器。 使用參數,服務器可以提供更好的網絡利用率,并且可以將模型擴展到更多并行計算機。 可以分配多個參數服務器。 有興趣的讀者可以看看[這里](https://www.tensorflow.org/deploy/distributed)
# 訓練分布式 TensorFlow MNIST 分類器
此秘籍用于以分布式方式訓練完??整的 MNIST 分類器。 該秘籍的靈感來自[這個頁面](http://ischlag.github.io/2016/06/12/async-distributed-tensorflow/)中的博客文章,[此處提供了在 TensorFlow 1.2 上運行的代碼](https://github.com/ischlag/distributed-tensorflow-example)
# 準備
此秘籍基于上一個秘籍。 因此,按順序閱讀它們可能會很方便。
# 操作步驟
我們按以下步驟進行:
1. 導入一些標準模塊并定義運行計算的 TensorFlow 集群。 然后為特定任務啟動服務器
```py
import tensorflow as tf
import sys
import time
# cluster specification
parameter_servers = ["pc-01:2222"]
workers = [ "pc-02:2222",
"pc-03:2222",
"pc-04:2222"]
cluster = tf.train.ClusterSpec({"ps":parameter_servers, "worker":workers})
# input flags
tf.app.flags.DEFINE_string("job_name", "", "Either 'ps' or 'worker'")
tf.app.flags.DEFINE_integer("task_index", 0, "Index of task within the job")FLAGS = tf.app.flags.FLAGS
# start a server for a specific task
server = tf.train.Server(
cluster,
job_name=FLAGS.job_name,
task_index=FLAGS.task_index)
```
2. 讀取 MNIST 數據并定義用于訓練的超參數
```py
# config
batch_size = 100
learning_rate = 0.0005
training_epochs = 20
logs_path = "/tmp/mnist/1"
# load mnist data set
from tensorflow.examples.tutorials.mnist import input_data
mnist = input_data.read_data_sets('MNIST_data', one_hot=True)
```
3. 檢查您的角色是參數服務器還是工作器。 如果工作器隨后定義了一個簡單的密集神經網絡,則定義一個優化器以及用于評估分類器的度量(例如準確率)。
```py
if FLAGS.job_name == "ps":
server.join()
elif FLAGS.job_name == "worker":
# Between-graph replication
with tf.device(tf.train.replica_device_setter(
worker_device="/job:worker/task:%d" % FLAGS.task_index,
cluster=cluster)):
# count the number of updates
global_step = tf.get_variable( 'global_step', [], initializer = tf.constant_initializer(0),
trainable = False)
# input images
with tf.name_scope('input'):
# None -> batch size can be any size, 784 -> flattened mnist image
x = tf.placeholder(tf.float32, shape=[None, 784], name="x-input")
# target 10 output classes
y_ = tf.placeholder(tf.float32, shape=[None, 10], name="y-input")
# model parameters will change during training so we use tf.Variable
tf.set_random_seed(1)
with tf.name_scope("weights"):
W1 = tf.Variable(tf.random_normal([784, 100]))
W2 = tf.Variable(tf.random_normal([100, 10]))
# bias
with tf.name_scope("biases"):
b1 = tf.Variable(tf.zeros([100]))
b2 = tf.Variable(tf.zeros([10]))
# implement model
with tf.name_scope("softmax"):
# y is our prediction
z2 = tf.add(tf.matmul(x,W1),b1)
a2 = tf.nn.sigmoid(z2)
z3 = tf.add(tf.matmul(a2,W2),b2)
y = tf.nn.softmax(z3)
# specify cost function
with tf.name_scope('cross_entropy'):
# this is our cost
cross_entropy = tf.reduce_mean(
-tf.reduce_sum(y_ * tf.log(y), reduction_indices=[1]))
# specify optimizer
with tf.name_scope('train'):
# optimizer is an "operation" which we can execute in a session
grad_op = tf.train.GradientDescentOptimizer(learning_rate)
train_op = grad_op.minimize(cross_entropy, global_step=global_step)
with tf.name_scope('Accuracy'):
# accuracy
correct_prediction = tf.equal(tf.argmax(y,1), tf.argmax(y_,1))
accuracy = tf.reduce_mean(tf.cast(correct_prediction, tf.float32))
# create a summary for our cost and accuracy
tf.summary.scalar("cost", cross_entropy)
tf.summary.scalar("accuracy", accuracy)
# merge all summaries into a single "operation" which we can execute in a session
summary_op = tf.summary.merge_all()
init_op = tf.global_variables_initializer()
print("Variables initialized ...")
```
4. 啟動一個主管,該主管充當分布式設置的首席計算機。 首要的是負責管理集群其余所有部分的工作機。 會話由負責人維護,關鍵指令為`sv = tf.train.Supervisor(is_chief=(FLAGS.task_index == 0))`。 同樣,使用`prepare_or_wait_for_session(server.target)`,主管將等待模型準備就緒可以使用。 請注意,每個工作器將處理不同的批量模型,然后最終模型可用于主管。
```py
sv = tf.train.Supervisor(is_chief=(FLAGS.task_index == 0),
begin_time = time.time()
frequency = 100
with sv.prepare_or_wait_for_session(server.target) as sess:
# create log writer object (this will log on every machine)
writer = tf.summary.FileWriter(logs_path, graph=tf.get_default_graph())
# perform training cycles
start_time = time.time()
for epoch in range(training_epochs):
# number of batches in one epoch
batch_count = int(mnist.train.num_examples/batch_size)
count = 0
for i in range(batch_count):
batch_x, batch_y = mnist.train.next_batch(batch_size)
# perform the operations we defined earlier on batch
_, cost, summary, step = sess.run(
[train_op, cross_entropy, summary_op, global_step],
feed_dict={x: batch_x, y_: batch_y})
writer.add_summary(summary, step)
count += 1
if count % frequency == 0 or i+1 == batch_count:
elapsed_time = time.time() - start_time
start_time = time.time()
print("Step: %d," % (step+1),
" Epoch: %2d," % (epoch+1), " Batch: %3d of %3d," % (i+1, batch_count),
" Cost: %.4f," % cost,
"AvgTime:%3.2fms" % float(elapsed_time*1000/frequency))
count = 0
print("Test-Accuracy: %2.2f" % sess.run(accuracy, feed_dict={x: mnist.test.images, y_: mnist.test.labels}))
print("Total Time: %3.2fs" % float(time.time() - begin_time))
print("Final Cost: %.4f" % cost)
sv.stop()
print("done")
```
# 工作原理
本秘籍描述了分布式 MNIST 分類器的示例。 在此示例中,TensorFlow 允許我們定義三臺機器的集群。 一臺充當參數服務器,另外兩臺機器用作工作器,負責處理不同批次的訓練數據。
# 使用 TensorFlow Serving 和 Docker
在本秘籍中,我們將展示如何為 TensorFlow Serving 運行 Docker 容器,這是一組組件以導出經過訓練的 TensorFlow 模型并使用標準`tensorflow_model_server`為其提供服務。 TensorFlow Serving 服務器發現新導出的模型并運行 gRPC 服務來為其服務。
# 準備
我們將使用 Docker,并假設您熟悉該系統。 如果沒有,[請確保查看并安裝](https://www.docker.com/)。 我們要做的是構建 TF 服務版本。
# 操作步驟
這是我們進行秘籍的方法:
1. 從[這里](https://github.com/tensorflow/serving/blob/master/tensorflow_serving/tools/docker/Dockerfile.devel)下載`Dockerfile.devel`
2. 通過運行以下來構建容器
```py
docker build --pull -t $USER/tensorflow-serving-devel -f Dockerfile.devel
```
3. 運行容器
```py
docker run -it $USER/tensorflow-serving-devel
```
4. 克隆 TensorFlow 服務,配置和測試服務器
```py
git clone --recurse-submodules https://github.com/tensorflow/serving
cd serving/tensorflow
./configure
cd ..
bazel test tensorflow_serving/...
```
5. 現在,讓我們看一個保存模型的示例,以便服務器可以保存它。 此步驟的靈感來自[用于構建 MNIST 訓練器和服務模型的示例](https://github.com/tensorflow/serving/blob/master/tensorflow_serving/example/mnist_saved_model.py)。 第一步是將構建器導入為`saved_model_builder`。 然后,大部分工作由`SavedModelBuilder()`完成,該工作將已訓練模型的*快照*保存到可靠的存儲中。 請注意,此處`export_path`是`/tmp/mnist_model/`
```py
from tensorflow.python.saved_model import builder as saved_model_builder
...
export_path_base = sys.argv[-1]
export_path = os.path.join(
compat.as_bytes(export_path_base),
compat.as_bytes(str(FLAGS.model_version)))
print 'Exporting trained model to', export_path
builder = saved_model_builder.SavedModelBuilder(export_path)
builder.add_meta_graph_and_variables(
sess, [tag_constants.SERVING],
signature_def_map={
'predict_images':
prediction_signature,
signature_constants.DEFAULT_SERVING_SIGNATURE_DEF_KEY:
classification_signature,
},
legacy_init_op=legacy_init_op)
builder.save()
```
6. 然后可以通過簡單的命令為模型提供服務
```py
tensorflow_model_server --port=9000 --model_name=mnist --model_base_path=/tmp/mnist_model/
```
# 工作原理
Google 在 2016 年 2 月發布了 [TensorFlow Serving](https://www.tensorflow.org/serving/),這是一種針對機器學習模型的高性能服務系統,專為生產環境而設計。 截至 2017 年 8 月,谷歌內部有 800 多個使用 TensorFlow Serving 的項目投入生產。
# 更多
TensoFlow Serving 是一款非常通用的軟件,在本秘籍中,我們只是初步探究了潛在用途。 如果您有興趣進一步了解高級功能。 例如大批量運行或動態加載模型,則應查看[這個頁面](https://github.com/tensorflow/serving/blob/master/tensorflow_serving/g3doc/serving_advanced.md)
# 使用 Compute Engine 在 Google Cloud(GCP)上運行分布式 TensorFlow
在本秘籍中,我們將學習如何在 Google Cloud(GCP)上使用 Google Tensorflow。 我們將要審查的示例是經典 MNIST。
# 準備
看看 GCP 在 [GoogleCloud](https://cloud.google.com/) 中的工作方式會很好。 請注意,GCP 提供 300 美元的免費贈金,以開始使用任何 GCP 產品。 此外,在免費試用期間和之后,某些產品針對符合條件的客戶可以免費使用。 (優惠如有更改,請參見[這個頁面](https://cloud.google.com/free/)。
# 操作步驟
這是我們進行秘籍的方法:
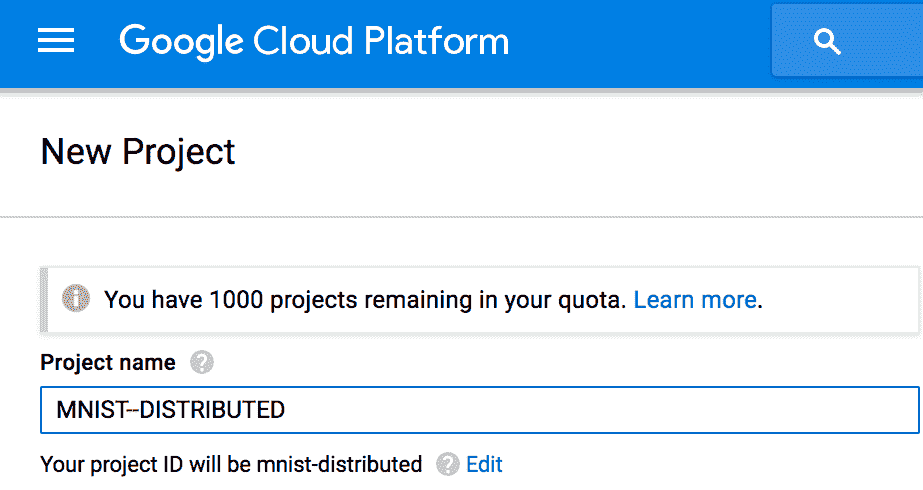
1. [通過網絡控制臺](https://pantheon.google.com/cloud-resource-manager)創建一個新的 Google Cloud 項目。

單擊創建項目時,將顯示以下屏幕:
2. 通過選擇控制臺左側欄上的相關語音,為該項目啟用計費。 然后為該項目啟用 Compute Engine 和 Cloud Machine Learning API:

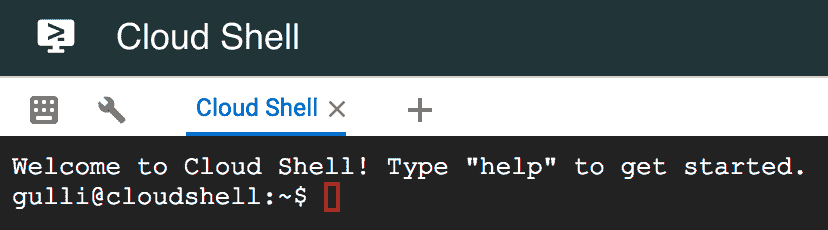
3. 登錄到網絡 [cloudshell](https://pantheon.google.com/cloudshell/editor)。
4. 從控制臺運行以下命令,以配置將在其中執行計算的區域,下載示例代碼以及創建用于運行代碼的 VM。 最后連接到機器:
```py
gcloud config set compute/zone us-east1-c
gcloud config set project [YOUR_PROJECT_ID]
git clone https://github.com/GoogleCloudPlatform/cloudml-dist-mnist-example
cd cloudml-dist-mnist-example
gcloud compute instances create template-instance \
--image-project ubuntu-os-cloud \
--image-family ubuntu-1604-lts \
--boot-disk-size 10GB \
--machine-type n1-standard-1
gcloud compute ssh template-instance
```
5. 現在,登錄到機器后,我們需要通過使用這些命令安裝 PIP 和 TensorFlow 來設置環境。
```py
sudo apt-get update
sudo apt-get -y upgrade \
&& sudo apt-get install -y python-pip python-dev
sudo pip install tensorflow
sudo pip install --upgrade tensorflow
```
6. 我們將有多個工作器對 MNIST 數據進行操作,因此最好的方法是創建一個在所有工作器之間共享的存儲桶,并在該存儲桶中復制 MNIST 數據
```py
BUCKET="mnist-$RANDOM-$RANDOM"
gsutil mb -c regional -l us-east1 gs://${BUCKET}
sudo ./scripts/create_records.py
gsutil cp /tmp/data/train.tfrecords gs://${BUCKET}/data/
gsutil cp /tmp/data/test.tfrecords gs://${BUCKET}/data/
```
7. 現在,我們將創建多個工作程序(`worker-0`,`worker-1`),它們是初始模板實例計算機的克隆。 我們不希望計算機在關閉時刪除磁盤,因此這就是我們擁有第一個命令的原因。
```py
gcloud compute instances set-disk-auto-delete template-instance \
--disk template-instance --no-auto-delete
gcloud compute instances delete template-instance
gcloud compute images create template-image \
--source-disk template-instance
gcloud compute instances create \
master-0 worker-0 worker-1 ps-0 \
--image template-image \
--machine-type n1-standard-4 \
--scopes=default,storage-rw
```
8. 最后一步是運行用于分布式訓練的計算。
```py
./scripts/start-training.sh gs://${BUCKET}
```
# 工作原理
演示腳本將代碼移動到每個 VM 并開始分布式計算。 這兩個工作程序在公共存儲桶上共享的相同 MNIST 數據上并行運行。 計算結束后,腳本將打印訓練后的模型的位置。
# 更多
如果我們不想管理 TensorFlow,那么我們可以決定使用 Google 代表您運行的托管版本。 這是在下一個秘籍中描述的 CloudML 服務。 此外,如果您決定不將 GPU 與 CloudML 一起使用,[那么此 URL 是一個不錯的起點](https://cloud.google.com/ml-engine/docs/using-gpus)
# 在 Google CloudML 上運行分布式 TensorFlow
CloudML 是 Google 運行的 Tensorflow 的托管版本。 無需自己運行 TF,您只需使用 CloudML 即可,而無需考慮與基礎架構和可伸縮性相關的所有問題。
# 準備
在這里,我們假設您已經創建了一個 Cloud Platform Project,為您的項目啟用計費,并啟用了 Google Compute Engine 和 Cloud Machine Learning API。 這些步驟類似于先前秘籍中描述的步驟。 此秘籍的靈感來自[這個頁面](https://cloud.google.com/ml-engine/docs/distributed-tensorflow-mnist-cloud-datalab)中提供的 MNIST 訓練代碼。
# 操作步驟
我們繼續在 Google CloudML 上運行分布式 TensorFlow:
1. 第一步只是下載示例代碼
```py
git clonehttps://github.com/GoogleCloudPlatform/cloudml-dist-mnist-example
cd cloudml-dist-mnist-example
```
2. 然后,我們下載數據并將其保存在 GCP 存儲桶中
```py
PROJECT_ID=$(gcloud config list project --format "value(core.project)")
BUCKET="${PROJECT_ID}-ml"
gsutil mb -c regional -l us-central1 gs://${BUCKET}
./scripts/create_records.py
gsutil cp /tmp/data/train.tfrecords gs://${BUCKET}/data/
gsutil cp /tmp/data/test.tfrecords gs://${BUCKET}/data/
```
3. 提交訓練工作非常簡單:我們可以使用 CloudML 引擎簡單地調用訓練步驟。 在此示例中,訓練人員代碼在`us-central1`區域中運行 1000 次迭代。 輸入數據是從存儲桶中提取的,而輸出桶將被提交到其他存儲桶中。
```py
JOB_NAME="job_$(date +%Y%m%d_%H%M%S)"
gcloud ml-engine jobs submit training ${JOB_NAME} \
--package-path trainer \
--module-name trainer.task \
--staging-bucket gs://${BUCKET} \
--job-dir gs://${BUCKET}/${JOB_NAME} \
--runtime-version 1.2 \
--region us-central1 \
--config config/config.yaml \
-- \
--data_dir gs://${BUCKET}/data \
--output_dir gs://${BUCKET}/${JOB_NAME} \
--train_steps 10000
```
4. 如果需要,您可以通過訪問[這個頁面](https://pantheon.google.com/mlengine/)中的 CloudML 控制臺來控制訓練過程。
5. 訓練結束后,就可以直接從 CloudML 服務模型了
```py
MODEL_NAME=MNIST
gcloud ml-engine models create --regions us-central1 ${MODEL_NAME}
VERSION_NAME=v1
ORIGIN=$(gsutil ls gs://${BUCKET}/${JOB_NAME}/export/Servo | tail -1)
gcloud ml-engine versions create \
--origin ${ORIGIN} \
--model ${MODEL_NAME} \
${VERSION_NAME}
gcloud ml-engine versions set-default --model ${MODEL_NAME} ${VERSION_NAME}
```
6. 在線提供模型后,便可以訪問服務器并做出預測。 通過使用腳本`make_request.py`創建`request.json`,該腳本從 MNIST 讀取數據,執行一次熱編碼,然后使用格式正確的 json 模式編寫功能。
```py
gcloud ml-engine predict --model ${MODEL_NAME} --json-instances request.json
```
# 工作原理
CloudML 是使用 Google 運行的托管版本的 TensorFlow 的便捷解決方案。 除了直接照顧基礎設施和運營,還可以直接專注于開發機器學習模型。
# 更多
CloudML 的一項非常酷的功能是能夠通過并行運行多個試驗來自動調整模型中包含的超參數的能力。 這為您提供了超參數的優化值,從而最大化了模型的預測精度。 如果您有興趣了解更多信息,那么看看[這里](https://cloud.google.com/ml-engine/docs/hyperparameter-tuning-overview)
# 在 Microsoft Azure 上運行分布式 TensorFlow
Microsoft Azure 提供了一項名為 Batch AI 的服務,該服務使我們能夠在 Azure 虛擬機的群集上運行機器學習模型。
# 準備
第一步,我們需要一個 Azure 帳戶:如果您還沒有 Azure 帳戶,則可以[在此處免費創建一個帳戶](https://azure.microsoft.com/en-us/services/batch-ai/) 。 Azure 向新用戶提供為期 30 天的 200 美元信用額度。 此秘籍將遵循 Microsoft Azure 提供的示例,以使用 TensorFlow 分布式在兩個 GPU 上運行 MNIST,相關代碼可[在 Github 上獲得](https://github.com/Azure/batch-shipyard/tree/master/recipes/TensorFlow-Distributed)
# 操作步驟
我們按以下步驟進行:
1. 第一步是安裝 Azure CLI。 可在[此處](https://docs.microsoft.com/en-us/cli/azure/install-azure-cli?view=azure-cli-latest)獲得在不同 OS 平臺上安裝 Azure CLI 的詳細信息。
2. 在創建群集之前,您需要使用命令`az login`登錄 Azure。 它將生成一個代碼,并為您提供一個網站地址,將要求您在其中驗證您的憑據,一旦網站上的所有步驟都結束,將要求您關閉并驗證您的 az 憑據。
3. 配置默認位置,創建和配置資源組。
```py
az group create --name myResourceGroup --location eastus
az configure --defaults group=myResourceGroup
az configure --defaults location=eastus
```
4. 接下來,我們將需要使用`az`命令創建存儲,并根據您的操作系統設置環境變量,有關環境變量及其值的詳細信息,請參見[這里](https://docs.microsoft.com/en-us/azure/batch-ai/quickstart-cli)
5. 下載并提取預處理的 MNIST 數據庫
```py
wget "https://batchaisamples.blob.core.windows.net/samples/mnist_dataset_original.zip?st=2017-09-29T18%3A29%3A00Z&se=2099-12-31T08%3A00%3A00Z&sp=rl&sv=2016-05-31&sr=b&sig=Qc1RA3zsXIP4oeioXutkL1PXIrHJO0pHJlppS2rID3I%3D" -O mnist_dataset_original.zip
unzip mnist_dataset_original.zip
```
6. 下載`mnist_replica`
```py
wget "https://raw.githubusercontent.com/Azure/BatchAI/master/recipes/TensorFlow/TensorFlow-GPU-Distributed/mnist_replica.py?token=AcZzrcpJGDHCUzsCyjlWiKVNfBuDdkqwks5Z4dPrwA%3D%3D" -O mnist_replica.py
```
7. 接下來,創建一個 Azure 文件共享,在其中上傳下載的 MNIST 數據集和`mnist_replica.py`文件。
```py
az storage share create --name batchaisample
az storage directory create --share-name batchaisample --name mnist_dataset
az storage file upload --share-name batchaisample --source t10k-images-idx3-ubyte.gz --path mnist_dataset
az storage file upload --share-name batchaisample --source t10k-labels-idx1-ubyte.gz --path mnist_dataset
az storage file upload --share-name batchaisample --source train-images-idx3-ubyte.gz --path mnist_dataset
az storage file upload --share-name batchaisample --source train-labels-idx1-ubyte.gz --path mnist_dataset
az storage directory create --share-name batchaisample --name tensorflow_samples
az storage file upload --share-name batchaisample --source mnist_replica.py --path tensorflow_samples
```
8. 現在,我們為該秘籍創建一個集群,該集群由具有 standard_NC6 大小的兩個 GPU 節點組成,具有標準的 Ubuntu LTS 或 Ubuntu DVSM。 可以使用 Azure CLI 命令創建群集:
對于 Linux:
```py
az batchai cluster create -n nc6 -i UbuntuDSVM -s Standard_NC6 --min 2 --max 2 --afs-name batchaisample --afs-mount-path external -u $USER -k ~/.ssh/id_rsa.pub
```
對于 Windows:
```py
az batchai cluster create -n nc6 -i UbuntuDSVM -s Standard_NC6 --min 2 --max 2 --afs-name batchaisample --afs-mount-path external -u <user_name> -p <password>
```
9. 下一步是在`job.json`文件中創建作業創建參數:
```py
{
"properties": {
"nodeCount": 2,
"tensorFlowSettings": {
"parameterServerCount": 1,
"workerCount": 2,
"pythonScriptFilePath": "$AZ_BATCHAI_INPUT_SCRIPT/mnist_replica.py",
"masterCommandLineArgs": "--job_name=worker --num_gpus=1 --ps_hosts=$AZ_BATCHAI_PS_HOSTS --worker_hosts=$AZ_BATCHAI_WORKER_HOSTS --task_index=$AZ_BATCHAI_TASK_INDEX --data_dir=$AZ_BATCHAI_INPUT_DATASET --output_dir=$AZ_BATCHAI_OUTPUT_MODEL",
"workerCommandLineArgs": "--job_name=worker --num_gpus=1 --ps_hosts=$AZ_BATCHAI_PS_HOSTS --worker_hosts=$AZ_BATCHAI_WORKER_HOSTS --task_index=$AZ_BATCHAI_TASK_INDEX --data_dir=$AZ_BATCHAI_INPUT_DATASET --output_dir=$AZ_BATCHAI_OUTPUT_MODEL",
"parameterServerCommandLineArgs": "--job_name=ps --num_gpus=0 --ps_hosts=$AZ_BATCHAI_PS_HOSTS --worker_hosts=$AZ_BATCHAI_WORKER_HOSTS --task_index=$AZ_BATCHAI_TASK_INDEX --data_dir=$AZ_BATCHAI_INPUT_DATASET --output_dir=$AZ_BATCHAI_OUTPUT_MODEL"
},
"stdOutErrPathPrefix": "$AZ_BATCHAI_MOUNT_ROOT/external",
"inputDirectories": [{
"id": "DATASET",
"path": "$AZ_BATCHAI_MOUNT_ROOT/external/mnist_dataset"
}, {
"id": "SCRIPT",
"path": "$AZ_BATCHAI_MOUNT_ROOT/external/tensorflow_samples"
}],
"outputDirectories": [{
"id": "MODEL",
"pathPrefix": "$AZ_BATCHAI_MOUNT_ROOT/external",
"pathSuffix": "Models"
}],
"containerSettings": {
"imageSourceRegistry": {
"image": "tensorflow/tensorflow:1.1.0-gpu"
}
}
}
}
```
10. 最后,使用以下命令創建 Batch AI 作業:
```py
az batchai job create -n distibuted_tensorflow --cluster-name nc6 -c job.json
```
# 工作原理
Batch AI 自行管理資源,您只需要指定作業,輸入的位置以及存儲輸出的位置即可。 如果在執行作業期間想要查看結果,則可以使用以下命令:
```py
az batchai job stream-file --job-name myjob --output-directory-id stdouterr --name stderr.txt
```
作業結束后,您可以使用`az batchai job delete`和`az batchai cluster delete`命令刪除作業和群集。
# 更多
上面我們學習了如何使用 Azure 命令行工具將 Microsoft Azure Batch AI 用于分布式 TensorFlow。 我們也可以使用 Jupyter 筆記本做同樣的事情。 這將涉及設置 Azure Active Directory 并進行新的 App 注冊。 [可以在以下鏈接上獲得詳細信息](https://docs.microsoft.com/en-us/azure/azure-resource-manager/resource-group-create-service-principal-portal)。
Azure BatchAI 也可以與其他 AI 深度學習庫一起使用,我們建議您仔細閱讀 BatchAI Github [以獲取更多詳細信息](https://github.com/Azure/BatchAI)。
# 在 Amazon AWS 上運行分布式 TensorFlow
Amazon AWS 提供了配備 NVIDIA K8 GPU 的 P2.x 機器。 為了能夠使用,第一步再次涉及創建一個 Amazon AWS 賬戶。 如果還沒有,[可以使用以下鏈接創建它](https://portal.aws.amazon.com/billing/signup?nc2=h_ct&redirect_url=https%3A%2F%2Faws.amazon.com%2Fregistration-confirmation#/start)。 登錄帳戶后,儀表板將如下所示:
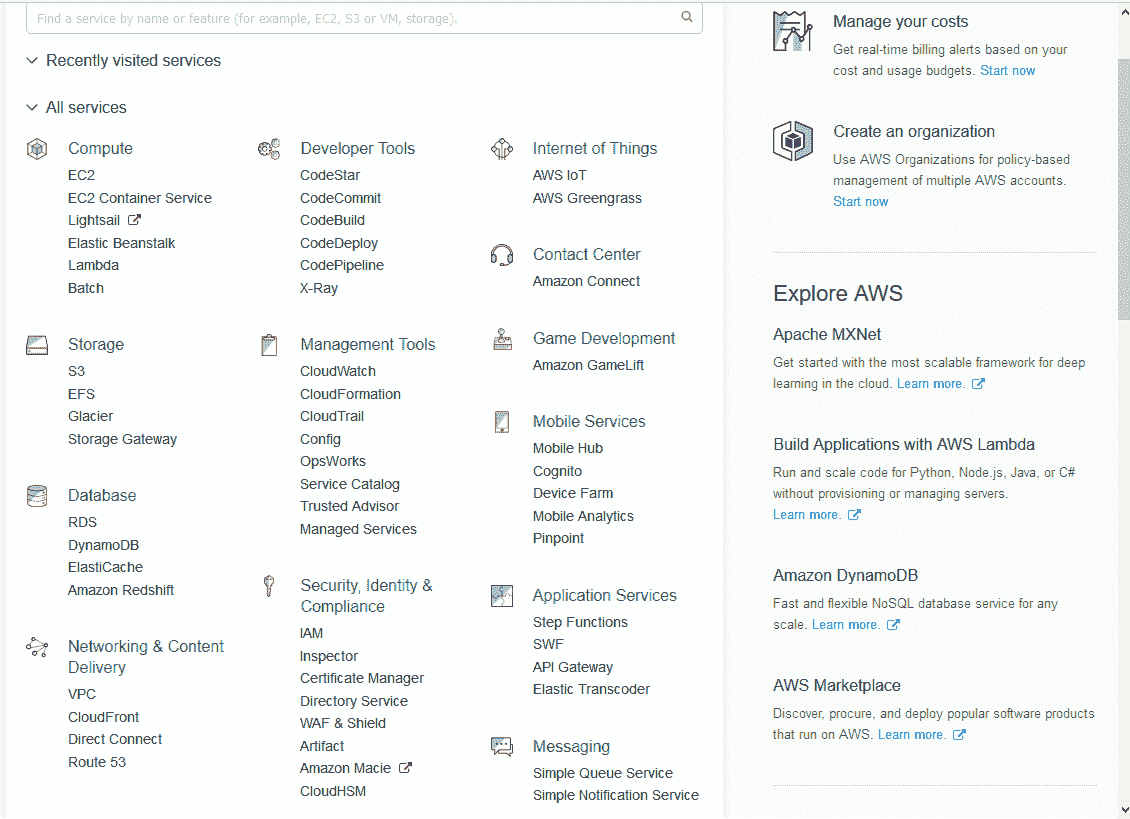
您可以看到 Amazon AWS 提供了許多服務,但是在這里,我們擔心使用 Amazon AWS 進行深度學習。
GPU 僅在 P2 實例創建中可用,并且默認情況下不可用,要獲得此服務,您必須通過 AWS 支持籌集更多資源,一旦獲得支持,該支持就會顯示在右上角, 您將看到一個按鈕,創建案例,選擇按鈕并進行以下選擇:
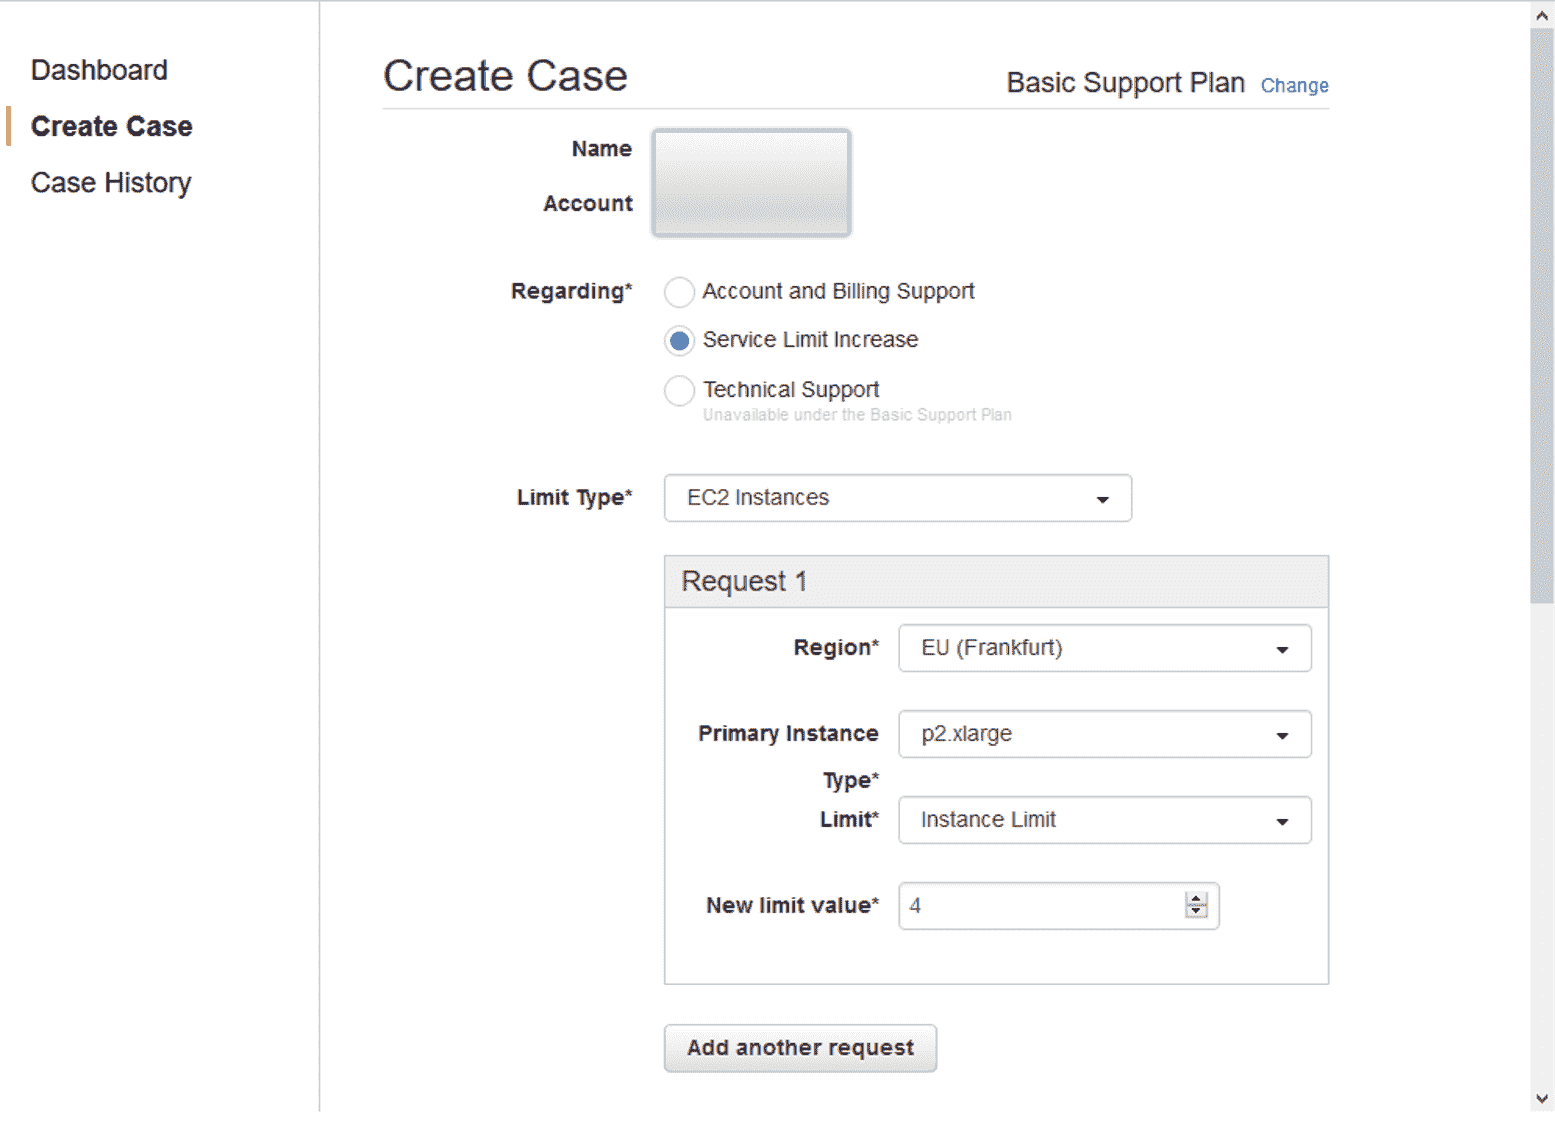
您可以選擇提供 p2.xlarge 實例的任何區域。 新的限制值決定了您可以使用的實例的最大數量,請謹慎選擇數量,因為該服務不是免費的,并且每小時的費用約為 1 美元。 AWS 大約需要 24 小時才能響應請求。
# 準備
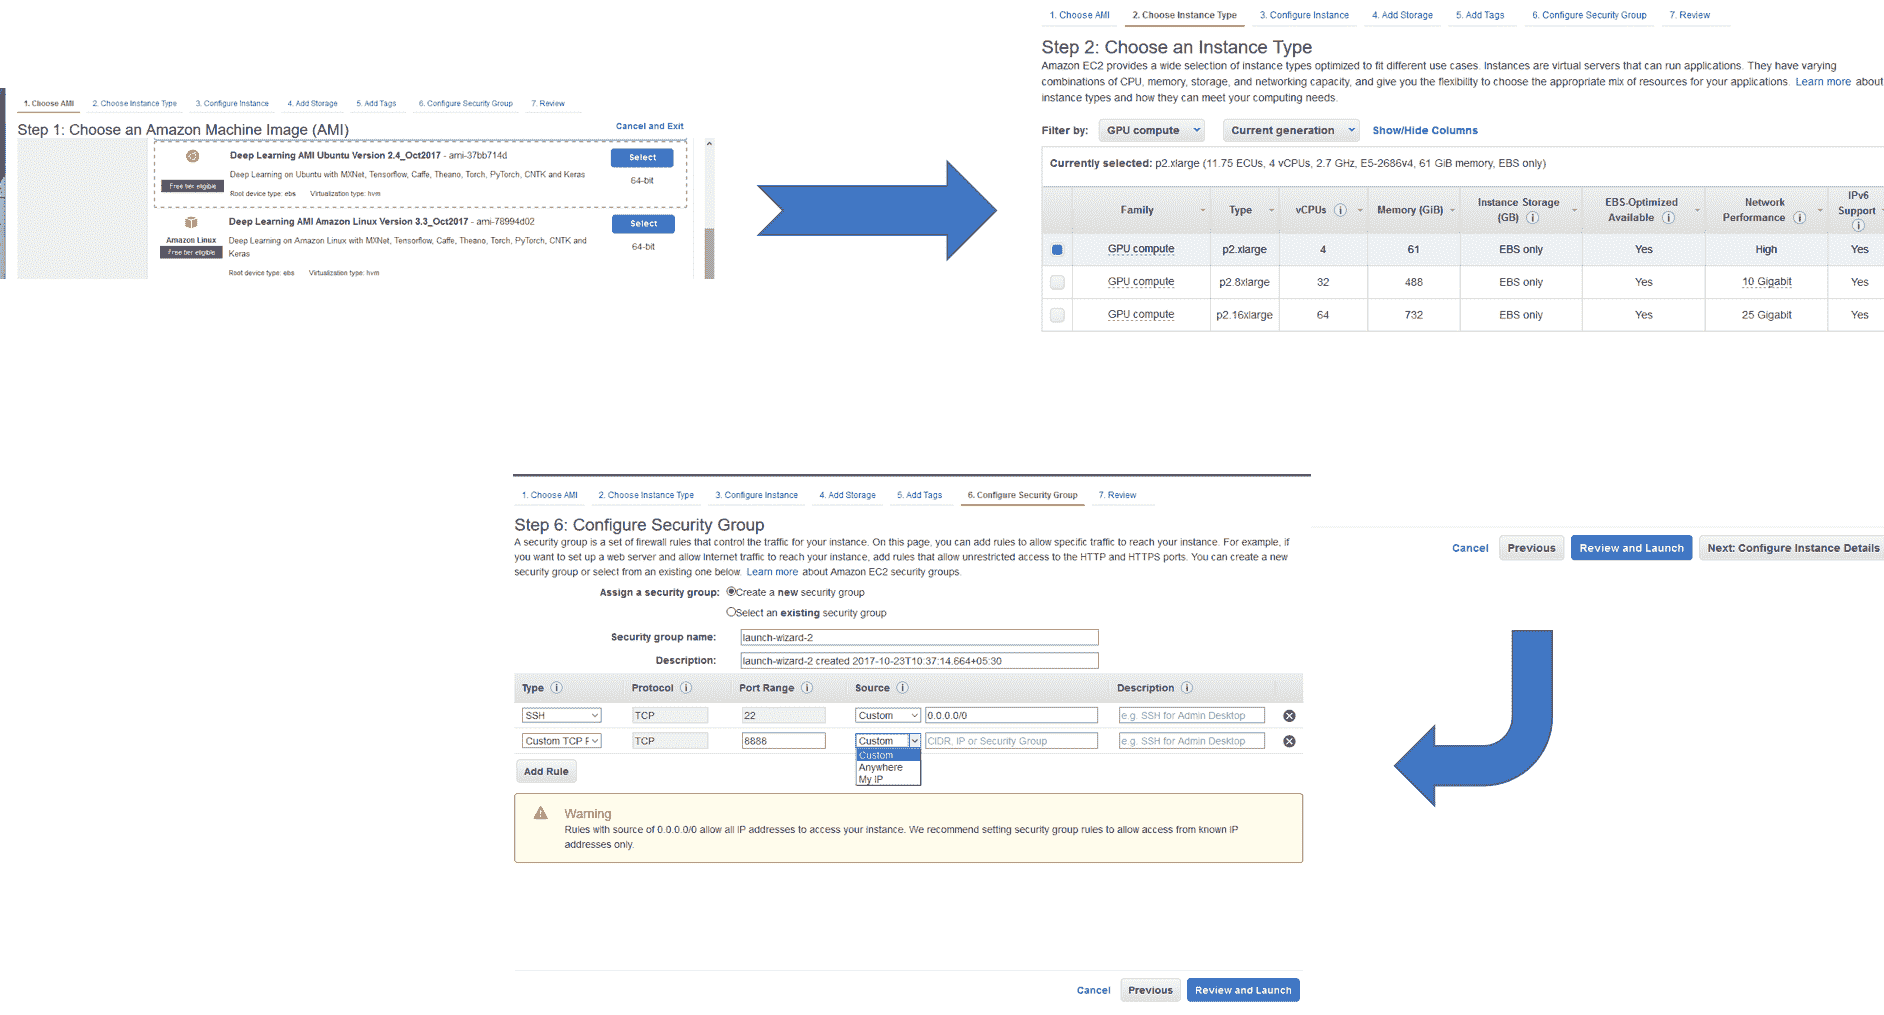
現在您已經可以使用 AWS 賬戶和 p2.xlarge 實例,現在就可以從 EC2 儀表板創建自己的實例了。 第一步是選擇機器映像,到目前為止,Amazon 提供了預裝有深度學習庫的特殊機器映像,您可以選擇 Ubuntu 或 Linux 版本。 接下來,選擇 GPU 以計算實例類型。
您可以使用默認參數查看并啟動實例,也可以配置設置,選擇存儲并配置安全組。 配置安全組很重要,默認情況下已設置 SSH 安全組,但是如果要使用 Jupyter 筆記本,則需要為端口 8888 添加自定義安全組,可以選擇從中登錄的源。 對于實例,有三種可能性:“自定義”,“隨處可見”或“我的 IP”:
最后,在啟動實例時,將要求您創建一個密鑰對,以允許您登錄到特定實例,您將需要創建一個密鑰對并下載相應的`.pem`文件,您將使用文件以便后續記錄。
# 操作步驟
1. 第一步是連接到實例,您可以使用命令行通過 SSH 或瀏覽器來實現。 我們使用 CLI。
2. 要進行連接,首先更改`.pem`文件的模式。
```py
chmod 400 <security-keypair-filename>.pem
```
3. 接下來,使用以下命令對實例進行 SSH。 選擇連接時,確切的地址將在儀表板上可用:
```py
ssh -i " <security-keypair-filename>.pem" ubuntu@ec2-XXXXXXXXXXXXX.compute-1.amazonaws.com
```
4. 我們選擇的機器實例已經包含了所有深度學習庫,包括 TensorFlow,因此我們不需要安裝任何東西:
5. 每個文件夾都包含一個自述文件,該文件描述了如何使用相應的庫:
# 工作原理
您可以運行在我們創建的實例上學到的代碼。 工作結束后,不要忘記退出,并從儀表板停止實例。 有關價格和使用情況的更多詳細信息,請參見[這里](https://aws.amazon.com/documentation/ec2/)
# 更多
AWS 市場上提供了帶有預配置庫和 API 的大量 Docker 映像和機器映像。 要啟動 jupyter 筆記本,請在命令行中使用`<jupyter notebook --ip=0.0.0.0 --no-browser>`。 這將導致輸出,如下所示:
首次連接以使用令牌登錄時,將此 URL 復制/粘貼到瀏覽器中:
```py
http://0.0.0.0:8888/?token=3156e...
```
您將 URL 復制并粘貼到瀏覽器中,就可以開始使用了。
此外,可以通過查看 AWS CloudFormation 簡化整個過程。 它使用模板創建和配置 Amazon Web Services 資源。 這樣可以簡化設置分布式深度學習集群的過程。 有興趣的讀者可以看看[這里](https://aws.amazon.com/blogs/compute/distributed-deep-learning-made-easy/)
- TensorFlow 1.x 深度學習秘籍
- 零、前言
- 一、TensorFlow 簡介
- 二、回歸
- 三、神經網絡:感知器
- 四、卷積神經網絡
- 五、高級卷積神經網絡
- 六、循環神經網絡
- 七、無監督學習
- 八、自編碼器
- 九、強化學習
- 十、移動計算
- 十一、生成模型和 CapsNet
- 十二、分布式 TensorFlow 和云深度學習
- 十三、AutoML 和學習如何學習(元學習)
- 十四、TensorFlow 處理單元
- 使用 TensorFlow 構建機器學習項目中文版
- 一、探索和轉換數據
- 二、聚類
- 三、線性回歸
- 四、邏輯回歸
- 五、簡單的前饋神經網絡
- 六、卷積神經網絡
- 七、循環神經網絡和 LSTM
- 八、深度神經網絡
- 九、大規模運行模型 -- GPU 和服務
- 十、庫安裝和其他提示
- TensorFlow 深度學習中文第二版
- 一、人工神經網絡
- 二、TensorFlow v1.6 的新功能是什么?
- 三、實現前饋神經網絡
- 四、CNN 實戰
- 五、使用 TensorFlow 實現自編碼器
- 六、RNN 和梯度消失或爆炸問題
- 七、TensorFlow GPU 配置
- 八、TFLearn
- 九、使用協同過濾的電影推薦
- 十、OpenAI Gym
- TensorFlow 深度學習實戰指南中文版
- 一、入門
- 二、深度神經網絡
- 三、卷積神經網絡
- 四、循環神經網絡介紹
- 五、總結
- 精通 TensorFlow 1.x
- 一、TensorFlow 101
- 二、TensorFlow 的高級庫
- 三、Keras 101
- 四、TensorFlow 中的經典機器學習
- 五、TensorFlow 和 Keras 中的神經網絡和 MLP
- 六、TensorFlow 和 Keras 中的 RNN
- 七、TensorFlow 和 Keras 中的用于時間序列數據的 RNN
- 八、TensorFlow 和 Keras 中的用于文本數據的 RNN
- 九、TensorFlow 和 Keras 中的 CNN
- 十、TensorFlow 和 Keras 中的自編碼器
- 十一、TF 服務:生產中的 TensorFlow 模型
- 十二、遷移學習和預訓練模型
- 十三、深度強化學習
- 十四、生成對抗網絡
- 十五、TensorFlow 集群的分布式模型
- 十六、移動和嵌入式平臺上的 TensorFlow 模型
- 十七、R 中的 TensorFlow 和 Keras
- 十八、調試 TensorFlow 模型
- 十九、張量處理單元
- TensorFlow 機器學習秘籍中文第二版
- 一、TensorFlow 入門
- 二、TensorFlow 的方式
- 三、線性回歸
- 四、支持向量機
- 五、最近鄰方法
- 六、神經網絡
- 七、自然語言處理
- 八、卷積神經網絡
- 九、循環神經網絡
- 十、將 TensorFlow 投入生產
- 十一、更多 TensorFlow
- 與 TensorFlow 的初次接觸
- 前言
- 1.?TensorFlow 基礎知識
- 2. TensorFlow 中的線性回歸
- 3. TensorFlow 中的聚類
- 4. TensorFlow 中的單層神經網絡
- 5. TensorFlow 中的多層神經網絡
- 6. 并行
- 后記
- TensorFlow 學習指南
- 一、基礎
- 二、線性模型
- 三、學習
- 四、分布式
- TensorFlow Rager 教程
- 一、如何使用 TensorFlow Eager 構建簡單的神經網絡
- 二、在 Eager 模式中使用指標
- 三、如何保存和恢復訓練模型
- 四、文本序列到 TFRecords
- 五、如何將原始圖片數據轉換為 TFRecords
- 六、如何使用 TensorFlow Eager 從 TFRecords 批量讀取數據
- 七、使用 TensorFlow Eager 構建用于情感識別的卷積神經網絡(CNN)
- 八、用于 TensorFlow Eager 序列分類的動態循壞神經網絡
- 九、用于 TensorFlow Eager 時間序列回歸的遞歸神經網絡
- TensorFlow 高效編程
- 圖嵌入綜述:問題,技術與應用
- 一、引言
- 三、圖嵌入的問題設定
- 四、圖嵌入技術
- 基于邊重構的優化問題
- 應用
- 基于深度學習的推薦系統:綜述和新視角
- 引言
- 基于深度學習的推薦:最先進的技術
- 基于卷積神經網絡的推薦
- 關于卷積神經網絡我們理解了什么
- 第1章概論
- 第2章多層網絡
- 2.1.4生成對抗網絡
- 2.2.1最近ConvNets演變中的關鍵架構
- 2.2.2走向ConvNet不變性
- 2.3時空卷積網絡
- 第3章了解ConvNets構建塊
- 3.2整改
- 3.3規范化
- 3.4匯集
- 第四章現狀
- 4.2打開問題
- 參考
- 機器學習超級復習筆記
- Python 遷移學習實用指南
- 零、前言
- 一、機器學習基礎
- 二、深度學習基礎
- 三、了解深度學習架構
- 四、遷移學習基礎
- 五、釋放遷移學習的力量
- 六、圖像識別與分類
- 七、文本文件分類
- 八、音頻事件識別與分類
- 九、DeepDream
- 十、自動圖像字幕生成器
- 十一、圖像著色
- 面向計算機視覺的深度學習
- 零、前言
- 一、入門
- 二、圖像分類
- 三、圖像檢索
- 四、對象檢測
- 五、語義分割
- 六、相似性學習
- 七、圖像字幕
- 八、生成模型
- 九、視頻分類
- 十、部署
- 深度學習快速參考
- 零、前言
- 一、深度學習的基礎
- 二、使用深度學習解決回歸問題
- 三、使用 TensorBoard 監控網絡訓練
- 四、使用深度學習解決二分類問題
- 五、使用 Keras 解決多分類問題
- 六、超參數優化
- 七、從頭開始訓練 CNN
- 八、將預訓練的 CNN 用于遷移學習
- 九、從頭開始訓練 RNN
- 十、使用詞嵌入從頭開始訓練 LSTM
- 十一、訓練 Seq2Seq 模型
- 十二、深度強化學習
- 十三、生成對抗網絡
- TensorFlow 2.0 快速入門指南
- 零、前言
- 第 1 部分:TensorFlow 2.00 Alpha 簡介
- 一、TensorFlow 2 簡介
- 二、Keras:TensorFlow 2 的高級 API
- 三、TensorFlow 2 和 ANN 技術
- 第 2 部分:TensorFlow 2.00 Alpha 中的監督和無監督學習
- 四、TensorFlow 2 和監督機器學習
- 五、TensorFlow 2 和無監督學習
- 第 3 部分:TensorFlow 2.00 Alpha 的神經網絡應用
- 六、使用 TensorFlow 2 識別圖像
- 七、TensorFlow 2 和神經風格遷移
- 八、TensorFlow 2 和循環神經網絡
- 九、TensorFlow 估計器和 TensorFlow HUB
- 十、從 tf1.12 轉換為 tf2
- TensorFlow 入門
- 零、前言
- 一、TensorFlow 基本概念
- 二、TensorFlow 數學運算
- 三、機器學習入門
- 四、神經網絡簡介
- 五、深度學習
- 六、TensorFlow GPU 編程和服務
- TensorFlow 卷積神經網絡實用指南
- 零、前言
- 一、TensorFlow 的設置和介紹
- 二、深度學習和卷積神經網絡
- 三、TensorFlow 中的圖像分類
- 四、目標檢測與分割
- 五、VGG,Inception,ResNet 和 MobileNets
- 六、自編碼器,變分自編碼器和生成對抗網絡
- 七、遷移學習
- 八、機器學習最佳實踐和故障排除
- 九、大規模訓練
- 十、參考文獻