
# 九、大規模運行模型 -- GPU 和服務
到目前為止,我們一直在運行在主機的主 CPU 上運行的代碼。 這意味著最多使用所有不同的處理器內核(低端處理器使用 2 或 4 個內核,高級處理器使用多達 16 個內核)。
在過去的十年中,通用處理單元(GPU)已成為所有高表現計算設置中無處不在的部分。 它的大量固有并行度非常適合于高維矩陣乘法以及機器學習模型訓練和運行所需的其他運算。
盡管如此,即使擁有真正強大的計算節點,也存在許多任務,即使是最強大的單個服務器也無法應對。
因此,必須開發一種訓練和運行模型的分布式方法。 這是分布式 TensorFlow 的原始功能。
在本章中,您將:
* 了解如何發現 TensorFlow 可用的計算資源
* 了解如何將任務分配給計算節點中的任何不同計算單元
* 了解如何記錄 GPU 操作
* 了解如何不僅在主主機中而且在許多分布式單元的集群中分布計算
# TensorFlow 上的 GPU 支持
TensorFlow 對至少兩種計算設備具有本機支持:CPU 和 GPU。 為此,它為支持的每種計算設備實現每個操作的一個版本:
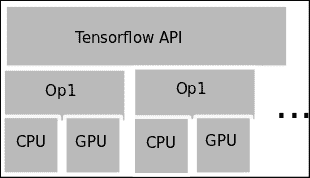
## 記錄設備的放置和設備能力
在嘗試執行計算之前,TensorFlow 允許您記錄所有可用資源。 這樣,我們只能將操作應用于現有的計算類型。
### 查詢計算能力
為了獲取機器上計算元素的日志,我們可以在創建 TensorFlow 會話時使用`log_device_placement`標志,方法是:
```py
python
>>>Import tensorflow as tf
>>>sess = tf.Session(config=tf.ConfigProto(log_device_placement=True))
```
這是命令的輸出:
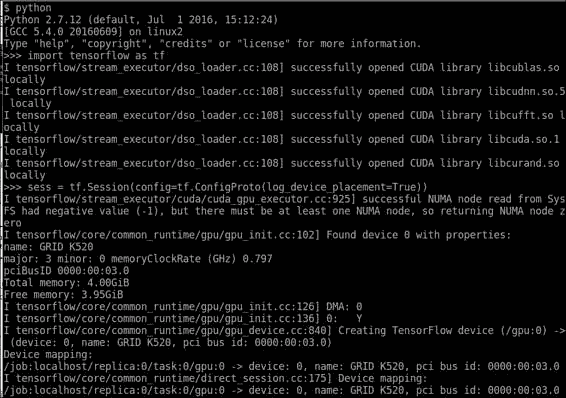
選擇 GPU 來運行代碼
此長輸出主要顯示了所需的不同`CUDA`庫的加載,然后顯示了名稱(`GRID K520`)和 GPU 的計算能力。
## 選擇用于計算的 CPU
如果我們有可用的 GPU,但仍想繼續使用 CPU,則可以通過`tf.Graph.device`方法選擇一個。
方法調用如下:
```py
tf.Graph.device(device_name_or_function) :
```
該函數接收處理單元字符串,返回處理單元字符串的函數或不返回處理單元字符串,并返回分配了處理單元的上下文管理器。
如果參數是一個函數,則每個操作都將調用此函數來決定它將在哪個處理單元中執行,這是組合所有操作的有用元素。
### 設備命名
為了指定在指定設備時我們指的是哪個計算單元,TensorFlow 使用以下格式的簡單方案:

設備 ID 格式
設備標識示例包括:
* `"/cpu:0"`:計算機的第一個 CPU
* `"/gpu:0"`:您計算機的 GPU(如果有)
* `"/gpu:1"`:計算機的第二個 GPU,依此類推
可用時,如果沒有相反指示,則使用第一個 GPU 設備。
# 示例 1 -- 將操作分配給 GPU
在此示例中,我們將創建兩個張量,將現有 GPU 定位為默認位置,并將在配置了 CUDA 環境的服務器上執行張量總和(您將在附錄 A-庫安裝和其他中學習安裝該張量) 提示)。
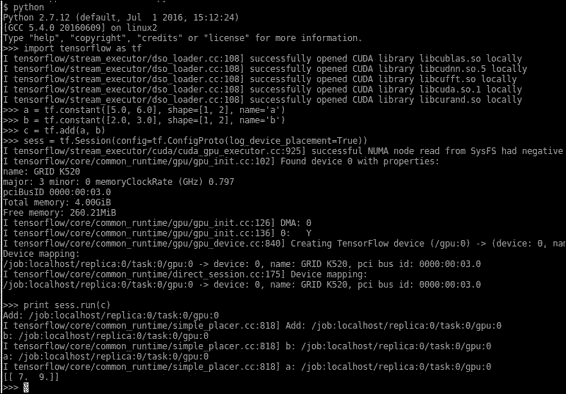
在這里,我們看到常量和求和操作都是在`/gpu:0`服務器上構建的。 這是因為 GPU 是可用時首選的計算設備類型。
# 示例 2 -- 并行計算 Pi
該示例將作為并行處理的介紹,實現 Pi 的蒙特卡洛近似。
蒙特卡洛(Monte Carlo)利用隨機數序列執行近似。
為了解決這個問題,我們將拋出許多隨機樣本,因為我們知道圓內的樣本與正方形上的樣本之比與面積比相同。
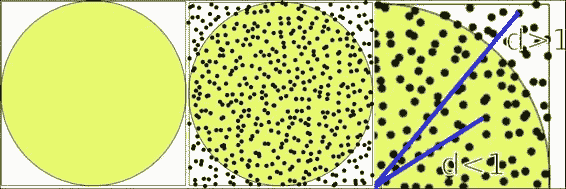
隨機區域計算技術
計算假設概率分布均勻,則分配的樣本數與圖形的面積成比例。
我們使用以下比例:

Pi 的面積比例
從上述比例,我們可以推斷出圓中的樣本數/正方形的樣本數也是`0.78`。
另一個事實是,我們可以為計算生成的隨機樣本越多,答案就越近似。 這是在增加 GPU 數量時會給我們帶來更多樣本和準確率。
我們做的進一步減少是我們生成`(X, Y)`坐標,范圍是`(0..1)`,因此隨機數生成更直接。 因此,我們需要確定樣本是否屬于圓的唯一標準是`distance = d < 1.0`(圓的半徑)。
## 解決方案實現
該解決方案將基于 CPU。 它將管理服務器中擁有的 GPU 資源(在本例中為`4`),然后我們將接收結果,并進行最終的樣本求和。
### 提示
注意:此方法的收斂速度非常慢,為`O(n^1/2)`,但由于其簡單性,將作為示例。
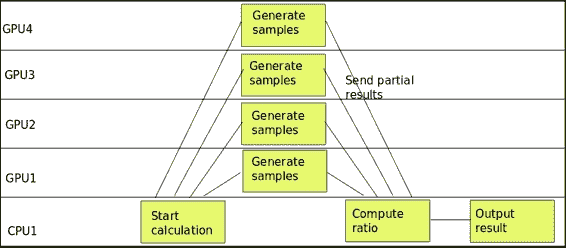
計算任務時間表
在上圖中,我們看到了計算的并行行為,即樣本生成和主要活動計數。
## 源代碼
源代碼如下:
```py
import tensorflow as tf
import numpy as np
c = []
#Distribute the work between the GPUs
for d in ['/gpu:0', '/gpu:1', '/gpu:2', '/gpu:3']:
#Generate the random 2D samples
i=tf.constant(np.random.uniform(size=10000), shape=[5000,2])
with tf.Session() as sess:
tf.initialize_all_variables()
#Calculate the euclidean distance to the origin
distances=tf.reduce_sum(tf.pow(i,2),1)
#Sum the samples inside the circle
tempsum = sess.run(tf.reduce_sum(tf.cast(tf.greater_equal(tf.cast(1.0,tf.float64),distances),tf.float64)))
#append the current result to the results array
c.append( tempsum)
#Do the final ratio calculation on the CPU
with tf.device('/cpu:0'):
with tf.Session() as sess:
sum = tf.add_n(c)
print (sess.run(sum/20000.0)*4.0)
```
# 分布式 TensorFlow
分布式 TensorFlow 是一項補充技術,旨在輕松高效地創建計算節點集群,并以無縫方式在節點之間分配作業。
這是創建分布式計算環境以及大規模執行模型的訓練和運行的標準方法,因此能夠完成生產,大量數據設置中的主要任務非常重要。
## 技術組件
在本節中,我們將描述分布式 TensorFlow 計算設置上的所有組件,從最細粒度的任務元素到整個集群描述。
### 作業
作業定義了一組同類任務,通常針對解決問題領域的同一子集。
區分作業的示例有:
* 參數服務器作業,它將模型參數存儲在一個單獨的作業中,并負責將初始和當前參數值分配給所有分布式節點
* 工作器作業,在其中執行所有計算密集型任務
### 任務
任務是工作的細分,執行不同的步驟或并行的工作單元以解決其工作的問題區域,并且通常附加到單個過程中。
每個作業都有許多任務,它們由索引標識。 通常,索引為 0 的任務被視為主要任務或協調者任務。
### 服務器
服務器是代表專用于實現任務的一組物理設備的邏輯對象。 服務器將專門分配給一個任務。
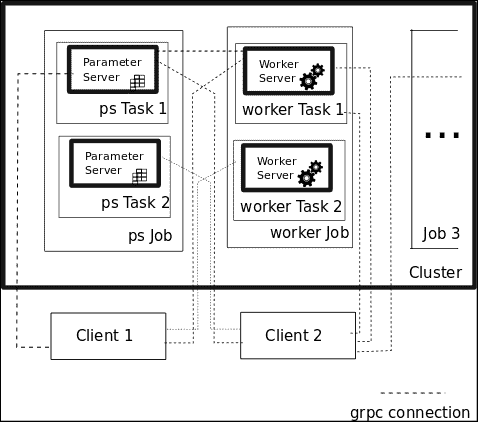
#### 組件概覽
在下圖中,我們將代表集群計算設置中的所有參與部分:
TensorFlow 集群設置元素
該圖包含由`ps`和`worker`作業代表的兩個作業,以及可以從客戶端為其創建的 grpc 通訊通道(在附錄 A 庫安裝和附加提示中介紹)。 對于每種作業類型,都有服務器執行不同的任務,從而解決了作業域問題的子集。
### 創建一個 TensorFlow 集群
分布式集群程序的第一個任務是定義和創建一個`ClusterSpec`對象,該對象包含真實服務器實例的地址和端口,它們將成為集群的一部分。
定義此`ClusterSpec`的兩種主要方法是:
* 創建一個`tf.train.ClusterSpec`對象,該對象指定所有群集任務
* 在創建`tf.train.Server`時,傳遞上述`ClusterSpec`對象,并將本地任務與作業名稱和任務索引相關聯
#### `ClusterSpec`定義格式
`ClusterSpec`對象是使用協議緩沖區格式定義的,該格式是基于 JSON 的特殊格式。
格式如下:
```py
{
"job1 name": [
"task0 server uri",
"task1 server uri"
...
]
...
"jobn name"[
"task0 server uri",
"task1 server uri"
]})
...
```
因此,這將是使用參數服務器任務服務器和三個工作者任務服務器創建集群的函數調用:
```py
tf.train.ClusterSpec({
"worker": [
"wk0.example.com:2222",
"wk1.example.com:2222",
"wk2.example.com:2222"
],
"ps": [
"ps0.example.com:2222",
]})
```
#### 創建`tf.Train.Server`
創建`ClusterSpec`之后,我們現在可以在運行時準確了解集群配置。 我們將繼續創建本地服務器實例,并創建一個`tf.train.Server`實例:
這是一個示例服務器創建,它使用集群對象,作業名稱和任務索引作為參數:
```py
server = tf.train.Server(cluster, job_name="local", task_index=[Number of server])
```
## 集群操作 -- 將計算方法發送到任務
為了開始學習集群的操作,我們需要學習計算資源的尋址。
首先,我們假設我們已經創建了一個集群,它具有不同的作業和任務資源。 任何資源的 ID 字符串具有以下形式:

上下文管理器中資源的常規調用是`with`關鍵字,具有以下結構。
```py
with tf.device("/job:ps/task:1"):
[Code Block]
```
`with`關鍵字指示在需要任務標識符時,將使用上下文管理器指令中指定的任務標識符。
下圖說明了一個示例集群設置,其中包含設置的所有不同部分的地址名稱:
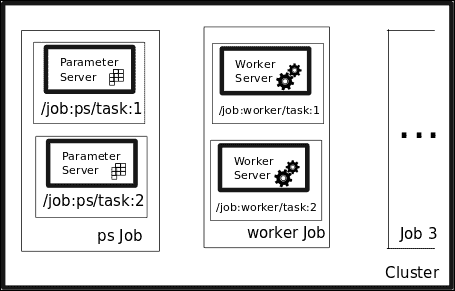
服務器元素命名
### 分布式示例代碼結構
此示例代碼將向您顯示解決集群中不同任務的程序的大致結構,特別是參數服務器和輔助作業:
```py
#Address the Parameter Server task
with tf.device("/job:ps/task:1"):
weights = tf.Variable(...)
bias = tf.Variable(...)
#Address the Parameter Server task
with tf.device("/job:worker/task:1"):
#... Generate and train a model
layer_1 = tf.nn.relu(tf.matmul(input, weights_1) + biases_1)
logits = tf.nn.relu(tf.matmul(layer_1, weights_2) + biases_2)
train_op = ...
#Command the main task of the cluster
with tf.Session("grpc://worker1.cluster:2222") as sess:
for i in range(100):
sess.run(train_op)
```
# 示例 3 -- 分布式 Pi 計算
在此示例中,我們將更改視角,從一臺具有多個計算資源的服務器變為一臺具有多個資源的服務器集群。
分布式版本的執行將具有不同的設置,如下圖所示:
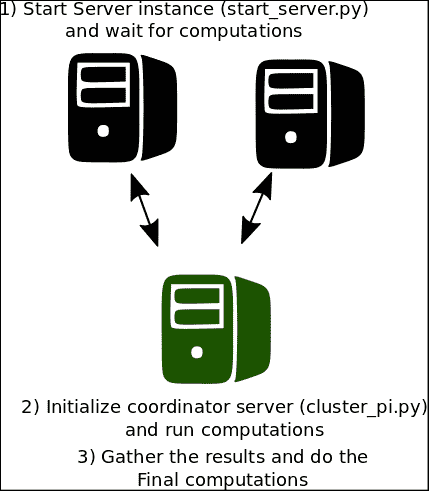
分布式協調運行
## 服務器腳本
該腳本將在每個計算節點上執行,這將生成一批樣本,并通過可用服務器的數量增加生成的隨機數的數量。 在這種情況下,我們將使用兩臺服務器,并假設我們在本地主機中啟動它們,并在命令行中指示索引號。 如果要在單獨的節點中運行它們,則只需替換`ClusterSpec`定義中的本地主機地址(如果希望它更具代表性,則可以替換名稱)。
該腳本的源代碼如下:
```py
import tensorflow as tf
tf.app.flags.DEFINE_string("index", "0","Server index")
FLAGS = tf.app.flags.FLAGS
print FLAGS.index
cluster = tf.train.ClusterSpec({"local": ["localhost:2222", "localhost:2223"]})
server = tf.train.Server(cluster, job_name="local", task_index=int(FLAGS.index))
server.join()
```
在`localhost`中執行此腳本的命令行如下:
```py
python start_server.py -index=0 #Server task 0
python start_server.py -index=1 #Server task 1
```
這是其中一臺服務器的預期輸出:

單個服務器啟動命令行
## 客戶端腳本
然后,我們獲得了客戶端腳本,該腳本將向集群成員發送隨機數創建任務,并將執行最終的 Pi 計算,幾乎與 GPU 示例相同。
## 完整源代碼
源代碼如下:
```py
import tensorflow as tf
import numpy as np
tf.app.flags.DEFINE_integer("numsamples", "100","Number of samples per server")
FLAGS = tf.app.flags.FLAGS
print ("Sample number per server: " + str(FLAGS.numsamples) )
cluster = tf.train.ClusterSpec({"local": ["localhost:2222", "localhost:2223"]})
#This is the list containing the sumation of samples on any node
c=[]
def generate_sum():
i=tf.constant(np.random.uniform(size=FLAGS.numsamples*2), shape=[FLAGS.numsamples,2])
distances=tf.reduce_sum(tf.pow(i,2),1)
return (tf.reduce_sum(tf.cast(tf.greater_equal(tf.cast(1.0,tf.float64),distances),tf.int32)))
with tf.device("/job:local/task:0"):
test1= generate_sum()
with tf.device("/job:local/task:1"):
test2= generate_sum()
#If your cluster is local, you must replace localhost by the address of the first node
with tf.Session("grpc://localhost:2222") as sess:
result = sess.run(tf.cast(test1 + test2,tf.float64)/FLAGS.numsamples*2.0)
print(result)
```
# 示例 4 -- 在集群中運行分布式模型
這個非常簡單的示例將為我們提供分布式 TensorFlow 設置工作原理的示例。
在此示例中,我們將執行一個非常簡單的任務,盡管如此,它仍將在機器學習過程中采取所有必需的步驟。
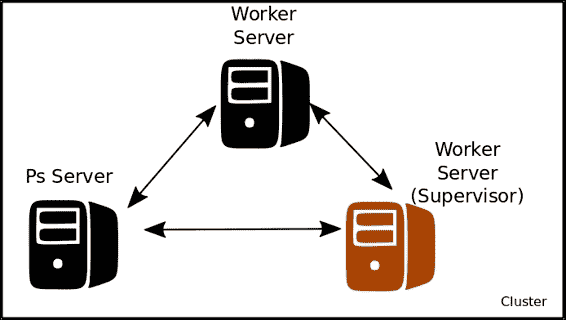
分布式訓練集群設置
`Ps Server`將包含要求解的線性函數的不同參數(在本例中為`x`和`b0`),兩個工作服務器將對變量進行訓練,該變量將不斷更新和改進。 最后一個,在協作模式下工作。
## 示例代碼
示例代碼如下:
```py
import tensorflow as tf
import numpy as np
from sklearn.utils import shuffle
# Here we define our cluster setup via the command line
tf.app.flags.DEFINE_string("ps_hosts", "",
"Comma-separated list of hostname:port pairs")
tf.app.flags.DEFINE_string("worker_hosts", "",
"Comma-separated list of hostname:port pairs")
# Define the characteristics of the cluster node, and its task index
tf.app.flags.DEFINE_string("job_name", "", "One of 'ps', 'worker'")
tf.app.flags.DEFINE_integer("task_index", 0, "Index of task within the job")
FLAGS = tf.app.flags.FLAGS
def main(_):
ps_hosts = FLAGS.ps_hosts.split(",")
worker_hosts = FLAGS.worker_hosts.split(",")
# Create a cluster following the command line paramaters.
cluster = tf.train.ClusterSpec({"ps": ps_hosts, "worker": worker_hosts})
# Create the local task.
server = tf.train.Server(cluster,
job_name=FLAGS.job_name,
task_index=FLAGS.task_index)
if FLAGS.job_name == "ps":
server.join()
elif FLAGS.job_name == "worker":
# Assigns ops to the local worker by default.
with tf.device(tf.train.replica_device_setter(
worker_device="/job:worker/task:%d" % FLAGS.task_index,
cluster=cluster)):
#Define the training set, and the model parameters, loss function and training operation
trX = np.linspace(-1, 1, 101)
trY = 2 * trX + np.random.randn(*trX.shape) * 0.4 + 0.2 # create a y value
X = tf.placeholder("float", name="X") # create symbolic variables
Y = tf.placeholder("float", name = "Y")
def model(X, w, b):
return tf.mul(X, w) + b # We just define the line as X*w + b0
w = tf.Variable(-1.0, name="b0") # create a shared variable
b = tf.Variable(-2.0, name="b1") # create a shared variable
y_model = model(X, w, b)
loss = (tf.pow(Y-y_model, 2)) # use sqr error for cost function
global_step = tf.Variable(0)
train_op = tf.train.AdagradOptimizer(0.8).minimize(
loss, global_step=global_step)
#Create a saver, and a summary and init operation
saver = tf.train.Saver()
summary_op = tf.merge_all_summaries()
init_op = tf.initialize_all_variables()
# Create a "supervisor", which oversees the training process.
sv = tf.train.Supervisor(is_chief=(FLAGS.task_index == 0),
logdir="/tmp/train_logs",
init_op=init_op,
summary_op=summary_op,
saver=saver,
global_step=global_step,
save_model_secs=600)
# The supervisor takes care of session initialization, restoring from
# a checkpoint, and closing when done or an error occurs.
with sv.managed_session(server.target) as sess:
# Loop until the supervisor shuts down
step = 0
while not sv.should_stop() :
# Run a training step asynchronously.
# See `tf.train.SyncReplicasOptimizer` for additional details on how to
# perform *synchronous* training.
for i in range(100):
trX, trY = shuffle (trX, trY, random_state=0)
for (x, y) in zip(trX, trY):
_, step = sess.run([train_op, global_step],feed_dict={X: x, Y: y})
#Print the partial results, and the current node doing the calculation
print ("Partial result from node: " + str(FLAGS.task_index) + ", w: " + str(w.eval(session=sess))+ ", b0: " + str(b.eval(session=sess)))
# Ask for all the services to stop.
sv.stop()
if __name__ == "__main__":
tf.app.run()
```
在參數服務器當前主機中:
```py
python trainer.py --ps_hosts=localhost:2222 --worker_hosts=localhost:2223,localhost:2224 --job_name=ps -task_index=0
he first
```
在工作器主機編號中:
```py
python trainer.py --ps_hosts=localhost:2222 --worker_hosts=localhost:2223,localhost:2224 --job_name=worker -task_index=0
```
在第二個工作者主機中:
```py
python trainer.py --ps_hosts=localhost:2222 --worker_hosts=localhost:2223,localhost:2224 --job_name=worker --task_index=1
```
# 總結
在本章中,我們回顧了 TensorFlow 工具箱中的兩個主要元素,以在高表現環境中實現我們的模型,無論是在單服務器還是分布式集群環境中。
在下一章中,我們將查看有關如何在各種環境和工具下安裝 TensorFlow 的詳細說明。
- TensorFlow 1.x 深度學習秘籍
- 零、前言
- 一、TensorFlow 簡介
- 二、回歸
- 三、神經網絡:感知器
- 四、卷積神經網絡
- 五、高級卷積神經網絡
- 六、循環神經網絡
- 七、無監督學習
- 八、自編碼器
- 九、強化學習
- 十、移動計算
- 十一、生成模型和 CapsNet
- 十二、分布式 TensorFlow 和云深度學習
- 十三、AutoML 和學習如何學習(元學習)
- 十四、TensorFlow 處理單元
- 使用 TensorFlow 構建機器學習項目中文版
- 一、探索和轉換數據
- 二、聚類
- 三、線性回歸
- 四、邏輯回歸
- 五、簡單的前饋神經網絡
- 六、卷積神經網絡
- 七、循環神經網絡和 LSTM
- 八、深度神經網絡
- 九、大規模運行模型 -- GPU 和服務
- 十、庫安裝和其他提示
- TensorFlow 深度學習中文第二版
- 一、人工神經網絡
- 二、TensorFlow v1.6 的新功能是什么?
- 三、實現前饋神經網絡
- 四、CNN 實戰
- 五、使用 TensorFlow 實現自編碼器
- 六、RNN 和梯度消失或爆炸問題
- 七、TensorFlow GPU 配置
- 八、TFLearn
- 九、使用協同過濾的電影推薦
- 十、OpenAI Gym
- TensorFlow 深度學習實戰指南中文版
- 一、入門
- 二、深度神經網絡
- 三、卷積神經網絡
- 四、循環神經網絡介紹
- 五、總結
- 精通 TensorFlow 1.x
- 一、TensorFlow 101
- 二、TensorFlow 的高級庫
- 三、Keras 101
- 四、TensorFlow 中的經典機器學習
- 五、TensorFlow 和 Keras 中的神經網絡和 MLP
- 六、TensorFlow 和 Keras 中的 RNN
- 七、TensorFlow 和 Keras 中的用于時間序列數據的 RNN
- 八、TensorFlow 和 Keras 中的用于文本數據的 RNN
- 九、TensorFlow 和 Keras 中的 CNN
- 十、TensorFlow 和 Keras 中的自編碼器
- 十一、TF 服務:生產中的 TensorFlow 模型
- 十二、遷移學習和預訓練模型
- 十三、深度強化學習
- 十四、生成對抗網絡
- 十五、TensorFlow 集群的分布式模型
- 十六、移動和嵌入式平臺上的 TensorFlow 模型
- 十七、R 中的 TensorFlow 和 Keras
- 十八、調試 TensorFlow 模型
- 十九、張量處理單元
- TensorFlow 機器學習秘籍中文第二版
- 一、TensorFlow 入門
- 二、TensorFlow 的方式
- 三、線性回歸
- 四、支持向量機
- 五、最近鄰方法
- 六、神經網絡
- 七、自然語言處理
- 八、卷積神經網絡
- 九、循環神經網絡
- 十、將 TensorFlow 投入生產
- 十一、更多 TensorFlow
- 與 TensorFlow 的初次接觸
- 前言
- 1.?TensorFlow 基礎知識
- 2. TensorFlow 中的線性回歸
- 3. TensorFlow 中的聚類
- 4. TensorFlow 中的單層神經網絡
- 5. TensorFlow 中的多層神經網絡
- 6. 并行
- 后記
- TensorFlow 學習指南
- 一、基礎
- 二、線性模型
- 三、學習
- 四、分布式
- TensorFlow Rager 教程
- 一、如何使用 TensorFlow Eager 構建簡單的神經網絡
- 二、在 Eager 模式中使用指標
- 三、如何保存和恢復訓練模型
- 四、文本序列到 TFRecords
- 五、如何將原始圖片數據轉換為 TFRecords
- 六、如何使用 TensorFlow Eager 從 TFRecords 批量讀取數據
- 七、使用 TensorFlow Eager 構建用于情感識別的卷積神經網絡(CNN)
- 八、用于 TensorFlow Eager 序列分類的動態循壞神經網絡
- 九、用于 TensorFlow Eager 時間序列回歸的遞歸神經網絡
- TensorFlow 高效編程
- 圖嵌入綜述:問題,技術與應用
- 一、引言
- 三、圖嵌入的問題設定
- 四、圖嵌入技術
- 基于邊重構的優化問題
- 應用
- 基于深度學習的推薦系統:綜述和新視角
- 引言
- 基于深度學習的推薦:最先進的技術
- 基于卷積神經網絡的推薦
- 關于卷積神經網絡我們理解了什么
- 第1章概論
- 第2章多層網絡
- 2.1.4生成對抗網絡
- 2.2.1最近ConvNets演變中的關鍵架構
- 2.2.2走向ConvNet不變性
- 2.3時空卷積網絡
- 第3章了解ConvNets構建塊
- 3.2整改
- 3.3規范化
- 3.4匯集
- 第四章現狀
- 4.2打開問題
- 參考
- 機器學習超級復習筆記
- Python 遷移學習實用指南
- 零、前言
- 一、機器學習基礎
- 二、深度學習基礎
- 三、了解深度學習架構
- 四、遷移學習基礎
- 五、釋放遷移學習的力量
- 六、圖像識別與分類
- 七、文本文件分類
- 八、音頻事件識別與分類
- 九、DeepDream
- 十、自動圖像字幕生成器
- 十一、圖像著色
- 面向計算機視覺的深度學習
- 零、前言
- 一、入門
- 二、圖像分類
- 三、圖像檢索
- 四、對象檢測
- 五、語義分割
- 六、相似性學習
- 七、圖像字幕
- 八、生成模型
- 九、視頻分類
- 十、部署
- 深度學習快速參考
- 零、前言
- 一、深度學習的基礎
- 二、使用深度學習解決回歸問題
- 三、使用 TensorBoard 監控網絡訓練
- 四、使用深度學習解決二分類問題
- 五、使用 Keras 解決多分類問題
- 六、超參數優化
- 七、從頭開始訓練 CNN
- 八、將預訓練的 CNN 用于遷移學習
- 九、從頭開始訓練 RNN
- 十、使用詞嵌入從頭開始訓練 LSTM
- 十一、訓練 Seq2Seq 模型
- 十二、深度強化學習
- 十三、生成對抗網絡
- TensorFlow 2.0 快速入門指南
- 零、前言
- 第 1 部分:TensorFlow 2.00 Alpha 簡介
- 一、TensorFlow 2 簡介
- 二、Keras:TensorFlow 2 的高級 API
- 三、TensorFlow 2 和 ANN 技術
- 第 2 部分:TensorFlow 2.00 Alpha 中的監督和無監督學習
- 四、TensorFlow 2 和監督機器學習
- 五、TensorFlow 2 和無監督學習
- 第 3 部分:TensorFlow 2.00 Alpha 的神經網絡應用
- 六、使用 TensorFlow 2 識別圖像
- 七、TensorFlow 2 和神經風格遷移
- 八、TensorFlow 2 和循環神經網絡
- 九、TensorFlow 估計器和 TensorFlow HUB
- 十、從 tf1.12 轉換為 tf2
- TensorFlow 入門
- 零、前言
- 一、TensorFlow 基本概念
- 二、TensorFlow 數學運算
- 三、機器學習入門
- 四、神經網絡簡介
- 五、深度學習
- 六、TensorFlow GPU 編程和服務
- TensorFlow 卷積神經網絡實用指南
- 零、前言
- 一、TensorFlow 的設置和介紹
- 二、深度學習和卷積神經網絡
- 三、TensorFlow 中的圖像分類
- 四、目標檢測與分割
- 五、VGG,Inception,ResNet 和 MobileNets
- 六、自編碼器,變分自編碼器和生成對抗網絡
- 七、遷移學習
- 八、機器學習最佳實踐和故障排除
- 九、大規模訓練
- 十、參考文獻