
# 六、相似性學習
在本章中,我們將學習相似性學習并學習相似性學習中使用的各種損失函數。 當每個類別的數據集都很小時,相似性學習對我們很有用。 我們將了解可用于人臉分析的不同數據集,并建立用于人臉識別,界標檢測的模型。 我們將在本章介紹以下主題:
* 相似性學習的不同算法
* 用于相似度學習的各種損失函數
* 可以使用此類模型的各種方案
* 人臉識別的完整過程
# 相似性學習算法
**相似性學習**是訓練度量以計算兩個實體之間的相似性的過程。 由于學習了相似性,這也可以稱為度量學習。 度量可以是歐幾里得或余弦或其他自定義距離函數。 實體可以是任何數據,例如圖像,視頻,文本或表格。 為了計算度量,需要圖像的向量表示。 此表示可以是 CNN 計算的特征,如第 3 章,“圖像檢索”中所述。 為對象分類而學習的 CNN 可以用作計算度量的向量。 為圖像分類而獲得的特征向量將不是手頭任務的最佳表示。 在相似性學習中,我們發現有關 CNN 的信息,這些 CNN 會為相似性學習任務生成經過訓練的特征。 這里給出了相似性學習的一些應用:
* 使用生物識別比較兩個人臉的人臉驗證
* 用于在線查找類似產品的現實世界中的對象的視覺搜索
* 某些屬性相似的產品的視覺推薦
在本章中,我們將詳細了解人臉驗證。 因此,讓我們從可用于相似性學習的算法開始。
# 連體網絡
顧名思義,連體網絡是一種神經網絡模型,其中訓練該網絡以區分兩個輸入。 連體網絡可以訓練 CNN,以通過兩個編碼器產生嵌入。 每個編碼器被饋送正對或負對中的一個圖像。 連體網絡所需的數據少于其他深度學習算法。 最初引入連體網絡來比較簽名。 下圖顯示了一個連體網絡。 權重在網絡之間共享:
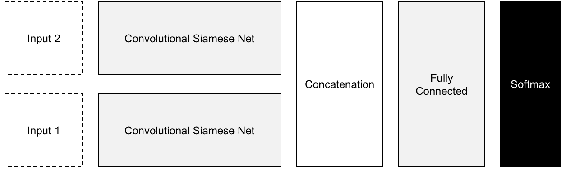
連體網絡的另一種用途是一次性學習。 **單次學習**是僅舉一個示例的學習技術。 在這種情況下,可以顯示圖像,并判斷它們是否相似。 對于大多數相似性學習任務,需要一對正負對進行訓練。 可以將此類數據集與可用于分類任務的任何數據集一起形成,前提是它們是歐幾里得距離。 這些算法與前幾章中的算法之間的主要區別在于,這些編碼器試圖將一個編碼器與另一個編碼器區分開。
# 對比損失
對比損失通過相似度區分圖像。 使用相似性度量比較特征或潛在層,并與目標一起訓練相似性得分。 在正對的情況下,目標將為 0,因為兩個輸入相同。 對于負數對,在余弦距離或正則歐幾里得距離的情況下,潛對之間的距離最大為 0。 損耗可以由`contrastive_loss`定義,在以下代碼中進行解釋:
```py
def contrastive_loss(model_1, model_2, label, margin=0.1):
distance = tf.reduce_sum(tf.square(model_1 - model_2), 1)
loss = label * tf.square(
tf.maximum(0., margin - tf.sqrt(distance))) + (1 - label) * distance
loss = 0.5 * tf.reduce_mean(loss)
return loss
```
比較兩個模型的距離并計算損失。 現在,我們將定義和訓練一個連體網絡。 對于連體網絡,我們將需要兩個相同的模型。 接下來,借助以下代碼,為具有給定輸入的簡單 CNN 定義一個函數:
```py
def get_model(input_):
input_reshape = tf.reshape(input_, [-1, 28, 28, 1],
name='input_reshape')
convolution_layer_1 = convolution_layer(input_reshape, 64)
pooling_layer_1 = pooling_layer(convolution_layer_1)
convolution_layer_2 = convolution_layer(pooling_layer_1, 128)
pooling_layer_2 = pooling_layer(convolution_layer_2)
flattened_pool = tf.reshape(pooling_layer_2, [-1, 5 * 5 * 128],
name='flattened_pool')
dense_layer_bottleneck = dense_layer(flattened_pool, 1024)
return dense_layer_bottleneck
```
定義的模型將使用兩次來定義連體網絡所需的編碼器。 接下來,定義兩個模型的占位符。 對于每一對,輸入的相似性也作為輸入提供。 定義的模型相同。 還可以定義模型,以便共享權重。 此處定義了左右兩個模型:
```py
left_input = tf.placeholder(tf.float32, shape=[None, input_size])
right_input = tf.placeholder(tf.float32, shape=[None, input_size])
y_input = tf.placeholder(tf.float32, shape=[None, no_classes])
left_bottleneck = get_model(left_input)
right_bottleneck = get_model(right_input)
```
瓶頸層是從模型中獲取的,并被連接在一起。 這對于相似性學習問題至關重要。 可以創建任意數量的模型,并且可以連接最后的層,如下所示:
```py
dense_layer_bottleneck = tf.concat([left_bottleneck, right_bottleneck], 1)
```
接下來,添加一個丟棄層,并從級聯層中計算出對率。 然后,該過程類似于任何其他網絡,如下所示:
```py
dropout_bool = tf.placeholder(tf.bool)
dropout_layer = tf.layers.dropout(
inputs=dense_layer_bottleneck,
rate=0.4,
training=dropout_bool
)
logits = dense_layer(dropout_layer, no_classes)
with tf.name_scope('loss'):
softmax_cross_entropy = tf.nn.softmax_cross_entropy_with_logits(
labels=y_input, logits=logits)
loss_operation = tf.reduce_mean(softmax_cross_entropy, name='loss')
tf.summary.scalar('loss', loss_operation)
with tf.name_scope('optimiser'):
optimiser = tf.train.AdamOptimizer().minimize(loss_operation)
with tf.name_scope('accuracy'):
with tf.name_scope('correct_prediction'):
predictions = tf.argmax(logits, 1)
correct_predictions = tf.equal(predictions, tf.argmax(y_input, 1))
with tf.name_scope('accuracy'):
accuracy_operation = tf.reduce_mean(
tf.cast(correct_predictions, tf.float32))
tf.summary.scalar('accuracy', accuracy_operation)
session = tf.Session()
session.run(tf.global_variables_initializer())
merged_summary_operation = tf.summary.merge_all()
train_summary_writer = tf.summary.FileWriter('/tmp/train', session.graph)
test_summary_writer = tf.summary.FileWriter('/tmp/test')
test_images, test_labels = mnist_data.test.images, mnist_data.test.labels
```
數據必須分別輸入左右模型,如下所示:
```py
for batch_no in range(total_batches):
mnist_batch = mnist_data.train.next_batch(batch_size)
train_images, train_labels = mnist_batch[0], mnist_batch[1]
_, merged_summary = session.run([optimiser, merged_summary_operation],
feed_dict={
left_input: train_images,
right_input: train_images,
y_input: train_labels,
dropout_bool: True
})
train_summary_writer.add_summary(merged_summary, batch_no)
if batch_no % 10 == 0:
merged_summary, _ = session.run([merged_summary_operation,
accuracy_operation], feed_dict={
left_input: test_images,
right_input: test_images,
y_input: test_labels,
dropout_bool: False
})
test_summary_writer.add_summary(merged_summary, batch_no)
```
我們已經看到了如何定義一個連體網絡。 定義了兩個編碼器,并連接了潛在空間以形成訓練損失。 左右模型分別提供數據。 接下來,我們將看到如何在單個網絡中執行相似性學習。
# FaceNet
Schroff 等人提出的 [FaceNet 模型](https://arxiv.org/pdf/1503.03832.pdf)解決了人臉驗證問題。 它學習一個深層的 CNN,然后將人臉圖像轉換為嵌入圖像。 嵌入可用于比較人臉以查看其相似程度,并可通過以下三種方式使用:
* **人臉驗證**考慮兩個人臉,并確定它們是否相似。 人臉驗證可以通過計算距離度量來完成。
* **人臉識別**是用于用名字標記人臉的分類問題。 嵌入向量可用于訓練最終標簽。
* **人臉聚類**將相似的人臉分組,就像照片應用將同一個人的照片聚在一起的方式一樣。 諸如 KMeans 之類的聚類算法用于對人臉進行分組。
下圖顯示了 FaceNet 架構:
經 Schroff 等人許可復制。
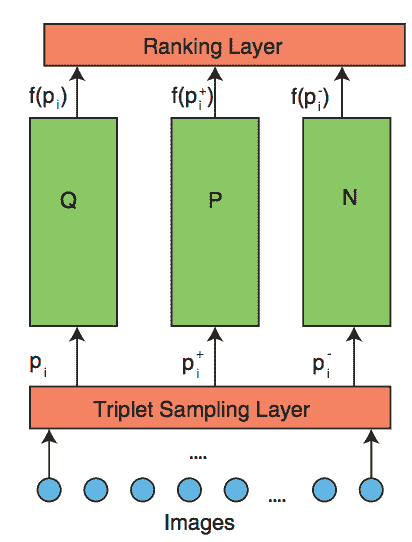
FaceNet 會獲取一批人臉圖像并進行訓練。 在那一批中,將有幾個正對。 在計算損耗時,考慮正對和最接近的幾個負對。 挖掘選擇性對可實現平穩訓練。 如果所有負面因素一直都被推開,則訓練不穩定。 比較三個數據點稱為**三元組損失**。 在計算損耗時,圖像被認為具有正負匹配。 底片僅被推動一定的幅度。 在此詳細說明三元組損失。
# 三元組損失
三元組損失學習圖像的得分向量。 人臉描述符的得分向量可用于驗證歐幾里得空間中的人臉。 在學習投影的意義上,三元組損失類似于度量學習,因此可以區分輸入。 這些投影或描述符或分數向量是緊湊的表示形式,因此可以視為降維技術。 一個三元組由一個錨點,正負面組成。 錨可以是任何人的人臉,正面是同一個人的圖像。 負片圖像可能來自另一個人。 顯然,對于給定的錨點,將會有很多負面的人臉。 通過選擇當前更靠近錨點的底片,編碼器將很難區分人臉,從而使其學習效果更好。 此過程稱為**難負例挖掘**。 可以在歐氏空間中使用閾值獲得更接近的負值。 下圖描述了三元組損失模型:

經 Schroff 等人許可復制。
TensorFlow 中的損失計算如下所示:
```py
def triplet_loss(anchor_face, positive_face, negative_face, margin):
def get_distance(x, y):
return tf.reduce_sum(tf.square(tf.subtract(x, y)), 1)
positive_distance = get_distance(anchor_face, positive_face)
negative_distance = get_distance(anchor_face, negative_face)
total_distance = tf.add(tf.subtract(positive_distance, negative_distance), margin)
return tf.reduce_mean(tf.maximum(total_distance, 0.0), 0)
```
三胞胎的開采是一項艱巨的任務。 每個點都必須與其他點進行比較,以獲得適當的錨點和正對。 三元組的挖掘如下所示:
```py
def mine_triplets(anchor, targets, negative_samples):
distances = cdist(anchor, targets, 'cosine')
distances = cdist(anchor, targets, 'cosine').tolist()
QnQ_duplicated = [
[target_index for target_index, dist in enumerate(QnQ_dist) if dist == QnQ_dist[query_index]]
for query_index, QnQ_dist in enumerate(distances)]
for i, QnT_dist in enumerate(QnT_dists):
for j in QnQ_duplicated[i]:
QnT_dist.itemset(j, np.inf)
QnT_dists_topk = QnT_dists.argsort(axis=1)[:, :negative_samples]
top_k_index = np.array([np.insert(QnT_dist, 0, i) for i, QnT_dist in enumerate(QnT_dists_topk)])
return top_k_index
```
由于距離計算發生在 CPU 中,因此這可能會使在 GPU 機器上的訓練變慢。 FaceNet 模型是訓練人臉相似模型的最新方法。
# DeepNet 模型
DeepNet 模型用于學習用于人臉驗證任務(例如 FaceNet)的人臉嵌入。 這是對上一部分中討論的 FaceNet 方法的改進。 它需要對同一張臉進行多次裁剪,并通過多個編碼器才能獲得更好的嵌入效果。 與 FaceNet 相比,此方法具有更高的準確率,但需要更多時間進行處理。 人臉裁切在相同區域進行,并通過其各自的編碼器。 然后將所有層連接起來以進行三元組損失的訓練。
# DeepRank
Wang 等人提出的 [DeepRank](https://users.eecs.northwestern.edu/~jwa368/pdfs/deep_ranking.pdf) 用于根據相似度對圖像進行排名。 圖像通過不同的模型傳遞,如下所示:
經王等人許可轉載。
在此也計算了三元組損耗,并且反向傳播更加順利。 然后可以將圖像轉換為線性嵌入以進行排名,如下所示:

經 Wang 等人許可復制。
該算法對于排名目的非常有用。
# 視覺推薦系統
視覺推薦系統非常適合獲取給定圖像的推薦。 推薦模型提供具有相似屬性的圖像。 [根據 Shankar 等人提出的以下模型](https://arxiv.org/pdf/1703.02344.pdf),您可以了解相似圖像的嵌入,并提供以下建議:
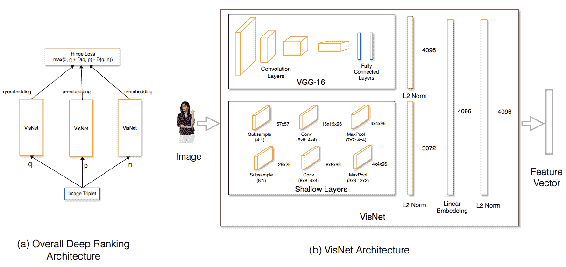
圖(a)顯示了深度排名架構,圖(b)顯示了 VisNet 架構(經 Shankar 等人許可復制)。
這些是用于相似性學習的一些算法。 在下一節中,我們將看到如何將這些技術應用于人臉。
# 人臉分析
可以使用計算機視覺以多種方式分析人臉。 為此,需要考慮以下幾個因素:
* **人臉檢測**:找到人臉位置的邊界框
* **人臉標志檢測**:查找鼻子,嘴巴等人臉特征的空間點
* **人臉對齊**:將人臉轉換成正面人臉以進行進一步分析
* **屬性識別**:查找諸如性別,微笑等屬性
* **情感分析**:分析人的情感
* **人臉驗證**:查找兩個圖像是否屬于同一個人
* **人臉識別**:識別人臉
* **人臉聚類**:將同一個人的人臉分組在一起
在以下各節中,讓我們詳細了解這些任務的數據集和實現。
# 人臉檢測
人臉檢測類似于對象檢測,我們在第 4 章,“對象檢測”中討論過。 必須從圖像中檢測出人臉的位置。 可以從[這里](http://vis-www.cs.umass.edu/fddb/)下載名為**人臉檢測數據集和基準**(**FDDB**)的數據集。 。 它具有 2,845 張帶有 5,171 張臉的圖像。 可以從[這里](http://mmlab.ie.cuhk.edu.hk/projects/WIDERFace/)下載 Yang 等人提出的另一個稱為**寬臉**的數據集。 它具有 32,203 張圖像和 393,703 張人臉。 這是來自更廣泛的人臉數據集的圖像示例:
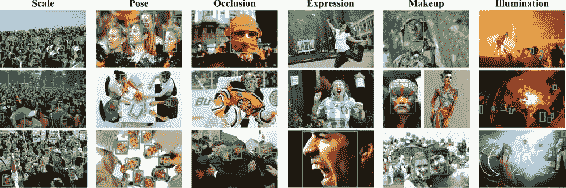
由楊等人提出。 并轉載自[這里](http://mmlab.ie.cuhk.edu.hk/projects/WIDERFace/support/intro.jpg)
數據集的比例,姿勢,遮擋,表情,妝容和照明度都有很好的變化。 另一個名**多屬性標簽的人臉**(**MALF**)的數據集包含 5,250 張圖像,其中包含 11,931 張人臉。 可以從[這個](http://www.cbsr.ia.ac.cn/faceevaluation/)鏈接訪問 MALF。 在對象檢測中使用的相同技術也可以應用于人臉檢測。
# 人臉標志和屬性
人臉標志是人臉的空間點。 空間點對應于各種人臉特征的位置,例如眼睛,眉毛,鼻子,嘴巴和下巴。 點數可能會從 5 到 78 不等,具體取決于標注。 人臉界標也稱為**基準點**,**人臉關鍵點**或**人臉姿勢**。 人臉標志具有許多應用,如下所示:
* 更好地進行人臉驗證或識別的人臉對齊
* 跟蹤視頻中的人臉
* 測量人臉表情或情感
* 有助于診斷疾病
接下來,我們將看到一些帶有基準點標注的數據庫。
# 多任務人臉標志(MTFL)數據集
`MTFL`數據集由 Zhang 等人提出。 并帶有五個人臉標志以及性別,微笑,眼鏡和頭部姿勢標注。 數據庫中存在 12,995 張人臉。 可以從[這里](http://mmlab.ie.cuhk.edu.hk/projects/TCDCN/data/MTFL.zip)下載`MTFL`。
這是`MTFL`中存在的圖像的示例:
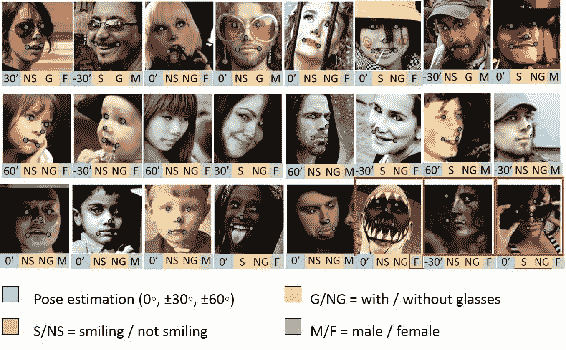
由張等人提出。 并轉載自[這里](http://mmlab.ie.cuhk.edu.hk/projects/TCDCN/img/1.jpg)
人臉在年齡,照度,情感等方面有很多變化。 **頭部姿勢**是人臉方向的角度,以度為單位。 眼鏡,微笑,性別屬性等都用二元標簽標注。
# Kaggle 關鍵點數據集
Kaggle 關鍵點數據集帶有 15 個人臉標志。 數據集中存在 8,832 張圖像。 可以從[這個鏈接](https://www.kaggle.com/c/facial-keypoints-detection/data)下載。 圖像尺寸為 96 像素 x 96 像素。
# 多屬性人臉標志(MAFL)數據集
Zhang 等人提出的`MAFL`數據集。 帶有 5 種具有 40 種不同人臉屬性的人臉標志。 數據庫中存在 20,000 張人臉。 可以從[這里](https://github.com/zhzhanp/TCDCN-face-alignment)下載`MAFL`。 這是`MAFL`中存在的圖像的示例:
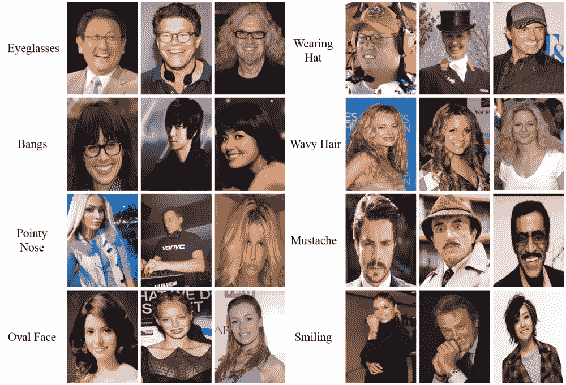
由 Liu 等人提出。 并轉載自[這里](http://mmlab.ie.cuhk.edu.hk/projects/celeba/overview.png)
標注的屬性包括尖頭,帶子,小胡子,卷發,戴帽子等。 這些圖像也包含在`CelebA`數據集中,稍后將詳細討論。
# 學習人臉關鍵點
如先前主題中所述,在計算關鍵人臉點時,需要定義一些參數。 我們將使用以下代碼來定義這些參數:
```py
image_size = 40 no_landmark = 10 no_gender_classes = 2 no_smile_classes = 2 no_glasses_classes = 2 no_headpose_classes = 5 batch_size = 100 total_batches = 300
```
接下來,為各種輸入保留一些占位符。
```py
image_input = tf.placeholder(tf.float32, shape=[None, image_size, image_size])
landmark_input = tf.placeholder(tf.float32, shape=[None, no_landmark])
gender_input = tf.placeholder(tf.float32, shape=[None, no_gender_classes])
smile_input = tf.placeholder(tf.float32, shape=[None, no_smile_classes])
glasses_input = tf.placeholder(tf.float32, shape=[None, no_glasses_classes])
headpose_input = tf.placeholder(tf.float32, shape=[None, no_headpose_classes])
```
接下來,使用四個卷積層構造主模型,如以下代碼所示:
```py
image_input_reshape = tf.reshape(image_input, [-1, image_size, image_size, 1],
name='input_reshape')
convolution_layer_1 = convolution_layer(image_input_reshape, 16)
pooling_layer_1 = pooling_layer(convolution_layer_1)
convolution_layer_2 = convolution_layer(pooling_layer_1, 48)
pooling_layer_2 = pooling_layer(convolution_layer_2)
convolution_layer_3 = convolution_layer(pooling_layer_2, 64)
pooling_layer_3 = pooling_layer(convolution_layer_3)
convolution_layer_4 = convolution_layer(pooling_layer_3, 64)
flattened_pool = tf.reshape(convolution_layer_4, [-1, 5 * 5 * 64],
name='flattened_pool')
dense_layer_bottleneck = dense_layer(flattened_pool, 1024)
dropout_bool = tf.placeholder(tf.bool)
dropout_layer = tf.layers.dropout(
inputs=dense_layer_bottleneck,
rate=0.4,
training=dropout_bool
)
```
接下來,我們將使用以下代碼為所有不同的任務創建一個對率分支:
```py
landmark_logits = dense_layer(dropout_layer, 10)
smile_logits = dense_layer(dropout_layer, 2)
glass_logits = dense_layer(dropout_layer, 2)
gender_logits = dense_layer(dropout_layer, 2)
headpose_logits = dense_layer(dropout_layer, 5)
```
損耗是針對所有人臉特征單獨計算的,如以下代碼所示:
```py
landmark_loss = 0.5 * tf.reduce_mean(
tf.square(landmark_input, landmark_logits))
gender_loss = tf.reduce_mean(
tf.nn.softmax_cross_entropy_with_logits(
labels=gender_input, logits=gender_logits))
smile_loss = tf.reduce_mean(
tf.nn.softmax_cross_entropy_with_logits(
labels=smile_input, logits=smile_logits))
glass_loss = tf.reduce_mean(
tf.nn.softmax_cross_entropy_with_logits(
labels=glasses_input, logits=glass_logits))
headpose_loss = tf.reduce_mean(
tf.nn.softmax_cross_entropy_with_logits(
labels=headpose_input, logits=headpose_logits))
loss_operation = landmark_loss + gender_loss + \
smile_loss + glass_loss + headpose_loss
```
現在,我們將初始化優化器并開始訓練,如以下代碼所示:
```py
optimiser = tf.train.AdamOptimizer().minimize(loss_operation)
session = tf.Session()
session.run(tf.initialize_all_variables())
fiducial_test_data = fiducial_data.test
for batch_no in range(total_batches):
fiducial_data_batch = fiducial_data.train.next_batch(batch_size)
loss, _landmark_loss, _ = session.run(
[loss_operation, landmark_loss, optimiser],
feed_dict={
image_input: fiducial_data_batch.images,
landmark_input: fiducial_data_batch.landmarks,
gender_input: fiducial_data_batch.gender,
smile_input: fiducial_data_batch.smile,
glasses_input: fiducial_data_batch.glasses,
headpose_input: fiducial_data_batch.pose,
dropout_bool: True
})
if batch_no % 10 == 0:
loss, _landmark_loss, _ = session.run(
[loss_operation, landmark_loss],
feed_dict={
image_input: fiducial_test_data.images,
landmark_input: fiducial_test_data.landmarks,
gender_input: fiducial_test_data.gender,
smile_input: fiducial_test_data.smile,
glasses_input: fiducial_test_data.glasses,
headpose_input: fiducial_test_data.pose,
dropout_bool: False
})
```
此過程可用于檢測人臉特征以及界標。
# 人臉識別
**人臉識別**或**人臉識別**是從數字圖像或視頻中識別人物的過程。 讓我們在下一部分中了解可用于人臉識別的數據集。
# 野生(LFW)數據集中的帶標簽的人臉
`LFW`數據集包含 13,233 張人臉和 5,749 位獨特的人,被視為評估人臉驗證數據集的標準數據集。 精度度量可用于評估計法。 可以在[這個鏈接](http://vis-www.cs.umass.edu/lfw/)中訪問數據集。
# YouTube 人臉數據集
YouTube `faces`數據集包含 3,425 個視頻剪輯,其中包含 1,595 個獨特的人。 這些視頻是從 YouTube 收集的。 數據集每人至少有兩個視頻。 該數據集被視為視頻中人臉驗證的標準數據集。 可以在[這個鏈接](https://www.cs.tau.ac.il/~wolf/ytfaces/)中訪問數據集。
# CelebFaces 屬性數據集(CelebA)
`CelebA` 數據集帶有人物身份以及 5 個人臉標志和 40 個屬性的標注。 數據庫中有 10,177 位獨特的人,擁有 202,599 張人臉圖像。 它是可用于人臉驗證,檢測,界標和屬性識別問題的大型數據集之一。 圖像具有帶有各種標注的良好人臉變化。 可以在[這個鏈接](http://mmlab.ie.cuhk.edu.hk/projects/CelebA.html)中訪問數據集。
# CASIA 網絡人臉數據庫
`CASIA`數據集帶有 10,575 個獨特的帶標注人臉,總共有 494,414 張圖像。 該數據集可以從[這個鏈接](http://www.cbsr.ia.ac.cn/english/CASIA-WebFace-Database.html)獲得。 這是可用于人臉驗證和識別問題的第二大公共數據集。
# VGGFace2 數據集
Cao 等人提出的`VGGFace2`數據集。 被 9,131 位獨特的人注解,具有 331 萬張圖片。 數據集可從[這個鏈接](http://www.robots.ox.ac.uk/~vgg/data/vgg_face2/)獲得。 變化包括年齡,種族,姿勢,職業和照度。 這是可用于人臉驗證的最大數據集。
這是數據集中存在的圖像的示例:
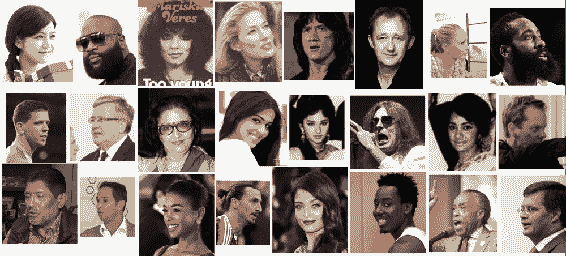
由曹等人提出。 并轉載自[這里](http://www.robots.ox.ac.uk/~vgg/data/vgg_face2/web_page_img.png)
每個唯一的人的最小,平均和最大圖像數分別是 87、362.6 和 843。
# 計算人臉之間的相似度
人臉相似度的計算是一個多步驟問題。 必須檢測人臉,然后找到基準點。 面可以與基準點對齊。 對齊的面可以用于比較。 如前所述,人臉檢測類似于對象檢測。 因此,為了找到人臉之間的相似性,我們將首先通過以下代碼導入所需的庫,以及`facenet`庫:
```py
from scipy import misc
import tensorflow as tf
import numpy as np
import os
import facenet
print facenet
from facenet import load_model, prewhiten
import align.detect_face
```
可以如下所示加載和對齊圖像:
```py
def load_and_align_data(image_paths, image_size=160, margin=44, gpu_memory_fraction=1.0):
minsize = 20
threshold = [0.6, 0.7, 0.7]
factor = 0.709 print('Creating networks and loading parameters')
with tf.Graph().as_default():
gpu_options = tf.GPUOptions(per_process_gpu_memory_fraction=gpu_memory_fraction)
sess = tf.Session(config=tf.ConfigProto(gpu_options=gpu_options, log_device_placement=False))
with sess.as_default():
pnet, rnet, onet = align.detect_face.create_mtcnn(sess, None)
nrof_samples = len(image_paths)
img_list = [None] * nrof_samples
for i in range(nrof_samples):
img = misc.imread(os.path.expanduser(image_paths[i]), mode='RGB')
img_size = np.asarray(img.shape)[0:2]
bounding_boxes, _ = align.detect_face.detect_face(img, minsize, pnet, rnet, onet, threshold, factor)
det = np.squeeze(bounding_boxes[0, 0:4])
bb = np.zeros(4, dtype=np.int32)
bb[0] = np.maximum(det[0] - margin / 2, 0)
bb[1] = np.maximum(det[1] - margin / 2, 0)
bb[2] = np.minimum(det[2] + margin / 2, img_size[1])
bb[3] = np.minimum(det[3] + margin / 2, img_size[0])
cropped = img[bb[1]:bb[3], bb[0]:bb[2], :]
aligned = misc.imresize(cropped, (image_size, image_size), interp='bilinear')
prewhitened = prewhiten(aligned)
img_list[i] = prewhitened
images = np.stack(img_list)
return images
```
現在,我們將處理圖像路徑以獲取嵌入。 相同的代碼在這里給出:
```py
def get_face_embeddings(image_paths, model='/20170512-110547/'):
images = load_and_align_data(image_paths)
with tf.Graph().as_default():
with tf.Session() as sess:
load_model(model)
images_placeholder = tf.get_default_graph().get_tensor_by_name("input:0")
embeddings = tf.get_default_graph().get_tensor_by_name("embeddings:0")
phase_train_placeholder = tf.get_default_graph().get_tensor_by_name("phase_train:0")
feed_dict = {images_placeholder: images, phase_train_placeholder: False}
emb = sess.run(embeddings, feed_dict=feed_dict)
return emb
```
現在,我們將使用以下代碼來計算嵌入之間的距離:
```py
def compute_distance(embedding_1, embedding_2):
dist = np.sqrt(np.sum(np.square(np.subtract(embedding_1, embedding_2))))
return dist
```
此函數將計算嵌入之間的**歐幾里德**距離。
# 尋找最佳閾值
使用前面的函數,可以計算出該系統的精度。 以下代碼可用于計算最佳閾值:
```py
import sys
import argparse
import os
import re
from sklearn.metrics import classification_report
from sklearn.metrics import accuracy_score
```
現在,使用以下代碼從文件夾中獲取圖像路徑:
```py
def get_image_paths(image_directory):
image_names = sorted(os.listdir(image_directory))
image_paths = [os.path.join(image_directory, image_name) for image_name in image_names]
return image_paths
```
通過嵌入時,將獲得圖像的距離,如以下代碼所示:
```py
def get_labels_distances(image_paths, embeddings):
target_labels, distances = [], []
for image_path_1, embedding_1 in zip(image_paths, embeddings):
for image_path_2, embedding_2 in zip(image_paths, embeddings):
if (re.sub(r'\d+', '', image_path_1)).lower() == (re.sub(r'\d+', '', image_path_2)).lower():
target_labels.append(1)
else:
target_labels.append(0)
distances.append(compute_distance(embedding_1, embedding_2)) # Replace distance metric here
return target_labels, distances
```
閾值隨以下代碼所示而變化,并相應打印各種度量:
```py
def print_metrics(target_labels, distances):
accuracies = []
for threshold in range(50, 150, 1):
threshold = threshold/100.
predicted_labels = [1 if dist <= threshold else 0 for dist in distances]
print("Threshold", threshold)
print(classification_report(target_labels, predicted_labels, target_names=['Different', 'Same']))
accuracy = accuracy_score(target_labels, predicted_labels)
print('Accuracy: ', accuracy)
accuracies.append(accuracy)
print(max(accuracies))
```
現在,借助以下代碼將圖像路徑傳遞給嵌入:
```py
def main(args):
image_paths = get_image_paths(args.image_directory)
embeddings = get_face_embeddings(image_paths) # Replace your embedding calculation here
target_labels, distances = get_labels_distances(image_paths, embeddings)
print_metrics(target_labels, distances)
```
最后,圖像目錄作為這些方法的主要參數傳遞,如以下代碼所示:
```py
if __name__ == '__main__':
parser = argparse.ArgumentParser()
parser.add_argument('image_directory', type=str, help='Directory containing the images to be compared')
parsed_arguments = parser.parse_args(sys.argv[1:])
main(parsed_arguments)
```
在此示例中,我們采用了預先訓練的模型并將其用于構建人臉驗證方法。 ;
# 人臉聚類
**人臉聚類**是將同一個人的圖像分組在一起以形成相冊的過程。 可以提取人臉的嵌入,并且可以使用諸如 K 均值的聚類算法將同一個人的人臉合并在一起。 TensorFlow 為 KMeans 算法提供了一個稱為 `tf.contrib.learn.KmeansClustering` 的 API。 K 均值算法將數據點分組在一起。 借助這種 KMeans 算法,可以提取專輯的嵌入內容,并且可以一起找到個人的人臉,或者換句話說,可以將聚在一起。
# 總結
在本章中,我們介紹了相似性學習的基礎知識。 我們研究了度量學習,連體網絡和 FaceNet 等算法。 我們還介紹了損失函數,例如對比損失和三重損失。 還涵蓋了兩個不同的領域,即排名和推薦。 最后,通過理解幾個步驟(包括檢測,基準點檢測和相似性評分)涵蓋了人臉識別的分步演練。
在下一章中,我們將了解循環神經網絡及其在自然語言處理問題中的使用。 稍后,我們將使用語言模型和圖像模型來對圖像進行字幕。 我們將針對該問題訪問幾種算法,并查看兩種不同類型數據的實現。
- TensorFlow 1.x 深度學習秘籍
- 零、前言
- 一、TensorFlow 簡介
- 二、回歸
- 三、神經網絡:感知器
- 四、卷積神經網絡
- 五、高級卷積神經網絡
- 六、循環神經網絡
- 七、無監督學習
- 八、自編碼器
- 九、強化學習
- 十、移動計算
- 十一、生成模型和 CapsNet
- 十二、分布式 TensorFlow 和云深度學習
- 十三、AutoML 和學習如何學習(元學習)
- 十四、TensorFlow 處理單元
- 使用 TensorFlow 構建機器學習項目中文版
- 一、探索和轉換數據
- 二、聚類
- 三、線性回歸
- 四、邏輯回歸
- 五、簡單的前饋神經網絡
- 六、卷積神經網絡
- 七、循環神經網絡和 LSTM
- 八、深度神經網絡
- 九、大規模運行模型 -- GPU 和服務
- 十、庫安裝和其他提示
- TensorFlow 深度學習中文第二版
- 一、人工神經網絡
- 二、TensorFlow v1.6 的新功能是什么?
- 三、實現前饋神經網絡
- 四、CNN 實戰
- 五、使用 TensorFlow 實現自編碼器
- 六、RNN 和梯度消失或爆炸問題
- 七、TensorFlow GPU 配置
- 八、TFLearn
- 九、使用協同過濾的電影推薦
- 十、OpenAI Gym
- TensorFlow 深度學習實戰指南中文版
- 一、入門
- 二、深度神經網絡
- 三、卷積神經網絡
- 四、循環神經網絡介紹
- 五、總結
- 精通 TensorFlow 1.x
- 一、TensorFlow 101
- 二、TensorFlow 的高級庫
- 三、Keras 101
- 四、TensorFlow 中的經典機器學習
- 五、TensorFlow 和 Keras 中的神經網絡和 MLP
- 六、TensorFlow 和 Keras 中的 RNN
- 七、TensorFlow 和 Keras 中的用于時間序列數據的 RNN
- 八、TensorFlow 和 Keras 中的用于文本數據的 RNN
- 九、TensorFlow 和 Keras 中的 CNN
- 十、TensorFlow 和 Keras 中的自編碼器
- 十一、TF 服務:生產中的 TensorFlow 模型
- 十二、遷移學習和預訓練模型
- 十三、深度強化學習
- 十四、生成對抗網絡
- 十五、TensorFlow 集群的分布式模型
- 十六、移動和嵌入式平臺上的 TensorFlow 模型
- 十七、R 中的 TensorFlow 和 Keras
- 十八、調試 TensorFlow 模型
- 十九、張量處理單元
- TensorFlow 機器學習秘籍中文第二版
- 一、TensorFlow 入門
- 二、TensorFlow 的方式
- 三、線性回歸
- 四、支持向量機
- 五、最近鄰方法
- 六、神經網絡
- 七、自然語言處理
- 八、卷積神經網絡
- 九、循環神經網絡
- 十、將 TensorFlow 投入生產
- 十一、更多 TensorFlow
- 與 TensorFlow 的初次接觸
- 前言
- 1.?TensorFlow 基礎知識
- 2. TensorFlow 中的線性回歸
- 3. TensorFlow 中的聚類
- 4. TensorFlow 中的單層神經網絡
- 5. TensorFlow 中的多層神經網絡
- 6. 并行
- 后記
- TensorFlow 學習指南
- 一、基礎
- 二、線性模型
- 三、學習
- 四、分布式
- TensorFlow Rager 教程
- 一、如何使用 TensorFlow Eager 構建簡單的神經網絡
- 二、在 Eager 模式中使用指標
- 三、如何保存和恢復訓練模型
- 四、文本序列到 TFRecords
- 五、如何將原始圖片數據轉換為 TFRecords
- 六、如何使用 TensorFlow Eager 從 TFRecords 批量讀取數據
- 七、使用 TensorFlow Eager 構建用于情感識別的卷積神經網絡(CNN)
- 八、用于 TensorFlow Eager 序列分類的動態循壞神經網絡
- 九、用于 TensorFlow Eager 時間序列回歸的遞歸神經網絡
- TensorFlow 高效編程
- 圖嵌入綜述:問題,技術與應用
- 一、引言
- 三、圖嵌入的問題設定
- 四、圖嵌入技術
- 基于邊重構的優化問題
- 應用
- 基于深度學習的推薦系統:綜述和新視角
- 引言
- 基于深度學習的推薦:最先進的技術
- 基于卷積神經網絡的推薦
- 關于卷積神經網絡我們理解了什么
- 第1章概論
- 第2章多層網絡
- 2.1.4生成對抗網絡
- 2.2.1最近ConvNets演變中的關鍵架構
- 2.2.2走向ConvNet不變性
- 2.3時空卷積網絡
- 第3章了解ConvNets構建塊
- 3.2整改
- 3.3規范化
- 3.4匯集
- 第四章現狀
- 4.2打開問題
- 參考
- 機器學習超級復習筆記
- Python 遷移學習實用指南
- 零、前言
- 一、機器學習基礎
- 二、深度學習基礎
- 三、了解深度學習架構
- 四、遷移學習基礎
- 五、釋放遷移學習的力量
- 六、圖像識別與分類
- 七、文本文件分類
- 八、音頻事件識別與分類
- 九、DeepDream
- 十、自動圖像字幕生成器
- 十一、圖像著色
- 面向計算機視覺的深度學習
- 零、前言
- 一、入門
- 二、圖像分類
- 三、圖像檢索
- 四、對象檢測
- 五、語義分割
- 六、相似性學習
- 七、圖像字幕
- 八、生成模型
- 九、視頻分類
- 十、部署
- 深度學習快速參考
- 零、前言
- 一、深度學習的基礎
- 二、使用深度學習解決回歸問題
- 三、使用 TensorBoard 監控網絡訓練
- 四、使用深度學習解決二分類問題
- 五、使用 Keras 解決多分類問題
- 六、超參數優化
- 七、從頭開始訓練 CNN
- 八、將預訓練的 CNN 用于遷移學習
- 九、從頭開始訓練 RNN
- 十、使用詞嵌入從頭開始訓練 LSTM
- 十一、訓練 Seq2Seq 模型
- 十二、深度強化學習
- 十三、生成對抗網絡
- TensorFlow 2.0 快速入門指南
- 零、前言
- 第 1 部分:TensorFlow 2.00 Alpha 簡介
- 一、TensorFlow 2 簡介
- 二、Keras:TensorFlow 2 的高級 API
- 三、TensorFlow 2 和 ANN 技術
- 第 2 部分:TensorFlow 2.00 Alpha 中的監督和無監督學習
- 四、TensorFlow 2 和監督機器學習
- 五、TensorFlow 2 和無監督學習
- 第 3 部分:TensorFlow 2.00 Alpha 的神經網絡應用
- 六、使用 TensorFlow 2 識別圖像
- 七、TensorFlow 2 和神經風格遷移
- 八、TensorFlow 2 和循環神經網絡
- 九、TensorFlow 估計器和 TensorFlow HUB
- 十、從 tf1.12 轉換為 tf2
- TensorFlow 入門
- 零、前言
- 一、TensorFlow 基本概念
- 二、TensorFlow 數學運算
- 三、機器學習入門
- 四、神經網絡簡介
- 五、深度學習
- 六、TensorFlow GPU 編程和服務
- TensorFlow 卷積神經網絡實用指南
- 零、前言
- 一、TensorFlow 的設置和介紹
- 二、深度學習和卷積神經網絡
- 三、TensorFlow 中的圖像分類
- 四、目標檢測與分割
- 五、VGG,Inception,ResNet 和 MobileNets
- 六、自編碼器,變分自編碼器和生成對抗網絡
- 七、遷移學習
- 八、機器學習最佳實踐和故障排除
- 九、大規模訓練
- 十、參考文獻