
# Selenium C#Webdriver 教程:NUnit 示例
> 原文: [https://www.guru99.com/selenium-csharp-tutorial.html](https://www.guru99.com/selenium-csharp-tutorial.html)
## 硒概述:
Selenium 是一種開源 Web [自動化測試](/automation-testing.html)工具,它支持多個瀏覽器和多個操作系統。 它允許測試人員使用多種編程語言(例如 Java,C#,Python,.Net,Ruby,PHP 和 Perl)來編碼自動化測試。
## C#概述:
C#是從 C ++和 Java 派生的一種面向對象的編程語言。 C#允許開發人員在.Net 平臺上使用 Visual Studio 構建應用程序。 以下是 C#的主要功能。
1. 它是一種面向對象的編程語言
2. 它支持控制臺,Windows 和基于 Web 的應用程序的開發
3. 它提供了諸如封裝,繼承和多態性的功能。
<center>**What You Will Learn:** []</center>
* [C#的基本語法:](#1)
* [使用 Selenium WebDriver 設置 Visual Studio:](#2)
* [在 Visual Studio 中創建一個新項目:](#3)
* [使用 Selenium WebDriver 設置 Visual Studio:](#4)
* [NUnit Framework:概述](#5)
* [安裝 NUnit Framework 的步驟:](#6)
* [下載 NUnit 測試適配器](#7)的步驟
* [Selenium 和 NUnit 框架:](#8)
* [在 Selenium 中創建 NUnit 測試類的步驟:](#9)
* C#中的 [WebDriver 命令:](#10)
* [瀏覽器命令:](#11)
* [Webelement 命令:](#12)
* C#中的[下拉命令:](#13)
* [代碼示例](#14)
* [示例 1:使用 XPATH 定位器單擊鏈接:](#15)
* [示例 2:將數據輸入到 TextBox 中,然后使用 XPATH 定位器單擊一個按鈕:](#16)
* [示例 3:將數據輸入到 TextBox 中,然后使用 CSS 定位器單擊一個按鈕:](#17)
* [示例 4:在下拉列表中選擇一個值:](#18)
## C#的基本語法:
C#中的程序需要包含以下部分
1. 命名空間聲明
2. 班級
3. 類的屬性和方法
4. 主要方法
5. 計劃陳述
**示例-**
下面是一個示例 C#程序,用于在系統控制臺上打印文本“ Guru99”。
```
using System;
namespace FirstProgram {
class DemoPrint {
static void main(){
Console.WriteLine("Guru99");
}
}
}
```
說明:
* C#中的名稱空間是多個類的集合。 必須使用關鍵字“ using”聲明每個名稱空間。
* 代碼的第一條語句在我們的程序中包含名稱空間“ System”。 系統名稱空間定義了 C#中使用的基本類和事件。 要使用的名稱空間取決于程序要求。
* 第二條語句是為類“ DemoPrint”聲明一個名稱空間“ FirstProgram”。 一個 C#文件可以在同一個命名空間中包含多個類。
* 第三條語句包括類聲明。 一個類可以包含多個屬性和多個方法。
* 第四個語句包括 Main 方法的聲明。 主要方法是每個類的執行入口。
* 最后一條語句是用于將語句打印到控制臺的 C#語法。 WriteLine 是“控制臺”類的方法。
## 使用 Selenium WebDriver 設置 Visual Studio:
Visual Studio 是一個集成開發環境(IDE),開發人員可使用它來跨多個平臺(例如 Windows,Android,iOS 和基于云的應用程序)構建應用程序。
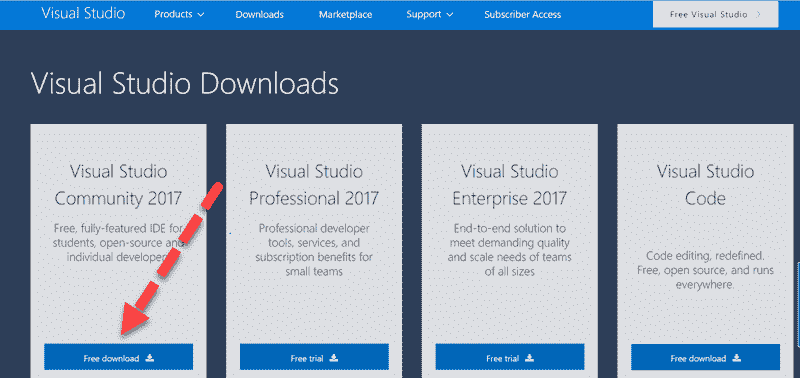
**步驟 1)**導航至 URL [https://www.visualstudio.com/downloads/](https://www.visualstudio.com/downloads/) ,然后單擊 Visual Studio Community 2017 選項卡上顯示的“免費下載”按鈕
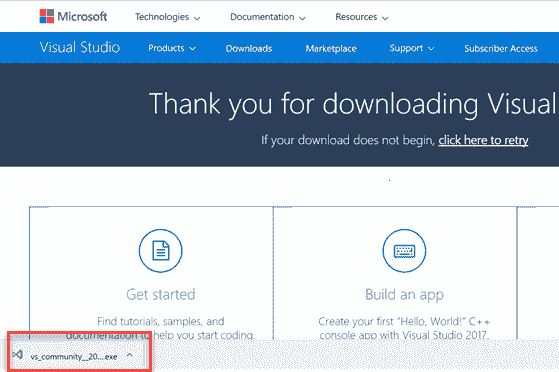
**步驟 2)**打開下載的 exe。 如果詢問管理員權限,請單擊“是”。
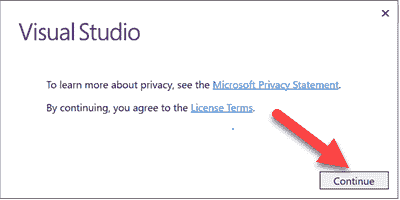
**步驟 3)**將會出現以下彈出窗口。 點擊“繼續”按鈕。
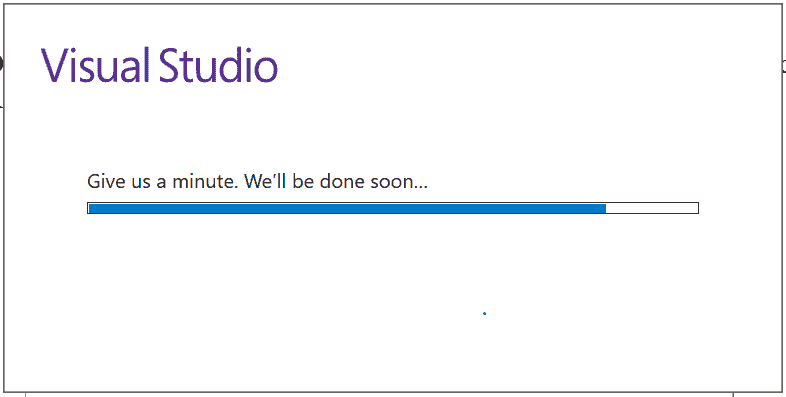
文件將被下載,如下面的彈出窗口所示。
**步驟 4)**在下一個屏幕中,
選中以下復選框
* 通用 Windows 平臺開發
* 網絡桌面開發
點擊“安裝”。
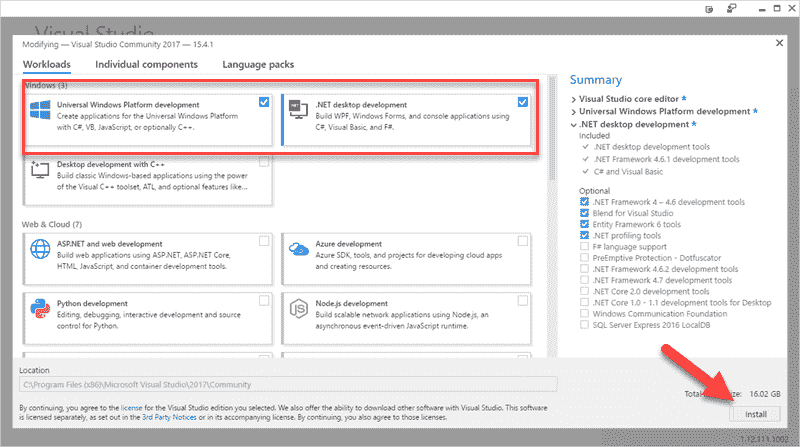
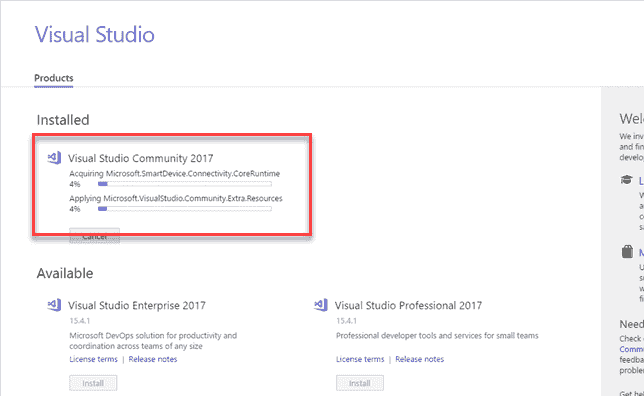
等待每個組件的安裝完成。 文件大小為 16GB,將需要一些時間。
**步驟 5)**將顯示以下彈出窗口。 點擊“重啟”按鈕。

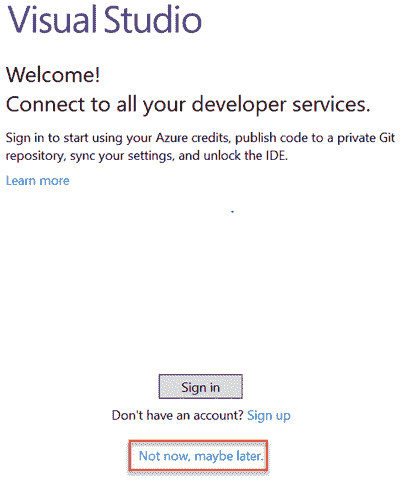
**步驟 6)**重新啟動計算機后,在開始菜單上搜索“ Visual Studio 2017”,然后單擊搜索結果。 將出現以下彈出窗口。 如果您沒有現有帳戶,請單擊“不立即,也許以后”鏈接。
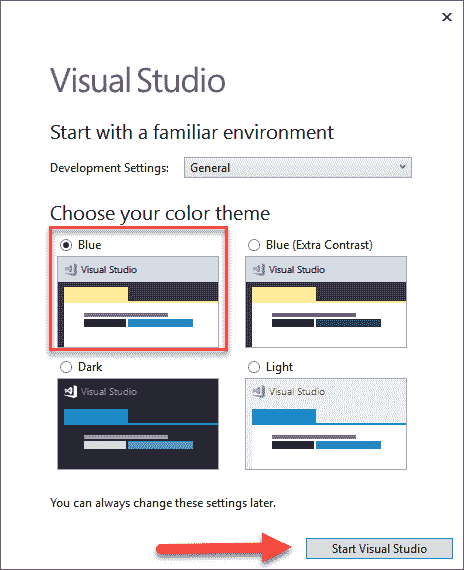
**步驟 7)**在下一個屏幕中,
* 選擇您喜歡的顏色主題
* 單擊按鈕“啟動 Visual Studio”
**步驟 8)**將出現 Visual Studio“入門”屏幕。
### 在 Visual Studio 中創建一個新項目:
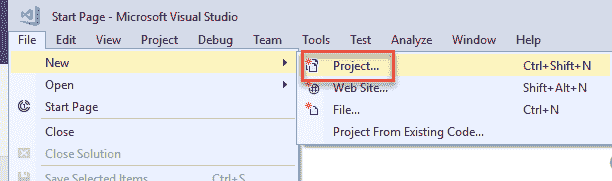
**步驟 1)**在文件菜單中,單擊新建>項目
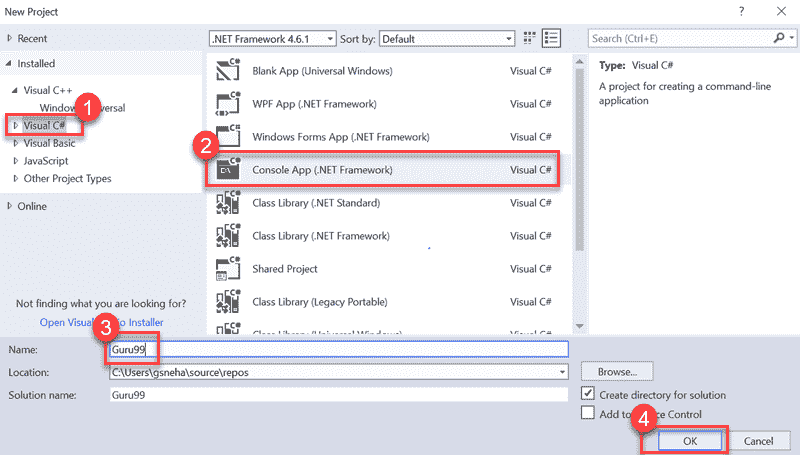
**步驟 2)**在下一個屏幕中,
1. 選擇選項“ Visual C#”
2. 單擊控制臺應用程序(.Net Framework)
3. 輸入名稱為“ Guru99”
4. 點擊確定
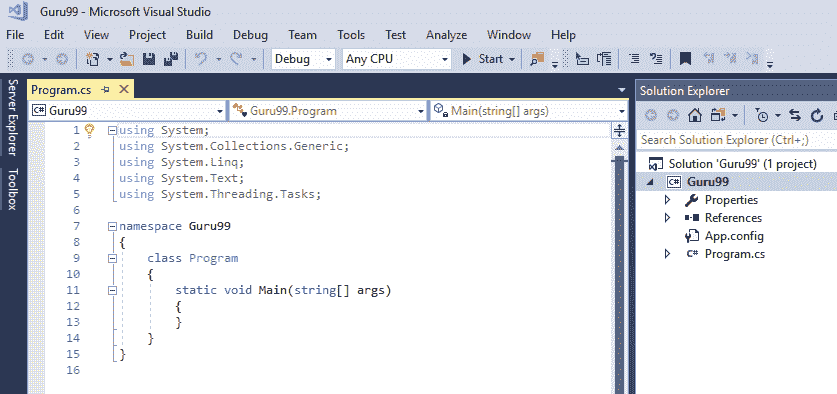
**步驟 3)**成功創建項目后,將顯示以下屏幕。
### 使用 Selenium WebDriver 設置 Visual Studio:
**步驟 1)**導航到工具-> NuGet 軟件包管理器->管理 NuGet 軟件包以獲取解決方案
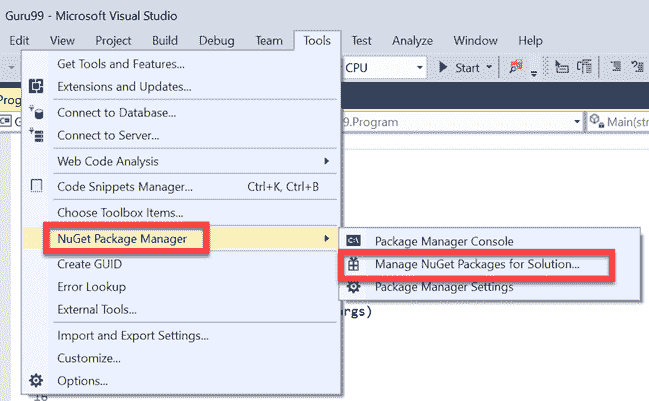
**步驟 2)**在下一個屏幕中
1. 在結果屏幕上搜索 Selenium
2. 選擇第一個搜索結果
3. 選中項目復選框
4. 點擊“安裝”

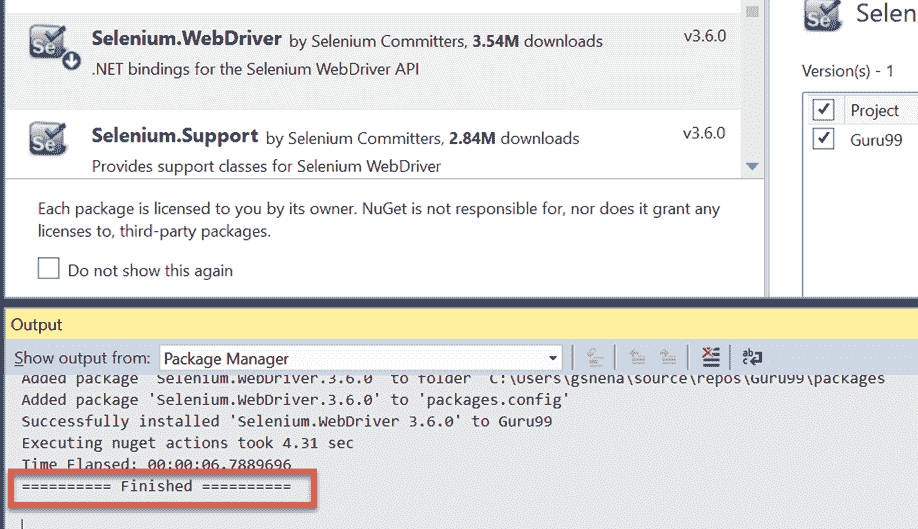
**步驟 3)**在彈出屏幕中單擊“確定”按鈕

**步驟 4)**成功安裝軟件包后,將顯示以下消息。
## NUnit 框架:概述
NUnit 是 Visual Studio 和 Selenium WebDriver 支持的[單元測試](/unit-testing-guide.html)框架。 NUnit 是.Net 應用程序中使用最廣泛的單元測試框架。 NUnit 以可讀的格式顯示測試結果,并允許測試人員調試自動測試。
為了使用它,我們需要在 Visual Studio 上安裝 NUnit Framework 和 NUnit 測試適配器。
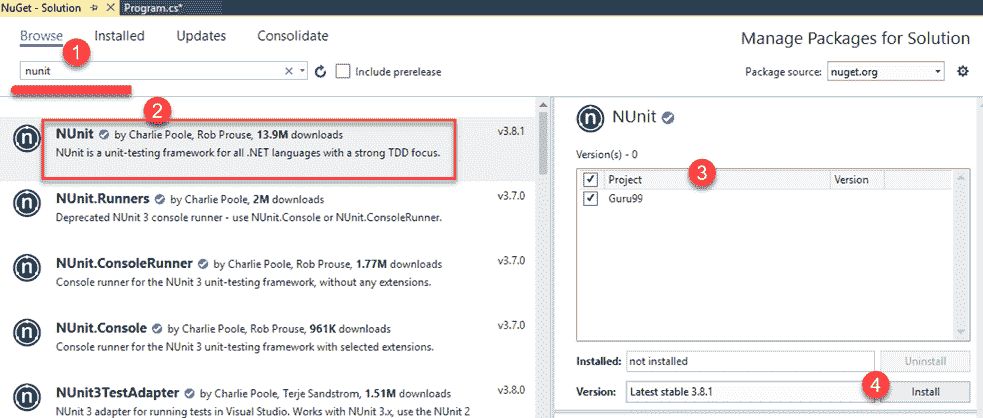
### 安裝 NUnit Framework 的步驟:
1.導航到工具-> NuGet 軟件包管理器->管理解決方案的 NuGet 軟件包

**步驟 2)**在下一個窗口中
1. 搜索 NUnit
2. 選擇搜索結果
3. 選擇項目
4. 點擊安裝
**步驟 3)**將會出現以下彈出窗口。 點擊“確定”按鈕。
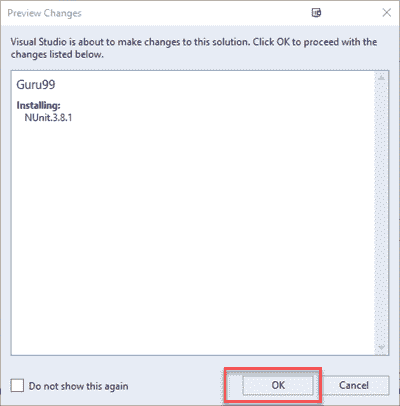
**步驟 4)**安裝完成后,將出現以下消息。

### 下載 NUnit 測試適配器的步驟
請注意,以下步驟僅適用于 32 位計算機。 對于 64 位計算機,您需要按照以下相同的步驟下載“ NUnit3 測試適配器”。
**步驟 1)**導航到工具-> NuGet 軟件包管理器->管理解決方案的 NuGet 軟件包。 在那個屏幕上
1. 搜索 NUnitTestAdapter
2. 點擊搜索結果
3. 選擇項目
4. 點擊安裝
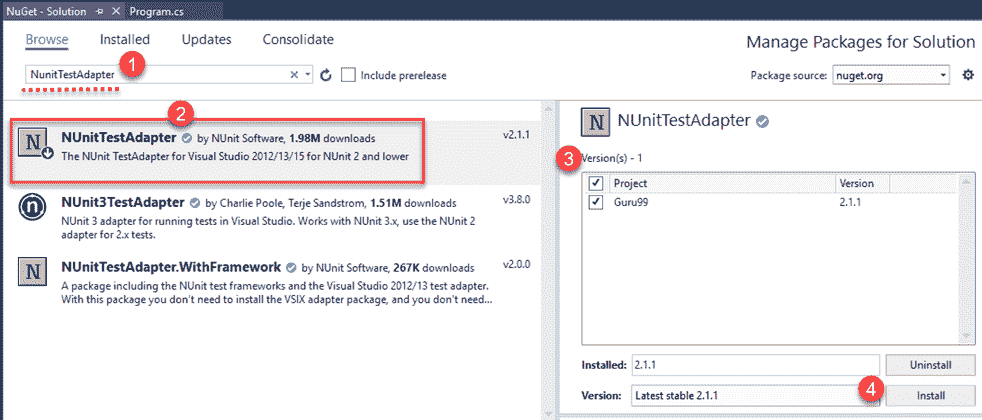
**步驟 2)**在確認彈出窗口上單擊“確定”。 安裝完成后,您將看到以下消息:

## Selenium 和 NUnit 框架:
硒與 NUnit 框架的集成使測試人員可以區分各種測試類別。 NUnit 還允許測試人員在運行測試之前和之后使用諸如 SetUp,Test 和 TearDown 之類的注釋執行操作。
通過創建 NUnit 測試類并使用 NUnit 框架運行測試類,可以將 NUnit 框架與 Selenium 集成。
以下是使用 NUnit 框架創建和運行測試類所需的步驟。
### 在 Selenium 中創建 NUnit 測試類的步驟:
**步驟 1)**在解決方案資源管理器中,右鍵單擊項目>添加>類
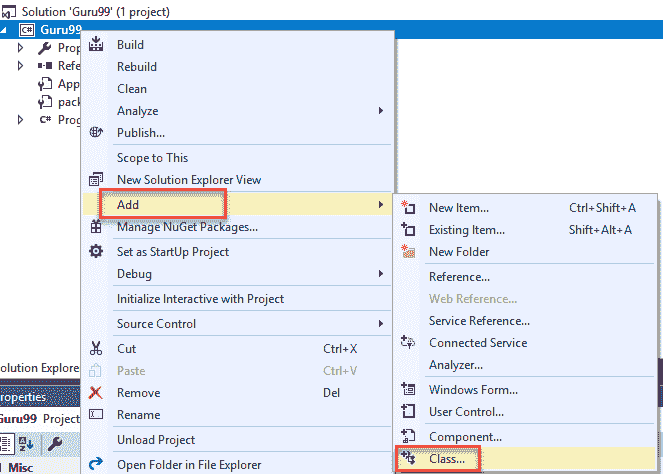
**步驟 2)將出現**類創建窗口。
1. 給班級起個名字
2. 點擊添加按鈕

**步驟 3)**將會出現以下屏幕。
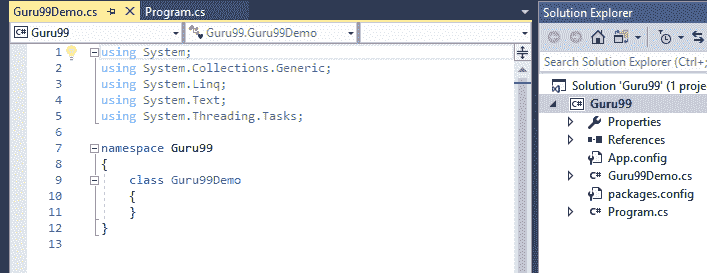
**步驟 4)**將以下代碼添加到創建的類中。 請注意,您需要在 chrome 驅動程序初始化期間指定“ chromdriver.exe”文件的位置。
```
using NUnit.Framework;
using OpenQA.Selenium;
using OpenQA.Selenium.Chrome;
using OpenQA.Selenium.Firefox;
using System;
using System.Collections.Generic;
using System.Linq;
using System.Text;
using System.Threading.Tasks;
namespace Guru99Demo
{
class Guru99Demo
{
IWebDriver driver;
[SetUp]
public void startBrowser()
{
driver = new ChromeDriver("D:\\3rdparty\\chrome");
}
[Test]
public void test()
{
driver.Url = "http://www.google.co.in";
}
[TearDown]
public void closeBrowser()
{
driver.Close();
}
}
}
```
**步驟 4)**單擊“構建”->“構建解決方案”

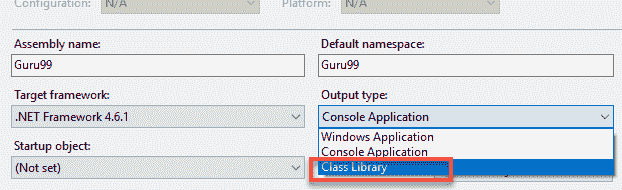
**注意:**構建時,您可能會收到類似“不包含適用于入口點的靜態'main'方法”之類的錯誤。
[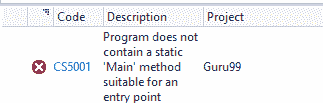 ](/images/1/103017_0412_SeleniumCWe28.png)
要解決此問題,請轉到項目>屬性,然后將“輸出類型”更改為“類庫”。 默認值為“控制臺應用程序”。
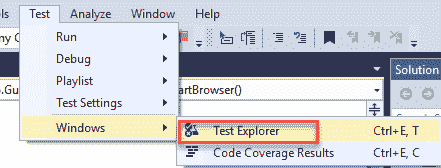
**步驟 5)**構建成功后,我們需要打開“測試資源管理器”窗口。 單擊測試-> Windows->測試瀏覽器
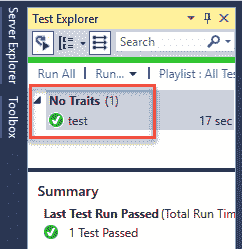
**步驟 6)**將打開“測試資源管理器”窗口,其中包含可用測試的列表。 右鍵單擊“測試資源管理器”,然后選擇“運行選定的測試”

**步驟 7)** Selenium 必須使用指定的 URL 打開瀏覽器并關閉瀏覽器。 測試用例的狀態將在“測試資源管理器”窗口中更改為“通過”。
## C#中的 Selenium WebDriver 命令:
C#使用接口“ IWebDriver”進行瀏覽器交互。 以下是 C#中可用的命令類別。
1. 瀏覽器命令
2. Web 元素命令
3. 下拉命令
讓我們一一研究
### 瀏覽器命令:
以下是 C#中可用的瀏覽器命令的列表。
| **命令名稱** | **說明** | **語法** |
| **網址命令** | 此命令用于在瀏覽器中打開指定的 URL。 |
```
driver.Url = "https://www.guru99.com"
```
|
| **標題命令** | 此命令用于檢索當前打開的網頁的頁面標題 |
```
String title = driver.Title
```
|
| **PageSource 命令** | 該命令用于獲取當前打開的網頁的源代碼。 |
```
String pageSource = driver.PageSource
```
|
| **關閉命令** | 此命令用于關閉最近打開的瀏覽器實例。 |
```
driver.Close();
```
|
| **退出命令** | 此命令用于關閉所有打開的瀏覽器實例 |
```
driver.Quit();
```
|
| **后退命令** | 此命令用于導航到瀏覽器歷史記錄的上一頁。 |
```
driver.Navigate().Back();
```
|
| **轉發命令** | 此命令用于導航到瀏覽器歷史記錄的下一頁。 |
```
driver.Navigate().Forward()
```
|
| **刷新命令** | 此命令用于執行瀏覽器刷新。 |
```
driver.Navigate().Refresh()
```
|
### Webelement 命令:
Webelement 代表網頁上的所有元素。 它們由 HTML 標記表示。 每個按鈕,文本框,鏈接,圖像,表格和框架都屬于 Webelements。 可以使用 IWebelement 界面觸發對 Web 元素的操作。 要與 Webelement 進行交互,我們需要在網頁上找到元素,然后對其進行操作。 諸如 Firebug 和 Firepath 之類的工具可用于識別 Webelement 的 Xpath。
以下是 C#中可用的 Webelement 命令的列表。
| **Command Name** | **Description** | **Syntax** |
| **點擊命令** | 此命令用于單擊 Webelement。 為了使元素可單擊,該元素必須在網頁上可見。 此命令也用于復選框和單選按鈕操作。 |
```
IWebelement element = driver.FindElement(By.xpath("xpath of Webelement")); element.Click();
```
|
| **清除命令** | 該命令專門用于清除文本框的現有內容。 |
```
IWebelement element = driver.FindElement(By.xpath("xpath of Webelement"));
element.Clear();
```
|
| **SendKeys 命令** | 此命令用于在文本框中輸入值。 輸入的值必須作為參數傳遞給 |
```
IWebelement element = driver.FindElement(By.xpath("xpath of Webelement"));
element.SendKeys("guru99");
```
|
| **顯示的命令** | 此命令用于標識網頁上是否顯示特定元素。 該命令返回一個布爾值; 是 true 還是 false 取決于 Web 元素的可見性。 |
```
IWebelement element = driver.FindElement(By.xpath("xpath of Webelement"));
Boolean status = element.Displayed;
```
|
| **啟用的命令** | 此命令用于標識是否在網頁上啟用了特定的 Web 元素。 該命令返回一個布爾值; 結果是對還是錯。 |
```
IWebelement element = driver.FindElement(By.xpath("xpath of Webelement"));
Boolean status = element.Enabled;
```
|
| **選定的命令** | 此命令用于標識是否選擇了特定的 Web 元素。 此命令用于復選框,單選按鈕和選擇操作。 |
```
IWebelement element = driver.FindElement(By.xpath("xpath of Webelement"));
Boolean status = element.Selected;
```
|
| **提交命令:** | 該命令與 click 命令類似,區別在于 HTML 表單是否具有類型為 Submit 的按鈕。 當 click 命令單擊任何按鈕時,submit 命令僅單擊類型為 commit 的按鈕。 |
```
IWebelement element = driver.FindElement(By.xpath("xpath of Webelement")); element.submit();
```
|
| **文本命令** | 此命令返回 Webelement 的內部文本。 此命令返回一個字符串值作為結果。 |
```
IWebelement element = driver.FindElement(By.xpath("xpath of Webelement"));
String text=element.Text;
```
|
| **TagName 命令** | 此命令返回 Web 元素的 HTML 標簽。 它返回一個字符串值作為結果。 |
```
IWebelement element = driver.FindElement(By.xpath("xpath of Webelement")); String tagName = element.TagName;
```
|
| **GetCSSValue 命令:** | 此方法用于以 rgba 字符串(紅色,綠色,藍色和 Alpha)的形式返回 Web 元素的顏色。 |
```
IWebelement element = driver.FindElement(By.xpath("xpath of Webelement"));
String color = element.getCSSValue;
```
**輸出**-如果元素的顏色為紅色,則輸出為 rgba(255,0,0,1) |
### 下拉命令:
可以使用 SelectElement 類實現 C#中的下拉操作。
以下是 C#中可用的各種下拉操作。
| **Command Name** | **Description** | **Syntax** |
| **SelectByText 命令** | 該命令根據選項的文本選擇下拉菜單的選項。 |
```
IWebelement element = driver.FindElement(By.xpath("xpath of Webelement"));
SelectElement select = new SelectElement(element);
select.SelectByText("Guru99");
```
|
| **SelectByIndex 命令** | 此命令用于根據其索引選擇一個選項。 下拉索引從 0 開始。 |
```
IWebelement element = driver.FindElement(By.xpath("xpath of Webelement"));
SelectElement select = new SelectElement(element);
select.SelectByIndex("4");
```
|
| **SelectByValue 命令** | 此命令用于根據選項值選擇選項。 |
```
IWebelement element = driver.FindElement(By.xpath("xpath of Webelement"));
SelectElement select = new SelectElement(element);
select.SelectByValue("Guru99");
```
|
| **選項命令** | 此命令用于檢索下拉菜單中顯示的選項列表。 |
```
IWebelement element = driver.FindElement(By.xpath("xpath of Webelement"));
SelectElement select = new SelectElement(element);
List<IWebelement> options = select. Options;
int size = options.Count;
for(int i=0;i<options.size();i++)
{
String value = size.elementAt(i).Text;
Console.writeLine(value);
}
```
上面的代碼在一個下拉列表中將所有選項打印到控制臺上。 |
| **IsMultiple 命令** | 此命令用于識別下拉列表是否為多選下拉列表; 多選下拉菜單使用戶可以一次選擇一個下拉菜單中的多個選項。 此命令返回一個布爾值。 |
```
IWebelement element = driver.FindElement(By.xpath("xpath of Webelement"));
SelectElement select = new SelectElement(element);
Boolean status = select.IsMultiple();
```
|
| **DeSelectAll 命令** | 此命令用于多選下拉列表中。 清除已選擇的選項。 |
```
IWebelement element = driver.FindElement(By.xpath("xpath of Webelement"));
SelectElement select = new SelectElement(element);
select.DeSelectAll();
```
|
| **DeSelectByIndex 命令** | 此命令使用其索引取消選擇已選擇的值。 |
```
IWebelement element = driver.FindElement(By.xpath("xpath of Webelement"));
SelectElement select = new SelectElement(element);
select.DeSelectByIndex("4");
```
|
| **DeSelectByValue 命令** | 此命令使用其值取消選擇已選擇的值。 |
```
IWebelement element = driver.FindElement(By.xpath("xpath of Webelement"));
SelectElement select = new SelectElement(element);
select.DeSelectByValue("Guru99");
```
|
| **DeSelectByText 命令** | 此命令使用其文本取消選擇已選擇的值。 |
```
IWebelement element = driver.FindElement(By.xpath("xpath of Webelement"));
SelectElement select = new SelectElement(element);
select.DeSelectByText("Guru99");
```
|
## 代碼示例
### 示例 1:使用 XPATH 定位器單擊鏈接:
**測試方案:**
1. 導航至 Demo Guru99 網頁- [http://demo.guru99.com/test/guru99home/](http://demo.guru99.com/test/guru99home/)
2. 最大化窗口
3. 點擊“測試”菜單
4. 關閉瀏覽器
```
using NUnit.Framework;
using OpenQA.Selenium;
using OpenQA.Selenium.Chrome;
using System;
using System.Collections.Generic;
using System.Linq;
using System.Text;
using System.Threading.Tasks;
namespace Guru99Demo
{
class CSS
{
IWebDriver m_driver;
[Test]
public void cssDemo()
{
m_driver = new ChromeDriver("D:\\3rdparty\\chrome");
m_driver.Url = "http://demo.guru99.com/test/guru99home/";
m_driver.Manage().Window.Maximize();
IWebelement link = m_driver.FindElement(By.XPath(".//*[@id='rt-header']//div[2]/div/ul/li[2]/a"));
link.Click();
m_driver.Close();
}
}
}
```
### 示例 2:將數據輸入到 TextBox 中,然后使用 XPATH 定位器單擊一個按鈕:
**Test Scenario:**
1. 導航到 Guru 99 演示頁面- [http://demo.guru99.com/test/guru99home/](http://demo.guru99.com/test/guru99home/)
2. 在電子郵件文本框中輸入數據
3. 點擊注冊按鈕
```
using NUnit.Framework;
using OpenQA.Selenium;
using OpenQA.Selenium.Chrome;
using System;
using System.Collections.Generic;
using System.Linq;
using System.Text;
using System.Threading.Tasks;
namespace Guru99Demo
{
class CSS
{
IWebDriver m_driver;
[Test]
public void cssDemo()
{
m_driver = new ChromeDriver("G:\\");
m_driver.Url = "http://demo.guru99.com/test/guru99home/";
m_driver.Manage().Window.Maximize();
// Store locator values of email text box and sign up button
IWebElement emailTextBox = m_driver.FindElement(By.XPath(".//*[@id='philadelphia-field-email']"));
IWebElement signUpButton = m_driver.FindElement(By.XPath(".//*[@id='philadelphia-field-submit']"));
emailTextBox.SendKeys("This email address is being protected from spambots. You need JavaScript enabled to view it.
");
signUpButton.Click();
}
}
}
```
### 示例 3:在 TextBox 中輸入數據并使用 CSS 定位器單擊一個按鈕:
**Test Scenario:**
1. 導航到 Guru 99 演示頁面- [http://demo.guru99.com/test/guru99home/](http://demo.guru99.com/test/guru99home/)
2. 在電子郵件文本框中輸入數據
3. 點擊注冊按鈕
```
using NUnit.Framework;
using OpenQA.Selenium;
using OpenQA.Selenium.Chrome;
using System;
using System.Collections.Generic;
using System.Linq;
using System.Text;
using System.Threading.Tasks;
namespace Guru99Demo
{
class CSS
{
IWebDriver m_driver;
[Test]
public void cssDemo()
{
m_driver = new ChromeDriver("G:\\");
m_driver.Url = "http://demo.guru99.com/test/guru99home/";
m_driver.Manage().Window.Maximize();
// Store locator values of email text box and sign up button
IWebElement emailTextBox = m_driver.FindElement(By.CssSelector("input[id=philadelphia-field-email]"));
IWebElement signUpButton = m_driver.FindElement(By.CssSelector("input[id=philadelphia-field-submit]"));
emailTextBox.SendKeys("This email address is being protected from spambots. You need JavaScript enabled to view it.");
signUpButton.Click();
}
}
}
```
### 示例 4:在下拉列表中選擇一個值:
**Test Scenario:**
1. 導航到 Guru 99 演示頁面- [http://demo.guru99.com/test/guru99home/](http://demo.guru99.com/test/guru99home/)
2. 點擊 SAP 鏈接
3. 在名稱和電子郵件文本框中輸入數據
4. 從課程下拉菜單中選擇一個值
5. 關閉瀏覽器
```
using NUnit.Framework;
using OpenQA.Selenium;
using OpenQA.Selenium.Chrome;
using OpenQA.Selenium.Support.UI;
namespace Guru99Demo
{
class TestSelect
{
IWebDriver m_driver;
[Test]
public void selectDemo()
{
m_driver = new ChromeDriver("G:\\");
m_driver.Url = "http://demo.guru99.com/test/guru99home/";
m_driver.Manage().Window.Maximize();
IWebElement course = m_driver.FindElement(By.XPath(".//*[@id='awf_field-91977689']"));
var selectTest = new SelectElement(course);
// Select a value from the dropdown
selectTest.SelectByValue("sap-abap");
}
}
}
```
## 摘要:
* 為了將 Selenium 與 C#一起使用,您需要安裝 Visual Studio。
* NUnit 是 Visual Studio 和 Selenium WebDriver 支持的單元測試框架
* 為了使用它,我們需要在 Visual Studio 上安裝 NUnit Framework 和 NUnit 測試適配器。
* 通過創建 NUnit 測試類并使用 NUnit 框架運行測試類,可以將 NUnit 框架與 Selenium 集成。
* NUnit 還允許測試人員在運行測試之前和之后使用諸如 SetUp,Test 和 TearDown 之類的注釋執行操作。
* Selenium WebDriver 命令可以分為瀏覽器命令,Webelement 命令和下拉命令。
本文由 Sneha Gudapati 提供
- Guru99 軟件測試教程
- 軟件測試教程:免費課程
- 現實生活
- 測試基礎
- 什么是軟件測試? 定義,基礎&類型
- 軟件測試作為職業道路(技能,薪水,成長)
- 軟件測試的 7 條原則:通過實例學習
- 軟件測試中的 V 模型
- STLC-軟件測試生命周期階段&進入,退出條件
- 測試類型
- 初學者手動測試教程:概念,類型,工具
- 自動化測試教程:什么是流程,收益&工具
- 自動化測試與 手動測試:有什么區別?
- 單元測試教程:什么是類型,工具,示例
- 集成測試:什么是類型,自上而下&自下而上的示例
- 什么是系統測試? 類型&的定義和示例
- 健康測試與煙霧測試:簡介&差異
- 什么是回歸測試? 定義,測試用例(示例)
- 什么是非功能測試? 帶示例的類型
- TestCase 開發
- 軟件測試中的測試文檔
- 什么是測試方案? 帶有示例的模板
- 如何編寫測試用例:帶有示例的示例模板
- QTP(UFT)中的環境變量與示例
- 什么是軟件測試中的測試分析(測試基礎)?
- 什么是需求可追溯性矩陣(RTM)? 示例模板
- 測試數據生成:什么是,如何做,示例,工具
- 下載示例測試案例模板:示例 Excel,Word 格式
- 測試技術
- 帶有測試用例設計示例的軟件測試技術
- 邊界值分析&等價分割的例子
- 決策表測試:學習示例
- 什么是狀態轉換測試? 圖表,技術,示例
- 什么是用例測試? 技術,范例
- 測試管理&放大器; 控制
- 軟件測試評估技術:分步指南
- 如何創建測試計劃(帶有示例)
- 測試計劃模板:帶有 Web 應用程序示例的樣本文檔
- 瑕疵
- 軟件測試的測試環境
- 軟件測試中的缺陷管理流程(錯誤報告模板)
- 軟件測試中的缺陷/缺陷生命周期
- 2020 年排名前 50 位的軟件測試工具
- 敏捷
- 敏捷方法論&模型:軟件開發指南&測試
- 什么是敏捷測試? 流程,策略,測試計劃,生命周期示例
- Scrum 測試方法論教程:什么是流程,工件,沖刺
- 敏捷/ Scrum 方法論的自動化測試框架
- SAFe 方法論教程:什么是可擴展敏捷框架
- 測試不同的域
- Web 應用程序測試:網站測試的 8 個步驟指南
- Web 應用程序測試清單:網站的測試用例示例
- 銀行領域應用測試:示例測試案例
- 電子商務測試:如何測試電子商務網站
- 帶有示例測試案例的支付網關測試教程
- 大型機測試-完整教程
- 測試零售銷售點(POS)系統:示例測試案例
- 使用樣本測試用例進行 HealthCare 域測試
- 使用樣本測試用例測試保險領域的應用程序
- 使用示例 OSS / BSS 測試用例測試電信域
- 商業智能(BI)測試:示例測試案例
- 白盒測試
- 什么是白盒測試? 技術,示例,類型&工具
- 什么是靜態測試? 什么是測試審查?
- Mccabe 的環復雜性:使用流程圖進行計算(示例)
- 代碼覆蓋率教程:分支,語句,決策,FSM
- 路徑測試&包含示例的基礎路徑測試
- 性能測試
- 性能測試教程:什么是類型,度量&示例
- 負載測試教程:什么是? 如何? (帶有示例)
- 什么是軟件測試中的應力測試? 工具,類型,示例
- 什么是音量測試? 通過實例學習
- 什么是可伸縮性測試? 通過示例學習
- 什么是浸泡測試? 定義,含義,示例
- 軟件測試中的穩定性測試
- 什么是峰值測試? 通過示例學習
- 負載測試,壓力測試,性能測試:討論差異
- 什么是響應時間測試?
- 什么是基準測試? 測試計劃,工具,示例
- 什么是軟件測試中的耐久性測試? (帶有示例)
- 可靠性測試教程:什么是方法,工具,示例
- 13 個最佳性能測試工具| 負載測試工具(2020)
- 預先測試主題
- 軟件測試指標:什么是類型&示例
- 如何創建測試策略文檔(示例模板)
- 什么是測試即服務? TaaS 模型解釋
- 什么是軟件測試中的測試成熟度模型(TMM)?
- 常問問題
- 嚴重性&測試優先級:差異&示例
- 測試策略與測試計劃:有什么區別?
- 靜態測試與動態測試:有什么區別?
- 重新測試和回歸測試之間的區別
- 質量保證與質量控制:有什么區別?
- 實例驗證與驗證之間的區別
- 正測試和負測試的例子
- 什么是測試線束? 工具&的例子
- 什么是缺陷密度? 用示例計算的公式
- 全球化測試和本地化測試之間的區別
- 測試條件與測試場景:有什么區別?
- 單元測試與集成測試:有什么區別?
- 功能測試與非功能測試:有什么區別?
- 黑匣子測試與 白盒測試:主要差異
- 前端測試與 后端測試:有什么區別?
- SDLC 與 STLC:有什么區別?
- 什么是 SDET? 完整的形式,含義,作用和職責
- 測試人員必須編寫代碼嗎?
- 測試用例與測試方案:有什么區別?
- 測試類型-超級列表
- 軟件測試類型:100 種不同測試類型的示例
- API 測試教程:10 分鐘內學習!
- 什么是黑盒測試? 技術,示例&類型
- Alpha 測試與 Beta 測試:有什么區別?
- 什么是功能測試? 類型&示例(完整教程)
- 什么是用戶驗收測試(UAT)? 與例子
- REST API 測試教程:手動測試案例示例
- 使用 Restito 工具進行 REST 客戶端測試
- REST 保證教程:如何使用示例測試 API
- 什么是安全測試? 帶示例的類型
- GUI 測試教程:帶有示例的用戶界面(UI)測試案例
- 軟件測試方法:了解質量檢查模型
- 端到端測試教程:什么是 E2E 測試示例
- 什么是探索性測試? 實例技巧
- 軟件測試中的變異測試:變異分數&分析示例
- 什么是臨時測試? 帶示例的類型
- 關鍵字驅動測試框架的示例
- 基于風險的測試:方法,矩陣,過程&示例
- 后端測試教程:什么是工具&示例
- 什么是煙霧測試? 如何使用示例
- 輔助功能測試教程:什么是工具&示例
- 什么是質量保證(QA)? 工藝,方法,實例
- 帶有示例項目示例的質量管理計劃模板
- 什么是 SOA 測試? 實例教程
- 滲透測試教程:什么是 PenTest?
- 什么是兼容性測試? 正向&向后測試(示例)
- 什么是帶有示例的系統集成測試(SIT)
- 軟件測試中的測試范圍
- 什么是可用性測試? UX(用戶體驗)測試示例
- 協議測試教程:L2 & L3
- 什么是云測試? SaaS 測試教程
- Cookie 測試:網站的測試用例示例
- 什么是灰盒測試? 技術實例
- 基于模型的測試教程:工具&示例
- 什么是試點測試? 定義,含義,示例
- 什么是正交陣列測試(OATS)? 工具,技術&示例
- 什么是 Alpha 測試? 工藝,實例
- 模糊測試(模糊)教程:什么是類型,工具&示例
- 什么是本地化測試? 測試用例示例&清單
- 什么是接口測試? 類型&示例
- 什么是漏洞評估? 測試過程,VAPT 掃描工具
- 什么是配置測試? 示例測試用例
- 應用程序測試教程:什么是工具,如何使用
- 什么是陰性測試? 測試用例
- 什么是軟件測試中的互操作性測試? (帶有示例)
- 一致性測試(一致性測試)-完整指南
- 什么是循環測試? 方法論,例子
- 什么是組件測試? 技術,示例測試用例
- 什么是動態測試? 類型,技術&示例
- 什么是并行測試? 定義,方法,實例
- 什么是運營驗收測試(OAT)? 示例測試用例
- 什么是模塊測試? 定義,例子
- 什么是軟件測試中的工作流測試? 與例子
- 存儲測試教程:什么是類型,概念
- 什么是恢復測試? 與例子
- 什么是軟件測試中的并發測試?
- 什么是軟件測試中的線程測試?
- 什么是破壞性測試? 技術,方法,實例
- 什么是 DevOps 中的連續測試? 定義,好處,工具
- 軟件測試中的測試級別
- IoT 測試教程:什么是流程,挑戰&工具
- 什么是測試驅動開發(TDD)? 實例教程
- 什么是數據驅動測試? 學習創建框架
- 什么是猴子&大猩猩測試? 例子,差異
- 什么是前端測試? 工具&框架
- 什么是軟件測試中的嵌入式測試?
- 什么是軟件測試中的域測試? (帶有示例)
- Salesforce 測試教程:什么,流程,工具,最佳實踐
- 設計驗證&驗證過程
- 無損檢測(NDT)
- 工具類
- 2020 年 10 種最佳跨瀏覽器兼容性測試工具
- 2020 年 20 種最佳 Bug /缺陷跟蹤工具
- 2020 年 20 種最佳 Web 測試工具
- 20 個最佳自動化測試工具(2020 年 7 月更新)
- 2020 年 15 種最佳測試數據生成工具
- 2020 年 13 家最佳人群測試(Crowdsource)公司
- 2020 年 10 種最佳探索性測試工具
- 檢查!
- 前 150 個軟件測試面試問題&答案
- 前 15 個自動化測試面試問題&答案
- 前 40 個 QA 面試問題&答案
- 前 25 個數據庫測試面試問題&答案
- 資質認證
- ISTQB 認證:完整的模擬學習考試材料
- CSTE 認證指南和學習資料
- 認證軟件質量分析師(CSQA)認證指南
- ISTQB CTAL(高級)考試及學習資料
- UFT / QTP 初學者教程:7 天學習
- 介紹
- 什么是 QTP / UFT 自動化測試工具?
- 如何下載和安裝 UFT 或 QTP [最新版本]
- HP UFT / QTP 中的航班預訂應用程序
- 如何使用 QTP / UFT IDE
- 如何記錄和播放 UFT / QTP 腳本
- 高級的東西
- 對象識別如何在 QTP / UFT 中工作?
- QTP / UFT 中的關鍵字和專家視圖
- 了解 SystemUtil.Run,??SetSecure,Set,類型:QTP / UFT 示例
- 如何使用示例重播 QTP / UFT 中的腳本
- 通過打印/導出示例了解 QTP / UFT 中的測試結果
- QTP / UFT 中的參數化示例
- QTP / UFT 中的檢查點與示例
- 如何使用示例在 QTP / UFT 中打印輸出值
- QTP / UFT 中包含 IF,Else,End IF 和示例
- QTP / UFT 中的 Reporter.ReportEvent 及其示例
- QTP / UFT 中的動作與示例
- QTP / UFT 中的智能識別示例
- QTP / UFT 中的順序標識符:對象識別示例
- QTP / UFT 中的本地&共享對象存儲庫
- QTP / UFT 中的記錄模式類型:模擬,低電平,上下文
- 如何通過 3 個簡單的步驟在 QTP / UFT 中使用功能
- 如何在 QTP / UFT 中使用事務
- 如何通過示例使用 QTP / UFT 中的恢復方案
- QTP / UFT 中的可選步驟(帶示例)
- QTP / UFT 中的對象間諜,GetRoProperty,GetToProperty 和示例
- QTP / UFT 中的描述性編程:動態&靜態
- 測試自動化框架-您必須知道的東西!
- QTP / UFT 中的數據,關鍵字&混合自動化框架
- QTP / UFT 中的業務流程測試(BPT)框架
- 如何在 QTP / UFT 中從 EXCEL 導入,讀取,更改數據
- QTP / UFT 移動應用測試教程
- 使用 QTP / UFT 進行 API 測試:完整的教程
- 檢查!
- 前 100 個 QTP / UFT 面試問題&答案
- 測驗
- 初學者硒教程:7 天學習 WebDriver
- 第一眼
- 什么是硒? 硒自動化測試簡介
- 什么是 Selenium WebDriver? 與 RC 的區別
- WebDriver 教程
- 如何下載&安裝 Selenium WebDriver
- 第一個 Selenium Webdriver 腳本:JAVA 代碼示例
- Selenium IDE 中的定位器:CSS 選擇器,DOM,XPath,鏈接文本,ID
- 在 Selenium WebDriver 中查找元素和 FindElements
- Selenium Form WebElement:文本框,提交按鈕,sendkeys(),click()
- 如何在 Selenium WebDriver 中選擇復選框和單選按鈕
- 如何在 Selenium Webdriver 中單擊圖像
- 如何使用 Selenium Webdriver 從 DropDown 中選擇值
- 在 Selenium Webdriver 中按鏈接文本&部分鏈接文本定位元素
- 鼠標單擊&鍵盤事件:Selenium Webdriver 中的操作類
- 如何上傳&使用 Selenium Webdriver 下載文件
- Selenium WebDriver 中的 XPath:完整教程
- Selenium WebDriver 中的警報&彈出窗口處理
- 如何在 Selenium WebDriver 中處理 Web 表
- 使用 Selenium WebDriver 處理動態 Web 表
- Selenium WebDriver 中所需的功能
- 如何使用 Selenium WebDriver 驗證工具提示
- 如何使用 Selenium Webdriver 查找所有/斷開的鏈接
- Gecko(Marionette)驅動程序 Selenium:下載,安裝,與 Firefox 一起使用
- 測試 NG
- 如何下載&在 Eclipse 中為 Selenium WebDriver 安裝 TestNG
- TestNG 教程:Selenium 中的注釋,框架和示例
- TestNG 組:包含,排除示例-Selenium 教程
- 硒中的 TestNG @Test 優先級
- Selenium 中的并行執行:會話處理& TestNG 依賴性
- TestNG:如何在 Selenium 中運行多個測試套件
- Selenium 中的 TestNG 偵聽器:??ITestListener & ITestResult 示例
- 如何在 TestNG 中執行失敗的測試用例:Selenium WebDriver
- Selenium WebDriver 中的 TestNG 報告生成
- 在 Selenium WebDriver 中自定義 PDF &電子郵件 TestNG 報告
- 構架
- 頁面對象模型(POM)&頁面工廠:Selenium WebDriver 教程
- Dataprovider & TestNG XML:Selenium 中的參數化(示例)
- 從 Selenium Webdriver 中的 Excel 文件中讀取&寫入數據:POI & JXL
- 如何從 Selenium Webdriver 中的 DatePicker /日歷中選擇日期
- 提前 Webdriver 的東西!
- Selenium Grid 教程:集線器&節點(帶有示例)
- Maven & Jenkins 與 Selenium 集成:完整教程
- Selenium 自動化框架:數據驅動,關鍵字驅動&混合
- 使用 Selenium 進行數據庫測試:分步指南
- 在 Selenium Webdriver 中處理 iFrame:switchTo()
- 使用 Selenium WebDriver 進行跨瀏覽器測試
- 如何在 Selenium WebDriver 中截屏
- 具有 Selenium 教程的 Log4j:下載,安裝,使用&示例
- 硒無頭瀏覽器測試:HTMLUnitDriver & PhantomJS
- Selenium Webdriver 中的機器人類
- 如何在 Selenium Webdriver 中使用 AutoIT:文件上傳示例
- 如何在 Selenium WebDriver 中處理 SSL 證書
- 如何在 Selenium Webdriver 中處理 AJAX 呼叫
- Selenium WebDriver 中的 JavaScriptExecutor 示例
- 使用 Python 的 Selenium Webdriver:示例教程
- 如何使用 IntelliJ IDE & Selenium Webdriver
- 使用 Selenium WebDriver 進行閃存測試
- 帶有 Selenium 的 Apache ANT:完整教程
- Selenium Webdriver 中的 XSLT 報告
- Github 與 Selenium 集成:完整教程
- Selenium WebDriver 中的 Cookie 處理
- 將 SoapUI 與 Selenium 一起用于 Web 服務測試
- 如何在 Selenium WebDriver 中創建 Firefox 配置文件
- 含硒硒(BDD 框架):帶有示例的教程
- 如何在 Selenium WebDriver 中拖放(示例)
- Selenium C#Webdriver 教程:NUnit 示例
- 在 Selenium WebDriver 中創建對象存儲庫:XML &屬性文件
- 如何在 Selenium Webdriver 中向下滾動或向上滾動頁面
- Sikuli 教程:如何將 Sikuli 與硒一起使用(示例)
- XPath 在 Selenium Webdriver 中包含,同級,祖先,與或,父級,開頭,軸
- Selenium WebDriver 中的隱式,顯式&流利等待
- 雙擊并右鍵單擊 Selenium 中的示例
- 使用帶有示例的 Webdriver 的 Selenium 代理身份驗證
- Selenium 異常處理(常見異常列表)
- Selenium IDE 教程
- 如何下載&為 Firefox 安裝 Selenium IDE
- Selenium IDE 初學者教程
- 如何通過腳本&命令(聲明,驗證)使用 Selenium IDE
- 在 Selenium IDE 中驗證 Element Present,waitFor 和 Wait
- 在 Selenium IDE 中存儲變量,回顯,警報,彈出窗口處理
- 硒核心擴展(User-Extensions.js)
- 如何在 Selenium IDE 中進行調試 斷點&起點
- 最大化 Selenium 中的瀏覽器
- Chrome 選項&所需功能:AdBlocker,隱身,無頭
- 使用 Selenium Webdriver 刷新頁面
- 使用 Excel VBA 和 Selenium
- 必須檢查!
- 前 100 個硒面試問題&答案
- 硒與 HP UFT(QTP):有什么區別?
- 2020 年排名前 15 位的硒替代品
- 2020 年 10 種最佳 iMacros 替代品
- 免費的移動應用測試教程
- 第一眼
- 移動應用程序測試:示例測試用例&測試方案
- 真實設備與模擬器與模擬器的測試:主要差異
- 鴉片
- 適用于 Android 的 APPIUM 教程& iOS 移動應用測試
- UIAutomatorViewer 教程:Android 測試檢查器
- Android 仿真器的 Appium 所需功能[示例]
- 將具有 Android 調試橋(ADB)的移動設備連接到 USB,WiFi
- Appium Maven 依賴項:項目示例
- 前 18 個 Appium 面試問題&答案
- 提前進行移動測試!
- 帶有自動化框架的 Android APP 測試教程
- Robotium 教程:您的第一個 Android 框架
- Selendroid 入門實例教程
- 移動應用程序性能測試:清單,工具(Andriod & iOS)
- 適用于 Android 測試的 Calabash 自動化工具教程
- iOS 應用測試教程:手冊&自動化
- 使用 UIAutomation 框架的 iOS 自動化測試
- 熱門 20 個移動測試面試問題&答案
- 游戲測試:如何測試移動/桌面應用程序
- 適用于 Android 的 14 種最佳移動測試工具& iOS App [免費/付費]
- 移動應用中的中斷測試
- 2020 年 26 種最佳移動應用開發工具
- 初學者黃瓜測試教程
- 什么是黃瓜測試工具? 框架介紹
- 如何下載&在 Windows 中安裝 CUCUMBER
- 什么是黃瓜特征文件&步驟定義? (帶有示例)
- 什么是小黃瓜? 用黃瓜寫小黃瓜測試
- 創建您的第一個黃瓜腳本(2 個示例)
- 黃瓜面試的前 20 個問題&答案
- SoapUI 初學者教程
- Web 服務測試:初學者教程
- 什么是 SoapUI? SoapUI 測試簡介
- 在 Windows 上進行 SOAPUI 下載,安裝和&配置
- SoapUI:如何創建測試套件&測試用例
- SoapUI 中的斷言:完整教程
- SoapUI 面試的前 15 個問題&答案
- 行為驅動開發(BDD)通過行為測試 REST API
- 15 Rest API 面試問題&答案
- 2020 年 19 種最佳 SoapUI 替代品
- JUnit 初學者教程:3 天學習
- 如何在 Eclipse 中下載和安裝 JUnit
- JUnit 測試用例@Before @BeforeClass 注釋
- 帶有示例的 JUnit 注釋教程
- Junit 斷言&斷言與示例
- 使用示例創建 JUnit 測試套件:@RunWith @SuiteClasses
- JUnit @Ignore 測試注釋與示例
- JUnit 預期的異常測試:@Test(預期)
- JUnit ErrorCollector @Rule 與示例
- 使用@Parameters 的示例進行 JUnit 參數化測試
- TestNG 與 JUnit:有什么區別?
- 機械手流程自動化(RPA)教程:什么是工具&示例
- Bugzilla 入門指南:缺陷跟蹤工具
- JIRA 教程:初學者完整指南
- MANTIS Bug Tracker 入門教程
- ETL 測試或數據倉庫測試教程
- 學習 SAP 測試:創建您的第一個 SAP 測試用例
- 帶有示例測試案例的數據庫(數據)測試教程
- HP ALM /質量中心教程
- 介紹
- 什么是 HP ALM? 質量中心工具
- 如何下載&安裝 HP ALM(質量中心)
- HP ALM 管理:創建域,項目&用戶
- 高級的東西
- 管理選項卡:在 HP ALM(質量中心)中創建版本&周期
- HP ALM(質量中心)教程中的需求模塊
- HP ALM(質量中心)教程中的測試計劃模塊
- HP ALM(質量中心)中的測試實驗室
- 如何將 UFT(QTP)與 ALM(質量中心)集成
- HP ALM(質量中心)中的缺陷管理生命周期
- 儀表板,報告 HP ALM(Quality Center)中的&分析
- HP ALM:過濾條件,查找,替換,標志,歷史記錄&發送郵件
- 如何在 HP ALM(質量中心)中自定義項目
- 檢查!
- HP ALM / QC 認證:絕對指南
- 30 個最佳 ALM 工具[2020 年 7 月列表]
- HP ALM(質量中心)面試的前 35 個問題&答案
- 測試管理教程:完整的培訓課程
- 介紹
- 角色&測試經理/測試負責人的職責
- 測試管理過程:測試項目的完整指南
- 測試管理中的項目風險分析&解決方案
- 軟件測試評估技術:分步指南
- 高級的東西
- 項目團隊:開發,構建&管理:逐步過程
- 如何創建測試計劃(帶有示例)
- 測試執行期間的測試監控&測試控制:完整教程
- 測試項目中的問題管理
- 測試摘要報告教程:通過示例&模板學習
- 軟件質量保證(SQA):計劃,審核&審核
- 軟件測試中的缺陷管理流程(錯誤報告模板)
- 使用 PDCA 模型的測試過程改進(TPI)
- 如何選擇最佳自動化測試工具
- 掌握團隊管理技能的 5 個步驟
- 必須知道!
- 最佳 25 種測試管理工具(2020 年 7 月更新)
- 前 20 名測試經理/領導面試問題
- TestLink 教程:完整指南
- Guru99 SAP 教程
- SAP 初學者課程
- 介紹
- 什么是 SAP? SAP ERP 軟件的定義
- SAP 業務套件
- SAP ERP 功能&技術模塊
- 如何為您的職業選擇最佳 SAP 模塊
- 如何成為 SAP 顧問
- 如何獲得 SAP 認證
- 高級的東西
- SAP 登錄:GUI &導航教程
- 如何安裝 SAP IDES for Practice
- 什么是 mySAP?
- SAP NetWeaver:10 分鐘學習
- 如何在 SAP 中顯示技術名稱
- 適用于所有國家/地區的 SAP Molga 列表
- 如何執行 SAP 報表
- 如何在 SAP 中創建變式
- SAP 面試的前 50 個問題
- SAP 業務藍圖:BBP 文檔&模板
- ERP 的完整形式和含義是什么?
- 完整格式的 SAP:首字母縮寫| 縮寫
- 必須知道!
- 2020 年面向初學者的 6 本最佳 SAP 書籍
- 2020 年 10 種最佳 SAP ERP 替代方案
- SAP 測試面試的前 18 個問題&答案
- SAP ABAP 編程教程
- ABAP 基礎知識
- 什么是 ABAP? 完整的形式,含義,歷史
- ABAP 簡介:數據類型,運算符&編輯器-教程
- ABAP 數據字典教程 SE11:表,鎖對象,視圖&結構
- ABAP 中的模塊化:宏,子例程&功能模塊
- 讓我們深入數據庫
- 在 SAP ABAP 中打開 SQL &本機 SQL
- SAP ABAP 內部表:創建,讀取,填充,復制&刪除
- SAP ABAP 表控件示例
- 讓 CODE!
- 關于 ABAP 報告編程的全部信息
- 對話框編程教程:SAP ABAP 中的模塊池
- ABAP 子屏幕教程:SAP 中的呼叫子屏幕
- SAP 按價值處理&按幫助處理
- SAP 教程-ABAP 列表查看器中的 ALV 報告
- 形式和腳本
- SAP 腳本教程:SE71,SE78,SCC1,VF03,SO10
- SAP ABAP 中的智能表單
- 一些出口的時間
- 什么是 SAP ABAP 中的用戶出口和客戶出口
- 什么是 BADI? SAP ABAP 教程
- 讓我們傳輸一些數據!
- SAP 中的 ABAP 查詢教程:SQ01,SQ02,SQ03
- SAP ABAP BDC(批處理數據通信)教程
- ALE,EDI & IDocs 簡介&差異:SAP 教程
- SAP IDOC 教程:定義,結構,類型,格式&表
- SAP BAPI 教程-在 ABAP 中創建 BAPI 的分步指南
- SAP 教程中的遠程功能調用(RFC)
- SAP ABAP 面試的前 35 個問題&答案
- SAP 人力資源| SAP HCM 模塊培訓教程
- 行政人員(PA)
- 什么是 SAP HR? SAP HCM 簡介
- 什么是信息類型?
- SAP 信息類型:使用 PA30,PA20 創建,更改,復制,刪除,概覽
- SAP 快速入門教程:PA70,PA71
- 您必須知道的重要信息類型 T 代碼
- 如何在 SAP 中查看為員工 PA10 保存的所有信息類型
- SAP 中有關 Infotype 0003 薪資狀態的所有信息
- 什么是時間限制? SAP HR 教程
- 人事行動
- SAP PA40:人員操作教程
- 如何刪除人員編號:SAP RPUDELPN
- SAP 中的組織,企業,人員結構
- 了解 SAP HR 中的組織管理(OM)
- SAP PP01:如何維護 OM 信息類型
- SAP PPOCE:如何創建組織單位
- 職位
- 如何創建,復制&界定職位:SAP PPOME
- 在 SAP 中將職位定義為組織單位負責人
- 如何將作業&成本中心分配給 SAP 中的職位
- 如何顯示職位的組織結構
- SAP HR 時間管理:PA51,PA53,PA61,PA62,PA63
- 如何進行運行時評估:SAP PT60
- SAP PT66:如何檢查時間評估結果 RPTIME
- SAP 中的工資核算流程概述
- SAP PA03:薪資控制記錄教程
- 如何在 SAP 中執行工資核算
- 如何在 SAP 中使用 PC_PAYRESULT 檢查工資結果
- 如何在 SAP 中刪除工資核算結果:PU01
- 必須知道工資信息
- 什么是非周期工資? SAP IT267
- 如何在 SAP 中審核工資單:RPUAUD00
- SAP HR 中的 Matchcode W 是什么?
- SAP Wage Types 教程:主要,輔助,對話,時間
- SAP 工資類型報表器:PC00_MXX_CWTR
- 過帳工資核算活動
- 使用 SAP DME 文件進行銀行轉帳
- SAP FI01:如何創建銀行密鑰
- SAP 中的總分類帳(G / L)過帳:PCP0 & PC00_M99_CIPE
- SAP AD HOC 查詢教程(S_PH0_48000513)
- 檢查!
- SAP HR 面試主要問題
- SAP FICO 培訓教程:了解 SAP FI & SAP CO 模塊
- SAP FI
- SAP FICO 簡介
- 如何在 SAP 中創建公司
- 如何在 SAP &中創建公司分配公司代碼
- 總帳
- 如何在 SAP 中創建會計科目表
- 如何在 SAP 中定義保留收益帳戶
- SAP 教程中的總帳科目:創建,顯示,凍結&刪除 FS00
- SAP 中的總分類帳(G / L)過帳:PCP0 & PC00_M99_CIPE
- 如何在 SAP 中創建財務報表版本(FSV)
- 如何在 SAP 中執行日記帳分錄 FB50
- 在 SAP 中創建會計年度變式&分配給公司代碼:完整教程
- 如何在 SAP 中定義過帳期間變式
- 如何在 SAP 中過帳期間變式中打開和關閉期間
- 如何在 SAP 中定義字段狀態變式&字段狀態組
- 如何在 SAP FICO 中定義文檔類型和編號范圍
- 總帳憑證教程:在 SAP 中暫留,暫存,過帳過帳
- 應收賬款
- SAP FI 中的應收帳款
- 客戶主數據教程:在 SAP 中創建,顯示,阻止,刪除
- SAP 中的 FB02:更改客戶文檔教程
- 如何在 SAP 中創建客戶帳戶組
- 如何在 SAP 中創建一次性客戶 FD01
- 如何在 SAP FICO 中創建客戶銷售發票 FB70
- SAP 中的憑證沖銷 FB08:分步指南
- SAP 中的 FB75:過帳銷售退貨指南–貸項憑證
- 如何在 SAP 中過帳客戶收款 F-28
- 如何在 SAP 中過帳外幣發票 FB70
- 剩余方法:將&收款轉入 SAP 中的部分付款
- 部分方式:SAP 中收款&的部分付款過帳
- FBRA:如何在 SAP 中重置已清除的項目
- SAP 中的 FD32:信用控制范圍教程
- 應付賬款
- SAP FI 中的應付帳款
- 如何在 SAP FICO 中創建供應商帳戶組
- 如何在 SAP FICO 中阻止或刪除供應商
- 在 SAP 中創建供應商主數據的分步指南
- 如何在 SAP 中創建一次性供應商 FK01
- SAP 中的 FB60:如何過帳采購發票
- 如何在 SAP FI 中過帳采購退貨 FB65
- 如何在 SAP 中過帳外向供應商付款 F-53
- 供應商發票&付款過帳期間 SAP 中的預扣稅
- 自動付款程序運行 F110:SAP 教程
- 如何在 SAP 中將符號科目映射到總賬科目
- 在 SAP 教程中發布舍入差異
- 報告書
- SAP FI 中的重要報告
- 必須知道!
- SAP 中的外幣重估:月末結算
- SAP FI 重要表:必須知道!
- 如何執行催款:SAP F150
- 如何在 SAP 中維護匯率
- SAP 通訊教程:配置,生成,打印&電子郵件
- SAP FICO 面試的前 50 個問題&答案
- 成本中心
- 如何創建一個新的成本中心:SAP KS01
- 內部訂單
- 有關 SAP 內部訂單的全部信息
- 內部訂單的結算教程:SAP 中的 KO02 & KO88
- 利潤中心
- SAP Profit Center 教程:創建,分組,過帳&計劃
- 在 SAP 中使用標準層次結構創建利潤中心
- 如何在 SAP 中將成本中心分配到利潤中心
- 如何將物料分配給 SAP 中的利潤中心
- 必須知道!
- SAP CO 表:控制模塊中的重要表
- 比較 SAP 中的成本中心,利潤中心和內部訂單
- SAP 基礎培訓教程
- 基礎介紹
- 什么是 SAP BASIS? 完整的教程
- 如何下載&為 Windows 安裝 SAP GUI(FrontEnd)
- 什么是 SAP 實例& SAP SID?
- SAP R / 3 體系結構教程
- 客戶群
- 什么是客戶? 如何在 SAP SCC4 中創建新客戶端
- SAP 客戶端副本:本地,遠程,導入/導出
- 如何在 SAP SM50 中刪除客戶端
- 用戶授權
- SU01:如何在 SAP 中創建新用戶
- 如何鎖定(SU01)&解鎖(SU10)SAP 用戶
- SAP RZ11:參數(login / fails_to_session_end)限制登錄嘗試
- SAP USR40:如何設置密碼限制
- 后臺工作
- SAP 后臺作業處理 SM36:創建,計劃,重新計劃
- SAP SM37:如何監視后臺作業
- SAP RSBTCDEL2:如何刪除后臺作業
- 運輸管理系統
- SAP TMS(運輸管理系統)教程
- 如何配置 STMS(SAP 傳輸管理系統)
- SAP 路由&層:逐步配置
- 什么是 SAP 傳輸請求? 如何導入/導出 TR
- 補丁管理
- 支持軟件包&堆棧升級:SAP SPS
- 下載&升級 SAP 內核:分步教程
- SAP 監視&性能檢查:完整的 Tcode 教程
- 什么是 OSS 注釋? SAP SNOTE 教程
- RFC
- SAP 教程中的遠程功能調用(RFC)
- 如何在 SAP 中配置&測試 RFC 連接-SM59
- 數據遷移
- SAP IDOC 教程:定義,結構,類型,格式&表
- 什么是 SAP LSMW? 使用 LSMW 遷移數據的步驟
- 檢查!
- 60 個 SAP 基礎面試問題&答案
- SAP SD(銷售&分發)培訓教程
- 客戶主數據和物料主數據
- 什么是 SAP SD? SAP Sales &分發模塊簡介
- 創建客戶主數據:SAP XD01
- SAP SD:創建編號范圍&分配到帳戶組 XDN1
- 如何創建合作伙伴功能&合作伙伴確定:SAP VOPAN
- MB1C:如何在 SAP 中創建物料庫存
- 如何在 SAP 中創建客戶物料信息記錄 VD51
- MMBE:如何獲取 SAP 庫存概覽
- SAP SD:創建物料主數據
- 營業額
- SAP SD 中的售前活動
- 如何在 SAP 中創建查詢:VA11
- 如何創建報價:SAP VA21
- 如何創建銷售訂單:SAP VA01
- 如何在 SAP 中創建借項憑單
- 如何在 SAP 中創建貸項憑證
- 如何在 SAP 中創建銷售單據類型
- SAP 銷售文檔教程:VA01,VA02,VA03
- 銷售憑證的文本確定:SAP VOTXN
- 計劃行類別確定教程:SAP VOV6
- 如何在 SAP 中創建項目建議 VA51
- 物料清單&排除:SAP VB01
- 交貨
- 如何確定裝運點:SAP OVL2
- 創建揀配,包裝& PGI(發貨后):SAP LT03,VL02N
- 免費創建退貨訂單&后續交貨:SAP VL01N
- SAP SD 中的所有關于寄售流程
- 使用 Tcode V / 30 在 SAP SD 中進行輸出確定
- SAP 中 OVRQ 替代原因
- 開票
- CS01:如何在 SAP SD 中創建物料清單(BoM)
- 如何在 SAP SD 中創建發票更正請求
- SAP 項目類別確定:VOV7,VOV4
- 在 SAP 中定義&分配阻塞原因(OVV4,S_ALR_87007670)
- 價錢
- 在 SAP 中按物料類別確定定價:OVKO
- SAP SD 稅收確定程序教程:VK12,OX10,OVK4,OVK1
- 如何在 SAP 中創建文本類型:VOTXN
- SAP 項目類別確定:VOV7,VOV4
- 使用 Tcode OV31 的 SAP 中的條件排除組
- 如何在 SAP 中創建記帳密鑰:OV34
- 信用管理
- SAP 信用管理教程:OVA8
- SAP SD 面試的前 20 個問題&答案
- 2020 年 100 項最佳銷售培訓課程
- SAP CRM 培訓教程
- 介紹
- SAP CRM 模塊:概述,體系結構
- SAP CRM 銷售流程,管理,報價&產品確定
- SAP CRM SERVICEPRO:服務協議,合同,計劃,訂單管理
- SAP CRM Marketing:計劃,活動管理&自動化細分
- 高級的東西
- SAP 合作伙伴渠道管理(PCM)
- SAP CRM 互動中心
- SAP CRM 業務合作伙伴:分組,角色,關系
- SAP CRM 組織管理
- SAP CRM Product Master:層次結構,類別,集合類型&屬性
- SAP CRM 業務交易流程
- SAP CRM 合作伙伴處理:類別,功能,順序,確定
- SAP CRM 操作配置文件:完整教程
- SAP CRM 定價&計費:元素,過程,類型,Web UI
- SAP CRM WebUI 教程
- SAP CRM Web UI:配置,應用程序&增強工具
- 必須知道!
- 26 個最佳 Salesforce 競爭對手&替代品[免費/付費]
- SAP CRM 面試的前 25 個問題&答案
- SAP MM(材料管理)培訓教程
- 簡介&放大器; 主要的數據
- SAP MM 模塊概述
- SAP 主數據簡介
- 如何在 SAP 中創建物料主數據 MM01
- 如何在 SAP 中更改物料主數據(MM02,MM03)
- 如何在 SAP 中復制物料主數據:MM01
- MM17:SAP 中物料主數據的批量維護
- SAP 中的物料主視圖:最終指南
- 購買
- SAP 中的采購&采購申請簡介
- ME11:如何在 SAP 中創建購買信息記錄
- 如何更改采購信息記錄:SAP 中的 ME12
- 如何在 SAP 中創建采購申請:ME51N
- 如何在 SAP 中將采購申請轉換為采購訂單
- ME41:如何在 SAP 中創建 RFQ(報價請求)
- ME47:如何在 SAP MM 中創建報價
- 如何比較不同報價的價格:SAP ME49
- 如何選擇或拒絕報價:SAP ME47
- 如何創建來源清單確定:SAP ME05
- 如何在 SAP 中創建采購訂單 ME21N
- 如何使用參考 ME58 創建采購訂單 SAP 中的 ME21N
- ME22N:如何在 SAP 中更改采購訂單
- 如何過帳收貨:SAP MIGO
- MIRO:如何在 SAP 中執行發票驗證
- MRBR:在 SAP 中發布凍結的發票
- SAP 中的服務采購訂單:ME23N
- SAP 中的大綱協議:合同&計劃協議 ME31
- 下達策略,SAP 中的采購訂單流程:CT04,ME28,CL02
- 價錢
- SAP 中的定價過程總覽
- 如何在 SAP V / 05,M / 03 中定義訪問順序&條件表
- 如何在 SAP 中定義條件類型
- 如何在 SAP 中定義計算架構
- 如何在 SAP 中定義架構組&確定
- 庫存管理
- SAP 庫存管理教程:移動類型{OMJJ}
- 如何在 SAP 中創建收貨:MIGO,MB1C,MB03
- 如何在 SAP 中沖銷(取消)收貨 MMBE
- SAP MB21,MB1A,MBST,MB22 中的庫存預留
- 如何在 SAP MM VL02N,VL09 中過帳發貨
- SAP MB1B 中的貨物轉移過帳
- SAP 庫存盤點教程:MI01,MI02,MI04,MI07
- SAP 中的特殊庫存&特殊采購
- SAP MM 面試的前 21 個問題&答案
- SAP CO(控制)模塊培訓教程
- 如何創建一個新的成本中心:SAP KS01
- 如何創建新的成本要素
- 有關 SAP 內部訂單的全部信息
- 內部訂單的結算教程:SAP 中的 KO02 & KO88
- SAP Profit Center 教程:創建,分組,過帳&計劃
- 在 SAP 中使用標準層次結構創建利潤中心
- 如何在 SAP 中將成本中心分配到利潤中心
- 如何將物料分配給 SAP 中的利潤中心
- SAP CO 表:控制模塊中的重要表
- 比較 SAP 中的成本中心,利潤中心和內部訂單
- SAP 薪資培訓課程
- 初學者重要的薪資概念
- SAP 中的工資核算流程概述
- SAP 中的工資核算流程概述
- SAP PA03:薪資控制記錄教程
- 如何在 SAP 中執行工資核算
- 如何在 SAP 中使用 PC_PAYRESULT 檢查工資結果
- 如何在 SAP 中刪除工資核算結果:PU01
- 必須知道工資信息
- 如何在 SAP 中執行工資核算
- 什么是非周期工資? SAP IT267
- 如何在 SAP 中審核工資單:RPUAUD00
- SAP HR 中的 Matchcode W 是什么?
- SAP Wage Types 教程:主要,輔助,對話,時間
- SAP 工資類型報表器:PC00_MXX_CWTR
- 薪水面試的前 17 個問題&答案
- 過帳工資核算活動
- 使用 SAP DME 文件進行銀行轉帳
- SAP 中的總分類帳(G / L)過帳:PCP0 & PC00_M99_CIPE
- SAP BI / BW 教程:初學者培訓
- 介紹
- 簡介 SAP BI
- SAP BI 體系結構概述
- SAP Infoobject,Infoarea,Infoobject 目錄教程
- 高級的東西
- 如何在 SAP BI / BW 中創建信息區域
- 如何在 SAP BI / BW 中創建 InfoObject 目錄
- 如何在 SAP BI / BW 中創建具有特征的 InfoObject
- 如何在 SAP BI / BW 中使用關鍵指標創建 InfoObjects
- SAP BW 中的 DSO 是什么? 為什么要使用它?
- SAP 中的標準 DSO 是什么? 如何創建一個?
- 什么是 SAP 中的寫入優化 DSO? 如何創建一個?
- 什么是 SAP 中的直接更新 DSO? 如何創建一個?
- SAP InfoSet 教程:什么是創建,聯接
- 什么是 SAP BI / BW 中的 Infocube? 如何創建一個?
- 如何從 SAP BI / BW 中的平面文件加載主數據
- 如何從 SAP BI / BW 中的平面文件加載事務數據
- 如何從 SAP BI / BW 中的 ECC 加載主數據
- 如何從 ECC 加載事務數據:SAP RSA5
- 有關 SAP BI / BW 中星型架構&擴展星型架構的全部信息
- SAP BI 流程鏈:創建,檢查,激活,分配,監視
- SAP BI 內容:安裝,激活
- SAP BEx 查詢設計器教程&查詢元素
- SAP BEx:特征&關鍵指標設置(RKF,CKF &公式)
- 必須知道!
- SAP BW / BI 面試的前 40 個問題&答案
- SAP PP(生產計劃)培訓教程
- 介紹
- SAP PP 簡介(生產計劃)
- SAP PP 中的物料清單(BoM):創建,更改,顯示
- SAP PP 中的工作中心:創建,更改,顯示
- 高級的東西
- 如何在 SAP PP 中創建/更改/顯示工藝路線
- 如何在 SAP PP C223 中創建生產版本
- SAP 需求管理教程:MD61,MD62,MD04,MD74,MD75
- SAP MRP(物料需求計劃)教程:MD01,MD02,MD04
- SAP PP 中的長期計劃(LTP)教程:MS31,MS02,MD61
- SAP PP 容量計劃:CM01,CM21
- SAP PP 中針對生產訂單的貨物移動:MIGO
- SAP 中的生產訂單:CO01,MD16,CO02,CO15
- SAP PP 報告教程:COOIS,MB52,CS15,CS12
- 必須知道!
- SAP PP 面試最常見的 26 個問題&答案
- SAP QM(質量管理)教程
- SAP QM 簡介
- SAP 中的主數據是什么? QS21,QP01,QS31,QDV1,QI01
- SAP QM 進/原材料檢查程序:MIGO,QA32
- 流程中檢查 SAP QM:CO01 & QA32
- SQP QM:最終檢驗 CO01 & QA32
- SAP QM 中的質量通知:QM02
- SAP HANA 初學者培訓教程
- SAP HANA 體系結構,LandScape,規模調整:完整教程
- 如何下載&安裝 SAP HANA Studio
- SAP HANA SQL:10 分鐘學習
- SAP HANA 數據類型&標識符
- SAP HANA 操作員:聯盟&聯盟全部
- SAP HANA SQL 功能教程
- SAP HANA SQL 表達式教程
- SAP HANA SQL 存儲過程教程
- SAP HANA 教程:創建序列
- SAP HANA 教程:創建觸發器
- SAP HANA SQL DATA 性能分析:5 分鐘學習
- SAP HANA 教程:SQL 腳本
- SAP HANA 計算視圖教程
- SAP HANA 中的 DATA Provisioning &復制
- SAP HANA 中的 SLT(SAP Landscape Transformation Replication 服務器)
- HANA 中的 SAP DS(數據服務)
- SAP HANA 直接提取器連接(DXC)教程
- SAP HANA 平面文件上傳教程:CSV,XLS & XLSX
- SAP HANA 建模:完整教程
- SAP HANA 入門教程
- SAP HANA 屬性視圖教程
- SAP HANA Analytic View:完整教程
- SAP HANA 分析特權教程
- SAP HANA 信息編輯器
- SAP HANA 導入和導出教程
- SAP HANA 安全性:完整教程
- SAP HANA 報表
- SAP HANA 面試的前 15 個問題&答案
- Guru99 必須學習的教程
- Microsoft Excel 培訓教程:7 天學習
- 介紹
- Microsoft Excel 101 簡介
- 如何在 Excel 中進行加,減,乘,除
- Excel 數據驗證,過濾器,分組
- Excel 公式&函數:學習基本示例
- IF,AND,OR 或嵌套 IF &在 Excel 中不是邏輯函數
- 如何在 Excel 中創建圖表:類型&示例
- 如何在 Excel 中進行預算:個人理財教程
- 進階的東西
- 如何將 XML 數據導入 Excel [示例]
- 如何將 CSV 數據(文本)導入 Excel [示例]
- 如何將 MS Access 數據導入 Excel [示例]
- 如何將 SQL 數據庫數據導入 Excel [示例]
- 如何在 Excel 中創建數據透視表:初學者教程
- Excel 中的高級圖表&圖形
- 什么是 Microsoft Office 365? Excel on Cloud 的好處
- CSV 與 Excel(.xls)-有什么區別?
- Excel VLOOKUP 初學者教程:通過示例學習
- Excel ISBLANK 功能:通過示例學習
- Excel 中的迷你圖和示例
- Excel 中的 SUMIF 函數:通過示例學習
- 前 40 個 Microsoft Excel 面試問題&答案
- 面試中提出的十大 Excel 公式&答案
- 2020 年 20 種最佳 Excel 課程
- 2020 年的 17 種最佳 Excel 替代品(免費/付費)
- 15 本最佳 Excel 書籍(2020 年更新)
- 2020 年 85 種最佳 Microsoft Office 類課程
- 宏&放大器; Excel 中的 VBA
- 如何在 Excel 中編寫宏:分步入門指南
- 如何使用示例在 Excel 中創建 Visual Basic for Applications(VBA)
- Excel VBA 變量,數據類型&常量
- Excel VBA 數組:帶示例的動態多維類型
- VBA Excel 表單控件& ActiveX 控件
- VBA 算術運算符:乘法,除法,加法,模量
- VBA 字符串運算符
- VBA 比較運算符:不等于,小于或等于,大于
- VBA 邏輯運算符:AND,OR,NOT
- Excel VBA 子例程:如何使用示例調用 Sub
- Excel VBA 函數教程:返回,調用,示例
- Excel VBA 范圍對象
- 初學者會計教程:7 天學習簿記
- 介紹
- 什么是會計? 重要性,目的&需要
- 會計中的資產&負債是什么? 定義&示例
- 什么是會計等式? 示例問題
- 什么是會計中的收入,費用&提款? [例子]
- 高級的東西
- 帶有實例的擴展會計方程
- 基本會計交易示例
- 如何在會計中創建日記帳分錄[示例]
- 如何創建分類帳帳戶[示例]
- 如何計算折舊:直線,遞減值示例
- 如何通過示例準備試算表
- 如何用示例制作損益表
- 如何用示例制作資產負債表
- 現金流量表的重要性及示例
- 如何使用示例分析財務報表
- 印度 7 種最佳在線稅務軟件[2020 更新]
- 必須知道!
- 2020 年 22 種面向小型企業的最佳會計軟件
- 2020 年 22 種最佳 QuickBooks 替代品[免費/付費]
- 2020 年 65 個最佳會計課程
- 2020 年 90 項最佳金融建模認證課程
- 11 本最佳會計書籍(2020 年更新)
- 134 個最熱門的會計面試問題&答案
- 前 30 個理貨面試問題&答案
- 免費道德黑客教程:初學者課程
- 介紹
- 什么是駭客? 簡介&類型
- 對計算機系統的潛在安全威脅
- 成為道德黑客所需的技能
- 2020 年排名前 20 位的道德黑客工具
- 高級的東西
- 什么是社會工程學? 攻擊,技巧&預防
- 密碼學教程:密碼分析,RC4,CrypTool
- 如何破解密碼
- 蠕蟲病毒&特洛伊木馬:道德黑客教程
- 通過示例了解 ARP 中毒
- Wireshark 教程:網絡&密碼嗅探器
- 如何破解 WiFi(無線)網絡
- DoS(拒絕服務)攻擊教程:Ping of Death,DDOS
- 2020 年 10 種最佳 DDoS 攻擊工具[免費/付費]
- 如何破解 Web 服務器
- 如何破解網站:在線示例
- SQL 注入教程:學習示例
- 黑客 Linux 操作系統:完整的 Ubuntu 示例教程
- CISSP 認證指南:什么是必備條件,成本,CISSP 薪水
- 什么是數字取證? 歷史,過程,類型,挑戰
- 什么是網絡犯罪? 類型,工具,示例
- 必須知道!
- 10 個最常見的 Web 安全漏洞
- 2020 年排名前 30 的 Bug 賞金計劃
- 2020 年 40 種最佳滲透測試(筆測試)Vapt 工具
- Kali Linux 教程:什么是安裝,利用 Metasploit 和 Nmap
- 2020 年 13 種最佳黑客操作系統
- 2020 年 11 種最佳 Wireshark 替代品
- 網站,網絡的 13 種最佳漏洞評估掃描儀
- 最佳 16 無日志 VPN(2020 更新)
- 20 個最佳手機間諜應用程序[Android / iPhone]
- 2020 年 15 種最佳數字取證工具[免費/付費]
- 2020 年 17 種最佳 IP &網絡掃描工具(免費/付費)
- Windows 的 11 種最佳免費防火墻軟件[2020 更新]
- 前 25 個道德黑客面試問題&答案
- 熱門的 110 個網絡安全面試問題&答案
- CompTIA 認證指南:職業道路&學習資料
- 16 本最佳道德黑客書籍(2020 更新)
- 初學者云計算教程
- 面向初學者的 Adobe Photoshop CC 教程:7 天學習
- 介紹
- 什么是 Photoshop CC? 完整的介紹
- 如何在 PhotoShop CC 中使用工作區
- Photoshop LAYERS 教程
- Photoshop 圖層蒙版教程和示例
- 高級的東西
- 如何使用 Photoshop 圖層樣式&效果[示例]
- 如何使用形狀工具在 Photoshop 中繪制形狀
- 什么是智能對象? 如何在 Photoshop 中使用智能對象?
- Photoshop 中的混合模式
- 如何在 Photoshop 中使用鋼筆工具? 完整的教程
- 如何在 Photoshop 中刪除背景?
- 如何在 PhotoShop 中使用畫筆工具?
- 如何使用 Photoshop 文字工具添加文字
- 如何在 Photoshop 中使用濾鏡&效果
- 必須知道!
- 2020 年 30 種最佳屏幕捕獲軟件工具,可提供更好的屏幕截圖
- 2020 年 15 種最佳 Snagit 替代品
- 2020 年 11 種最佳 After Effects 替代品(免費&付費)
- 2020 年 14 種最佳 2D 動畫軟件[免費/付費]
- 2020 年 20 種最佳 3D 動畫軟件[免費/付費]
- 2020 年 16 種最佳 InDesign 替代方案[免費/付費]
- 2020 年 26 種最佳 Adobe Premiere Alternative [免費/付費]
- 2020 年 16 種最佳 Photoshop 替代品[免費/付費]
- 2020 年 16 種最佳屏幕錄像機[免費/付費]
- 15 用于 MAC 的最佳屏幕錄像軟件[免費/付費]
- 2020 年 17 個最佳股票視頻網站[有償/免版稅素材]
- 2020 年 22 種最佳 Sketchup 替代品
- 2020 年 36 種最佳視頻編輯軟件
- 30 最佳免費圖片庫在 2020 年
- 2020 年 18 個最佳免費股票視頻網站
- GIMP 與 Photoshop:主要區別
- Adobe Photoshop 面試的前 45 個問題&答案
- 2020 年 90 種最佳 Adobe Illustrator 課程
- 2020 年 90 種最佳繪畫課程
- 2020 年 80 項最佳 AutoCAD 課程
- 2020 年 95 個最佳平面設計認證課程
- 2020 年 80 項最佳 UI / UX 設計課程
- 2020 年 50 最佳 Web 設計課程
- 數字營銷教程:在線課程
- 面向初學者的業務分析師培訓教程
- 介紹
- 什么是業務分析? 工藝&技術
- 什么是業務分析師? 角色,責任,技能,認證
- 利益相關者分析&與模板映射的示例
- 生命周期
- 軟件測試中的 V 模型
- 需求生命周期管理
- 軟件工程方法
- SDLC 中的瀑布模型是什么? 優點&缺點
- 什么是 RAD 模型? 優點&缺點
- SDLC 中的增量模型:使用優勢&劣勢
- 什么是螺旋模型? 什么時候使用? 優點&缺點
- 敏捷方法論&模型:軟件開發指南&測試
- 需求流程
- 示例軟件需求分析
- 需求分析技術及示例:完整教程
- 什么是功能需求? 規格,類型,示例
- 什么是非功能性要求? 類型和例子
- 功能需求與非功能需求:主要區別
- 最終確定要求
- 如何將需求組織為業務分析師
- 管理需求資產
- 分步進行軟件工程變更控制流程
- 文獻資料
- BRS 與 SRS:了解差異
- 質量保證
- 什么是軟件測試? 定義,基礎&類型
- 初學者手動測試教程:概念,類型,工具
- 軟件測試中的缺陷/缺陷生命周期
- 什么是用戶驗收測試(UAT)? 與例子
- 軟件測試中的影響分析
- 完整的過程
- 業務分析過程:分步教程
- 必須閱讀主題
- 什么是 ER 建模? 通過示例學習
- 決策表測試:學習示例
- 什么是靜態測試? 什么是測試審查?
- 100 多個業務分析師面試問題&答案
- 軟件工程中的軟件配置管理
- Microsoft VISIO 教程:歷史記錄,文件類型,如何使用示例
- 十大 Microsoft Visio 面試問題&答案
- Drools 教程:體系結構,規則引擎示例
- 16 個最佳軟件配置管理工具(2020 年將成為 SCM 工具)
- 2020 年十大最佳決策工具
- 16 種最佳甘特圖軟件[免費在線應用]
- 2020 年 30 種最佳需求管理工具
- 2020 年的 19 種最佳思維導圖軟件(免費&付費)
- 適用于 BA 分析師的 21 種最佳業務分析工具(2020 年更新)
- 38 個用于 UI 和 UX 設計器的最佳原型開發工具[2020 更新]
- 2020 年 30 種最佳 Adobe Acrobat 替代品
- 2020 年 14 種最佳 SharePoint 替代品(免費&付費)
- 2020 年 22 種最佳 OCR 軟件[免費/付費]
- 2020 年 17 種最佳 Outlook 替代方案[免費/付費]
- 2020 年 21 種最佳 Google 語音替代品
- 21 項最佳免費電話會議服務(2020)
- 2020 年 20 種最佳 Evernote 替代品
- 2020 年的 17 種最佳 IVR 系統
- 13 最佳聽寫和語音合成軟件[2020 更新]
- 2020 年 18 種最佳 PowerPoint 替代品
- 2020 年 100 最佳商業分析課程
- INFORMATICA 教程:完整的在線培訓
- 介紹
- 什么是 Informatica? 完整的介紹
- Informatica 體系結構教程
- 如何下載&安裝 Informatica PowerCenter
- 如何在 Informatica 中配置客戶端和存儲庫
- 高級的東西
- Informatica 中的源分析器和目標設計器
- Informatica 中的映射:創建,組件,參數,變量
- Informatica 中的工作流程:創建,任務,參數,可重用,管理器
- Informatica 中的工作流監視器:任務&甘特圖視圖示例
- Informatica 中的調試器:會話,斷點,詳細數據&映射
- Informatica 中的會話屬性:完整教程
- INFORMATICA 轉換教程&過濾器轉換
- Informatica 中的源限定符轉換(帶有示例)
- Informatica 中的聚合器轉換示例
- Informatica 中的路由器轉換:多個條件示例
- 示例中 Informatica 中的 Joiner 轉換
- Informatica 中的排名轉換(帶有示例)
- Informatica 中的序列轉換示例
- Informatica 中的事務控制轉換:TCL 命令
- Informatica &可重用轉換示例中的查找轉換
- Informatica 中的規范化器轉換(帶有示例)
- Informatica 中的性能調優:完整的教程
- 必須知道!
- Informatica 面試的前 50 個問題&答案
- 面向初學者的項目管理教程
- 什么是項目管理? 目標,方法
- 什么是 PMP? 認證成本,收益
- 項目管理生命周期的各個階段
- 項目成本估算&預算管理技術
- 項目管理中的風險分析&風險管理
- 項目管理方法論教程
- 六西格碼認證指南:綠色,黃色,黑色皮帶詳細信息
- 40 個最佳項目管理工具[2020 年 7 月列表]
- PMP 教程:在線培訓材料
- 介紹
- 什么是項目管理? 目標,方法
- 項目管理生命周期的各個階段
- 高級的東西
- 項目集成管理教程:定義,流程&計劃
- 項目范圍管理:PMP 教程
- 項目成本估算&預算管理技術
- 利益相關者分析&與模板映射的示例
- 項目管理中的風險分析&風險管理
- 必須知道!
- 2020 年 30 種最佳 Trello 替代品
- 2020 年 20 種最佳 Microsoft Project 替代方案
- 2020 年最佳 8 個 Wrike 替代品
- MIS(管理信息系統)教程
- 什么是 MIS? 簡介&定義
- 組件& MIS(管理信息系統)的作用
- MIS(管理信息系統)的目標&
- 信息系統類型:TPS,DSS &金字塔圖
- SDLC &敏捷的 MIS 開發流程
- 信息系統中的道德&安全問題
- Microsoft MCSA 認證考試指南
- 決策支持系統(DSS):零售商店的演示 PoS
- Excel VBA 初學者教程:3 天學習
- 介紹
- 如何在 Excel 中編寫宏:分步入門指南
- 如何使用示例在 Excel 中創建 Visual Basic for Applications(VBA)
- Excel VBA 變量,數據類型&常量
- Excel VBA 數組:帶示例的動態多維類型
- 高級的東西
- VBA Excel 表單控件& ActiveX 控件
- VBA 算術運算符:乘法,除法,加法,模量
- VBA 字符串運算符
- VBA 比較運算符:不等于,小于或等于,大于
- VBA 邏輯運算符:AND,OR,NOT
- Excel VBA 子例程:如何使用示例調用 Sub
- Excel VBA 函數教程:返回,調用,示例
- Excel VBA 范圍對象
- 必須知道!
- 使用 VBA 進行網頁搜刮
- VBA 面試的前 22 個問題&答案
- CCNA 認證教程:簡介&基礎
- Jenkins 初學者教程:3 天學習
- 介紹
- 什么是持續集成?
- 詹金斯是什么? 持續集成(CI)工具
- 如何下載&在 Windows 上安裝 Jenkins
- 高級的東西
- Jenkins GitHub 集成:安裝 Git 插件
- 如何創建用戶&管理權限:角色策略插件
- 如何使用 Jenkins Freestyle 項目創建構建
- Jenkins 管道教程:JenkinsFile 示例
- Jenkins vs Travis-CI:有什么區別?
- 必須知道!
- 2020 年 15 種最佳詹金斯替代品
- 十大 JENKINS 面試問題&答案
- 初學者軟件工程教程:3 天學習
- 介紹
- 什么是軟件工程? 定義,基礎,特征
- 成為軟件工程師/開發人員的 9 個步驟
- 軟件工程師與軟件開發人員:有什么區別?
- SDLC(軟件開發生命周期)教程:什么是階段,模型
- SDLC 中的瀑布模型是什么? 優點&缺點
- 高級的東西
- SDLC 中的增量模型:使用優勢&劣勢
- 什么是螺旋模型? 什么時候使用? 優點&缺點
- 什么是 RAD 模型? 優點&缺點
- 軟件工程中的原型模型:方法論,過程,方法
- 瀑布模型,增量模型,螺旋模型與輻射模型:主要區別
- 能力成熟度模型(CMM)&是軟件工程中的各個級別
- N 層(多層),3 層,2 層架構(帶示例)
- 什么是全棧開發人員? 成為 Web 開發人員的技能
- 什么是函數式編程? 實例教程
- MVC 初學者教程:什么是架構&示例
- MVC 面試的前 31 個問題&答案
- 背包問題:動態編程示例
- 小背包問題:帶有示例的貪婪算法
- 2020 年 21 種最佳軟件開發工具
- 程序與程序之間的區別
- 主存儲器和輔助存儲器之間的區別
- 局部變量和全局變量之間的差異
- 抽象與封裝之間的區別
- XML 和 HTML 之間的區別
- 網站和 Web 應用程序之間的區別
- URL 與 URI:您必須知道的最重要的區別
- AR vs VR:有什么區別?
- 加密與解密:有什么區別?
- Web 開發人員與軟件開發人員:有什么區別?
- 必須知道!
- HTML 和 HTML5 之間的區別
- 按值致電與按引用致電之間的區別
- 類和對象之間的區別
- 堆疊與堆:了解差異
- 32 位和 64 位:主要區別
- 系統軟件和應用程序軟件之間的區別
- 軟件工程與計算機科學:簡介&的差異
- CISC 與 RISC:體系結構,指令集之間的差異
- SSD 與 HDD:選擇哪一個?
- SRAM 與 DRAM:了解差異
- MVC 與 MVVM:示例的主要區別
- CPU 核心,多核心,線程,核心與線程,超線程
- 2020 年面向 Java,C,C ++,C#,Python 的 13 種最佳代碼覆蓋工具
- 2020 年 14 種最佳代碼審查工具[靜態代碼分析]
- 15 個適用于 Windows 的最佳免費代碼編輯器& Mac [2020 更新]
- 2020 年學習的 10 種最佳編程語言
- 什么是后端開發人員? 成為 Web 開發人員的技能
- 什么是平均堆棧開發人員? 技能,薪水,成長
- 初學者競爭性編程:Topcoder 挑戰
- 什么是計算機編程? 學習編碼的基礎
- 14 本 BEST 算法&數據結構書籍(2020 清單)
- 2020 年面向初學者的 50 多個 BEST Freelance 網站
- 2020 年的 11 種最佳 Fiverr 替代品
- 2020 年 20 種最佳前端 Web 開發工具
- 2020 年 10 種最佳 Notepad ++替代品
- 2020 年 10 種最佳 Sublime Text 替代品
- 2020 年 13 種最佳 Github 替代方案
- 2020 年 21 種最佳 CCleaner 替代品
- 12 最佳免費 PC 清潔器| TuneUp | 優化器實用程序
- 2020 年 20 種最佳免費注冊表清潔工具
- 2020 年 21 種最佳打字導師軟件
- 前 50 名軟件工程面試問答
- SDLC 面試的前 27 個問題與解答
- 前 40 名計算機科學面試問答