# 如何在 Excel 中編寫宏:分步入門指南
> 原文: [https://www.guru99.com/introduction-to-macros-in-excel.html](https://www.guru99.com/introduction-to-macros-in-excel.html)
## 什么是 Excel 宏?
**EXCEL MACRO** 是一種記錄和播放工具,它僅記錄您的 Excel 步驟,并且宏將根據需要播放任意多次。 VBA 宏可自動執行重復任務,從而節省了時間。 這是一段可在 Excel 環境中運行的編程代碼,但您無需成為編碼器即可對宏進行編程。 但是,您需要 VBA 的基礎知識才能在宏中進行高級修改。
在本教程中,您將學習
* [為什么在 Excel 中使用 Excel 宏?](#2)
* [外行人使用的 VBA 是什么?](#3)
* [宏基礎知識](#4)
* [在 Excel 中記錄宏的分步示例](#5)
## 為什么在 Excel 中使用 Excel 宏?
作為人類,我們是習慣的產物。 我們每天每個工作日都會做某些事情。 如果有某種神奇的方法可以按一個按鈕并且完成了我們所有的例行任務,這會更好嗎? 我能聽到你說是的。 宏可以幫助您實現這一目標。 用外行語言來說,宏定義為您在 Excel 中的常規步驟的記錄,您可以使用單個按鈕進行重放。
例如,您正在作為自來水公司的出納員。 一些客戶通過銀行付款,最終,您需要從銀行下載數據并以符合業務需求的方式對其進行格式化。
您可以將數據導入 Excel 和格式。 第二天,您將需要執行相同的儀式。 它將很快變得無聊和乏味。 **宏通過自動執行此類常規任務**解決了此類問題。 您可以使用宏來記錄以下步驟
* 導入數據
* 對其進行格式化以滿足您的業務報告要求。
## 外行語言的 VBA 是什么?
**VBA 是 Visual Basic for Applications 的縮寫。** 這是一種編程語言,Excel 在執行日常任務時會使用它來記錄您的步驟。 您無需成為程序員或技術人員就可以享受 Excel 中宏的好處。 Excel 具有自動為您生成源代碼的功能。 閱讀有關 Vba 的文章以了解更多詳細信息。
## 宏基礎知識
**宏是開發人員功能之一。 默認情況下,開發人員選項卡不顯示在 excel 中。 您需要通過自定義報告**顯示它
攻擊者可以使用宏來破壞您的系統。 默認情況下,它們在 excel 中被禁用。 如果需要運行宏,則將需要啟用運行宏,并且僅運行您知道來自受信任來源的宏
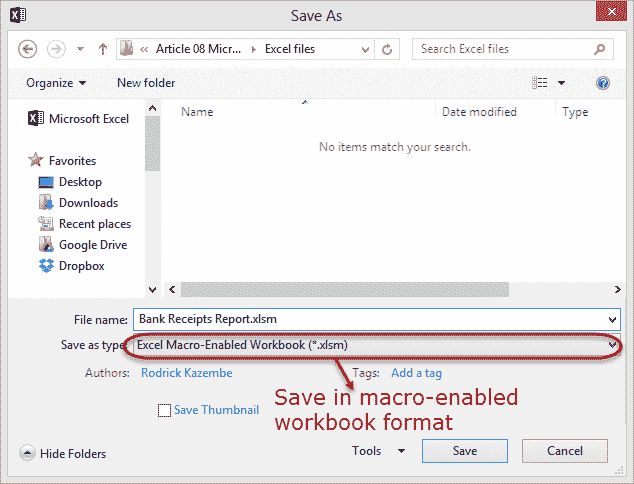
如果要保存宏,則必須將工作簿保存為啟用宏的格式* .xlsm
宏名稱不得包含任何空格。
創建宏時,請務必填寫宏的描述。 這將幫助您和其他人了解宏在做什么。
## 在 Excel 中記錄宏的分步示例
我們將使用宏 excel 重要性中描述的方案進行工作。 我們將使用以下 CSV 文件。

您可以在此處下載以上文件
[下載上述 CSV 文件&宏](https://drive.google.com/uc?export=download&id=0BwL5un1OyjsdcEl4Y1N6SGZkWWs)
我們將創建一個啟用宏的模板,該模板將導入上述數據并對其進行格式化,以滿足我們的業務報告要求。
**## 啟用開發者選項**
要執行 VBA 程序,您必須有權訪問 Excel 中的開發人員選項。 如下所示啟用開發人員選項,然后將其固定到 Excel 中的主要功能區。
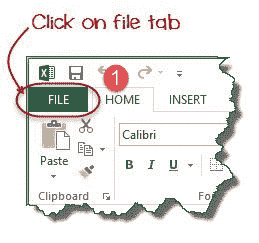
**步驟 1)**轉到主菜單“文件”
選擇選項“選項”。
[ ](/images/vba/062416_1048_WhatisVBA2.png)
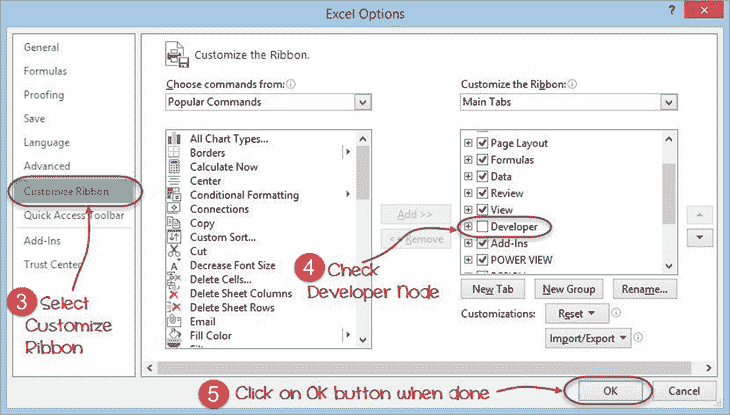
**步驟 2)**現在將打開另一個窗口,在該窗口中執行以下操作
* 單擊自定義功能區
* 將復選框標記為開發人員選項
* 點擊確定按鈕
**步驟 3)**開發人員標簽
現在,您將能夠在功能區中看到“開發人員”選項卡

**步驟 4)**下載 CSV
首先,我們將看到如何在電子表格上創建命令按鈕并執行程序。
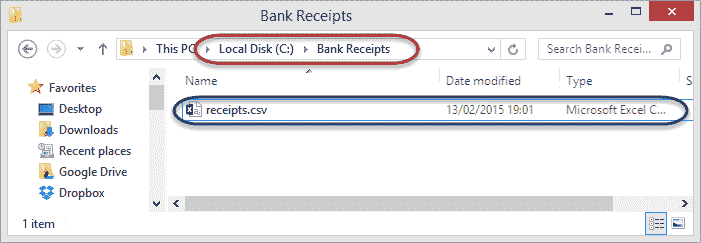
* 在驅動器 C 中創建一個名為 Bank Receipts 的文件夾
* 粘貼您下載的 receives.csv 文件
**步驟 5)**記錄宏
1. 單擊開發人員選項卡
2. 單擊記錄宏,如下圖所示

您將獲得以下對話窗口

1. 輸入 ImportBankReceipts 作為宏名稱。
2. 第二步將默認存在
3. 輸入說明,如上圖所示
4. 點擊“確定”標簽
**步驟 6)**執行您要記錄的宏操作/步驟
* 將光標放在單元格 A1 中
* 單擊數據選項卡
* 單擊“獲取外部數據”功能區欄上的“來自文本”按鈕
You will get the following dialogue window
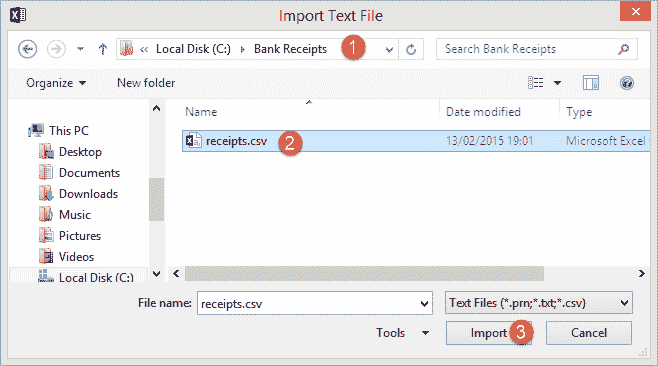
1. 轉到存儲 CSV 文件的本地驅動器
2. 選擇 CSV 文件
3. 點擊導入按鈕
您將獲得以下向導

完成上述步驟后,單擊“下一步”按鈕

請按照上述步驟操作,然后單擊下一步按鈕

* 點擊完成按鈕
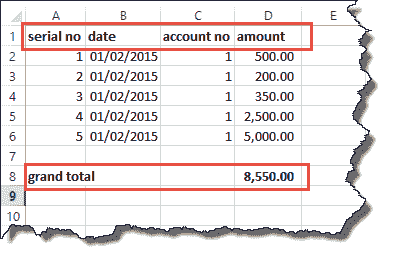
* 您的工作簿現在應如下所示
[ ](/images/5-2015/050215_1033_Introductio10.png)
**步驟 7)**格式化數據
將列設為粗體,添加總計,然后使用 SUM 函數獲取總計。
**步驟 8)**停止錄制宏
現在我們已經完成了日常工作,我們可以單擊停止錄制宏按鈕,如下圖所示

**步驟 9)**重播宏
在保存工作簿之前,我們將需要刪除導入的數據。 我們將執行此操作以創建一個模板,該模板將在每次我們有新的收據并要運行 ImportBankReceipts 宏時復制。
* 突出顯示所有導入的數據
* 右鍵單擊突出顯示的數據
* 點擊刪除
* 單擊另存為按鈕
* 將工作簿保存為啟用宏的格式,如下所示
* 復制新保存的模板
* 打開它
* 單擊開發人員選項卡
* 單擊宏按鈕
You will get the following dialogue window

1. 選擇 ImportBankReceipts
2. 突出顯示您的宏的描述
3. 點擊運行按鈕
您將獲得以下數據

恭喜,您剛剛在 excel 中創建了第一個宏。
## 摘要
宏通過使我們執行的大多數日常工作自動化來簡化我們的工作生活。 Excel 中的宏由 Visual Basic for Applications 驅動。
To execute VBA program, you have to have access to developer option in Excel. Enable the developer option as shown below and pin it into your main ribbon in Excel.
**Step 1)**Go to main menu "FILE"
Select option "Options."


**Step 1)**Go to main menu "FILE"
Select option "Options."
**Step 2)** Now another window will open, in that window do following things
* 單擊自定義功能區
* 將復選框標記為開發人員選項
* 點擊確定按鈕

**Step 2)** Now another window will open, in that window do following things
* 單擊自定義功能區
* 將復選框標記為開發人員選項
* 點擊確定按鈕
**Step 3)** Developer Tab
You will now be able to see the DEVELOPER tab in the ribbon

**Step 3)** Developer Tab
You will now be able to see the DEVELOPER tab in the ribbon
**Step 4)** Download CSV
First, we will see how we can create a command button on the spreadsheet and execute the program.
* 在驅動器 C 中創建一個名為 Bank Receipts 的文件夾
* 粘貼您下載的 receives.csv 文件

**Step 4)** Download CSV
First, we will see how we can create a command button on the spreadsheet and execute the program.
**Step 5)** Record Macro
1. 單擊開發人員選項卡
2. 單擊記錄宏,如下圖所示

You will get the following dialogue window

1. 輸入 ImportBankReceipts 作為宏名稱。
2. 第二步將默認存在
3. 輸入說明,如上圖所示
4. 點擊“確定”標簽
**Step 5)** Record Macro
1. 單擊開發人員選項卡
2. 單擊記錄宏,如下圖所示
**Step 6)** Perform Macro Operations/Steps you want to record
* 將光標放在單元格 A1 中
* 單擊數據選項卡
* 單擊“獲取外部數據”功能區欄上的“來自文本”按鈕
You will get the following dialogue window

1. 轉到存儲 CSV 文件的本地驅動器
2. 選擇 CSV 文件
3. 點擊導入按鈕
You will get the following wizard

Click on Next button after following the above steps

Follow the above steps and click on next button

* 點擊完成按鈕
* 您的工作簿現在應如下所示

**Step 6)** Perform Macro Operations/Steps you want to record
* 將光標放在單元格 A1 中
* 單擊數據選項卡
* 單擊“獲取外部數據”功能區欄上的“來自文本”按鈕
**Step 7)** Format the Data
Make the columns bold, add the grand total and use the SUM function to get the total amount.

**Step 7)** Format the Data
Make the columns bold, add the grand total and use the SUM function to get the total amount.
**Step 8)** Stop Recording Macro
Now that we have finished our routine work, we can click on stop recording macro button as shown in the image below

**Step 8)** Stop Recording Macro
Now that we have finished our routine work, we can click on stop recording macro button as shown in the image below
**Step 9)** Replay the Macro
Before we save our work book, we will need to delete the imported data. We will do this to create a template that we will be copying every time we have new receipts and want to run the ImportBankReceipts macro.
* 突出顯示所有導入的數據
* 右鍵單擊突出顯示的數據
* 點擊刪除
* 單擊另存為按鈕
* 將工作簿保存為啟用宏的格式,如下所示

* 復制新保存的模板
* 打開它
* 單擊開發人員選項卡
* 單擊宏按鈕
You will get the following dialogue window

1. 選擇 ImportBankReceipts
2. 突出顯示您的宏的描述
3. 點擊運行按鈕
You will get the following data

Congratulations, you just created your first macro in excel.
**Step 9)** Replay the Macro
Before we save our work book, we will need to delete the imported data. We will do this to create a template that we will be copying every time we have new receipts and want to run the ImportBankReceipts macro.
- Guru99 軟件測試教程
- 軟件測試教程:免費課程
- 現實生活
- 測試基礎
- 什么是軟件測試? 定義,基礎&類型
- 軟件測試作為職業道路(技能,薪水,成長)
- 軟件測試的 7 條原則:通過實例學習
- 軟件測試中的 V 模型
- STLC-軟件測試生命周期階段&進入,退出條件
- 測試類型
- 初學者手動測試教程:概念,類型,工具
- 自動化測試教程:什么是流程,收益&工具
- 自動化測試與 手動測試:有什么區別?
- 單元測試教程:什么是類型,工具,示例
- 集成測試:什么是類型,自上而下&自下而上的示例
- 什么是系統測試? 類型&的定義和示例
- 健康測試與煙霧測試:簡介&差異
- 什么是回歸測試? 定義,測試用例(示例)
- 什么是非功能測試? 帶示例的類型
- TestCase 開發
- 軟件測試中的測試文檔
- 什么是測試方案? 帶有示例的模板
- 如何編寫測試用例:帶有示例的示例模板
- QTP(UFT)中的環境變量與示例
- 什么是軟件測試中的測試分析(測試基礎)?
- 什么是需求可追溯性矩陣(RTM)? 示例模板
- 測試數據生成:什么是,如何做,示例,工具
- 下載示例測試案例模板:示例 Excel,Word 格式
- 測試技術
- 帶有測試用例設計示例的軟件測試技術
- 邊界值分析&等價分割的例子
- 決策表測試:學習示例
- 什么是狀態轉換測試? 圖表,技術,示例
- 什么是用例測試? 技術,范例
- 測試管理&放大器; 控制
- 軟件測試評估技術:分步指南
- 如何創建測試計劃(帶有示例)
- 測試計劃模板:帶有 Web 應用程序示例的樣本文檔
- 瑕疵
- 軟件測試的測試環境
- 軟件測試中的缺陷管理流程(錯誤報告模板)
- 軟件測試中的缺陷/缺陷生命周期
- 2020 年排名前 50 位的軟件測試工具
- 敏捷
- 敏捷方法論&模型:軟件開發指南&測試
- 什么是敏捷測試? 流程,策略,測試計劃,生命周期示例
- Scrum 測試方法論教程:什么是流程,工件,沖刺
- 敏捷/ Scrum 方法論的自動化測試框架
- SAFe 方法論教程:什么是可擴展敏捷框架
- 測試不同的域
- Web 應用程序測試:網站測試的 8 個步驟指南
- Web 應用程序測試清單:網站的測試用例示例
- 銀行領域應用測試:示例測試案例
- 電子商務測試:如何測試電子商務網站
- 帶有示例測試案例的支付網關測試教程
- 大型機測試-完整教程
- 測試零售銷售點(POS)系統:示例測試案例
- 使用樣本測試用例進行 HealthCare 域測試
- 使用樣本測試用例測試保險領域的應用程序
- 使用示例 OSS / BSS 測試用例測試電信域
- 商業智能(BI)測試:示例測試案例
- 白盒測試
- 什么是白盒測試? 技術,示例,類型&工具
- 什么是靜態測試? 什么是測試審查?
- Mccabe 的環復雜性:使用流程圖進行計算(示例)
- 代碼覆蓋率教程:分支,語句,決策,FSM
- 路徑測試&包含示例的基礎路徑測試
- 性能測試
- 性能測試教程:什么是類型,度量&示例
- 負載測試教程:什么是? 如何? (帶有示例)
- 什么是軟件測試中的應力測試? 工具,類型,示例
- 什么是音量測試? 通過實例學習
- 什么是可伸縮性測試? 通過示例學習
- 什么是浸泡測試? 定義,含義,示例
- 軟件測試中的穩定性測試
- 什么是峰值測試? 通過示例學習
- 負載測試,壓力測試,性能測試:討論差異
- 什么是響應時間測試?
- 什么是基準測試? 測試計劃,工具,示例
- 什么是軟件測試中的耐久性測試? (帶有示例)
- 可靠性測試教程:什么是方法,工具,示例
- 13 個最佳性能測試工具| 負載測試工具(2020)
- 預先測試主題
- 軟件測試指標:什么是類型&示例
- 如何創建測試策略文檔(示例模板)
- 什么是測試即服務? TaaS 模型解釋
- 什么是軟件測試中的測試成熟度模型(TMM)?
- 常問問題
- 嚴重性&測試優先級:差異&示例
- 測試策略與測試計劃:有什么區別?
- 靜態測試與動態測試:有什么區別?
- 重新測試和回歸測試之間的區別
- 質量保證與質量控制:有什么區別?
- 實例驗證與驗證之間的區別
- 正測試和負測試的例子
- 什么是測試線束? 工具&的例子
- 什么是缺陷密度? 用示例計算的公式
- 全球化測試和本地化測試之間的區別
- 測試條件與測試場景:有什么區別?
- 單元測試與集成測試:有什么區別?
- 功能測試與非功能測試:有什么區別?
- 黑匣子測試與 白盒測試:主要差異
- 前端測試與 后端測試:有什么區別?
- SDLC 與 STLC:有什么區別?
- 什么是 SDET? 完整的形式,含義,作用和職責
- 測試人員必須編寫代碼嗎?
- 測試用例與測試方案:有什么區別?
- 測試類型-超級列表
- 軟件測試類型:100 種不同測試類型的示例
- API 測試教程:10 分鐘內學習!
- 什么是黑盒測試? 技術,示例&類型
- Alpha 測試與 Beta 測試:有什么區別?
- 什么是功能測試? 類型&示例(完整教程)
- 什么是用戶驗收測試(UAT)? 與例子
- REST API 測試教程:手動測試案例示例
- 使用 Restito 工具進行 REST 客戶端測試
- REST 保證教程:如何使用示例測試 API
- 什么是安全測試? 帶示例的類型
- GUI 測試教程:帶有示例的用戶界面(UI)測試案例
- 軟件測試方法:了解質量檢查模型
- 端到端測試教程:什么是 E2E 測試示例
- 什么是探索性測試? 實例技巧
- 軟件測試中的變異測試:變異分數&分析示例
- 什么是臨時測試? 帶示例的類型
- 關鍵字驅動測試框架的示例
- 基于風險的測試:方法,矩陣,過程&示例
- 后端測試教程:什么是工具&示例
- 什么是煙霧測試? 如何使用示例
- 輔助功能測試教程:什么是工具&示例
- 什么是質量保證(QA)? 工藝,方法,實例
- 帶有示例項目示例的質量管理計劃模板
- 什么是 SOA 測試? 實例教程
- 滲透測試教程:什么是 PenTest?
- 什么是兼容性測試? 正向&向后測試(示例)
- 什么是帶有示例的系統集成測試(SIT)
- 軟件測試中的測試范圍
- 什么是可用性測試? UX(用戶體驗)測試示例
- 協議測試教程:L2 & L3
- 什么是云測試? SaaS 測試教程
- Cookie 測試:網站的測試用例示例
- 什么是灰盒測試? 技術實例
- 基于模型的測試教程:工具&示例
- 什么是試點測試? 定義,含義,示例
- 什么是正交陣列測試(OATS)? 工具,技術&示例
- 什么是 Alpha 測試? 工藝,實例
- 模糊測試(模糊)教程:什么是類型,工具&示例
- 什么是本地化測試? 測試用例示例&清單
- 什么是接口測試? 類型&示例
- 什么是漏洞評估? 測試過程,VAPT 掃描工具
- 什么是配置測試? 示例測試用例
- 應用程序測試教程:什么是工具,如何使用
- 什么是陰性測試? 測試用例
- 什么是軟件測試中的互操作性測試? (帶有示例)
- 一致性測試(一致性測試)-完整指南
- 什么是循環測試? 方法論,例子
- 什么是組件測試? 技術,示例測試用例
- 什么是動態測試? 類型,技術&示例
- 什么是并行測試? 定義,方法,實例
- 什么是運營驗收測試(OAT)? 示例測試用例
- 什么是模塊測試? 定義,例子
- 什么是軟件測試中的工作流測試? 與例子
- 存儲測試教程:什么是類型,概念
- 什么是恢復測試? 與例子
- 什么是軟件測試中的并發測試?
- 什么是軟件測試中的線程測試?
- 什么是破壞性測試? 技術,方法,實例
- 什么是 DevOps 中的連續測試? 定義,好處,工具
- 軟件測試中的測試級別
- IoT 測試教程:什么是流程,挑戰&工具
- 什么是測試驅動開發(TDD)? 實例教程
- 什么是數據驅動測試? 學習創建框架
- 什么是猴子&大猩猩測試? 例子,差異
- 什么是前端測試? 工具&框架
- 什么是軟件測試中的嵌入式測試?
- 什么是軟件測試中的域測試? (帶有示例)
- Salesforce 測試教程:什么,流程,工具,最佳實踐
- 設計驗證&驗證過程
- 無損檢測(NDT)
- 工具類
- 2020 年 10 種最佳跨瀏覽器兼容性測試工具
- 2020 年 20 種最佳 Bug /缺陷跟蹤工具
- 2020 年 20 種最佳 Web 測試工具
- 20 個最佳自動化測試工具(2020 年 7 月更新)
- 2020 年 15 種最佳測試數據生成工具
- 2020 年 13 家最佳人群測試(Crowdsource)公司
- 2020 年 10 種最佳探索性測試工具
- 檢查!
- 前 150 個軟件測試面試問題&答案
- 前 15 個自動化測試面試問題&答案
- 前 40 個 QA 面試問題&答案
- 前 25 個數據庫測試面試問題&答案
- 資質認證
- ISTQB 認證:完整的模擬學習考試材料
- CSTE 認證指南和學習資料
- 認證軟件質量分析師(CSQA)認證指南
- ISTQB CTAL(高級)考試及學習資料
- UFT / QTP 初學者教程:7 天學習
- 介紹
- 什么是 QTP / UFT 自動化測試工具?
- 如何下載和安裝 UFT 或 QTP [最新版本]
- HP UFT / QTP 中的航班預訂應用程序
- 如何使用 QTP / UFT IDE
- 如何記錄和播放 UFT / QTP 腳本
- 高級的東西
- 對象識別如何在 QTP / UFT 中工作?
- QTP / UFT 中的關鍵字和專家視圖
- 了解 SystemUtil.Run,??SetSecure,Set,類型:QTP / UFT 示例
- 如何使用示例重播 QTP / UFT 中的腳本
- 通過打印/導出示例了解 QTP / UFT 中的測試結果
- QTP / UFT 中的參數化示例
- QTP / UFT 中的檢查點與示例
- 如何使用示例在 QTP / UFT 中打印輸出值
- QTP / UFT 中包含 IF,Else,End IF 和示例
- QTP / UFT 中的 Reporter.ReportEvent 及其示例
- QTP / UFT 中的動作與示例
- QTP / UFT 中的智能識別示例
- QTP / UFT 中的順序標識符:對象識別示例
- QTP / UFT 中的本地&共享對象存儲庫
- QTP / UFT 中的記錄模式類型:模擬,低電平,上下文
- 如何通過 3 個簡單的步驟在 QTP / UFT 中使用功能
- 如何在 QTP / UFT 中使用事務
- 如何通過示例使用 QTP / UFT 中的恢復方案
- QTP / UFT 中的可選步驟(帶示例)
- QTP / UFT 中的對象間諜,GetRoProperty,GetToProperty 和示例
- QTP / UFT 中的描述性編程:動態&靜態
- 測試自動化框架-您必須知道的東西!
- QTP / UFT 中的數據,關鍵字&混合自動化框架
- QTP / UFT 中的業務流程測試(BPT)框架
- 如何在 QTP / UFT 中從 EXCEL 導入,讀取,更改數據
- QTP / UFT 移動應用測試教程
- 使用 QTP / UFT 進行 API 測試:完整的教程
- 檢查!
- 前 100 個 QTP / UFT 面試問題&答案
- 測驗
- 初學者硒教程:7 天學習 WebDriver
- 第一眼
- 什么是硒? 硒自動化測試簡介
- 什么是 Selenium WebDriver? 與 RC 的區別
- WebDriver 教程
- 如何下載&安裝 Selenium WebDriver
- 第一個 Selenium Webdriver 腳本:JAVA 代碼示例
- Selenium IDE 中的定位器:CSS 選擇器,DOM,XPath,鏈接文本,ID
- 在 Selenium WebDriver 中查找元素和 FindElements
- Selenium Form WebElement:文本框,提交按鈕,sendkeys(),click()
- 如何在 Selenium WebDriver 中選擇復選框和單選按鈕
- 如何在 Selenium Webdriver 中單擊圖像
- 如何使用 Selenium Webdriver 從 DropDown 中選擇值
- 在 Selenium Webdriver 中按鏈接文本&部分鏈接文本定位元素
- 鼠標單擊&鍵盤事件:Selenium Webdriver 中的操作類
- 如何上傳&使用 Selenium Webdriver 下載文件
- Selenium WebDriver 中的 XPath:完整教程
- Selenium WebDriver 中的警報&彈出窗口處理
- 如何在 Selenium WebDriver 中處理 Web 表
- 使用 Selenium WebDriver 處理動態 Web 表
- Selenium WebDriver 中所需的功能
- 如何使用 Selenium WebDriver 驗證工具提示
- 如何使用 Selenium Webdriver 查找所有/斷開的鏈接
- Gecko(Marionette)驅動程序 Selenium:下載,安裝,與 Firefox 一起使用
- 測試 NG
- 如何下載&在 Eclipse 中為 Selenium WebDriver 安裝 TestNG
- TestNG 教程:Selenium 中的注釋,框架和示例
- TestNG 組:包含,排除示例-Selenium 教程
- 硒中的 TestNG @Test 優先級
- Selenium 中的并行執行:會話處理& TestNG 依賴性
- TestNG:如何在 Selenium 中運行多個測試套件
- Selenium 中的 TestNG 偵聽器:??ITestListener & ITestResult 示例
- 如何在 TestNG 中執行失敗的測試用例:Selenium WebDriver
- Selenium WebDriver 中的 TestNG 報告生成
- 在 Selenium WebDriver 中自定義 PDF &電子郵件 TestNG 報告
- 構架
- 頁面對象模型(POM)&頁面工廠:Selenium WebDriver 教程
- Dataprovider & TestNG XML:Selenium 中的參數化(示例)
- 從 Selenium Webdriver 中的 Excel 文件中讀取&寫入數據:POI & JXL
- 如何從 Selenium Webdriver 中的 DatePicker /日歷中選擇日期
- 提前 Webdriver 的東西!
- Selenium Grid 教程:集線器&節點(帶有示例)
- Maven & Jenkins 與 Selenium 集成:完整教程
- Selenium 自動化框架:數據驅動,關鍵字驅動&混合
- 使用 Selenium 進行數據庫測試:分步指南
- 在 Selenium Webdriver 中處理 iFrame:switchTo()
- 使用 Selenium WebDriver 進行跨瀏覽器測試
- 如何在 Selenium WebDriver 中截屏
- 具有 Selenium 教程的 Log4j:下載,安裝,使用&示例
- 硒無頭瀏覽器測試:HTMLUnitDriver & PhantomJS
- Selenium Webdriver 中的機器人類
- 如何在 Selenium Webdriver 中使用 AutoIT:文件上傳示例
- 如何在 Selenium WebDriver 中處理 SSL 證書
- 如何在 Selenium Webdriver 中處理 AJAX 呼叫
- Selenium WebDriver 中的 JavaScriptExecutor 示例
- 使用 Python 的 Selenium Webdriver:示例教程
- 如何使用 IntelliJ IDE & Selenium Webdriver
- 使用 Selenium WebDriver 進行閃存測試
- 帶有 Selenium 的 Apache ANT:完整教程
- Selenium Webdriver 中的 XSLT 報告
- Github 與 Selenium 集成:完整教程
- Selenium WebDriver 中的 Cookie 處理
- 將 SoapUI 與 Selenium 一起用于 Web 服務測試
- 如何在 Selenium WebDriver 中創建 Firefox 配置文件
- 含硒硒(BDD 框架):帶有示例的教程
- 如何在 Selenium WebDriver 中拖放(示例)
- Selenium C#Webdriver 教程:NUnit 示例
- 在 Selenium WebDriver 中創建對象存儲庫:XML &屬性文件
- 如何在 Selenium Webdriver 中向下滾動或向上滾動頁面
- Sikuli 教程:如何將 Sikuli 與硒一起使用(示例)
- XPath 在 Selenium Webdriver 中包含,同級,祖先,與或,父級,開頭,軸
- Selenium WebDriver 中的隱式,顯式&流利等待
- 雙擊并右鍵單擊 Selenium 中的示例
- 使用帶有示例的 Webdriver 的 Selenium 代理身份驗證
- Selenium 異常處理(常見異常列表)
- Selenium IDE 教程
- 如何下載&為 Firefox 安裝 Selenium IDE
- Selenium IDE 初學者教程
- 如何通過腳本&命令(聲明,驗證)使用 Selenium IDE
- 在 Selenium IDE 中驗證 Element Present,waitFor 和 Wait
- 在 Selenium IDE 中存儲變量,回顯,警報,彈出窗口處理
- 硒核心擴展(User-Extensions.js)
- 如何在 Selenium IDE 中進行調試 斷點&起點
- 最大化 Selenium 中的瀏覽器
- Chrome 選項&所需功能:AdBlocker,隱身,無頭
- 使用 Selenium Webdriver 刷新頁面
- 使用 Excel VBA 和 Selenium
- 必須檢查!
- 前 100 個硒面試問題&答案
- 硒與 HP UFT(QTP):有什么區別?
- 2020 年排名前 15 位的硒替代品
- 2020 年 10 種最佳 iMacros 替代品
- 免費的移動應用測試教程
- 第一眼
- 移動應用程序測試:示例測試用例&測試方案
- 真實設備與模擬器與模擬器的測試:主要差異
- 鴉片
- 適用于 Android 的 APPIUM 教程& iOS 移動應用測試
- UIAutomatorViewer 教程:Android 測試檢查器
- Android 仿真器的 Appium 所需功能[示例]
- 將具有 Android 調試橋(ADB)的移動設備連接到 USB,WiFi
- Appium Maven 依賴項:項目示例
- 前 18 個 Appium 面試問題&答案
- 提前進行移動測試!
- 帶有自動化框架的 Android APP 測試教程
- Robotium 教程:您的第一個 Android 框架
- Selendroid 入門實例教程
- 移動應用程序性能測試:清單,工具(Andriod & iOS)
- 適用于 Android 測試的 Calabash 自動化工具教程
- iOS 應用測試教程:手冊&自動化
- 使用 UIAutomation 框架的 iOS 自動化測試
- 熱門 20 個移動測試面試問題&答案
- 游戲測試:如何測試移動/桌面應用程序
- 適用于 Android 的 14 種最佳移動測試工具& iOS App [免費/付費]
- 移動應用中的中斷測試
- 2020 年 26 種最佳移動應用開發工具
- 初學者黃瓜測試教程
- 什么是黃瓜測試工具? 框架介紹
- 如何下載&在 Windows 中安裝 CUCUMBER
- 什么是黃瓜特征文件&步驟定義? (帶有示例)
- 什么是小黃瓜? 用黃瓜寫小黃瓜測試
- 創建您的第一個黃瓜腳本(2 個示例)
- 黃瓜面試的前 20 個問題&答案
- SoapUI 初學者教程
- Web 服務測試:初學者教程
- 什么是 SoapUI? SoapUI 測試簡介
- 在 Windows 上進行 SOAPUI 下載,安裝和&配置
- SoapUI:如何創建測試套件&測試用例
- SoapUI 中的斷言:完整教程
- SoapUI 面試的前 15 個問題&答案
- 行為驅動開發(BDD)通過行為測試 REST API
- 15 Rest API 面試問題&答案
- 2020 年 19 種最佳 SoapUI 替代品
- JUnit 初學者教程:3 天學習
- 如何在 Eclipse 中下載和安裝 JUnit
- JUnit 測試用例@Before @BeforeClass 注釋
- 帶有示例的 JUnit 注釋教程
- Junit 斷言&斷言與示例
- 使用示例創建 JUnit 測試套件:@RunWith @SuiteClasses
- JUnit @Ignore 測試注釋與示例
- JUnit 預期的異常測試:@Test(預期)
- JUnit ErrorCollector @Rule 與示例
- 使用@Parameters 的示例進行 JUnit 參數化測試
- TestNG 與 JUnit:有什么區別?
- 機械手流程自動化(RPA)教程:什么是工具&示例
- Bugzilla 入門指南:缺陷跟蹤工具
- JIRA 教程:初學者完整指南
- MANTIS Bug Tracker 入門教程
- ETL 測試或數據倉庫測試教程
- 學習 SAP 測試:創建您的第一個 SAP 測試用例
- 帶有示例測試案例的數據庫(數據)測試教程
- HP ALM /質量中心教程
- 介紹
- 什么是 HP ALM? 質量中心工具
- 如何下載&安裝 HP ALM(質量中心)
- HP ALM 管理:創建域,項目&用戶
- 高級的東西
- 管理選項卡:在 HP ALM(質量中心)中創建版本&周期
- HP ALM(質量中心)教程中的需求模塊
- HP ALM(質量中心)教程中的測試計劃模塊
- HP ALM(質量中心)中的測試實驗室
- 如何將 UFT(QTP)與 ALM(質量中心)集成
- HP ALM(質量中心)中的缺陷管理生命周期
- 儀表板,報告 HP ALM(Quality Center)中的&分析
- HP ALM:過濾條件,查找,替換,標志,歷史記錄&發送郵件
- 如何在 HP ALM(質量中心)中自定義項目
- 檢查!
- HP ALM / QC 認證:絕對指南
- 30 個最佳 ALM 工具[2020 年 7 月列表]
- HP ALM(質量中心)面試的前 35 個問題&答案
- 測試管理教程:完整的培訓課程
- 介紹
- 角色&測試經理/測試負責人的職責
- 測試管理過程:測試項目的完整指南
- 測試管理中的項目風險分析&解決方案
- 軟件測試評估技術:分步指南
- 高級的東西
- 項目團隊:開發,構建&管理:逐步過程
- 如何創建測試計劃(帶有示例)
- 測試執行期間的測試監控&測試控制:完整教程
- 測試項目中的問題管理
- 測試摘要報告教程:通過示例&模板學習
- 軟件質量保證(SQA):計劃,審核&審核
- 軟件測試中的缺陷管理流程(錯誤報告模板)
- 使用 PDCA 模型的測試過程改進(TPI)
- 如何選擇最佳自動化測試工具
- 掌握團隊管理技能的 5 個步驟
- 必須知道!
- 最佳 25 種測試管理工具(2020 年 7 月更新)
- 前 20 名測試經理/領導面試問題
- TestLink 教程:完整指南
- Guru99 SAP 教程
- SAP 初學者課程
- 介紹
- 什么是 SAP? SAP ERP 軟件的定義
- SAP 業務套件
- SAP ERP 功能&技術模塊
- 如何為您的職業選擇最佳 SAP 模塊
- 如何成為 SAP 顧問
- 如何獲得 SAP 認證
- 高級的東西
- SAP 登錄:GUI &導航教程
- 如何安裝 SAP IDES for Practice
- 什么是 mySAP?
- SAP NetWeaver:10 分鐘學習
- 如何在 SAP 中顯示技術名稱
- 適用于所有國家/地區的 SAP Molga 列表
- 如何執行 SAP 報表
- 如何在 SAP 中創建變式
- SAP 面試的前 50 個問題
- SAP 業務藍圖:BBP 文檔&模板
- ERP 的完整形式和含義是什么?
- 完整格式的 SAP:首字母縮寫| 縮寫
- 必須知道!
- 2020 年面向初學者的 6 本最佳 SAP 書籍
- 2020 年 10 種最佳 SAP ERP 替代方案
- SAP 測試面試的前 18 個問題&答案
- SAP ABAP 編程教程
- ABAP 基礎知識
- 什么是 ABAP? 完整的形式,含義,歷史
- ABAP 簡介:數據類型,運算符&編輯器-教程
- ABAP 數據字典教程 SE11:表,鎖對象,視圖&結構
- ABAP 中的模塊化:宏,子例程&功能模塊
- 讓我們深入數據庫
- 在 SAP ABAP 中打開 SQL &本機 SQL
- SAP ABAP 內部表:創建,讀取,填充,復制&刪除
- SAP ABAP 表控件示例
- 讓 CODE!
- 關于 ABAP 報告編程的全部信息
- 對話框編程教程:SAP ABAP 中的模塊池
- ABAP 子屏幕教程:SAP 中的呼叫子屏幕
- SAP 按價值處理&按幫助處理
- SAP 教程-ABAP 列表查看器中的 ALV 報告
- 形式和腳本
- SAP 腳本教程:SE71,SE78,SCC1,VF03,SO10
- SAP ABAP 中的智能表單
- 一些出口的時間
- 什么是 SAP ABAP 中的用戶出口和客戶出口
- 什么是 BADI? SAP ABAP 教程
- 讓我們傳輸一些數據!
- SAP 中的 ABAP 查詢教程:SQ01,SQ02,SQ03
- SAP ABAP BDC(批處理數據通信)教程
- ALE,EDI & IDocs 簡介&差異:SAP 教程
- SAP IDOC 教程:定義,結構,類型,格式&表
- SAP BAPI 教程-在 ABAP 中創建 BAPI 的分步指南
- SAP 教程中的遠程功能調用(RFC)
- SAP ABAP 面試的前 35 個問題&答案
- SAP 人力資源| SAP HCM 模塊培訓教程
- 行政人員(PA)
- 什么是 SAP HR? SAP HCM 簡介
- 什么是信息類型?
- SAP 信息類型:使用 PA30,PA20 創建,更改,復制,刪除,概覽
- SAP 快速入門教程:PA70,PA71
- 您必須知道的重要信息類型 T 代碼
- 如何在 SAP 中查看為員工 PA10 保存的所有信息類型
- SAP 中有關 Infotype 0003 薪資狀態的所有信息
- 什么是時間限制? SAP HR 教程
- 人事行動
- SAP PA40:人員操作教程
- 如何刪除人員編號:SAP RPUDELPN
- SAP 中的組織,企業,人員結構
- 了解 SAP HR 中的組織管理(OM)
- SAP PP01:如何維護 OM 信息類型
- SAP PPOCE:如何創建組織單位
- 職位
- 如何創建,復制&界定職位:SAP PPOME
- 在 SAP 中將職位定義為組織單位負責人
- 如何將作業&成本中心分配給 SAP 中的職位
- 如何顯示職位的組織結構
- SAP HR 時間管理:PA51,PA53,PA61,PA62,PA63
- 如何進行運行時評估:SAP PT60
- SAP PT66:如何檢查時間評估結果 RPTIME
- SAP 中的工資核算流程概述
- SAP PA03:薪資控制記錄教程
- 如何在 SAP 中執行工資核算
- 如何在 SAP 中使用 PC_PAYRESULT 檢查工資結果
- 如何在 SAP 中刪除工資核算結果:PU01
- 必須知道工資信息
- 什么是非周期工資? SAP IT267
- 如何在 SAP 中審核工資單:RPUAUD00
- SAP HR 中的 Matchcode W 是什么?
- SAP Wage Types 教程:主要,輔助,對話,時間
- SAP 工資類型報表器:PC00_MXX_CWTR
- 過帳工資核算活動
- 使用 SAP DME 文件進行銀行轉帳
- SAP FI01:如何創建銀行密鑰
- SAP 中的總分類帳(G / L)過帳:PCP0 & PC00_M99_CIPE
- SAP AD HOC 查詢教程(S_PH0_48000513)
- 檢查!
- SAP HR 面試主要問題
- SAP FICO 培訓教程:了解 SAP FI & SAP CO 模塊
- SAP FI
- SAP FICO 簡介
- 如何在 SAP 中創建公司
- 如何在 SAP &中創建公司分配公司代碼
- 總帳
- 如何在 SAP 中創建會計科目表
- 如何在 SAP 中定義保留收益帳戶
- SAP 教程中的總帳科目:創建,顯示,凍結&刪除 FS00
- SAP 中的總分類帳(G / L)過帳:PCP0 & PC00_M99_CIPE
- 如何在 SAP 中創建財務報表版本(FSV)
- 如何在 SAP 中執行日記帳分錄 FB50
- 在 SAP 中創建會計年度變式&分配給公司代碼:完整教程
- 如何在 SAP 中定義過帳期間變式
- 如何在 SAP 中過帳期間變式中打開和關閉期間
- 如何在 SAP 中定義字段狀態變式&字段狀態組
- 如何在 SAP FICO 中定義文檔類型和編號范圍
- 總帳憑證教程:在 SAP 中暫留,暫存,過帳過帳
- 應收賬款
- SAP FI 中的應收帳款
- 客戶主數據教程:在 SAP 中創建,顯示,阻止,刪除
- SAP 中的 FB02:更改客戶文檔教程
- 如何在 SAP 中創建客戶帳戶組
- 如何在 SAP 中創建一次性客戶 FD01
- 如何在 SAP FICO 中創建客戶銷售發票 FB70
- SAP 中的憑證沖銷 FB08:分步指南
- SAP 中的 FB75:過帳銷售退貨指南–貸項憑證
- 如何在 SAP 中過帳客戶收款 F-28
- 如何在 SAP 中過帳外幣發票 FB70
- 剩余方法:將&收款轉入 SAP 中的部分付款
- 部分方式:SAP 中收款&的部分付款過帳
- FBRA:如何在 SAP 中重置已清除的項目
- SAP 中的 FD32:信用控制范圍教程
- 應付賬款
- SAP FI 中的應付帳款
- 如何在 SAP FICO 中創建供應商帳戶組
- 如何在 SAP FICO 中阻止或刪除供應商
- 在 SAP 中創建供應商主數據的分步指南
- 如何在 SAP 中創建一次性供應商 FK01
- SAP 中的 FB60:如何過帳采購發票
- 如何在 SAP FI 中過帳采購退貨 FB65
- 如何在 SAP 中過帳外向供應商付款 F-53
- 供應商發票&付款過帳期間 SAP 中的預扣稅
- 自動付款程序運行 F110:SAP 教程
- 如何在 SAP 中將符號科目映射到總賬科目
- 在 SAP 教程中發布舍入差異
- 報告書
- SAP FI 中的重要報告
- 必須知道!
- SAP 中的外幣重估:月末結算
- SAP FI 重要表:必須知道!
- 如何執行催款:SAP F150
- 如何在 SAP 中維護匯率
- SAP 通訊教程:配置,生成,打印&電子郵件
- SAP FICO 面試的前 50 個問題&答案
- 成本中心
- 如何創建一個新的成本中心:SAP KS01
- 內部訂單
- 有關 SAP 內部訂單的全部信息
- 內部訂單的結算教程:SAP 中的 KO02 & KO88
- 利潤中心
- SAP Profit Center 教程:創建,分組,過帳&計劃
- 在 SAP 中使用標準層次結構創建利潤中心
- 如何在 SAP 中將成本中心分配到利潤中心
- 如何將物料分配給 SAP 中的利潤中心
- 必須知道!
- SAP CO 表:控制模塊中的重要表
- 比較 SAP 中的成本中心,利潤中心和內部訂單
- SAP 基礎培訓教程
- 基礎介紹
- 什么是 SAP BASIS? 完整的教程
- 如何下載&為 Windows 安裝 SAP GUI(FrontEnd)
- 什么是 SAP 實例& SAP SID?
- SAP R / 3 體系結構教程
- 客戶群
- 什么是客戶? 如何在 SAP SCC4 中創建新客戶端
- SAP 客戶端副本:本地,遠程,導入/導出
- 如何在 SAP SM50 中刪除客戶端
- 用戶授權
- SU01:如何在 SAP 中創建新用戶
- 如何鎖定(SU01)&解鎖(SU10)SAP 用戶
- SAP RZ11:參數(login / fails_to_session_end)限制登錄嘗試
- SAP USR40:如何設置密碼限制
- 后臺工作
- SAP 后臺作業處理 SM36:創建,計劃,重新計劃
- SAP SM37:如何監視后臺作業
- SAP RSBTCDEL2:如何刪除后臺作業
- 運輸管理系統
- SAP TMS(運輸管理系統)教程
- 如何配置 STMS(SAP 傳輸管理系統)
- SAP 路由&層:逐步配置
- 什么是 SAP 傳輸請求? 如何導入/導出 TR
- 補丁管理
- 支持軟件包&堆棧升級:SAP SPS
- 下載&升級 SAP 內核:分步教程
- SAP 監視&性能檢查:完整的 Tcode 教程
- 什么是 OSS 注釋? SAP SNOTE 教程
- RFC
- SAP 教程中的遠程功能調用(RFC)
- 如何在 SAP 中配置&測試 RFC 連接-SM59
- 數據遷移
- SAP IDOC 教程:定義,結構,類型,格式&表
- 什么是 SAP LSMW? 使用 LSMW 遷移數據的步驟
- 檢查!
- 60 個 SAP 基礎面試問題&答案
- SAP SD(銷售&分發)培訓教程
- 客戶主數據和物料主數據
- 什么是 SAP SD? SAP Sales &分發模塊簡介
- 創建客戶主數據:SAP XD01
- SAP SD:創建編號范圍&分配到帳戶組 XDN1
- 如何創建合作伙伴功能&合作伙伴確定:SAP VOPAN
- MB1C:如何在 SAP 中創建物料庫存
- 如何在 SAP 中創建客戶物料信息記錄 VD51
- MMBE:如何獲取 SAP 庫存概覽
- SAP SD:創建物料主數據
- 營業額
- SAP SD 中的售前活動
- 如何在 SAP 中創建查詢:VA11
- 如何創建報價:SAP VA21
- 如何創建銷售訂單:SAP VA01
- 如何在 SAP 中創建借項憑單
- 如何在 SAP 中創建貸項憑證
- 如何在 SAP 中創建銷售單據類型
- SAP 銷售文檔教程:VA01,VA02,VA03
- 銷售憑證的文本確定:SAP VOTXN
- 計劃行類別確定教程:SAP VOV6
- 如何在 SAP 中創建項目建議 VA51
- 物料清單&排除:SAP VB01
- 交貨
- 如何確定裝運點:SAP OVL2
- 創建揀配,包裝& PGI(發貨后):SAP LT03,VL02N
- 免費創建退貨訂單&后續交貨:SAP VL01N
- SAP SD 中的所有關于寄售流程
- 使用 Tcode V / 30 在 SAP SD 中進行輸出確定
- SAP 中 OVRQ 替代原因
- 開票
- CS01:如何在 SAP SD 中創建物料清單(BoM)
- 如何在 SAP SD 中創建發票更正請求
- SAP 項目類別確定:VOV7,VOV4
- 在 SAP 中定義&分配阻塞原因(OVV4,S_ALR_87007670)
- 價錢
- 在 SAP 中按物料類別確定定價:OVKO
- SAP SD 稅收確定程序教程:VK12,OX10,OVK4,OVK1
- 如何在 SAP 中創建文本類型:VOTXN
- SAP 項目類別確定:VOV7,VOV4
- 使用 Tcode OV31 的 SAP 中的條件排除組
- 如何在 SAP 中創建記帳密鑰:OV34
- 信用管理
- SAP 信用管理教程:OVA8
- SAP SD 面試的前 20 個問題&答案
- 2020 年 100 項最佳銷售培訓課程
- SAP CRM 培訓教程
- 介紹
- SAP CRM 模塊:概述,體系結構
- SAP CRM 銷售流程,管理,報價&產品確定
- SAP CRM SERVICEPRO:服務協議,合同,計劃,訂單管理
- SAP CRM Marketing:計劃,活動管理&自動化細分
- 高級的東西
- SAP 合作伙伴渠道管理(PCM)
- SAP CRM 互動中心
- SAP CRM 業務合作伙伴:分組,角色,關系
- SAP CRM 組織管理
- SAP CRM Product Master:層次結構,類別,集合類型&屬性
- SAP CRM 業務交易流程
- SAP CRM 合作伙伴處理:類別,功能,順序,確定
- SAP CRM 操作配置文件:完整教程
- SAP CRM 定價&計費:元素,過程,類型,Web UI
- SAP CRM WebUI 教程
- SAP CRM Web UI:配置,應用程序&增強工具
- 必須知道!
- 26 個最佳 Salesforce 競爭對手&替代品[免費/付費]
- SAP CRM 面試的前 25 個問題&答案
- SAP MM(材料管理)培訓教程
- 簡介&放大器; 主要的數據
- SAP MM 模塊概述
- SAP 主數據簡介
- 如何在 SAP 中創建物料主數據 MM01
- 如何在 SAP 中更改物料主數據(MM02,MM03)
- 如何在 SAP 中復制物料主數據:MM01
- MM17:SAP 中物料主數據的批量維護
- SAP 中的物料主視圖:最終指南
- 購買
- SAP 中的采購&采購申請簡介
- ME11:如何在 SAP 中創建購買信息記錄
- 如何更改采購信息記錄:SAP 中的 ME12
- 如何在 SAP 中創建采購申請:ME51N
- 如何在 SAP 中將采購申請轉換為采購訂單
- ME41:如何在 SAP 中創建 RFQ(報價請求)
- ME47:如何在 SAP MM 中創建報價
- 如何比較不同報價的價格:SAP ME49
- 如何選擇或拒絕報價:SAP ME47
- 如何創建來源清單確定:SAP ME05
- 如何在 SAP 中創建采購訂單 ME21N
- 如何使用參考 ME58 創建采購訂單 SAP 中的 ME21N
- ME22N:如何在 SAP 中更改采購訂單
- 如何過帳收貨:SAP MIGO
- MIRO:如何在 SAP 中執行發票驗證
- MRBR:在 SAP 中發布凍結的發票
- SAP 中的服務采購訂單:ME23N
- SAP 中的大綱協議:合同&計劃協議 ME31
- 下達策略,SAP 中的采購訂單流程:CT04,ME28,CL02
- 價錢
- SAP 中的定價過程總覽
- 如何在 SAP V / 05,M / 03 中定義訪問順序&條件表
- 如何在 SAP 中定義條件類型
- 如何在 SAP 中定義計算架構
- 如何在 SAP 中定義架構組&確定
- 庫存管理
- SAP 庫存管理教程:移動類型{OMJJ}
- 如何在 SAP 中創建收貨:MIGO,MB1C,MB03
- 如何在 SAP 中沖銷(取消)收貨 MMBE
- SAP MB21,MB1A,MBST,MB22 中的庫存預留
- 如何在 SAP MM VL02N,VL09 中過帳發貨
- SAP MB1B 中的貨物轉移過帳
- SAP 庫存盤點教程:MI01,MI02,MI04,MI07
- SAP 中的特殊庫存&特殊采購
- SAP MM 面試的前 21 個問題&答案
- SAP CO(控制)模塊培訓教程
- 如何創建一個新的成本中心:SAP KS01
- 如何創建新的成本要素
- 有關 SAP 內部訂單的全部信息
- 內部訂單的結算教程:SAP 中的 KO02 & KO88
- SAP Profit Center 教程:創建,分組,過帳&計劃
- 在 SAP 中使用標準層次結構創建利潤中心
- 如何在 SAP 中將成本中心分配到利潤中心
- 如何將物料分配給 SAP 中的利潤中心
- SAP CO 表:控制模塊中的重要表
- 比較 SAP 中的成本中心,利潤中心和內部訂單
- SAP 薪資培訓課程
- 初學者重要的薪資概念
- SAP 中的工資核算流程概述
- SAP 中的工資核算流程概述
- SAP PA03:薪資控制記錄教程
- 如何在 SAP 中執行工資核算
- 如何在 SAP 中使用 PC_PAYRESULT 檢查工資結果
- 如何在 SAP 中刪除工資核算結果:PU01
- 必須知道工資信息
- 如何在 SAP 中執行工資核算
- 什么是非周期工資? SAP IT267
- 如何在 SAP 中審核工資單:RPUAUD00
- SAP HR 中的 Matchcode W 是什么?
- SAP Wage Types 教程:主要,輔助,對話,時間
- SAP 工資類型報表器:PC00_MXX_CWTR
- 薪水面試的前 17 個問題&答案
- 過帳工資核算活動
- 使用 SAP DME 文件進行銀行轉帳
- SAP 中的總分類帳(G / L)過帳:PCP0 & PC00_M99_CIPE
- SAP BI / BW 教程:初學者培訓
- 介紹
- 簡介 SAP BI
- SAP BI 體系結構概述
- SAP Infoobject,Infoarea,Infoobject 目錄教程
- 高級的東西
- 如何在 SAP BI / BW 中創建信息區域
- 如何在 SAP BI / BW 中創建 InfoObject 目錄
- 如何在 SAP BI / BW 中創建具有特征的 InfoObject
- 如何在 SAP BI / BW 中使用關鍵指標創建 InfoObjects
- SAP BW 中的 DSO 是什么? 為什么要使用它?
- SAP 中的標準 DSO 是什么? 如何創建一個?
- 什么是 SAP 中的寫入優化 DSO? 如何創建一個?
- 什么是 SAP 中的直接更新 DSO? 如何創建一個?
- SAP InfoSet 教程:什么是創建,聯接
- 什么是 SAP BI / BW 中的 Infocube? 如何創建一個?
- 如何從 SAP BI / BW 中的平面文件加載主數據
- 如何從 SAP BI / BW 中的平面文件加載事務數據
- 如何從 SAP BI / BW 中的 ECC 加載主數據
- 如何從 ECC 加載事務數據:SAP RSA5
- 有關 SAP BI / BW 中星型架構&擴展星型架構的全部信息
- SAP BI 流程鏈:創建,檢查,激活,分配,監視
- SAP BI 內容:安裝,激活
- SAP BEx 查詢設計器教程&查詢元素
- SAP BEx:特征&關鍵指標設置(RKF,CKF &公式)
- 必須知道!
- SAP BW / BI 面試的前 40 個問題&答案
- SAP PP(生產計劃)培訓教程
- 介紹
- SAP PP 簡介(生產計劃)
- SAP PP 中的物料清單(BoM):創建,更改,顯示
- SAP PP 中的工作中心:創建,更改,顯示
- 高級的東西
- 如何在 SAP PP 中創建/更改/顯示工藝路線
- 如何在 SAP PP C223 中創建生產版本
- SAP 需求管理教程:MD61,MD62,MD04,MD74,MD75
- SAP MRP(物料需求計劃)教程:MD01,MD02,MD04
- SAP PP 中的長期計劃(LTP)教程:MS31,MS02,MD61
- SAP PP 容量計劃:CM01,CM21
- SAP PP 中針對生產訂單的貨物移動:MIGO
- SAP 中的生產訂單:CO01,MD16,CO02,CO15
- SAP PP 報告教程:COOIS,MB52,CS15,CS12
- 必須知道!
- SAP PP 面試最常見的 26 個問題&答案
- SAP QM(質量管理)教程
- SAP QM 簡介
- SAP 中的主數據是什么? QS21,QP01,QS31,QDV1,QI01
- SAP QM 進/原材料檢查程序:MIGO,QA32
- 流程中檢查 SAP QM:CO01 & QA32
- SQP QM:最終檢驗 CO01 & QA32
- SAP QM 中的質量通知:QM02
- SAP HANA 初學者培訓教程
- SAP HANA 體系結構,LandScape,規模調整:完整教程
- 如何下載&安裝 SAP HANA Studio
- SAP HANA SQL:10 分鐘學習
- SAP HANA 數據類型&標識符
- SAP HANA 操作員:聯盟&聯盟全部
- SAP HANA SQL 功能教程
- SAP HANA SQL 表達式教程
- SAP HANA SQL 存儲過程教程
- SAP HANA 教程:創建序列
- SAP HANA 教程:創建觸發器
- SAP HANA SQL DATA 性能分析:5 分鐘學習
- SAP HANA 教程:SQL 腳本
- SAP HANA 計算視圖教程
- SAP HANA 中的 DATA Provisioning &復制
- SAP HANA 中的 SLT(SAP Landscape Transformation Replication 服務器)
- HANA 中的 SAP DS(數據服務)
- SAP HANA 直接提取器連接(DXC)教程
- SAP HANA 平面文件上傳教程:CSV,XLS & XLSX
- SAP HANA 建模:完整教程
- SAP HANA 入門教程
- SAP HANA 屬性視圖教程
- SAP HANA Analytic View:完整教程
- SAP HANA 分析特權教程
- SAP HANA 信息編輯器
- SAP HANA 導入和導出教程
- SAP HANA 安全性:完整教程
- SAP HANA 報表
- SAP HANA 面試的前 15 個問題&答案
- Guru99 必須學習的教程
- Microsoft Excel 培訓教程:7 天學習
- 介紹
- Microsoft Excel 101 簡介
- 如何在 Excel 中進行加,減,乘,除
- Excel 數據驗證,過濾器,分組
- Excel 公式&函數:學習基本示例
- IF,AND,OR 或嵌套 IF &在 Excel 中不是邏輯函數
- 如何在 Excel 中創建圖表:類型&示例
- 如何在 Excel 中進行預算:個人理財教程
- 進階的東西
- 如何將 XML 數據導入 Excel [示例]
- 如何將 CSV 數據(文本)導入 Excel [示例]
- 如何將 MS Access 數據導入 Excel [示例]
- 如何將 SQL 數據庫數據導入 Excel [示例]
- 如何在 Excel 中創建數據透視表:初學者教程
- Excel 中的高級圖表&圖形
- 什么是 Microsoft Office 365? Excel on Cloud 的好處
- CSV 與 Excel(.xls)-有什么區別?
- Excel VLOOKUP 初學者教程:通過示例學習
- Excel ISBLANK 功能:通過示例學習
- Excel 中的迷你圖和示例
- Excel 中的 SUMIF 函數:通過示例學習
- 前 40 個 Microsoft Excel 面試問題&答案
- 面試中提出的十大 Excel 公式&答案
- 2020 年 20 種最佳 Excel 課程
- 2020 年的 17 種最佳 Excel 替代品(免費/付費)
- 15 本最佳 Excel 書籍(2020 年更新)
- 2020 年 85 種最佳 Microsoft Office 類課程
- 宏&放大器; Excel 中的 VBA
- 如何在 Excel 中編寫宏:分步入門指南
- 如何使用示例在 Excel 中創建 Visual Basic for Applications(VBA)
- Excel VBA 變量,數據類型&常量
- Excel VBA 數組:帶示例的動態多維類型
- VBA Excel 表單控件& ActiveX 控件
- VBA 算術運算符:乘法,除法,加法,模量
- VBA 字符串運算符
- VBA 比較運算符:不等于,小于或等于,大于
- VBA 邏輯運算符:AND,OR,NOT
- Excel VBA 子例程:如何使用示例調用 Sub
- Excel VBA 函數教程:返回,調用,示例
- Excel VBA 范圍對象
- 初學者會計教程:7 天學習簿記
- 介紹
- 什么是會計? 重要性,目的&需要
- 會計中的資產&負債是什么? 定義&示例
- 什么是會計等式? 示例問題
- 什么是會計中的收入,費用&提款? [例子]
- 高級的東西
- 帶有實例的擴展會計方程
- 基本會計交易示例
- 如何在會計中創建日記帳分錄[示例]
- 如何創建分類帳帳戶[示例]
- 如何計算折舊:直線,遞減值示例
- 如何通過示例準備試算表
- 如何用示例制作損益表
- 如何用示例制作資產負債表
- 現金流量表的重要性及示例
- 如何使用示例分析財務報表
- 印度 7 種最佳在線稅務軟件[2020 更新]
- 必須知道!
- 2020 年 22 種面向小型企業的最佳會計軟件
- 2020 年 22 種最佳 QuickBooks 替代品[免費/付費]
- 2020 年 65 個最佳會計課程
- 2020 年 90 項最佳金融建模認證課程
- 11 本最佳會計書籍(2020 年更新)
- 134 個最熱門的會計面試問題&答案
- 前 30 個理貨面試問題&答案
- 免費道德黑客教程:初學者課程
- 介紹
- 什么是駭客? 簡介&類型
- 對計算機系統的潛在安全威脅
- 成為道德黑客所需的技能
- 2020 年排名前 20 位的道德黑客工具
- 高級的東西
- 什么是社會工程學? 攻擊,技巧&預防
- 密碼學教程:密碼分析,RC4,CrypTool
- 如何破解密碼
- 蠕蟲病毒&特洛伊木馬:道德黑客教程
- 通過示例了解 ARP 中毒
- Wireshark 教程:網絡&密碼嗅探器
- 如何破解 WiFi(無線)網絡
- DoS(拒絕服務)攻擊教程:Ping of Death,DDOS
- 2020 年 10 種最佳 DDoS 攻擊工具[免費/付費]
- 如何破解 Web 服務器
- 如何破解網站:在線示例
- SQL 注入教程:學習示例
- 黑客 Linux 操作系統:完整的 Ubuntu 示例教程
- CISSP 認證指南:什么是必備條件,成本,CISSP 薪水
- 什么是數字取證? 歷史,過程,類型,挑戰
- 什么是網絡犯罪? 類型,工具,示例
- 必須知道!
- 10 個最常見的 Web 安全漏洞
- 2020 年排名前 30 的 Bug 賞金計劃
- 2020 年 40 種最佳滲透測試(筆測試)Vapt 工具
- Kali Linux 教程:什么是安裝,利用 Metasploit 和 Nmap
- 2020 年 13 種最佳黑客操作系統
- 2020 年 11 種最佳 Wireshark 替代品
- 網站,網絡的 13 種最佳漏洞評估掃描儀
- 最佳 16 無日志 VPN(2020 更新)
- 20 個最佳手機間諜應用程序[Android / iPhone]
- 2020 年 15 種最佳數字取證工具[免費/付費]
- 2020 年 17 種最佳 IP &網絡掃描工具(免費/付費)
- Windows 的 11 種最佳免費防火墻軟件[2020 更新]
- 前 25 個道德黑客面試問題&答案
- 熱門的 110 個網絡安全面試問題&答案
- CompTIA 認證指南:職業道路&學習資料
- 16 本最佳道德黑客書籍(2020 更新)
- 初學者云計算教程
- 面向初學者的 Adobe Photoshop CC 教程:7 天學習
- 介紹
- 什么是 Photoshop CC? 完整的介紹
- 如何在 PhotoShop CC 中使用工作區
- Photoshop LAYERS 教程
- Photoshop 圖層蒙版教程和示例
- 高級的東西
- 如何使用 Photoshop 圖層樣式&效果[示例]
- 如何使用形狀工具在 Photoshop 中繪制形狀
- 什么是智能對象? 如何在 Photoshop 中使用智能對象?
- Photoshop 中的混合模式
- 如何在 Photoshop 中使用鋼筆工具? 完整的教程
- 如何在 Photoshop 中刪除背景?
- 如何在 PhotoShop 中使用畫筆工具?
- 如何使用 Photoshop 文字工具添加文字
- 如何在 Photoshop 中使用濾鏡&效果
- 必須知道!
- 2020 年 30 種最佳屏幕捕獲軟件工具,可提供更好的屏幕截圖
- 2020 年 15 種最佳 Snagit 替代品
- 2020 年 11 種最佳 After Effects 替代品(免費&付費)
- 2020 年 14 種最佳 2D 動畫軟件[免費/付費]
- 2020 年 20 種最佳 3D 動畫軟件[免費/付費]
- 2020 年 16 種最佳 InDesign 替代方案[免費/付費]
- 2020 年 26 種最佳 Adobe Premiere Alternative [免費/付費]
- 2020 年 16 種最佳 Photoshop 替代品[免費/付費]
- 2020 年 16 種最佳屏幕錄像機[免費/付費]
- 15 用于 MAC 的最佳屏幕錄像軟件[免費/付費]
- 2020 年 17 個最佳股票視頻網站[有償/免版稅素材]
- 2020 年 22 種最佳 Sketchup 替代品
- 2020 年 36 種最佳視頻編輯軟件
- 30 最佳免費圖片庫在 2020 年
- 2020 年 18 個最佳免費股票視頻網站
- GIMP 與 Photoshop:主要區別
- Adobe Photoshop 面試的前 45 個問題&答案
- 2020 年 90 種最佳 Adobe Illustrator 課程
- 2020 年 90 種最佳繪畫課程
- 2020 年 80 項最佳 AutoCAD 課程
- 2020 年 95 個最佳平面設計認證課程
- 2020 年 80 項最佳 UI / UX 設計課程
- 2020 年 50 最佳 Web 設計課程
- 數字營銷教程:在線課程
- 面向初學者的業務分析師培訓教程
- 介紹
- 什么是業務分析? 工藝&技術
- 什么是業務分析師? 角色,責任,技能,認證
- 利益相關者分析&與模板映射的示例
- 生命周期
- 軟件測試中的 V 模型
- 需求生命周期管理
- 軟件工程方法
- SDLC 中的瀑布模型是什么? 優點&缺點
- 什么是 RAD 模型? 優點&缺點
- SDLC 中的增量模型:使用優勢&劣勢
- 什么是螺旋模型? 什么時候使用? 優點&缺點
- 敏捷方法論&模型:軟件開發指南&測試
- 需求流程
- 示例軟件需求分析
- 需求分析技術及示例:完整教程
- 什么是功能需求? 規格,類型,示例
- 什么是非功能性要求? 類型和例子
- 功能需求與非功能需求:主要區別
- 最終確定要求
- 如何將需求組織為業務分析師
- 管理需求資產
- 分步進行軟件工程變更控制流程
- 文獻資料
- BRS 與 SRS:了解差異
- 質量保證
- 什么是軟件測試? 定義,基礎&類型
- 初學者手動測試教程:概念,類型,工具
- 軟件測試中的缺陷/缺陷生命周期
- 什么是用戶驗收測試(UAT)? 與例子
- 軟件測試中的影響分析
- 完整的過程
- 業務分析過程:分步教程
- 必須閱讀主題
- 什么是 ER 建模? 通過示例學習
- 決策表測試:學習示例
- 什么是靜態測試? 什么是測試審查?
- 100 多個業務分析師面試問題&答案
- 軟件工程中的軟件配置管理
- Microsoft VISIO 教程:歷史記錄,文件類型,如何使用示例
- 十大 Microsoft Visio 面試問題&答案
- Drools 教程:體系結構,規則引擎示例
- 16 個最佳軟件配置管理工具(2020 年將成為 SCM 工具)
- 2020 年十大最佳決策工具
- 16 種最佳甘特圖軟件[免費在線應用]
- 2020 年 30 種最佳需求管理工具
- 2020 年的 19 種最佳思維導圖軟件(免費&付費)
- 適用于 BA 分析師的 21 種最佳業務分析工具(2020 年更新)
- 38 個用于 UI 和 UX 設計器的最佳原型開發工具[2020 更新]
- 2020 年 30 種最佳 Adobe Acrobat 替代品
- 2020 年 14 種最佳 SharePoint 替代品(免費&付費)
- 2020 年 22 種最佳 OCR 軟件[免費/付費]
- 2020 年 17 種最佳 Outlook 替代方案[免費/付費]
- 2020 年 21 種最佳 Google 語音替代品
- 21 項最佳免費電話會議服務(2020)
- 2020 年 20 種最佳 Evernote 替代品
- 2020 年的 17 種最佳 IVR 系統
- 13 最佳聽寫和語音合成軟件[2020 更新]
- 2020 年 18 種最佳 PowerPoint 替代品
- 2020 年 100 最佳商業分析課程
- INFORMATICA 教程:完整的在線培訓
- 介紹
- 什么是 Informatica? 完整的介紹
- Informatica 體系結構教程
- 如何下載&安裝 Informatica PowerCenter
- 如何在 Informatica 中配置客戶端和存儲庫
- 高級的東西
- Informatica 中的源分析器和目標設計器
- Informatica 中的映射:創建,組件,參數,變量
- Informatica 中的工作流程:創建,任務,參數,可重用,管理器
- Informatica 中的工作流監視器:任務&甘特圖視圖示例
- Informatica 中的調試器:會話,斷點,詳細數據&映射
- Informatica 中的會話屬性:完整教程
- INFORMATICA 轉換教程&過濾器轉換
- Informatica 中的源限定符轉換(帶有示例)
- Informatica 中的聚合器轉換示例
- Informatica 中的路由器轉換:多個條件示例
- 示例中 Informatica 中的 Joiner 轉換
- Informatica 中的排名轉換(帶有示例)
- Informatica 中的序列轉換示例
- Informatica 中的事務控制轉換:TCL 命令
- Informatica &可重用轉換示例中的查找轉換
- Informatica 中的規范化器轉換(帶有示例)
- Informatica 中的性能調優:完整的教程
- 必須知道!
- Informatica 面試的前 50 個問題&答案
- 面向初學者的項目管理教程
- 什么是項目管理? 目標,方法
- 什么是 PMP? 認證成本,收益
- 項目管理生命周期的各個階段
- 項目成本估算&預算管理技術
- 項目管理中的風險分析&風險管理
- 項目管理方法論教程
- 六西格碼認證指南:綠色,黃色,黑色皮帶詳細信息
- 40 個最佳項目管理工具[2020 年 7 月列表]
- PMP 教程:在線培訓材料
- 介紹
- 什么是項目管理? 目標,方法
- 項目管理生命周期的各個階段
- 高級的東西
- 項目集成管理教程:定義,流程&計劃
- 項目范圍管理:PMP 教程
- 項目成本估算&預算管理技術
- 利益相關者分析&與模板映射的示例
- 項目管理中的風險分析&風險管理
- 必須知道!
- 2020 年 30 種最佳 Trello 替代品
- 2020 年 20 種最佳 Microsoft Project 替代方案
- 2020 年最佳 8 個 Wrike 替代品
- MIS(管理信息系統)教程
- 什么是 MIS? 簡介&定義
- 組件& MIS(管理信息系統)的作用
- MIS(管理信息系統)的目標&
- 信息系統類型:TPS,DSS &金字塔圖
- SDLC &敏捷的 MIS 開發流程
- 信息系統中的道德&安全問題
- Microsoft MCSA 認證考試指南
- 決策支持系統(DSS):零售商店的演示 PoS
- Excel VBA 初學者教程:3 天學習
- 介紹
- 如何在 Excel 中編寫宏:分步入門指南
- 如何使用示例在 Excel 中創建 Visual Basic for Applications(VBA)
- Excel VBA 變量,數據類型&常量
- Excel VBA 數組:帶示例的動態多維類型
- 高級的東西
- VBA Excel 表單控件& ActiveX 控件
- VBA 算術運算符:乘法,除法,加法,模量
- VBA 字符串運算符
- VBA 比較運算符:不等于,小于或等于,大于
- VBA 邏輯運算符:AND,OR,NOT
- Excel VBA 子例程:如何使用示例調用 Sub
- Excel VBA 函數教程:返回,調用,示例
- Excel VBA 范圍對象
- 必須知道!
- 使用 VBA 進行網頁搜刮
- VBA 面試的前 22 個問題&答案
- CCNA 認證教程:簡介&基礎
- Jenkins 初學者教程:3 天學習
- 介紹
- 什么是持續集成?
- 詹金斯是什么? 持續集成(CI)工具
- 如何下載&在 Windows 上安裝 Jenkins
- 高級的東西
- Jenkins GitHub 集成:安裝 Git 插件
- 如何創建用戶&管理權限:角色策略插件
- 如何使用 Jenkins Freestyle 項目創建構建
- Jenkins 管道教程:JenkinsFile 示例
- Jenkins vs Travis-CI:有什么區別?
- 必須知道!
- 2020 年 15 種最佳詹金斯替代品
- 十大 JENKINS 面試問題&答案
- 初學者軟件工程教程:3 天學習
- 介紹
- 什么是軟件工程? 定義,基礎,特征
- 成為軟件工程師/開發人員的 9 個步驟
- 軟件工程師與軟件開發人員:有什么區別?
- SDLC(軟件開發生命周期)教程:什么是階段,模型
- SDLC 中的瀑布模型是什么? 優點&缺點
- 高級的東西
- SDLC 中的增量模型:使用優勢&劣勢
- 什么是螺旋模型? 什么時候使用? 優點&缺點
- 什么是 RAD 模型? 優點&缺點
- 軟件工程中的原型模型:方法論,過程,方法
- 瀑布模型,增量模型,螺旋模型與輻射模型:主要區別
- 能力成熟度模型(CMM)&是軟件工程中的各個級別
- N 層(多層),3 層,2 層架構(帶示例)
- 什么是全棧開發人員? 成為 Web 開發人員的技能
- 什么是函數式編程? 實例教程
- MVC 初學者教程:什么是架構&示例
- MVC 面試的前 31 個問題&答案
- 背包問題:動態編程示例
- 小背包問題:帶有示例的貪婪算法
- 2020 年 21 種最佳軟件開發工具
- 程序與程序之間的區別
- 主存儲器和輔助存儲器之間的區別
- 局部變量和全局變量之間的差異
- 抽象與封裝之間的區別
- XML 和 HTML 之間的區別
- 網站和 Web 應用程序之間的區別
- URL 與 URI:您必須知道的最重要的區別
- AR vs VR:有什么區別?
- 加密與解密:有什么區別?
- Web 開發人員與軟件開發人員:有什么區別?
- 必須知道!
- HTML 和 HTML5 之間的區別
- 按值致電與按引用致電之間的區別
- 類和對象之間的區別
- 堆疊與堆:了解差異
- 32 位和 64 位:主要區別
- 系統軟件和應用程序軟件之間的區別
- 軟件工程與計算機科學:簡介&的差異
- CISC 與 RISC:體系結構,指令集之間的差異
- SSD 與 HDD:選擇哪一個?
- SRAM 與 DRAM:了解差異
- MVC 與 MVVM:示例的主要區別
- CPU 核心,多核心,線程,核心與線程,超線程
- 2020 年面向 Java,C,C ++,C#,Python 的 13 種最佳代碼覆蓋工具
- 2020 年 14 種最佳代碼審查工具[靜態代碼分析]
- 15 個適用于 Windows 的最佳免費代碼編輯器& Mac [2020 更新]
- 2020 年學習的 10 種最佳編程語言
- 什么是后端開發人員? 成為 Web 開發人員的技能
- 什么是平均堆棧開發人員? 技能,薪水,成長
- 初學者競爭性編程:Topcoder 挑戰
- 什么是計算機編程? 學習編碼的基礎
- 14 本 BEST 算法&數據結構書籍(2020 清單)
- 2020 年面向初學者的 50 多個 BEST Freelance 網站
- 2020 年的 11 種最佳 Fiverr 替代品
- 2020 年 20 種最佳前端 Web 開發工具
- 2020 年 10 種最佳 Notepad ++替代品
- 2020 年 10 種最佳 Sublime Text 替代品
- 2020 年 13 種最佳 Github 替代方案
- 2020 年 21 種最佳 CCleaner 替代品
- 12 最佳免費 PC 清潔器| TuneUp | 優化器實用程序
- 2020 年 20 種最佳免費注冊表清潔工具
- 2020 年 21 種最佳打字導師軟件
- 前 50 名軟件工程面試問答
- SDLC 面試的前 27 個問題與解答
- 前 40 名計算機科學面試問答
